


Everyday Tote
Edgestitch bias tape onto the sides and bottom of the bag,
I’m someone who needs a large bag. I don’t understand how people can carry dainty little purses! Where do they put their stuff? My ideal bag needs room for a whole lot of life’s supplies: a sweater, wallet, book, notebook, cell phone, and laptop, plus some baby toys, my current craft project and tonight’s dinner. It also needs to be sturdy, easy to carry, and good looking! The Everyday Tote fits the bill… and all of my things as well!

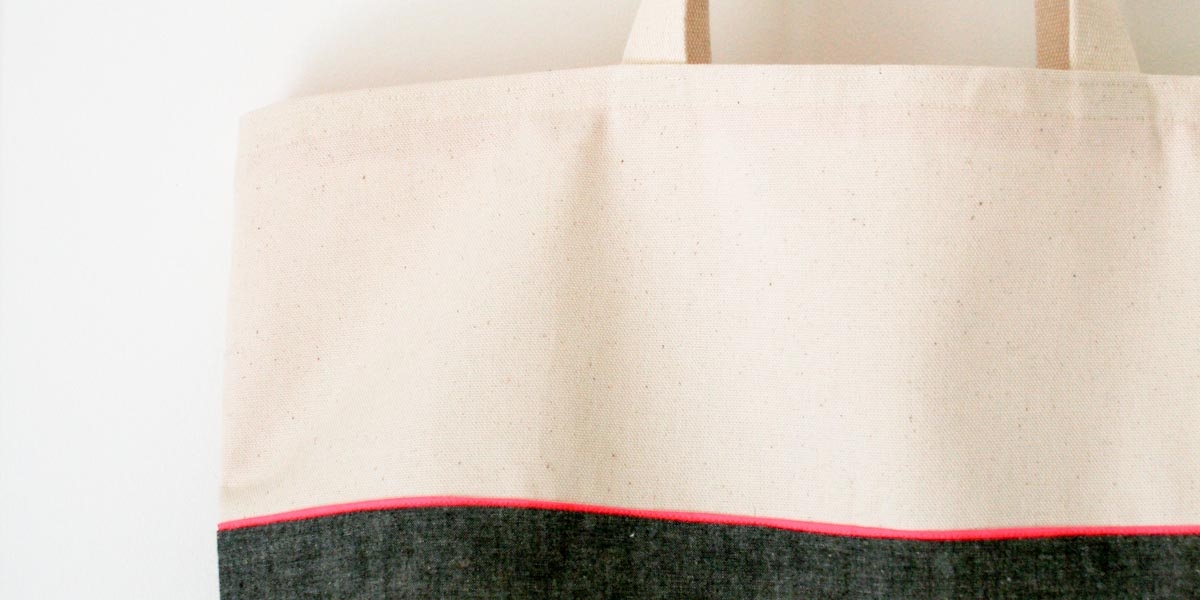
I’ve made many bags for the Purl Bee, but I feel like they’ve all been leading me to this Everyday Tote. Using techniques honed on my 40 Minute Tote and Inside Out Bag, I think I’ve finally created my ideal carryall! Since it’s made from Cotton Duck, this bag is strong and utilitarian but also attractive with accents of Neon Bias Tape and yarn-dyed fabric.

The Everyday Tote is a blast to sew. It uses lots of different sewing techniques so it’s never boring, and the result is so refined and professional looking, no one will believe you made it yourself! Best of all, the finished bag is totally modern and totally functional. You really are going to want to carry it everyday!

Update: New Fabric
November 27, 2015
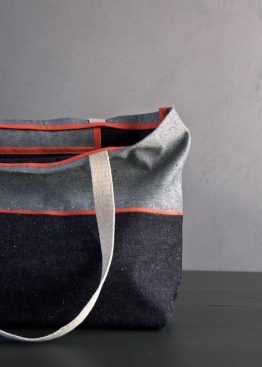
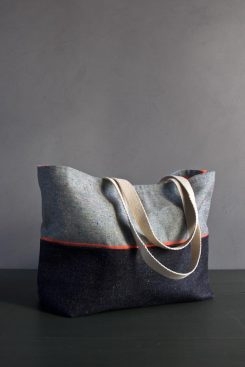
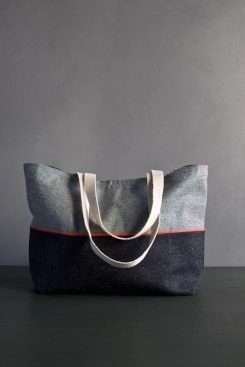
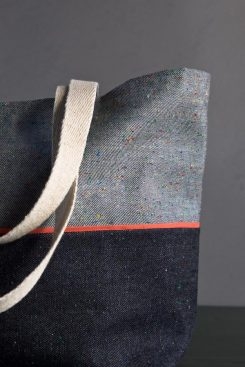
We sewed a new version of this tote in an intriguing new fabric, Robert Kaufman’s Demin with Colored Motes. To see more photos and get the list of materials, check out our Favorite Totes in Denim with Colored Motes story!
Materials

To make one bag you’ll need …
- 1/2 yard of Cotton Duck in Natural. This is the Bag Fabric.
- 1/2 yard of Kiyohara Linen Blend Solid in Black for the pink kit, or Navy for the yellow kit. This is the Accent Fabric.
- 5 yards of Neon Bias Tape in Pink or Yellow
- 2 yards of Cotton Webbing in Natural or Navy
- 100% cotton thread in color 1040. This is the Bag Thread.
- Neon Thread in Chrysanthemum or Sour Apple. This is the Bias Tape Thread.
Size
Finished Measurements:
21 1/4 inches wide X 12 1/4 inches tall X 6 inches deep
Note
If you have never sewn with bias tape before you might want to review our recent Inside Out Bag story, which gives more step by step instructions and helpful tips!
Machine wash and dry the fabric (but not the bias tape or webbing) before beginning.
Pattern
Cut
From the Bag Fabric:
Two 22-inch by 17-inch rectangles. These are the Bag Panels.
One 7-inch square. This is the Pocket Back.
From the Accent Fabric:
Two 22-inch by 10-inch rectangles. These are the Accent Panels.
One 7-inch by 5-inch rectangle. This is the Pocket Front.
From the Webbing:
Two 24-inch lengths. These are the Handles.
Sew the Pocket

Cut a 7-inch length of bias tape and pin it over a 7-inch side of the Pocket Front. Using the Bias Tape Thread, edgestitch it on. This bias tape edge is now the top of the Pocket Front.

Place the Pocket Front on top of the Pocket Back, right sides facing up and lining up the bottom raw edges. The top of the Pocket Front will be 2 inches below the top of the Pocket Back.
Cut a 22-inch length of bias tape and pin it around the sides and bottom of the two pocket pieces. To create neat mitered corners, fold the bias tape in a 45-degree angle, as shown above.

Then fold the bias tape up the next side, maintaining the 45-degree angle and pinning the tape in place. Make sure the backside looks the same.

Using the Bias Tape Thread, edgestitch the tape on all three sides, thus sewing together the Pocket Front and Pocket Back. Make sure you catch both sides of the bias tape.
This is now the Pocket.
Sew the Bag Panels

Pin the ends of the Handles to the right side of a 22-inch edge of each Bag Panel, 7 inches from each corner. Make sure the Handles are not twisted.
Using the Bag Thread, sew the Handles in place with a 3/8-inch seam allowance.
The edges with the Handles are now the tops of the Bag Panels.

Cut two 22-inch lengths of the bias tape and pin them to the top edges of the Bag Panels thus encasing the ends of the Handles. Using the Bias Tape Thread, edgestitch the bias tape in place.

Fold and pin down the top edges of the Bag Panels 1 inch towards the wrong side so that the Handles flip up and away from the Bag Panels.
With the wrong side of one Bag Panel facing up, insert the Pocket, right side up, inside the fold between the Handle’s ends, as shown above. Pin the Pocket in place.
Using the Bag Thread, sew down the fold with two seams, the first 1/4 inch from the top folded edge and the second directly above the bias tape, thus sewing the Pocket in place.

Cut a 22-inch length of bias tape. Slice it in half lengthwise.

Gather your Accent Panels and orient them right side facing up, the 22-inch edges at the top and bottom. Align the raw edge of a bias tape half to the top 22-inch edge of an Accent Panel. Pin it in place and using the Bag Thread, sew the tape to the Accent Panel with a 1/4-inch seam allowance. Repeat with the other bias tape half and Accent Panel.

Fold this seam 1/4 inch towards the back side of Accent Panel and press the panel flat. There should be a small ridge of bias tape peeking out the top of the Accent Panel.
Lining up their bottom and side edges, pin the top edge of the Accent Panel to a Bag Panel, right sides facing up. Make sure to not pin the Pocket. Repeat with the other set of Panels.

Using the Bias Tape Thread, sew each Accent Panel into place along the top pinned edge. Sew just along the bias tape edge, being careful not to sew onto the Accent or Bag Fabric. Again, make sure to not sew the pocket.
Sew Together

Pin the Bag Panels right sides together along their three raw edges.
Using the Bag Thread, sew the Bag Panels together along the pinned sides with a 3/8-inch seam allowance.

To make the boxed bottom of the bag, pull the two Bag Panels apart so that the bottom seam and a side seam are directly on top of each other and the corner forms a 90-degree angle. Press the corner in this orientation.
Mark a line perpendicular to the two seams, 3 inches from the corner. This line will be 6 inches across. It is the Sew Line.

Mark a second line 3/8-inch above the Sew Line.

Cut off the corner of the bag along this second line.
Repeat for the other bottom corner of the bag.

When both corners are cut, open the bag and press it flat once again. It will have two notches taken out of the bottom corners, as shown above.
Using the Bias Tape Thread edgestitch bias tape onto the sides and bottom of the bag, leaving the notched sections alone. Tuck the raw ends of the bias tape inside itself at the top corners before you sew it down.

Press and pin the corners back into their boxed orientation, with the side and bottom seams matching up. Face the bias tape on the bottom in the opposite direction of the bias tape on the side, to reduce the bulk of these seams.
Using the Bag Thread, sew the pinned sides together along the Sew Line, giving you a 3/8-inch seam allowance.

Using the Bias Tape Thread, edgestitch bias tape onto the boxed corner seam, tucking the beginning and end of the tape into itself to hide the raw ends.

You’re all done sewing!

Turn the bag right side out, press it and you’re ready to go!


This is BEAUTIFUL…I want one ! Mother's Day is coming up fast……
i really like that bag. can't have enough totes as far as i am concerned. i have two that i carry around daily!
but i really don't understand the obsession with neon everywhere lately. am i showing my age?
So cute. Looked for the navy and black and didn't see either of those options though. ???
I love the combination of the duck with the yarn dyed fabric and pop of neon. They play so well off each other!
Hi Johanna-
The black and navy fabric is sold out but it is available in the Everyday Tote Kit that you can find here: http://purlbee.squarespace.com/the-purl-bee/2013/5/2/mollys-sketchbook-everyday-tote.html
Or, if you'd like to buy the fabric separately please email customerservice AT purlsoho DOT com and they'll let you know when it comes back in stock.
Thanks!
Molly
So great! I love this bag, you couldnt have chosen better fabrics.
Greetings,
Isabella
How fun! Love the neon touch!
I love the pop of neon in your totes! Neon is where it's at. 😉 Like you, I'm all about big bags. Clutch-style wallet + small accordion couponing binder + stashing my son's iPad in my purse half of the time = need for something roomy!
P.S. I found you via Blog Inc!
So good-looking! If you were to feel extra crafty and wanted to add instructions for extra internal pockets it could make a great diaper bag!
DONE! THANK YOU SO MUCH FOR THIS PATTERN.
I made one using left over upholstery fabric from another project and it looks great!!
This tote is great and very well constructed!
I don't know what kind of sewing machine you are working with, but I have a Bernina and bought the Bernina Binder Attachment a year or two ago and it would make this bag SO MUCH EASIER. I promise you! I am sure that whatever machine brand you use also has a similar attachment and it would make projects like this a BREEZE!
Thanks so much for the tote!
Hi Molly! I'm a Grade 11 student in Australia and our next project is to make a tote bag to replace the use of plastic bags while grocery shopping (we have an accompanying assignment about how plastic bags are affecting our environment). Anyway, I'm not sure how long we will have to finish the bag, so I was wondering roughly how long it takes to make this tote? We have two 80-minute lessons and two 40-minute lessons per week, however I think that some of these will be used for theory work rather than practical. Do you think I'd be able to complete this design easily? Thanks!
HI Emma-
I would say this will probably take 2 hours to complete.
Thank you for your question!
Molly
I just made this up this summer in the navy blue and neon green. It has become my new everyday bag: chic, urban, yet practical. I use it for running errands, to the gym and out for a casual dinner. It goes with my trench coat as well as jean jacket or canvas army green hoodie. My keys fit perfectly in the upper pocket. Easy to throw in the wash. Pattern was clear and straightforward. A very satisfying project. Thank you!
I just made this, and it is so pretty! As someone very new to sewing, I really appreciated the detailed tutorial. It seemed daunting, but came together quickly and looks like something you would spend $60 on at J. Crew. Thanks so much for sharing.
Looks very stylish with two different colours of fabric.
I love the style of this tote! I just made it for my mom using a red ticking stripe fabric, and the look is very nautical. Adorable!
I love this! Can I make a request for a tote pattern with a zip opening? – I recently had my wallet swipped from my favourite tote and wondered about adding a fastening to keep prying hands out!
Hi Elly-
Thanks for the suggestion! We will definitely keep it in mind going forward!
M
So cute!
This bag rocks. I picked up supplies at JoAnn’s to save a few dollars, but I was able to find fabrics for a similar look that I’m really happy with. The tutorial was really easy to follow. Thanks! I was able to finish this up in about two hours. I’m not a very confident seamstress, but it came together really nice. I gifted the first one to a friend, and I have enough materials for a second bag. I doubled the quantities of fabric above, and picked up two 3yd packs of bias tape per bag. I was able to make an extra pocket for each bag, that I made deeper so it could be a place to stash a water bottle. Awesome design, Molly. I love it.
Thanks for the kind words, Stephanie! We’re so glad you like our bag! Keep stitching! -Alyson
I love this bag and I’m planning to make this as my next project.
But I wonder as well if there might be a way to add a zipper or even lining? Or is this going too far on a simple design?
Anyway, I love your projects but my obsession for all kinds of bags is being put to the test here 🙂
Hi Aricia-
A lining or zipper is a great idea for this bag! Unfortunately we don’t have a version like that at this time but we will keep it in mind going forward. In the meantime you may want to look through some of our other bag and pouch patterns to get an idea of how to add a lining or zipper on your own.
https://www.purlsoho.com/create/category/sew/sew-bags-pouches/
Thanks so much for getting in touch and good luck with the project!
Molly
I was looking for the Inside Out tutorial to learn about Bias tape as you suggested but the link is broken. Can you give me the updated link?
Thanks!
Hi Liz,
Thanks for reaching out and letting us know about the broken link! I have repaired it above and will also include it here for you: https://www.purlsoho.com/create/2013/03/31/mollys-sketchbook-inside-out-bag/
Thanks again and happy knitting!
Cassy
I’m wondering about the dimensions for the bag panels – the instructions say 17 inches tall – is it supposed to be 7 inches? The finished bag height only 12 1/4 inches. Thanks!
Hi Kris,
Thanks for reaching out! I am happy to clear things up! The 17 inch measurement for the bag panels is correct! The contrast panel for the bottom is applied on top of this panel, accounting for a good portion of the length. You will be able to see this in some of the images of the inside or back of the panel above.
Additionally, these panels also account for the bottom of the bag (3 inches) as well as the finishing at the top (1 3/8 inches) and the seam at the bottom (3/8 inch). So in total 4 3/4 inches from the 17 inches of the panel will yield a bag that is 12 1/4 inches tall!
I hope that this helps!
Cassy
Thanks Cassy!
I love this tote and noticed the neon bias tape you suggested is no longer available. On your site, you do have a twill tape (3/4” wide) and a single fold bias tape (7/8” wide). Could you please tell me which would be more appropriate for this project? I don’t know the width of the neon tape originally used and I’m not sure if it had a fold. Thank you!
Hi Erica!
Thank you for your question. The neon bias tape originally used in this pattern was 7/8″ wide, which means the single fold bias tape we carry would definitely work for this tote!
I hope this helps!
All the best,
Margaret