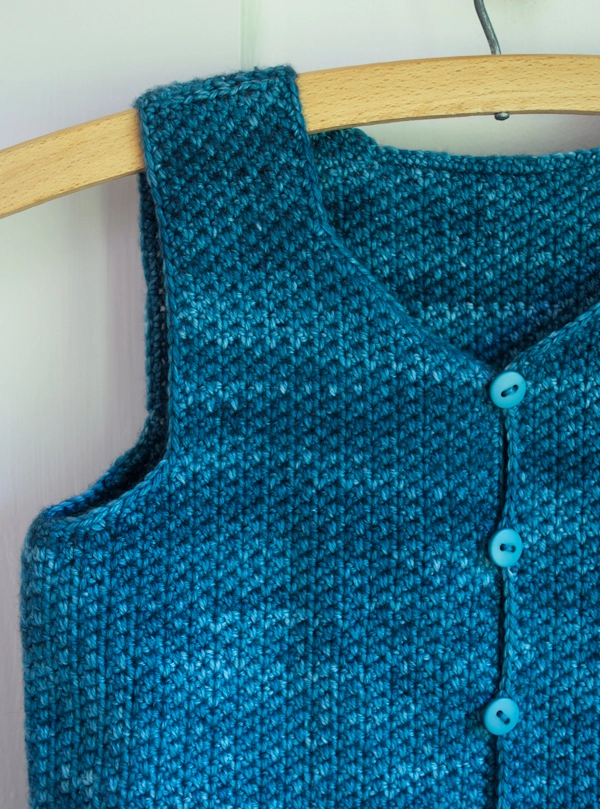
Classic Crocheted Vest for Little Kids

From Mongolia to Peru, vests are a wardrobe staple that seem to go under appreciated here in 21st century America. But to my thinking, so many people so far and so wide could not be wrong about such a thing. Vests are classic!

This one uses a lovely, nubbly stitch pattern and pairs it up with the wonderfully soft and beautiful Anzula Squishy. Sized for ages 2 to 5, little kids will love the loose, easy fit and the freedom of no sleeves. And do with this vest what people everywhere do with theirs, make it a nearly year-round layering essential!
The Materials
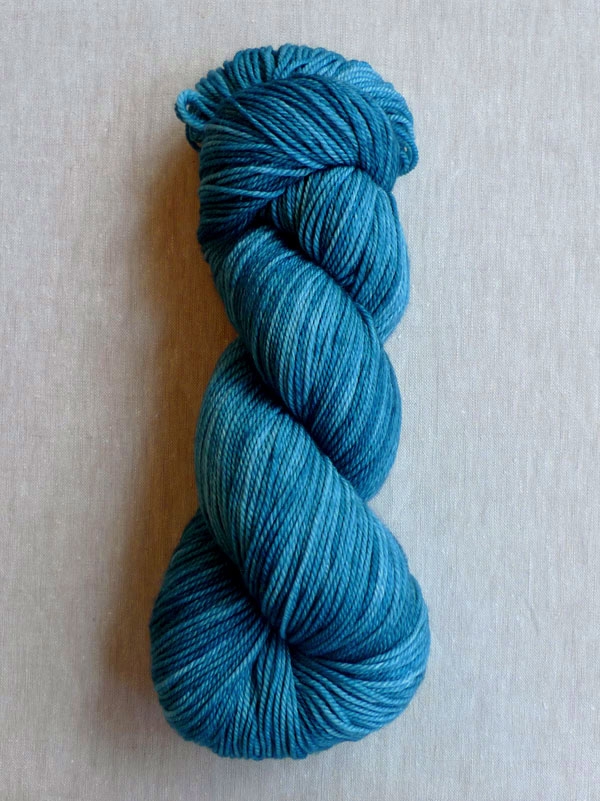
- 2 (2,3) skeins of Anzula’s Squishy, 80% Superwash Merino, 10% Cashmere, 10% Nylon. Each skein is 385 yards/ 114 grams. This color is Teal.
- A Size E (3.5 mm) crochet hook
- 5 1/2-inch buttons. I used Purl Soho’s Medium Buttons (size 19) in the color Teal.
- 3 removable stitch markers (or safety pins or scrap yarn)
GAUGE
24 stitches = 4 inches in stitch pattern
SIZES
2-3 (3-4, 4-5)
- Chest Circumference: 25 (27, 29) inches
- Length from Shoulder to Bottom Edge: 12 (13, 14) inches
- Armhole: 5 (5½, 6) inches
Sample: The vest pictured here is a size 2-3.
NOTES
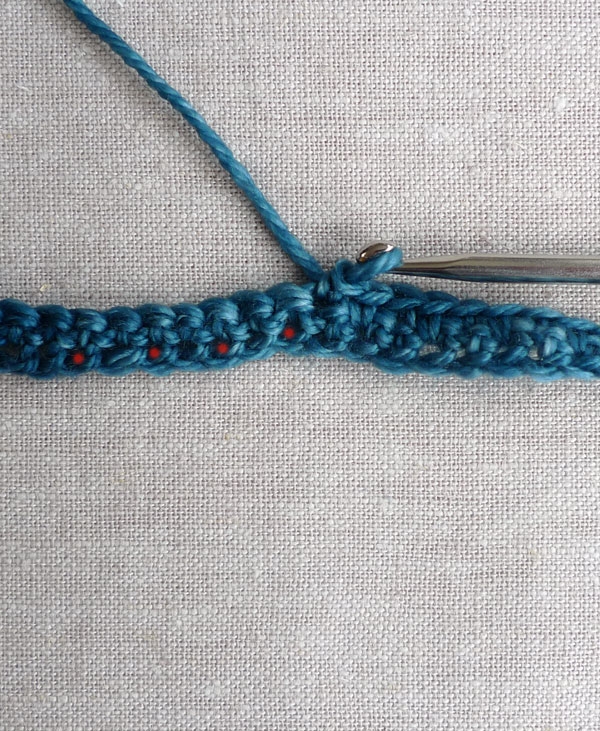
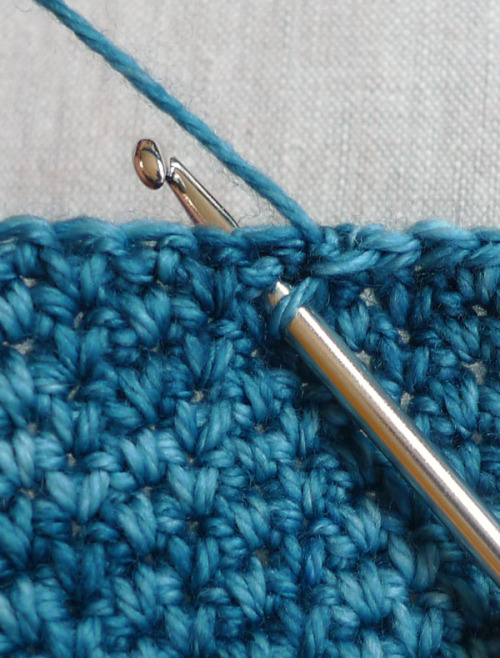
How to “Make 1sc into next space”
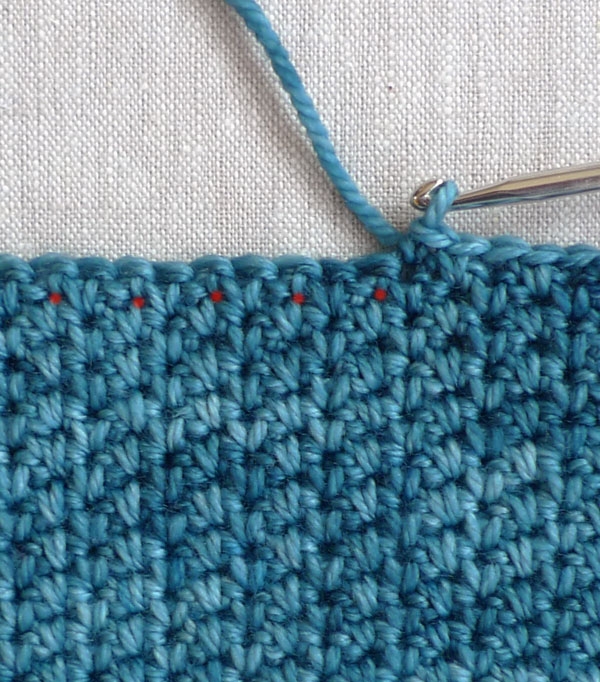
This stitch pattern alternates between making a single crochet into the next stitch (like normal) and making a single crochet into the next “space”. The space is below the next stitch, slightly to the right. The first row of working the stitch pattern (Row 2) looks a little different than subsequent rows, so here are pictures of both!
For Row 2, the “spaces” are marked here with red dots:
And here’s what the spaces look like once you’re beyond the second row:
PATTERN
Begin
Chain 151 (163, 175).
Row 1: Starting with second chain from hook, make 1 single crochet (sc) into each chain. 150 (162, 174) stitches
Row 2: *1sc into next stitch, 1 sc into next space (see Pattern Note above), repeat from * to end of row.
Repeat Row 2 until piece measures 7 (7 1/2, 8) inches from the beginning. When you’re working the last row, mark the 43rd (46th, 49th) stitch and the 117th (127th, 137th) stitch with removable stitch markers (or safety pins).
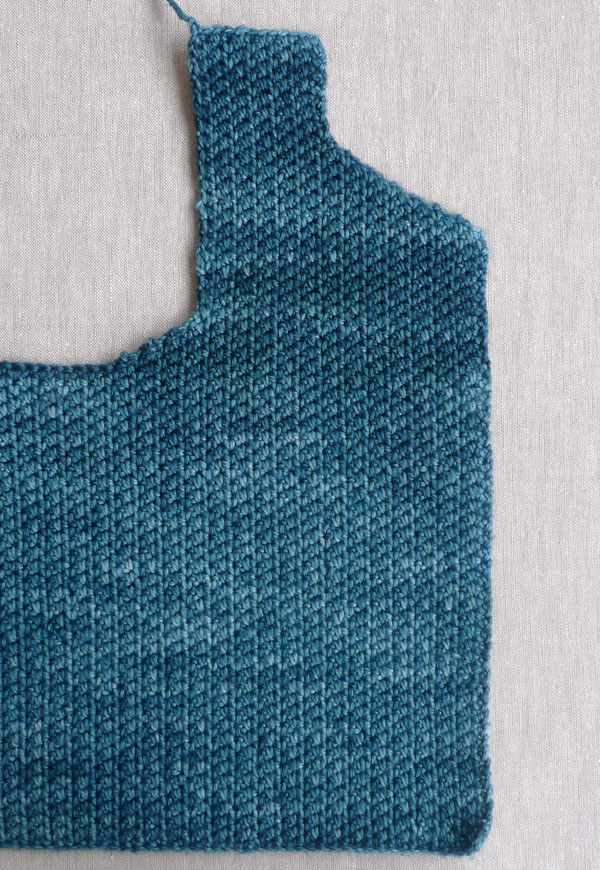
Right Front
ARMHOLE SHAPING
Note: Since both sides of the work look the same, now is a good time to use a removable stitch marker or safety pin to mark the side that is facing you as the “right side”.
Row 1 (right side): (1sc into next stitch, 1sc into next space) 16 (17, 18) times, 1 sc into next stitch, turn the work. 33 (35, 37) stitches
Row 2 (wrong side): Skip a stitch, *1sc into next stitch, 1sc into next space, repeat from * to end of row. 32 (34, 36) stitches
Row 3: (1sc into next stitch, 1sc into next space) 15 (16, 17) times, 1 sc into next stitch, turn. 31 (33, 35) stitches
Row 4: Repeat Row 2. 30 (32, 34) stitches
Row 5: (1sc into next stitch, 1sc into next space) 14 (15, 16) times, 1 sc into next stitch, turn. 29 (31, 33) stitches
Row 6: Repeat Row 2. 28 (30, 32) stitches
Row 7: (1sc into next stitch, 1sc into next space) 13 (14, 15) times, 1 sc into next stitch, turn. 27 (29, 31) stitches
Row 8: Repeat Row 2. 26 (28, 30) stitches
Row 9: (1sc into next stitch, 1sc into next space) 13 (14, 15) times, turn. 26 (28, 30) stitches
Repeat Row 9 until armhole measures 2 (2 1/4, 2 1/2) inches, ending with a right side row.
NECKLINE SHAPING
Row 1 (ws): (1sc into next stitch, 1sc into next space) 12 (13, 14) times, 1 sc into next stitch. 25 (27, 29) stitches
Row 2 (rs): Skip a stitch, *1sc into next stitch, 1sc into next space, repeat from * to end of Right Front, turn. (1 stitch decreased)
Row 3: (1sc into next stitch, 1sc into next space) 11 (12, 13) times, 1 sc into next stitch. 23 (25, 27) stitches
Row 4: Repeat Row 2. 22 (24, 26) stitches
Row 5: (1sc into next stitch, 1sc into next space) 10 (11, 12) times, 1 sc into next stitch. 21 (23, 25) stitches
Row 6: Repeat Row 2. 20 (22, 24) stitches
Row 7: (1sc into next stitch, 1sc into next space) 9 (10, 11) times, 1 sc into next stitch. 19 (21, 23) stitches
Row 8: Repeat Row 2. 18 (20, 22) stitches
Row 9: (1sc into next stitch, 1sc into next space) 8 (9, 10) times, 1 sc into next stitch. 17 (19, 21) stitches
Row 10: Repeat Row 2. 16 (18, 20) stitches
Row 11: (1sc into next stitch, 1sc into next space) 7 (8, 9) times, 1 sc into next stitch. 15 (17, 19) stitches
Row 12: Repeat Row 2. 14 (16, 18) stitches
Row 13: (1sc into next stitch, 1sc into next space) 6 (7, 8) times, 1 sc into next stitch. 13 (15, 17) stitches
Row 14: Repeat Row 2. 12 (14, 16) stitches
Row 15: (1sc into next stitch, 1sc into next space) 6 (7, 8) times, turn. 12 (14, 16) stitches
Repeat Row 15 until armhole measures 5 (5 1/2, 6) inches, ending with either side. Cut the yarn and pull it through the remaining stitch.
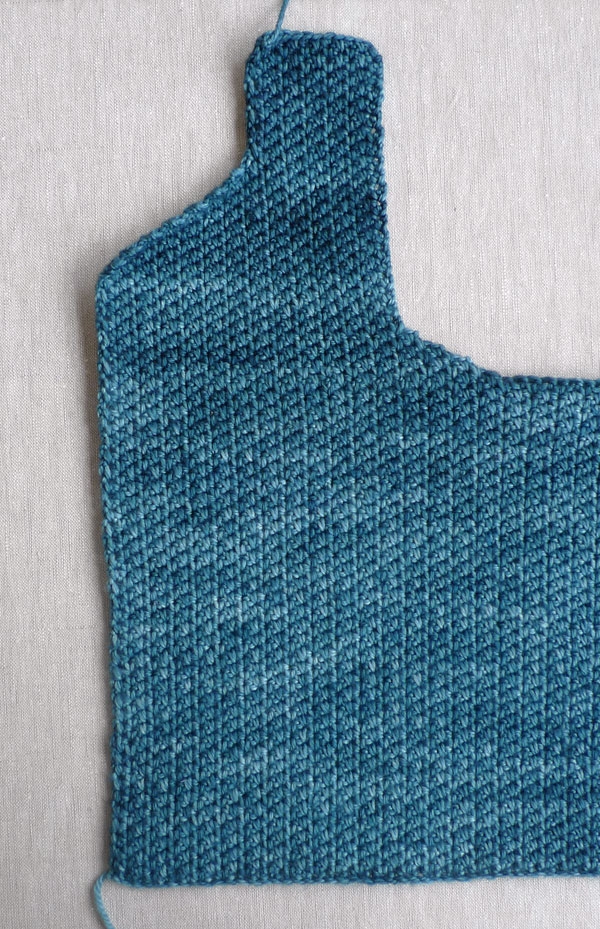
Left Front
ARMHOLE SHAPING
With the right side facing you, join yarn at the 117th (127th, 137th) stitch (marked with a stitch marker).
Row 1 (rs): Chain 1 (counts as a single crochet), *1sc into next space, 1sc into next stitch, repeat from * to last stitch, 1sc into next space. 33 (35, 37) stitches
Row 2 (ws): (1sc into next stitch, 1sc into next space) 16 (17, 18) times. 32 (34, 36) stitches
Row 3: Skip a stitch, *1sc into next space, 1sc into next stitch, repeat from * to last stitch, 1sc into next space. (1 stitch decreased)
Row 4: (1sc into next stitch, 1 sc into next space) 15 (16, 17) times. 30 (32, 34) stitches
Row 5: Repeat Row 3. 29 (31, 33) stitches
Row 6: (1sc into next stitch, 1 sc into next space) 14 (15, 16) times. 28 (30, 32) stitches
Row 7: Repeat Row 3. 27 (29, 31) stitches
Row 8: (1sc into next stitch, 1 sc into next space) 13 (14, 15) times. 26 (28, 30) stitches
Repeat Row 8 until armhole measures 2 (2 1/4, 2 1/2) inches, ending with a wrong side row.
NECKLINE SHAPING
Work as for the Right Front Neckline Shaping section, starting with Row 1. Substitute the “right side” for the “wrong side” and the “wrong side” for the “right side”. Work all the way to the end of the Right Front section.
Back
ARMHOLE SHAPING
With the right side facing you, join yarn at the 43rd (46th, 49th) stitch (marked with a stitch marker).
Row 1 (rs): Chain 1 (counts as a single crochet), (1sc into next space, 1sc into next stitch) 32 (34, 36) times, 1 sc into next space, turn. 66 (70, 74) stitches
Row 2 (ws): Skip a stitch, (1sc into next space, 1sc into next stitch) 32 (34, 36) times, turn. 64 (68, 72) stitches
Row 3: Skip a stitch, (1sc into next stitch, 1sc into next space) 31 (33, 35) times, turn. 62 (66, 70) stitches
Row 4: Skip a stitch, (1sc into next space, 1sc into next stitch) 30 (32, 34) times, turn. 60 (64, 68) stitches
Row 5: Skip a stitch, (1sc into next stitch, 1sc into next space) 29 (31, 33) times, turn. 58 (62, 66) stitches
Row 6: Skip a stitch, (1sc into next space, 1sc into next stitch) 28 (30, 32) times, turn. 56 (60, 64) stitches
Row 7: Skip a stitch, (1sc into next stitch, 1sc into next space) 27 (29, 31) times, turn. 54 (58, 62) stitches
Row 8: *1sc into next stitch, 1 sc into next space, repeat from * to end of Back, turn. 54 (58, 62) stitches
Repeat Row 8 until back measures 4 (4 1/2, 5) inches, ending with a wrong side row. When you’re working the last row, mark the 18th stitch (all sizes) with removable stitch markers (or safety pins).
RIGHT BACK SHOULDER
Row 1 (rs): (1sc into next stitch, 1sc into next space) 9 times, turn. 18 stitches (all sizes)
Row 2 (ws): Skip a stitch, *1sc into next space, 1sc into next stitch, repeat from * to last stitch, 1sc into next space. (1 stitch decreased)
Row 3: (1sc into next stitch, 1sc into next space) 8 times, turn. 16 stitches
Row 4: Repeat Row 2. 15 stitches
Row 5: (1sc into next stitch, 1sc into next space) 7 times, turn. 14 stitches
Row 6: Repeat Row 2. 13 stitches
Row 7: (1sc into next stitch, 1sc into next space) 6 times, turn. 12 stitches
Repeat Row 7 three more times. 12 stitches
Cut the yarn and pull it through the remaining stitch.
LEFT BACK SHOULDER
With the right side facing you, join yarn at the 18th stitch (marked with a stitch marker).
Row 1 (rs): Chain 1 (counts as a single crochet), *1sc into next stitch, 1sc into next space, repeat from * to end of row. 18 stitches
Row 2 (ws): (1sc into next stitch, 1sc into next space) 8 times, 1sc into next stitch, turn. 17 stitches
Row 3: Skip a stitch, *1sc into next stitch, 1sc into next space, repeat from * to end of row. (1 stitch decreased)
Row 4: (1sc into next stitch, 1sc into next space) 7 times, 1sc into next stitch, turn. 15 stitches
Row 5: Repeat Row 3. 14 stitches
Row 6: (1sc into next stitch, 1sc into next space) 6 times, 1sc into next stitch, turn. 13 stitches
Row 7: Repeat Row 3. 12 stitches
Row 8: (1sc into next stitch, 1sc into next space) 6 times, turn. 12 stitches
Repeat Row 8 two more times.
Cut the yarn and pull it through the remaining stitch.
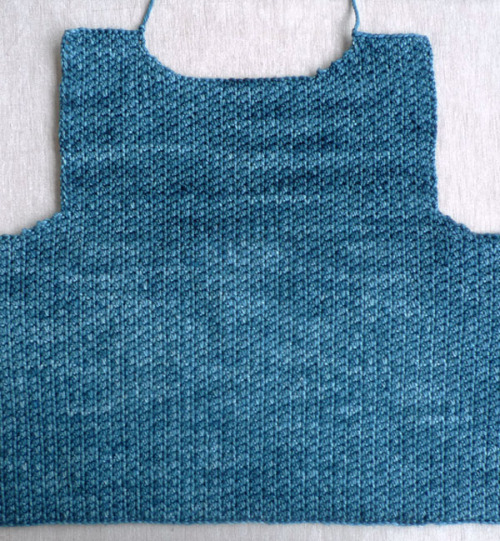
Finishing
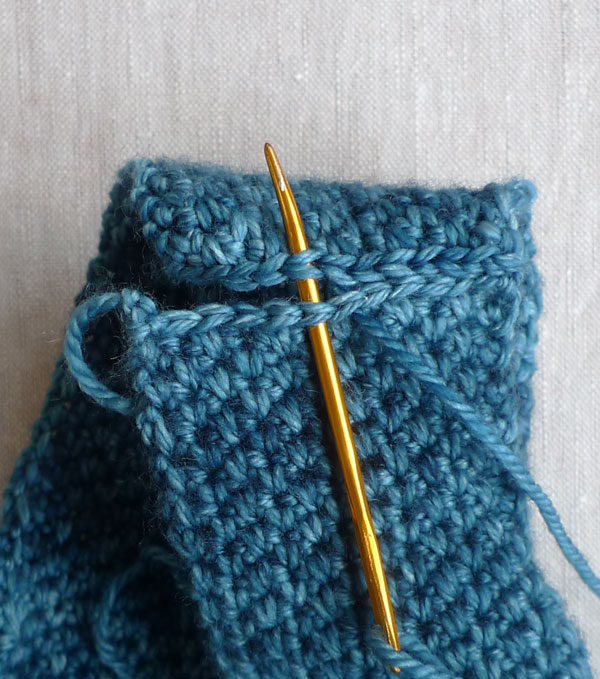
SHOULDERS
Use the tails at the shoulders to sew (or crochet) the right shoulders together and the left shoulders together. I like the finished look of sewing back and forth under the top row of stitches, like this:
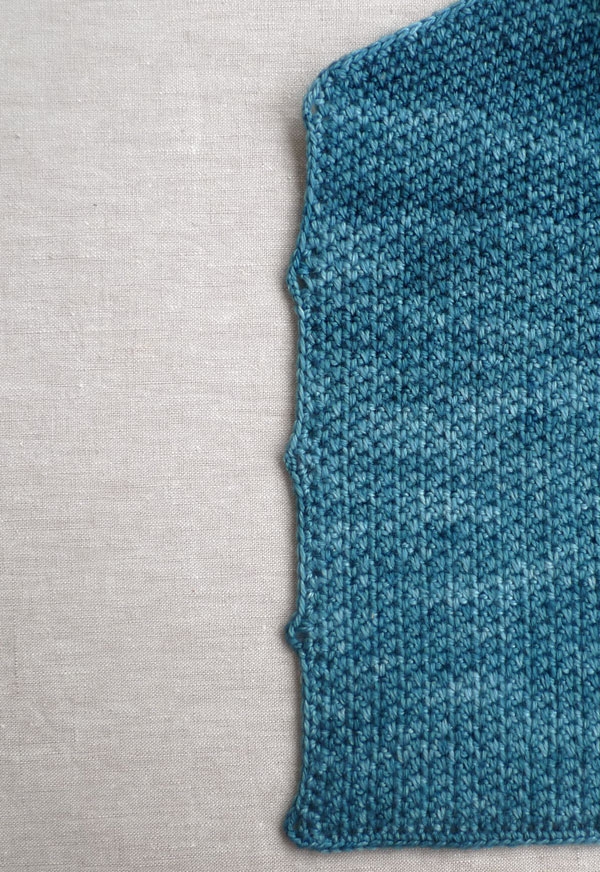
ARMHOLE TRIM
With the right side facing you, join yarn anywhere along the armhole edge with a slip stitch, chain 1. Make 1sc into each stitch around the armhole edge, at the end joining with a slip stitch into the original chain 1. Do the same for the other armhole.
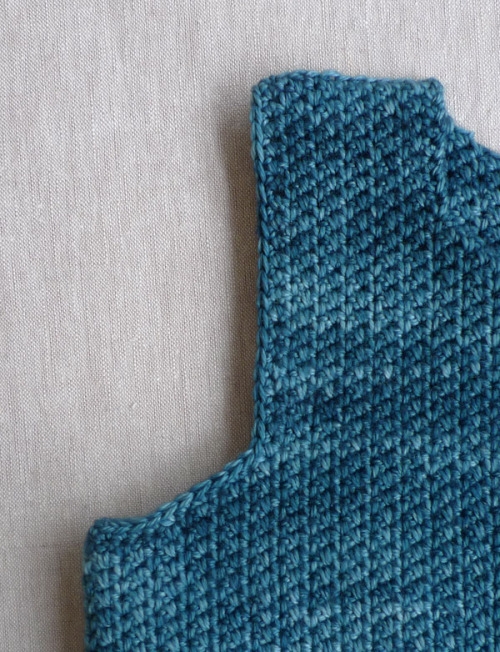
Remaining Trim
With the right side facing you, join yarn to the Back Neck with a slip stitch, chain 1. Make a single crochet border (as you did for the armholes) around the neck, buttonbands and bottom edge. At the corners, chain 1 to turn the corner.
Along the right buttonband (for girls) or left buttonband (for boys), make 5 equally spaced buttonholes by chaining 3. Continue the border with a single crochet into the next stitch.
Sew on five buttons across from the five buttonholes. Weave in the ends and gently block your vest. And you’re done!


I ♥ it….I wonder if I could make an adult version?
That is my question. Sometimes all I need in the evening is a vest.
Is there a version of this pattern for us knitters?
Would love to knit this,,…please help! ❤️
Hi Lonna,
Thanks for writing in! We do not have a knitted version of this vest but we will keep your request in mind for the future!
Best,
Julianna
Are you using a knitting needle to join? Looks like you're sewing the shoulders with a knitting needle.
Hi knitters! Right now there is only a crochet version of this pattern. But ya never know what's to come! -Purl
Beautiful!
Shouldn't the instructions include a turning chain before starting each new row?
Hi Strix,
I sewed the shoulders together with a tapestry needle, but I say in the pattern that you can crochet them together if you'd prefer!
Thanks for your question!
Whitney
Hi Whitney,
This is lovely! I'd like to attempt one for my Daughter's second birthday…what level of experience would you think this is, and how long to make it (roughly)? Thanks Stacey.
Hi Stacey,
I'd say this is an advanced beginner pattern and that it takes about 10-18 hours to complete.
What a loving present! Good luck!
Whitney
Hi Laura,
I used to do a turning chain for single crochet, but when a reader suggested it wasn't necessary, I gave it a try, and she was right! It's so much easier to not have to make the last stitch into the turning chain, and it really does look just as good. Give it a try! (By the way, you'll still need turning chains for taller stitches like double crochets.)
Thanks for your question; it's a good one!
Whitney
Hi, I wondered if there was an easy way to make this in a size 7-8 year? My son loves these types of vests but I can never find patterns for his size!
Hi Charlie,
The first thing to determine is what size you would like the chest circumference to be. Then multiply that number by 6 (assuming that your gauge is 6 stitches to the inch) and chain that number plus 1 (make sure you chain an odd number).
You will need to make some stitch count adjustments for the armhole and neckline shaping. I would also recommend modeling the length measurements on an article of clothing that fits your son well.
Overall, this is a very simple pattern, so if you're somewhat experienced with making sweaters, you hopefully won't find it complicated to modify. Please let me know if you run into any questions and good luck!
Whitney
Is this a loose fitting vest? 151 stitches seems so wide for a 2/3 size.
Hi Lisa,
If you get the correct gauge (6 stitches to the inch in the stitch pattern), then the 2/3 size will be a 25-inch chest circumference. This should be big enough to wear over a layer or two, but no, it's not super loose fitting or anything. Maybe you're used to working with thicker yarn?
Thanks for your question and good luck!
Whitney
Lovely, thanks so much for the info, I'll give it a go! 🙂
Buen día. Gracias por este magnifico blog. Me gusta el chaleco clásico para niños, les agradecería si me pudieran enviar el gráfico para hacerselo a mi nieto.
Un saludo,
Carmen
On the first part of the pattern working up to 7 inches. You then say to place a marker on the 43rd stitch, then on the 117. Have a total of 150 stitches, subtracting the 117th stitch, brings you to 33. Will the shoulders be lopsided? Having 43 stitches on one side and 33 on the other? Please respond ASAP for I am making this for my grandaughter for Christmas. Thank you and Happy Holiday's
Hi Kathy,
Good question! The reason the markers are lopsided is that they aren't marking the same thing.The 117th-stitch marker is for the edge of the left front and the 43rd-stitch marker is for the edge of the right back. You should be all set!
I hope this clears things up for you and that you get your vest done in time for the holidays!
Whitney
I would like to know how to reduce this to a toddler size, 2T. ?
Hi Robin,
The smallest size of this vest is 2-3. If you'd like to make adjustments to that size, check out my answer to Charlie (above) where I give some modification tips!
Thanks for your question; please let us know if you have any more!
Whitney
I really wish you’d post adult sizes for this…
Hi I’m knitting this for my grandson. Smallest size. Have had a little trouble with the tension – getting 6 st to the inch now with size 2.5mm hook (I’m in the UK). My tension swatch feels a little firm, though I’m reluctant to go up a hook size ( 3mm hook gives a tension of 5 to the inch and a softer finish) given the recalculations that will be required to keep the size the same. The yarn is lovely and I want to get this right. I don’t want the boy to feel like he’s wearing a bullet-proof vest! Would appreciate any comments on the finished garment.
Hello Sara,
Thanks so much for your question! This stitch pattern is quite dense, so if you would like to change the feeling of the finished item, you are correct to try and change the needle size. However, if you do this and get 5 stitches to the inch instead of 6, your item will come out around 5 inches too big. To rectify this issue, you should begin with 25 stitches less. Just keep in mind that the number of stitches that you should end up with after the decreases will change. This will also affect how many times you will be doing the decreasing.
If you want to avoid all of this knitting math that can get complicated quite quickly, I would recommend following the pattern as written, use the 2.5mm hook that you were able to get the correct gauge with, but use a slightly lighter weight yarn. For example, Anzula Cloud, available here: https://www.purlsoho.com/purl/products/item/8152-Anzula-Cloud, would give you a lighter weight fabric while being able to stick to the pattern as written. I hope this helps and if you have any more questions, never hesitate to write in to purlbee@purlsoho.com for further clarification.
Thanks!
Alyson
Thanks for that. Have decided to stick with the pattern and tension, so am about to start again with 2.5 hook and get the sizing right.
Hello Ladies,
I only just now found this DARLING pattern (something more to add to my long list of knitting/crocheting), and realize the plane already left the tarmac. It is too late to help Sara with the tension/gauge problem she was having and the bullet-proof quality of her fabric… but hopefully in time for other less experienced knitters.
One thing I RARELY hear designers say is how yarn ‘relaxes’ after being washed… it spreads out, and the knit fabric seems a little thinner (flattened) and softer.
Washing swatches never ceases to amaze me… how the tension/gauge can change and how soft the knit fabric is afterwards. NOT to swatch and WASH is a prescription for disaster. I know it seems like a silly thing NEEDING to be done but it is necessary. It is the only way you can trust that all your HARD WORK will turn into a well-fitting thing of beauty with proper density. You can take that to the bank!
Once again, THANK YOU for yet another lovely piece to make.
HAPPY KNITTING!
MJ, the SKEINdinavian
Hi MJ,
Thank you so much for sharing your thoughts!
Jake
Hi MJ and Alyson, Just a quick update on the vest saga. It turned out fab. Grandson has worn it until it’s now too small. It still looks great and has washed well (Thanks MJ for your tip on washing the swatches. Washing certainly softened the garment without affecting the size.) So it’s going to be passed on to another child and I’ve had a request for another, larger size. I loved making it so that’s no problem.
Sara
Good day. I would be grateful if it would be possible to put this video graphic or vest, for what I do and I can not because I am very bad with the tutorials.
A greeting,
Carmen
Hi Carmen-
Unfortunately we don’t have plans to do a video for this project but we are happy to answer any specific questions you may have here in the comments section. Thank you!
Molly
Hi, love this, it’s perfect for a summer christening we have coming up but sadly I can only follow knitting patterns! Is there a way of converting this to knotting, ie all the decreases etc for shaping?
Hope you can help. Thank you 🙂
Hi Caroline,
I’m afraid we don’t have the resources here to convert pattern from crochet to knitting (or vice versa!), but perhaps today’s new post, Linen Vests for Babies, will resolve the issue for you! They’re knit vests with lovely details and simple instructions, and the free pattern is right here:
https://www.purlsoho.com/create/2015/07/13/linen-vest-for-babies/
Thank you so much for your question and please let us know if you have any others!
Whitney
I love the stitch pattern in this! Is there any chance you could bring out an adult garment pattern using this stitch? I was trying to figure out how to convert this pattern (and the little girls bobble dress) into adult sizing, but it’s well beyond my skill level, I’m afraid.
I will certainly give that stitch pattern a try though regardless 🙂
Thanks for posting.
Hi, Mara!
Thank you for writing in and thank you for your kind words! Unfortunately, we don’t have an adult pattern for this vest! Again, thank you for your comment!
Best,
Kumeko
Thinking of using this pattern for an interesting stripe repeat and wondering if it would work in a standard sc stitch throughout rather than 1 sc and then 1 sc into next space.
Thanks for your reply!
Hi Gay,
Thanks for writing in! This pattern can be translated into a single crochet and I don’t think that it would drastically affect the gauge. However, I do think that if you were to do stripes using the original stitch pattern, it would become a very interesting and intriguing textile. The choice is yours! Thanks again for writing in and let me know if you have any other questions.
Best,
Adam
Dear friend
I came across your project.. I really like this as I was looking to do a vest for my grand daughter who is 8 yrs old.
Hope I will be able to follow along with the pattern as I am used to follow in utube with other projects.
I will try to do the best.. even if it means have to unravel several times.
Thankyou once again
God bless you
Liz
Hi Liz!
Thank you so much for writing in! If you have any questions regarding the pattern please let us know, we are happy to help!
Best,
Kumeko
Do you have this or a similar vest pattern for adults? I do plan to make this vest for my great, great nephew. Thanks for a beautiful pattern.
Hi Jo,
Thanks for writing in! At present, we do not have a similar pattern for adults. We will certainly keep your request in mind for the future!
Best,
Cassy
Dear friends,
I’m quite inexperienced crocheter, so
this pattern has two parts or it’s made in one piece?
Thank you all!!
Hello Monica,
Thank you for reaching out! The only seaming in this pattern is the top of the shoulders so it is made as one piece.
I hope this helps! Let me know if you have any further questions.
-Marilla
VERY, VERY nice! Thank you.
Hi I am a beginner and having trouble try to get this pattern! Is there a name for the stitch that I can watch on video? HELP!!
Hi Jo,
Thanks for reaching out! Unfortunately we do not have a video for this stitch; however, you may be able to find some helpful videos by searching for “crochet moss stitch” on Youtube!
Best,
Julianna
Do you have a similar crochet pattern for a sweater with sleeves?
Hi Kathleen,
Thanks for reaching out! Unfortunately we do not have a crocheted sweater pattern similar to what you describe, but I will be sure to pass your suggestion along to the design team!
Best,
Julianna
Do you have a vest like this for a 10 year old? I would like to make some for school this year.
Hi Diane,
Thanks for reaching out! Unfortunately this pattern is not available in larger sizes; however, I will be sure to pass your request along to the design team!
Best,
Julianna
Would it work if the single crochet foundation technique was used to start this garment? I’m a novice at crochet so just thought it would be good to try out this approach. Many thanks
Hi Anne,
Great question! Yes, this would be a great project to try out a foundation single crochet! You can substitute it in any project that begins with a row of all single crochets. Just remember to work one less foundation single crochet than the starting chains that the pattern calls for!
Best of luck and happy crocheting!
Julianna
Hi, Do you have this for a slightly bigger kid- 6-8 year old please?
Thank you!
Hi Emma,
Thanks for reaching out! Unfortunately, this pattern doesn’t come in larger sizes, but I will be sure to pass your request along to the design team!
Best,
Julianna
Julianne I’m wanting to make a vest for a newborn. This is the only pattern I’ve come across. Do you know measurements so I can try and modify? I might even make more simple but want a place to start.
Hi Jen,
Thanks for writing in! This vest will be absolutely adorable scaled down for a newborn! I would use the dimensions for our Little Baby Sweater as a guide since it is fairly similar to a vest. Based on that pattern, the finished chest circumference for newborn to six months should be 18 inches, the length from the hem to the armholes should be 5.5 inches, and the length from the hem to the shoulder should be 9.5 inches.
I hope that helps, and please do let us know how it turns out!
Julianna
Is turning chain necessary for this? How will I go to the next row if not ?
Hi Patricia,
Thanks for reaching out! I recommend following the instructions and turning chain to ensure that the pattern comes out as expected!
I hope this clears things up, happy crafting!
Gianna