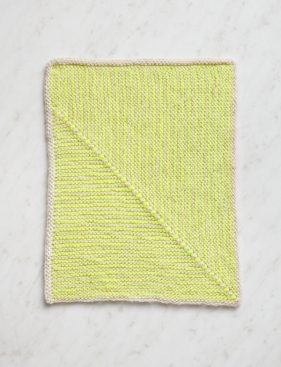
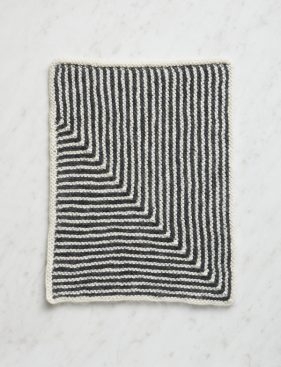
Little Mitered Stripes Scarf
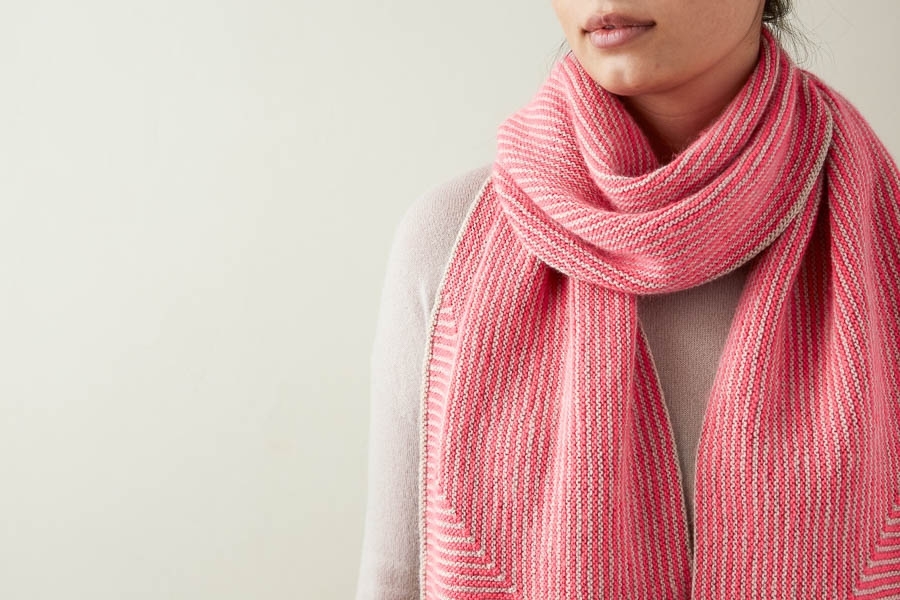
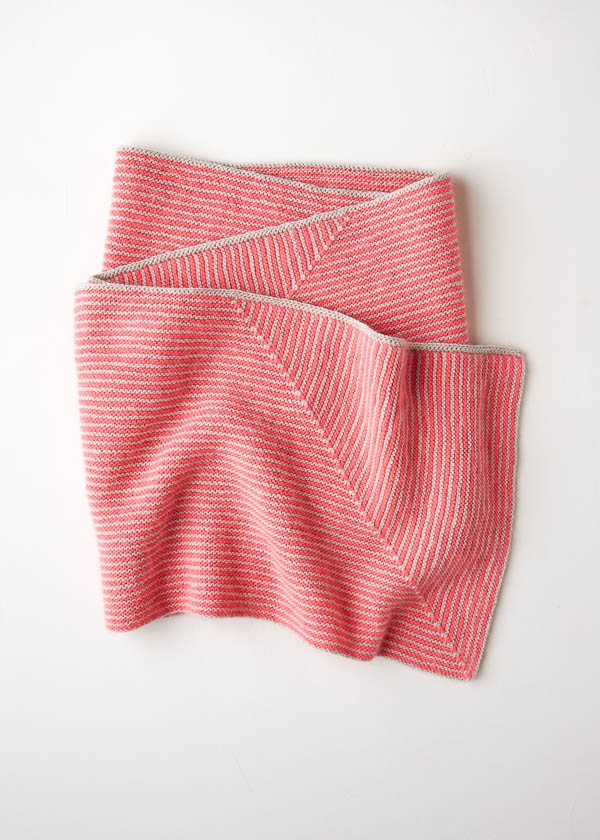
A just-right spring scarf always carries an inherent levity: It’s not there because you need it to be but because you want it to be. Our soft and breezy Little Mitered Stripes Scarf is the perfect breath-of-fresh-air as the days get longer, the knitwear lighter.
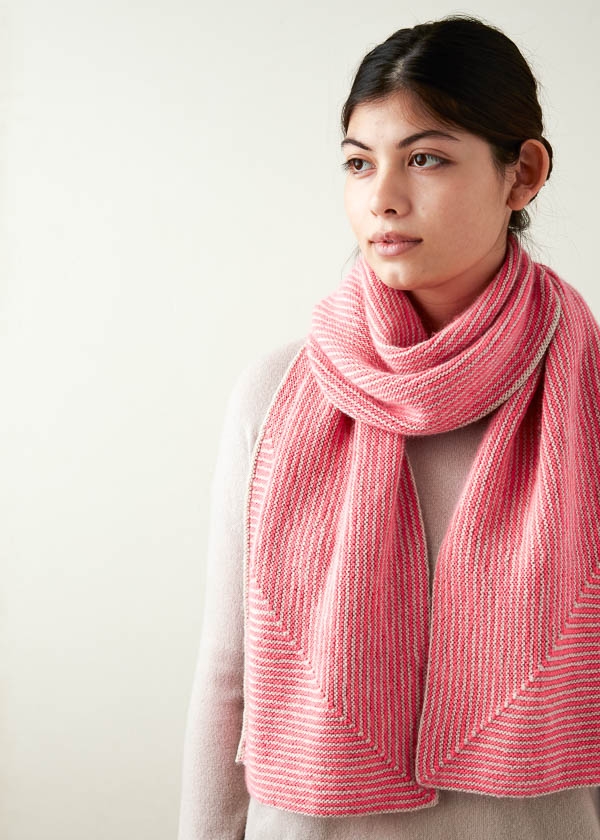
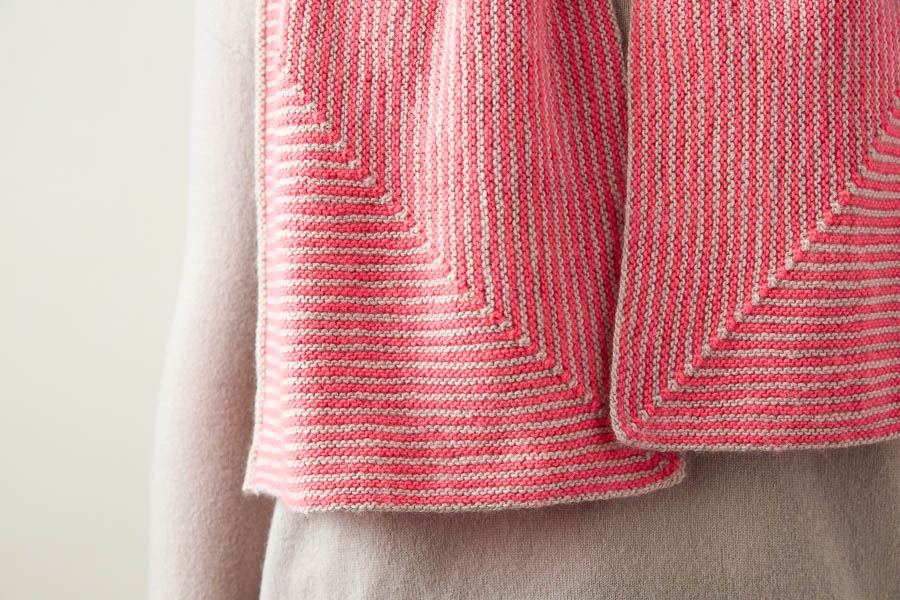
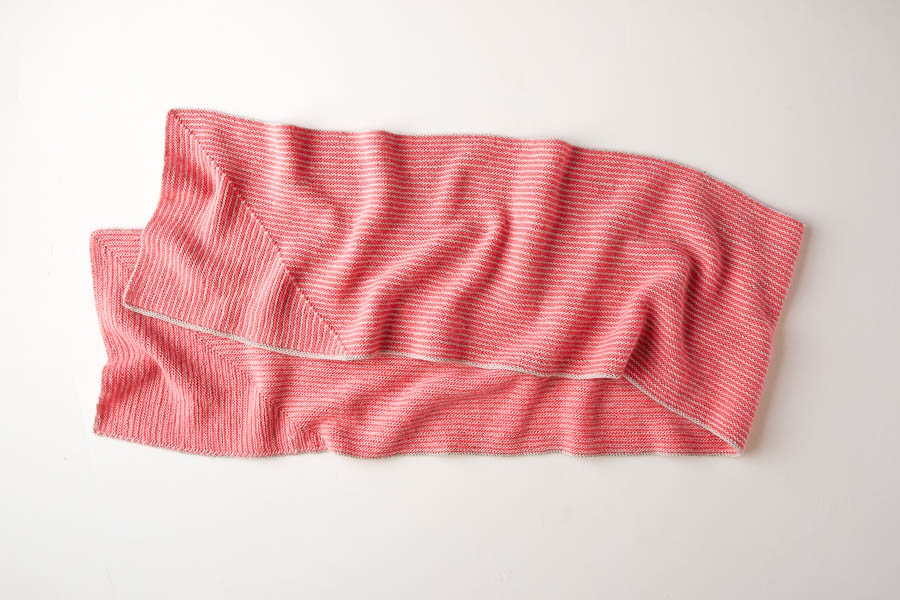
Slender two-row garter stitch stripes vibe off each other, an optical play that mirrors a playful construction: You cast on for both ends of the scarf plus the long edge in between, make a double decrease every other row at each mitered corner, then cast off along the other long edge. Sounds crazy, but it’s not!
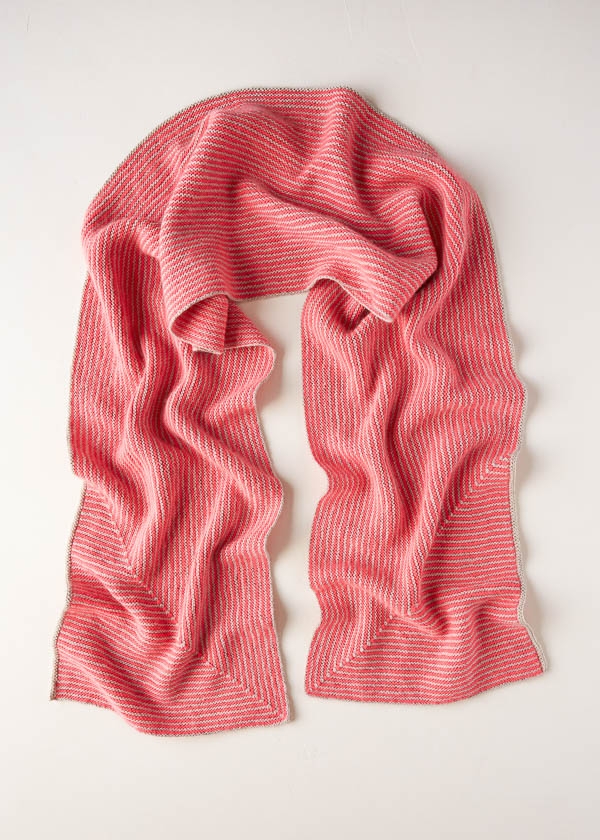
It’s all knit up in our fan favorite Line Weight, dozens of colors in a simple single-ply 100% merino. Pick your pair for this project and there you have a stunning scarf to usher in the season of new beginnings!
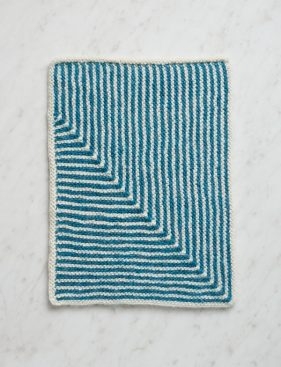
UPDATE: NOW A BLANKET IN KNITTING YARN
OCTOBER 2022
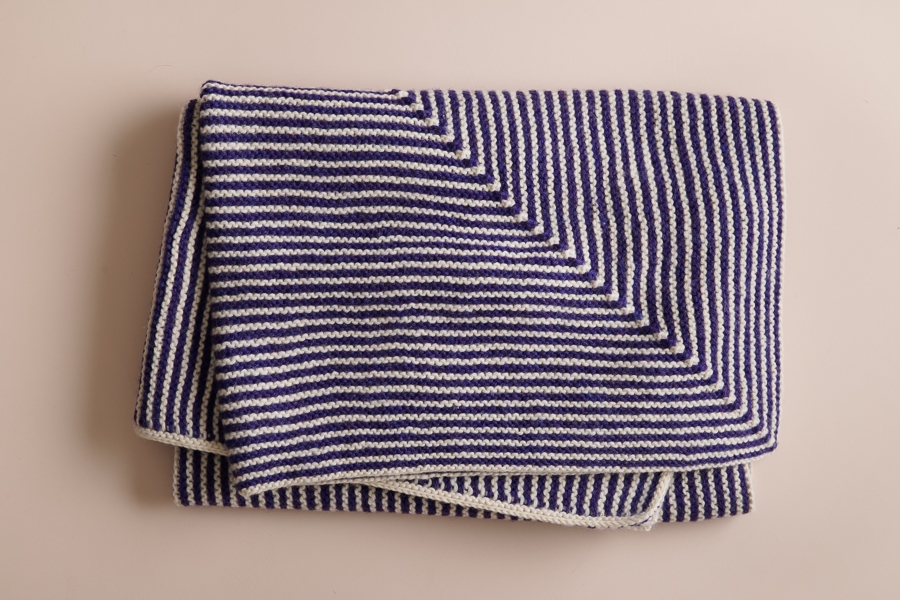
Our clever Little Mitered Stripes Blanket pattern uses a very similar four-line repeat as the scarf, but on a larger scale. Cast one on with our crib- or throw-size bundles, each a big, squishy pile of our gorgeous Knitting Yarn merino!
Designed by Purl Soho designer, Jake Canton. Click here to see even more of Jake’s designs!
Share your progress and connect with the community by tagging your pics with #PurlSoho, #PurlSohoBusyHands, #PurlSohoLittleMiteredStripesScarf, #PurlSohoLineWeight, and #PurlSohoLinenQuill. We can’t wait to see what you make!
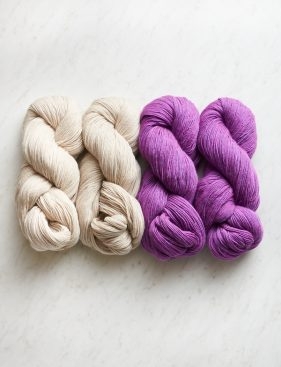
Materials

To knit your own Little Mitered Stripes Scarf, you will need…
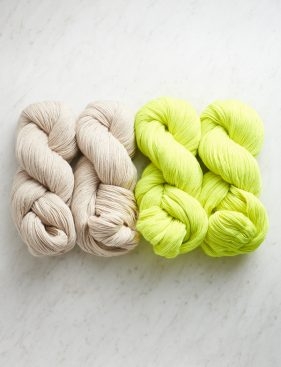
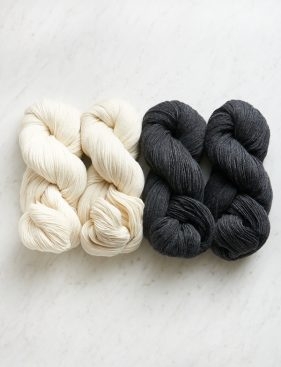
- Color A: 2 skeins of Purl Soho’s Line Weight, 100% merino wool. Each skein is 494 yards/ 100 grams; approximately 677 yards required. We used Reed Gray.
- Color B: 2 skeins of Line Weight; approximately 628 yards required. We used Bright Flamingo.
You’ll also need…
- US 3 (3.25 mm), 40- or 47- inch circular needles
- Stitch markers or scrap yarn
The Little Mitered Stripes Scarf features color beautifully! Here’s a few ideas to inspire you…
Wheat Flour + Lotus Flower

Color A: Wheat Flour; Color B: Lotus Flower
Wheat Flour + Cosmic Yellow
Color A: Wheat Flour; Color B: Cosmic Yellow
Heirloom White + True Turquoise
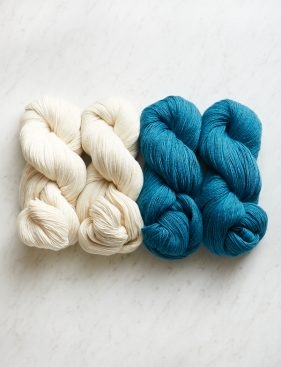
Color A: Heirloom White; Color B: True Turquoise
Heirloom White + River Rock
Color A: Heirloom White; Color B: River Rock
Gauge
28 stitches and 60 rows = 4 inches in garter stitch
Size
Finished Dimensions: 13 inches wide x 68 inches long
Note
S2kp (slip 2, knit 1, psso): Slip 2 stitches together knitwise with yarn in back, knit 1, pass slipped stitches over knit stitch and off right needle. [2 stitches decreased]
For additional help, please visit our S2kp Tutorial.
Pattern
With Color A, cast on 660 stitches. TIP: When you’re casting on so many stitches, it really helps to place a marker or piece of scrap yarn every 50 stitches. That way, when you lose count (which you will!), you won’t have to recount all the stitches. (Remember to remove the markers when you work the first row.)
Set-Up Row (wrong side): Slip 1 knitwise with yarn in front (wyif); with Color A, k90, place marker (pm), knit to last 94 stitches, pm, knit to end of row.
Row 1 (right side): Slip 1 knitwise wyif, bring Color A to back of work; with Color B, [knit to 3 stitches before next marker, s2kp (see Notes), remove marker, k1, place marker (pm)] twice, knit to end of row. [4 stitches decreased]
Row 2 (wrong side): Slip 1 knitwise wyif; with Color B, knit to end of row.
Row 3 (right side): Slip 1 knitwise wyif, bring Color B to back of work; with Color A, [knit to 3 stitches before next marker, s2kp, remove marker, k1, pm] twice, knit to end of row. [4 stitches decreased]
Row 4 (wrong side): Slip 1 knitwise wyif; with Color A, knit to end of row.
Repeat Rows 1-4 until, with right side facing you, 4 stitches remain to right of right stitch marker and 1 stitch remains to left of left stitch marker, ending with Row 4. [300 stitches remain]
Next Row (right side): Slip 1 knitwise wyif, bring Color A to back of work; with Color B, s2kp (removing marker), knit to 3 stitches before next marker, s2kp (removing marker), k1. [296 stitches remain]
Next Row (wrong side): Slip 1 knitwise wyif; with Color B, knit to end of row.
Cut Colors A and B.
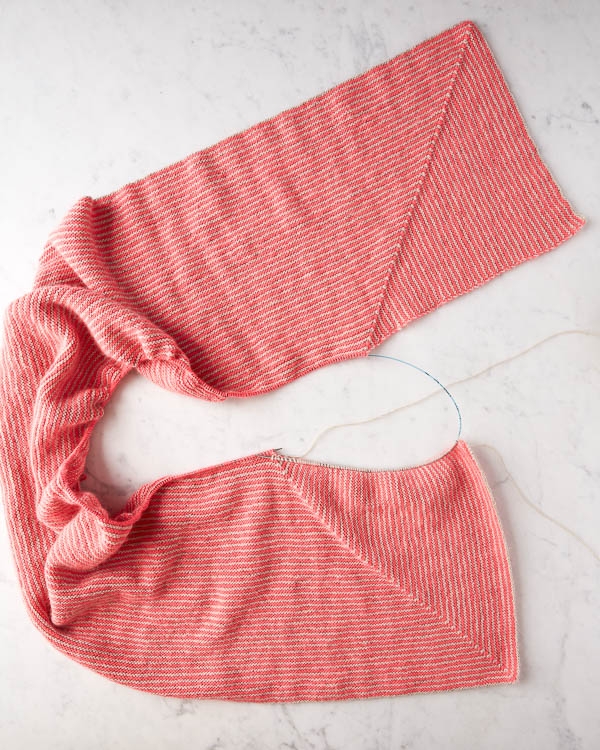
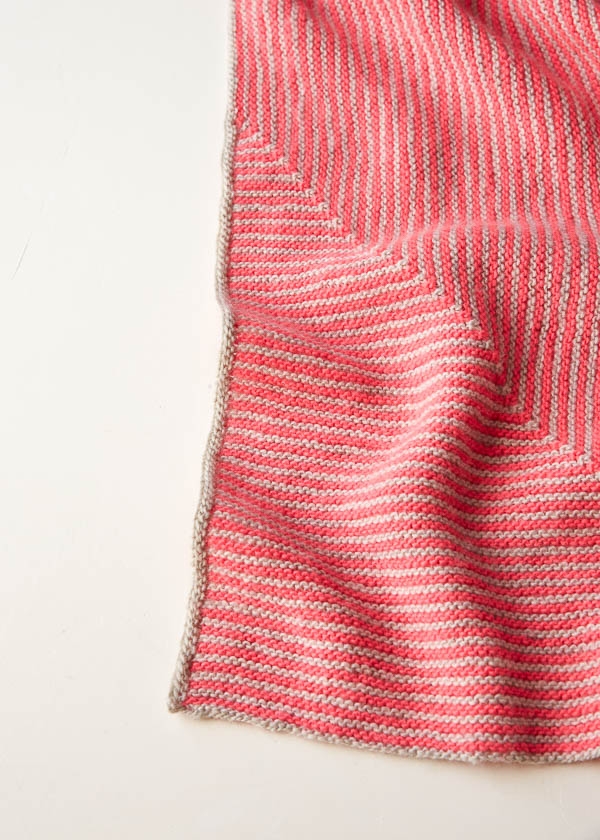
Next Round (right side): With right side of work facing you and with new strand of Color A, start at bottom right corner and use right end of circular needles to pick up and knit 91 stitches along right-hand selvage (as shown above); knit across 296 live stitches; pick up and knit 91 stitches along left-hand selvage. [478 total stitches]
Next Round (wrong side): Slip 1 knitwise wyif; with Color A, knit to end of row.
With right side facing you, bind off knitwise.
Weave in ends and block as desired.


I would like a yawn other than wool. What would you suggest for a light summer scarf? Thank you.
Hi Suzanne,
Great question! I think this scarf would be just lovely in our Cattail Silk!
Happy knitting!
Julianna
This is a most interesting construction. I’d like to make it a bit wider for a stole, maybe 18-20 inches. Would adding additional stitches on each CO end be all I need to do?
Hi Fay,
Thanks for reaching out! Adjusting the width of this wrap is a bit tricky but possible! Since both the width and length are cast on at the same time, you will first need to determine how many stitches you need for your desired width and length- for your example, a 20 inch wide wrap will require 140 stitches for the width at each end, plus 476 stitches for a 68 inch length, or 756 stitches total. When working the set-up row, you will place your first marker after the first width set of stitches (140), and place the second marker before the last width set of stitches, plus three to account for the first decrease (143). You can then work the pattern as written until all of the width stitches have been decreased.
Best of luck and happy knitting!
Julianna
Can these directions work for a scarf that is only, say 7” wide?
Hi MaryEllen,
Thanks for reaching out! Adjusting the width of this wrap is a bit tricky but possible! Since both the width and length are cast on at the same time, you will first need to determine how many stitches you need for your desired width and length- for your example, a 7 inch wide scarf will require 49 stitches for the width at each end, plus 476 stitches for a 68 inch length, or 574 stitches total. When working the set-up row, you will place your first marker after the first width set of stitches (49), and place the second marker before the last width set of stitches, plus three to account for the first decrease (52). You can then work the pattern as written until all of the width stitches have been decreased.
I hope that helps!
Julianna
Hi,
I have been working this pattern for a 7” width, and I don’t see how I’ll get down to 300 remaining stitches. If I complete all the width rows, I’ll still have the original 474 stitches remaining on my needle. Can you explain how I can get down to 300 stitches using the 1-4 row pattern, where a total of 8 stitches are decreased over every 4 rows?
Thanks so much for your help!!
Sorry. I meant after 50 stripes, I will only decrease 200 stitches which will still leave me with a total of 374 stitches. I’m wondering how to get down to 300
Thanks!!
Hi Marnie,
Thanks for writing in! Since you changing the dimensions of the scarf, you won’t end up with the same number of stitches that we did, so 374 may be correct! Rather than going by how many rows you work or how many stitches you have left, you will know you are done decreasing when 4 stitches remain to right of the right stitch marker and 1 stitch remains to left of the left stitch marker, ending with Row 4.
I hope that helps!
Julianna
Thank you for yet another beautiful project! I’d like to make this without the mitred corner, so just a scarf of garter stitch vertical stripes. How many stitches would you suggest I cast on to achieve the 68 inch length? I’ll be using the Line Weight. Would a 40/47 inch cable still be sufficient?
Thanks again, I’m definitely a Purl Soho addict! I’m currently knitting the Daybreak scarf – really enjoying the pattern and the Cashmere Bloom is just divine to work with!
Hi Sarah,
Thanks so much for the kind words and for writing in! At our gauge of 28 stitches per four inches, you will need to cast on 476 stitches for a regular garter stitch scarf worked lengthwise. Since this is fewer stitches than the original, I think a 40″ needle would be plenty long!
Best of luck and happy knitting!
Julianna
I am feeling insecure in knitting this pattern. On rows one and three when you do SS2kp, do you do it twice in a row or do do it once at the first marker and then knit to the second place marker and do the second ss2kp? I just don’t get how the pattern works out?
Hello Lizzy,
Thank you for reaching out! You are doing this whole section “[knit to 3 stitches before next marker, s2kp (see Notes), remove marker, k1, place marker (pm)] ” twice and then just knitting till the end of the row.
Happy knitting!
-Marilla
When I neared the end of the scarf I found that I must have missed some decreases. If I had continued, the scarf would not have had a smooth top. I have ripped back and will add additional decreases this time. I remain perplexed about how the miter is going to work. I love the yarn and pattern but want a smooth end to this time consuming project. Do you have any suggestions for me?
Hi Vicki,
Thanks for reaching out! What shape did it look like the scarf would be when you were getting close to the end? In a mitered pattern like this, the shape relies completely on the increases being worked at the correct intervals, so it really is essential that you don’t miss any and follow the pattern exactly! If you work two double decreases in the correct spot on every right side row, I promise that the scarf will turn out rectangular! There may be slight blips or points at the end of the mitered decrease lines, but the edging at the end should smooth out any minor irregularities.
Best,
Julianna
What cast on do you suggest for this scarf? I typically like a long tail cast on but with that many stitches I’m afraid of getting towards the end and running out of tail.
Hi Amelia,
Great question! We did use a Long Tail Cast On, but it can be very frustrating indeed to run out of yarn when casting on lots of stitches! You could use a Cable Cast On as long as you are careful not to cast on too tightly, as a Cable Cast On has less elasticity than Long Tail Cast On, but otherwise would be fine for this scarf. Another option would be to use a Long Tail Cast On, but work from two balls of yarn at once, one for each tail. To start this, you will tie a slip knot using both strands held together, and then set up for your cast on as usual, but don’t include the slip knot when you are counting your stitches. Once you are done, slide the slip knot off your needle and unravel it, and cut off one of the balls of yarn.
I hope that helps, and happy knitting!
Julianna
I think a video tutorial would help a lot with this pattern. The direction are not written for a novice to intermediate knitter but it is so beautiful I would love to try it. Just a hint?
Hi Mel,
Thanks for writing in! Unfortunately we don’t have the resources at the moment to do a video tutorial of this. We will keep your request in mind though for the future!
Best,
Julianna
Just started the Little Mitered Stripes scarf. Should I be carrying the dropped yarn along rather than cut at each row?
Hi Sue,
Thanks for reaching out! Since these are only two row stripes, you should be carrying your yarns up between rows instead of cutting them.
Happy knitting!
Julianna
When adjusting the width of the scarf, does the first marker have to be placed after an uneven number of stitches to ensure that you ultimately end on Row 4 rather than Row 2?
Hi Christine,
Thanks for writing in and pointing this out! Yes, to make sure you end on Row 4, you would need to start with an odd number of stitches for the width; however, if you didn’t, since the long edge is finished with an applied i-cord, I don’t think it would be terribly noticeable if you ended on Row 2 instead.
Happy knitting!
Julianna
Can you please tell me of an equivalent yarn that I can find in the UK. Thanks
Hi Maria,
Thanks for writing in. I can certainly help you figure out what types of yarn you’ll need to buy for this project! We knit the Little Mitered Stripes Scarf in Line Weight, which is a fingering weight, single-ply yarn made from 100% merino wool. It comes to approximately 7 – 8.5 stitches per inch on needles size US 1 – 4 (2.5 – 3.5 mm). When looking for a substitute yarn, keep these specifications in mind! You’ll definitely want to find a yarn that is the same weight, and while the other characteristics are not absolutely necessary for a substitute yarn, they might come in handy as well to get an even more similar feel. Hope this helps!
All the best,
Lili
Juliana,
I too would like to make a 7″ wide scarf. I saw what you wrote for Marnie but I am wondering if the second marker placement is correct. In the originial width there is a 4 stitch difference between the first and second markers. In the 7″ there is a 3 stitch difference.
Your thoughts on this would be appreciated!
Thankyou,
Chris
Hi Chris,
Thanks for writing in! There’s actually a 3-stitch difference in the pattern at the original width. The first section has 91 stitches (1 slipped stitch, plus 90 knit stitches), and the second section has 94 stitches. Hope this helps clarify things!
All the best,
Lili
OPPS! It was MaryEllen that ask about a 7″ wide version.