Braided Ribbing
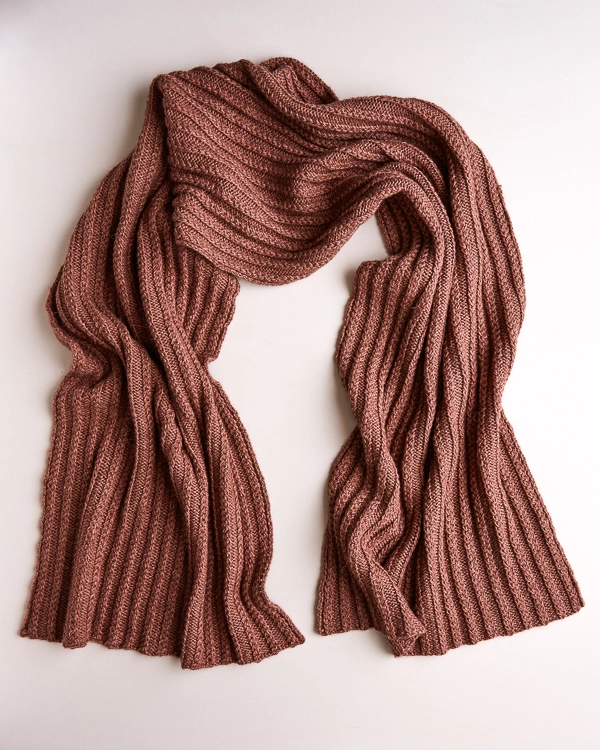
Braided Ribbing Stitch is a beautiful cable stitch that you work right on the needles, without the fussiness of a cable stitch holder. This stitch creates hearty ribs, alternating delicately entwined cables with a couple of reverse stockinette stitches, surprisingly intricate looking but not at all complicated! We show you all the techniques involved here in our braided ribbing tutorial. For specific instructions on how to bind off the Braided Ribbing Stitch, just skip ahead to 2:53 minutes.
Click To See Video Transcript
I am going to show you how to work Braided Ribbing Stitch. As you can see here, I have a small swatch and I’m going to begin with a right-side row. The first thing I’m going to do is purl two stitches: It’s one and that’s two. Now I’m going to jump right into the repeat. The first part of the repeat is to knit one. There we go. Now what you want to do is use your right needle and insert it from back to front between the first and second stitch on your left-hand needle. Swivel your right needle around in order to knit that second stitch like so. And now go ahead and knit that first stitch. At this point, you can let both of those fall off your left needle. The last part of the repeat is to purl two.
Let’s run through that one more time. So first knit one, then enter your right needle from back to front between the first and second stitch on your left hand needle. So move your needle around and order to knit that second stitch. Then knit the first stitch and let the first and second stitch fall from your left needle. Finish up with purl two. That’s the repeat for the right-side row.
Now I’m going to show you how to work the wrong-side row of braided ribbing stitch. The first thing I’m going to do is knit two stitches: That’s one, and two. And now I’m going to jump into the repeat. First thing you do is purl one. Here we go. Now you’re going to purl the second stitch skipping over this first stitch. Just like that. Now go ahead and purl that first stitch. At this point, you can let both of those fall off the left needle. Finish up by knitting two.
Let’s run through that one more time. First purl one, then purl the second stitch on your left needle. Then purl the first stitch, and then let those fall off your left needle. Finish up by knitting too. And that’s it. That’s the repeat for braided ribbing stitch for the wrong-side row.
Now I’m going to show you how to bind off. The bind off for this stitch has worked across the wrong side row in pattern. I’ll show you how. First knit two, bind one off. Next purl one, bind one off. Now purl the second stitch on your left needle and bind one off. Purl the first stitch. Let both of those gently fall off the left needle and bind one off. And then finish up the repeat by knitting one and binding one off. Knitting one more and binding one off. So that’s the repeat for the bind off. It’s really similar to the repeat of the wrong-side row.
Let me show you one more time. Purl one, bind off; purl the second stitch, bind off. Purl the first stitch, let those two fall off of the left-hand needle, bind off. Knit one, bind of, and knit one, bind off. So now we’ve done two repeats of the bind off. Just continue that to the end of the row and you will have bound off Braided Ribbing Stitch.
We used this stitch pattern for our Braided Rib Wrap. Get the free pattern to try it out yourself!
Looking for more inspiration? Explore all of our free knitting patterns and knitting tutorials, buy one of our many knitting kits and yarn bundles, and shop for beautiful yarn. We have over 35 gorgeous natural fiber yarns in 100’s of magnificent colors, designed to bring integrity, beauty, and joy to your next knitting project and only available at Purl Soho!


Do you recommend any particular cast-on method for this piece?
Hi Cynthia,
Thanks for writing in! For this, as well as most of our projects, unless otherwise noted, we like to use the long tail cast on. We find that it makes a neat and pleasing edge!
Best,
Cassy
Trying to start the stitch, when you knit between first and second stitch, are you catching the front of the second stitch and twisting the second stitch to the back,vyour finger gets in the way. Thank you
Hello Becky,
Thank you for reaching out! You are correct, after inserting your needle back to front through the middle of the first and second stitch, you will pick up the second stitch through the front and knit a stitch and letting that stitch rest on the right needle. I hope this clears things up for you and please let us know if you have any further questions!
Happy knitting,
Marilla
Hello there,
If I were to design this as a cowl, do I need to have the first two knit stitches on the right side row/purl on the wrong or can I just start with the pattern? I assume that’s correct as I won’t have an edge, right?
Thanks for you help,
Ximena
Hello Ximena,
Thank you for reaching out! Yes, you are correct you can just jump right in. The most important thing to remember is that you are knitting in the round you are only knitting on the right side of your project so you may have to do a bit of experimenting before getting it right.
Good luck and happy knitting!
-Marilla
Would you think this stitch would be fine in heavy lace weight? (I know I can do a swatch but I wanted to ask first)
Hello May,
Thank you for reaching out! You can certainly knit this stitch up in a heavy lace weight, it will just come out much smaller!
Happy knitting,
Marilla
I will try this pattern this very morning
It is almost impossible to knit the first stitch after inserting needle from back to front because it is too tight and then knitting first stitch before slipping both off the needle.
Hi Martha,
Thanks for reaching out! Although it is a bit tricky, especially on the first row after the cast on, it should be possible to knit the first stitch. I would suggest watching our tutorial to make sure you are bringing the right hand needle back to the correct position after knitting the second stitch – the right hand needle should end up back in its usual spot, to the right of the left hand needle, rather than between the first two stitches, so that you are knitting the first stitch just as you normally would.
I hope that clears things up!
Julianna
To solve the “too tight to execute”problem: cast on using size 8 needles. Switch to needles 1-2 sizes down to perform the first 5 rows of the pattern. Switch back to size 8s for row 6 and stay on the larger needles until you are within 3/4 of an inch for bind-off. Switch back to smaller needles and bind off from them. Switch needles on wrong side rows (where the tricky bit involves purling) for the easiest transition. This technique has the added advantage of combatting flaring at the top and bottom of the scarf.
I am so grateful for your patterns and tutorials. Where can I buy your yarn in Canada? Buying via crossborder shopping is too expensive given the tariff costs.
Hi Anne,
Thank you so much for writing in and for the kind words! Unfortunately we do not wholesale our yarns, so they are only available from our website. We are currently offering a shipping rate of just $8 to anywhere in Canada!
I hope that helps!
Julianna