Your basket is empty.
Continue Shopping
Italian Bind Off
We’ve all bound off in rib stitch only to find that the edge is not nearly as stretchy as the ribbing itself… No more! Our Italian Bind Off Tutorial shows you a great way to finish off ribbing while maintaining all of its elasticity. Also known as the Long Tail Tubular Bind Off (or sometimes the Ribbed Sewn Bind Off or Sewn Tubular Bind Off), this technique creates a beautiful, elastic edge, perfect for sweaters, socks, or anywhere you need a little bit of stretch without sacrificing stability. It’s a perfect match for the Italian Cast On (aka Long Tail Tubular Cast On), and we have a tutorial for that as well.
For this method, you’ll thread the yarn tail onto a tapestry needle and pass it through the live stitches in four easy-to-remember, repeating steps—similar to Kitchener Stitch, but all on one needle. Here’s our Italian Bind Off Tutorial to show you how we do it!
Note: This tutorial works best with 1×1 ribbing, but you can also use it for 2×2 ribbing by simply rearranging your stitches into 1×1 ribbing before you start this tutorial. It will still turn out great!
Italian Bind Off: Video Tutorial
Click To See Video Transcript
Hi, this is Whitney from Purl Soho and I’m going to show you how to do an Italian Bind Off, which is also called a Long Tail Tubular Bind Off or a Ribbed Sewn Bind Off. This bind off is for one by one ribbing. You’ve probably noticed that when you bind off ribbing with a simple knit one, purl one, it can feel taut and unstretchy. But using an Italian Bind Off creates a beautiful and wonderfully stretchy edge. It continues the knits and purls of the ribbing, but with this nice rounded finish. It’s a really great technique for neck bands, cuffs, hems, and button bands. You don’t knit this bind off with knitting needles. Instead, you use your tail of yarn and a tapestry needle, kind of like sewing. There’s a nice rhythm to doing it and it looks so satisfying when you’re done. I think you’re going to love it, so let’s get started.
Knitting two set-up rows before you work the bind off adds a nice roundness and stability to the edge. If you’re working with a really thick yarn, you may want to skip these two rows because they can add too much bulk. But otherwise, whether you’re working in the round or knitting flat, your first set-up row is the same.
You work across all your stitches, knitting the knit stitches and slipping the purl stitches purlwise with the yarn in front. So you bring the yarn between your needles to the front of your work, and you slip the next stitch, as if you’re purling, from the left needle to the right needle, just like that. Then you bring your yarn to the back to knit the next stitch, and you do this across all your stitches, slipping the purls with the yarn in front, purlwise, and knitting the knits.
If you’re working flat, when you get to the end of the row, you turn your work and you work the second set-up row exactly the same, again knitting the knit stitches and slipping the purl stitches purlwise with the yarn in front. If you’re working in the round, your second set-up round is the opposite. You slip the knit stitches purlwise with the yarn in back, and you purl the purl stitches. So slip the knit stitches purlwise with the yarn and back and purl the purl stitches. And once you finish those two rows or rounds, you are ready to work your Italian bind off.
You’re going to start by cutting your yarn about four times longer than the edge you are binding off and threading it onto a tapestry needle. To get the bind off started, you need to work two set-up steps. First, insert the tapestry needle into the first stitch, which is a knit stitch, purlwise, from right to left through that front leg, draw the yarn through and leave that stitch on the needle. If your ribbing starts with a purl stitch, you should treat the first two stitches, a purl stitch and a knit stitch, as one stitch. So insert the tapestry needle purlwise into both of those first two stitches.
Next, set-up step number two. Bring the tapestry needle to the back of the work and pass it between the first and second stitches from back to front. Then insert the tapestry needle knitwise into the second stitch, which is a purl stitch. Make sure you’re going just through that one stitch, bring your needle out the back and now you can pull the yarn through, just like that. Those are your first two set-up stitches.
Now it’s time to settle into the four steps you’ll repeat. Step one is to insert the needle knitwise into the first stitch and then let that stitch fall off the needle, and you can pull your yarn through here. Step two is to insert your needle purlwise into what is now the second stitch on your knitting needle, this one. So purlwise, from right to left, and draw the yarn through. For step three, insert the needle purlwise into the first stitch like this, purlwise, and you can remove that stitch from your knitting needle. Just pull it right off and pull your yarn through. If it’s getting stuck down here, you just kind of pull it up, make it tidy just like that. And the final step, step four, is to bring the tapestry needle between the first two stitches. You’ve seen this before in your set-up stitches, from back to front, and then knitwise into that second stitch and bring the needle out the back, and again pull the yarn through.
Now we’re going to repeat those four steps again. Insert the insert the needle knitwise into the first stitch and bring that stitch off your knitting needle. That was step one. Step two, purlwise into the second stitch, just like that. Pull the yarn through. Step three, again, purlwise, now into the first stitch on your needle and allow that stitch to come off the needle. Here’s where the yarn gets stuck. And then that final step, which is bring the needle between the two stitches on your knitting needle, and then insert your tapestry needle into the second stitch knitwise, bring it out the back, and pull the yarn through.
You’ll keep repeating these four steps all the way across your work, until you have just two stitches left on the needle. As you go, you’ll find you can combine steps one and two into one motion, going knitwise into that first stitch and taking it off the needle, then purlwise into the second stitch, and now is when you can draw that yarn through. Then you can insert purlwise into that first stitch and let it off the needle, and then bring your yarn to the back, come up between those first and second stitches, and into the second stitch knitwise, and now pull your yarn through. So that makes it a little bit more efficient if you start to develop little shortcuts like that.
So as you go, be sure that the working yarn always stays under the knitting needle here, not crossing over the top, and be sure to also maintain an even tension that matches the gauge of your knitting. I’ll come back and show you what to do when you have just two stitches remaining.
Okay, so when you have worked your bind off all the way until you have just two stitches left, all you do is insert the needle knitwise into the first stitch, let it drop off the needle, and then inside insert it purlwise into the last stitch, off the needle, and pull the yarn through. And you are done.
Note that if your row or round ends with a knit stitch, what you’re going to do is repeat your four steps until you have three stitches remaining on the needle, then do steps one through three and finish by inserting the needle knitwise into the last stitch and let it drop off. If the tension on your bind off seems loose, you can go through and kind of adjust it a little bit. Snug it up if you need to, but be careful not to lose that wonderful stretch.
And that’s it. That’s how you work the Italian Bind Off, Long Tail Tubular Bind Off, Ribbed Sewn Bind Off, or whatever you want to call it. Use it on all of your neck bands, cuffs, and hems. You may never go back!
Italian Bind Off: Step-By-Step Instructions
Prefer still photos and text? Follow along here!
Set-Up Rows/Rounds
Knitting two set-up rows or rounds before you start binding off creates a true “tubular” bind off that is very rounded and also adds more stability and bounce to the edge.
NOTE: If you’re working with a very chunky or bulky yarn, you may want to skip these set-up rows/rounds to avoid too bulky an edge!
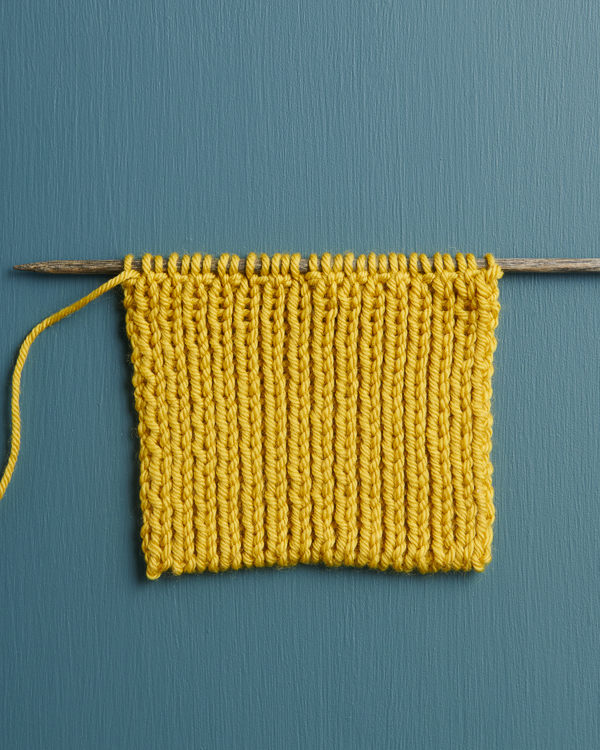
Set-Up Row/Round 1: Work across the row/round, knitting the knit stitches and slipping the purled stitches purlwise with the yarn in front.
IF YOU’RE WORKING FLAT…
Set-Up Row 2: Repeat Set-Up Row 1.
IF YOU’RE WORKING IN THE ROUND…
Set-Up Round 2: Work across the round, purling the purl stitches and slipping the knit stitches purlwise with yarn in back.
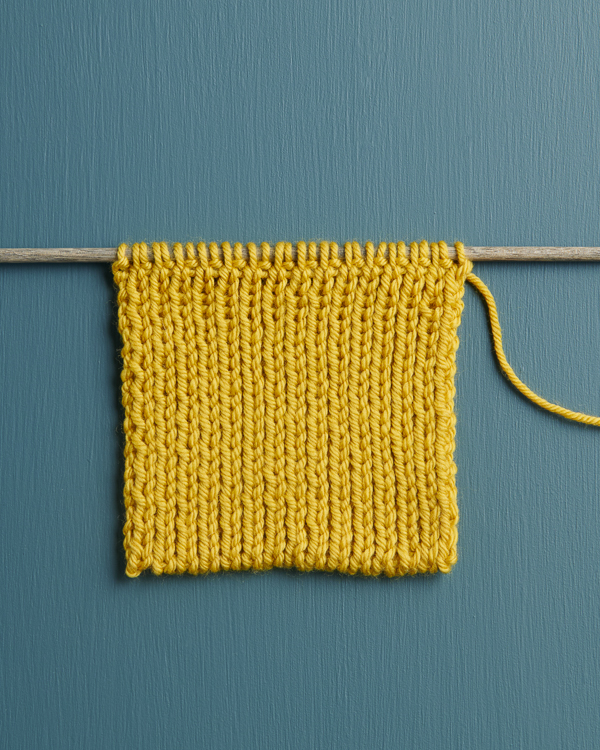
Now you’re ready to start your bind off!
Bind Off
Cut the working yarn 4 times longer than the edge you are binding off. Thread tail onto a tapestry needle.
NOTE: As you bind off, try to maintain an even tension, not too loose and not too tight, similar to the tension of your knitting.
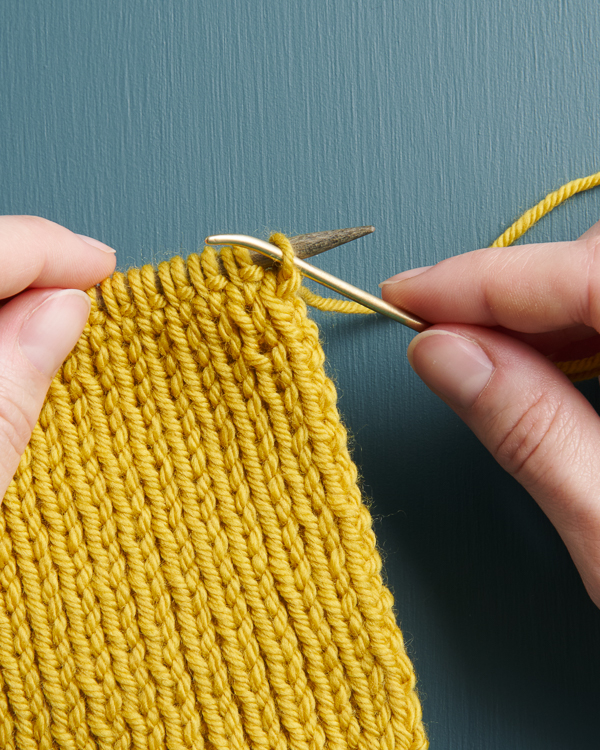
Set-Up Step 1: Insert your tapestry needle into the first stitch as if to PURL and leave the stitch on the needle. Pull the yarn through.
NOTE: If your ribbing starts with a purl stitch, insert the tapestry needle purlwise into the first two stitches and treat them as one stitch for the following two steps.
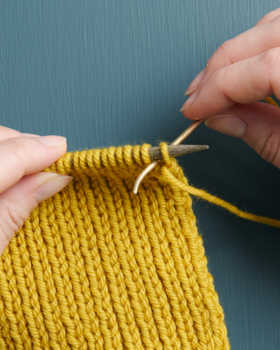
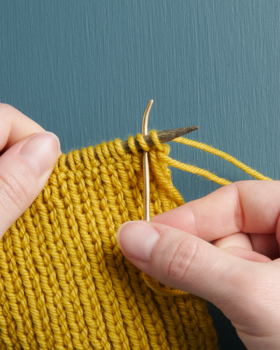
Set-Up Step 2: Bring the tapestry needle between the first and second stitches from back to front, then insert the tapestry needle as if to KNIT into the second stitch and pull the yarn through to the back.
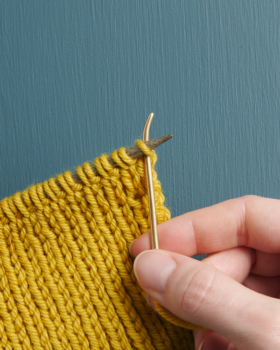
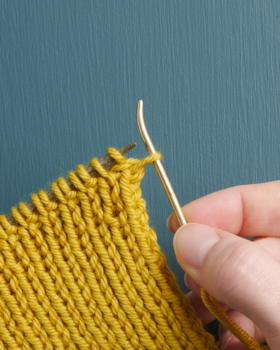
Now you start the four steps you will repeat across the rest of your stitches…
Step 1: Insert the tapestry needle into the first stitch as if to KNIT and remove the stitch from the knitting needle. Pull the yarn through.
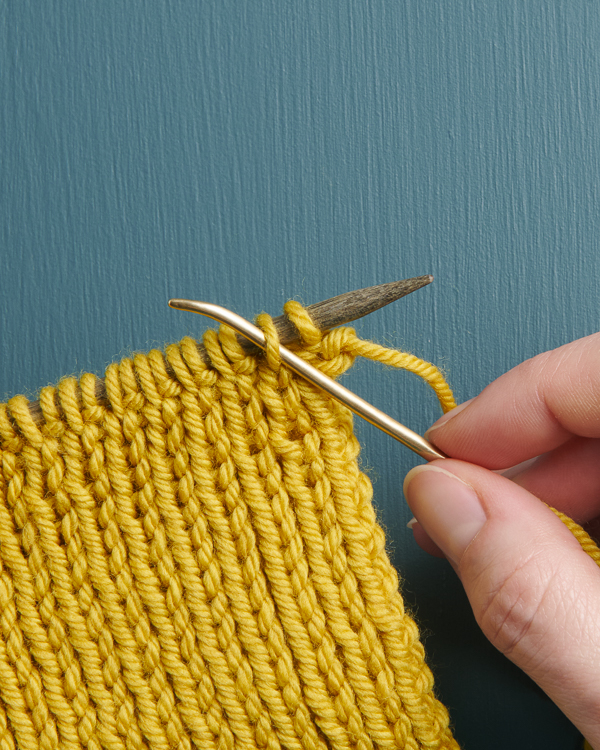
Step 2: Insert the tapestry needle as if to PURL into the second stitch. Pull the yarn through.
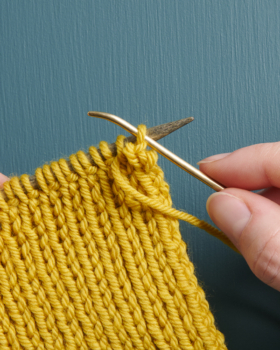
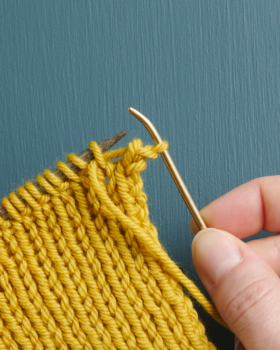
Step 3: Insert the tapestry needle into the first stitch as if to PURL and remove the stitch from the knitting needle. Pull the yarn through.
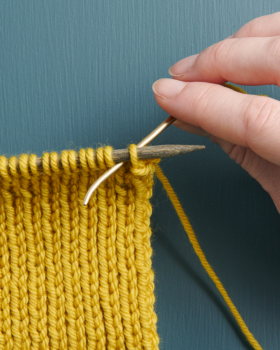
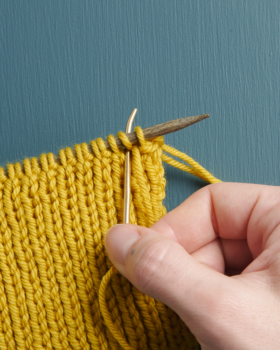
Step 4: Bring the tapestry needle between the first and second stitches from back to front, then insert the tapestry needle into the second stitch as if to KNIT and pull the yarn through to the back.
Repeat Steps 1-4 until 2 stitches remain. As you go, you’ll get into a rhythm and you may find that you can combine the first two steps into one movement, as well as the third and fourth steps, allowing you to pull the yarn through less often. You can also repeat “knit off, purl on, purl off, knit on” to yourself as you go to help you remember the steps!
When you’re down to just two stitches remaining, work Step 1 one more time and then go straight to Step 3 to finish. If your row or round ends with a knit stitch instead of a purl, repeat your four steps until you have three stitches remaining on the needle instead of two. Then do Steps 1 through 3 and finish by inserting the needle knitwise into the last stitch and letting it drop off.
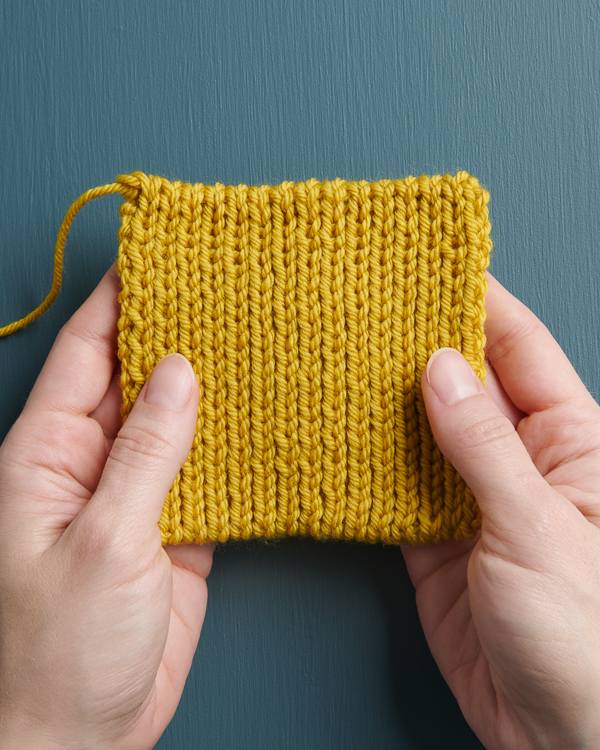
You’re all done! Simply weave in your yarn tail (if you’re working in the round, be sure to use the yarn tail to join the start and finish of the bind off!) and enjoy your beautiful and stretchy bound-off edge.
Another Option: Kitchener Method
If you’re struggling with this bind off but you are comfortable with Kitchener Stitch, there’s another way to work this bind off with two knitting needles. This technique works both for knitting in the round or knitting flat.
You will need a spare circular needle or a set of spare double pointed needles, of equal or smaller size than your working needles and long enough to accommodate half your stitches.
Set-Up Rows/Rounds
Work your set-up rows/rounds as above, then arrange your stitches onto two needles as follows: Slip each stitch purlwise, slipping the knit stitches onto the working needles and the purl stitches onto the spare needles. At this point you will have half of the stitches (or approximately half, if you are working over an odd number) on each of two parallel needles.
Bind Off
Cut the working yarn 4 times longer than the edge you are binding off and thread the tail onto a tapestry needle. Hold the needles with the live stitches parallel in your left hand.
Now you’re going to use Kitchener Stitch to graft together the two sets of stitches. The basic steps are below, but see our Kitchener Stitch Tutorial for a video, step-by-step photos, and tips.
Set-Up Step 1: Insert the tapestry needle through the first stitch on the front needle as if to PURL. Pull the yarn through, leaving a tail that you will weave in later. Leave the stitch on the front needle.
Set-Up Step 2: Insert the tapestry needle through the first stitch on the back needle as if to KNIT and pull the yarn through, leaving the stitch on the back needle.
Step 1: Insert the tapestry needle through the first stitch on the front needle as if to KNIT and pull the yarn through, removing the stitch from the front needle.
Step 2: Insert the tapestry needle through the first stitch on the front needle as if to PURL and pull the yarn through, leaving the stitch on the front needle.
Step 3: Insert the tapestry needle through the first stitch on the back needle as if to PURL and pull the yarn through, removing the stitch on the back needle.
Step 4: Insert the tapestry needle through the first stitch on the back needle as if to KNIT and pull the yarn through, leaving the stitch on the back needle.
Repeat Steps 1-4 until there is just one stitch left on each needle, and then work Step 1 and Step 3 again.
This will get you the exact same result as the Italian Bind Off method we used in the video and step-by-step instructions above: stretchy, beautiful, and stable!
Tutorial written by Andrea Lotz + Whitney Van Nes for Purl Soho.
Looking for more inspiration? Explore all of our knitting patterns (including tons of free knitting patterns) and knitting tutorials, buy one of our many knitting kits and yarn bundles, and shop for beautiful yarn. We have over 55 gorgeous natural fiber yarns in 1,000s of magnificent colors, designed to bring integrity, beauty, and joy to your next knitting project and only available at Purl Soho!



Thankyou so much for these easy to follow instructions and tutorial for Italian bind off. I have been trying to do this for years and have never found instructions easy enough to follow
Hi Robyn,
We’re so glad to read how helpful this was for you! Please feel free to reach back out anytime.
Happy knitting,
Hills
Great tutorial. I will definitely try this technique for a polished look!
Hi Barbara,
Thank you so much for reaching out with your kind feedback! We’re really glad you found this helpful and can’t wait to see what you make next.
Happy knitting,
Hills
When doing the bind off for the full base of a jacket that requires a very long tail which makes things tricky
Hi Carole,
Thanks so much for writing in! While working the Italian Bind Off over a large number of stitches does mean working with an extra long tail, we always find the results of our patience to be worthwhile. Hope you give it a go!
All the best,
Mia
Love the video’s as well as the written instructions.
Seeing it in writing and working each step slowly while reading it was great for my learning process. Thank you so much.
Marcia
Hi Marcia,
We’re really glad this was helpful for you! Please feel free to reach out anytime.
Happy knitting!
Hills