Weaving In Your Ends
I have some good news. And, I have some bad news. Good news first: there is no one right way to weave in your ends. So, chances are, you haven’t been doing it wrong! Now, the bad news: there are so many different ways to weave in your ends, you might not be doing it the best way either.
Having options, it’s a blessing and a curse. While options allow us a certain freedom, they also give us cause for doubt and uncertainty! Sure, as knitters we do live by a few hard and fast rules (such as: no knots!), but for the most part, there is always another way to do it, no matter what it happens to be. This truth became abundantly clear during my days working at the Purl Soho shop.
Some of our most seasoned customers would come in to find a knitting newbie at the communal table, finishing up a project in some newfangled kind of way. The old pro would sheepishly ask about it in an apologetic tone, pre-emptively saying “I know, I know I should know this.” It turns out the most basic questions are the most common. And, so as simple as this tutorial may sound, it’s not just for beginners! It’s for everyone who has a creeping feeling of doubt whenever she or he tucks away those last stray tails, “Is this really how you do it?”.
The perhaps unsettling truth is that there is probably another way to do whatever it is you are doing. It might not be a better way, just different. We all have our favorites. To help you pick yours, I’ve gathered together some of my favorite techniques for hiding ends. Some I picked up from the humbling-ly talented Joelle Hoverson, some from the witty Whitney of Whit’s Knits, a lot from customers and of course a few from dear Mom. The techniques below are by no means a conclusive list. We’d all love to hear if you have another favorite method!
Stockinette
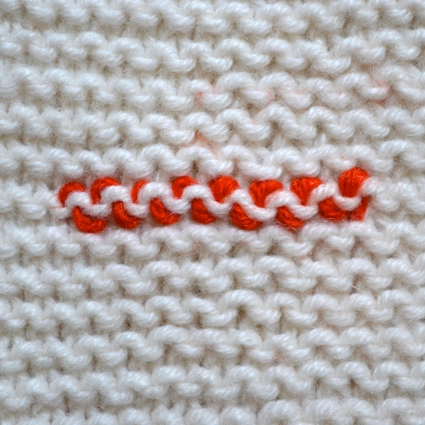
Weaving in Ends with Duplicate Stitch (on the ‘Right Side’)
Weaving your ends using the duplicate stitch method means you will sew along your fabric, following the path of the stitched yarn.
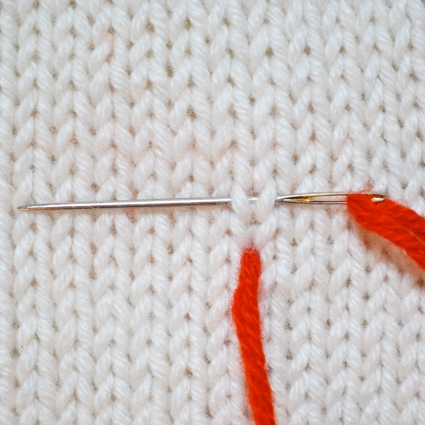
With your tapestry needle threaded, bring your needle from the back or ‘wrong side’ of the fabric to the front or ‘right side’ of your fabric at the base of the nearest ‘V’ created by the knit stitches. Orienting the needle parallel to your rows of knitting, bring your needle behind the ‘V’ of the row above.
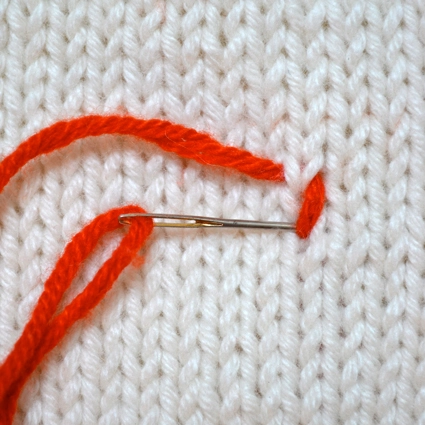
Next, insert the needle back into the bottom of the ‘V’, the same place where you began. You have now duplicated one stitch.

To make your next stitch, bring your needle to the front again, at the base of the adjacent ‘V’. Run your needle behind the ‘V’ of the row above. Pull your end though. Then bring the needle back through the hole at the base of the ‘V’ below, where you began your second duplicate stitch.

Continue in this fashion for a few more stitches or until your feel your end is secure.
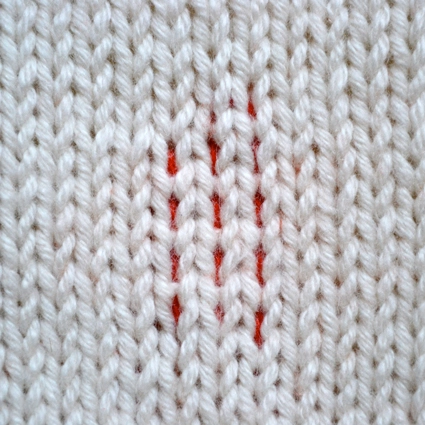
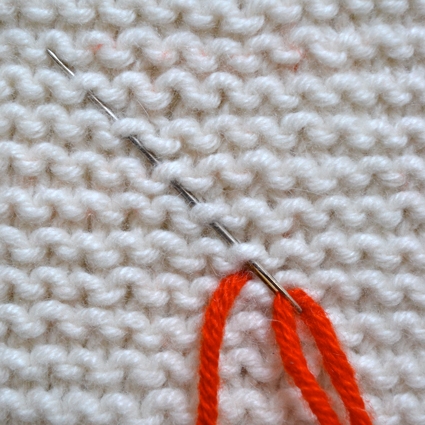
Weaving in Ends on the Vertical
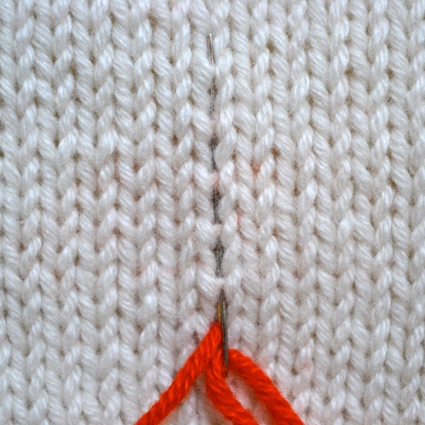
Hold your fabric with the ‘right side’ facing you. Bring your threaded needle from the ‘wrong side’ to the ‘right side’. Point the needle vertically away from you. Weave the needle under every other horizontal strand that stretches between the ‘V’s created by the knit stitches. To see these horizontal strands more clearly, hold your fabric on the right and left sides and gently tug, stretching the fabric slightly.
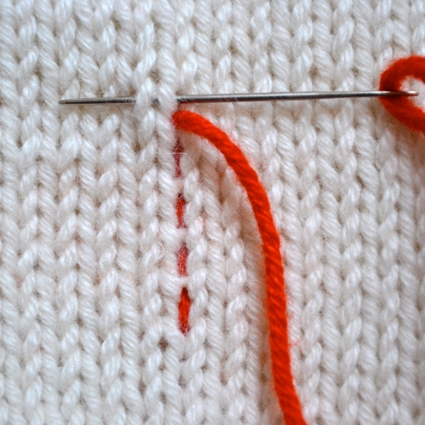
Hold the needle perpendicular to the stitches you just made. Run your needle under the adjacent ‘V’.
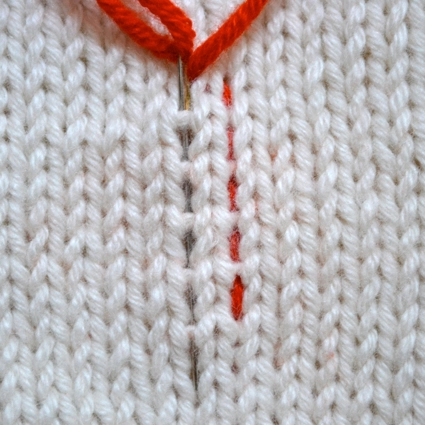
Point the needle vertically toward you. Run it under every other horizontal strand found between the ‘V’s made by the knit stiches.
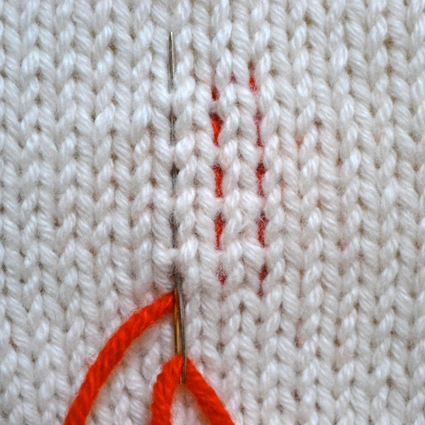
Weaving your end into the fabric in two directions should secure your tail. If you want to be extra sure your end is tucked, rotate your needle and weave it vertically away from you once more.
Weaving in Ends with Duplicate Stitch (on the ‘Wrong Side’)

Orient your fabric with the ‘wrong side’ facing you. With your needle threaded, bring it from the ‘right side’ to the ‘wrong side’ of your work, the side you are looking at. Point the needle away from you. Go up through the nearest purl bump.
Closely following the path of the yarn in the stitched fabric, rotate your needle and bring it towards you. First go under the purl bump adjacent to the original purl you went under. Then take your needle under the purl bump in the row below, slightly to the right.

Once again, rotate your needle. Point it away from you, and slightly to the left. Draw the needle under the purl bump adjacent to the one you recently went under, and then under the purl bump from the row above that you previously came down through.
Continue in this fashion, following the path of the knit yarn, for a few more stitches or until your feel your end is secure.
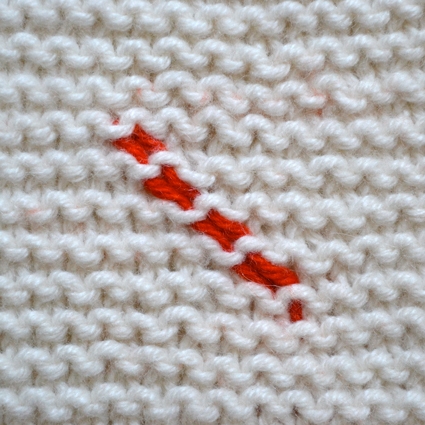
Weaving in Ends on the Diagonal
Hold your fabric with the ‘wrong side’ facing you. With your needle threaded, bring it from the ‘right side’ of the fabric through to the ‘wrong side’, the side you are looking at. Point your needle at roughly a 45 degree angle. Weave it at a diagonal, under the purl bumps of each of the above rows.
After taking 4 to 6 stitches, rotate your needle 180 degrees. Take another 4 to 6 stitches, parallel to your original stitches. For extra security, you can rotate your needle once again and take a few more stitches.

Garter
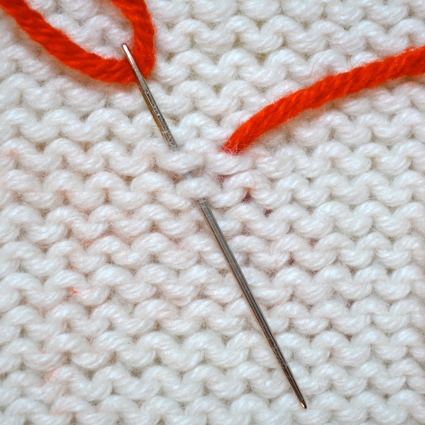
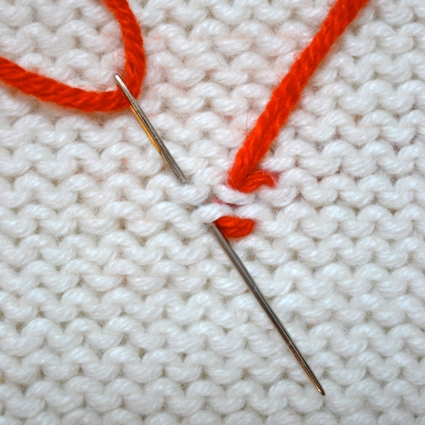
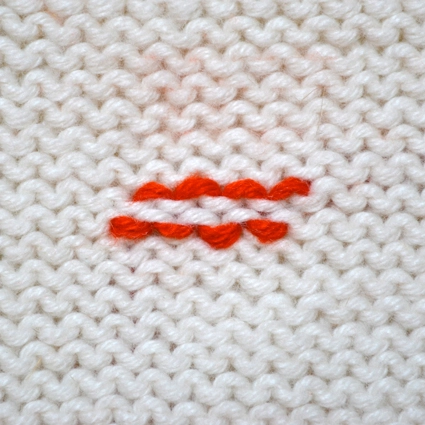
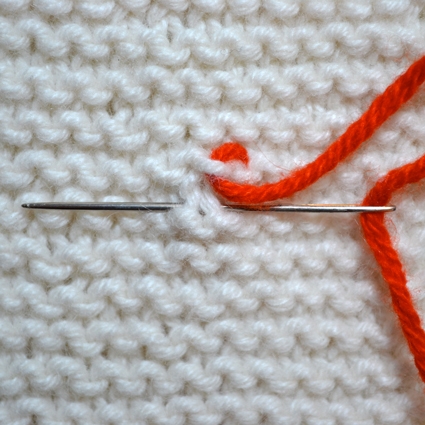
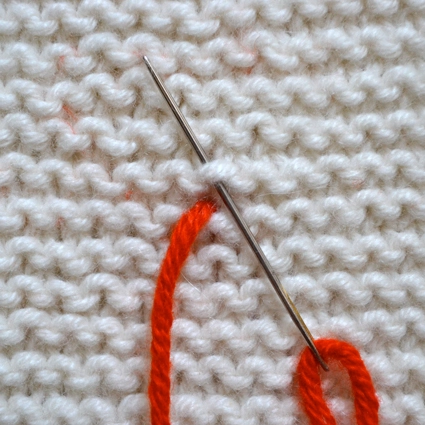
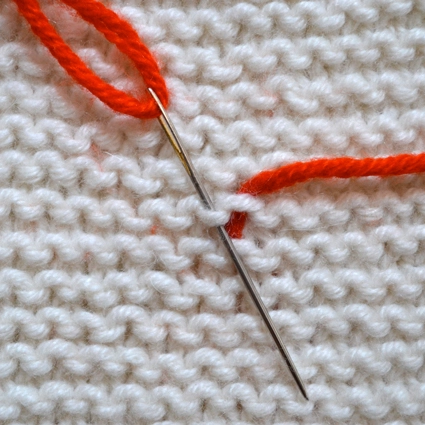
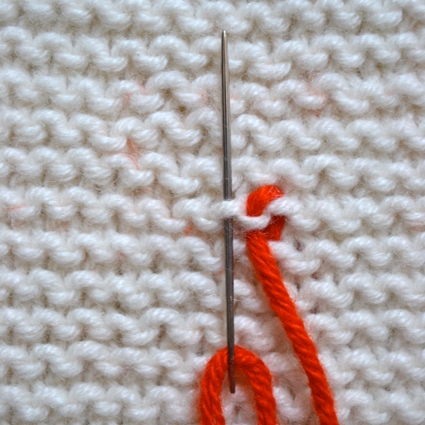
Weaving in Ends with Duplicate Stitch
Duplicate stitch for garter is a combination of duplicate stitch for stockinette and reverse stockinette. By that I mean, you will follow the path of the knit yarn, grabbing a purl stitch at the top of the row and then a ‘V’ of the row below.

With your needle threaded, point the needle away from you. Run the needle under the closest purl bump.
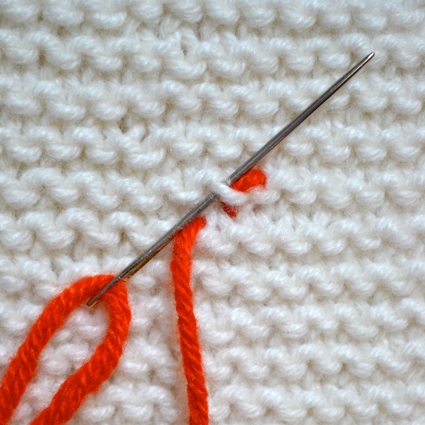
Rotate the needle. Pointing the needle towards you, pull your loose end under the adjacent purl bump. Next, orient your needle parallel to the rows of ridges created by the garter stitch. Slide the needle under the base of the ‘V’ in the row below.
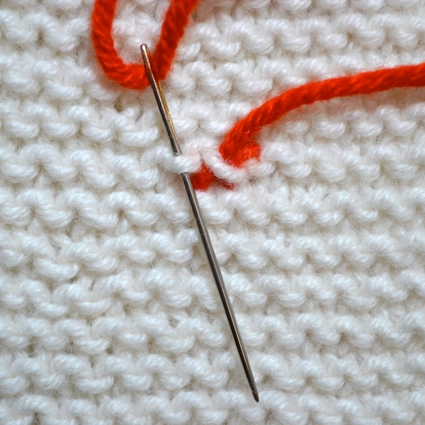
Following the path of the knit yarn, point the needle away from you. Run the needle under the purl bump you last came through.
Once again, point your needle towards you and bring it under the adjacent purl bump.
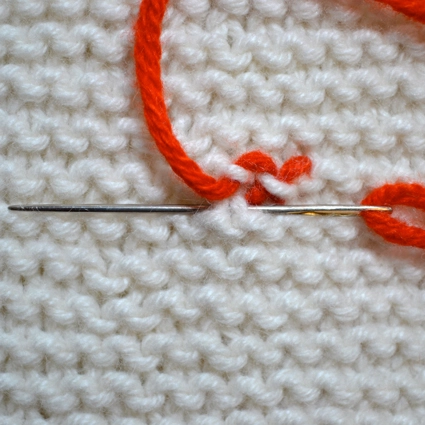
Continue in the fashion until you have duplicated 4 to 6 stitches total.
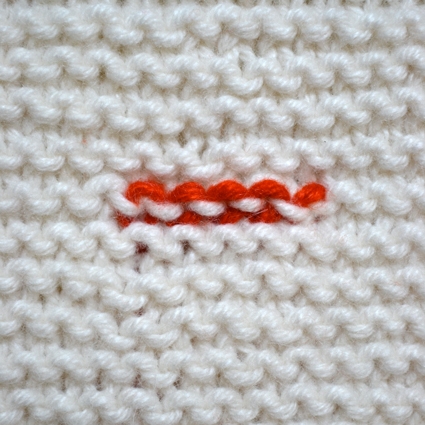
Garter can be tricky for weaving in ends, but I find this method nearly invisible and quite secure.
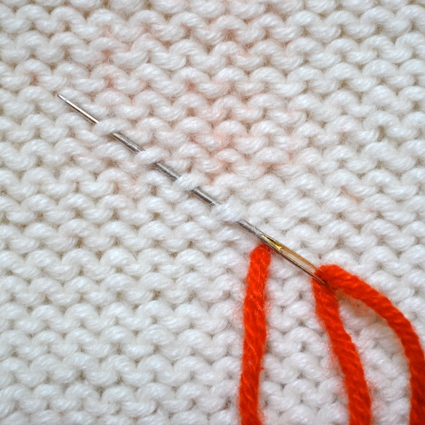
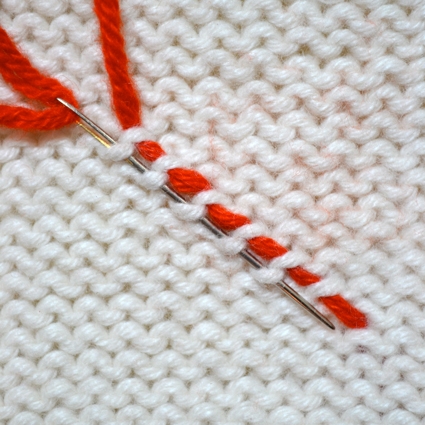
Weaving in Ends on the Horizontal
With your needle threaded and your loose end brought through the fabric to the side you are looking at. Garter stitch creates ridges of purl bumps. The ridges are created by pairs of slightly staggered purl bumps, one slightly above the other, one making a smiley face, one making a frowney face.
While pointing the needle away from you, run the needle under the nearest higher, frowney face purl bump.
Rotate your needle. Run the needle under the adjacent purl bump, it is slightly lower and making more of a smiley face.
Once again, rotate the needle. Run it under the adjacent purl bump. Continue in this fashion for several more stitches.
With this method, you are only weaving your tail in one general direction. Because of this, I tend to take a few extra stitches to make sure the end is secure.
Weaving in Ends on the Diagonal
This method is very similar to weaving in ends on the diagonal on a stockinette stitch fabric.
With your needle threaded, point your needle at roughly a 45 degree angle. Weave it at a diagonal, under the purl bumps of each of the above rows.

After taking 4 to 6 stitches, rotate your needle 180 degrees. Take another 4 to 6 stitches, parallel to your original stitches. For extra security, you can rotate your needle once again and take a few more stitches.
Rib
Weaving in Your Ends on the Vertical
Whitney tipped me off to this method and its usefulness especially with ribbed knits.

This method is similar to that of weaving in ends vertically on a stockinette stitch fabric.
Point the needle vertically away from you. Weave the needle under every other horizontal strand that stretches between the ‘V’s created by the knit stiches. To see these horizontal strands more clearly, hold your fabric on the right and left sides and gently tug, stretching the fabric slightly.

After taking 4 to 6 stitches, run the needle horizontally on the ‘wrong side’ of the fabric over to the adjacent rib column. Next, point the needle towards you. Take another 4 to 6 stitches, parallel to your original stitches.

For extra security, you can stitch away from you once more.
Materials Used
To demonstrate I used Jade Sapphire’s 8-ply Cousin Coral to contrast with the Ivory swatches. To weave in the ends I used a Clover darning needle from this chibi set. Although, sometimes I prefer to use a tapestry needle for weaving in my ends; the bent tip helps grab the stitches easily.
What is your Favorite Technique?
As I said before, this is by no means a conclusive list of all the methods for weaving in ends. These are simply some of our favorites. What are yours?
–Laura
PS: the pictures at the top of the post are from the following stories: Winter Hats for Everybody, Baby Girl Fair Isle Cardigan, Big Herringbone Cowl and Perfect Fit Socks.


Thank you, thank you, thank you for this!
Perfect Timing!!! I was just finishing up a pair of socks and tonight am sewing the tails in. You are right…. I did think I was doing it wrong, but I see the diagonal method I usually use is one of your choices. I think I might try something new this time. Thanks a bunch for the new options.
😀
This is more than 1000 times helpful. I never even dreamed that there were so many options for weaving in ends and I always wondered if I had it right — Thank you so much for this simple and most important tool!
This is one of those cases where a picture is worth a thousand words, and these pictures are so nice and clear. Thanks a million!
Thanks for sharing these. I have a favorite way to weave in my “beginnings.” When I'm done with a long tail cast-on, I simply carry what is left of the tail along with my working yarn. After 4 or 5 stitches, I let it go and keep knitting. When I'm done, I simply snip any remaining tail and the weaving is already done. Of course the pesky ends are still there, but this helps with half of the usual after-work anyhow.
I use a combo platter. I duplicate stitch in pattern for a few stitches, then vertical or diagonally weave a few rows or down, flip the piece toe to tail then duplicate stitch in pattern going the other way. May be over kill… I think I just like duplicate stitching a lot. 🙂
Thanks for showing me a couple of techniques I haven't seen before!
My favourite tip for weaving in ends – or, rather, avvoid weaving them in at all – is to simply knit with the last few inches of the old yarn and the first few inches of the new yarn together for a few stitches. It's only really usable when switching skeins, but saves me from weaving in two ends, which is great. 🙂 It has the same effect as weaving in by doing duplicate stitches as explained in the article, in any stitch pattern.
I am thrilled to see the tutorial. I have knitted FOREVER and have not see most of these. I love the duplicate stitches. It looks like they would really hold their position and make the tail the most secure. Thanks so much for sharing.
Hi
This is a great tutorial. What about covering the same content for crochet? I am making a ripple blanket with 6 colours and half-way through have only just started weaving in the tails when changing colours. I have to go back and do the remainder at the end. I'm still not sure if I'm weaving in correctly.
thanks
Thanks for doing this post. I always wonder how to weave in the ends as no one ever taught me and I have never found it in any books. (I never even thought of looking on the internet). I usually do some version of one of these, but I think these are a bit more in depth than I do. I
I'd love to see this for crochet, too. I'm always trying to decide the best way to weave in the ends, and you've done such a beautiful job!
I LOVE this tutorial. The best and most clear one i have seen by far. I'm bookmarking for the future.
xxx
This is so helpful! Your photographs are great, very easy to follow. Thank you!
In stockinette and garter stitch, I'll almost always weave in ends on the diagonal because I've never been great at duplicate stitch. My biggest challenge when it comes to weaving in ends is with lace knitting. My solution? One-skein lace projects! (I know, not the best solution. Sigh.)
I make a lot of inatarsia hats, so for me it's often a combination of all of these (some I worked out on my own, but good to see they are “real” methods) depending on what the pattern and colours are doing. This is really useful. Any chance we could have one for crocheting ….I weave in my ends I go. Easy when you start a row/round, but I'm not quite sure I have the best method at the end….
Grest suggestions. But my problems seem to be with “slippery” yarn or with large needles and lacy patterns. How does one finish ends there? Thank you.
Whew! Thank you. When I am weaving in ends, I question myself.. hoping that if it doesn't show, it's smooth and holds, then it must be right?.. and I use several of your examples! A confidence builder! Thanks.
Oh my goodness, thank you. I have not been leaving my ends long enough! I will be referring to this post for years to come.
I second Georgia's question. My problem is more with lacy or stretchy pieces, when the weaved in pieces seem to come out over time. Any suggestions for those?
This is great!! Thanks for showing this, I've been knitting for 1.5 yrs and any help is appreciated.
Great post! For slippery yarns I like to leave a really long tail, split the yarn into 2 strands, and then weave them in opposite directions to improve the odds of anchoring it in.
Splitting the yarn into thinner strands also reduces bulk.
Thank you so much for posting these different techniques in one tutorial! It gets a bit confusing trying to remember where all the different ways of finishing are posted/listed. Super helpful!
I prefer to use the needle to **pierce through the strands of yarn** and weave in any pattern desired. I think piercing through the strands of yarn provides more “grip” than going through the holes in the knitting. Hope this helps!!!
Oh wow, what a helpful post. I've used most of these in my knitting depending on how energetic I feel, though I've never seen or used the diagonal weaving-in!
If I'm changing colors in the middle of my knitting, I'll frequently weave in my ends as I go, weaving the end in and out of the new active color in the same way I'd use for long floats in Fair Isle knitting. (Did that make sense?)
I'll be referring to this post frequently! Thanks!
I usually just use the diagonal method on the wrong side but it's nice to be reminded about more “finicky” options, like the duplicate stitch, for yarns where the faster way will show. My indispensable tool for weaving in ends is actually a sewing notion – a loop turner. It makes finishing so much easier – no yarn threading and I can leave shorter tails too.
I would definitely be interested in a tutorial for weaving in ends for crochet. I try to follow the stitch but some patterns have large spaces between stitches making it hard to hide the ends.
If my yarn is wool I will meticulously felt the end with a needle (on wrong side) with the yarn near on horizontal row. or, I will use GS hypo fabric cement, it has a needle like applicator and it dries clear and its washable.
Oh man! THANK YOU for this! Contrast yarn and closeups – I totally get it now!
oh my gawd thank you so much for this tutorial!! i have been knitting/crocheting for years and have never, ever felt like i had fully understood the best ways to weave in ends. i've never seen any publication that clearly explained it either. thank you thank you!!!
I weave in my ends as I go with both knit and crochet so that when my project is done, it is done.
peggy
Here I sit with a hat of many color stripes with ends ready to be woven in. How timely that I should see this tutorial! It was GREAT and I plan on sharing it with my knitter friends. All level knitters would benefit from this….I was intrigued about GS hypo fabric cement…I think I would like to try that. Not only was the tutorial helpful but the comments from other readers were interesting as well.
Hi Georgia and Ashley-
Very thing and very thick yarn make weaving in ends a bit harder. With lacy pieces, I tend to do somewhat of a duplicate stitch to weave in my ends. I take the end and follow a strand on the knitted yarn through the piece, changing directions occasionally. I weave it in much more than I would a worsted weight yarn, to ensure its stability. With bulky pieces, it totally depends on the stitch pattern, but I tend to weave in on the diagonal. It seems to be a bit less noticeable than having a handful vertical or horizontal stitches in a row that are extra thick looking.
Thanks for your question!
Hi bjb-
Slippery yarn is tricky. Wonderful to knit with, but a bit more difficult to finish. I tend to weave these types of ends in, following more stitches and using a longer tail, than a medium weight yarn. I use somewhat of a duplicate stitch technique. I take the end and follow a strand on the knitted yarn through the piece, changing directions occasionally, usually more than twice. I weave it in much more than I would a worsted weight yarn, to ensure its stability.
Thanks for your question!
Thanks so much for posting this!
I've been knitting for a while, but never knew all the possibilities of finishing a piece by weaving in the ends. I always feel like my ends look like a mess (but I'm a huge perfectionist about my work), & so I tried to take my sweet time on the projects to prolong the inevitable of weaving in those ends.
This will definitely help with my Christmas knitting this year!
Whenever I knit with wool or wool blends, I like to felt my ends together so that I don't have to weave anything in at all. It's a little gross, but well worth it. I take each end of yarn and suck on them a bit to get them wet. I lay them together as if to make one long strand, and roll them in my palms vigorously so that they felt together. The join is barely noticeable, and even less noticeable if each end is torn instead of cut. The less abrupt start and end of the yarn makes for a smoother join. I hope this helps!
Thanks also for the tutorial! It is so helpful to have such clear photos. Thank you!
I'm a pretty new knitter. I was wondering if someone could give me any tips on weaving in your ends on a lacy pattern where you have done a lot of yarn overs to make holes… Here's the stitch I was doing. I had a little trouble hiding my ends though.
PATTERN STITCH
Eyelet Pattern (multiple of 4 + 3 sts)
Row 1 (RS): Knit.
Row 2 and all WS Rows: Knit.
Row 3: K2, *k2tog, yo, k2; rep from * across to last st, k1.
Row 5: K4, *k2tog, yo, k2; rep from * to last 3 sts, k3.
Row 7: Rep Row 3.
Row 8: Knit.
Rep Rows 1-8 for Eyelet Pattern.
this came from Lion website free pattern:
http://www.lionbrand.com/patterns/90731AD.html?noImages=&utm_source=20100611_June11&utm_medium=Emails&utm_campaign=Weeklynewsletter&utm_content=Babies-SummerStripesBabyAfghan
so helpful, thank you!
I'm wondering if weaving in ends should always be done before blocking or washing the work? That's what I've done in the past but I'm just finishing a project using Rowan Denim cotton yarn, which I know is supposed to be “blocked” by machine washing and will shrink somewhat. Should I wait until after I've washed it to weave in the ends?
I started knitting this week, and made the mistake of just tying a double knot. I hope my scarf holds out, and I'll totes try these methods for my next projects.
Hi.
I am knitting with a very slippery linen and am making a lace project. How shall I weave in the ends here??
Hi Heather-
Please see the response to bjb (7 comments above this one) on the subject of slippery yarn. Thanks for your question!
On ribbing, I like to weave my ends in up and down the ribs on the wrong side, by sort of doing overhand stitches that follow the “direction” of the stitch curl on the ribbing. I'll frequently duplicate-stitch along to about a rib or two away, then just go up and down the lines of ribs until I run out of tail (I'm paranoid about loose ends: I weave in six to eight inches of tail, every time!)
Something about duplicate stitch you didn't mention: you can use it to “close the gap” on stripes knitted in the round, by doing the duplicate stitch as if you were following the round, one row down, and pulling a little. If you do this both directions (one row down and one row up) you end up with nice even stripes where you can barely see the join.
What a useful post! I'm a longtime knitter and I've used almost all of these in one form or another. But I still sometimes have the clipped end pop out on the right side of the work, like a little flag.
So the question I have is this: Once you have used one of these techniques, what do you do with the end of the yarn? How closely do you clip it to the fabric? How do you ensure it doesn't pop out?
Thanks much!
Hi dclulu,
Unfortunately, the occasional end will always present itself. It is simply part of hand knitting. When cutting the yarn after weaving it in, I usually pull the tail gently which causes the knit fabric to bunch some. I cut the tail then smooth out the bunched fabric. The tail should retreat nicely into your knit piece. But as I said before, especially with wash and wear, tails will pop out now and then.
Thanks for your question!
Great! Thank you for share!
OMG best tutorial ever. Thank you!!!!
Hello!
I am very new to crocheting and mistakenly l cut me ends very short! Like only left 1inch short! Is this something I can still do? Is there any tips any one has for very short ends?
Thanks in advance
Jai
How helpful this is! The comments are helpful, too; never thought of splitting a slippery yarn and weaving in in two directions.
This is the most complete tutorial on weaving in the ends ever! I knew a few of these things but there was much that was new to me! Thank you, thank you.
Thanks for this post! I also like to use the duplicate stitch to weave in the ends. I like it because it works for pretty much any stitch pattern. Here's a video on the Knit Darling YouTube channel that shows some similar techniques in action: http://www.youtube.com/watch?v=djXIzuUbZGo&feature=share&list=PL_nNRQO-AA5-wajf3Aer-HSQ3gi5SgVD1
wonderful information. I still am wary of the cut end creeping to the front of the item.