All About Gauge
If you’ve ever knit a sweater with sleeves that nearly hit the floor or a hat that flies off your head whenever a strong wind blows, chances are you’ve had gauge problems! “Gauge” has a technical meaning that we’ll get into, but essentially, it’s all about choosing the right needles and yarn for your pattern and your way of knitting… a real balancing act. And since issues with your gauge are very often to blame for why your project doesn’t look, feel, or fit the way you expected, it’s worth your time to learn some basics. We promise to make it as painless as possible!
What Is Gauge?
“Gauge” (or “tension”) simply means the number of stitches you knit over either an inch or 4 inches (or 10 centimeters). Patterns always give you a gauge to follow, for example 16 stitches = 4 inches, and you may think that if you use the pattern’s yarn and needle recommendation, you’ll be all set, but that thinking goes out the window when you realize that everyone knits on a spectrum between very loose and very tight, including the person who wrote the pattern! This means you need to find the right needle size and yarn for you and your project, and the way to do this is to knit a fair-sized piece of test fabric, i.e. the dreaded gauge swatch.

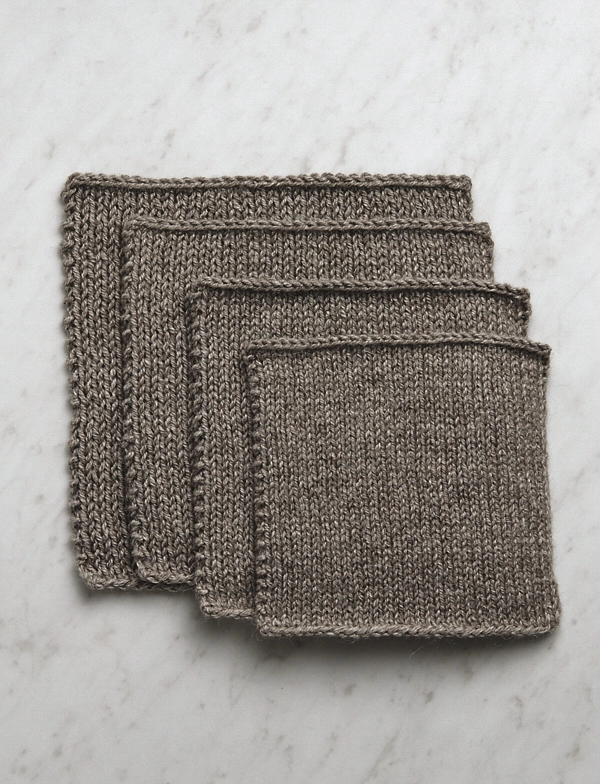
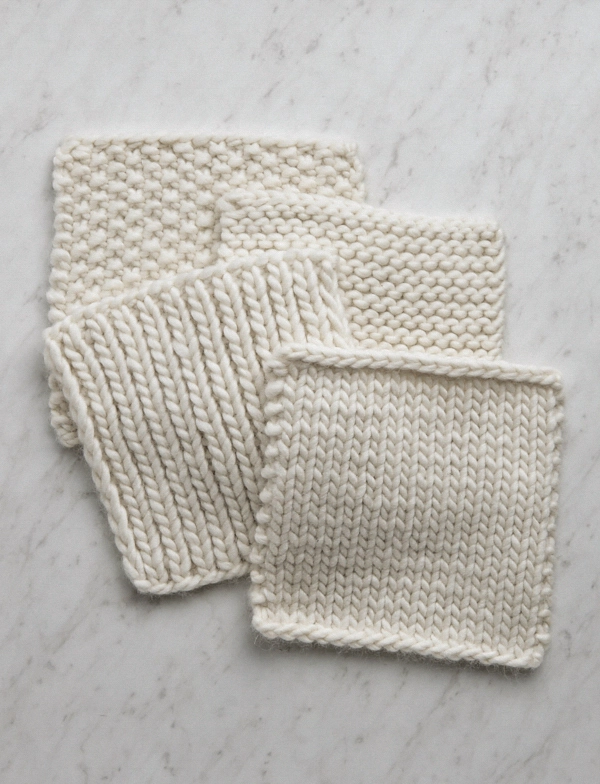
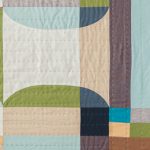
Same yarn, same cast on number, different needle sizes!
Why so dreaded? Because knitting a gauge swatch prolongs the moment when you get to cast on for the project you’re so excited about. But once you realize that knitting a gauge swatch is just doing more of the thing you love (knitting!), you may actually start to enjoy this step!
How To Make A Gauge Swatch
There are more intense ways to knit a gauge swatch than the way we describe here, but our belief is that a good swatch is better than a perfect one, if it means you’ll actually doing it.
- A good goal is to knit a 4 x 4-inch gauge swatch. It needs to be big enough to get a feel of your fabric and also to have different places in your knitting to measure. Many patterns give their gauge over four inches, so you can just cast on that number (if the gauge is 20 stitches = 4 inches, then cast on 20 stitches). If the gauge is given per inch, then multiply the gauge by 4 and cast on that number (so if the gauge is 5 stitches = 1 inch, multiply 5 stitches x 4 inches and cast on 20 stitches). If you have a stitch pattern that repeats, make sure you cast on enough stitches to work at least one full repeat.
- Work the stitch pattern specified in the gauge section of the pattern (for example, 32 stitches = 4 inches in stockinette stitch) for 4 inches, then bind off. If you have a stitch pattern that repeats vertically, finish at least one full repeat before binding off.
- Generally, patterns give the gauge of your knitting after it’s been blocked. This is an extra step, but critical, because your gauge can change dramatically after you block it. So, unless you plan to never wash your knitting, take the time to give your swatch a little soak in a bowl of room temperature water with a dash of gentle soap, then rinse and squeeze it, and lay it flat to dry.
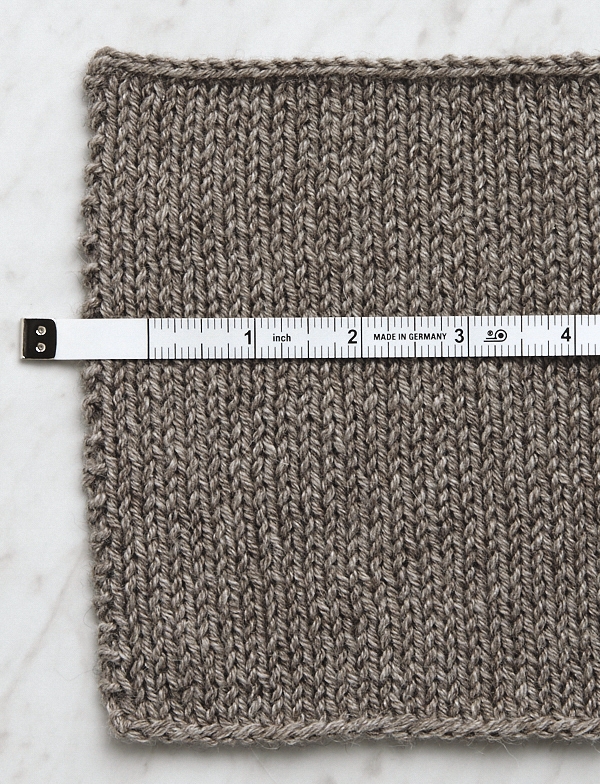
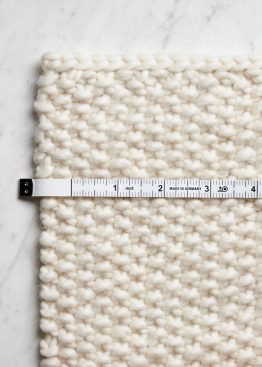
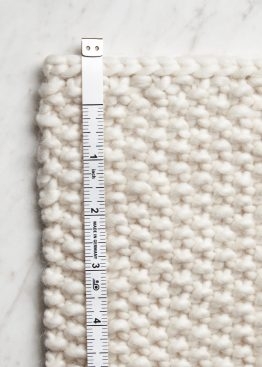
- Once your swatch is dry, lay it on a flat surface and count your stitches! Just lay a ruler or measuring tape along a row of stitches and count how many “Vs” there are in 4 inches. Measure in a few different places and take the average if the numbers vary. Counting with the tip of a knitting will help you keep track, and be sure to count a quarter, half, or three-quarter stitch if the four-inch mark doesn’t fall at the exact end of a stitch. For examples, the stitch gauge in the example below is 18.75 stitches over four inches.
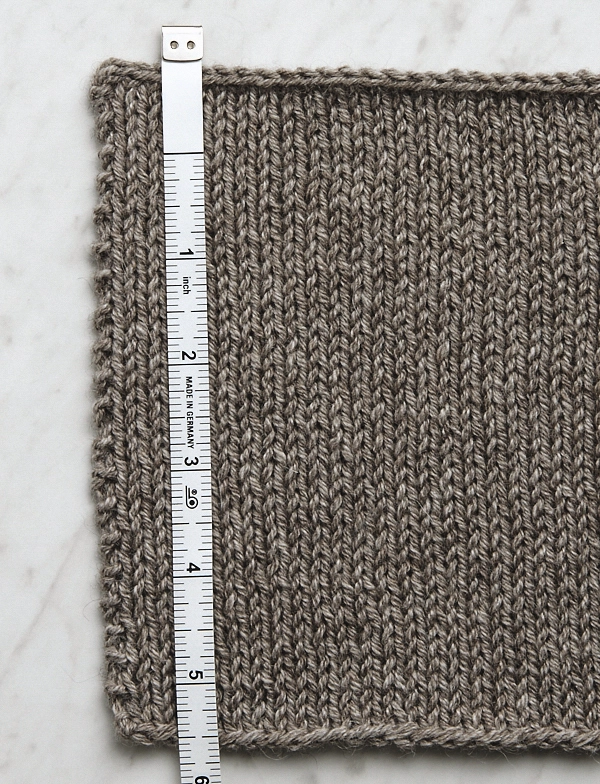
- If row gauge is important for your pattern, align your ruler along a column of stitches and count rows the same way you counted stitches. For example, the row gauge in the example below is 27 stitches over four inches.
TROUBLESHOOTING
- Too many stitches, i.e. the number of stitches you’re counting is higher than the gauge given? Make another swatch with bigger needles.
- Too few stitches per inch, i.e. the number of stitches you’re counting is lower than the gauge given?? Try smaller needles!
- What if your stitch gauge is accurate but the row gauge isn’t? In most cases you should use the needle that gives you the proper stitch gauge. You can probably more easily adjust the length of your piece to compensate for the difference in rows, either by working more or fewer rows than the pattern specifies or when blocking. However, if the garment is fitted and/or involves complex shaping, consider trying a yarn with different properties that gives you correct stitch and row gauges.
- Do you like it?! Even if you’re getting the correct gauge, you also need to consider the fabric you’re creating. You may find that, at the right gauge, the swatch feels too loose or tight, that it stretches too much or is too fuzzy to show the stitch pattern. You might decide the yarn isn’t a good match for the design after all. Back to the drawing board, which just means you get to knit some more!
These swatches are knit in Purl Soho’s Understory using (NOTE: We no longer offer Understory, but click here to see our other light worsted/dk weight yarns.)
Size isn’t the only factor when it comes to needles; gauge can vary with material (wood, metal, plastic, etc.) and with the use of circular or straight needles, too. For the most accurate results, use the exact needles you intend to use for your project.
Swatches for Other Stitch Patterns
Ribbing
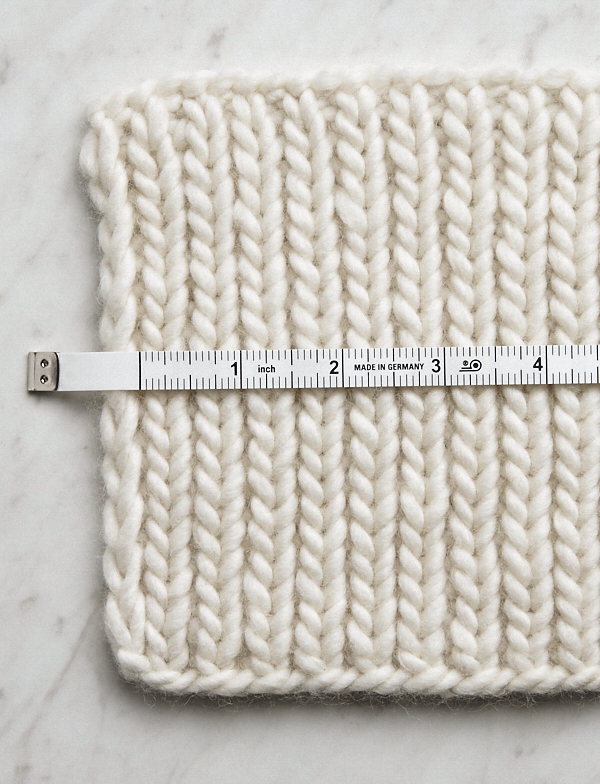
Measuring gauge in ribbed fabric can be a head-scratcher: Isn’t the whole point of ribbing that it can be stretched to a variety of widths? Sometimes the pattern will use wording like “slightly stretched,” but even that is open to interpretation. One good approach is to take a measurement with the ribbing completely relaxed (unstretched), then stretch it to its widest and take another measurement, and use the average of the two. For example, the stitch gauge in this example is 15 stitches over four inches (remember the purl stitches of the rib pattern are hiding!).
Garter Stitch
Garter stitch also presents its own set of issues. To count garter stitches, instead of “V”s, count the purl bumps or little “frowns” over a four-inch span. For row counts, patterns in garter stitch may specify gauge in “rows” or “ridges,” which are the pronounced horizontal stripes that span the width of your swatch. Every ridge is two garter stitch rows, so if the pattern specifies rows, count ridges and simply multiply by two to get your row count. For example, the row gauge in this example is 25 rows (or 12.5 ridges) over four inches.

Seed Stitch
The purl bumps in this stitch pattern are quite prominent, but there are little knit “V”‘s hiding above, below, to the left, and to the right of each purl! When measuring gauge in seed stitch, it is important to remember to count those knits whether you’re counting horizontal stitches or vertical rows. You might be tempted to count only the purl bumps, but don’t forget those “V”‘s! The stitch gauge in the example below is 10 stitches and 21 rows over four inches.
In The Round
Let’s say your pattern is stockinette stitch in the round, which means you’ll only be knitting (not purling), and let’s say you tend to purl very tightly or loosely. This means that knitting a flat swatch (where every other row is purling) will not be a very accurate reenactment of you knitting your project. Luckily, there is a little trick to mimic circular knitting without having to knit a whole tube… Our Swatching For Circular Gauge Tutorial shows you how!
Whew, You Did It!
Not so bad, right? You knit a little square of fabric, you blocked it, you measured it, you corrected it if necessary, and now you’re truly ready to go. The reward for this extra work is the serenity and confidence you will feel as you’re knitting, knowing that your project is going to fit and be beautiful!


Gracious me, as always, you Purl Sohoians provide us with such useful, valuable, understandable help! Bless you — stay safe and well, and thank you!
This is an excellent explanation of swatching. I have looked at a lot of swatching articles and tutorials, but yours is the most comprehensive and useful!
Thank you.
Thank you, this is so helpful! I have a question: if I make a complete gauge swatch and then block it only to discover it doesn’t match the gauge of the pattern, do I need to start all over again with more yarn in a different sized needle and then block that swatch as well? I’m concerned about wasting yarn, especially when it’s a special or luxurious type. Is there another solution? Thanks.
Hi Rachel,
Thanks for writing in! After you make the first initial gauge swatch and if it doesn’t match the gauge of the pattern, your swatch will tell you how you need to move forward to get the right gauge (either sizing up or down in needle size.) So if you are comfortable, you can move forward with the pattern with the needle adjustment. You can also work up another gauge swatch to double check with the needle adjustment and measure your unblocked gauge without casting off or blocking the swatch so that you can unravel the swatch!
I hope this helps!
Gianna
Thanks Gianna! Would it ever be the case that you’d need to go up or down two needle sizes? Or is that unusual?
Hi Rachel,
Thanks for writing in again! Yes, it happens and it is totally normal for knitters to go up or down in needle size to achieve the correct gauge for a pattern!
All the best,
Gianna
Question – how did you pattern the guage so that the edges lay flat? Are you passing the first stich knit wise an always knitting the last stitch of each row?
Hi Laura,
Thanks for reaching out! The swatches we used for this tutorial have been blocked so that they are completely flat. The swatches were also knit in stockinette stitch, so the first row is knit from the first to last stitch and the 2nd row is purled from the first to the last stitch.
All the best,
Gianna
Have you ever discussed edges of knitting (first and last stitch)? Sometimes my edges curl…why? Why do they look so uneven? Somethings then have little knots. They just look awful. What am I doing wrong?
Hi Risa,
Thanks for writing in! Because stockinette stitch is essentially “unbalanced” in its structure, it has a natural tendency to curl in exactly the way you’re describing. It is possible to minimize the curl by blocking your swatch (as we have done for the swatches in the photos), but many knitters like to use a different stitch for the swatch borders. For example, if you use garter stitch (which is balanced and does not curl like stockinette) for the first and last couple rows and stitches on your swatch, the swatch as a whole will not curl.
One other thing you could do is choose a different selvedge treatment for the very first stitch of every row. If you slip that stitch, instead of knitting or purling it, you’ll be able to create a very smooth edge!
All the best,
Lili
Typically, do you use the yarn from the gauge swatch in the project or do you bind off and keep it for reference?
Thanks,
Melissa
Hi Melissa,
Thanks for reaching out! I typically bind off my swatches so that I can keep them as reference (I actually keep a swatch binder!) I also like to do this so that I have the option to block my swatch. In the event that you are short on yarn for your project you can absolutely skip the bind off and reuse that yarn!
Warmly,
Gianna
Hi Gianna-
I love that you keep a swatch binder! I wish I could see what that looks like so I can do the same thing. Do you use plastic sheet protectors?
Hi Natalie,
Yes! I keep them in plastic sheet protectors, and I pin the swatch to a piece of paper a write a bit of information under the swatch like the stitch, needle size, yarn used, and the pattern when applicable!
Warmly,
Gianna
Which yarn did you use for the white swatches?
Hi Patricia,
Thanks for reaching out! The white yarn we used for the swatch is our Super Soft Merino in Heirloom White!
Warmly,
Gianna
So, the only way to fix incorrect gauge is to change the size of the needles? Hopefully it’s not off by much because changing needle size can greatly affect the feel and look of the finished piece.
Hi Claudia,
Thanks for reaching out! Yes changing needle size is one way to fix your gauge, another is to adjust your tension! However, this can be a bit tricky to adjust your tension especially for more beginners knitters but it is something you can play around with!
Warmly,
Gianna
I’m confused by knit patterns that state gauge in the following example: 25 stitches by 32 rows
Instead of listing gauge as stitches per inch.
I’ve read that you should divide the number of cast on stitches by the suggested length of the swatch, (4 inches) to get the number of stitches per inch.
In my example the answer is 6.25. Is it usual to have to count fractions of a stitch or have I misunderstood something?
Hi PJG,
Thanks for reaching out! When counting your gauge you will always get a more accurate measurement when you count your stitches per 4″. This is also how most patterns will have their gauge listed! As you can see with your example, the stitches per 1 inch will often include a decimal, another reason why you will get a better measurement with 4″! However to calculate a cast on you will need to divide the total number by 4. So if your stitch per inch comes out to 6.25 and you want to cast on something that will be 12″ wide for example you would want to cast on 75 stitches!
I hope this clears things up!
Warmly,
Gianna
Hello Gianna,
Thank you so much for this great guide about getting gauge. I found it most helpful with a project I was doing in garter stitch. Now I’m wondering how you count stitches if you’re doing a project in linen stitch? I want to try making Purl Soho’s Simple Knit Tote.
Hi Jan,
Thanks for reaching out! Linen stitch can be pretty tricky to get an accurate gauge measurement, basically 2 rows on linen stitch counts as one row since you are slipping stitches! It should be easy to count the stitches but for the row count keep in mind that 2 rows worked will equal one row in gauge!
I hope this helps and please let me know if you have any more questions!
Warmly,
Gianna
What can I do if my stitch gauge is okay but my row gauge is too big?
Hi Eva,
Thanks for reaching out! If your stitch gauge is correct that’s great! In most cases, you will want to stick with the needle that gives you the correct stitch gauge over row gauge since you can easily adjust the length of your piece to compensate for the difference in rows, either by working more or fewer rows than the pattern specifies! You can also adjust this by blocking the finished piece. However, if you are making a garment that is fitted and/or involves shaping, consider trying a yarn with different properties that will give you the correct stitch and row gauges.
I hope this helps, happy knitting!
Gianna
Thank you Gianna! I did block my swatch before measuring, but I didn’t think of trying a yarn with different characteristics.
The pattern I am knitting uses 2 needle sizes but only gives the guage for the larger needle. When I did my swatch to determine my guage for the larger needle I had to use a smaller needle size. Will I need to drop a size for the second smaller needle even though the pattern does not indicate a guage for it?
Hi Beth,
Thanks for reaching out! If the gauge listed in your pattern is for the larger size needle, and to obtain the accurate gauge you need to size down to a smaller needle then yes, you will want to also size down the second set of needles. As an example, say your pattern suggests using size US9 for gauge and US7 needles as the smaller size, but to get the accurate gauge you need to use a US7 as the larger needle. In that case, you’ll want to size down the smaller set to US5 to keep the overall gauge accurate. I hope this helps clear things up!
Warmly,
Kelsey
I’m about to start my first project that requires me to check gauge. (Up to now, I’ve only knitted scarves.) Is it standard practice for pattern-specified yarn requirements to already factor in enough yarn to make a gauge swatch? I’m planning to make a set of the PS Classic Baby Hats, so I’ve purchased two skeins of Santolina. Should I assume that I will have enough yarn to make a gauge swatch and the three baby hats? And if yes, is that generally true for all knitting patterns? Thanks for your help!
Hi Tiffany,
That’s a very good question! Yes, it is standard for pattern-specified yarn requirements to factor in enough yarn for a gauge swatch, as well as extra yards just in case. I would also suggest using the color you intend on using less of in the actual pattern to make your swatch! In the case of the Classic Baby Hats, this would be color B (although the two colors are still fairly close in yardage).
All the best,
Lili
I made a 4″x4″ square in garter stitch but when I measured it ended up being a 4 and a half inch wide by 4″ length. I did four of them perfect with size 8 needles. When I did this last one I also used 8 needles. What did I do wrong? Your help will be appreciated. Thank you.
Hi Dorie,
Thanks for reaching out! My best guess for why your last swatch came out larger is likely due to your tensions, if you loosen up your tension with the yarn while knitting it will change the tightness of the stitch which can result in larger stitches overall and change the width of your knitting.
Going forward I recommend trying to keep your tension as even and consistent as possible, this will help ensure that your knitting stays on gauge!
I hope this helps, happy knitting!
Gianna
Such a great article, thank you! I’m about to start a wrap project with silk. My first gauge swatch came out correct but I can see through the stitches and was hoping for the wrap to be dense with tighter stitches. If I change to smaller needles could I achieve this or can I only achieve this by knitting with more tension?
Hi Charis,
Thanks for writing in. You have exactly the right idea to try with smaller needles! That will certainly make your stitches denser and tighter.
All the best,
Lili
I liked the stitch density of the needles recommended in the pattern I am using, but from my swatch it is going to end up much too small (supposed to be 18 by 4″ and I got 25). I went up a couple sizes and it’s still not quite there. I supposedly have the same yarn weight as the pattern calls for, but I don’t know how true that actually is. Anyway, because it’s very simple and all stockinette, could I cast on more stitches to reach my size, i.e. work the pattern for a couple sizes larger than I want it?
Hi Amanda,
Thanks for reaching out! What pattern are you working on and what is the recommended yarn/the yarn you are using?
I would recommend blocking your swatch, most of the time gauge is measured post-blocking, so if you haven’t already tried that and see how your gauge comes out.
Also, depending on the type of project, you can probably get away with adding more stitches to achieve the correct width!
I hope this helps!
Gianna
Hi there,
It is a cotton t-shirt style pattern with DK yarn which is what I was trying it with, but I have actually recently found out that I was knitting wrong and twisting every stitch, so my gauge was about three sizes too small just from that alone. I’ve done a few smaller projects and have been getting gauge on recommended needles now. I had no idea twisted stitches could make my gauge off by that much! When I get back to redoing my swatch for the shirt I have a feeling it won’t be so badly off anymore. Thanks!
HI!
This is a fantastic reference article.
Hypothetically, if a pattern is calling for 12 sts x 12 rows over 4″, but I do not like any of the yarns I’m finding in that approximate gauge, but like yarns that would work up to be 24 sts x 24 rows over 4″, could I simply hold the yarn double and expect to get close to the gauge the pattern calls for? I’m not sure if this makes sense.
Thank you!
Hi Jane,
Thanks for reaching out! Hypothetically, that should be the result! However, I would suggest swatching first to see how the gauge works up!
Warmly,
Gianna
I am starting the Lightweight Raglan Pullover. The gauge says “28 stitches & 33 rounds = 4 inches in stockinette stitch”. The sweater is worked in the round. Should I be doing a swatch in the round or flat?
Hi Dyan,
Thanks for writing in! For patterns that involve knitting in the round, it’s always a great idea to do a swatch in the round as well. If you’d like more information on that, we have a tutorial called Swatching for Circular Gauge that covers just that!
I hope this helps, and have a great day!
All the best,
Cat
Two questions; 1. I see from the pattern for the matching cowl that it is suggested that you cast on for the project and the first row before joining in the round as well as working the hat from the wrong side. Should I do the same?
2. Should I do the gauge swatch in same stitch as pattern? I’m struggling to get gauge.
Hi Kathleen,
Thanks for reaching out. Can you let me know what cowl pattern you’re working on? I’ll need to take a look at the pattern in order to give you advice! But in answer to your second question, yes, you should always swatch in the same stitch as the pattern. Every stitch has a different gauge, so you’ll need to use the same stitch pattern to accurately measure what your gauge will be when you begin the pattern.
All the best,
Lili
Hello, I am not a very experienced knitter and I am embarking upon the nine note seed stitch wrap — I notice that it describes the swatch measurements in terms of how it will measure after blocking. Yet the instructions also say that we should reuse the swatch yarn in order for the stripes to end up the same length; what I’m wondering is, would it not affect the overall measurements/ texture to be using yarn for the actual project that has already been blocked along with the rest of the yarn which has not been blocked? (And if we need to knit and block multiple swatches before getting it right, so much the worse?) Thank you!
Hi Kim,
Thanks for reaching out. Since you will eventually block the entire wrap, the texture will match in entirety at the end! Hope this helps clarify things.
All the best,
Lili
Thank you Lili for your quick reply! Okay I was concerned that mixing the two would distort the piece in a way that subsequent blocking of the whole wouldn’t remedy, but it sounds like that’s not the case. Many thanks again!
Gauge is literally my worst nightmare, I don’t think I’ve ever gotten gauge. EVER. I’ve just created a 4×4 swatch where my count is about 35 stitches by 37 rows. The pattern wants 22×34 and the yarn itself recommends 26×30. I’ve used 3mm needles as both suggested for that size.
SOB!
Here’s the thing, I quite like the fabric in my swatch. I’m concerned that changing needles to get stitch gauge will create a very open fabric that I’m not even seeing in the sample photos (and I get it, filters / lighting etc.)
Please could I have some advice? I can definitely create a new swatch just to check on the fabric with bigger needles. Perhaps I won’t hate that fabric… but what if I do? I’m SO far out of gauge.
Hi Gina,
Thanks for writing in! I completely understand gauge struggles. I would recommend trying larger needles, just to see what the knit fabric is like. But you can also absolutely just continue with the gauge you’re already getting! You would just need to modify the pattern a bit, or make a different size.
If the pattern is simpler, like a scarf or wrap, you’ll just need to adjust the number of stitches you cast on. To figure out your cast-on number, multiply the number of stitches you’re getting per inch (8.75, in your case) by the width that you would like and cast on the nearest number that’s in line with the stitch multiple noted in the pattern. Then you can follow the pattern as written!
If the pattern is more complex though, like a garment, it would be easiest just to knit a different size. To figure out which size will work with your gauge, multiply the number of stitches per inch (8.75) by the chest circumference measurement for your original size. Then, compare the resulting number to the stitch counts around the body of each size. The size that comes closest is the one you should make!
I hope this helps, but please let me know if you have any other questions or concerns, or would like help calculating any of these things!
All the best,
Lili
Hi Lili
Having done a few rows with a larger needle (I went from 3mm to 4mm), already not loving it and STILL not getting gauge, I will definitely be doing some maths and looking at another size. Fortunately this pattern goes down into children’s sizes so I’m sure I’ll figure it out.
My only remaining question then is this – what would cause gauge to be so dramatically different? Most of what I’ve read seems to cater to small inaccuracies that can be resolved with a slightly larger needle. It makes me really anxious to even start this project.
Thank you!
Hi Gina,
Picking a new size definitely sounds like the best plan then! Gauge depends on a lot of things, including needle size, needle material, yarn weight, fiber content, and even just your muscle tension on any given day. And some knitters will naturally tend towards smaller or larger gauges than others! It’s surprisingly common to have a drastically differing gauge, and it’s a very good thing to know about yourself so that you can keep the workarounds in mind if you encounter another project that you struggle to meet gauge for.
All the best,
Lili
I am about to start knitting the Little Moons Lace Wrap in Santolina yarn. I always knit tight and the swatch using a 6 needle was 3 1/2″ rather than the 4″ for 22 sts as suggested in the gauge (I did not block my swatch). I tried with a 7 needle and the gauge came out closer to 4″. But I’m concerned that using the 7 needle will make the pattern too loose. Do you think I should go with the 7 needle or increase the number of stitches and use the 6 needle? I calculated it as approximately 130 or 136 sts with the 6 needle. Thanks for your help.
Hi Gail,
Either option will work great! If you’re coming close to the gauge with the size 7 needles, then the knit fabric will be the same density as it is in our design, so it shouldn’t be too loose. But if you like the density of the fabric created by the size 6 needles, then you can totally use those instead and adjust the cast-on number!
All the best,
Lili
Hello!
I’m making the Half & Half Triangle Wrap. My question is how to determine the amount of yarn needed. I’m going to use Woolfolk TYND. It is a fingering yarn although it seems to border (a little) on sport weight to me.
Each skein is 223 yds and 50 grams. Gauge for the yarn is 21-25 stitches and 34-38 rows using US 2-4 needles which is similar the pattern’s gauge.
My gauge with 3.25 needles is 11.5/12 per 2 inches.
Also, I would like to make this wrap in a middle size with casting on 220/230 stitches. What are your expert thoughts on this?
Perhaps this yarn was the wrong choice, but I have already purchased 4 skeins and I fear that will not be enough.
Thank you so much !
Joyce
Hi Joyce,
It sounds like Wookfolk TYND is a great choice for this project! Since you’re able to get the gauge with the needles you’re using, then you can go right ahead with the pattern.
However, because each skein of Woolfolk TYND is only 50g (half the size of one skein of Linen Quill), 4 skeins will not be enough for an entire wrap, especially since you want to alter the cast-on. You’ll actually need 8 skeins, 4 of each color, if you want to make a wrap with a cast-on of 220 or 230 stitches!
All the best,
Lili
So many questions…. I usually use the yarn i love for a particular pattern and use the yarn’s recommended gauge to meet the pattern’s measurements. My question: is there a correct feel/tension/density to stockinette stitch? In the article, you have a picture of 4 swatches of the same yarn using different needle sizes. How see-through Are they? Which one follows the yarn recommendations? I am getting ready so start a shell (no pattern) in worsted weight silk (which had no gauge recommendation). Tried the swatches with needles 9 and 6–both felt good but see-through.
Hi Yamira,
Those are all great questions! Overall, there is no one correct density to any stitch pattern. That choice is up to the knitter and what sort of fabric texture they enjoy the most for a particular project! While a specific pattern may specify a recommended yarn weight, which would correspond to the fabric density the designer preferred, you have a lot more freedom in your own project.
For example, let’s say a hypothetical pattern recommends worsted weight yarn and a gauge of 20 stitches in 4 inches. If you used a fingering weight yarn for this pattern instead and still achieved the 20st gauge, the density of the knit fabric would be much looser than the original design, but it would still work out otherwise, in terms of measurements!
In our post, we demonstrate this principle in the opposite direction: Instead of changing the yarn weight while keeping the gauge constant, we kept the yarn constant while changing the gauge by knitting it on differently sized needles. The swatches made on larger needles have more space between each stitch (they’re less dense) than the swatches made on smaller needles do (these are more dense).
For your own pattern, I’d recommend making sure that your own gauge matches the gauge of the pattern. That will make sure the shell will come out to the correct size, no matter what yarn you use! Since you’re finding that there’s more space between stitches than is to your liking, then you may want to try a thicker yarn. If you use a chunky weight yarn instead of a worsted weight yarn–and make sure you achieve the gauge of the pattern–the resulting fabric will be more dense and therefore have less space between stitches!
I hope this helps clarify things a bit more, and please don’t hesitate to reach out if you have any other questions.
All the best,
Lili
Thank you, Lili. This puts me at ease. I want the shell to have a fabric soft feel and movement, so i will adjust needle size because i am in love with that silk😜. Didnt say it before, but great article!