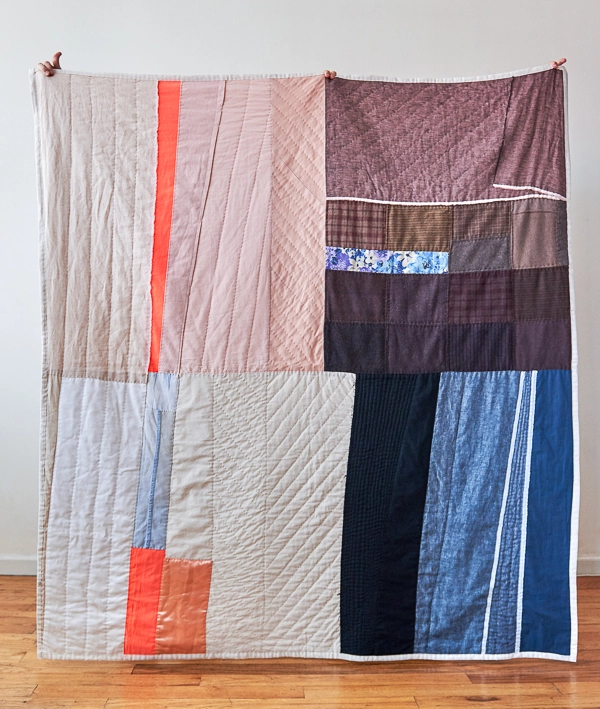
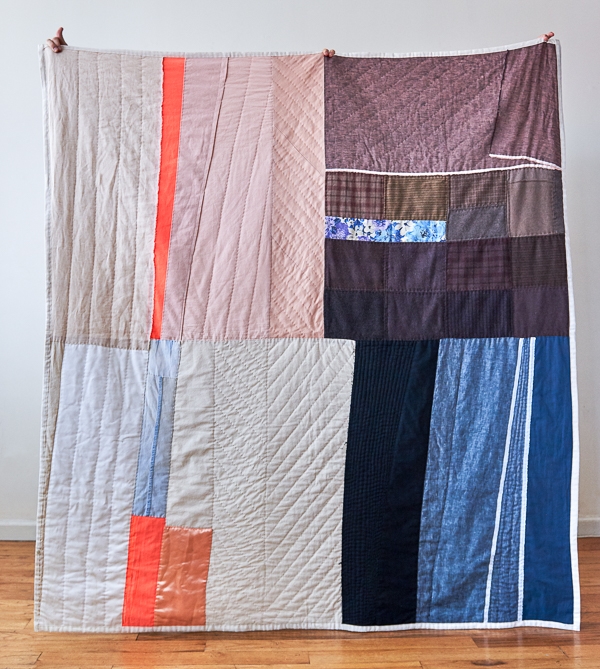
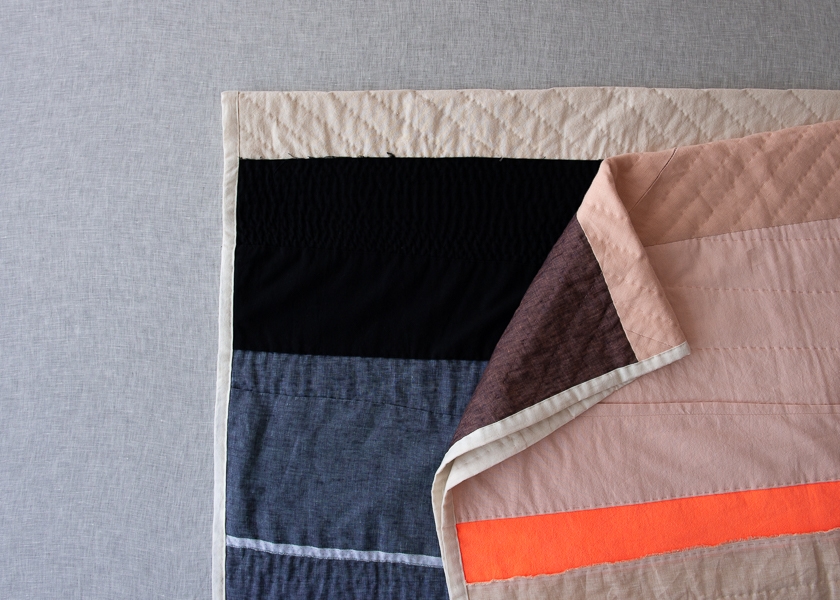
Lost + Found Quilt
We are so inspired by what Coulter Fussell has brought to our lives, not just her beautiful Lost + Found Quilt, but her approach and spirit. Coulter is founder and owner of YaloRUN Textiles, a studio, classroom, and purveyor of hand-dyed bounty in the northern hills of Mississippi, but most importantly, she is an emissary of freedom!
Coulter’s brand of freedom is not about willy-nilliness; it’s about hearing the voices inside and having the confidence to follow them. Measuring inches matters much less here than measuring disposition and tendency, yours and the fabric’s.
Incorporating scraps of your own old clothes and textiles, every Lost + Found Quilt is different. It’s all about digging deep and taking a thoughtful look into your own relationship to fabric.
Maybe those old floral sheets are linked in your mind to a particular morning light, or a worn-out T-shirt summons a big game and the feeling of hot bleachers against your skin, or a terrible bridesmaid dress embodies your loyalty to the friend for whom you wore it. You are the master of your lost and found moments, and there’s no way to go wrong!
So, turn on your closet light and see what you find inside, browse our fabrics to supplement your story, and then follow along on Coulter’s joy ride!
Designed for Purl Soho by Coulter Fussell of YaloRUN Textiles; Instagram @coultyalo.
Materials
To make a Lost + Found Quilt you’ll need four small pieces of fabric from your own stash or closet…
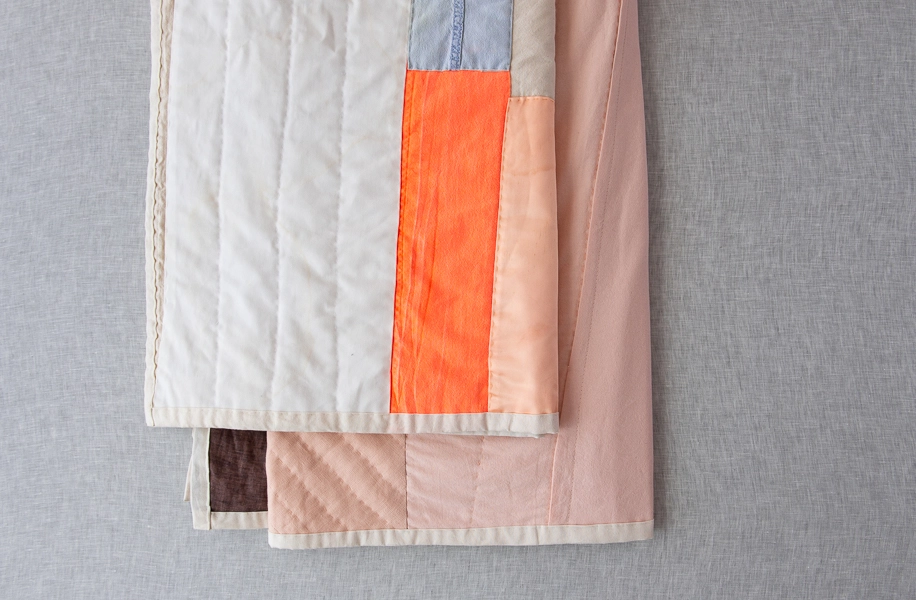
- A florescent, about 8 x 38 inches, (Coulter used 1/4 yard of Purl Soho’s Spectrum Cotton in Neon Orange. If you do the same, be sure to read the care instructions!)
- A floral, about 5 x 18 inches
- A piece of old clothing, about 5 x 22 inches, like worn out jeans, a favorite t-shirt, or grandma’s apron (Coulter used an old chambray work shirt.)
- A satin, about 8 x 15 inches
You’ll also need some yardage to coordinate with your stash fabrics…
BLOCK A: Whites
- Color 1: 1/2 yard of Moda’s Muslin, 60 x 60, 45-inch in White
- Color 2: 1 yard of Purl Soho’s Spectrum Cotton in Raw Oats
- Your fluorescent fabric, piece of old clothing, and satin fabric (see above)
BLOCK B: Medium Lights
- Color 3: 1/2 yard of Purl Soho’s Watercolor Linen in Pink Sand
- Color 4: 1/2 yard of Spectrum Cotton in Vintage Pink
- Color 5: 1/4 yard of Purl Soho’s Warsa Linen in Blush (Please Note: Warsa Linen is no longer available. To browse our fabric collection, click here!)
- Your fluorescent fabric
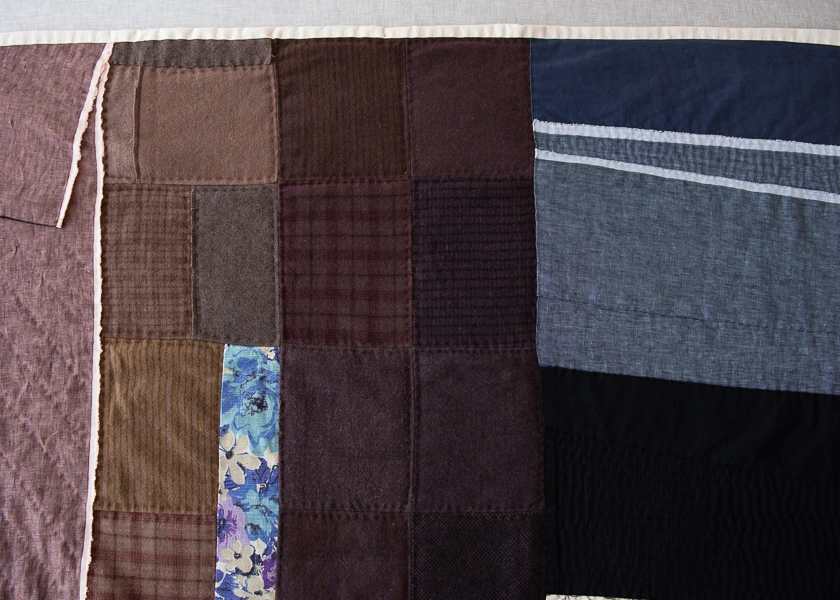
BLOCK C: Medium Darks
- 2 of Mary Flanagan’s Mini Textured Felted Wool Bundles, one in Wagon Trail and one in Blackberry
- Your floral fabric
- Color 6: 1 yard of Watercolor Linen in Smoked Rose
BLOCK D: Darks
- Color 7: 1/2 yard of Spectrum Cotton in Raven Black
- Color 8: 1 yard of Watercolor Linen in Streambed Blue
- Color 9: 1/4 yard of Spectrum Cotton in Ink Blue
NOTE: Your stash fabric is the centerpiece, so adjust lights and darks accordingly. Blocks that Coulter made light based on her found fabrics, may be dark for you. Play!
You’ll also need…
- Three 274-yard spools of Gutermann’s Cotton Sewing Thread in light, medium, and dark colors. Coulter used 1040, 6210, and 5500.
- Backing Fabric: 2 yards Moda’s Muslin, 200 count, 90-inch in Natural
- Quilters Dream’s Cotton Batting, Twin size, Request thickness
- A fabric-marking tool for marking the quilting, like a Hera Marker
- Purl Soho’s Rotary Cutting Tool Kit, which includes…
- A rotary cutter
- A non-slip quilting ruler
- A self-healing cutting mat
- Quilter’s curved safety pins
SIZE
Finished Dimensions: 66 inches wide X 72 inches long
Pattern
Notes
Prewash and iron all of the fabrics (but not the batting) before beginning.
All seam allowances are ¼ inch unless otherwise noted.
Cut
Block A
From Color 1, cut one 10½ x 37-inch strip
From Color 2, cut one 27 x 37-inch strip
From your old clothing, cut one 4½ x 21-inch strip
From your fluorescent, cut one 4½ x 15-inch strip
From your satin, cut one 6½ x 13½-inch strip
Block B
From Color 3, cut one 16 x 37-inch strip
From Color 4, cut one 16½ x 37-inch strip
From Color 5, cut one 7 x 37-inch strip
From your fluorescent, cut one 3½ x 37-inch strip
Block C
From Color 6, cut one 16½ x 40½-inch strip, leaving selvage edge
From the wool squares, choose around 14 of your favorites. No cutting needed now.
From your floral, cut one 3½ x 15½-inch strip
Block D
From Color 7, cut one 10½ x 37-inch strip
From Color 8, cut one 13½ x 37-inch strip and one 7½ x 37-inch strip, leaving selvage edge on each
From Color 9, cut one 8 x 37-inch strip
Piece
For this quilt you will basically just sew strips of fabric together lengthwise. Coulter often throws in appliqué and top stitching instead of regular seam-sewing because she loves raw edges. You decide what you like and do it that way!
Block A
Place the Color 1 and Color 2 strips right sides together. Sew them together lengthwise. Press the seam and set aside, right side up.
Sew a short edge of your Block A fluorescent strip to a short edge of your old clothing strip. Press the seam.
With right side facing up, pin the fluorescent/old clothing strip on top of the Colors 1 and 2 seam. Coulter placed hers at a slanted angle. Appliqué the fluorescent/old clothing strip in place.
With right side facing up, pin the satin strip along the bottom-right edge of the fluorescent/old clothing strip, on top of Color 2. Appliqué the satin strip in place.
Block B
Place the right edge of Color 3 on top of the left edge of the fluorescent strip, right sides up. Pin in place and top stitch together.
Place Color 4 on top of the fluorescent strip, with the left edge of Color 4 overhanging the left edge of the fluorescent strip by at least 1½ inches. Shift the bottom edge of Color 4 to the left about 1½ inches, keeping the top of the strip in place. Now, fold the left edge of Color 4 back to the right to expose the fluorescent strip. Fold at a slant, bringing back the top of the fabric an inch or so further than the bottom. No need to be exact here. See the fluorescent? See the slant? If so, you’ve done it! Press down the fold and pin it to the fluorescent fabric. Top stitch the strips together along the fold. Appliqué down the right edge with a hand sewn tucked seam.
Place the Color 5 strip on the Color 4 strip, right sides together an right edges aligned. Sew them together lengthwise. Press the seam and set aside, right side up.
Block C
Place a wool square on top of another wool square. Pin along a shorter edge and sew a seam. Press the seam.
Repeat six more times with remaining wool squares. You now have seven 2-piece wool strips and some squares left over for another day!
Pin and sew together two wool strips along a longer edge. Press the seam.
Repeat two more times with two more sets of wool strips. You now have three 4-piece wool blocks and one 2-piece wool strip left over.
Pin together a long edge of the remaining wool strip and a long edge of the floral strip, right sides together. Sew them together and press the seam. You now have 4 blocks.
Arrange the four blocks in a horizontally oriented grid and sew together. Press the seams, turn right side up, and orient the piece horizontally.
Slightly overlap the bottom raw selvage edge of Color 6 along the top of the wool grid. Pin in place and hand sew the raw selvage edge to the wool grid.
A playful option here is to fold back the right side of Color 6 (similar to the method used in Block B) and sew it down. Otherwise, trim it to align with the edge of the wool grid.
Block D
Place the Color 7 and wider Color 8 strips right sides together. Sew them together lengthwise. Press seam and place right side up.
Hand sew the right raw selvage edge of Color 8 along the edge of the Color 9 strip. Again, Coulter left the raw edge showing. You do as you wish.
Appliqué the remaining Color 8 strip onto the original Color 8 strip, at a slant, leaving the raw selvage edge showing. This is another playful step that adds direction and texture. You don’t have to do it and can save that extra strip for another day, if you wish.
Assemble The Quilt Top
Arrange the four blocks in a grid, with Block A in the lower left corner, Block B in the upper left, Block C in the upper right, and Block D in the lower right, right sides up.
Flip Block C onto Block B, right sides together. Pin and sew along the right edge. Press the seam and turn over.
Cut the left edge of Block D at a slight curve or slant. Overlap the left edge of Block D along the right edge of Block A. Pin in place and appliqué this Block D’s raw left edge to the right edge of Block A.
Again, arrange Block B/C on top and Block A/D on the bottom, right sides up. Adjust them so that the joining seam of Block A/D does NOT line up perfectly with the joining seam of Block B/C. Throw the symmetry off a little. Remember, the precision and balance is in feeling and flow, not necessarily perfectly met edges.
Flip the bottom A/D block on top of the top B/C block, right sides together. Pin and sew along the long bottom edge. Press the seam and turn over.
Size, Cut Backing Fabric + Baste
Cut the Quilt Top to around 66 x 72 inches. Don’t sweat it too much about perfect 90-degree corners.
This project’s unpredictable method of piecing makes now the best time to cut the backing fabric. Cut it to a size that leaves at least 2 inches around every side of the Quilt Top. This overlap will later act as your binding.
Now make a quilt sandwich and pin-baste the backing, batting and Quilt Top together. For instructions on how to do all this, please check out our Pin Basting Tutorial!
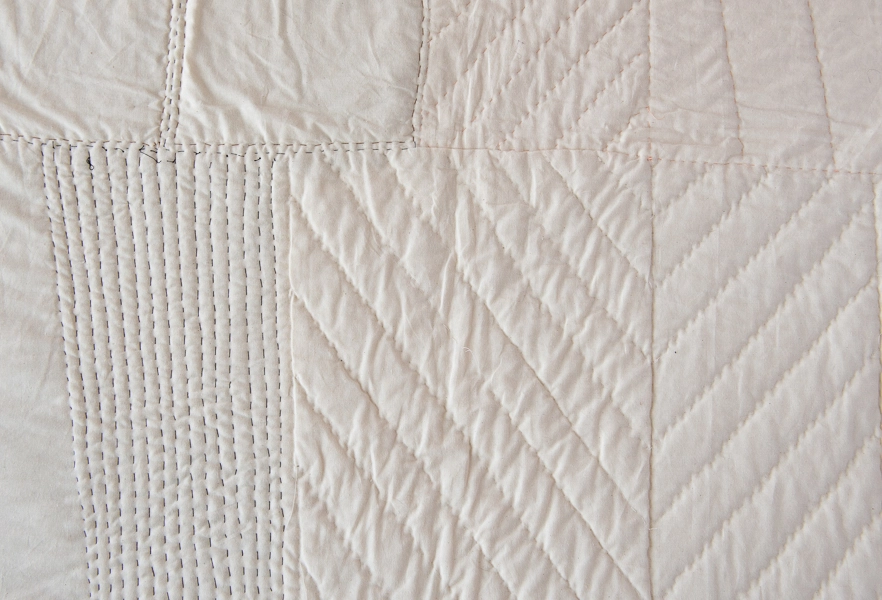
Quilt
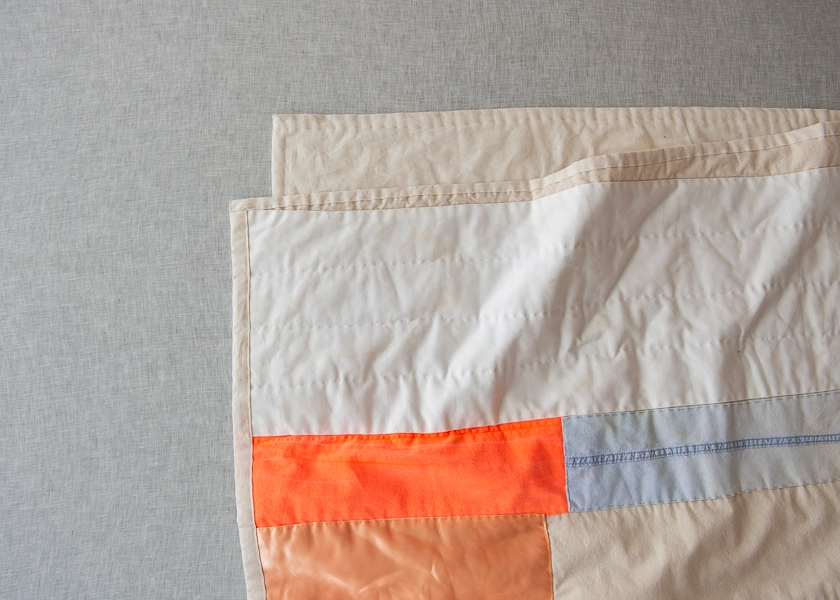
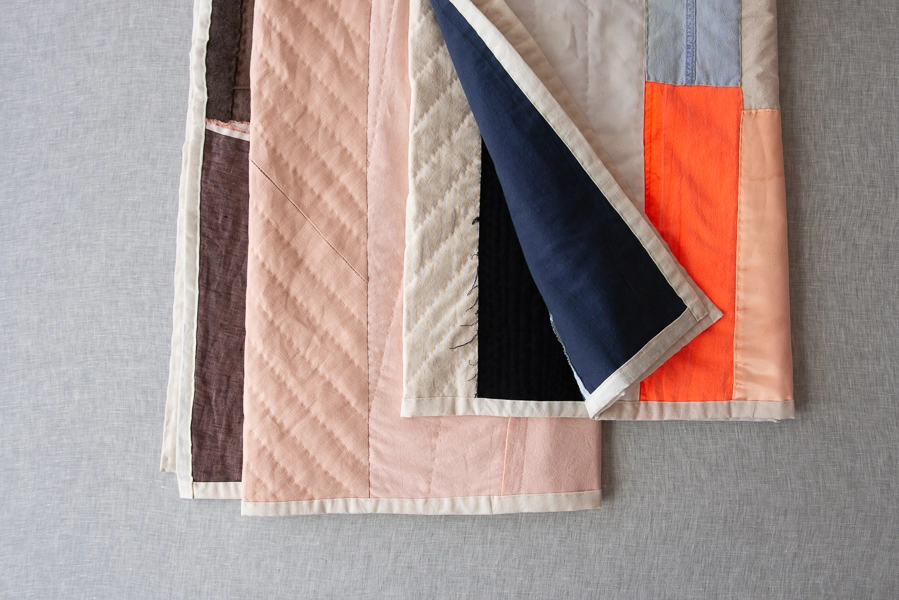
This step is entirely up to you. Coulter hand-quilted in various directions to play on the asymmetrical directional flow. A grid or straight lines or Baptists Fans would all do, as well. Whatever you chose is the right choice!
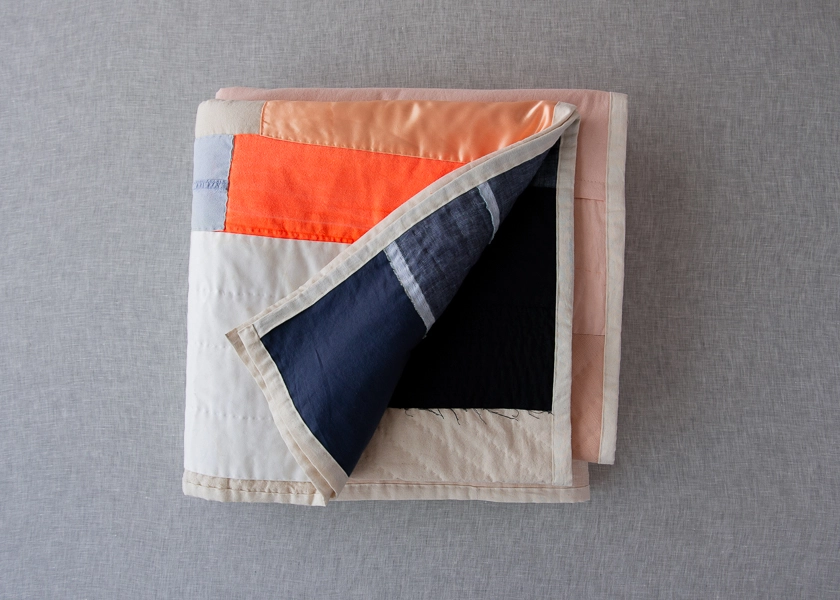
Bind
Use the backing fabric to bind the piece (learn how here). Coulter hand sewed the binding because she likes the natural look that hand stitches bring to a straight edge.


This quilt is reminiscent of those made by the women of Gee Bend Alabama. They worked for a bedspread factory and were permitted to take the end of bolts home. They used them to make useful quilts for them home without the benefit of sewing machines. Their quilts were part of a museum tour about 15 years ago. A book was published displaying their work. Here’s a link with a more complete description. It’s important to recognize the history of their work and culture which is being incorporated in your quilt design!
https://www.soulsgrowndeep.org/publication/gees-bend-architecture-quilt
Hi Christine,
Thank you for reaching out… We could not agree more! The incredible quilts of Gee’s Bend are, without question, some of the most spectacular American quilts of the 20th century. Many of us saw the exhibit that you mention years ago at the Whitney Museum. It was certainly a deeply inspiring and pivotal show. Like you, we also see how Coulter’s quilt relates to those of Gee’s Bend and imagine she is very influenced by them.
Thank you so much for bringing up Gee’s Bend and for reminding us all of the brilliance of those quilt-makers. Thank you also for sharing the link. We are sure our readers will love to explore it!
Best,
Julianna
Absolutely stunning, what a beautiful quilt!
I adore this quilt and this style of quilting. I have been quilting for over 30 years and have taught it professionally. So many years spent fretting over the perfect 1/4″ seam measurement and cutting things out so precisely. While that has it’s place, this type of quilting is so much more innovative and exciting. I have given up the kind of quilts I used to make and now create freely with scissors instead of relying on a rotary cutter so much, and I just sew without trying to be so persnickety. The joy that results from this type of quilting is huge and hard to explain to those who do not understand it. My mother, who has been gone for 20 years, would be totally appalled at the quilts I make and love now. Thank you for showcasing this quilt and quilter, her work is wonderful. I will use this as a jumping off point for my own work! I love to look at my Gee’s Bend quilt books for inspiration and never tire of the incredible mix of fabrics and how they are used. The soul of the quilter is in these creations.
Hi this quilt is great!! I’m curious, are the blocks running with the lengthwise grain in same direction? Is it important to do so? The blocks up top on right side look as though the grain runs horizontally as opposed to vertically.
Hi Lisa,
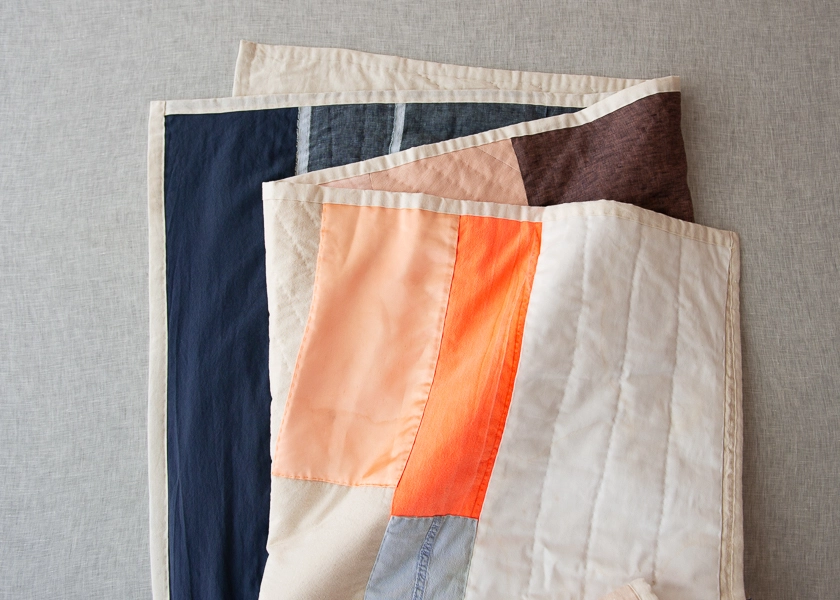
Thank you so much for the kind words! In this freestyle method of quilting, the grain of the fabric isn’t too important! If you take a look at Blocks C and D, you can see by the exposed selvages of Watercolor Linen that the two pieces are arranged with the grain of the fabric running perpendicular to each other. Feel free to arrange your pieces however makes sense based on how large your scraps or fabric pieces are, or in whatever alignment looks most pleasing to you!
Best,
Julianna
I finished this quilt today. It’s been my quarantine project, all hand quilted–and huge. A grandmother’s apron, a grandfather’s sweater, baby bloomers and bits of purl soho fabric stitched between. Hours of meditative mindful time. I don’t know where I will go next for my comfort–but this project has brought much to me during this time.
Hi April,
Thanks for writing in and for your kind words! We are so pleased to hear that you have had such a great time working on this lovely quilt!
All the best,
Gianna