


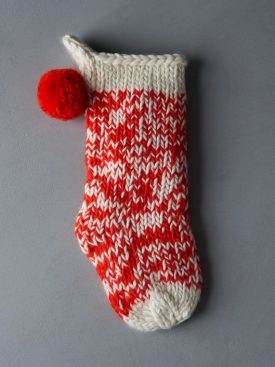
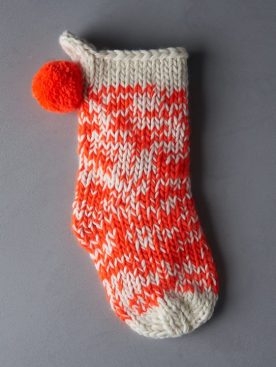
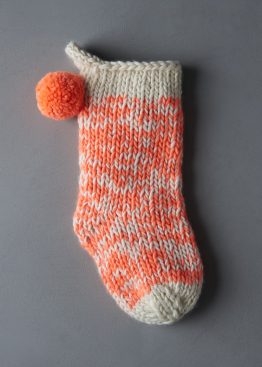
Snow Day Stocking
We knitters know that it’s never too early to prepare for the most wonderful time of the year! Jump right in with our Snow Day Stocking, a modern take on the most important of Christmas knits.

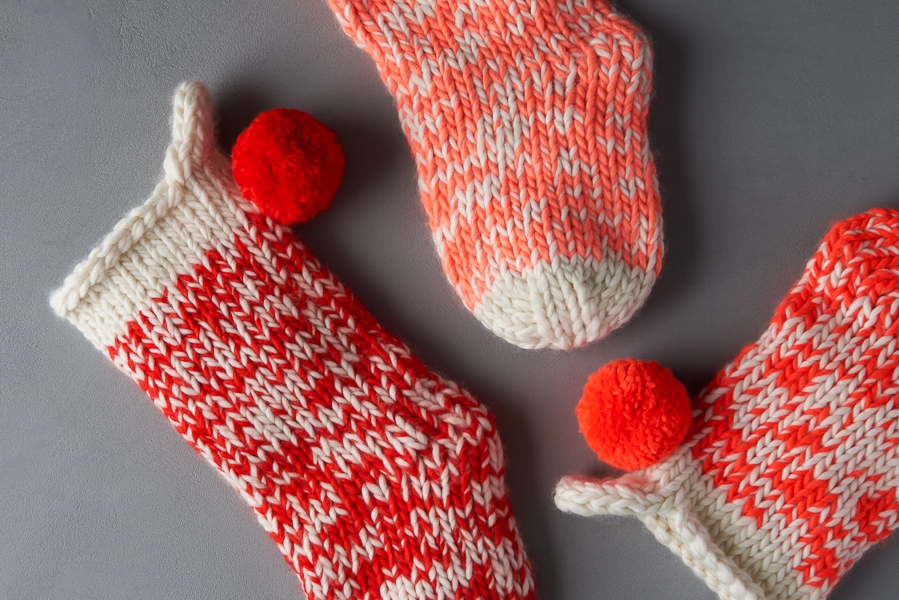
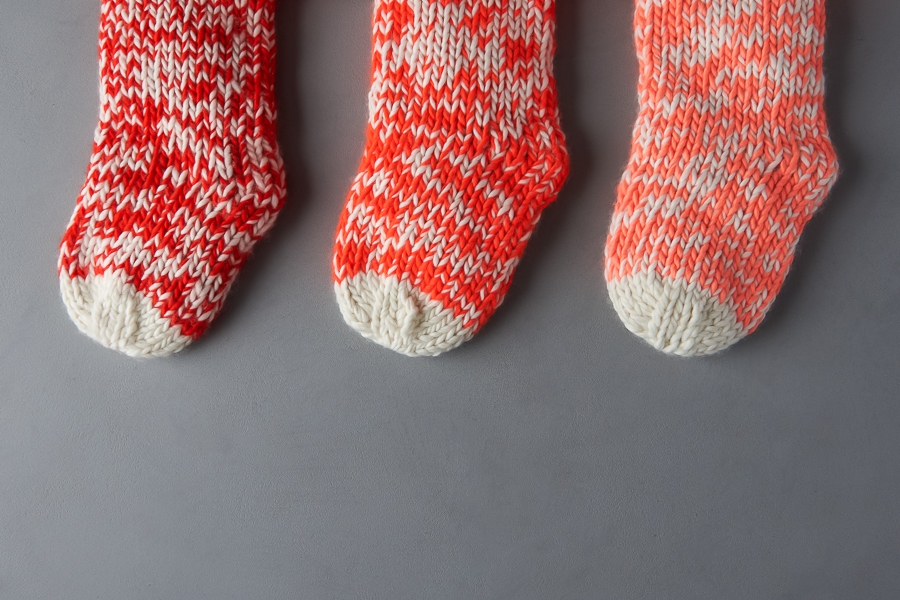
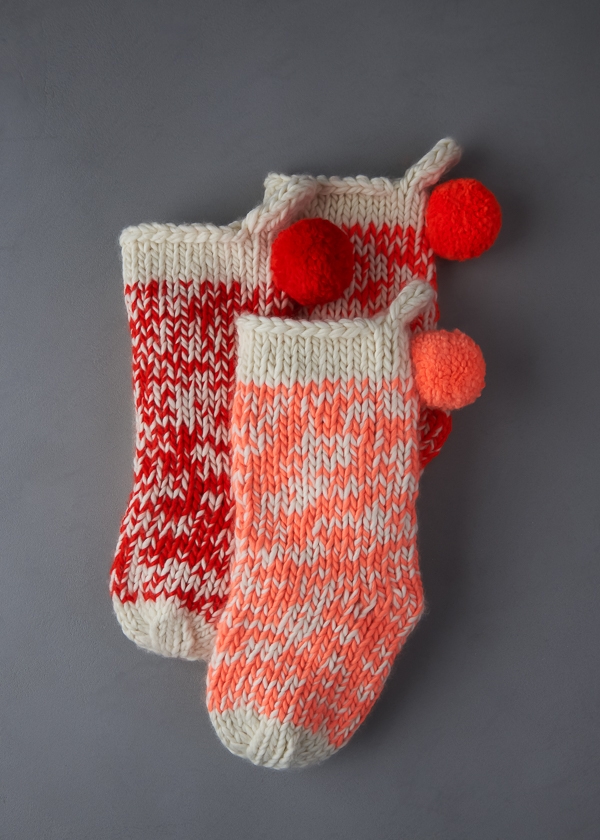
Inspired by our similarly marled Snow Day Hat, the Snow Day Stocking takes a classic rag sock and magnifies its scale and impact!

All you need is two skeins of our snuggly Super Soft Merino to make one simple stocking. Holding two strands together and using US 17 needles, you’ll start at the toe and knit in the round right up to the top. At a whopping 2 stitches per inch, your mantel will be full in no time!


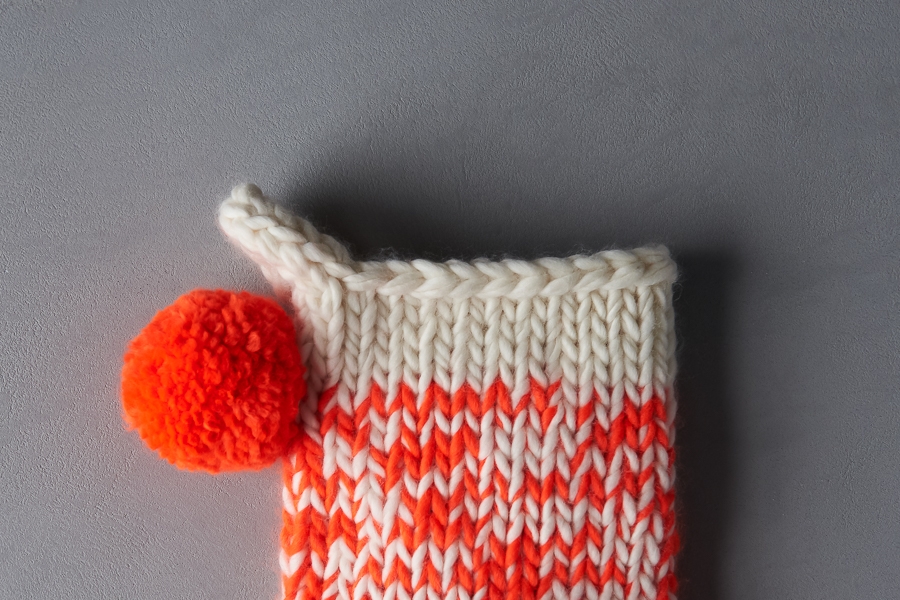
And top off your tootsie with a perfectly round and bouncy pom pom courtesy of our Pom Pom Maker Set… What could be merrier?

Designed by Purl Soho designer, Jake Canton. Click here to see even more of Jake’s designs!
Share your progress + connect with the community by tagging your pics with #PurlSoho, #PurlSohoBusyHands, #PurlSohoSnowDayStocking, and #PurlSohoSuperSoftMerino. We can’t wait to see what you make!
Materials
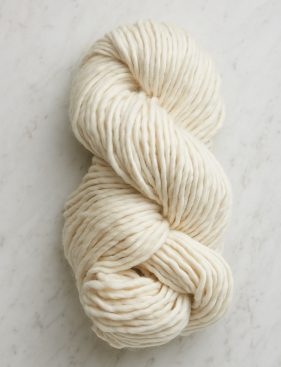
- Main Color: 1 skein of Purl Soho’s Super Soft Merino, 100% merino wool. Each skein is 87 yards; approximately 87 yards required. We used Heirloom White.
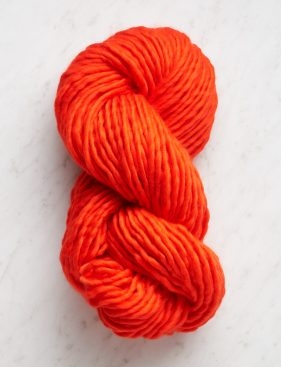
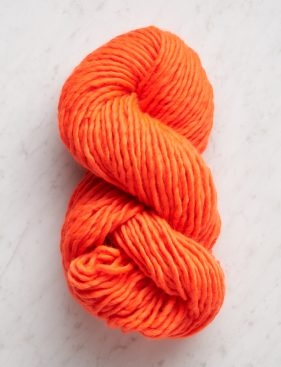
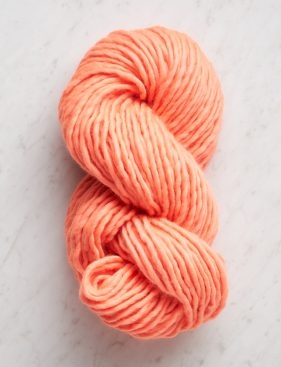
- Contrast Color: 1 skein of Super Soft Merino. Approximately 87 yards required. We used Red Poppy, Super Orange, and Peachy Pink, seen above from top to bottom.
- A set of US 17 (12 mm) double pointed needles
- A jumbo stitch marker or scrap yarn
- Purl Soho’s Pom Pom Maker Set
Gauge
8 stitches and 11 rounds = 4 inches in stockinette stitch with yarn doubled
Size
- Finished Circumference: 13 inches
- Finished Length From Top Of Heel To Top Of Leg (unrolled): 10 inches
- Finished Length From Top Of Heel To Tip Of Toe: 9 inches
Notes
Construction
You will knit this piece in the round from the toe up to the cuff.
Double The Yarn
Throughout this pattern, you will hold two strands of yarn. For the Toe and Cuff you will hold two strands of the Main Color. The easiest way to do this is to wind a center-pull ball and to pull from the center and the outside of the ball.
Short Row Shaping: Wrap and Turn (wrp-t)
- On the right side: Keeping yarn in back, slip next stitch purlwise from left needle to right needle. Bring yarn to front. Return slipped stitch to left needle. Bring yarn to back. Turn work so wrong side is facing you.
- On the wrong side: Keeping yarn in front, slip next stitch purlwise from left needle to right needle. Bring yarn to back. Return slipped stitch to left needle. Bring yarn to front. Turn work so right side is facing you.
For a step-by-step video and photo tutorial of how to work this technique, please visit our Short Row tutorial.
Pattern
Toe
NOTE: For assistance with the cast on, please visit our Provisional Cast-On: A Two-Step Method Tutorial.
Using a Provisional Cast-On and scrap yarn, cast 6 stitches onto double pointed needle.
NOTE: If you’re feeling intimidated by the Provisional Cast On, go ahead and use a Basic Long Tail Cast On! Instead of cinching live stitches at the end, just thread the cast-on tail through the cast-on stitches to pull the Toe hole closed.
Holding two strands of Main Color (MC) and leaving a 12-inch tail, knit across 6 cast-on stitches.
Divide stitches among 3 double pointed needles with 2 stitches on each needle.
Place marker (pm) and join for working in the round, being careful not to twist the stitches.
Round 1: *K1, yarn over (yo), k1, yo, pm, k1, repeat from * to end of round. [4 stitches increased]
Round 2: *K1, yo, knit to next marker, yo, slip marker, k1, repeat from * to end of round, knitting all yarn overs from previous round through the back loop. [4 stitches increased]
Repeat Round 2 three more times. [26 stitches total]
Next Round: Knit to end of round.
Cut 1 strand of MC.
Foot
Join one strand of Contrast Color (CC) and knit every round in stockinette stitch until Foot measures 5 inches.
Heel
NOTE: In this section, you will work in short rows, turning the work partway through each row (see Notes). While working short rows, knit the wraps with their wrapped stitch when you come to them.
Short Row 1 (right side): K10, wrp-t.
Short Row 2 (wrong side): P5, wrp-t.
Short Row 3: K3, wrp-t.
Short Row 4: P4, wrp-t.
Short Row 5: K5, wrp-t.
Short Row 6: P6, wrp-t.
Short Row 7: K8, wrp-t.
Short Row 8: P9, wrp-t.
Partial Round: Remove end of round marker, k5, pm, this is now the end of round marker.
Leg
Round 1: Knit to end of round, knitting wraps with their paired stitch when you come to them.
Continue in stockinette stitch, knitting every round for 8 inches.
Cut one strand of CC.
Cuff
Join 1 strand of MC.
Continue in stockinette stitch, knitting every round for 2 inches or until approximately 4 yards of MC remain.
Bind-Off Round: K3, place 3 stitches on spare double pointed needle, bind off knitwise to last 2 stitches, k2. [6 stitches remain: 3 stitches at beginning of round and 3 stitches at end of round]
Hanging Loop
Still using two strands of MC and starting with 3 stitches remaining at the end of round, make a 4-inch I-cord.
Thread tails onto tapestry needle and use Kitchener Stitch to graft I-cord stitches to 3 stitches on spare needle from beginning of bind-off round.
Pom Pom
If you’re using Purl Soho’s Pom Pom Maker Set, use the Large Pom Pom Maker and the 2½ inch Trim Guide to make a pom pom. Follow the basic instructions for a Solid Pom Pom found in our Pom Pom Tutorial. Here’s exactly how we made our Super Soft Merino Pom Pom…
Make Pom Pom
Holding two strands of CC together, pulling from the inside and outside of the ball, wrap the two strands of yarn around the Large Pom Pom Maker 60 times (120 total revolutions) and tie with a piece of CC.
With the 2½ inch Trim Guide, trim the pom pom a bit outside the edge of the Trim Guide to create a 3-inch pom pom. Make sure to not trim the 2 ties so you can use them to attach the pom pom to the stocking.
Attach Pom Pom
Thread each pom pom tail separately through the base of the hanging loop to the inside of the stocking. Tie the tails into a knot, then thread the tails up through the pom pom itself and trim them flush with the pom pom.
Finishing
Close Toe
Place the 6 cast-on stitches onto 2 double pointed needles, removing the scrap yarn from the Provisional Cast-On. Thread cast-on tail onto tapestry needle and thread tail through the 6 cast-on stitches, going through the stitches twice. Pull taught and bring tail to inside of stocking to weave in.
Weave + Block
Weave in remaining ends and block as desired. If working with Super Soft Merino, we suggest a lightly steam blocking.


For this sock pattern , I think the needle size is a mistake. Shouldn’t it be a 7 instead of 17
Hi Mary,
Thanks for reaching out! For this stocking, we used two strands of a super bulky yarn held together, so a US 17 needle is correct!
Best,
Julianna
Such a cute stocking! My daughters crochet (don’t know to knit), any chance you have crochet instructions for a similarly proportioned stocking (the proportions make it so cute!)?
Thank you!
Hi Amy,
Thanks for writing in. While we don’t have a crochet version of this pattern at the moment, that’s definitely a good suggestion! I’ll absolutely pass it along to the rest of my team, so we can consider creating crochet instructions.
All the best,
Lili
Dear purl bee,
I am from Germany and my English is not very good., I hope you can understand me:)
I like the snow day socks very much und I have a question about the socks: Are they made for filling them with christmas presents od are the socks made for babies? Can I knit them for myself (adult size)?
Thank you very much for answering me and I wish you a fine day!Best regards
Kathrin
Hi Kathrin,
Thanks for writing in! These stockings are meant for presents, and not to fit a foot – although, if they should happen to fit your foot, they would be very cozy slippers!
I hope that clears things up!
Julianna
Can you do magic loop with this pattern and yarn? In reading the pattern I’m not sure if it can be done particularly for the beginning and the foot section.
Thanks,
Ruth
Hello Ruth,
Thank you for reaching out! You certainly can use Magic Loop for this project.
Happy knitting ,
Marilla
Hi! I have a question about the short rows… It looks like it jumps from 6 stitches to 8 stitches in rows 6 and 7. Should row 7 read “K7, wrp-t” and row 8 read “P8, wrp-t”? Would it then require two more rows after that to get the new start of the round in the center of the heel? Trying to better understand how short rows work and the math behind it! Thanks!
Hi Allison,
Thanks for reaching out! Because this is a stocking, and not a real sock meant to fit a foot, we did take a few liberties with the short row heel! In a regular short row heel, the short rows would cover half the stitches and would take up half the total stitches and usually move in and out by one stitch at a time, as you are expecting. However, for this sock, we did adjust things a bit because the short rows don’t extend full half way across the stocking and don’t create as sharp of a heel turn so that the stocking hangs nicely – and so that you end up nicely at the beginning of the round!
I hope that clears things up!
Julianna
I purchased the suggested yarn from Purl. Got the size 17 double pointed needles also. I found the stocking impossible to make. The size 17 needles are too large to maneuver with only 2 stitches of doubled yarn apiece. And having to do yarn overs and keep markers dangling on the sticks as well, was an exercise in frustration and, for me, futility. Luckily Purl has a free hat pattern using this yarn undoubled on size 11 needles. More doable, I hope. I wish you had given some warning of the difficulty and dexterity involved in making these stockings.
Hi Karen,
Thanks for reaching out, and I’m so sorry that the toe of the sock gave you so much trouble! It can indeed be very tricky to start a toe up sock like this with only 6 stitches distributed over double pointed needles; however, if you do ever decide to give it another shot, if you can make it through just a few rows, it very quickly gets easier as you increase – even just getting to 4 or 5 stitches per needle makes a world of difference in the ease of knitting each row! Either way, I’m so glad you enjoyed knitting our Snow Day Hat instead!
Best,
Julianna
I love these stockings and I’ve been so excited to start them. Thank you for making such cute patterns! But I have had a hard time with the toe section. I’ve started over several times but I still have huge holes and I’m not sure how to make them smaller. Do you have any other cast on methods I can use to get the same look but maybe smaller holes? Thank you for your help!
Hi Emily,
Thanks for reaching out! If you are having difficulty with Provisional Cast On, go ahead and use a Basic Long Tail Cast On!
All the best,
Gianna
Would I be able to use this yarn combo to make the “Knit Before Christmas Stocking”? I would double on the comment about trying to knit from the toe up on dpn’s with this weight yarn.
Hi Cathy,
Thanks for reaching out! Yes, you can definitely use this combination for the Knit Before Christmas Stocking! Two strands of Super Soft Merino should come up to a similar gauge as Gentle Giant. I do recommend working a gauge swatch prior to starting to insure that it is consistent.
All the best,
Gianna
I’m really surprised by the red color in the project photo for the Red Poppy version of this sock – it almost looks like a true red on all of my devices, including on a color-calibrated monitor, even though the photo of the Super Soft Merino yarn itself looks much more orange. I bought the Red Poppy before you released the new colors in hopes that it was more like the project photos than the product photos, but when I received it, it turned out to be the reddish orange shown in the product photo – far from the true red look of the project photo!
I’m glad Super Soft Merino is now also available in the much more “true red” feeling Red Gingham. Having received the Red Gingham now, too, I can say it looks a lot more like the project photo of the Red Poppy version. I can’t wait to get started on this project with that color!
Anyway, I know that photographing colors accurately is very hard, but I figured I’d mention this in case anyone else was looking to make more “traditional” Christmas colored Snow Day Stockings.
I love you Purl Soho! I just finished making this beautiful stocking-have knit for years but like others struggled with dpns and this weight yarn. I’ve never felt the need to use Magic Loop before, but watched the Purl Soho instructional video which made the mystery easy to understand and execute. One successful stocking later, I’ve learned something new and couldn’t be happier with the outcome.
Hi Mary,
Thanks for reaching out and for your kind words! I am so pleased to hear that you enjoyed making this stocking! Magic loop is a great technique (can be intimidating at first) but once you get the hang of it, it is quite fun and so useful!
Happy knitting!
Gianna
will 8″ DPN’s work?
thanks in advance!
Hi Tara,
Thanks for writing in! You can use either 6″ or 8″ long DPNs for this pattern!
All the best,
Lili
I am Interested in making this Snow Day Stocking. Is it possible to make the stocking larger in circumference and longer in length?
Hi Judi,
Thanks for reaching out! Yes, you can absolutely do both modifications. To increase the circumference, first repeat the increase rounds in the TOE section until you have your desired stitch count. Then, you can knit the foot to however long you want it to be, work the short rows, and then continue the leg to your desired length. Hope this helps!
All the best,
Lili
I would love to knit this but I don’t have DPNs, do you have a version of this pattern for circular needles? Thank you!
Hi Madison,
Thanks for reaching out! Since the circumference of this stocking is fairly small (13 inches, at its widest), you will not be able to use circular needles, unless you have very short ones (less than 16 inches), or if you use the magic loop technique. Magic loop is probably the most feasible option, and you can use that technique and follow the pattern exactly as written! If you’re unfamiliar with magic loop, I’d recommend checking out our tutorial on it. Hope this helps!
All the best,
Lili