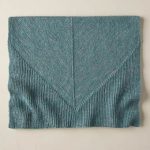
Verse + Reverse Scarf
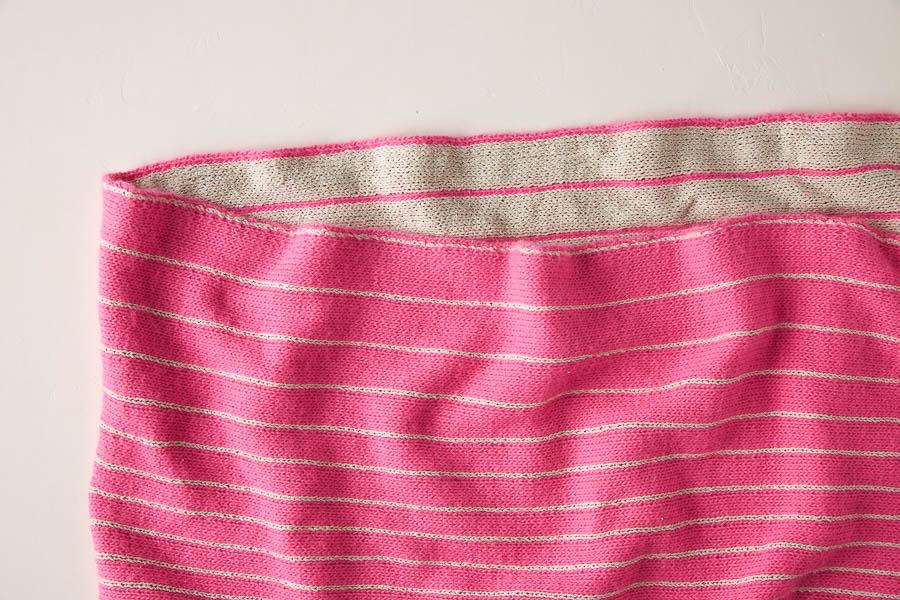
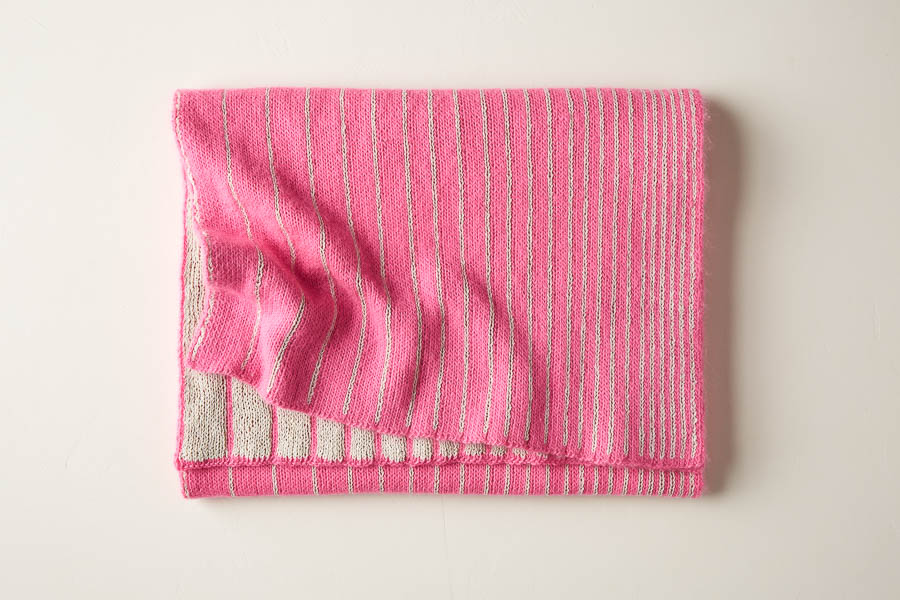
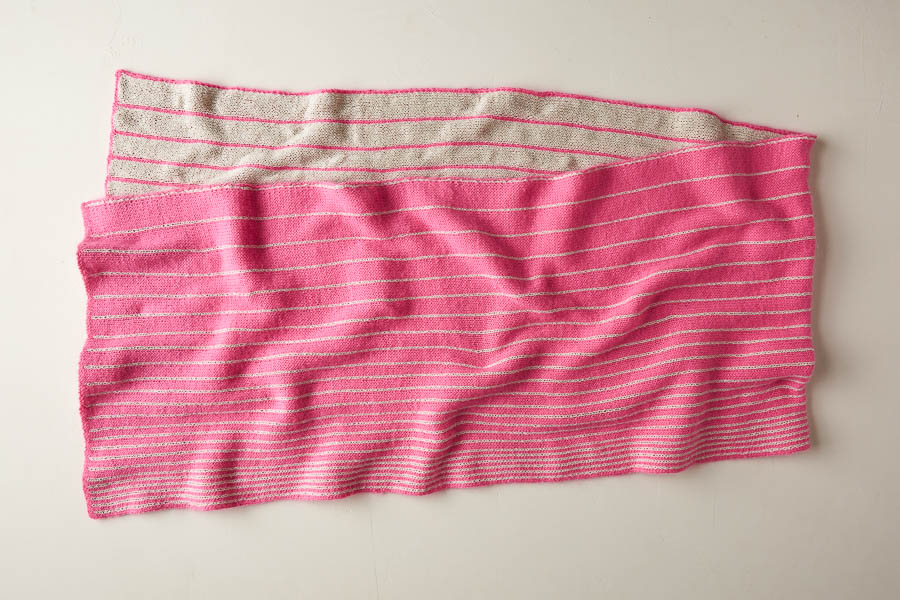
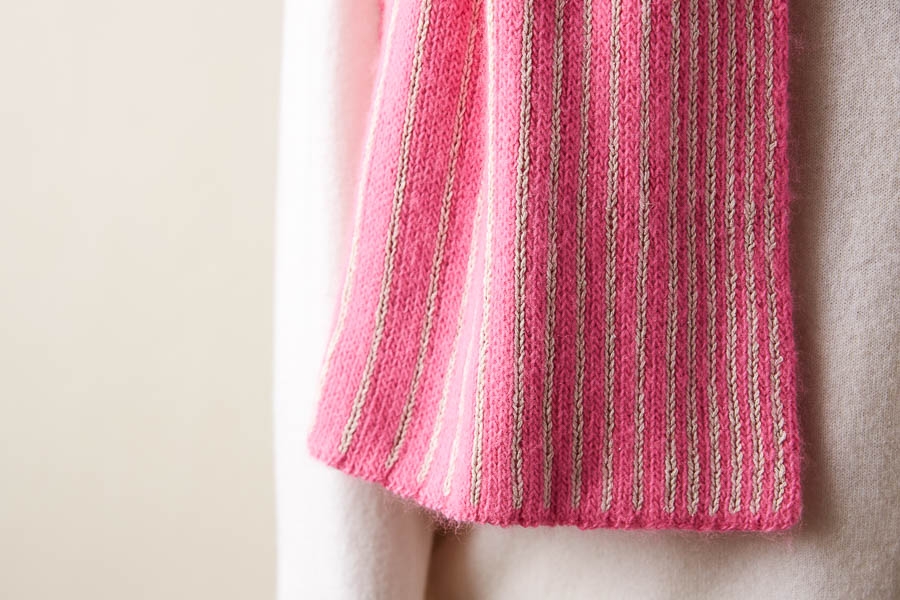
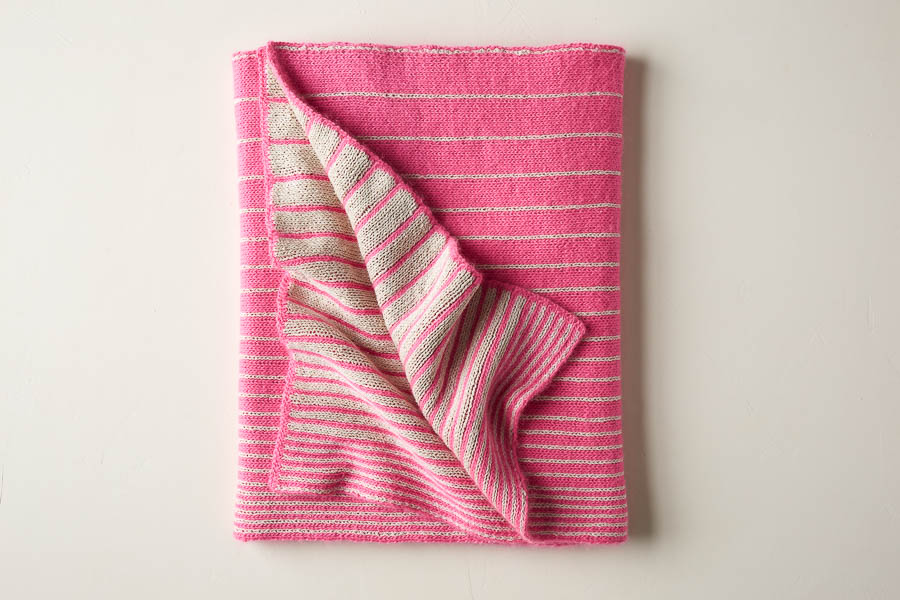
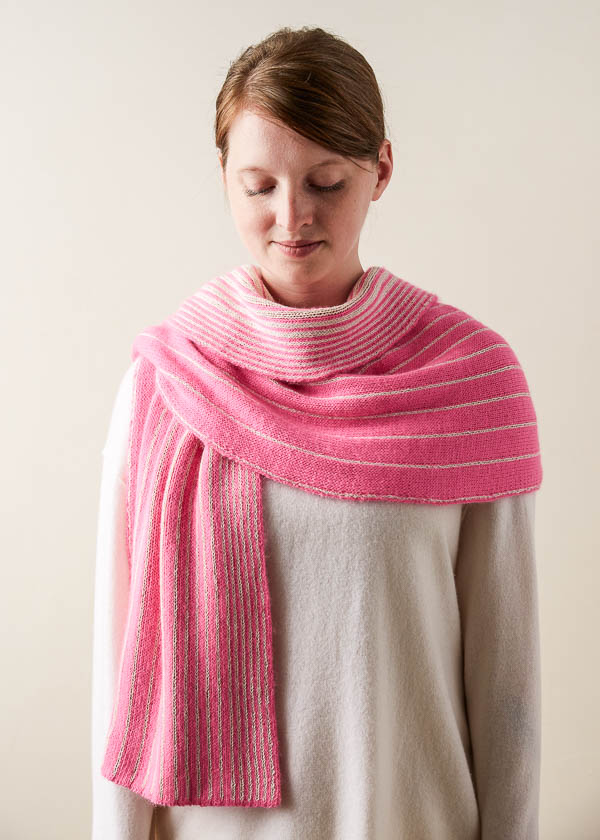
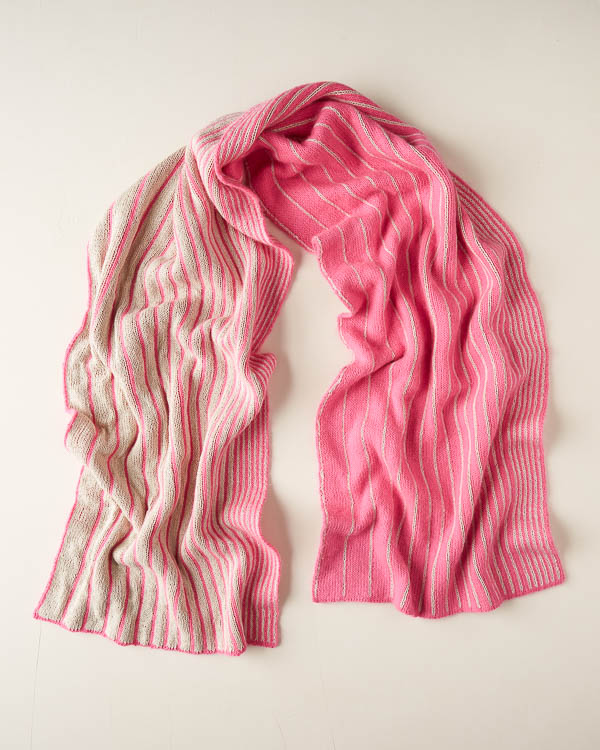
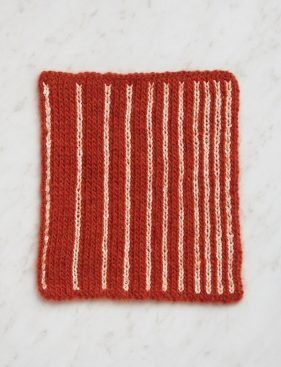
Our Verse + Reverse Scarf promises two plots in one, a seamless dual narrative from two colors at once. This double-knit endeavor is a gloriously uncomplicated process that feels (and looks!) like magic spinning from your needles.
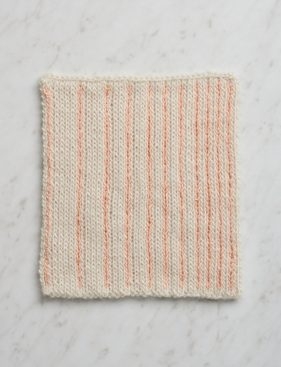
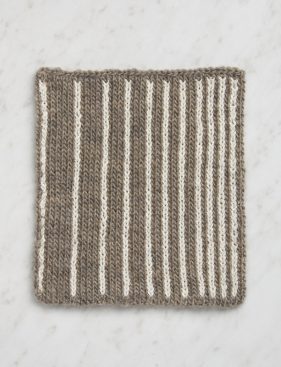
Casting on the short side, row after row of vertical lines emerge thanks to the simple technique of double knitting. Quell your concerns by watching our new Double Knitting video tutorial, which shows how this slip stitch technique is easy enough to be a challenge for advanced beginners and, for the experienced, a project to sink your teeth into.
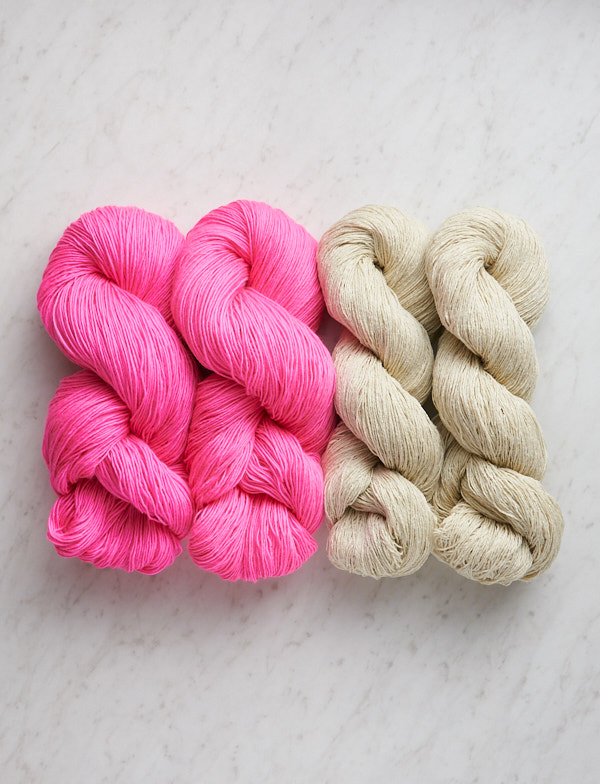
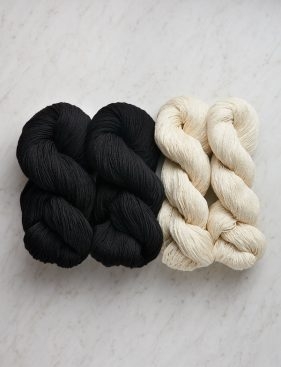
We used two yarns from different ends of the fiber world: our Cattail Silk with its raw elegance and our Line Weight merino with its cloud-like downy softness. These two voices seem to completely understand each other while respecting their differences. You’ll only need two skeins of each, and to help you choose colors, we’ve put them together in seven palettes!
Designed by Purl Soho designer, Jake Canton. Click here to see even more of Jake’s designs!
Share your progress and connect with the community by tagging your pics with #PurlSoho, #PurlSohoBusyHands, #PurlSohoVerseReverseScarf, #PurlSohoLineWeight, and #PurlSohoCattailSilk. We can’t wait to see what you make!
Materials
To knit your own Verse + Reverse Scarf, you will need…
- Yarn A: 2 skeins of Purl Soho’s Line Weight, 100% merino wool. Each skein is 494 yards/ 100 grams; approximately 988 yards required.
- Yarn B: 2 skeins of Purl Soho’s Cattail Silk, 100% silk. Each skein is 618 yards/ 100 grams; approximately 1128 yards required.
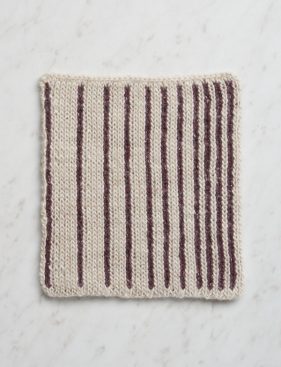
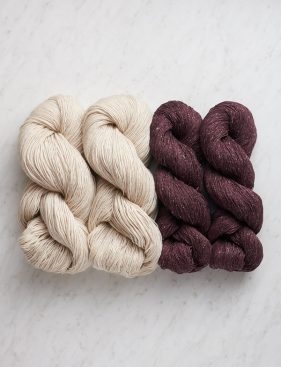
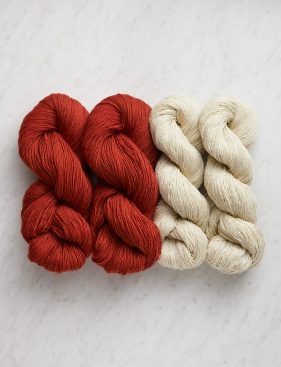
We used the palette Wild Begonia…
Yarn A: Line Weight in Super Pink + Yarn B: Cattail Silk in Porcelain White
Choose from six inspiring palettes, shown below (NOTE: some colors are no longer available)…
TEA CUP

Yarn A: Line Weight in Heirloom White + Yarn B: Cattail Silk in Rabbit Ear Pink
TOADSTOOL
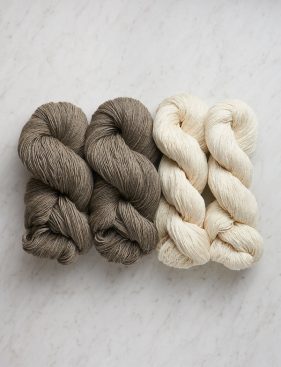
Yarn A: Line Weight in Tabby Gray + Yarn B: Cattail Silk in Moon White
PURPLE TUBER
Yarn A: Line Weight in Wheat Flour + Yarn B: Cattail Silk in Wild Mulberry
RIVER BLUE
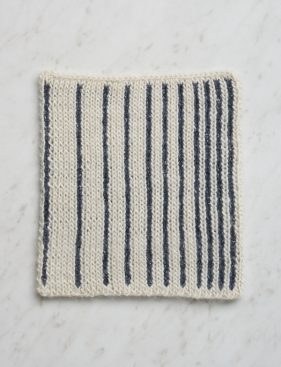
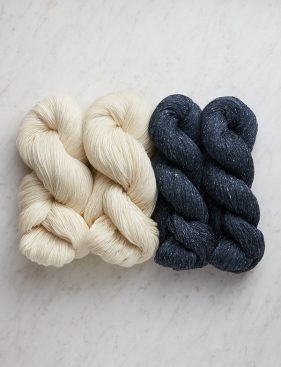
Yarn A: Line Weight in Heirloom White + Yarn B: Cattail Silk in Deep Indigo
WOODPECKER

Yarn A: Line Weight in Soft Black + Yarn B: Cattail Silk in Moon White
CHIMNEY
Yarn A: Line Weight in Kiln Red + Yarn B: Cattail Silk in Porcelain White
You will also need…
- US 4 (3.5 mm), 24- or 32-inch circular needles
- A spare US 4 or smaller, 24- or 32-inch circular needles
Gauge
26 stitches = 4 inches in double knit stockinette stitch
Size
Finished Dimensions: 16 inches wide x 68 inches long
Notes
Slip Stitches
Slip all slipped stitches purlwise unless indicated in the pattern.
Turn + Slide
Each row in this pattern starts with the instructions to either “Turn” or “Slide” the work:
“Turning the work” means to do what you would normally do when knitting rows with circular needles: Transfer the needle from your left hand into your right and the needle from your right hand into your left, and flip the work around so the opposite side is facing you.
“Sliding the work” means to keep the same side of the work facing you and to push all the stitches to the right end of the circular needles. Without turning the work, start the new row as you normally would.
You will know that you’re doing this right if the yarn you need to work the next row is magically there waiting for you!
Double Knitting
This wrap uses a technique called Double Knitting. You can follow the pattern as written, but if you need extra help, our step-by-step video tutorial shows you exactly how to do it!
Pattern
With Yarn A, use a Long Tail Cast On to cast on 210 stitches.
Set-Up Row 1 (wrong side): With Yarn A, k1, p1, slip 1 with yarn in back (wyib), [k1, slip 1 with yarn in front (wyif)] 9 times, p1, slip 1 wyib, [k1, slip 1 wyif] 8 times, p1, slip 1 wyib, [k1, slip 1 wyif] 7 times, p1, slip 1 wyib, [k1, slip 1 wyif] 6 times, [p1, slip 1 wyib, (k1, slip 1 wyif) 5 times] 2 times, [p1, slip 1 wyib, (k1, slip 1 wyif) 4 times] 3 times, [p1, slip 1 wyib, (k1, slip 1 wyif) 3 times] 4 times, [p1, slip 1 wyib, (k1, slip 1 wyif) 2 times] 5 times, [p1, slip 1 wyib, k1, slip 1 wyif] 6 times, k1.
Set-Up Row 2 (right side): Turn the work and with Yarn A, p1, [k1, slip 1 wyif, p1, slip 1 wyib] 6 times, [(k1, slip 1 wyif) 2 times, p1, slip 1 wyib] 5 times, [(k1, slip 1 wyif) 3 times, p1, slip 1 wyib] 4 times, [(k1, slip 1 wyif) 4 times, p1, slip 1 wyib] 3 times, [(k1, slip 1 wyif) 5 times, p1, slip 1 wyib] 2 times, [k1, slip 1 wyif] 6 times, p1, slip 1 wyib, [k1, slip 1 wyif] 7 times, p1, slip 1 wyib, [k1, slip 1 wyif] 8 times, p1, slip 1 wyib, [k1, slip 1 wyif] 9 times, p1, slip 1 wyib, p1.
Row 1 (wrong side): Turn the work and with Yarn B, slip 1 wyib, p1, slip 1 wyib, [k1, slip 1 wyif] 9 times, p1, slip 1 wyib, [k1, slip 1 wyif] 8 times, p1, slip 1 wyib, [k1, slip 1 wyif] 7 times, p1, slip 1 wyib, [k1, slip 1 wyif] 6 times, [p1, slip 1 wyib, (k1, slip 1 wyif) 5 times] 2 times, [p1, slip 1 wyib, (k1, slip 1 wyif) 4 times] 3 times, [p1, slip 1 wyib, (k1, slip 1 wyif) 3 times] 4 times, [p1, slip 1 wyib, (k1, slip 1 wyif) 2 times] 5 times, [p1, slip 1 wyib, k1, slip 1 wyif] 6 times, slip 1 wyib.
NOTE: When changing yarns at the beginning of Row 1, carry the new yarn in front of the old yarn.
Row 2 (wrong side): Slide the work and with Yarn A, k1, slip 1 wyif, k1, [slip 1 wyib, p1] 9 times, slip 1 wyif, k1, [slip 1 wyib, p1] 8 times, slip 1 wyif, k1, [slip 1 wyib, p1] 7 times, slip 1 wyif, k1, [slip 1 wyib, p1] 6 times, [slip 1 wyif, k1, (slip 1 wyib, p1) 5 times] 2 times, [slip 1 wyif, k1, (slip 1 wyib, p1) 4 times] 3 times, [slip 1 wyif, k1, (slip 1 wyib, p1) 3 times] 4 times, [slip 1 wyif, k1, (slip 1 wyib, p1) 2 times] 5 times, [slip 1 wyif, k1, slip 1 wyib, p1] 6 times, k1.
Row 3 (right side): Turn the work and with Yarn B, slip 1 wyif, [slip 1 wyib, p1, slip 1 wyif, k1] 6 times, [(slip 1 wyib, p1) 2 times, slip 1 wyif, k1] 5 times, [(slip 1 wyib, p1) 3 times, slip 1 wyif, k1] 4 times, [(slip 1 wyib, p1) 4 times, slip 1 wyif, k1] 3 times, [(slip 1 wyib, p1) 5 times, slip 1 wyif, k1] 2 times, [slip 1 wyib, p1] 6 times, slip 1 wyif, k1, [slip 1 wyib, p1] 7 times, slip 1 wyif, k1, [slip 1 wyib, p1] 8 times, slip 1 wyif, k1, [slip 1 wyib, p1] 9 times, slip 1 wyif, k1, slip 1 wyif.
NOTE: When changing yarns at the beginning of Row 3, carry the new yarn behind the old yarn.
Row 4 (right side): Slide the work and with Yarn A, p1, [k1, slip 1 wyif, p1, slip 1 wyib] 6 times, [(k1, slip 1 wyif) 2 times, p1, slip 1 wyib] 5 times, [(k1, slip 1 wyif) 3 times, p1, slip 1 wyib] 4 times, [(k1, slip 1 wyif) 4 times, p1, slip 1 wyib] 3 times, [(k1, slip 1 wyif) 5 times, p1, slip 1 wyib] 2 times, [k1, slip 1 wyif] 6 times, p1, slip 1 wyib, [k1, slip 1 wyif] 7 times, p1, slip 1 wyib, [k1, slip 1 wyif] 8 times, p1, slip 1 wyib, [k1, slip 1 wyif] 9 times, p1, slip 1 wyib, p1.
Repeat Rows 1-4 until piece measures 68 inches from cast-on edge, ending with Row 4.
Cut Yarn B.
Next Row (wrong side): Turn the work and with Yarn A, repeat Set-Up Row 1.
Next Row (right side): Turn the work and with Yarn A, repeat Set-Up Row 2.
Next Row (wrong side): Turn the work and with Yarn A, repeat Set-Up Row 1.
Bind Off
Alternating between needles, slip all the knit stitches onto the working circular needles and all the purl stitches onto the spare circular needles.
FOR A BASIC LONG TAIL CAST ON…
Slide the work and with the right side facing you, use Yarn A to bind off using a 3-Needle Bind Off.
IF YOU DID A LONG TAIL TUBULAR CAST ON…
Slide the work and with the right side facing you, use Yarn A to bind off in Kitchener Stitch.
Weave in the ends and block as desired!


Your comments and responses are absent – where did they go?
I’ve seen them in the past so I know they did exist
So the question is will this even show up ?
I think I should email cs.
Hi Pam,
Thank you so much for getting in touch, and I apologize that our comments aren’t available at the moment! We are experiencing a few technical difficulties with our site right now, but our web team is hard at work to get everything restored as quickly as possible. The comments should be back in the next day or two, but if you have any questions in the meantime, please let us know!
All the best,
Julianna
Hi. How do I gauge in double knit?
Thanks.
Hi Betsy,
Thanks for reaching out! To gauge in double knit, follow the pattern instructions as if you were making the scarf with a smaller cast on! We have a great Double Knitting tutorial that explains exactly how to work this!
All the best,
Gianna
Thanks Gianna. Well, I finally finished the scarf. I love it but wow was that a slow knit! Like many commenters, I set this project aside and picked it up quite a few times and made some mistakes with the side edges. I am having a problem with the last 3 rows and the 3 needle bind off. The finish does not look quite like the cast on side and I have some bulky spots on certain of the color A striped spots. Thanks for any help.
Hi Betsy,
Thanks for checking back in! You may find it helpful to take a look at our 3-Needle Bind Off tutorial. While this bind-off will never look exactly like the cast-on edge created by a basic long tail cast-on, it should come fairly close! Also, if you did a long tail tubular cast-on, then we recommend using kitchener stitch to bind off instead.
It also would be easier for us to give advice on this issue if we could visualize the problem! Feel free to send along photos of your work to customerservice@purlsoho.com so we can get a better idea of what might be going wrong with the end of your scarf.
All the best,
Lili
I love this scarf. So much so that I have knit about 14 inches, wasn’t happy with it, frogged it and started over. Now I have about 5 inches done and am going to frog again. (Re-frog?) The problem is the edges. I just can’t get them right. I’m going to try to devise another way of creating a neat edge but thought I’d ask you first if you have any suggestions?
Hi Sue,
Thanks for reaching out! I am so glad to hear that you love this scarf! I am happy to help, please send a photo of your work to our customer service team at customerservice@purlsoho.com and they can troubleshoot further what may be happening and help advise a way to keep your edges neat!
Warmly,
Gianna
I will never give up on this scarf although I’ve been working (on and off) on it for almost 2 yrs. I’m still having a problem with the edges although they look better now but I’m not proud of them! The double knitting isn’t a problem at all; I mastered that about 3 frogs ago. I just want you to know that I’m not giving up on it. I’ve requested that it be buried with me after I die so that I can keep working on it. Maybe I’ll finally finish it!
I see above you mention how to cast off but how do you cast on with 2 colors? It looks as though you have done the first couple rows in the primary color but is there a particular way you add the second color?
Hi Jo Ann,
Thank you for writing in! We used a single color for both the cast on and cast off in this pattern. For this pattern specifically, we used color A for both steps. Unfortunately, we do not have a tutorial on casting on with two colors at the moment. I hope this helps clarify the instructions but please let me know if you have any other questions!
Happy knitting,
Gavriella