
Julie Hoover for Purl Soho: Sayer
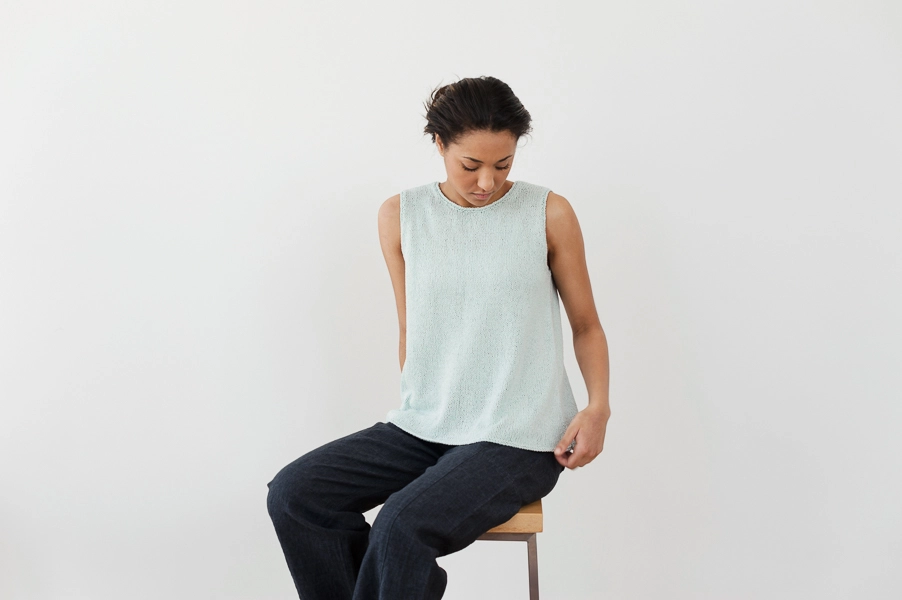
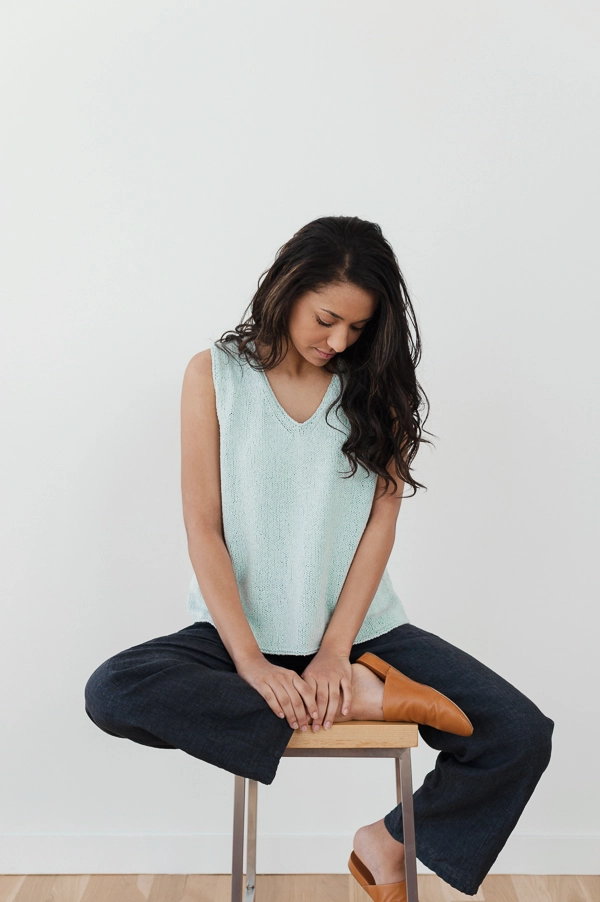
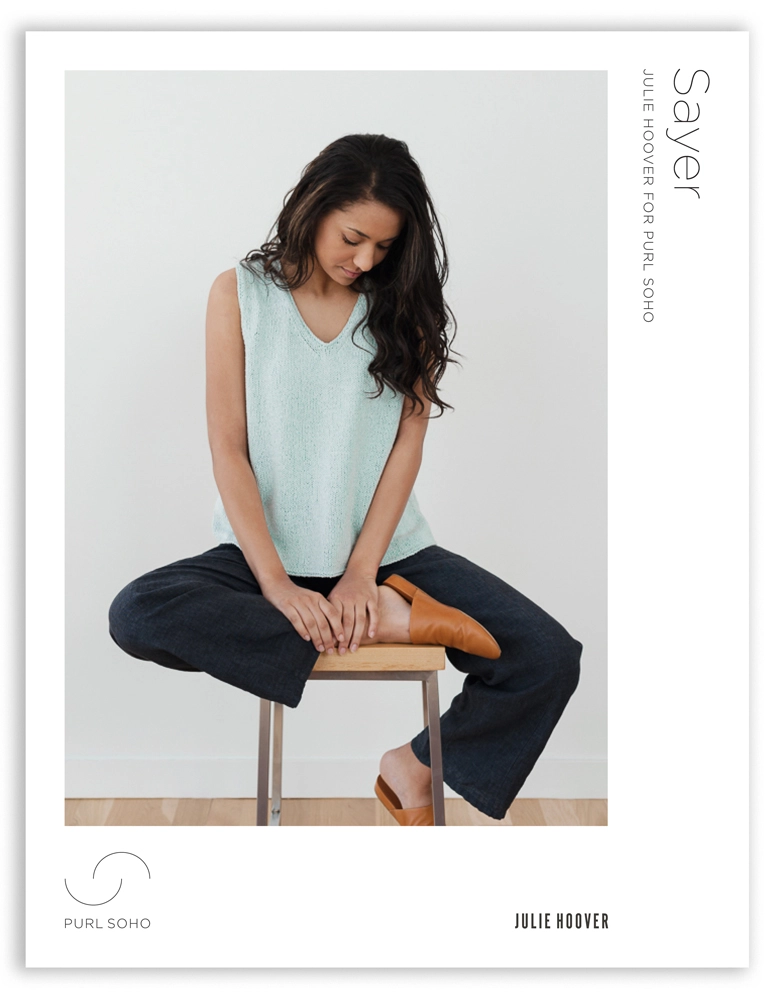
From designer Julie Hoover specially for Purl Soho, the Sayer tank is a no-fuss knit fit for summertime’s most fun activities: outdoor dinners, vacation ramblings, and hammock catnaps.
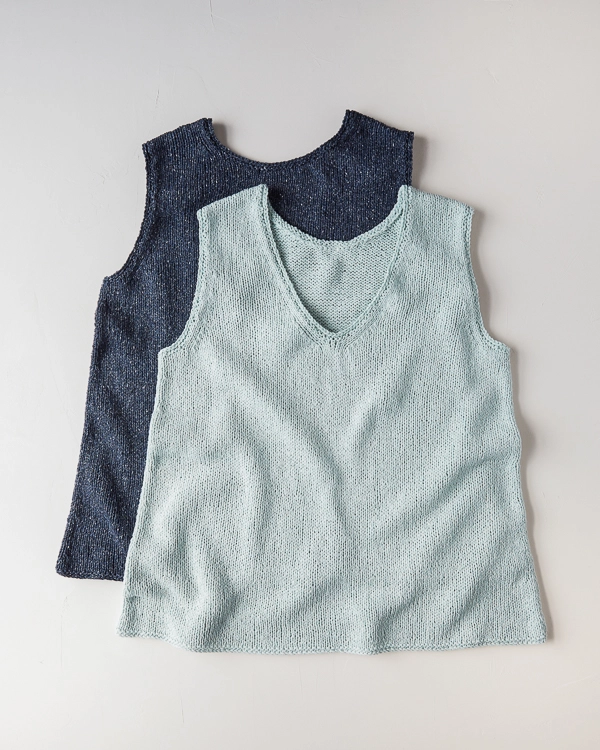
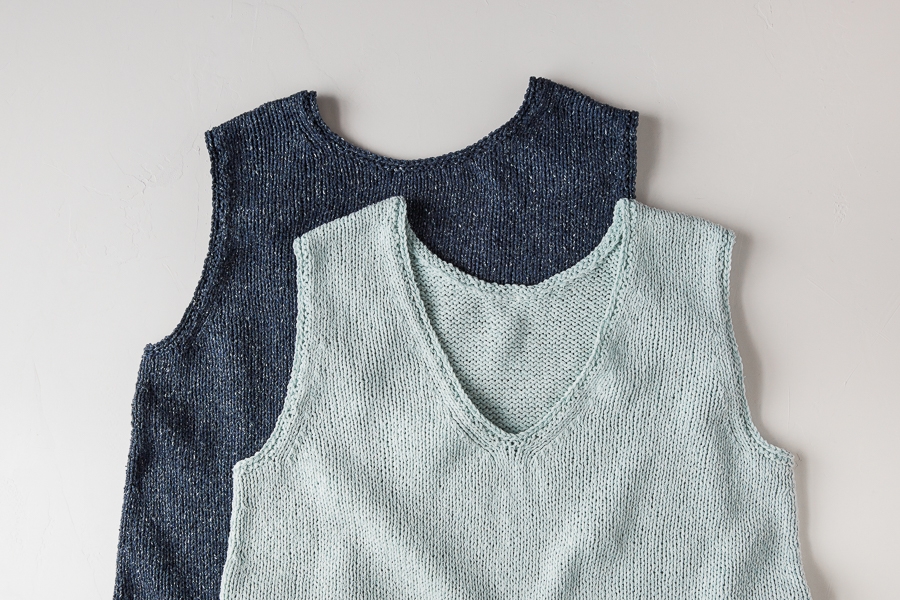
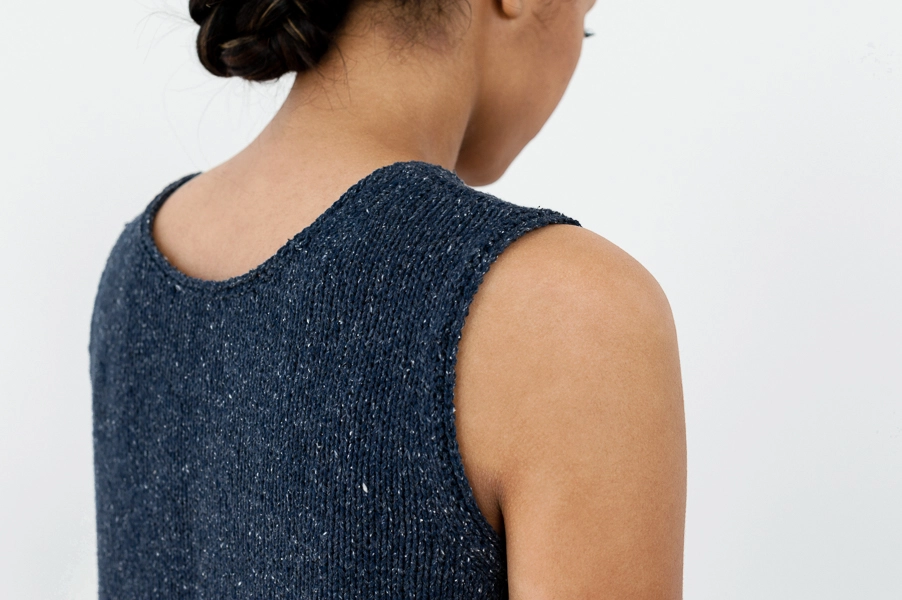
With a V-neck on one side and a crewneck on the other, the Sayer gives you free rein to decide which one to wear in front and which in back… And to change your mind! Knit in two pieces from the bottom up, Sayer’s simple stockinette body, with slight A-line shaping and garter edges, is truly a breeze!
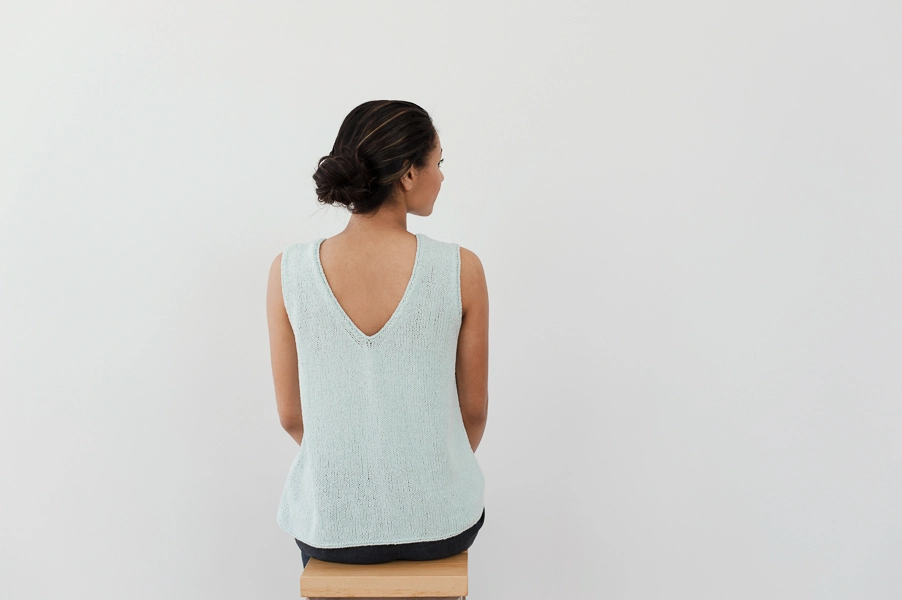
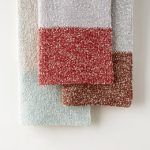
Julie knit her tank holding two strands of our fine Cattail Silk for a fabric that is lightweight and cool, natural and totally beautiful. We dipped into two summer-sky shades, Blue Bamboo and Deep Indigo, but the sky’s the limit with eighteen gorgeous colors of Cattail Silk to choose from. You’ll only need a few skeins to whip up your own, just in time for summer!
Designed for Purl Soho by Julie Hoover. Currently based in Ann Arbor, Michigan, Julie Hoover designs knitwear and makes yarn, for both her own personal label and others. Her work reflects a lifelong passion for clothing and textiles, and her view that knitting is a beautiful way of creating timeless fashion, a thoughtful mix of quality and creativity, intention and care.
Share your progress and connect with the community by tagging your pics with #PurlSoho, #PurlSohoBusyHands, #PurlSohoSayer, and #PurlSohoCattailSilk. We can’t wait to see what you make!
Materials
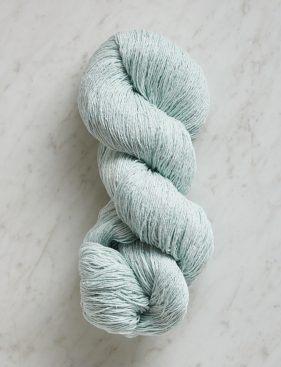
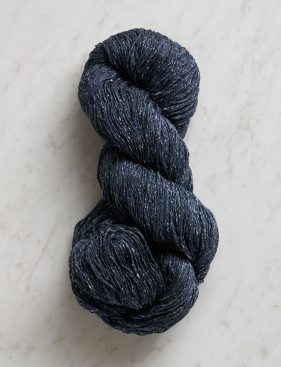
- 2 (3, 3, 3) (4, 4, 4, 4) skeins of Purl Soho’s Cattail Silk, 100% silk. Each skein is 618 yards/ 100 grams; approximately 1235 (1375, 1580, 1715) (1935, 2095, 2290, 2445) yards required. These are the colors Blue Bamboo and Deep Indigo.
You’ll also need…
- US 7 (4.5 mm), 24-inch circular needles
- US 7, 16-inch circular needles
- US 6 (4 mm), 16-inch circular needles
- Stitch markers
- Scrap yarn or stitch holders
- T-pins and blocking wires (optional)
- Julie Hoover for Purl Soho’s Sayer Pattern
Gauge
18 stitches and 27 rows = 4 inches in stockinette stitch on larger needles with yarn held double, after blocking
Sizes
NOTE For help picking a size, please check out our Understanding Ease + Selecting Size Tutorial!
36½ (40, 43½, 47) (50½, 54, 58, 62)
To fit actual chest circumference of 30–33 (34–37, 38–41 41–44) (45–48, 48–51, 52-55, 56-59) inches, with approximately 3-6 inches of ease.
- Finished Chest Circumference: 36½ (40, 43½, 47) (50½, 54, 58, 62) inches
- Finished Length from Shoulder to Bottom Edge: 24 (24½, 26¼, 26½) (27¾, 28¼, 29¾, 30) inches
SAMPLE: The top pictured here is Size 40 inches modeled with 6½ inches of ease.
Pattern
Sayer is is available for purchase as a PDF download.
Update: More Sizes
January 2020
We’ve expanded the size range for Sayer! Since last spring, all of our new sweaters fit at least a 60-inch chest. If you downloaded this pattern in the past, please update your pattern for free, either in My Pattern PDFs on your My Account page at purlsoho.com or in your Ravelry library.


Hi, I’m about to shape the armholes on the crew neck side. When it says “bind off x stitches at beginning of next 2 rows,” does that mean to bind off knitwise on the right side row and purlwise on the wrong side row? If so, would that also be the rule for the rest of the pattern (unless specifically stated otherwise)?
Hi Anna,
Thanks for reaching out! Unless otherwise specified, you will want to always bind off on the right side of the fabric!
I hope this helps, happy knitting!
Gianna
Thank you, Gianna!
I haven’t knitted anything in quite a long time and was going to start with the Little Moons Lace Wrap but am concerned it might be too complicated, so might start with the Sayer. I’d like to make it using the Burnish yarn but since I have to buy the pattern, I see from the comments that it has to be soaked and washed before blocking if you use the Cattail silk. Is this the same case with the Burnish? And it would be great if you could show some samples of garments made with each type of yarn as well as care instructions before we have to buy the patterns.
Hi Katherine,
Thanks for reaching out! Burnish is an excellent option for this top! You don’t need to soak and wash the yarn prior to blocking since rayon is a much different fiber from silk and doesn’t require the extra steps, it is good to go to start knitting!
Also, this top was knit and designed in the Cattail Silk, so that is the only version of the samples we have knit up. Since we didn’t design this top in Burnish, and it is only a yarn that has come up as a recommended substitute for people who don’t want to knit with Cattail, we do not have a sample available.
We are always happy to provide yarn substitutions and care instructions for those yarns upon request, but unfortunately, we just don’t have the resources to create samples for every yarn. We only have the samples knit in the yarn the pattern was written for.
I hope this helps and clears things up, happy knitting!
Gianna
Hello,
I have two questions.
First, I’d rather do the blocking at the end of the project. Is there any reason why I can’t do the seams before blocking the finished project? If the front and back pieces are identical along the seams, there shouldn’t be any issue with the pieces not matching.
Second, should the seaming be done with a single yarn, or should it be doubled in the needle?
Thanks! I’m really enjoying this knit and the way the finished fabric drapes.
Hi Laura,
Thanks for reaching out! We recommend blocking the pieces before assembly because it makes the seaming process much easier and you can ensure that the pieces are blocked to the exact finished dimensions. It also helps to even out the stitches so you have an easy time sewing! I always recommend following the pattern and blocking the pieces prior to assembly but I also suggest blocking your finished garments again once you have sewn everything together for the best overall results. Also, when you sew the pieces together you will want to use a single strand, not a doubled strand.
I hope this clears things up and I am so glad to hear that you are enjoying this patter!
Gianna
What is meant by “work 1 wrong-side row even”. I know what a wrong side row is but what does “even” mean?
Hi Pam,
That’s a really good question! Here, “work 1 wrong-side row even” just means to work a normal wrong-side row, so in the case of this pattern: Slip 1, purl to end of row. Basically, the word “even” is there to indicate that you don’t need to work any decreases or bind off any stitches in this row, like you’ll do on other wrong-side rows in this portion of the pattern. Hope this helps!
All the best,
Lili
Hello,
I tried needle size US 7 (4.5mm) and am getting 20 stitches across, instead of 18 as indicated in the pattern for gauge. Should I go up a needle size to US 8 to get gauge? I only ask because the label for the Cattail Silk yarn says for US size 2 to 5 needles, and 4 inches = 24 to 30 stitches.
Hi Adriana,
Thanks for reaching out! Yes, that is correct, if you find you have more stitches than needed to obtain the gauge you will want to go up in needle size! The gauge of this pattern is a bit unique since you are using 2 strands of Cattail Silk as opposed to a single strand, so you can disregard the suggested needle size on the Cattail Silk label since those are what we recommend using if you are only knitting with a single strand!
I hope this clears things up, happy knitting!
Gianna
Hi- do you think I can make this using 2 stands of Santolina instead of Cattail Silk?
Thanks!
Danielle
Hi Danielle!
Thank you for your questions! Two strands of Santolina would be too thick for this pattern, however just one strand of Santolina would be perfect! We always recommend double checking gauge, especially when substituting yarns, however Santolina and Cattail Silk have a very close gauge so you shouldn’t need to make too many adjustments.
I hope this helps!
Happy knitting,
Margaret
oh thanks…..I guess I don’t understand gauge! they both say fingering and Cattail says 6.0 to 7.5 sts = 1 inch and Santolina says 6.5 to 7.0 sts = 1 inch….so if cattail is held double I’m confused why Santolina couldn’t be! What weight would Santolina knit up to held double?
Thanks and sorry for my ignorance!
Hi Danielle,
We’re so sorry for the incorrect information in our previous reply! Since this design uses a fingering weight yarn held double, two strands of Santolina would be perfect! Just be sure to do a gauge swatch to double check. You may need to size up or down your needles in order to get the correct gauge!
All the best,
Lili
Hello…I have two questions regarding the Sayer Pattern.
1. for the sloped bind off, my size requires binding off 9 stitches total…would I bind off 6 stitches normally on the first round then three sloped on the second round?
2. I’d like to do both sides crew neck. Can I just knit the crew neck pattern twice? Thank you,
Hi Alison,
Thanks for reaching out! Can you let me know where in the pattern you’re seeing a bind-off of 9 stitches total? Perhaps I’m missing this! If you let me know what size you’re making, that would be super helpful as well. In general though, you would work the normal number of bind-off stitches on the first row. Then, on the next right side row, you would slip the first two stitches and bind off one of them. After that, you would work one fewer bind-off stitch than the pattern states, since you already worked the first one with the slipped stitches!
And in answer to your second question, yes, it would definitely work to knit the crew neck side twice. Hope this helps, and I’ll keep an eye out for your reply to the first question!
All the best,
Lili
Hi Lili,
Thank you for getting back to me. I’m on page two, “Shape Armholes” section – Crew neck side. size is 47. …directions are to bind off 9 stitches at the beginning of the next two rows. I just don’t understand the sloped bind off. I’ve watched the video over and over, but I can’t wrap my mind around it. Thanks for your time and patience.
Ally
Hi Ally,
Thanks for letting me know! You actually will not need to use a sloped bind-off at this point in the pattern. That’s because you’re binding off 9 stitches on each side, not next to each other! You’ll begin by binding off 9 stitches on the first one of these two rows, which is a right side row. Once you finish knitting across that row, you’ll be on the other side of the knitting. Then, you’ll turn your work to begin the second row, which is a wrong side row, and you’ll bind off 9 stitches there. This creates the bottoms of the armholes–one on each side!
All the best,
Lili
Thank you Lili!
I so appreciate your help!
Ally
I’d like to begin this in the round and then I read in previous comments that I should “subtract two stitches from each the front and back cast on and from the armhole cast offs …but otherwise it should be smooth sailing!”
My question is about side decreases- how should I adapt them to shape the sides in the round?
Thanks!
Hi Chantal,
I would recommend placing a stitch marker halfway through your live stitches to mark the other side. Then, you can simply work the decreases as the pattern indicates before and after each marker (the end-of-round marker and the new marker) for the side shaping!
All the best,
Lili