
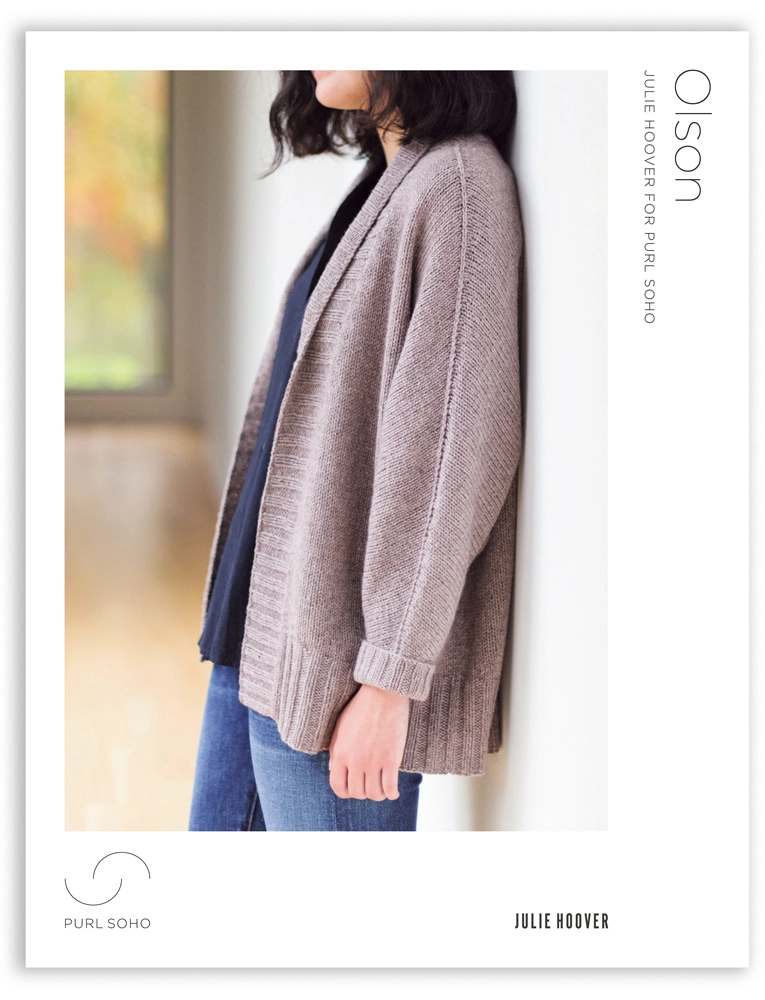
Julie Hoover for Purl Soho: Olson
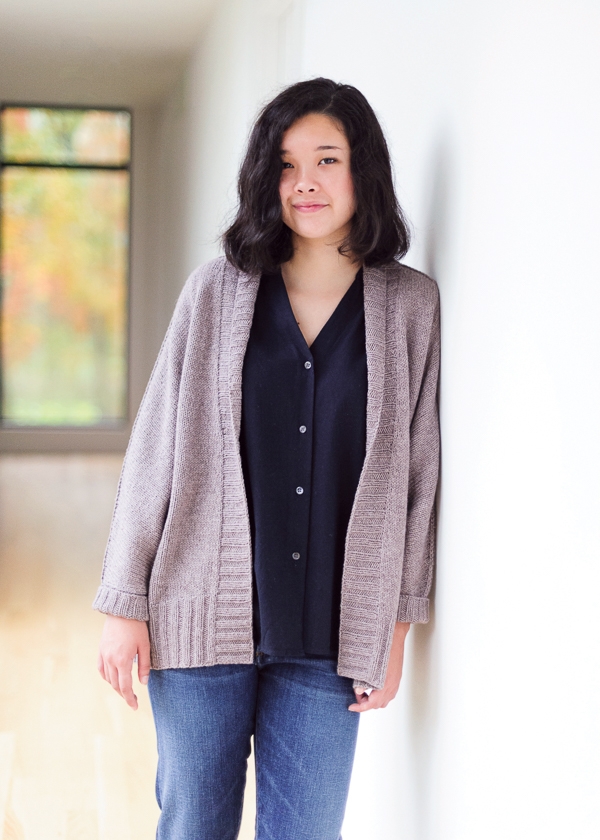
If, like me, your favorite shirts are loose with a generous armhole depth, when you want to layer something warmer over them, you can’t reach for a cardigan that has a traditional shape. That’s where Olson comes in, a cardigan inspired by a hole in my closet!
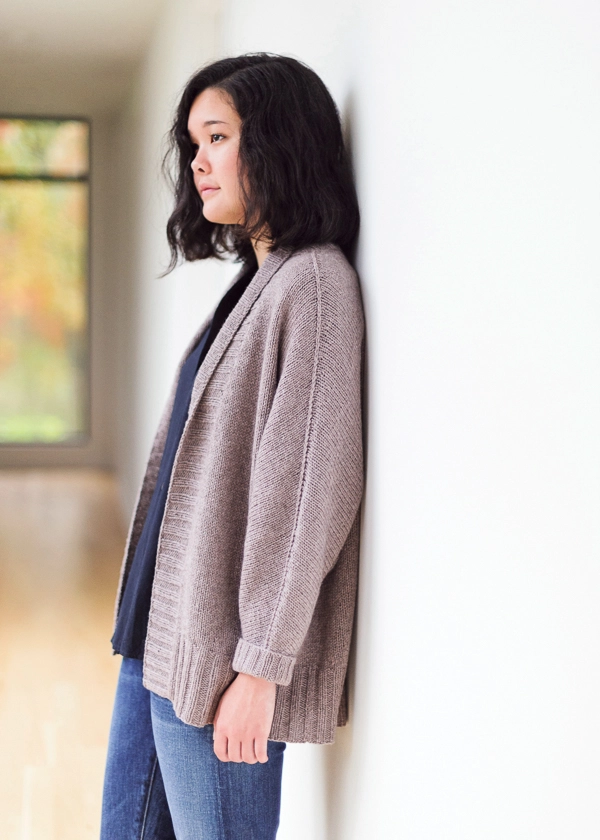
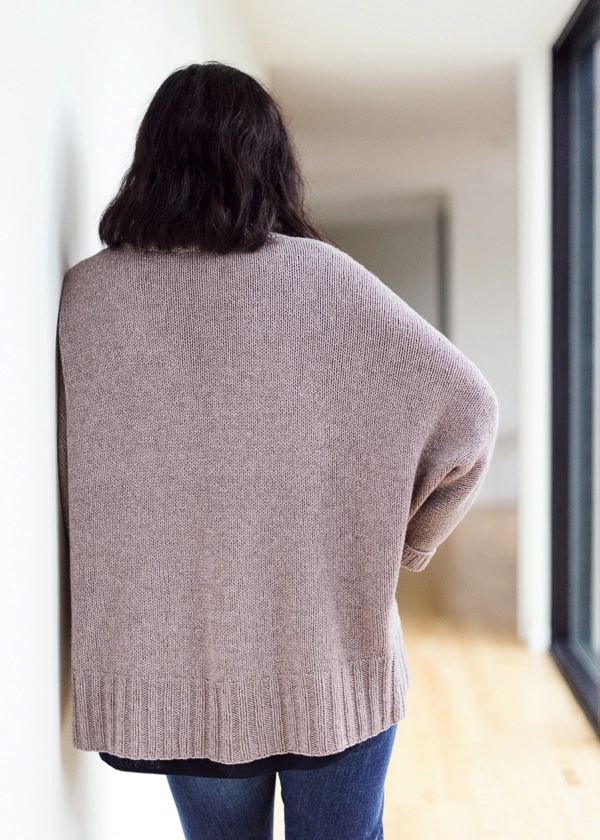
Olson has a deep Dolman sleeve and a steep shoulder slope, making it an ideal garment to pull on over almost anything. There is also subtle short-row hem shaping, slightly higher in the front than the back for a gentle sweep. In addition, a Modified Three-Needle Bind Off that celebrates (as well as joins) the long slope of the sleeve. Extra deep ribbed bands are the final touch.
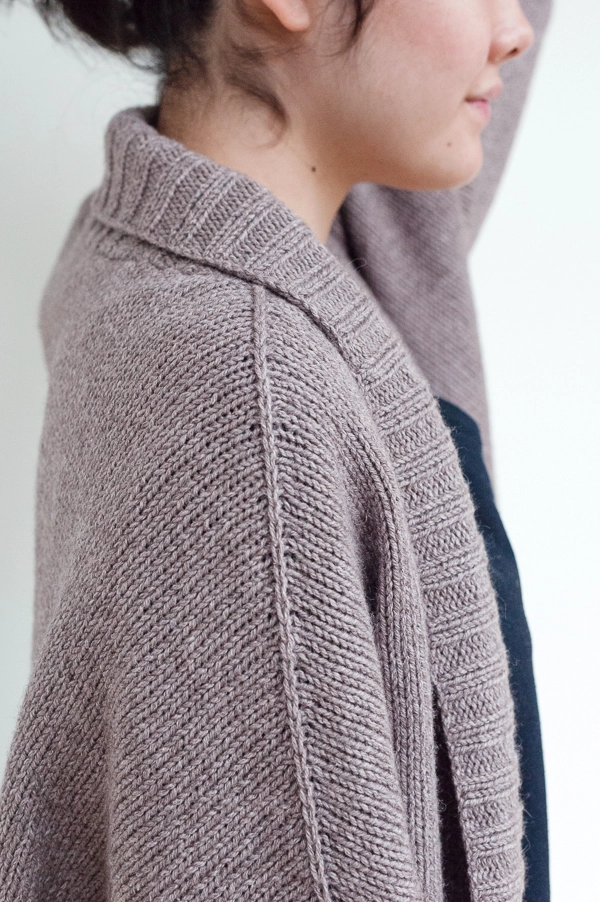
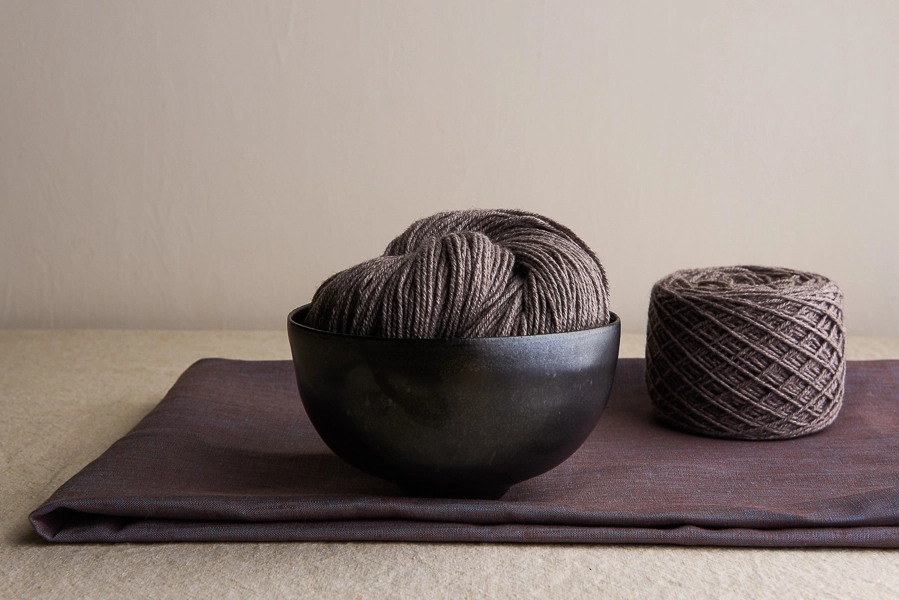
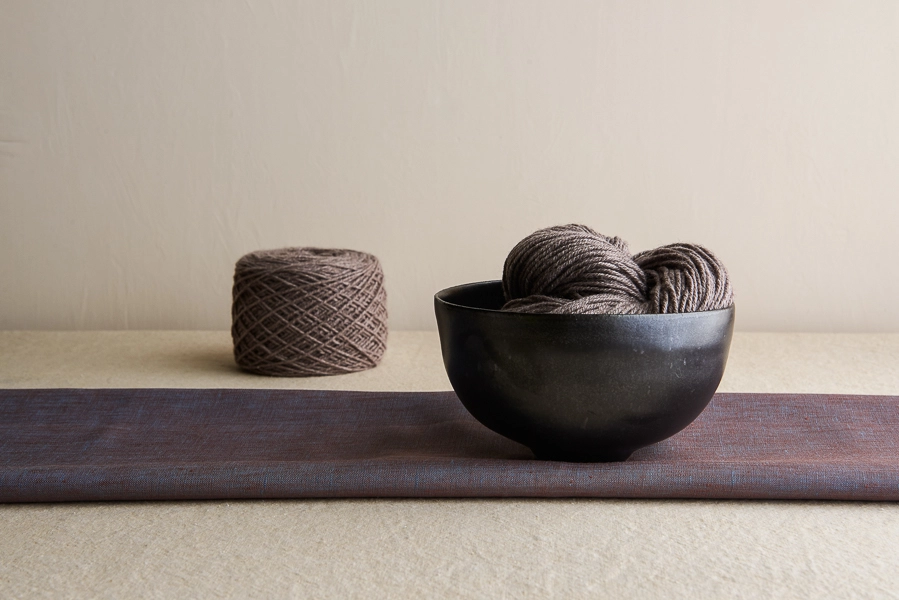
For this classic knit, I chose Purl Soho’s Understory, a fantastic blend of alpaca, yak, and silk that looks and feels absolutely amazing in simple stockinette stitch. Its drape is lightweight, but it knits up into a wonderfully warm and cozy fabric.
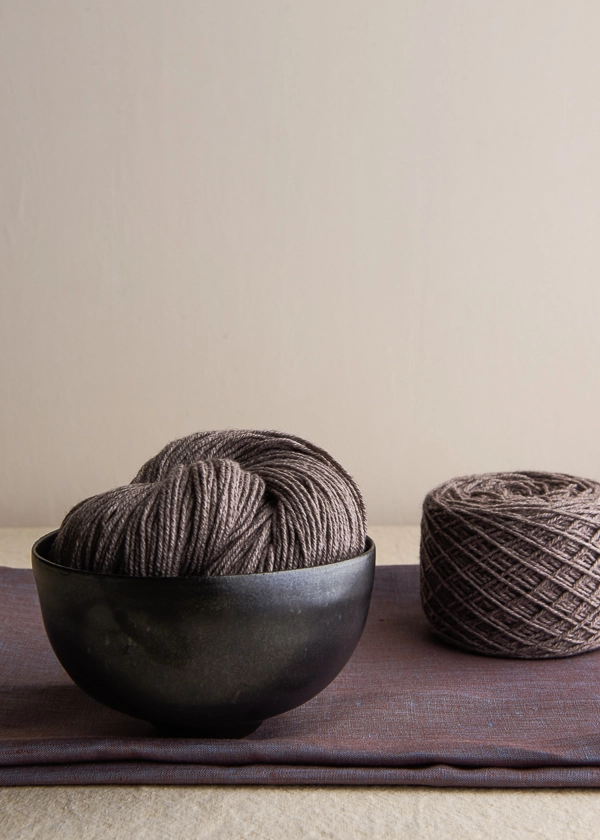
I love the color Silver Berry, a pale lilac with a dose of gray that feels timeless and neutral but far from boring. I think it’s the perfect color for Olson, nothing too fancy but very special! -Julie
Designed for Purl Soho by Julie Hoover. Currently based in Ann Arbor, Michigan, Julie Hoover designs knitwear and makes yarn, for both her own personal label and others. Her work reflects a lifelong passion for clothing and textiles, and her view that knitting is a beautiful way of creating timeless fashion, a thoughtful mix of quality and creativity, intention and care.
UPDATE: NOW IN HEDGEROW!
OCTOBER 2023
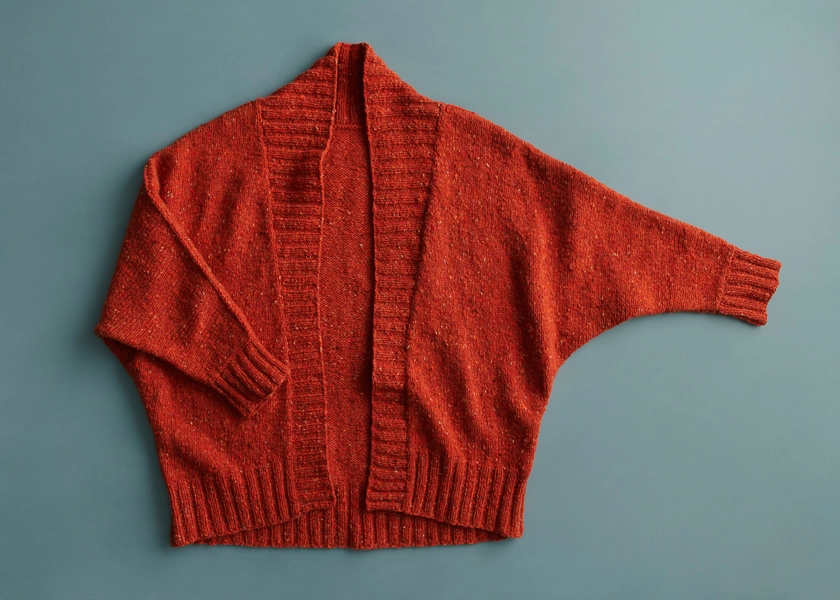
Our Hedgerow infuses your Olson with a wealth of character and vitality! Made in County Donegal, Ireland, Hedgerow has a softer feel than traditional Irish wool with 93% merino wool, 3.5% cashmere, and 3.5% mulberry silk. Its two loosely spun plies knit into a fabric full of rugged beauty that celebrates the aesthetic and integrity of time-honored Irish wool tweeds. With colorful bits (“burrs” or “nebs”) spun into the fiber, every stitch of this yarn is a joy!
Share your progress and connect with the community by tagging your pics with #PurlSoho, #PurlSohoBusyHands, #PurlSohoOlson, and #PurlSohoUnderstory. We can’t wait to see what you make!
Materials
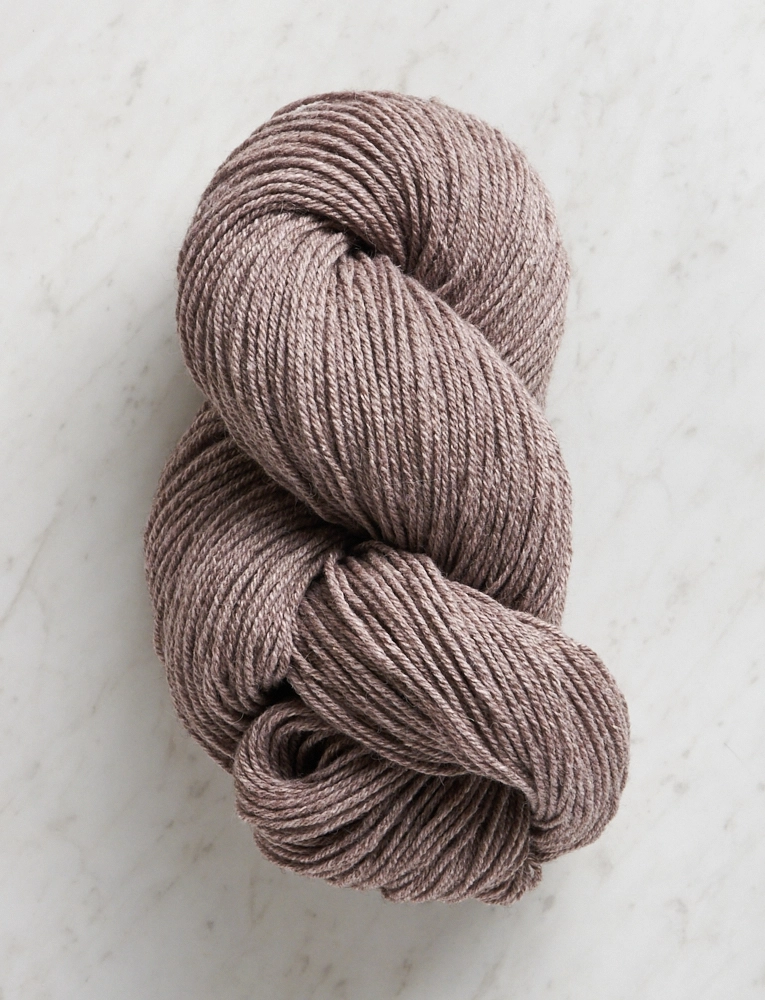
- 6 (6, 7, 7) (7, 7, 8, 8) skeins of Purl Soho’s Understory, 50% baby alpaca, 25% baby yak, and 25% silk. Each skein is approximately 250 yards/ 100 grams; approximately 1320 (1370, 1515, 1570) (1690, 1745, 1890, 1965) yards required. We used the color Silver Berry. (NOTE: We no longer offer Understory, but choose from one of our other light worsted/dk weight yarns.)
- US 6 (4 mm), 32- or 40-inch circular needles
- US 7 (4.5 mm), 24- or 32-inch circular needles
- A set of US 6 double pointed needles
- A stitch marker
- Scrap yarn or stitch holders
- An Olson Pattern
Gauge
18 stitches and 27 rows = 4 inches in stockinette stitch on larger needles, after blocking
Sizes
NOTE For help picking a size, please check out our Understanding Ease + Selecting Size Tutorial!
40¾ (44½, 47¾, 51½) (55, 58¾, 62½, 65¾)
To fit actual chest circumference of 30–32 (34–36, 38–40, 42–44) (46–48, 50–52, 54–56, 58–60) inches with 7–10 inches of ease
- Finished Midriff Circumference: 40¾ (44½, 47¾, 51½) (55, 58¾, 62½, 65¾) inches, with front bands overlapping
- Finished Length from Shoulder to Center Back: 28 (28¼, 29¼, 29½) (30¾, 31, 32, 32¼) inches
- Finished Length from Shoulder to Center Front: 25¼ (25½, 26¼, 26½) (28, 28¼, 29¼, 29½) inches
- Finished Length from Cuff to Underarm: 14 inches
SAMPLE: The cardigan pictured here is size 44½ inches on model with 35-inch chest
Pattern
The Olson Pattern is available available as a PDF download only.


Hi
Today (06 August 2020) I`ve bought the pattern for the Olson Cardigan from Julie Hoover at Ravelry.
Ravelry refers to error corrections on your homepage,
but I can’t find….
Please, Where can I find all the corrections for this manual.
Thank you very much for your help:)
Best regards
Beatrix
Hi Beatrix,
Thanks for reaching out! Since you just purchased the pattern, all corrections and updates will be included in the PDF, but you can also access our Errata Page if you would like more information on just what has been updated!
All the best,
Julianna
Is there a reason that I cannot access the comments for this pattern?
Hi Cathi,
Thanks for bringing this to our attention! We recently did a massive upgrade on our website, and we are still working out some of the kinks. Missing comments is one of them! Don’t worry, we still have all the comments, and our tech team is working on getting them back on the website.
In the meantime, is there anything I can help you with?
Best,
Oscar
No, thank you. I like to go back and read all the comments before I begin a new section of the pattern. The comments are showing now and I’m good to go!
I am working on this pattern and have noticed that the increases RLI and LLI on page 3 for the back are now labeled RRI and LLI on pages 5 and 6 for the right and left front pieces. Are they the same? If not, what is the difference?
Hi Cathi,
Thank you so much for catching this typo! We do mean for you to use an RLI throughout the pattern – I don’t think there is such a thing as an RRI in knitting! We’re working on updating the PDF, but in the meantime, you can safely work an RLI wherever you see an RRI!
All the best,
Julianna
I am having trouble using the mattress stitch under the arms because the stitches are not aligned, what is the proper way to do it ?
Hi Sophie,
Thanks for reaching out! Since the underarm seam is sewn from two cast-on edges instead of the vertical sides of the knitted pieces, you will have to use a slightly modified method which is shown in our Seaming Stockinette Stitch Horizontally tutorial. This should make it much easier to get everything put together!
I hope that helps!
Julianna
I gauge out to the correct 18 st in 4 inches, but am only getting 24 rows instead of 27 on #7 needle. Did a swatch on a #6 and got the same result. I’m well into the back on the #7. So far, so good for this late-stage beginner. But is my nagging assumption correct that 24 rows instead of 27 will simly yield a slightly (by about 10%) longer sweater (realizing it may change with blocking)? Thoughts? Not eager to redo the progress to date if I’m wrong.
Hi Robert,
Thanks for writing in! Yes, 24 rows instead of 27 will just result in a slightly longer sweater, which may change after blocking. If you are okay with that result I would say there is no reason to redo what you have already done!
Please feel free to reach out with any more questions you may have going forward!
Gianna
One more question. I’m knitting this for my wife. But does Purl have any patterns for men’s sweaters on its site? If so, I haven’t found them.
Hi Robert,
Thanks for writing in! We don’t currently have any Purl Soho men’s sweater patterns. We do have a few that are unisex like the Sweatshirt Sweater. We also carry Brooklyn Tweed patterns and they have some great patterns for men!
Best,
Gianna
And finally (for now), in Shape Dolman Sleeves, instructions say “use Backward Loop method to cast on 2 stitches at beginning of the next 12 rows . . .” Am I casting onto the LEFT needle and then slipping the first of the 2 cast ons to maintain the selvage edge? Slipping the first pre-existing stitch and then doing the 2 cast ons onto the left needle and knitting them? Or?
Hi Robert,
Thanks for writing in again! Yes, you are casting onto the left needle and then continuing the stitch pattern each row!
I hope this helps!
Gianna
How am I supposed to interpret this: “Continue in stockinette stitch, repeating the Sleeve Increase
Row every 6th (6th, 8th, 8th, 10th, 10th) row once”
If it is once, why the “every”? Thanks.
Hi Tessa,
Thanks for reaching out! I could see how that would be confusing! Yes it means to repeat the increase row on the 6th (6th, 8th, 8th, 10th, 10th) row once. Thanks for pointing that out and I will be sure to pass that along to the team!
All the best,
Gianna
Instructions for Left Shoulder and Neckline say to knit and place 39 stitches for the right shoulder on a stitch holder. After binding off 16 stitches for the neckline, there are 143 stitches remaining for the Left shoulder! I must have something wrong.
Right Shoulder instructions are looking for 82 stitches when all I have is 39 stitches on the stitch holder.
Please help.
Hi Andrea,
Thanks for reaching out! It sounds like you may be okay! After working rows 2-9 with the short rows and bind offs you should be left with 82 stitches!
All the best,
Gianna
I am still uncertain about the wrp-t for shaping shoulders. For the smallest size, 40 and 3/4, should there be 57 stitches on each needle after wrapping 19 times (rows 3 and 4 repeated 17 times after first 4 rows).
Also, just to check, the Purlsoho tutorial (https://www.youtube.com/watch?v=I3BrIMIdO-c)
demonstrates picking up the wrapped stitches on the next row. This is not being done at this point for the back, correct? It appears to be described in hem and elsewhere. Thanks a lot.
Hi Andrea,
Thanks for reaching out! That sounds correct, and yes you won’t be picking up and working the wraps unless it tells you to in the pattern.
All the best,
Gianna
Hello! This is my first time encountering short rows / the wrap+turn method (the tutorial video was very helpful!). I’m on the step for establishing main fabric and shaping the hem, and the one thing I’m not clear on is whether there is a regular row in between each of the short rows, or if all of the short rows are together (I’m not sure if my question makes sense…)
The instructions say to do short rows 1-6, then next row (wrong side), then next row (right side). Is this correct, or should the sequence be as follows:
Short row 1, next row (wrong side)
Short row 2, next row (right side)
Short row 3, next row (wrong side)
Etc.
Thanks in advance!
HI Madalyn,
Thanks for reaching out! For the ESTABLISH MAIN FABRIC + SHAPE HEM section you should be working the rows as written:
Short Row 1 (right side): Slip 1, k5 (4, 4, 5) (5, 7, 6, 8), wrp-t.
Short Row 2 (wrong side): Purl to end of row.
Short Row 3: Knit to previous wrapped stitch, knit wrapped stitch with its wrap, k4 (5, 6, 6) (7, 7, 8, 8),
wrp-t.
Repeat Short Rows 2 and 3 five more times, then Short Row 2 once more.
I hope this helps, happy knitting!
Gianna
Got the back done and moving onto the front! Gauge seems to be spot-on; sleeves are short but, fingers crossed, will be ok with addition of cuffs and the way the garment drapes when complete.
QUESTION RE LEFT FRONT. In “Establish Main Fabric + Shape Hem, for odd rows after row 1 it doesn’t say anything about slipping the 1st stitch, so I haven’t been. Should I?
Hi Robert,
Thanks for reaching out! I am so glad to hear that this pattern is going so well for you! You may also be able to get a bit more length from the sleeves when you block the finished garment! Unless it specifies to slip the stitch at the beginning of the row than there is no need to slip the first stitch!
Happy Knitting!
Gianna
I am making the left front piece for the smallest size (40 1/4). It appears after the first four short rows that 0 more rows are added for the 40 1/4 size while they are repeated 21 more times for the next size, 44 1/2. Is this correct? Thank you
Hi Michael,
Thanks for reaching out! That is correct! Once you finish the first four rows you move directly on to the next step instead of repeating the section!
All the best,
Gianna
Oh my goodness. Finished and proud. Then I block it and see that the left neckband is alot wider than the left side. The right side . These were short rows so what have I done wrong?
Hi Cathy,
Thanks for reaching out! You can send our team some photos of your work to customerservice@purlsoho.com and they can troubleshoot further from there!
Warmly,
Gianna
Hi- I am working on the left front, establish main fabric and shape hem. On short row 3 it says to “knit to previous wrapped stitch…” no mention of slipping first stitch. Is that correct?, not to slip first stitch. Same with Right Front.
Thanks!!!
Hi Alix,
Thanks for reaching out! Yes that is correct, you will knit to the previous wrapped stitch without slipping the first stitch!
Happy knitting!
Gianna
Hi Gianna,
I’ve been reading through the comments. The last two lines of this section, it actually does say “maintaining slipped stitch on first stitch of every row…”
So in mine I have been slipping the stitch. Hope I’m reading this correctly.
Hi Ginette,
You are correct! We’ve spent some time double-checking this pattern for the slip stitch directions specifically, and the consensus is to do as you have been and slip the first stitch anytime you’re at the beginning of a row that is on the selvedge edge! I hope this helps clear things up!
Warmly,
Kelsey
I’m confused about shaping the sleeve, cuff, neckline and shoulder at the same time. After the part of “shape sleeve” it says that when piece measures 8 3/4 inches, shape neckline as follows and then goes on to say keep shaping shoulder and then start shaping cuffs. I have no idea where I would be on the fabric since no yarn goes off needles, no new yarn is cast on at a particular point, They don’ s say at a certain point in the existing fabric, this is where you shape neckline, so how to I work the shoulders, neckline, cuffs, etc. when I don’t know where in the pattern they start.
Hi Laura,
Thanks for reaching out! The construction of this cardigan is a little unique since it is knit from the bottom up and it is a raglan sleeve. This means the body and sleeve are one piece! So for the back once you work the body, by establishing the main fabric and shaping the hem you will move directly to the SHAPE DOLMAN SLEEVES section since it is connected directly to the body, you are not cutting the yarn at any point but you are continuing to knit working back and forth across the entire back section the whole time!
I hope this clears things up and please let me know if you have any more questions!
Warmly,
Gianna
I am making the sweater in smallest size (40¾). When finishing the neckband, I am only able to pick up around 88 stitches on the left and right hems which is quite a bit fewer than the 118 listed in the pattern. The size and shape look right and I pick up exactly 44 in the back neckline. How do you recommend that I adjust my short rows? Thank you!
Hi Lauren,
Thanks for reaching out! Rather than trying to adjust the short rows, I would actually recommend going back and trying to pick up the 118 stitches along the left and right hems. With just 88 stitches along each side, not only will you run into trouble when working the short rows, but with only 88 stitches along the hems, your finished neckline will not lay properly when you’re done.
When I’m working on a pattern like this and have to pick up a large number of stitches, I find it’s helpful to divide the length of fabric into sections with removable markers. That way, I have an easier time keeping track of how many stitches I need to pick up in any given section. I’d suggest dividing up the left and right hems into 4 sections; you’ll need to pick up about 29-30 stitches in each section to get to 118. This might help you make sure that you’re picking up enough stitches by the time you hit the back neckline!
I hope this helps, but please feel free to email us at customerservice@purlsoho.com if you need additional assistance!
Warmly,
Kelsey
Hi,
I love this cardigan, but have a love-hate relationship with it at the minute! I’m have completed the Left Shoulder + Neckline section (p4) and about to start the Right Shoulder + Neckline section and I am obviously not reading the pattern correctly.
Line 2 (Left Shoulder + Neckline) bind off 16… stitches, means that this bind off is on the far side of the garment??
Once finished this section I then transfer all of the Left shoulder stitches (82….) onto a stitch holder?
When I commence the Right Shoulder & Neckline I transfer the 39… stitches back onto the needles?
It is completely lopsided? I would normally visit my Wool Shop for advice but we are still in lockdown here in Melbourne Aus.
: (
Can you talk me through this?
Many thanks
Hi Helen,
Thanks for reaching out! I would suggest sending the information above along with clear photos of your work to our customer service team at customerservice@purlsoho.com and they can help verify if you have bound off in the correct area and walk you through the stitch breakdown!
Warmly,
Gianna
Hi!
I am preparing to knit this sweater having purchased the pattern several years ago. I have checked out Ravelry, errata, and the newer comments here. I swatched and am getting gauge but I also switched for the ribbing with the larger sized needles. I worry that the ribbing will pull in if I go down a size. Is that how it should be? Or should I just use the same needles throughout? I’m a super duper loose knitter so I’m getting gauge on ones. I hate tensioning the yarn and pulling so Small needles are my jam. I tried prym plastic ones but they are too grippy… so Im using chiagoo red cords… Thanks!
Hi Christa,
Thanks for reaching out. I would stick to the needles you’re getting gauge in stockinette with, since the ribbing in this pattern should have the same gauge as well (when stretched)! Because ribbing always has the tendency to pull in, I would recommend aggressively blocking your sweater after finishing it. This is likely the only way you’ll get the perfectly flat effect of the ribbing shown in our sample! But don’t be alarmed when the ribbing starts to pull in as your knitting–it will even out once you block it. Hope this helps!
All the best,
Lili
Can the German short row method be used instead of the wrap and turn?
Thank you.
Hi Nancy,
Thanks for reaching out. You can absolutely modify this pattern to use German short rows instead! However, you’ll actually need to knit one additional stitch before making the double stitch. So if the pattern says “Knit to last 8 (8, 8, 10) (10, 10, 12, 12) stitches, wrp-t,” you’ll actually need to “Knit to last 7 (7, 7, 9) (9, 9, 11, 11) stitches, make double stitch.” Hope this helps!
All the best,
Lili
I have just purchased this pattern. Since I am 5’9″ I would like to make it longer. I am thinking of adding stitches just after the bottom ribbing where it says ” continue for 13 rows” before the part where I increase for sleeves. So say instead of 13 rows, I’d knit 20 rows for an additional inch of length. This seems to make the most sense. Is this what you’d recommend?
Hi Barb,
Thanks for reaching out. Yes, that’s exactly how I would make this type of a modification! Just remember that you’ll need to add the same distance on the Left and Right Front pieces as well. Hope this helps!
All the best,
Lili
For a longer sweater, (I am 5’9″) would the best place to add length be between the bottom ribbing and the beginning of arm increases? After the 13 rows?
Hi Barb,
Thanks for checking back in about this! I replied to your comment yesterday, but here’s what I wrote, for reference:
Thanks for reaching out. Yes, that’s exactly how I would make this type of a modification! Just remember that you’ll need to add the same distance on the Left and Right Front pieces as well. Hope this helps!
Let me know if you see this comment!
All the best,
Lili
yes, sorry, I was looking for it at the top of the comments, then started looking by dates! Found it. thank you!
Reading previous comments I believe I have made a mistake-on shape shoulders I have stopped 2 stitches ahead of the previous wrap and turn . So I probably need to take that out?
And the directions:” repeat short rows 3 and 4 18 times “ does that mean 18 for row 3 and 18 for row 4 or 18 combined?
It looks like the pattern actually reads “Work to 3 stitches before previous wrap, wrp-t” in this section, so you should stop 3 stitches before the wrap, not 2. If this looks like what you’ve already been doing, then you don’t need to undo anything!
In answer to your second question, that means to repeat both Short Rows 3 and 4 18 times. So you’ll be doing a total of 36 more short rows!
All the best,
Lili
Hi! I’ve started this sweater several times because I wasn’t getting the length specified at the end of Shape Dolman Sleeve. Issues in the earlier versions were my gauge. The gauge is correct but my length is 2″ shorter (13.5 instead of 15.5). Is there a place in the pattern that I can knit more rows to make sure the sweater will fit? I’m concerned, at this rate, the shoulder shaping will not be in the correct place. Thank you.
Hi Nancy,
I’m sorry to hear that you’re still running into this issue! Have you made sure to measure the length from the center of the back? This is essential because there’s exactly 2 inches of extra fabric in the center back than there is at the sides, since you worked short rows to shape the back hem earlier on. Since your measurement is coming up short by 2 inches as well, my suspicion is that you’re taking it from one of the sides and not the very center, but please let me know if this isn’t the case!
All the best,
Lili
Lili,
I measured in the center of the back and can squeeze out 14″. The sides measure 13″.
Thank you.
Lili,
I counted my rows in the middle of the garment and I have 65 rows. If my calculations are correct, I should have 75 rows (I’m making the 47 3/4 size). Oops. Not sure where those 10 rows went. AARGH. If you have any ideas, let me know.
Thanks.
Very interesting! I think I do know where those rows have gone missing! For size 47 3/4, you should have 78 rows between the beginning of ESTABLISH MAIN FABRIC + SHAPE HEM and the end of SHAPE DOLMAN SLEEVES, so you’re actually 13 rows short. That number matches up exactly with the instruction: Continue in stockinette stitch for 13 more rows, maintaining slipped stitch on first stitch of every row and ending with a wrong-side row, which occurs at the end of the ESTABLISH MAIN FABRIC + SHAPE HEM section. I have a strong feeling that you just missed knitting these 13 rows!
All the best,
Lili
I am ready to pick up and rib the front of the sweater . I am picking up every stitch along the two front sides and I am only getting 260,I have 48 across the back . I don’t understand this because I added 2 inches in length. I don’t see how I can squeeze anymore stitches on. Suggestions on how I proceed and do the short rows?
Hi Barbara,
Thanks for writing in! Since each stitch along the edge is a slipped stitch, it actually extends over 2 rows, making it taller than a normal stitch. Because of that, you will sometimes need to pick up two stitches in each one of these stitches in order to fit all 300 Neckband stitches along this edge. I hope this helps, but please let me know if you have any other questions!
All the best,
Lili
It looks like I will need to drop to a 4 or even 3 needle to achieve the gauge. Is this possible or common?
Hi Andrea,
Yes, it’s actually quite common to need to drastically change needle sizes to achieve the gauge of a pattern! Every knitter has a different natural tension, and it can really vary more than you might expect. As long as your gauge is correct, then it won’t matter what size needle you’re knitting on!
All the best,
Lili
It appears I may need to drop down to a 2 or 3 needle in order to achieve the gauge. Is this common?
Hi Andrea,
It looks like I replied to this question yesterday! Have you been able to take a look at the previous comments yet? My reply should appear directly above this latest comment.
All the best,
Lili
Hi
I bought a PDF of this pattern a few years ago and am doing it now. CAn you please explain page 4, under LEFT SHOULDER AND NECKLINE why after slipping XX stitches on to a holder, we are to BIND OFF the next XX stitches and then carry on with the row. I cannot understand the reasoning behind this, and don’t see where an equivalent number of bound off stitches would be found on the other side.
Please explain. Thanks!
Best,
Sarah
Hi Sarah,
Thanks for reaching out! The stitches that you knit at the beginning of this row and then slip onto scrap yarn are the Right Shoulder stitches. Then, the stitches you bind off are the Neckline stitches, which are only in the center of the back. The remaining stitches are the Left Shoulder stitches, which you will continue knitting in this section. Once you’re ready to move onto the Right Shoulder + Neckline section, you will put the on-hold stitches back onto your needles and knit the Right Shoulder.
Hope this helps clarify things!
All the best,
Lili
Hello again! I’m at the LEFT SHOULDER + NECKLINE. I’m making the 47 3/4. I have 264 stitches on my needles. Per the instruction, the last row I knit from the previous section was the Short Row 3. I purled to the two stitches (German Short Row method) before the wrap and turn, turned and wrapped (265 stitches). If I knit in the direction my needles are facing, my neckline will not be in the center but on the left sleeve. Please break down how to do this part. Was I supposed to purl to the end of the row? Thank you. Nancy
Hi Nancy,
I’m a bit concerned about your stitch count actually! At this point in the pattern, size 47 3/4 should only have 224 stitches in total. This stitch count is reached at the end of the SHAPE CUFF EDGES section, and it remains constant until Short Row 1 of LEFT SHOULDER + NECKLINE. Can you double check your stitch count and get back to me? If it’s indeed 264, would you be able to send a photo of your work so far to customerservice@purlsoho.com? That way we could take a look and try to identify where the extra stitches came from!
All the best,
Lili
Hi Lili,
I mistakenly counted both feet of the stitches that make the short row. I have 264 stitches! Now, on to how to do the LEFT SHOULDER + NECKLINE. I did it once but can’t remember how I knitted it.
Thanks for your help!
Nancy
Hi Nancy,
I just realized that we are also communicating about this pattern over email! Would you mind if we kept this conversation to that method of communication? I think it’ll be easier to keep track of our messages that way!
All the best,
Lili
Hello,
I am attempting to work the left shoulder and neckline shaping but am very confused. It says to work a short row three, ending with a wrong side row. I did a wrap and turn, then knit 40 and bound off 20. I’m just feeling very turned around and am not sure I’m doing this correctly. I really wish the pattern told me how the row would be set up after following all instructions (x number knit on the left, x number bound off, x number on scrap yarn, x number knit). I don’t know what my question is exactly other than is there any place to get clarity on this portion? I’m trying to look at ravelry but haven’t found additional information.
Thanks!
Hi Janie,
Thank you for writing in. We are so sorry you are running into issues while knitting this pattern! If you don’t mind, could you send in a photo of your work to our team at customerservice@purlsoho.com so we could have a deeper look? We want to make sure you are able to get through your project and seeing a photo could help us better visualize where the issue might be. We will keep an eye out for your reply.
Warmly,
Gavriella