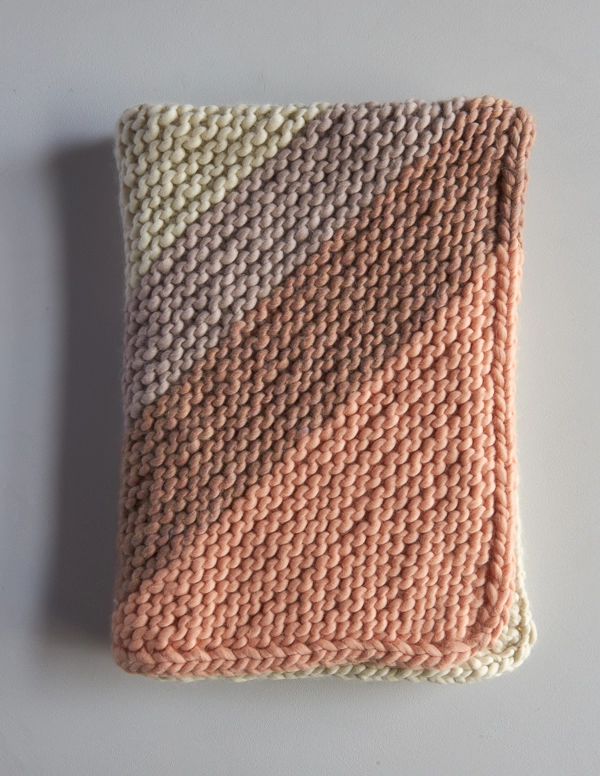
Colorful Corner Blanket
There’s a loud hush that falls over the city with the first big snow of the year. The sounds of trucks and sirens are dampened; people’s voices are library-quiet. Here in New York, we’re still waiting for our first snowfall, and me… I’m waiting under our Colorful Corner Blanket!
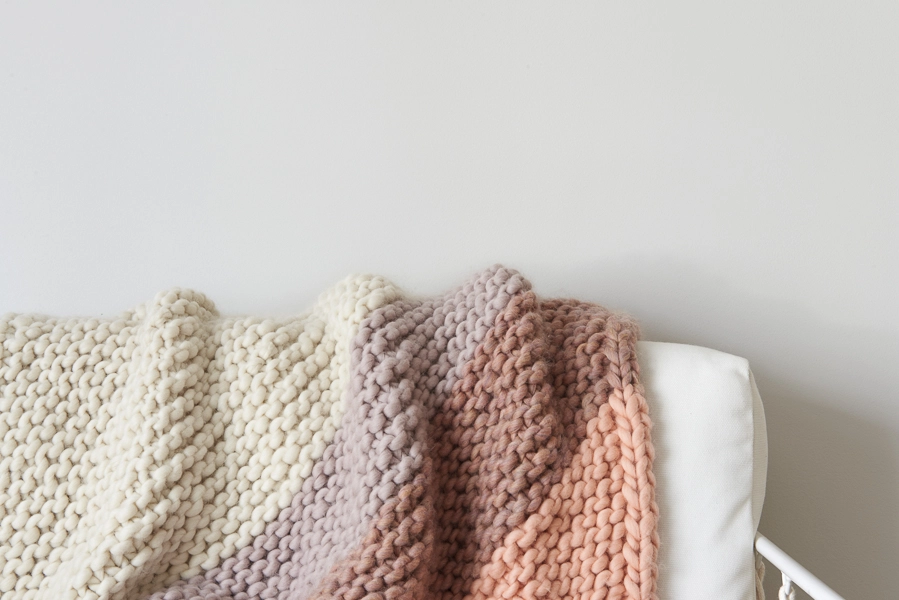
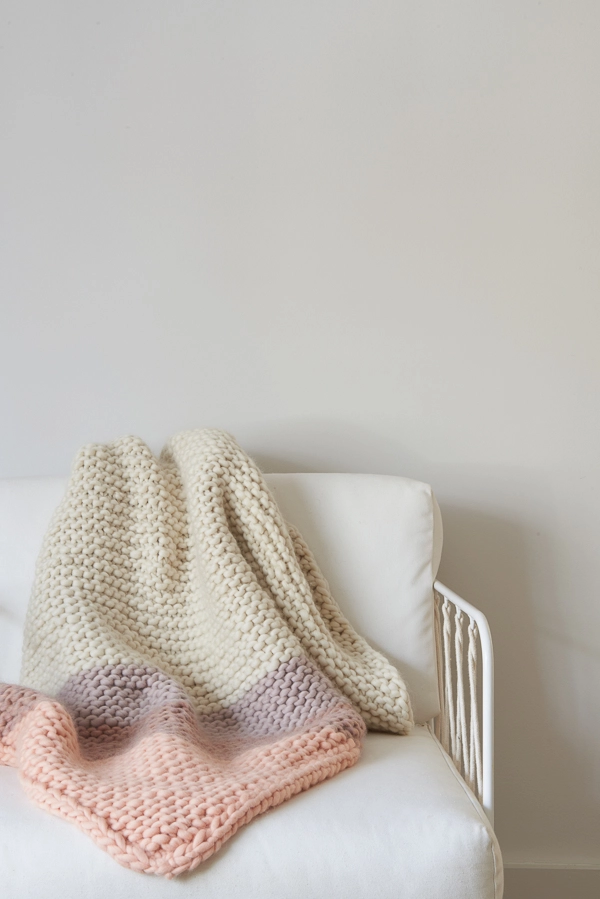
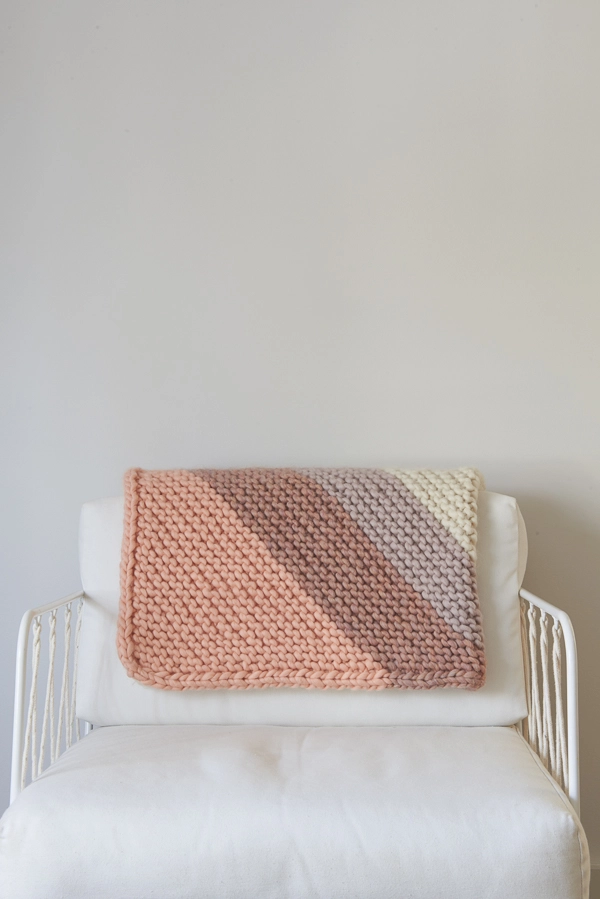
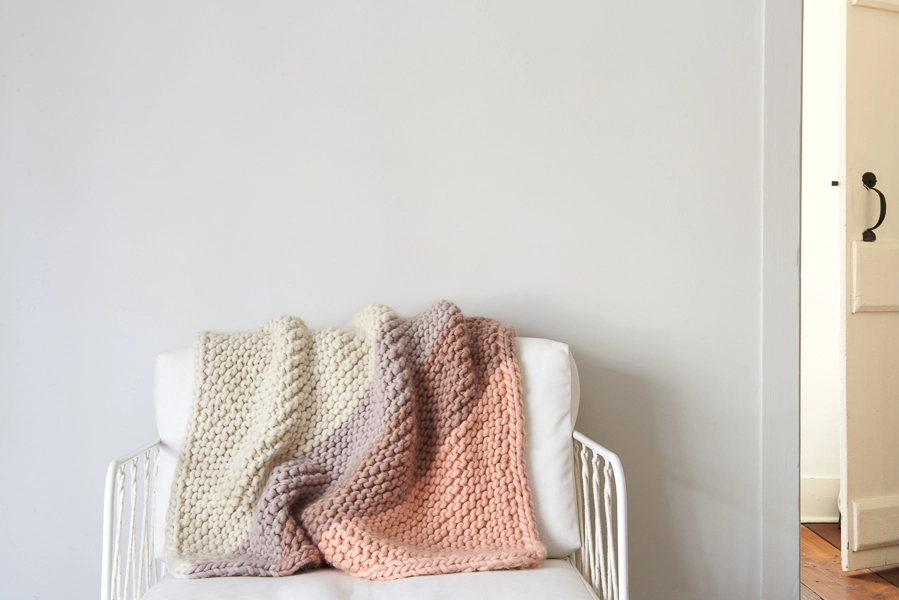
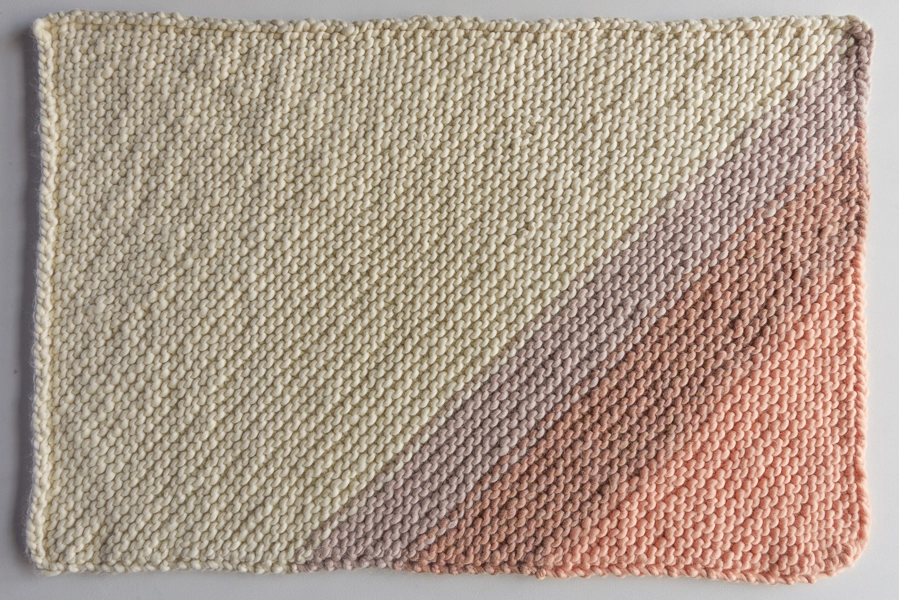
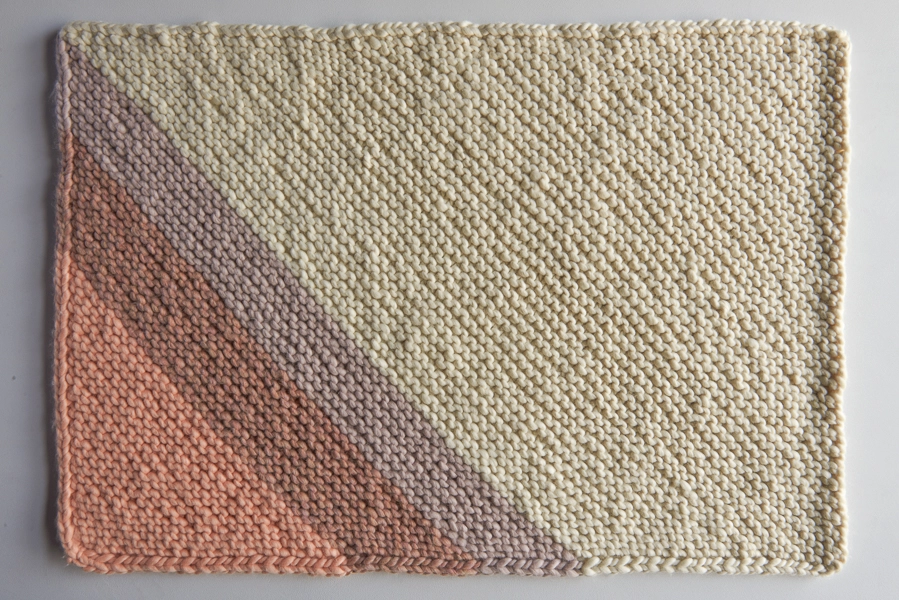
It’s the type of blanket that softens the sounds and comforts the spirit. As I worked on the bias, from one colorful corner to a field of Heirloom White, I thought of how this blanket will carry me out of fall into winter and through to spring, as heart-warming a blanket of snow on the city.
I knit our Colorful Corner Blanket in our joyfully soft Gentle Giant merino. At 1 1/2 stitches to the inch, this beauty is incredibly fast to knit. Six skeins of the Main Color and one skein each for the stripes make this an easy stitch for the holiday season, for those who have had their first snow or those who are still waiting! -Laura

Update: New Colors
November 2017
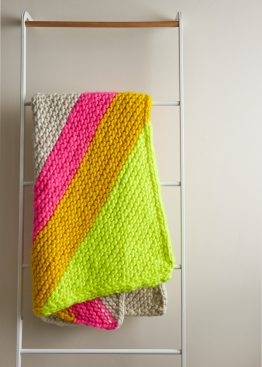
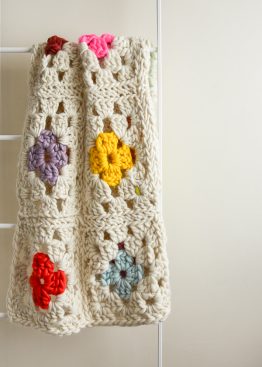
Sometimes the gray days of winter beg for a playful touch! This season’s Granny Square Blanket in Gentle Giant and Colorful Corner Blanket combine bright bursts of neon with warm outlier shades. Together, they bring out the best in each other, a bouquet of total happy!
UPDATE: NOW IN TULIP COTTON
MARCH 2022

Enjoy this delightful ode to a splash of color in our lovely Tulip Cotton, a 100% organically grown, worsted-weight cotton yarn. It is machine wash- and dry-able with a petal-soft feel, refined texture, and wonderful matte finish. Enjoy it with a choice of seven beautiful Colorful Corner Blanket Bundles!
Designed by Purl Soho designer, Laura Ferguson.
Share your progress and connect with the community by tagging your pics with #PurlSoho, #PurlSohoBusyHands, #PurlSohoColorfulCornerBlanket, and #PurlSohoGentleGiant. We can’t wait to see what you make!
Materials
To knit your own Colorful Corner Blanket, you will need…
- 9 skeins of Purl Soho’s Gentle Giant, 100% merino wool. Each skein is 48 yards/ 125 grams.
- Color A: 1 skein; approximately 45 yards required.
- Color B: 1 skein; approximately 45 yards required.
- Color C: 1 skein; approximately 45 yards required.
- Color D: 6 skeins; approximately 270 yards required.
- US 19 (15 mm), 40-inch circular needles
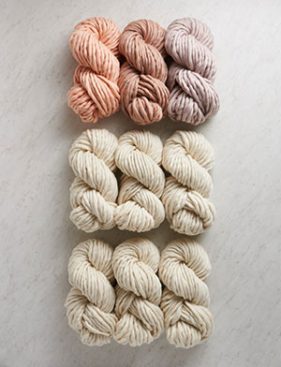

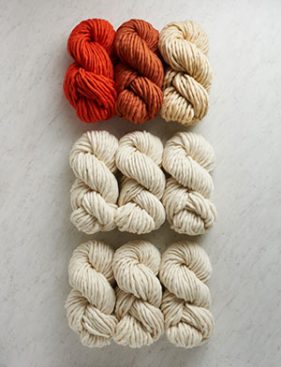
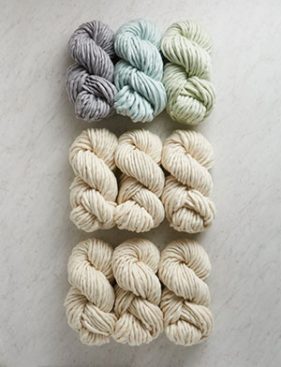


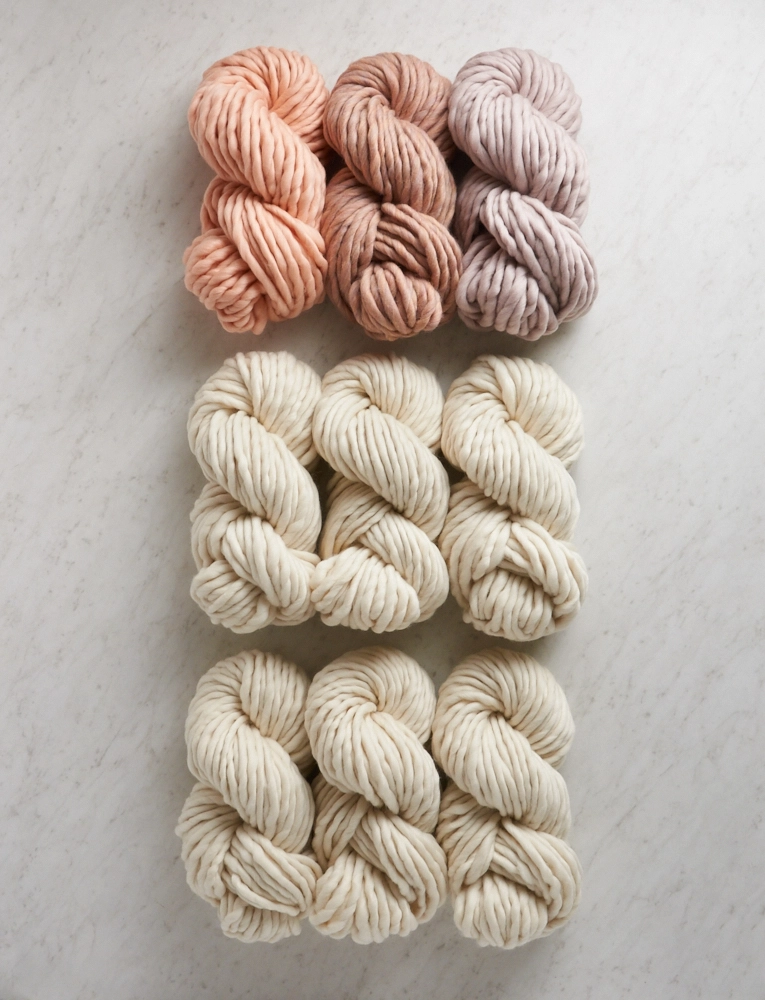
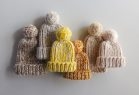
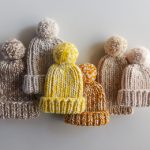
For a pop of inspiration, we’ve created the following color groups! They are, clockwise from top left…
- Wild Heather: Color A: Cowrie Pink; Color B: Calico Pink; Color C: Silver Mauve; Color D: Heirloom White
- Fox Den: Color A: Clay Pot; Color B: Cowrie Pink; Color C: Winter Bark; Color D: Heirloom White
- Sweet Potato: Color A: Orange Koi; Color B: Clay Pot; Color C: White Peppercorn; Color D: Heirloom White
- Barn Owl: Color A: Graphite Gray; Color B: Wolf Brown; Color C: Winter Bark; Color D: Heirloom White
- Sea Urchin: Color A: Purple Lupine; Color B: Silver Mauve; Color C: Winter Bark; Color D: Heirloom White
- Mint Julep: Color A: Pigeon Gray; Color B: Iceberg Blue; Color C: Mint Ice; Color D: Heirloom White
Gauge
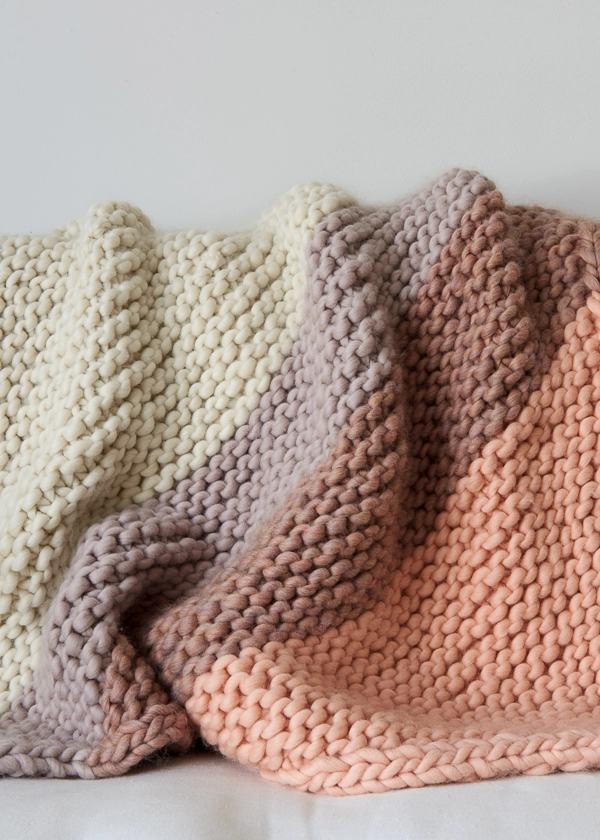
6 stitches and 12 rows = 4 inches in garter stitch
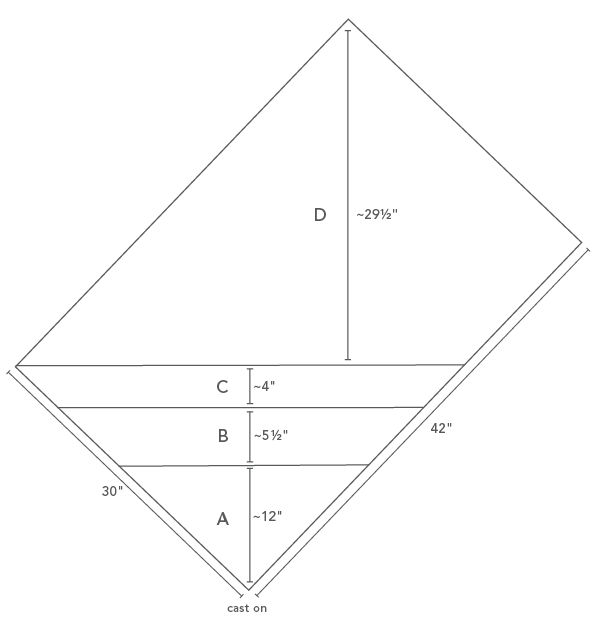
Size
Finished Dimensions: 30 inches wide x 42 inches long
Notes
When joining new skeins, I recommend wet splicing the ends together. This will eliminate having to weave in a bunch of bulky tails. For instructions on how, please visit our Wet Splice Tutorial.
Pattern
Begin + Increase
With Color A, cast on 5 stitches. We used a basic Long Tail Cast On.
Row 1 (right side): K2, make 1 left (m1L), knit to last two stitches, make 1 right (m1R), k2. [2 stitches increased]
Row 2: P2, knit to last two stitches, p2.
Repeat Rows 1 and 2 until you have used the entire Color A skein, ending with Row 2.
Join Color B.
Repeat Rows 1 and 2 until you have used the entire Color B skein, ending with Row 2.
Join Color C.
Repeat Rows 1 and 2 until you have used the entire Color C skein, ending with Row 2.
Join Color D.
Repeat Rows 1 and 2 one time.
Continue
Still using Color D…
Row 1 (right side): K2, m1L, knit to last three stitches, k2tog, k1.
Row 2: P2, knit to last two stitches, p2.
Repeat Rows 1 and 2 until you have used 3 skeins of Color D, ending with Row 2.
Continue + Decrease
Join fourth skein of Color D.
Row 1 (right side): K1, ssk, knit to last three stitches, k2tog, k1. [2 stitches decreased]
Row 2: P2, knit to last two stitches, p2.
Repeat Rows 1 and 2 until 5 stitches remain, ending with Row 1.
Bind Off: P2, bind off one, k1, bind off one, [p1, bind off one] twice.
Finish
Weave in the remaining ends.


Okay, I’m realizing I’m a bit of out my depth trying to modify this pattern! I would like to double the size of the blanket, all in one colour, to make it 42 x 60 instead of the original 42 x 30. I’ve never knit on the bias before and underestimated what this would entail with re-working the pattern. Can anyone help me with this or should I take this into a local knit shop to address hands on?
Thank you so much!
Hi Meghan,
Thanks for reaching out! This should actually be a fairly easy modification! When working the first section titled “Begin + Increase,” you will simply repeat these rows until the sides of your triangle measure 42 inches. Then, when you are working the “Continue” section, work these rows until the long edge of your blanket measures 60 inches. At that point you can move on to the “Continue + Decrease” instructions and work them as written.
Best of luck and please let us know how it turns out!
Julianna
Hi,
I need to knit a baby blanket fast, I could do this in seed stitch in one color? How many stitches would I cast on? What needles would I need to use?
Thank you for the help!
Hi Clorinda,
Thanks for reaching out! You could substitute seed stitch in this pattern if you wish, but most people find garter stitch to be much faster than seed stitch, so if you are trying to knit at top speed, I would probably stick with garter stitch – it will still be lovely and classic in one color! We used US 19 needles with our Gentle Giant for this blanket and found it to be a very fast knit indeed!
Best of luck and happy knitting!
Julianna
Hi!
I purchased the larger Giant bundle kit with the 12 colors and 9 whites but there isn’t a pattern for this. What should I do?
Thank you!
Lynn
Hi Lynn,
Thanks for reaching out! Our Gentle Giant Bundle in a Dozen Colors is enough yarn to crochet our Granny Square Blanket in Gentle Giant. If you aren’t a crocheter, you have plenty of yarn to knit an even larger and cozier Colorful Corner blanket! I would continue the Begin + Increase section, changing colors as you run out, until the shorter edges of the triangle measure 45 inches. You can then work the increase section until the longest edge measure 55 inches, and work the Continue + Decrease section as written.
Happy knitting, and please do let us know how it turns out!
Julianna
I’ve never knitted a bias blanket before and am trying to follow your directions but when I do my edges don’t look beautiful like yours! They are loose and I don’t see any sign of a border like yours either! What am I doing wrong??
Hi Haley,
Thanks for reaching out! It’s hard to say what might be going wrong without seeing your work, but it is normal to a degree to have loose or uneven stitches right at the edge of any piece of knitting. In this pattern, since the first two and last two stitches are stockinette, they should curl to the wrong side which will hide any unevenness, but you could also try slipping the first and last stitches of each wrong side row purlwise with the yarn in front. If that doesn’t solve the problem, feel free to send us a picture of your edges at customerservice@purlsoho.com so we can take a look!
I hope that helps!
Julianna
I started this blanket and I thought I was doing everything right, but my original corner isn’t round like your pictures, it’s more like a straight edge of the 5 original stitches I cast on. Any ideas on what I’ve done wrong?
Thank you!
Hello Elise,
Thank you for reaching out! How many rows have you done? Sometimes it will not look exactly right, until you have more rows. As you do your increases it will become more curved.
I hope this helps and let us know if the issue continues!
Happy knitting,
Marilla
Hello,
I’ve noticed the same thing when I work this pattern, and I’ve definitely worked this pattern out enough.
The picture looks like every corner has a knit edge.
The instructions will produce a straight edge of garter stitches.
How do I make the beginning have a curved knit edge?
Thanks!
Hello Kim,
Thanks for reaching out! In this pattern, since the first two and last two stitches are stockinette, they should curl to the wrong side which will hide any unevenness.
I hope this makes sense and happy knitting!
-Marilla
Hi. I’m on the 2nd color and just finished a row 2 and counted 50 stitches and realized somewhere I must have forgotten to increase 1. Can I just do an extra m1L on the next row to catch up? The edge looks fine other than a slight dip in about 5 rows back. Thanks!
Hi Emily,
Thanks for reaching out! Yes, as long as you don’t mind the irregularity on the edge, you could add an extra stitch on a wrong side row to get back to the correct number of stitches. If the dip does both you, you could always rip or tink back until you are at an odd number of stitches and continue knitting from that point.
Best of luck and happy knitting!
Julianna
Hi there, so I have never knitted anything in my life but I’d love to my my son a knitted blanket. Also I’d like to have a design within it. I’d like to have “ZZZ” within the blanket is there any chance you could tell me how to do that. Thank you!!
Renée,
Hello Renee,
Thank you for reaching out- this is such a lovely idea! Sadly, we can’t custom design a blanket for you. If you are local to NYC I would reccomend sending an e-mail to Store@purlsoho.com. We have a list of freelancers that we can reach out to on your behalf. You will just need to explain what you are interested in doing in your e-mail. If you are not local to New York I would reccomend that reach out to a local knitting instructor in your area.
I hope this helps and good luck!
-Marilla
I’m trying to adjust the pattern to a smaller blanket since i’m just using leftover stash. When would I need to start the 1st Continue section and when would I plan to decrease? The finished measurements would roughly be 23 inches wide x 32 inches long. Is there a measurement I can work to, to then change sections? Thanks for the help!
Hi Eunice,
Great question! If you are aiming for a size of 23 x 32 inches, you will work the “Begin + Increase” section until both sides measure 23 inches. You will then work the “Continue” section until the long side is 32 inches and then move on to the “Continue + Decrease” section!
I hope that this helps!
Cassy
Hi,
I’d like to make a newborn baby blanket version of this. Can you tell me how many skeins I need and how the pattern would shift?
Thank you!
Yvette
Hi Yvette,
Great question! You could very easily make this a 30 x 30 blanket which should work well for a baby! To do so, you would need 1 skein of each of the contrast colors and 3 skeins of the white. After knitting the 3 contrast colors in the “Begin + Increase” section, you would jump to the “Continue + Decrease” section with the white! This will give you more of a half and half blanket with one half being the contrast colors and the other being white. I think it will look lovely!
I hope that this helps!
Cassy
Hello!
I’m almost done with this blanket and it is gorgeous!! Would you recommend blocking this type of wool once it’s finished?
Thanks!!
Courtney
Hello Courtney,
Congratulations on almost being done! We recommend gently hand blocking this blanket. We’ve got a great tutorial right here on our recommended method of blocking. Please let us know if you have any more questions!
Best wishes,
I was hoping to do this in your Worsted Cotton, which I recognize will be much smaller due to the lighter weight (which is fine). But will the pattern still work out? Could you recommend an appropriate size needle?
Hi Alissa,
Thanks for writing in! This pattern is actually very easy to modify to knit at a different gauge! Blue Sky Worsted Cotton knits up very nicely on a US 9 needle, and you will still cast on the same number of stitches and work Rows 1 and 2 as written. You will repeat these rows in the Begin + Increase section, changing colors as you desire, until each side of the triangle measures how wide you would like your blanket to be – to match our blanket, that would be 30 inches. You will then follow the instructions in the Continue section until the longer side of the triangle measures 42 inches, or how long you would like the blanket to be, and work the Continue + Decrease section as written. You will be knitting more rows and will have more stitches on your needle than we did, but you can make the dimensions of the blanket whatever you would like. You will need about 8 skeins of Worsted Cotton for a blanket the same size as ours.
I hope that helps, and happy knitting!
Julianna
I’d like to knit this blanket for my son, he is an adult, is the big size 42 by 57 in big enough for him? How would this size be on the pattern and how many skeins would I need? Before I buy anything, Is it possible?
Hi Leticia,
Great question! You could certainly increase the size of this blanket to 42 by 57 inches if you would like! To do so, you will repeat these rows 1 and 2 in the Begin + Increase section, changing colors as you desire, until each side of the triangle measures 42 inches. You will then follow the instructions in the Continue section until the longer side of the triangle measures 57 inches, and then work the Continue + Decrease section as written. You will need 2 skeins of Gentle Giant in each contrast color as well as 12 skeins of your main color, or 18 skeins total of Gentle Giant, to knit a blanket this size.
Happy knitting!
Julianna
Love this pattern!! Would this be east to convert to your super soft merino? Using size 11 needles, would you still start with 5 stitches and then just follow the dimensions in the pattern? And approximately how many skeins do you think it will require? Thanks!!
Hi Lindsey,
Thank you so much for the kind words and for writing in! This pattern is actually very easy to modify to knit at a different gauge! Yes, you will still cast on the same number of stitches and work Rows 1 and 2 as written. You will repeat these rows in the Begin + Increase section, changing colors as you desire, until each side of the triangle measures how wide you would like your blanket to be – to match our blanket, that would be 30 inches. You will then follow the instructions in the Continue section until the longer side of the triangle measures 42 inches, or how long you would like the blanket to be, and work the Continue + Decrease section as written. You will be knitting more rows and will have more stitches on your needle than we did, but you can make the dimensions of the blanket whatever you would like. It’s a bit harder to estimate how much yarn you will need when altering the gauge, but I think you will need about 8 skeins of Super Soft Merino for a blanket the same size as ours.
Happy knitting!
Julianna
Hello,
I was wondering how I might knit this pattern in reverse? Ie start with the bulk triangle (colour D) first then work my way down to the smaller triangle? I’m trying to personalise the colours for a baby but we don’t know the gender! So figured if I did the bulk first I could quickly finish off with a pink or blue colour A after the bub has arrived. Thanks so much and I hope you and your staff are keeping healthy and well at this time.
Hi Hayley,
Thanks for reaching out! Yes, you can certainly knit this blanket in reverse! Simply start with Color D and follow all the instructions up until you have worked the first two rows of the Continue + Decrease section of the pattern, and then knit the rest of the blanket using colors A, B, and C.
Happy knitting!
Julianna
Hi, I’m almost done with the blanket. After I weave in any ends, do you recommend washing/laying flat to dry and blocking with the wet blanket? Or, just blocking? Will washing the wool cause any issues (felting, etc)?
Hi Elizabeth,
Thank you for reaching out with this question! I’m happy to hear your project is almost complete! Typically we recommend a wet blocking for most projects, but this blanket shouldn’t immediately require one. If you find that it needs a little help settling into the right shape or size, try laying it flat on a towel or blocking mats and dampening it with a spray bottle to block. Because Gentle Giant is a loosely spun single-ply yarn, when your blanket inevitably needs to be cleaned a gentle cold hand-wash and flat dry will do.
I hope this is helpful!
Gaby
Hi, I love this blanket. Looking at the instructions for increasing, I’m not familiar with “making one stitch to the left”, at the beginning of the row and “making one stitch to the right“, at the end. Is it just that in the US you call it making a stitch, what we call in the U.K. increase a stitch? By this I mean you knit twice into a stitch to make an extra stitch? I know it may seem obvious, but I wanted to check before I start.
Hi June,
Thanks for reaching out! The m1r and m1l are a specific type of increase, which you can learn how to do from our Make 1 Right (m1R) + Make 1 Left (m1L) tutorial. The increase you are describing sounds like a Knit Front and Back, which, while it still results in adding a stitch, unfortunately, won’t work for this pattern.
I hope that clears things up!
Julianna
Hi,
Since you’re out of heirloom white, I’m thinking of knitting this blanket using pigeon gray as the main color. The corner stripes would use lapis blue, mallard green, and purple petunia. What do you think?
Should I just wait until you restock heirloom gray?
Thank you.
Debra
Hi Debra,
Thanks for reaching out! I actually think Pigeon Gray would be a gorgeous alternative! The contrast colors you have chosen will still stand out beautifully against a gray background, and the darker body of the blanket might look a little more serious or sophisticated. If you prefer to wait for Heirloom White, you can always enter your email address on the product page and we will let you know as soon as it’s in stock!
Best,
Julianna
Thanks, julianna. One more option I wanted to run by you. I love gentle giant for making hats, but I’m a little concerned about the comfort of using size 19 needles for a blanket. I’m also considering quarry. Main color: granite. Stripes of garnet, lapis, and obsilia. The gauge is different, but since the skeins come with so much more yardage, do you think 9 skeins would yield similar results? More importantly, do you think quarry is a good option and if so, do you think these colors would make a beautiful blanket?
Thx so much.
Debra
Hi Debra,
Oh, what a lovely idea – I’m a huge fan of Quarry and think it would be so fantastic for a blanket! It’s really hard to say how much yardage you will need or how large the project will turn out when changing the gauge like this, but since you will have about four times as much yardage, I think your blanket will turn out larger than ours if anything. If it turns out you don’t need the last few skeins of Granite, you can always return them for store credit if they haven’t been wound!
I hope that helps, and please do let us know how it turns out!
Julianna
Thanks, julianna. I just placed my order.
Debra
Hi, Julianna,
The quarry yarn turned out to be not quite what I was looking for. I think the blanket would have looked nice but I didn’t like working with the yarn, at least not enough for a blanket! I ended up with super soft merino using soft black, heirloom white, and high tide for the corner and oatmeal gray heather for the rest of the blanket. I’m about 2/3 done and couldn’t be happier. Super soft merino is such a wonderful yarn to work with, and these colors create a nice accent in our gray and white living room. Thx so much for your help along the way.
Debra
Hi Debra,
Thanks for reaching out and for your kind words! I am very glad to hear that you have enjoyed working with Super Soft Merino and the color palette sounds beautiful! Please let us know how this turns out when you are finished!
All the best,
Gianna
Hi, I am working this blanket right now and am just finishing the continue part of the blanket ending with the third skein in color D. When I read the directions for Continue and Decrease, it reads like I am going to use only one more skein of yarn in Color D, but will actually have 2 additional skeins of Color D. Are those just extra?
Hi Gretchen,
Thanks for reaching out! You will actually use all of the skeins, we just state in the Continue and Decrease section you should be at the point where you begin using the third skein, but throughout that section, you should use that one and the rest you have of Color D! Keep in mind though, you may not use all of the 6th skein but will use some of it!
I hope this helps and please let me know if you have any more questions!
Gianna
Hi there,
I’m making this blanket and I must have added or dropped a stitch somewhere, because I’m nearing the end with an even number of stitches on my needles. As a result, I think I’m going to end up needing to bind off with either 4 or 6 stitches remaining. How would you recommend I proceed?
Thank you!
Lauren
Hi Lauren,
Thanks for writing in. I would suggest either skipping one decrease or doing an extra decrease somewhere! This will bring your stitch count back to an odd number, so you’ll be able to bind off as the pattern indicates. Hope this helps!
All the best,
Lili
I absolutely love this pattern and having a great time with it, but I’m curious if there is a better point to switch to a new color? I’ve been finishing out a color at the end of Row 2 and starting at new color at the beginning of Row 1. To do the wet splice I need enough yarn to combine the two, but then I end up with at least 1 stitch in the previous color and it doesn’t feel like a clean changeover. Any tips? Thanks so much!
Hi Keri,
Thanks for reaching out. Based on what you’re encountering at the color change points, I’d recommend doing the wet splice 1 or 2 stitches earlier! So work through Row 2 until you have 1 or 2 stitches left, then do the wet splice, and then you should have just enough of the original color left to finish the row and start Row 1 with the new color. Hope this helps!
All the best,
Lili
Hi I love the colorful corner blanket is there a crochet pattern to do this as I find knitting quite time consuming is there a a crochet way to do this would love to try it. Thank you colours are fantastic I love the neon with the cream
Hi Jenna,
Thanks for reaching out. I’m afraid that we haven’t made a crochet version of this pattern, but it should be easy to modify for crochet! I’d recommend following the knit version, but with crochet stitches instead. That would mean working back and forth in rows (single crochet would probably work best) and increasing by one stitch at either end of every other row. Hope this helps you get started!
All the best,
Lili
Ah thank you that’s amazing I didnt think I’d get a reply. Going to start tomorrow thanks happy new year
Hi Jenna,
We’re so glad that Lili could assist you! Please feel free to reach out anytime by leaving a comment or emailing us at customerservice@purlsoho.com. We’re always happy to help!
We’re so excited for you to cast on your blanket and wish you a happy new year as well!
All the best,
The CS Team
I’ve been knitting this with Wooly Wool, and it’s been an absolute pleasure to craft. I’m considering making another, and was curious if stockinette would work for the body, given that there is a border knit in to the blanket, or would it still curl? Would love to hear your thoughts.
If anyone is curious, I made a larger blanket, around 45″ x 64″ and it took 12 skeins of the Wooly Wool.
Hi Julie,
I’m so glad to hear that you’ve been enjoying Woolly Wool for this pattern! I would actually not recommend using stockinette. The border isn’t quite wide enough to prevent the curling, and the row gauge difference between garter and stockinette will distort the dimensions of the pattern. Stockinette has a taller row gauge than garter stitch, so you’d end up with more of a slanted diamond shape than a rectangle.
All the best,
Lili
Hi, I’m knitting this blanket and love the pattern, but I’m not sure I’m starting it right. Am I supposed to knit a regular row after casting on? Or do the increases start right after casting, as I think the pattern indicates? There are two “bars” between stitches after casting, so I was confused about which one to use for the increase. Thank you!
Hi Lauren,
Thanks for writing in! The increases in this pattern begin on Row 1, which is the row immediately after you cast on. You’ll want to work the make 1 increases into the bar that’s in front (i.e. closer to you when the right side of your work is facing you, as it is on Row 1). Hope this helps you get started!
All the best,
Lili