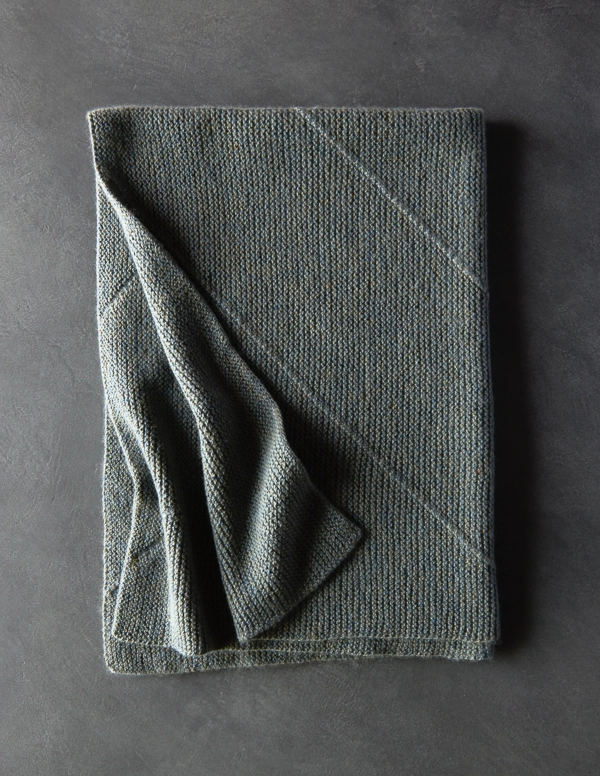
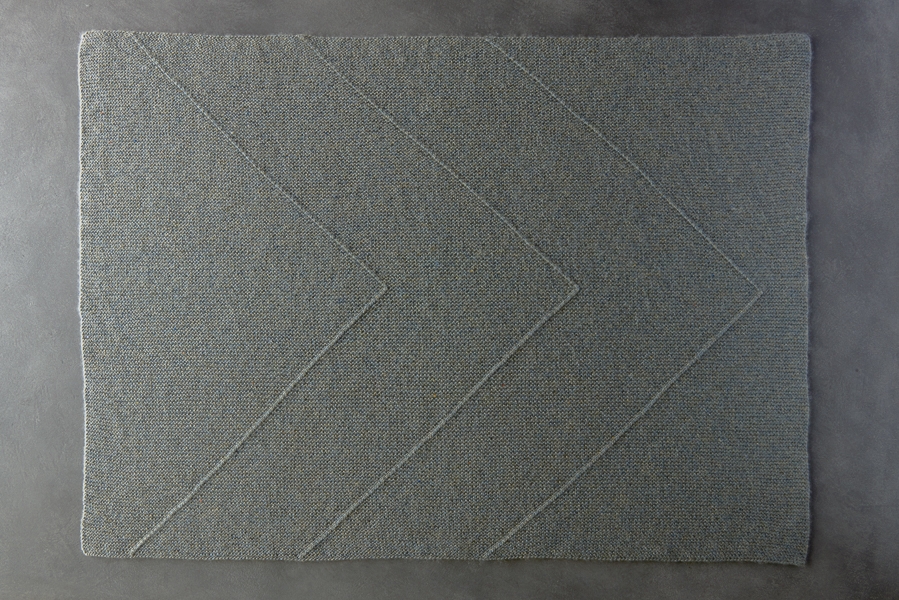
Ridgeline Baby Blanket
When I started knitting, my circle of friends was going through its own personal baby boom. I, of course, set out to hand knit every baby shower gift but soon found myself overwhelmed by intricate patterns filled with impractical details. So when I designed our Ridgeline Baby Blanket, I wanted a pattern that met, not only my modern design standards for clean, good looks, but also my modern knitting standards for simple, easy fun!
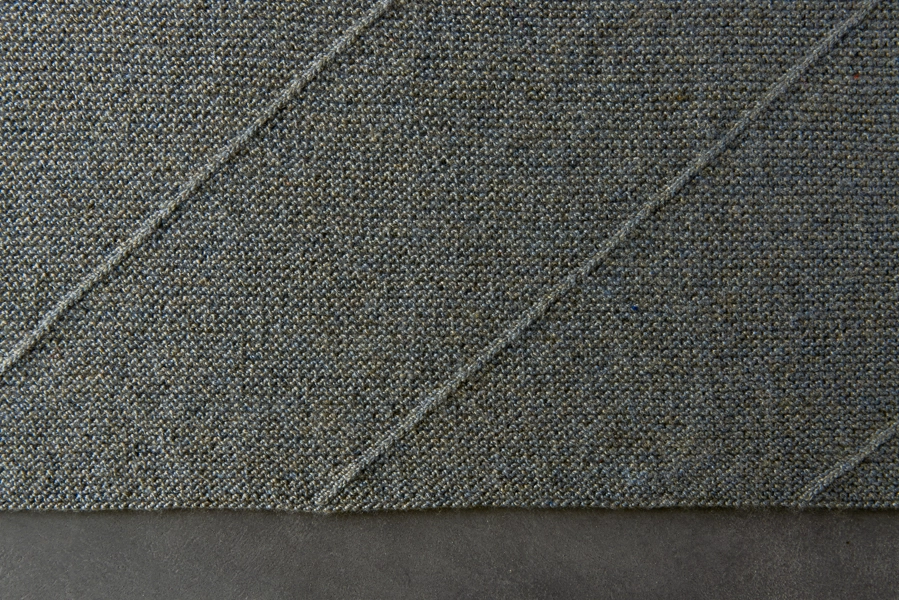
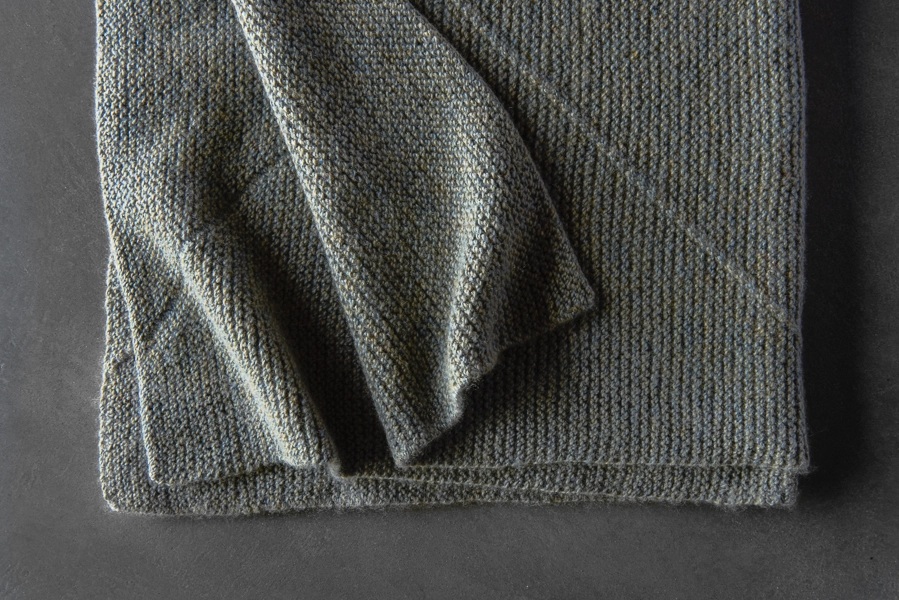
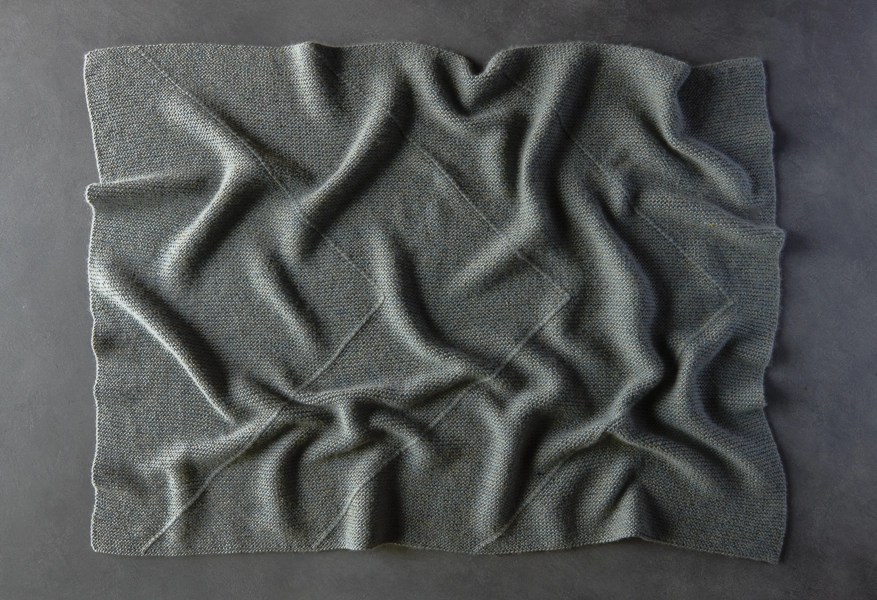
With a no-brainer garter stitch background, just three simple chevrons punctuate this blanket’s knitting. I love this detail. It’s easy but keeps the knitting interesting, and if you’ve never done any kind of cabling before, this simple 1 x 1 cable is the perfect start!
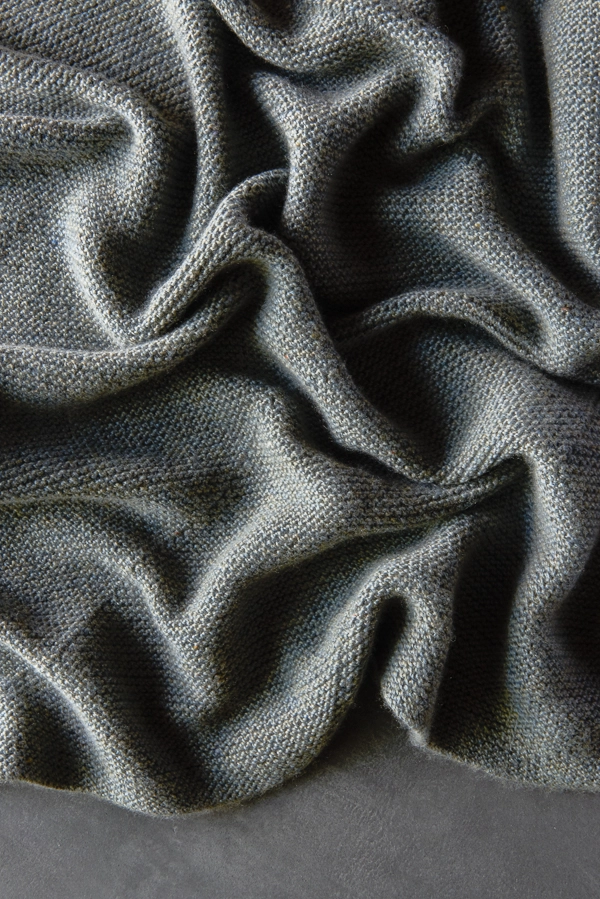
Our brand new buttery soft Cashmere Merino Bloom was the obvious choice for our Ridgeline Baby Blanket. This cashmere-extra-fine-merino blend is so cuddly and special that your knitting efforts are bound to please any baby who appreciates modern beauty! -Michele
P.S. “Michele” is Michele Wang, fellow knit designer and good friend to Purl Soho, and we’re thrilled that she’s contributed such a beautiful design to our collection! -The Purl Soho team
Designed for Purl Soho by Michele Wang.
Share your progress and connect with the community by tagging your pics with #PurlSoho, #PurlSohoBusyHands, #PurlSohoRidgelineBabyBlanket, and #PurlSohoCashmereMerinoBloom. We can’t wait to see what you make!
Materials
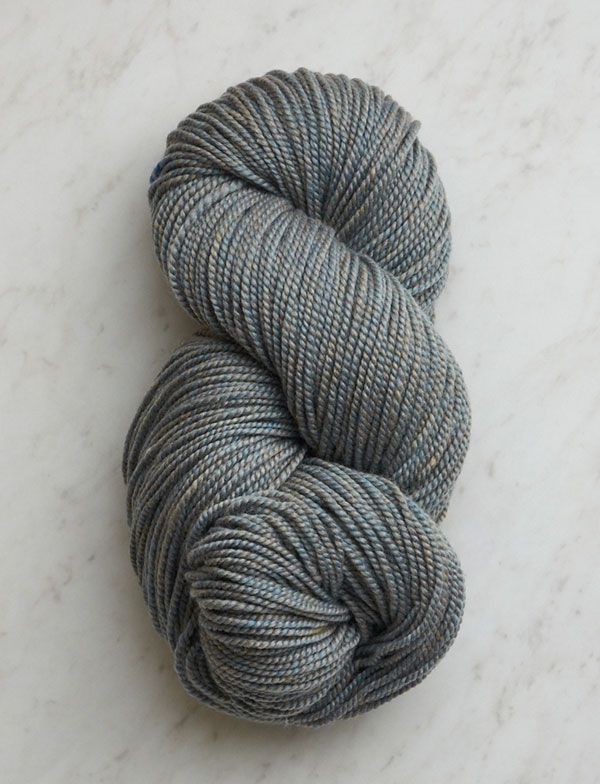
- 6 skeins of Purl Soho’s Cashmere Merino Bloom, 75% extra fine merino wool and 25% cashmere. Each skein is 218 yards/ 100 grams; approximately 1,308 yards required. We used Tide Pool.
- US 6 (4mm), 24- or 36-inch circular needles
- Cable stitch holder
Gauge
20 stitches and 40 rows = 4 inches in garter stitch
Size
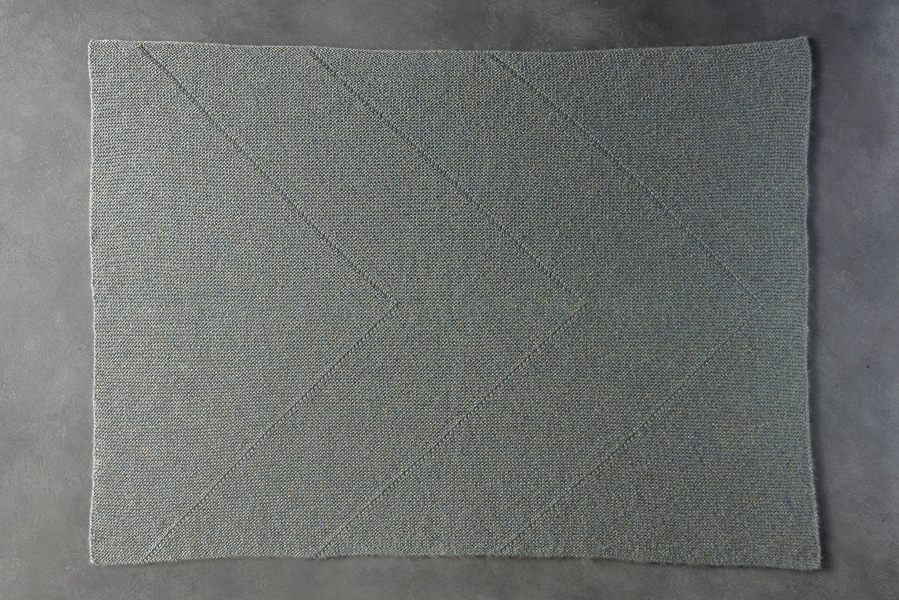
Finished Dimensions: 41 x 30 inches
Notes
Construction
You will cast on along the long side of this blanket and work from long to long side.
Abbreviations
1×1 RT: Slip next stitch onto cable stitch holder and hold in back of work, knit next stitch from left needle, knit stitch from cable stitch holder.
1×1 LT: Slip next stitch onto cable stitch holder and hold in front of work, knit next stitch from left needle, knit stitch from cable stitch holder.
Pattern
Cast on 205 stitches. We used a basic Long Tail Cast On.
Row 1 (right side): K88, 1×1 RT (see Notes), [k48, 1×1 RT] twice, knit to end of row.
Row 2 (wrong side): K16, p1, [k49, p1] twice, knit to end of row.
Row 3: K87, 1×1 RT, [k48, 1×1 RT] twice, knit to end of row.
Row 4: K17, p1, [k49, p1] twice, knit to end of row.
Continue in established pattern, knitting one less stitch at the beginning of each right-side (odd-numbered) row and one more stitch at the beginning of each wrong-side (even-numbered) row, ending with the wrong-side row that has 90 knit stitches before the first purl stitch.
Next Row (right side): K14, 1×1 LT (see Notes), [k48, 1×1 LT] twice, knit to end of row.
Next Row (wrong side): K89, p1, [k49, p1] twice, knit to end of row.
Next Row: K15, 1×1 LT, [k48, 1×1 LT] twice, knit to end of row.
Next Row: K88, p1, [k49, p1] twice, knit to end of row.
Continue in established pattern, knitting one more stitch at the beginning of each right-side (odd-numbered) row and one less stitch at the beginning of each wrong-side (even-numbered) row, ending with the right-side row that has 88 knit stitches before the first 1×1 LT.
Next Row (wrong side): Bind off all stitches in pattern, knitting the knit stitches and purling the purls.
Weave in the ends and block as desired.


Can you tell me what cast on and bind off methods you used for the blanket? It’s just beautiful!
Hi Debbie,
Thanks for writing in! Unless otherwise notes, all of our patterns use a long tail cast-on. For a tutorial on this cast-on, please look here: https://www.purlsoho.com/create/2006/09/29/long-tail-cast-on/
For the bind off, we suggest binding off all stitches in pattern, knitting the knit stitches and purling the purls.
I hope that this helps!
Cassy
Is there any way to get a written pattern of this. Would love to have one as my e-mails delete themselves after I open them the first time
Hi Roberta,
Thanks for writing in! The written pattern is listed above. You may also download the pattern as a PDF. If you’re on a desktop version of the site, you will find a “print” icon in the right column just below the date and tags. If you’re on a mobile version of the site, you will find a “print” icon below the pattern and above the comments.
Follow the easy on-screen instructions to delete whichever parts of the pattern you don’t want to print or save. For example, you may decide to shorten the pattern by omitting certain images or the list of materials.
Happy knitting!
Cassy
Hi, I am a left handed knitter. I usually don’t have any issues following patterns, but the cables are throwing me off. Because I hold my needles in the opposite hands, I would be slipping the stitch off the right needle when it says left,etc… Will it still be possible for me to make this as written? Or do I need to reverse the instructions?
Hi Sophie,
Thanks for reaching out! I believe if you are working with the needles in the opposite hands you would need to reverse the 1×1 RT and 1×1 LT.
I hope this helps, happy knitting!
Gianna
Thanks!
I love this, but would prefer to knit it in worsted weight yarn. Any tips on modifications?
Hi Kymm,
Great idea! You would need a similar amount of yarn and I would go up to US 8s. This will yield a slightly larger blanket is all dimensions but I think that it would be lovely!
Happy knitting,
Cassy
Simple, pretty, but elegant. I love it!
This is a great pattern – simple and functional. Any chance of a crochet version?
thanks,
Anne
Beautiful. Thank you for sharing this pattern.
I love this blanket and I love the suggested yarn; however hand wash is impractical for a new mom. As a grandmother who knits constantly and who also helps with the little ones, machine washables are essential otherwise hand knits slip into the machine with disastrous results. Do you have a suggestion of a washable yarn to use with this pattern?
Thanks.
Hi Sarah,
I totally understand! Cotton Pure has a similar gauge to Cashmere Merino Bloom. I would recommend knitting a gauge swatch to be sure that you like the fabric on the US 6 needles. If the fabric is a little too loose, you can certainly go down to a US 5 and still get a similar, if not a tiny bit smaller blanket! Another yarn that may work and is also washable is Anzula Cricket. It also has a some cashmere content and will have some of the lovely softness that the Cashmere Merino Bloom has.
I hope that this helps!
Cassy
It would also be interesting to do it in four colours – one for each section.
I hate to pose this question as I am typically someone who likes to follow the pattern as is, including the suggested yarn. I love the design and the timing is perfect as I was just planning which blanket to choose for my next project. The problem is I have to knit in cotton due to wool allergies and climate for the intended recipient. Is there a cotton substitute that you could suggest? Many thanks.
Hi Margaret,
I totally understand! Luckily enough, we have another yarn in our stable that would work and is made of cotton. Cotton Pure has a similar gauge to Cashmere Merino Bloom. I would recommend knitting a gauge swatch to be sure that you like the fabric on the US 6 needles. If the fabric is a little too loose, you can certainly go down to a US 5 and still get a similar, if not a tiny bit smaller blanket!
I hope that this helps!
Cassy
Thank you! I love it. Simple & understated.
Hello
I love all your baby blanket patters but like to make them larger. For this one would you cast on double and repeat the pattern twice (you would end up with two arrows.
Hi Sharyn,
Thank you for your patience and our apologies for the delayed response while we figured out an answer to your question! You idea is spot on!
There are a few options for making this blanket larger.
1. You could hold the yarn doubled and use either a US 10.5 or US 11. You would need double the amount of yarn and then follow the directions as written.
2. You could double the cast-on, and then repeat the pattern twice giving you a zig zag instead of a chevron. The resulting blanket would be twice as wide but the same height. To make the blanket even larger, you could repeat the pattern twice in each direction to yield a blanket 4 times the size of the original.
3. You could double the cast-on number and perform the pattern in the center of the blanket and then continue until it’s half the height you want and then begin the cables in the opposite direction.
I hope that this helps and happy knitting!
Cassy
How could I make this larger?
Hi Gail,
Thank you for your patience and our apologies for the delayed response while we figured out an answer to your question!
There are a few options for making this blanket larger.
1. You could hold the yarn doubled and use either a US 10.5 or US 11. You would need double the amount of yarn and then follow the directions as written.
2. You could double the cast-on, and then repeat the pattern twice giving you a zig zag instead of a chevron. The resulting blanket would be twice as wide but the same height. To make the blanket even larger, you could repeat the pattern twice in each direction to yield a blanket 4 times the size of the original.
3. You could double the cast-on number and perform the pattern in the center of the blanket and then continue until it’s half the height you want and then begin the cables in the opposite direction.
I hope that this helps and happy knitting!
Cassy
Hi,
In the first option above, what would the approximate finished dimensions be? I want to make a blanket for a full size bed, approximately 80×90…or around there.
How would you increase this pattern to make a throw?
Hi Karrie,
Hi Carol,
Thank you for your patience and our apologies for the delayed response while we figured out an answer to your question!
There are a few options for making this blanket larger.
1. You could hold the yarn doubled and use either a US 10.5 or US 11. You would need double the amount of yarn and then follow the directions as written.
2. You could double the cast-on, and then repeat the pattern twice giving you a zig zag instead of a chevron. The resulting blanket would be twice as wide but the same height. To make the blanket even larger, you could repeat the pattern twice in each direction to yield a blanket 4 times the size of the original.
3. You could double the cast-on number and perform the pattern in the center of the blanket and then continue until it’s half the height you want and then begin the cables in the opposite direction.
I hope that this helps and happy knitting!
Cassy
I’m relatively new to knitting and am frightened of the cable stitch. I can’t find a video of this stitch. Is there one out there?
Hi Sue,
Thanks for writing in! Cables are nothing to be frightened of. While we do not have videos available for these cables, I would encourage you to knit up a small gauge swatch with waste yarn and try the cables on that yarn. I find that when I am trying anew technique, it is really helpful to read it out loud as I try it. It reinforces the technique as I do it. For full explanation of the cables, please check out the notes section of the pattern.
I hope that this helps and happy knitting!
Cassy
This is gorgeous! I am interesting in making one for a teenager (mine are not babies any more) … how would I modify the pattern for a single bed-sized blanket? My daughter would love this in a nice soft gray!
Hi Ewa,
Thank you for your patience and our apologies for the delayed response while we figured out an answer to your question!
There are a few options for making this blanket larger.
1. You could hold the yarn doubled and use either a US 10.5 or US 11. You would need double the amount of yarn and then follow the directions as written.
2. You could double the cast-on, and then repeat the pattern twice giving you a zig zag instead of a chevron. The resulting blanket would be twice as wide but the same height. To make the blanket even larger, you could repeat the pattern twice in each direction to yield a blanket 4 times the size of the original.
3. You could double the cast-on number and perform the pattern in the center of the blanket and then continue until it’s half the height you want and then begin the cables in the opposite direction.
I hope that this helps and happy knitting!
Cassy
Do you have suggestions to keep track of the changes? There are a lot of stitches, and, knowing myself, I am likely to lose count. I’m wondering if there is a better way to keep track of the number of stitches than having to count every time!
Thank you.
Erica
Hi Erica,
Thank you for writing in! Excellent question! When I am dealing with a large number of stitches, I like to use stitch markers every 10-20 stitches so that I can quickly assess whether I have the correct number of stitches on the needles. These are my favorites and I can open and close them and move them without having to knit to them should I need to.
I hope that this helps and happy knitting!
Cassy
I love this pattern-just what I was looking for! Thank you for the non wool option as well.
How would I go about making a larger blanket-maybe 36×48. I guess starting with a worsted weight (a non wool suggestion would be appreciated) would help, but is there a formula to use to adjust the pattern for different size blankets?
Thanks,
Carol
Hi Carol,
Thank you for your patience and our apologies for the delayed response while we figured out an answer to your question!
There are a few options for making this blanket larger.
1. You could hold the yarn doubled and use either a US 10.5 or US 11. You would need double the amount of yarn and then follow the directions as written.
2. You could double the cast-on, and then repeat the pattern twice giving you a zig zag instead of a chevron. The resulting blanket would be twice as wide but the same height. To make the blanket even larger, you could repeat the pattern twice in each direction to yield a blanket 4 times the size of the original.
3. You could double the cast-on number and perform the pattern in the center of the blanket and then continue until it’s half the height you want and then begin the cables in the opposite direction.
I hope that this helps and happy knitting!
Cassy
This is blanket stunning. I love the pattern; I love the color. Thank you for creating it! I would love to make it larger (like twice the size, perhaps). Any guidance on how I could go about it?
Thank you!
Anjya
Hi Anjya,
Thank you for your patience and our apologies for the delayed response while we figured out an answer to your question!
There are a few options for making this blanket larger.
1. You could hold the yarn doubled and use either a US 10.5 or US 11. You would need double the amount of yarn and then follow the directions as written.
2. You could double the cast-on, and then repeat the pattern twice giving you a zig zag instead of a chevron. The resulting blanket would be twice as wide but the same height. To make the blanket even larger, you could repeat the pattern twice in each direction to yield a blanket 4 times the size of the original.
3. You could double the cast-on number and perform the pattern in the center of the blanket and then continue until it’s half the height you want and then begin the cables in the opposite direction.
I hope that this helps and happy knitting!
Cassy
Thank you! It seems many people had the same question! One of the reasons I think this is so pretty is that it seems that there are the same number of st from the top of the chevron to the edge of the blanket in the middle as there are from the bottom of the last chevron to the corner. It seems like I could get this same effect if I did option #3 and doubled the number of chevrons to 6. Am I thinking of that right? Thanks again.
Hi Anjya,
Thank you for your kind words! You are correct! Option 3 should get you exactly what you are looking for!
Happy knitting!
Cassy
Love the blanket but could you explain the technique of knitting one more stitch at end of right side row and one less stitch at end of wrong side row? Thank you!
Hi Marlene,
Thanks for the kind words about our lovely blanket!! I think that I can help with your question! On row 1 you will notice that you start with a k88 and on row 3 you start with k87. On row 2 you start with k16 and on row 4 you k17. For the odd rows you will continue on with k86 for row 5, k85 for row 6 etc. And for the even rows you will continue on with k18 for row 6 and k19 for row 8 etc. This will move the cable that creates the chevron in the prescribed fashion!
I hope that this helps!
Cassy
What a simply gorgeous blanket. I have a couple of questions. I have 1600 yards of sport weight yarn. Will that be enough? Do you have any ideas for a border or don’t you think it’s necessary? Last question: how do you think it will look with a yarn that is multicolored?
Thank you so much for this beautiful pattern.
Elyse
Hi Elyse,
Thank you for your questions! I think that 1600 yards is plenty. I don’t think a border is necessary, but if you’d like to add one, you have more than enough yarn to do so. You could pick up stitches along the sides of the work and do a double decrease in the corners or you could do a log cabin border. As for the multicolored yarn, I don’t think that would be a great idea considering the ridgeline cable is such a fine detail. It might get lost in all that changing color. Although, it really depends on how multicolored the yarn is!
All the best,
Adam
Hi, I love the look of this blanket! Do you have any suggestions for making it a larger blanket for an adult rather baby blanket? I’m interested in it being bigger than a lap blanket. Any thoughts on how to achieve this and get the same beautiful pattern?
Thanks so much!
Jen
Hi Jen,
Thanks for the question! There are a few options for making this blanket larger.
1. You could hold the yarn doubled and use either a US 10.5 or US 11. You would need double the amount of yarn and then follow the directions as written.
2. You could double the cast-on, and then repeat the pattern twice giving you a zig zag instead of a chevron. The resulting blanket would be twice as wide but the same height. To make the blanket even larger, you could repeat the pattern twice in each direction to yield a blanket 4 times the size of the original.
3. You could double the cast-on number and perform the pattern in the center of the blanket and then continue until it’s half the height you want and then begin the cables in the opposite direction.
Hope this helps!
-Adam
I’m just starting this and trying to write out the pattern for myself row by row to make it easier. What happens to the K49 x2 and K48X2 as you increase decrease the initial knits? So for instance on row 25 would the pattern be K76, 1×1 RT, [k48, 1×1 RT] twice, knit to end of row? Is the k48 always k48? That seems wrong to me.
Thabnks
Sarah
Hi Sarah,
Thanks for the question. After the initial directions, the pattern states the following:
Continue in established pattern, knitting one less stitch at the beginning of each right-side (odd-numbered) row and one more stitch at the beginning of each wrong-side (even-numbered) row, ending with the wrong-side row that has 90 knit stitches before the first purl stitch.
Because you are knitting a traveling cable stitch you need to knit up to one stitch before the cable on the right side to keep the 1×1 RT traveling to the right. On the wrong side the cable has moved one to the left so you knit one more stitch than the previous wrong-side row. Hope this makes more sense.
All the best,
Adam
Hello, Your blanket is fresh modern day and I have finally decided to take on the challenge. I am as well writing out the pattern before I start. Could you please tell me how many rows I will have completed after row 4 : Continue in established pattern, knitting one less stitch at the beginning of each right-side (odd-numbered) row and one more stitch at the beginning of each wrong-side (even-numbered) row, ending with the wrong-side row that has 90 knit stitches before the first purl stitch. I will have 115 rows please advise if this is correct! Thank you
Peg
Hi Peg,
Thanks for the question. You’ll have completed 148 rows at the middle of the blanket. To figure this out you subtract 16 (the amount of stitches you start with on the wrong side) from 90 (the amount you want to get to), which equals 74. Since you are knitting one more stitch every two rows, you multiply 74 by 2, which equals 148. Hope this helps!
-Adam
Could this be knit with a sport weight yarn? Would you knit with two strands or just adjust the needle size? Thank you!
Hello Jamie,
Great question! To knit this blanket in a sport weight you will need to knit a gauge swatch with desired needle size. I hope this helps!
-Marilla
Beautiful blanket and I would like to make it for a new granddaughter due this fall. Any suggestions for making it slightly shorter without ruining the look of the pattern? I would like to get it closer to 30×30″ for more of a swaddle/stroller/carseat size. Slightly longer in length is ok, if it makes the pattern look better. Thank you!
Hello Donna,
Thanks for writing in! Because you are casting on long-ways you could just take out some of the stitches between the ridges. This would bring the ridges closer together but create a smaller blanket. I hope this helps! Let me know if you have any further questions.
-Marilla
I am one skein short 🙁 of the total needed yardage.
Any hints on how to make this blanket with a total of 1,095 yards? I was thinking of casting on 20 less stitches and knitting 10 less stitched between ridgelines but I am not sure this would be enough to make up for the lack of yardage…
Hi Paula,
Thanks for writing in! With 1,085 yards, you would have roughly 20% less yarn that used here and so would need to cast on 20% fewer stitches. This would be roughly 25 fewer stitches. I would suggest subtracting 12 stitches from the first section and 12 from each of the repeats. You would then need to be sure to work the wrong side rows based on this new stitch count but I think that it would work well!
I hope that this helps!
Cassy
Hello! I’m in search of a pattern to make for our second little one, and love that this compliments the “Cozy Corners” crib blanket I made for our first. Out of curiosity, do you think I could amend the pattern to showcase the chevron ridge on a stockinette background instead of garter by purling the wrong side? Would this impact the cable direction I’d have to take?
The blanket is lovely and I likely will just make as-written, but my beginner-intermediate knitting mind and stockinette loving heart are just curious as to the possibilities!
Hi Alexandra,
Thanks for writing in! For this lovely blanket, the subtle cable does pop more on a garter background. Additionally, you will need to account for the fact that stockinette curls whereas garter lays flat. To account for the curl, you will want to add some type of border. I would recommend giving it a try on a swatch to see if you like the look!
Best,
Cassy
If I wanted to make a smaller blanket, how would you recommend I do that. Cast on ?? Then changing the pattern. Wanted more of a stroller blanket, and cuddling blanket. Thank you
Hello Jodi,
Thank you for reaching out! This blanket is knit from the long side down so the best way to make this blanket smaller is to cast on less stitches and depending on the size you would like your blanket to be, you could do two Vs rather than three, or you could make shallower Vs.
I think the simplest way to achieve this, especially if you would like it to be slightly smaller is to take off a few stitches (maybe 8?) on either end so there would be a little less space before your V starts and ends.
I hope this all makes sense and let me know if you have any further questions!
Warmly,
Marilla
Would this work with a variegated chunkier alpaca/wool yarn? Thank you! Beautiful pattern!
Hello Emily,
Thank you for reaching out! Technically you could knit this blanket with a thicker yarn you would just need to go up in needle size an down in cast on. This will change the look of the blanket because it will change the dimensions of the angles. My concern with knitting this particular blanket with a variegated yarn would be that the lines, which are what makes this blanket so special, would be lost in the pattern of the yarn.
I hope this helps and happy knitting!
-Marilla
I just started this lovely blanket and it’s my first time with cabling. Can you tell me if I should be careful about how I hold and then knit the stitch I place on the cable needle? Is it possible to knit it from the wrong side or twist it? I want the cable line to look as good as it does in your pictures! Thanks.
Hello Rebecca,
Thank you for reaching out! You do need to be carful not to twist your stitch when slipping it onto your cable needle.
As long as you are carful when doing this you will be setting yourself up for success.
Happy knitting!
-Marilla
Hi Marilla! I’m having trouble with this as well, I completed the first half of the V and the raised line of stitches looks great, but as I switched to start the second half of the V those stitches aren’t standing out as much. Any videos on slipping a stitch without twisting it? I don’t think I’m doing that but maybe I’m wrong…
Thanks!
Hi Michelle,
Thanks for writing in! We don’t have a video for this, but you just want to make sure that you are slipping the stitch onto the cable needle purlwise, and that the cable needle doesn’t rotate or twist around while you are holding it in the front of the work – when you are putting just one stitch on the cable needle, it can be hard to tell visually if it has gotten twisted around! Cables often improve quite a bit with blocking, so as long as you are confident that you are twisting the cables correctly, I would expect everything will even out and both cables will look the same in the end!
Best,
Julianna
Hi Purl Soho team! How much of the 5th skein did you end up using? I had to frog once and when that happened, the yarn looks very “worked” and fuzzy, so I want to cut that amount off.
Thank you!.
Hi Jihane,
Thanks for reaching out! For this lovely blanket we used 6 skeins of Cashmere Merino Bloom! We used most of the 6th skein. To use the already knit yarn will mitigating the fuzz, you could alternate between that yarn and the unknit yarn every two rows until you have worked through all of it. You can then de-pill the whole blanket once you finish and then the fuzz will be minimized!
Best,
Cassy
Thanks for the reply, Cassy! How do you recommend to de-pill the whole blanket? Do you use that defuzzing tool?
Hi Jihane,
Great question! We love the Gleener which we use in the shop and at home to keep our knits looking tip top!
Best,
Cassy
I love this pattern so much that I would love to make a wrap with this pattern, maybe 20-30 inches wide x 70-80 inches long. How would you suggest I modify the pattern and how many skeins of the cashmere merino bloom would I need? Thank you
Hi Brigitte,
Thanks for reaching out, and what a lovely idea! Since the blanket is knit sideways and is 41 inches long, I think the easiest way to start would be to double your cast on for an 82 inch long wrap and then work the pattern twice. You can work the pattern as written until you are half way to your desired width, which will be the “point” of the cables, and then switch to the second half of the pattern. Since the original blanket is 30 inches wide, unless you are planning on making a narrower wrap, I would get double the amount of yarn we used for the blanket, or 12 skeins, of Cashmere Merino Bloom.
Happy knitting, and please do let us know how it turns out!
Julianna
Thank you so much for your response and your beautiful products and patterns. I will be sure to update 😉
Hello staff! I’m doing this beatutiful projet, but I have problems in the second parte, despite having followed your explanations and the number of stitches is perfect. Is it possible that the first right row needs 2 stitches instead of 1? Thank you!
Hello Mariangela,
Thank you for reaching out and for your kind words! Are you referring to “row 1”? Where would it need 2 stitches instead of one? Are you remembering to repeat “[k48, 1×1 RT]” in row 1?
I hope I can help!
-Marilla
Thanks for the answer, Marilla. Of course, I follow the explanations faithfully….. my only difference is that I finished the last wrong side of the first section with 14 stitches, so I worked 15 stitches in the first right side of the second section.
I made several attempts, before asking you, no results.
Hello Mariangela,
Thank you for clarifying! For your last wrong side row, do you have 90 stitches at the end of the row? In other words you row looks like 90 stitches, 1 purl, 49 knits, 1 purl, 49 knits, 1 purl, 14 knits? If so this is exactly how your row should look for your final wrong side row of your fist section, so you are right on track and there is no need to alter the first right side row of your second section.
I hope this makes sense and let us know if it doesn’t!
Happy knitting,
Marilla
Thanks for the clarification, Marilla, I thought I was wrong. I’ve stitched up and I’m going to try again, I’ll let you know. Thank you so much!
After reading through the comments I have decided to make this blanket holding the yarn double to increase the size. What is the estimation of how much larger this will increase the size of the blanket?
Hi Chelsey,
Great question! It’s hard to say exactly without knitting a gauge swatch, but DK yarn held double comes turns out to about the equivalent of a bulky weight yarn. On a US 10 or 10.5, a bulky weight yarn usually comes out to 14 stitches and 28 rows per 4 inches, so the finished blanket would be 58 inches wide and 42 inches long. This is an estimate though, so your results may vary depending on your needle size and gauge!
I hope that helps, and happy knitting!
Julianna
I love this pattern and the yarn, which I have knit many beautiful pieces in – just wondering, does it really need to be hand washed? If so, can you recommend another yarn for this blanket that can be machine washed?
Thank you!
Hello Joy,
Thank you for reaching out! Yes, this yarn is not machine washable. I would recommend Anzula’s Cricket, which is made with a superwash wool.
I hope this helps and happy knitting!
-Marilla
Hi,
I have just started this pattern and not succeeding very well. The cable stitches are very flat and blend in with the other stitches, what could i be doing wrong? for 1X1RT I slip a stitch off the left needle and hold it behind the work, then knit the next stitch on the left needle and knit the stitch that i have slipped behind the work before i continue stitching along the left needle. It looks like a flat mess of untidy stitches, instead of standing out like a nice ridge. What could i be doing wrong?
Any tips or words of wisdom would be greatly appreciated! 🙂
Thankyou,
Sarah
Hi Sarah,
Thanks for reaching out! It’s hard to say what exactly might be going wrong, but is it possible that you are purling the wrong stitch on the wrong side rows? It sounds like you are doing the 1X1RT correctly, but if you lose count on the wrong side rows and purl the wrong stitch, the cables would disappear into the garter stitch background. I would suggest placing a removable stitch marker on the stitch that crosses in front – when working the 1X1RT, it is the stitch you knit from the left hand needle, not the stitch from the cable needle – to make sure it is the stitch that gets purled on the following row.
Best of luck, and I hope that helps!
Julianna
Hi again team! I try to send a question and I don’t know if you got it so I’m allowing myself to send it again.
Is the first stitch of the first row (88 (1X1TR) the one you slip on the cable needle? Is it how it starts? It says: slip NEXT stitch on the cable needle. So the next means the first?
Thank you for your answer.
Sylvie
Hi Sylvie,
Thanks for reaching out! At this point, you should have 205 stitches casted on, and you will start Row 1 by knitting the first 88 stitches on the needle. You will then work the 1x1RT by slipping the next stitch, or the 89th stitch on the needle, onto your cable needle and then following the rest of the instructions for the 1x1RT. In other words, the stitches for the 1x1RT are not part of the 88 knit stitches.
I hope that clears things up!
Julianna
Julianna, Thank you so much! I had really misunderstood from the beginning. I’m very happy you answered. I can start again!
So the 1X1 TR is in the 48 X2 in the first row?
Again Thank you.
Sylvie
Hi Sylvie,
I’m glad I can help! The cable stitches are not included in any of the stitch counts in the row. The first row has you knit 88 stitches, work the 1x1RT which takes up 2 stitches, knit 48 stitches, work another 1x1RT over 2 stitches, knit 48 again, work another 1x1RT over 2 stitches, and then knit to the end, which will be 15 stitches. If you add all these up (88+2+48+2+48+2+15) it comes out to 205, so you do not need to take any stitches away from the knit sections to work the cables.
Best,
Julianna
Julianna, you are my life saver! Thank you!
sylvie
Hello! I am coming off of a failed baby sock project. I’ve knit a few cable scarves but couldn’t keep track of my sock stitches (though your pattern was very straight forward!). It was probably to ambitious for me. Do you think that I could manage this pattern? I’m trying to find something simpler but still interesting and beautiful! Thanks for your help!
Hi Emily,
Thanks for reaching out! The majority of this blanket is simple garter stitch, with just a few tiny cable stitches, so I think it might be a good pattern to try! The biggest hurdle might be keeping track of your spot in the row, since you are knitting quite a few stitches between cables, but a few markers should keep you on track. As always, if you run into any problems, we are always here to help, so don’t hesitate to reach out!
Happy knitting!
Julianna
Hi again! Hope everyone is fine with the virus situation!
Good time for some knitting…
I wrote before and thank you for your help.
Am I wright to think that at EVERY right side (odd numbered) I have one less : row 4 starts with 87, row 7 starts with 86 and so on. Same with EVERY wrong side (even numbered) I have one more: row 6 starts with 17, row 8 starts with 18 and so on?
I don’t know if I’m clear but I mean – for the first part of the work- there is one less on EACH right side and one more on EACH wrong side?
Thank you for your help.
Stay well
Sylvie
Hi Sylvie,
Yes, that is correct! For the first part of this pattern, on the right side rows, you will be knitting one less stitch on each right side row before the first cable, and one more stitch before the first purl on each wrong side row. Once you reach the wrong side row where you knit 90 stitches before the first purl stitch, you will move on to the next section of the pattern and the sequence will reverse.
Happy knitting!
Julianna
Hi Julianna, thank you very very much. I will enjoy making that blanket now!
Take care.
Sylvie
If I am substituting Anzual Cricket for Cashmere Merino Blend in the Ridgeline Baby Blanket how many skeins do I need and what if any adjustments in the gauge and the pattern
Hi Mary Ann,
Thanks for reaching out! Anzula Cricket knits up tot he same gauge as Cashmere Merino Bloom, so you should be able to knit the pattern as written without making any modifications! You will need 6 skeins of Cricket for this blanket.
Happy knitting!
Julianna
Is there an email address I can send a photo to? I am on row 181 and just have a quick question to be sure my left twist looks right. Thanks! 🙂
Hi Emily!
You can send a photo to customerservice@purlsoho.com and we can take a look at it and get back to you!
Best,
Cassandra
HI!
I’ve begun knitting your Ridgeline Baby Blanket using Mulberry Merino in Heirloom White, which is what I had purchased for a different blanket but frogged! I’d prefer to knit this in the recommended Cashmere Merino Bloom in Heirloom White but you are currently out of it. Do you have any idea when you might have it back in stock? And also, if I need to go ahead and use my Mulberry Merino, will it knit up okay and show the design as well as the Cashmere Merino Bloom does? Will it be as soft? I’m usually a stickler for using the recommended yarn so that it turns out as well as it can. If you could give me some guidance, I’d sure appreciate it! Thanks!!
Hi Caren,
The Ridgeline Baby Blanket will work up beautifully in the Mulberry Merino! Although it is not quite as soft as the Cashmere Merino Bloom, it makes a lovely blanket and will show the design well. Fortunately, it looks like we will be getting more of the Cashmere Merino Bloom by the end of the month. If you like, you can sign up for notifications on the Cashmere Merino Bloom page and we will email you as soon as it is available!
I hope this helps!
Happy knitting,
Oscar
I would like to knit this blanket in Anzula Cricket. I have ordered and received the yarn and am anxious to get started. I noticed that the original yarn (Cashmere Bloom is 100 grams to 216 yards) would be a little heavier than the anzula (100 grams to 250). To swatch would you go a size down in the needle (US needle 5) or stick with the suggested needle (US needle 6). I’m opening to cast on soon–this will make a great holiday break project.
Hi Carol,
Thanks for reaching out! Cashmere Merino Bloom and Anzula Cricket are both light worsted/dk weight yarn so they should knit up to a very similar gauge, I would recommend sticking with the pattern instructions as is, and work a gauge swatch in the stitch pattern to see how it compares to the gauge of the pattern or if you will need to adjust the needle size from there!
I hope this helps, happy knitting!
Gianna
Hi,
I am about to start knitting this beautiful blanket with wool from my stash. Based on my gauge swatch, however, I’m concerned that the ‘selvedge’ edges (shorter sides of the blanket) might look messy and uneven. I’ve been reading that the best solution for this might just be to try to maintain very even tension but I am wondering if there are any other strategies you used to ensure tidy selvedge edges.
Thank you in advance for your advice!
Hi Sam,
Thanks for reaching out! That is my best tip as well, the best way to achieve a tidy edge is to keep a very even tension, especially when working the first and last stitch! You wont want to knit it too loose or too tight! You can also adjust the look of the edges quite a bit when you block the finished blanket!
I hope this helps and please let me know if you have any more questions!
Warmly,
Gianna
Could I make this blanket into a small “blankie” for a toddler to carry around? How many stitches to cast on and how many skeins?
Hi Judy,
Your cast-on number would depend on how large you’re planning on making this project! Do you have an idea of how long and how wide you’re aiming for? And are you planning on using a DK weight yarn, or a different weight yarn?
Let me know, and then I can help you make some adjustments to the pattern!
All the best,
Lili