
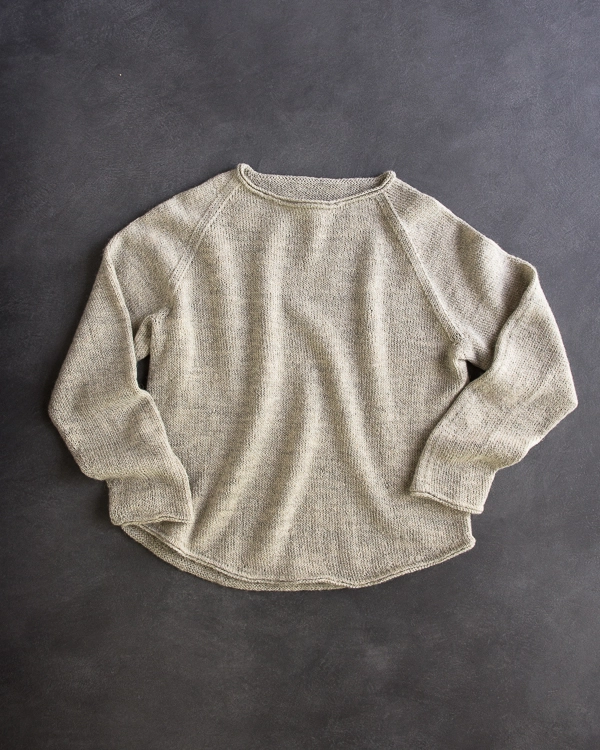

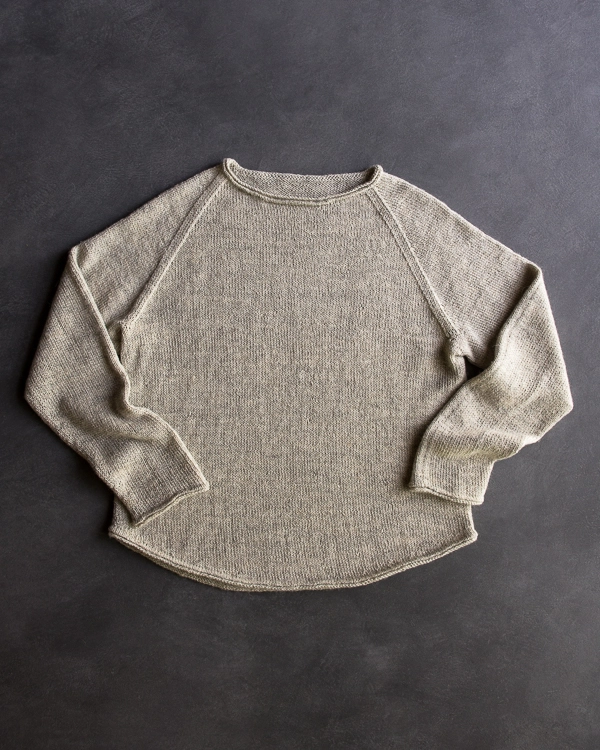
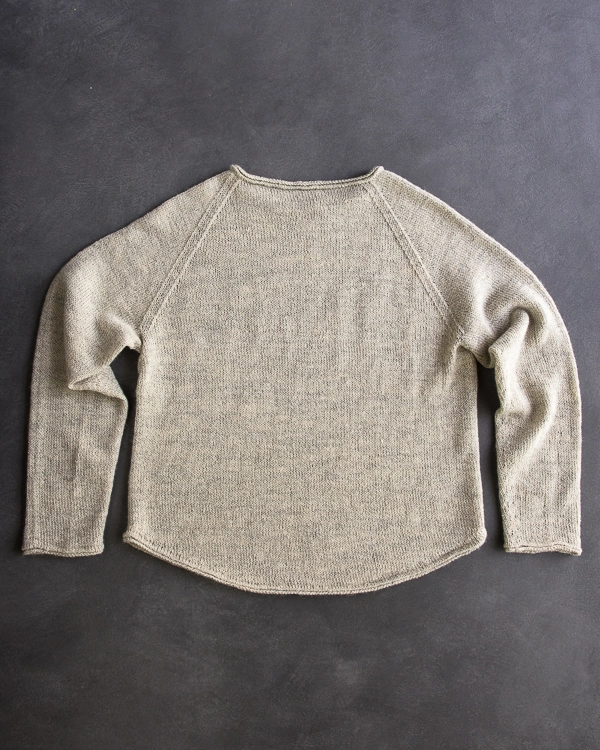
Lightweight Raglan Pullover
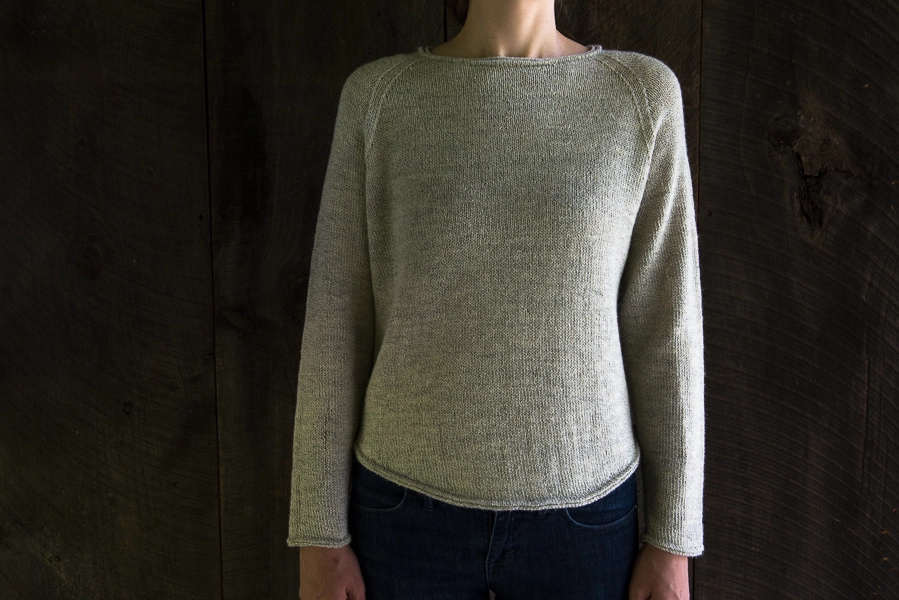
A circular raglan pullover is a wonderfully empowering thing for first-time sweater knitters. Creating one is like receiving a decoder ring for sweater-making. It unlocks secret geometries and makes simple sense of what is, after all, a pretty complicated garment.

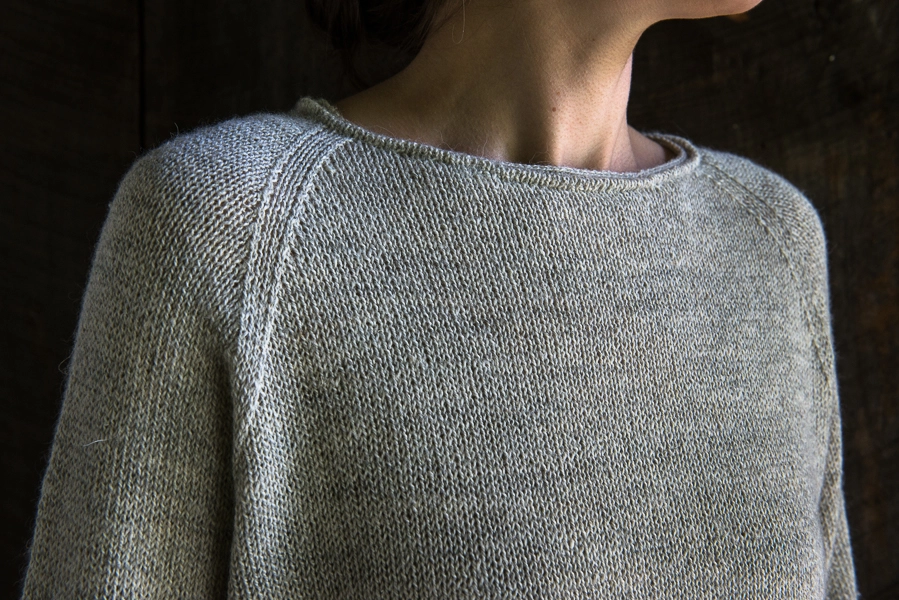
Who knew you could knit three tubes (i.e. 2 sleeves and a body) and then join them together into a larger tube (i.e. a yoke)!?! From there, regular “raglan” decreases shape the shoulders, from the underarms to the neckline. And in our Lightweight Raglan Pullover, subtle details, like cording stitch edges and short row shaping, give beginners a good challenge and keep experts interested.

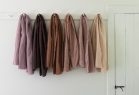
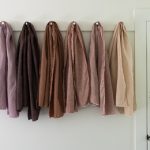
Purl Soho’s Linen Quill effortlessly elevates this simple sweater into something truly special. Its blend of wool, alpaca, and linen gives the Lightweight Raglan Pullover a soft bloom, a beautiful drape, and a unique look.

Whether this is your first sweater or your hundredth, I hope you enjoy the magic. No matter how many new tricks I learn, I turn to this intuitive construction method time and time again, loving how it unlocks the world of sweater-knitting! -Laura
Update: Now in Cattail Silk!
August 2018
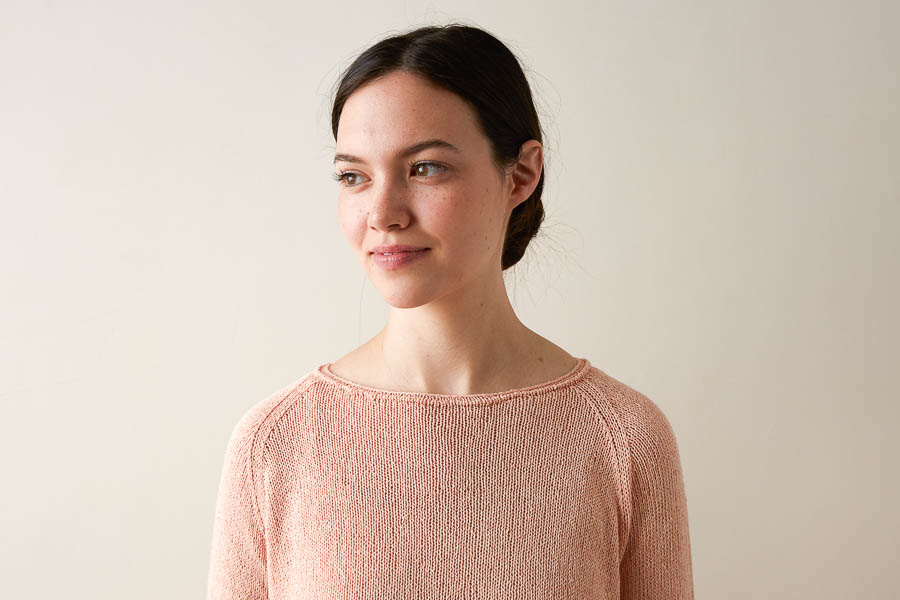
We love our Lightweight Raglan Pullover in Linen Quill, but for summer, we love it even more in beautiful Cattail Silk… as light and gentle as a warm breeze! Cattail Silk comes in a stunning array of colors and is 618 yards per skein… which means, to make a Cattail Silk version, you’d just need 2 (2, 3, 3, 3) skeins!
UPDATE: NEW COLORS
January 2022
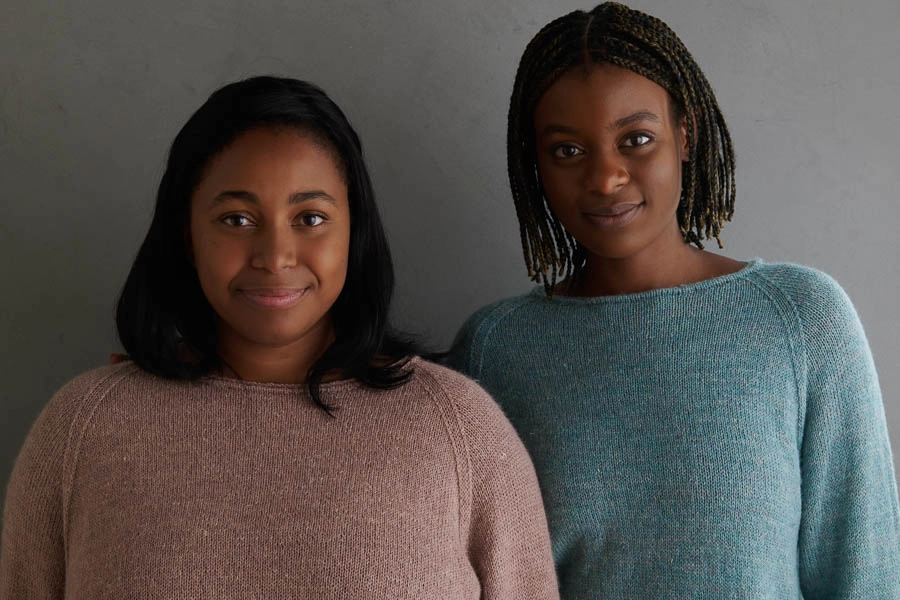
Whether it’s your first sweater or fiftieth, casting on with something special makes the knitting special. And when it comes to our Lightweight Raglan Pullover in Linen Quill, the mix of fine highland wool, alpaca, and linen ensure every stitch of this sweater is a thrill, no matter how many times you’ve knit it. See our two new versions here!
Designed by Purl Soho designer, Laura Ferguson.
Share your progress and connect with the community by tagging your pics with #PurlSoho, #PurlSohoBusyHands, #PurlSohoLightweightRaglanPullover, and #PurlSohoLinenQuill. We can’t wait to see what you make!
Materials

- 3 (3, 4, 4, 4) (5, 5, 5, 5) skeins of Purl Soho’s Linen Quill, 50% fine highland wool, 35% alpaca, and 15% linen. Each skein is approximately 439 yards/ 100 grams; approximately 1155 (1285, 1420, 1555, 1695) (1830, 1955, 2080, 2195) yards required. We used the color Oatmeal Gray.
- US 4 (3.5 mm), 32- or 40-inch circular needles, depending on size you are making
- US 4, 16-inch circular needles
- A set of US 4 double pointed needles
- Stitch markers, including one unique
- Stitch holders or scrap yarn
YARN UPDATE: For a fantastic alternative to Linen Quill, try our Cattail Silk! It has a very subtle shine, a wonderfully earthy texture, and a casual spin speckled by little nubs of color. It comes in a stunning array of colors and is 618 yards per skein… which means, to make this Lightweight Linen Raglan, you’d just need 2 (3, 3, 3, 3) (4, 4, 4, 4) skeins!
NOTE: Looking to knit your sleeves in double-time? Swap the double pointed needles for 32-inch or longer circular needles, and check out our Magic Loop: Two At A Time Tutorial!
Gauge
28 stitches and 33 rows = 4 inches in stockinette stitch
Sizes
NOTE: For help picking the correct size, visit our Understanding Ease + Selecting Your Size Tutorial.
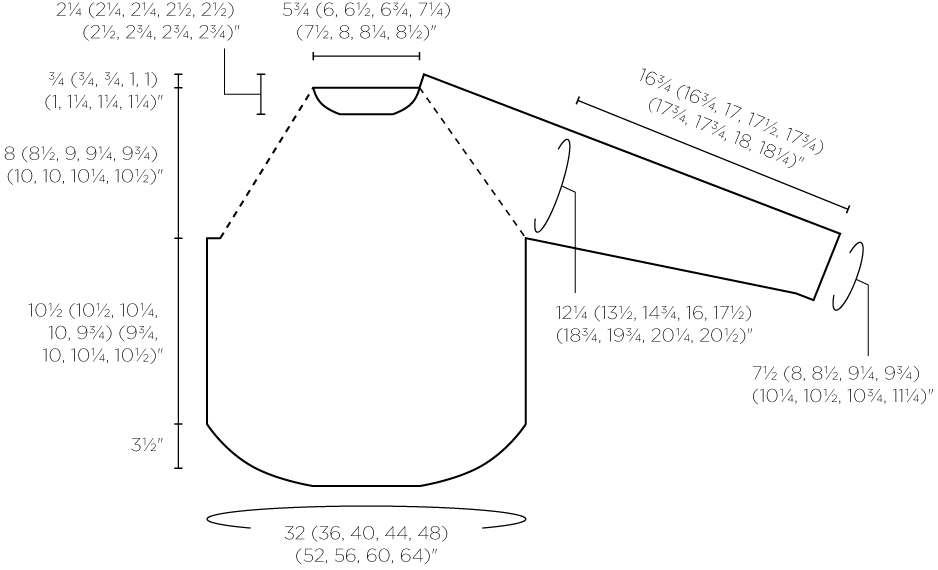
32 (36, 40, 44, 48) (52, 56, 60, 64)
To fit actual chest circumference of 28-31 (32-35, 36-39, 40-43, 44-47) (48-51, 52-55, 56-59, 60-63) inches, with 1-4 inches of ease
- Finished Chest Circumference: 32 (36, 40, 44, 48) (52, 56, 60, 64) inches
- Finished Length from Shoulder to Bottom Edge of Back: 22¾ (23¼, 23½, 23¾, 24) (24¼, 24¾, 25¼, 25¾) inches
- Finished Length from Underarm to Bottom Edge (measured at side): 10½ (10½, 10¼, 10, 9¾) (9¾, 10, 10¼, 10½) inches
- Finished Length from Underarm to Cuff: 16¾ (16¾, 17, 17½, 17¾) (17¾, 17¾, 18, 18¼) inches
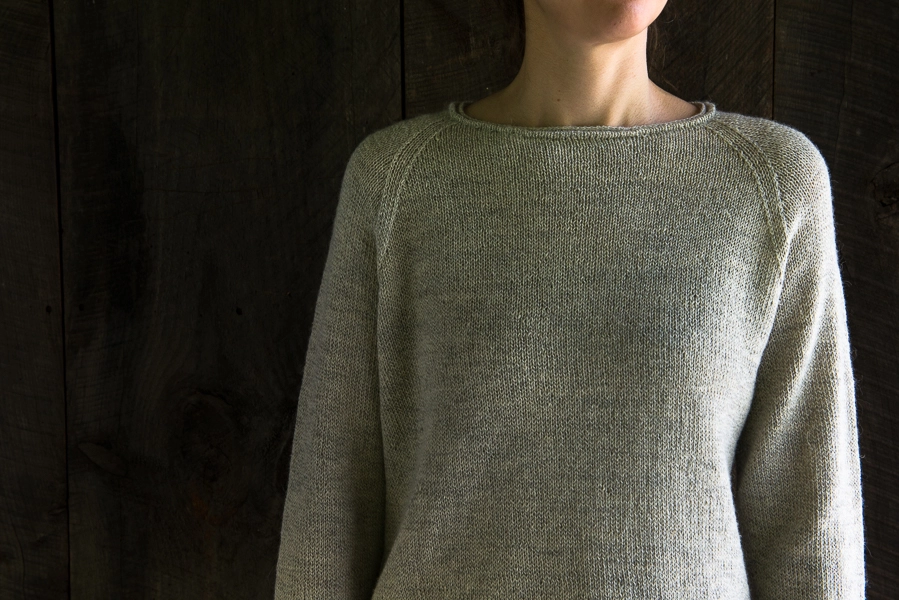
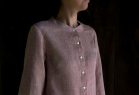
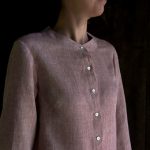
SAMPLE: The sample pictured here is size 36 inches, modeled with 3 inches of ease.
Notes
CONSTRUCTION
This sweater is worked in the round from bottom up. You will begin with the Sleeves, then set them aside and work the Body from bottom to Underarms. There, you will join Sleeves, then work the raglan Yoke to Neckline, which you will shape with short rows. You will finish with the Neckband.
SPECIAL INSTRUCTIONS
CORDING STITCH
NOTE: For a photo how-to of this technique, visit our Cording Stitch tutorial!

*Use tip of right needle to pick up purl bump four rounds directly below next stitch (shown in pink, above)…
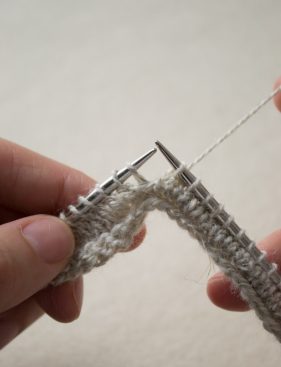
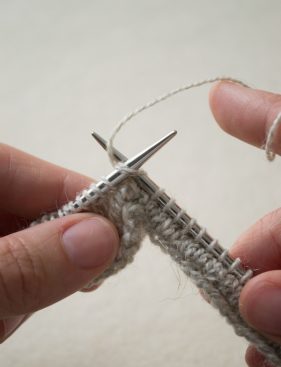
…Place purl bump on left needle, knit next stitch and picked-up stitch together, repeat from * to end of round.
NOTE: If you anticipate having trouble identifying the stitches you need to pick up, visit our Cording Stitch tutorial for tips on adding a “lifeline.” This is a step you do before you work the Cording Stitch that helps indicate which round you’re picking up!
MAKE 1 RIGHT + LEFT (M1R + M1L)
NOTE: For more help with these increases, visit our Make 1 Right (M1R) + Make 1 Left (M1L) tutorial.
Make 1 Right: Use left needle to pick up strand (or “bar”) between last stitch and next stitch, from back to front. Knit into front leg. [1 stitch increased]
Make 1 Left: Use left needle to pick up strand between last stitch and next stitch, from front to back. Knit into back leg. [1 stitch increased]
SHORT-ROW SHAPING: WRP-T (WRAP AND TURN)
NOTE: For more information about this technique, please visit our Short Rows tutorial.
On the right side: Keeping yarn in back, slip next stitch purlwise from left needle to right needle. Bring yarn to front. Return slipped stitch to left needle. Bring yarn to back. Turn work so wrong side is facing you.
On the wrong side: Keeping yarn in front, slip next stitch purlwise from left needle to right needle. Bring yarn to back. Return slipped stitch to left needle. Bring yarn to front. Turn work so right side is facing you.
PICKING UP PURL WRAP ON KNIT SIDE
NOTE: See this situation in action at minute 4:33 of our Short Rows tutorial.
Use tip of right needle to pick up wrap, inserting needle from front to back. Place wrap onto left needle, nudging wrap, if necessary, so it is after next stitch on needle. Slip first stitch knitwise, then slip wrap purlwise. Insert tip of left needle into front legs of two slipped stitches. Wrap working yarn around right needle to knit two together.
Pattern
Sleeves

Cast 52 (56, 60, 64, 68) (72, 74, 76, 78) stitches onto three double pointed needles. We used a basic Long Tail Cast On.
Place marker (pm) and join for working in the round, being careful to not twist the stitches.
Work in stockinette stitch, knitting each round, for 8 rounds. (Note: If you’re planning on adding a lifeline, do so right after finishing your fourth round at the cuffs, collar, and hem!)
Next Round: Work Cording Stitch (see Special Instructions) to end of round.
Continue in stockinette stitch until piece measures 1 inch from cast-on edge.
Shape Sleeve
Increase Round: K1, make 1 left (m1L), knit to last stitch, make 1 right (m1R), k1. [2 stitches increased]
Continuing in stockinette stitch, repeat Increase Round every 7th (6th, 6th, 5th, 5th) (4th, 4th, 4th, 4th) round 12 (18, 5, 22, 12) (29, 23, 22, 24) more times, then every 6th (0, 5th, 4th, 4th) (0, 3rd, 3rd, 3rd) round 4 (0, 16, 1, 14) (0, 8, 10, 8) time(s). [86 (94, 104, 112, 122) (132, 138, 142, 144) stitches]
Continue in stockinette stitch until piece measures 16¾ (16¾, 17, 17½, 17¾) (17¾, 17¾, 18, 18¼) inches from cast-on edge.
Next Round: K5 (7, 9, 11, 13) (15, 17, 19, 21), place previous 10 (14, 18, 22, 26) (30, 34, 38, 42) stitches onto stitch holder or scrap yarn (removing end-of-round marker), knit to end of round. [76 (80, 86, 90, 96) (102, 104, 104, 102) stitches remain]
Cut yarn.
Place remaining stitches onto stitch holders or scrap yarn and set aside. This will be the Right Sleeve.
Make Left Sleeve same as Right Sleeve, but leave the 76 (80, 86, 90, 96) (102, 104, 104, 102) Sleeve stitches on double pointed needles and set aside.
Body
Using a Long Tail Cast On, cast 224 (252, 280, 308, 336) (364, 392, 420, 448) stitches onto longer circular needles.
Place unique marker for end of round and join for working in the round, being careful not to twist the stitches.
Work in stockinette stitch for 8 rounds.
Next Round: Work Cording Stitch to end of round.
Shape Bottom Edge
NOTE: In this section, you will be working back and forth in short rows, turning the work partway through each row. For extra help, see Special Instructions.
Short Row 1 (right side): K75 (84, 93, 103, 112) (121, 131, 140, 149), wrp-t (see Special Instructions).
Short Row 2 (wrong side): P38 (42, 46, 52, 56) (60, 66, 70, 74), wrp-t.
Short Row 3: Knit to wrapped stitch, knit wrapped stitch with its wrap, k3 (4, 5, 5, 6) (7, 7, 8, 9), wrp-t.
Short Row 4: Purl to wrapped stitch, purl wrapped stitch with its wrap, p3 (4, 5, 5, 6) (7, 7, 8, 9), wrp-t.
Short Row 5: Knit to wrapped stitch, knit wrapped stitch with its wrap, k2 (3, 4, 4, 4) (5, 5, 6, 6), wrp-t.
Short Row 6: Purl to wrapped stitch, purl wrapped stitch with its wrap, p2 (3, 4, 4, 4) (5, 5, 6, 6), wrp-t.
Short Rows 7-12: Repeat Short Rows 5 and 6 three more times.
Short Row 13: Knit to wrapped stitch, knit wrapped stitch with its wrap, k2 (2, 2, 3, 3) (3, 4, 4, 4), wrp-t.
Short Row 14: Purl to wrapped stitch, purl wrapped stitch with its wrap, p2 (2, 2, 3, 3) (3, 4, 4, 4), wrp-t.
Short Rows 15-20: Repeat Short Rows 13 and 14 three more times.
Short Row 21: Knit to wrapped stitch, knit wrapped stitch with its wrap, k1 (1, 1, 1, 2) (2, 2, 2, 3), wrp-t.
Short Row 22: Purl to wrapped stitch, purl wrapped stitch with its wrap, p1 (1, 1, 1, 2) (2, 2, 2, 3), wrp-t.
Short Rows 23-28: Repeat Short Rows 21 and 22 three more times.
Short Row 29: Knit to wrapped stitch, knit wrapped stitch with its wrap, k75 (84, 93, 103, 112) (121, 131, 140, 149), wrp-t.
Repeat Short Rows 2 through 28 once more.
Next Short Row (right side): Knit to wrapped stitch, knit wrapped stitch with its wrap, slip marker.
Next Round: *Knit purl-wrapped stitch with its wrap (see Special Instructions), knit to next purl-wrapped stitch, knit purl-wrapped stitch with its wrap, knit to end of round.
Continue Body
Continue in stockinette stitch, knitting each round, until piece measures 14 (14, 13¾, 13½, 13¼) (13¼, 13½, 13¾, 14) inches from cast-on edge (measured at longest point, either at center Back or center Front).
Divide Front + Back
Division Round: K5 (7, 9, 11, 13) (15, 17, 19, 21), place previous 10 (14, 18, 22, 26) (30, 34, 38, 42) stitches onto stitch holder or scrap yarn for Left Underarm (removing end-of-round marker); k112 (126, 140, 154, 168) (182, 196, 210, 224), place previous 10 (14, 18, 22, 26) (30, 34, 38, 42) stitches onto stitch holder or scrap yarn for Right Underarm; knit to Left Underarm (next stitch holder). [204 (224, 244, 264, 284) (304, 324, 344, 364) stitches remain: 102 (112, 122, 132, 142) (152, 162, 172, 182) stitches each for Front and Back]
Yoke
Join Sleeves
NOTE: For help with this section, please visit our Joining Sleeves To Body Tutorial.
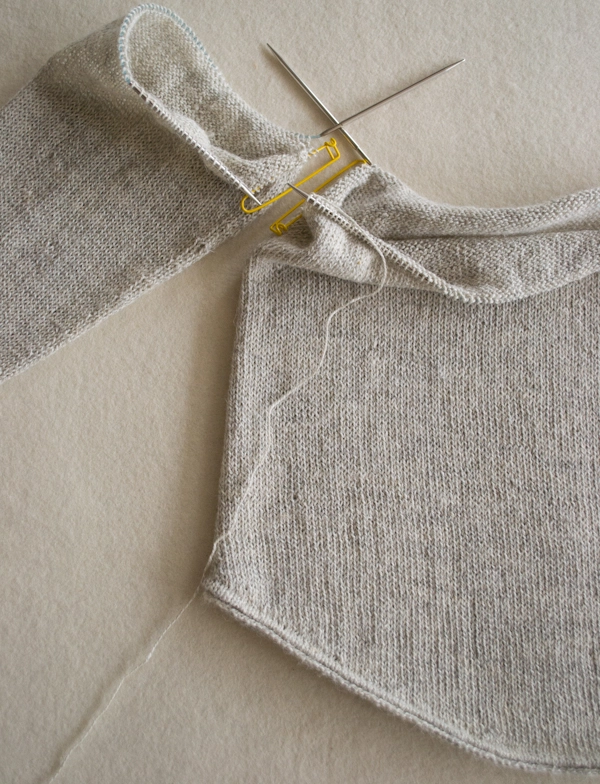
Joining Round: Holding Underarms parallel to each other, use working yarn from Body to k76 (80, 86, 90, 96) (102, 104, 104, 102) Left Sleeve stitches, pm; k102 (112, 122, 132, 142) (152, 162, 172, 182) Front stitches, pm; slip on-hold Right Sleeve stitches onto spare needles and holding Underarms parallel to each other, k76 (80, 86, 90, 96) (102, 104, 104, 102) Right Sleeve stitches, pm; k102 (112, 122, 132, 142) (152, 162, 172, 182) Back stitches, place unique marker for end-of-round. [356 (384, 416, 444, 476) (508, 532, 552, 568) total stitches: 102 (112, 122, 132, 142) (152, 162, 172, 182) stitches each for Front and Back; 76 (80, 86, 90, 96) (102, 104, 104, 102) stitches for each Sleeve]


Begin Shaping Raglan
SIZE 32 ONLY
Next Round: Knit to end of round.
Sleeve Decrease Round: [K1, slip slip knit (ssk), knit to 3 stitches before next marker, knit 2 together (k2tog), k1, slip marker (sm), knit to next marker, sm] 2 times. [4 stitches decreased]
Repeat last 2 rounds once more. [348 total stitches: 102 stitches each for Front and Back; 72 stitches for each Sleeve]
Next Round: Knit to end of round.
SIZES 36 AND 40 ONLY
Next Round: Knit to end of round.
SIZES 44, 48, 52, 56, 60, AND 64 ONLY
Next Round: Knit to end of round.
Body Decrease Round: [Knit to next marker, slip marker (sm), k1, slip slip knit (ssk), knit to 3 stitches before next marker, knit 2 together (k2tog), k1, sm] 2 times. [4 stitches decreased]
Repeat Body Decrease Round – (–, –, 2, 3) (3, 7, 11, 15) more times. [– (–, –, 432, 460) (492, 500, 504, 504) total stitches: – (–, –, 126, 134) (144, 146, 148, 150) stitches each for Front and Back; – (–, –, 90, 96) (102, 104, 104, 102) stitches for each Sleeve]
ALL SIZES
Raglan Decrease Round: [K1, slip slip knit (ssk), knit to 3 stitches before next marker, knit 2 together (k2tog), k1, slip marker (sm)] 4 times. [8 stitches decreased]
Continuing in stockinette stitch, repeat Raglan Decrease Round every round 0 (0, 2, 4, 6) (10, 14, 16, 16) more times, then every other round 23 (27, 28, 27, 28) (27, 23, 21, 20) more times. [156 (160, 168, 176, 180) (188, 196, 200, 208) total stitches remain: 54 (56, 60, 62, 64) (68, 70, 72, 76) stitches each for Front and Back; 24 (24, 24, 26, 26) (26, 28, 28, 28) stitches for each Sleeve]
Set Up Neckline + Shoulder Shaping
Set-Up Round: Knit to next marker, sm, k36 (38, 41, 43, 45) (48, 50, 52, 55), place previous 18 (20, 22, 24, 26) (28, 30, 32, 34) stitches onto stitch holder or scrap yarn for Front Neckline, knit to end of round. [138 (140, 146, 152, 154) (160, 166, 168, 174) total stitches remain: 18 (18, 19, 19, 19) (20, 20, 20, 21) stitches each for Left and Right Front; 54 (56, 60, 62, 64) (68, 70, 72, 76) stitches for Back; 24 (24, 24, 26, 26) (26, 28, 28, 28) stitches for each Sleeve]
Cut yarn.
Slip the following markers and stitches from left needle to right needle: slip end-of-round marker, slip 24 (24, 24, 26, 26) (26, 28, 28, 28) Left Sleeve stitches, sm, slip 18 (18, 19, 19, 19) (20, 20, 20, 21) Left Front stitches.
The stitch marker at Back Left now serves as a raglan marker instead of end-of-round marker, and the Front Neckline now marks the end of row.
SHAPE NECKLINE + SHOULDERS
NOTE: In this section you will again be working back and forth in short rows, turning the work partway through each row.
With right side facing you, join yarn to Right Front stitches…
Short Row 1 (right side): [Knit to 3 stitches before next marker, k2tog, k1, sm, k1, ssk] 4 times, knit to last stitch, wrp-t. [130 (132, 138, 144, 146) (152, 158, 160, 166) total stitches remain: 17 (17, 18, 18, 18) (19, 19, 19, 20) stitches for each Front; 52 (54, 58, 60, 62) (66, 68, 70, 74) stitches for Back; 22 (22, 22, 24, 24) (24, 26, 26, 26) stitches for each Sleeve]
Short Row 2 (wrong side): Purl to last stitch, wrp-t.
Short Row 3: [Knit to 3 stitches before next marker, k2tog, k1, sm, k1, ssk] 4 times, knit to last 5 stitches, wrp-t. [122 (124, 130, 136, 138) (144, 150, 152, 158) total stitches remain: 16 (16, 17, 17, 17) (18, 18, 18, 19) stitches for each Front; 50 (52, 56, 58, 60) (64, 66, 68, 72) stitches for Back; 20 (20, 20, 22, 22) (22, 24, 24, 24) stitches for each Sleeve]
Short Row 4: Purl to last 5 stitches, wrp-t.
Short Row 5: [Knit to 3 stitches before next marker, k2tog, k1, sm, k1, ssk] 4 times, knit to last 8 stitches, wrp-t. [114 (116, 122, 128, 130) (136, 142, 144, 150) total stitches remain: 15 (15, 16, 16, 16) (17, 17, 17, 18) stitches for each Front; 48 (50, 54, 56, 58) (62, 64, 66, 70) stitches for Back; 18 (18, 18, 20, 20) (20, 22, 22, 22) stitches for each Sleeve]
Short Row 6: Purl to last 8 stitches, wrp-t.
Short Row 7: [Knit to 3 stitches before next marker, k2tog, k1, sm, k1, ssk] 4 times, knit to last 10 (10, 11, 11, 11) (11, 12, 12, 12) stitches, wrp-t. [106 (108, 114, 120, 122) (128, 134, 136, 142) total stitches remain: 14 (14, 15, 15, 15) (16, 16, 16, 17) stitches for each Front; 46 (48, 52, 54, 56) (60, 62, 64, 68) stitches for Back; 16 (16, 16, 18, 18) (18, 20, 20, 20) stitches for each Sleeve]
Short Row 8: Purl to last 10 (10, 11, 11, 11) (11, 12, 12, 12) stitches, wrp-t.
Short Row 9: [Knit to 3 stitches before next marker, k2tog, k1, sm, k1, ssk] 3 times, knit to 4 stitches before next marker, wrp-t. [100 (102, 108, 114, 116) (122, 128, 130, 136) total stitches remain: 13 (13, 14, 14, 14) (15, 15, 15, 16) stitches for Right Front; 14 (14, 14, 16, 16) (16, 18, 18, 18) stitches for Right Sleeve; 44 (46, 50, 52, 54) (58, 60, 62, 66) stitches for Back; 15 (15, 15, 17, 17) (17, 19, 19, 19) stitches for Left Sleeve; 14 (14, 15, 15, 15) (16, 16, 16, 17) stitches for Left Front]
Short Row 10: [Purl to next marker, sm] 2 times, purl to 3 stitches before next marker, wrp-t.
Short Row 11: [Knit to 3 stitches before next marker, k2tog, k1, sm, k1, ssk] 2 times, k1, wrp-t. [96 (98, 104, 110, 112) (118, 124, 126, 132) total stitches remain: 13 (13, 14, 14, 14) (15, 15, 15, 16) stitches for Right Front; 13 (13, 13, 15, 15) (15, 17, 17, 17) stitches for Right Sleeve; 42 (44, 48, 50, 52) (56, 58, 60, 64) stitches for Back; 14 (14, 14, 16, 16) (16, 18, 18, 18) stitches for Left Sleeve; 14 (14, 15, 15, 15) (16, 16, 16, 17) stitches for Left Front]
Short Row 12: [Purl to next marker, sm] 2 times, p3, wrp-t.
Short Row 13: Knitting wrapped stitches with their wraps as you come to them, [k2tog, k1, remove marker, k1, ssk, knit to 3 stitches before next marker] 2 times, k2tog, k1, remove marker, k1, ssk, knit to end of row. [90 (92, 98, 104, 106) (112, 118, 120, 126) total stitches remain: 13 (13, 14, 14, 14) (15, 15, 15, 16) stitches for each Front; 40 (42, 46, 48, 50) (54, 56, 58, 62) stitches for Back; 12 (12, 12, 14, 14) (14, 16, 16, 16) stitches for each Sleeve]
Neckband
Changing to shorter needles, place a unique marker to indicate end of round.
Round 1: With right side facing you, k18 (20, 22, 24, 26) (28, 30, 32, 34) on-hold Front Neckline stitches, knit to end of round, knitting remaining wrapped stitches with their wraps and removing remaining raglan markers as you come to them. [108 (112, 120, 128, 132) (140, 148, 152, 160) stitches]
Continue in stockinette stitch for 3 rounds.
Next Round: Work Cording Stitch to end of round.
Continue in stockinette stitch for 2 rounds.
Bind off all stitches loosely.
Finishing
NOTE: For help with Kitchener Stitch, visit our tutorial.
Holding Body and Sleeve Underarms stitches parallel to each other, use Kitchener Stitch to graft Underarm stitches together. Sew up any holes, if necessary.
Weave in the ends and block as desired.


Hi there, I’ve just started lightweight raglan pullover but started the body first. I don’t understand the cording stitch and I’ve looked at the pics dozens of times. What do you mean “ four rounds below”? Is it four rows below the row you are working on? Is there a video for this? There are several videos for I cord stitch but it doesn’t look the same. Thanks for your help.
Hi Arlene,
I’m so sorry to hear you’re having trouble with the cording stitch! It’s definitely an uncommon technique, so I’ll try to explain it in more detail. Looking towards the inside (wrong side) of your work, you’ll see all the purl bumps. If you look directly below the first stitch on your left needle, you should see a column of bumps going straight down. Locate the top one, and count four bumps down. Then, using your right needle, pick up this bump and place it on your left needle. Finally, just knit together the first two stitches on your left needle (the original first stich + the purl bump you just placed there). Then continue on doing this same procedure for every stitch in the round. I hope this makes it more clear!
I also wanted to let you know that the cording stitch is actually quite different from an I-cord. Although we don’t have a tutorial demonstrating the cording stitch, we do have a tutorial for the Knit Hem, which is a more similar technique! I would recommend watching from about 4 minutes into the video to see how we make a knit hem along the bind-off edge, since that involves picking up purl bumps, just like the cording stitch does.
All the best,
Lili
Thank you so much! That was very helpful!
Dear Purl Soho, thank you for your free patterns. I am also impressed by the polite, supportive and informative way you reply to questions. I’ve learned a lot just reading your responses.
This is not a question, but a request. This pattern in particular is such a lovely basic. Has the time perhaps come to expand the sizing? Maybe to a 58 or 60 bustline? I think many would appreciate this revision. Alternatively, a tutorial on how to adjust?
Hi Margot,
Thanks for reaching out and for your kind words! We are so happy to hear that you are pleased with our customer service! As for your request, we are in the midst of expanding the size range of all our sweater patterns and are happy to report that many of them now fit chest sizes up to 62-64 inches! We are steadily working to make sure this is true of all our patterns. Please be on the lookout, and thank you so much for adding your voice to this issue. We greatly appreciate your feedback!
Happy knitting!
Gianna
Good day
could You help me please
I am stuck at short rows at the bottom after 29th short row stands “Repeat Short Rows 2 through 28 once more.”
what does that exactly mean to repeat 28th row or something else
Thank You very much
Hi Katija,
Thanks for reaching out. The instructions “Repeat Short Rows 2 through 28 once more” mean to work each short row, starting from Short Row 2, again! This will form the shaping on the other half of the body of the pullover. Hope this helps clarify things!
All the best,
Lili
oh no! now i understand i have to repeat from 2 to 28 rows all again to create a bow from the other side too
thank you anyway for the beautiful patterns and tutorials
Katija
I have only started on the sleeve and am up to 106 stitches (size 48 supposed to get to 122) and the circumference is huge at 16 inches. I got gauge by going down to size 3 needles and I am still at the correct gauge throughout the sleeve. Will I be able to knit the sleeve size for the 40 size and knit the body for the 48 size. I am using Linen Quill.
Hi Kathy,
Thanks for reaching out about this. I think it should be possible to knit size 40 sleeves and a size 48 body with just a few modifications! First, you’ll need to make sure that you have the same number of underarm stitches on hold between the sleeves and the body. That’s very easy to change though–you can pretty much pick any number that’s between 18 and 26 (the numbers for size 40 and size 48). Then, you can just knit the yoke in size 48 as written! The only thing to watch out for here is that, because the sleeves have fewer stitches, the raglan “seams” may collide when you get far enough up the yoke because you’ll be working with fewer sleeve stitches. If you encounter this, then I’d recommend switching to only working only the half of the raglan decreases that are on the front and back of the sweater (and not the ones on the sleeves). Also, just keep in mind that the stitch counts for the sleeves will be off for the remainder of the pattern!
I hope this helps you get started on making a garment that fits better!
All the best,
Lili
Hello!
2 times I restart the second side of the sweater, 2 times, i don’t have the same number of stitches. At rank 29 how many stitches am I supposed to have on both sides, please?
The swetaer is lovely, I really want to do it, lol.
Hi Joëlle,
Thanks for reaching out about this. When working the short row section in the body of the sweater, you should always have the same number of stitches on each side! The specific number of stitches, however, would depend on the size you’re making. The mismatch of stitches you’re seeing may be due to miscounting the stitches you knit on Short Row 1. It’s definitely a lot of stitches to count, but I would recommend double checking how many you have before continuing on! I hope this helps.
All the best,
Lili
Hi Purl Soho,
I am making my 4th lightweight raglan pullover! Love the pattern and am obsessed with Linen Quill.
I got perfect gauge on the recommended 3.5 mm needles with the first 3 sweaters, so carried on as usual with this 4th one. However gauge was waaaay off. Went down a needle size and still way off. Doing a swatch with 3 mm now. I’m quite confused by this.
Could it be that the Linen Quill has changed? Does this happen?
Hi Sheila,
Thanks for reaching out. It’s definitely a surprise when your gauge swatch doesn’t come out as expected, but I can confirm that Linen Quill has not changed. Gauge can be very tricky and depends on everything from needle size and yarn weight to things like needle material, tension in the working yarn, and even your own muscle tension! I’ve even experienced my own gauge change as I worked through a large project, making the second half of it significantly tighter. So while I can’t say for sure why the difference is so great in your case, it’s likely do to a combination of factors other than needle size and yarn weight. I’d definitely recommend trying on the 3mm needles, so let me know how that goes!
All the best,
Lili
Hello! I’m on the raglan decrease rounds: “Continuing in stockinette stitch, repeat Raglan Decrease Round every round 6 more times, then every other round 28 more times. ”
For the “28 more times”: am I knitting a total of 28 rounds, with half of them decreases, or 56 rounds, with half of them decreases?
Hi Katherine,
Thanks for reaching out. I can totally see how the wording can be confusing, but I can confirm that you’ll need to work a total of 56 rounds, with half of them being decrease rounds! I hope this helps clear things up.
All the best,
Lili
Thanks so much for the help!
Hello! Probably an intermediate knitter here. I have never knit a sweater before but feel that I’m ready to jump in and tackle that beast. This pattern looks beautiful and simple and beautifully simple! As someone who lives in Minnesota and is always cold, I’m curious- would it be possible for me to convert this pattern for a bulkier yarn so it could be more substantial? I don’t mind some math (my husband is a math teacher and I can drag him into this if need be), I’ve just never made such a drastic conversion before. Thank you for your help!
Hi Meghan,
Thanks for reaching out. You can absolutely knit this pattern with a bulkier yarn! The easiest way to do this is to simply knit a size that’s a bit smaller than you would make normally. To figure out exactly which size you’ll want to make, you will first want to knit a gauge swatch in pattern. Once you know how many stitches you’re getting per inch, multiply that by your chest circumference plus the amount of positive ease (1 – 4 inches). Finally, compare this number to the number of body stitches for each size (you can find this at the start of the BODY section) and pick the size that corresponds the closest. Then you can just follow the instructions for that size! I hope this helps.
All the best,
Lili
just popping in here to say that maybe a bulkier yarn wouldn’t be great for the corded hem on this sweater? has anyone at Purl done a sample on a DK or worsted yarn?
Meghan — if you are on Ravelry, I would recommend looking up this pattern to see if anyone else has knit it in a heavier weight yarn — maybe they have some advice!
Hi Melissa,
Thank you for your input! The cording stitch should still work out nicely with a sport, DK, or worsted weight yarn (though I wouldn’t recommend going any bulkier than that)! The hem will definitely end up more pronounced than when worked in a fingering weight yarn, but if that is bothersome, then there’s definitely a way around it. To create a slightly smaller version of the cording stitch, you can pick up the purl bump just 3 or even 2 stitches below, instead of the full 4 stitches below. I hope this helps!
All the best,
Lili
Buongiorno, sto lavorando il pullover raglan leggero e non riesco proprio a capire la parte forma scollo+ spalle
Quando si parla di Ferri accorciati, si intende che devo lavorare prima solo la parte posteriore e poi riprendere la parte spalle e il davanti?….
Forse è un problema dovuto alla traduzione in italiano, ma non riesco a capire!
Hi Gabriella,
Thanks for reaching out! For this portion of the pattern, you will be working back and forth in short rows, turning the work part way through each row rather than continuing to the end of the row. For more information and tips, please check out our wonderful Short Rows: Wrap-Turn tutorial.
I hope this helps, happy knitting!
Gianna
Forgive me if this has been asked before, but is there a way to adjust the neck to knit a smaller neck opening? Wide (or even semi-wide) necks just don’t sit well on my narrow shoulders. I wouldn’t mind if this makes the neck a bit higher. I would be knitting size 40 but would like the smallest neck.
Hi Elle,
Thanks for writing in. You have exactly the right idea! I would recommend knitting a few more decrease rounds until the neck is as small as you want it to be. Interestingly, you’ll only need to knit 2 more decrease rounds (4 rounds total) to get a neckline that’s even smaller than the smallest size, so you may want to decrease even a bit more than this! Hope this helps.
All the best,
Lili
I have the exact opposite question as Elle: is it possible to make the neck lower – by maybe 2 or even 3 inches – so that it sits well below the collarbone? I don’t mind the width at all, but I am not wild about the height. Can you suggest a fix for that, or would it be too complicated? Many thanks!
Debby
Hi Debby,
Yes, that’s totally possible as well! But I wanted to let you know that the height and width are connected, so a lower neckline means that it will be wider. To create that, just follow the raglan decrease rounds until the neckline is a little bit larger than your desired circumference. Then, you can work the short rows, keeping in mind that you have a different stitch count.
All the best,
Lili
Thanks, Lili. That sounds a bit complicated. Do you mean that just the neckline will be wider – in other words, a wider open U shape? There’s no way to keep it the same width of opening but a slightly lower U? Since the neckline is already wide, I fear that making it wider will make it slip off my shoulders. Can you estimate how much wider making the neck an inch lower would be? Sorry for my confusion!
Hi Debby,
I’m afraid that this type of modification is indeed very complicated! And modifying the shape of the neckline will unfortunately make it even more complicated. But if you’re up for it, I can definitely give you some guidance! To make the neckline have a deeper U shape, you would need to begin the short rows earlier. Then, work more short rows than the pattern states until the neckline is your desired shape.
I hope this gives you a general idea of the modifications you’d need to do to achieve this outcome! I’m sorry I can’t provide more specific advice at this point, but let me know if you end up trying this, and I can try to help out more along the way.
All the best,
Lili
Thanks so much, Lili. I will indeed let you know if I decide to try this, and I really appreciate your offer to help!
Hello,
I’m confused on the raglan decrease. On my work I’m starting the decrease round on the back side of the sweater starting the round with the left sleeve. The first decrease is the ssk which would be a left leaning decrease stitch. This is my first sweater so I may just be confused, but shouldn’t the stitch be right leaning?
Hi Madison,
Thanks for writing in. The ssk is indeed correct in that position! You’re essentially beginning the round in the exact center of one of the raglan “seams,” so the first decrease you’ll work is just the left side of this seam. You’ll work the right-leaning counterpart in this seam as your final decrease of the round. Hope this helps clarify things!
All the best,
Lili
Lili,
Thank you for responding! I’m still just a bit confused, only because my decreases don’t really look like the ones I see in the photos.
I’m currently working the pattern as follows, can you let me know if I’m knitting incorrectly?
Beginning of round is the start of the left sleeve from the back:
sm, k1, ssk, knit to last three stitches before next marker, k2tog, k1, sm, knit to next marker (beginning of right sleeve from the front) sm, k1, ssk, knit to last three stitches before next marker, k2tog, k1, sm, knit to end of round. This gives me 4 decreases for the entire round.
I hope that makes sense, please let me know if I’m doing this correctly 🙂
Thanks so much for your help – I’m so excited to finish!
Hi Madison,
No worries, I’m happy to clarify things for you! It looks like you are indeed missing half of the decreases–you should have 8 total decreases per Decrease Round! I’ll try to explain how this round works in more detail:
Starting at the end-of-round marker, sm, k1, ssk, knit to last 3 stitches before next marker, k2tog, k1, sm, k1, ssk, knit to 3 stitches before next marker, k2tog, k1, sm, k1, ssk, knit to 3 stitches before next marker, k2tog, k1, sm, k1, ssk, knit to 3 stitches before next marker, k2tog, k1, sm, k1, ssk, knit to 3 stitches before final marker, k2tog, k1, and then you’ve reached the end of the round!
Essentially, you’ll want to make sure that each of the four stitch markers is surrounded by 2 knit stitches, and then a decrease on each side as well. There should be a k2tog to the right of each marker, and an ssk to the left. Since there are 2 decreases per marker, this adds up to 8 decreases for the entire round!
I hope this helps clear things up so you can continue on in the pattern!
All the best,
Lili
Hello, I have casted on the body (224) and now I am working on shaping the bottom edge. I am working short rows 15-20 on the first side. It appears that I will go past halfway (I have 10 more rows to knit & purl) and only 3 stitches to the beginning of the round. Should I be going over the halfway mark?
Hi Karen,
Thanks for reaching out. Each half of the bottom edge shaping should be exactly halfway around the body, so it does sound like something’s a bit off here! What may have happened is that you knit too few stitches on Short Row 1. That row functions to position you in the correct spot so that the short rows line up correctly, and if it’s off, then it will throw off the rest of the shaping.
Another thing that could have caused this is how far you’re knitting after working each wrapped stitch with its wrap. Short Rows 3 and 4 have you knitting (or purling) 3 stitches before working the next wrp-t, Short Rows 5-14 have you knitting 2 stitches here, and the remaining short rows have you knitting just one more stitch. It’s possible that you’ve knit too far before working the wrp-t on some of these short rows!
It’s hard for me to know for sure what’s caused this for you, but I hope that these explanations help clarify things!
All the best,
Lili
Can you recommend the best way to add length to this sweater? I’m pretty busty (and long waisted) and based on the dimensions shown here I think the size that corresponds to my bust measurements will probably end around my natural waist (and I’d rather not leave the inches between my waist and my pants exposed!) I usually gravitate towards top-down knitting because it’s easier for me to figure out the fit, so I’m a bit nervous that I’ll get to the end of this project and end up with an unintended crop top. Thanks!
Hi BD,
Thanks for reaching out. The best way to add length to this sweater is to knit for more inches during the CONTINUE BODY section! At this point, the pattern indicates to knit until the body reaches a certain length, and you can add more inches here accordingly. To get a sense of how many more inches to add, I’d suggest measuring the distance from your underarm to where you’d like the bottom edge of the sweater to hit and then comparing that to the inches indicated in CONTINUE BODY. The difference between these two measurements is how many extra inches you should add to get a fit that you like! I hope this helps!
All the best,
Lili
Hi! I see others have had trouble with being off on the short rows. I think stitch counts would be helpful…that said, can you tell me how many stitches away from the BOR marker to begin the second set of short rows after row 29? I am knitting g the 3rd size. Thank you!
Hi Joy,
Thanks for reaching out! Row 28 will take you all the way back to the BOR marker. You’ll be wrapping the very first stitch of the round! Then, on Row 29, you’ll knit halfway around the body to the other wrapped stitch, knit that stitch, and then knit 93 stitches and then work a wrap + turn. There are 280 total stitches on your needles right now, and you’re knitting half of this plus 93, which is 140 + 93 = 233. So the wrap will actually be on the 234th stitch away from the BOR, and after turning your work, you’ll begin Short Row 2 on the 233rd stitch away from the BOR. I hope this helps clarify things!
All the best,
Lili
Next Round: K5 (7, 9, 11, 13) (15, 17, 19, 21), place previous 10 (14, 18, 22, 26) (30, 34, 38, 42) stitches onto stitch holder or scrap yarn (removing end-of-round marker), knit to end of round. [76 (80, 86, 90, 96) (102, 104, 104, 102) stitches remain]
Cut yarn.
Where it says Next Round: K5 (7,
Does this mean 7 stitches or 7 rows? I did 7 rows and now I think it meant stitches. If so, I’ll have to go back 7 rows. Ugh!
Please let me know.
Thanks.
Hi Tori,
Thanks for reaching out! Yes unfortunately that is correct, it should be knit 7 stitches, not 7 rows.
Warmly,
Gianna
I’m so sorry if this question has already been asked and answered but I couldn’t find anything. I have long, long arms and am just getting to the part on my first sleeve where I knit until the sleeve is 16-3/4”. Should I add some length here before shaping and if so, how much?
I should mention my arms are 23” from wrist to shoulder.
Hi again Kelli,
I just saw your second comment! I would recommend taking your arm measurement from wrist to armpit, subtracting about an inch or two, and that will get you the full sleeve length to aim for.
All the best,
Lili
Hi Kelli,
Thanks for reaching out. I would recommend adding extra length to the sleeves after you’ve finished working the sleeve shaping, or dividing it up before and after the shaping! The amount of extra length you add is really up to you (because it depends on your specific measurements), but keep in mind that these are raglan sleeves, so they are measured from armpit to wrist and actually begin an inch or two below the armpit because of the positive ease of the design. Hope this helps!
All the best,
Lili
Thank you SO MUCH! I really appreciate the help!
The closest to gauge I can get is 28st but 36 rows … the sleeves look ok but will the pattern still work for the body or do I have to make adjustments? This is my first garment, thank you in anticipation. Cheers Sally x
Hi Sally,
Thank you so much for reaching out with your question! Have you had a chance to block your swatch yet? If you haven’t, it’s possible that you are closer to the correct gauge! It is possible that being off just a little can change the overall proportions of your sweater, so I would recommend frequently measuring your length while you are knitting to be sure you are making each section long enough, and soaking your swatch so you know how much the gauge count will change after blocking.
I hope this helps, and please let me know if you have any other questions!
All the best,
Carly
Hello! I am hoping to get some guidance on my 7th attempt to start this lovely sweater! I have only made it out of the short row rounds a few times before needing to start over for one reason or another. My Achilles Heel is when I need to tink my stitches and get to the worked in wrap stitch on both the knit and purl side on when I am fixing a mistake. I can find no guidance anywhere online about how to undo a worked in wrp-t stitch, only tutorials on how to do a wrpt-t. Is there any guidance you can provide me with so that I can continue my work on this lovely sweater after fixing my mistake?
The mistake I am trying to fix was not reducing from K3 after wrp-t to K2 on short row 5 (I am doing a size small). Do you think it would screw things up too much if I just kept the mistake and reduced with short row 7?
I also think it would be very useful for me to know how to undo a worked in wrap since this is not the first time I have needed to undo my work because I reach this impasse.
Any help you could provide would be GREATLY appreciated.
Thank you so much!
Hi Kristen,
Thanks for reaching out. I can absolutely give you advice on how to undo a wrap + turn short row! I’m sure there are multiple ways, but here’s how I like to do this:
Tink back as usual until you come to the stitch knit with its wrap. Then, tink this stitch in the same way, but make sure to insert your needle into both the stitch and the wrap. This will leave you with one extra loop on your needles for the present, but never fear! Once you return to this spot on the next row that you tink, that extra loop will simply join into the working yarn, and your live stitches will go back to normal.
I hope this helps, but please let me know if you have any other questions!
All the best,
Lili
Hi I am at the shoulder and neckline setup. If I start at the original BOR and “knit to next marker, sm, k41 then place previous 22 on stitch holder” it looks like I’m knitting to the sleeve, then across the sleeve, then placing part of the sleeve stitches on a holder…..it doesn’t look right. Can you help?
(making a size 40)
Hi Amy,
Thanks for reaching out! I’m not sure, but is it possible that your BOR marker is at the wrong location and is at the back right shoulder instead of the back left shoulder? Starting at your BOR at the back left shoulder, you will knit across the sleeve stitches, then slip the marker and knit 41 of the front stitches. From here you will place 22 of those front neck stitches on the holder, then knit to the end of your round.
I hope this helps! Please let us know if you have any questions.
All the best,
Carly
Hi, bit behind here, but just finishing sleeves and I am not sure about how to take them off the needles – the directions say “K5, place previous 10 stitches onto holder, knit to end of round”, do I knit 5, then count *those* 5 plus another 5 stitches to get 10 and place those on the holder? My working yarn is then the first stitch on the holder? How do I knit the remaining stitches in the round? What am I missing here?! 🙂 thank you!!
Hi Jen!
Thank you for your question! When it comes time to place the underarm stitches on hold, you will begin the round by knitting 5 stitches. Then, when you place the previous 10 stitches on hold, this will include the 5 stitches you just knit at the beginning of the current round along with the last 5 stitches of the previous round. When done correctly, this will ensure that the held underarm stitches will be centered right over the beginning of the round marker and your sleeve increases, with your working yarn at the end of the stitches on your stitch holder ready to knit to the end of the round.
I hope this helps!
All the best,
Margaret
Thank you Margaret! I got it, just had to move my needles around and look at it again lol…
You are very welcome, Jen, and I am happy to hear you were able to figure this out!
All the best,
Margaret
When can I switch to circular needle when knitting sleeves. I keep losing stitches on my double pointed needles. Thanks
Also having trouble with the cording stitch. Can I just let the sleeves, top and bottom curl up by knitting 4 rows and then purling one row to stop curling.
Hi Marion!
Thank you for asking! You can switch to circular needles on the sleeves when you have enough stitches to comfortably use circular needles! As an alternative, Flexi Flips or a 9″-10″ circular needle may be a good solution in place of double pointed needles.
And you can absolutely leave the edges to curl, if you would prefer! Purling one row might help prevent a little curling, however a ribbed edge or garter stitch would be the best solution to completely stop curling.
I hope this helps give you some solutions!
All the best,
Margaret
Hello, do you think this pattern would work in 2 strands of silk mohair instead of linen quill? The gauge matches but I’m not sure if the construction would be suited to it.
Thanks!
Hi Olivia,
That sounds like it will make the most lovely soft and light sweater! The construction will work with that yarn, but the texture of the fabric will be very different. Linen Quill is likely much heavier (physical weight-wise, not yarn weight) and has more drape than mohair would. So the sweater in mohair would be incredibly airy and light! For an example of what this might look like, check out our Top-Down Turtleneck Cardigan in Brume. I actually knit the sample shown in the photos, and I can attest that wearing the cardigan in Brume was heavenly!
All the best,
Lili
Hello! I admit I think quite highly of myself but I don’t think my head is actually big. I knitted the 2nd smallest size and I can barely get my head through so I would like to make the neck opening a little larger. What is the best way to do this? I unravelled a few rows, into the short rows but now I feel I need your help in order for me to finish nicely. Please help! Thank you.
p.s. i am using Linen Quill, the number of stitches correctly knitted. I do tend to knit on the tight side.
Hi Emmi,
Thanks for reaching out, although I’m sorry that the neckline of your pullover isn’t working out! I think that this may just be due to the bind-off, so it should be an easy fix. It’s very easy to bind off too tightly (I do it myself all the time), and because bind-offs have far less elasticity than regular stitches, they can’t stretch as far when pulled over the head!
I’d recommend just redoing the bind-off and making sure that you bind off very loosely. A handy trick to make sure this happens is to use a needle that’s one or two sizes larger than the one you knit the rest of the garment with. Hope this helps!
All the best,
Lili
Hi Lili
Thank you for your help! i ended up frogging back to the beginning of short rows, re-knit from there an voila! the neckline is as it should be. I don’t know what i did the first time but i somehow knitted way more than i needed. Anyway the sweater is fabulous and i wear it all the time!
best,
Emmi
You’re very welcome, Emmi!
All the best,
Lili
I was reading over the instructions to decide if I want to tackle this. I don’t understand the first step of casting on to three double pointed needles then joining in the round. Should these be circular needles? Why three and not two? I can’t seem to visualize this.
Hi there!
Thanks for reaching out, and I’d be happy to help clarify this first step. In this pattern, you begin by knitting the sleeves. Since the circumference of the wrist of a sleeve is too small to fit around 16-inch circular needles, you will need to use DPNs (or magic loop) to be able to knit it in the round. If this is daunting, I’d recommend taking a look at our Double Pointed Needles tutorial! I hope this helps you visualize the beginning of the pattern, but please let me know if you have any other questions along the way!
All the best,
Lili
I had an AHA! moment after reading your reply and watching the video. I get it.
I will read through the instructions again and I believe I will give it a go!
Thank you!
Hi!
We’re so glad that Lili was able to help you! Thanks again for writing in and have a great rest of your day.
All the best,
The CS Team
Hello! This may be a silly question but after casting on stitches for body onto longer circular needles, how do you join due to the length of the longer circular needles? I can use magic loop but it seems I am missing something!?
Thank you!
Hi Sharon,
Thanks for writing in! The length of the longer needles should be in proportion to the size you’re making. As long as you use needles that are shorter than the finished circumference of your size, then you will be able to easily join the stitches in the round! For example, if you’re making size 40, then you’ll need to use 32-inch long needles, but if you’re making size 56, then you can use 40-inch long needles. Hope this helps clarify things!
All the best,
Lili
Thank you! I will start moving those stitches to shorter needles now!
Ihr Lieben, leider verstehe ich keine englische Anleitungen . Ich möchte so gerne den Pullover stricken. Finde ich die Anleitung auch irgendwo auf Deutsch ?
Ich gebe die Hoffnung nicht auf.
Liebe Grüße
Miriam
Hi Miriam,
Thanks for reaching out. Unfortunately, we do not currently have the time and resources to translate our patterns into other languages. We’re so sorry about that! Instead, I would recommend using an online service like Google Translate to convert our patterns into German. Or perhaps you have a friend who is able to help out!
Apologies for the inconvenience, and please let me know if you have any other questions or concerns!
All the best,
Lili
Hi!
I am about to start the body, at the end of the short rows but before continuing the body length how many stitches should i have?
I am a little nervous about short rows but ready!
Hi Adeline,
Thanks for reaching out. You should still have the same number of stitches you cast on at this point in the pattern! The short rows do not change the stitch count. Hope this helps clarify things!
All the best,
Lili
Hello!
After months of delays I have started knitting this sweater (size 32). I am looking at the row commands to shape the bottom edge of the sweater. When should I anticipate reaching the beginning of a round? I have completed three short rows that are stacked on top of each other.
Cheers,
Nancy
Hi Nancy,
Thanks for reaching out! It sounds like you’re doing the short rows exactly right. They should essentially be stacked on top of each other, each one getting slightly longer, because this creates the rounded hem. After completing Short Row 28, you will have wrapped the stitch right next to the end-of-round marker, and then you’ll move on to the shaping on the other side of the body. Hope this helps you envision how this part of the pattern works!
All the best,
Lili
Thanks Lili,
I produced an excel spreadsheet of the short rows to reduce errors and omissions- my last wrp-t is in the correct cell. Thanks for the assistance !
Nancy
Hello there, I’ve cut the yarn. I am at the “Shape neckline + shoulders” and I’m wondering which is the meaning of the sentence “With right side facing you, join yarn to Right Front stitches…”
mm..if you can help me out! 🙂
Hi Giorgia,
Thanks for reaching out! At this point, you’ll have stitches on your needles for the Back, Sleeves, and two sides of the Front (since you just slipped the center front stitches onto scrap yarn). If you turn your sweater so that you’re looking at the front, with the right side (outside) facing outwards, the Right Front stitches will be the portion of the Front stitches to your left (since they’d be on the right front when you’re wearing the sweater). This is where you will begin knitting Short Row 1 from! Just locate the first stitch of the Right Front section, and you can begin knitting with a new strand of working yarn. Hope this helps clarify things!
All the best,
Lili
I’m starting the short rows using 308 stitches.
First row 1 takes me to 103 stitches and then wrp-t.
Second row (wrong side) states P 52, then wrp-t
My question is with the third row – do I knit back to the first wrapped stitch which was 103?
Thanks.
Hi Marion,
Thanks for writing in! Yes, after you complete Short Row 2 by purling 52 stitches and working a wrp-t, then you will begin Short Row 3, which has you knit all the way back to the wrap you created on Short Row 1. Then, you knit this wrapped stitch with its wrap, knit 5 more stitches, and then work a wrp-t. Hope this helps clarify things!
All the best,
Lili
Hello
Please can I ask for your assistance in interpreting this section of the pattern. I don’t understand what you mean by ‘place previous 22 stitches on placeholder’. Does this mean knit 11, and place those 11 + 11 stitches from the end of round onto a holder? Looking at the photos there seems to be an even number of stitches on right side of the seam. But if I do this the first 11 stitches have one extra row to the second. I’m really confused 🫤
Next Round: K5 (7, 9, 11, 13) (15, 17, 19, 21), place previous 10 (14, 18, 22, 26) (30, 34, 38, 42) stitches onto stitch holder or scrap yarn (removing end-of-round marker), knit to end of round.
Thank you
Alison
Hi Alison,
Thanks for reaching out! It sounds like you’re interpreting this section perfectly. You’ll begin Next Round by knitting 11 stitches, then you place these stitches as well as the final 11 stitches from the previous round on a holder. Then you’ll finish the round by knitting the remaining live stitches. Hope this helps clarify things!
All the best,
Lili
I am not sure if you are still answering questions on this top. I am knitting the size 44 but am confused on the body decrease rounds. If I knit to next marker then sm k1 ssk won’t that put a left leaning decrease on the front of the body of the sweater on the left side instead of a right leaning decrease? And then a right leaning on the front body of the right sleeve side?
Hi Stephanie,
Thanks for reaching out! Yes, the ssk on the left of the front of the sweater will put a left-leaning decrease at that spot. The raglan seam on the left front of the sweater should lean towards the left (and the one on the right front should lean right, but the seam on the back right should lean left and the one on the back left should lean right). Hope this helps clarify things!
All the best,
Lili
Hi there, I am a little confused at row 29 on Lightweight Raglan Pullover. I have just completed short rows 1-28 on the first half of the body and I am at the BOR. For row 29, If I follow the pattern and knit to wrapped stitch, work wrapped stitch with wrap and knit 103, then wrap & turn, I will be going back again. Don’t I start second side of body at this point, going the other way. Thank you so much for your help. Rosanne
Hi Rosanne,
Thanks for reaching out, although I’m sorry to hear that you’ve reached a stopping point in your project! When you knit to the wrapped stitch on Row 29, you will be knitting all the way across the first half of the body that you’ve already completed the shaping for. Then, you’ll knit 103 stitches, which will take you to the center of the other half of the body. Now, you’ll work the shaping on this side as you did on the first side, working outwards from the center until you have a nice curve!
I hope this helps clarify things, but please let me know if you have any other questions.
All the best,
Lili
Hi,
For size 36-39, under shape sleeve it states: Continuing in stockinette stitch, repeat Increase Round every 6th round 5 more times.” Is 5 correct? The other sizes are 18, 22 and 12).
Thank you,
Hi Michele,
Thanks for reaching out. This is correct! You will repeat the Increase Round at a different rate after these 5 times, so it all evens out for each size to create the most streamlined sleeve shaping. Hope this helps clarify things!
All the best,
Lili
Will this work in line weight?
Hi Loren,
Thanks for reaching out. Line Weight is a wonderful choice for this pattern! As always, we recommend knitting a gauge swatch before casting on your project, especially when you are substituting yarns. You may need to size up or down your needles in order to get the correct gauge! If you would like to learn more about this, we have a handy tutorial called All About Gauge, which you can find right here. Hope this helps!
All the best,
Lili
Hello,
I knit 2 swatches in Cattail silk with needles 4 then 3, and before blocking even the swatch in 3 was way larger than 4 inches. However, blocking it seems to significantly shrink back the swatch so I can get it to 4 inches. Is that a characteristic of that yarn? Does it mean that the sweater won’t hold its shape? Do you have an advice regarding choosing a needle size for Cattail silk?
Thank you
Caroline
Hi Caroline,
Not to worry, it’s very normal for the size of a swatch to change during blocking as the yarn readjusts itself! To ensure that your sweater comes out the right size, you’ll want to take your gauge measurements after blocking, if you plan on blocking the finished sweater. It sounds as though your gauge with the size 3s was correct after blocking, so that’s perfect!
All the best,
Lili
For the sleeve increases every 5th row, does that mean 4 even rows between the increase rows or 5?
Thanks!
Hi Diane,
Thank you for writing in! That is correct! You will knit 4 rows even and then complete a decrease on the 5th row. Please let us know if you have any other questions!
Happy knitting,
Gavriella
Thanks for the clarification!
I cannot seem to do the short rows. Can I just knit straight from the bottom and just do a little curl at the bottom. I’m tired of starting over and over to no avail. Thanks.
Hi Marion,
Thank you for writing in although we are sorry to hear you have been running into trouble on the short row portion of this pattern. You could definitely knit this pattern without the short row shaping at the bottom by just knitting your body stitches to the desired length but you will need to complete the short rows in the yoke section for a nice fit. I would recommend checking out our short row tutorial video which better explains and demonstrates how to work wrap and turns. Since this project uses short rows in different parts of the pattern, we don’t recommend completely omitting them altogether. We are also always happy to provide additional help through one of our free 1 on 1 sessions as well!
All the best,
Gavriella