
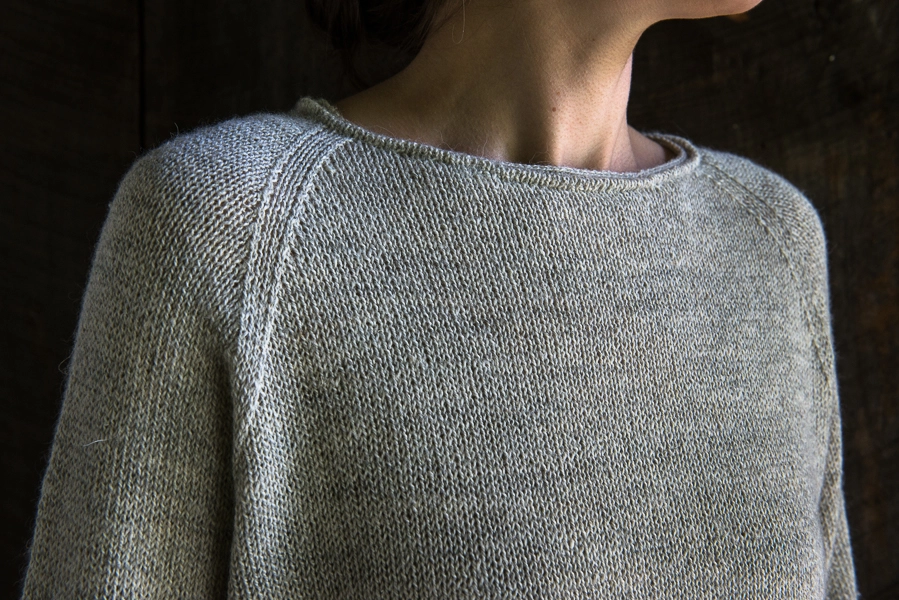
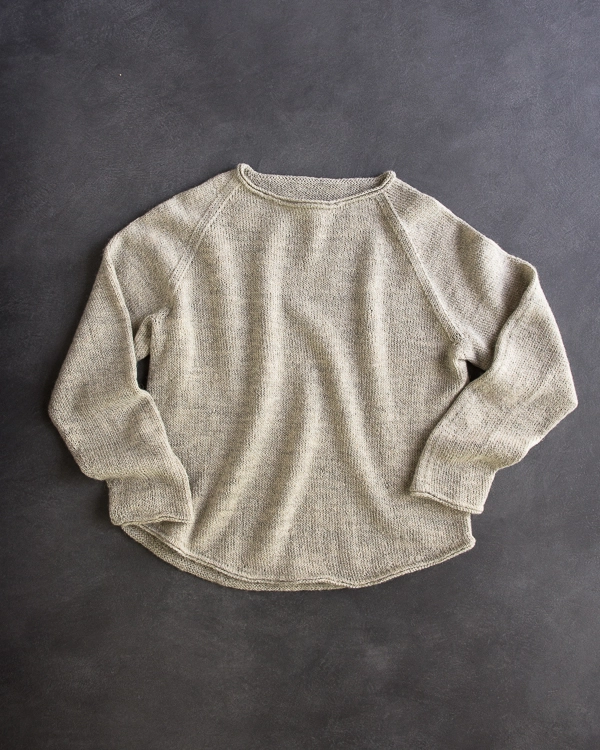

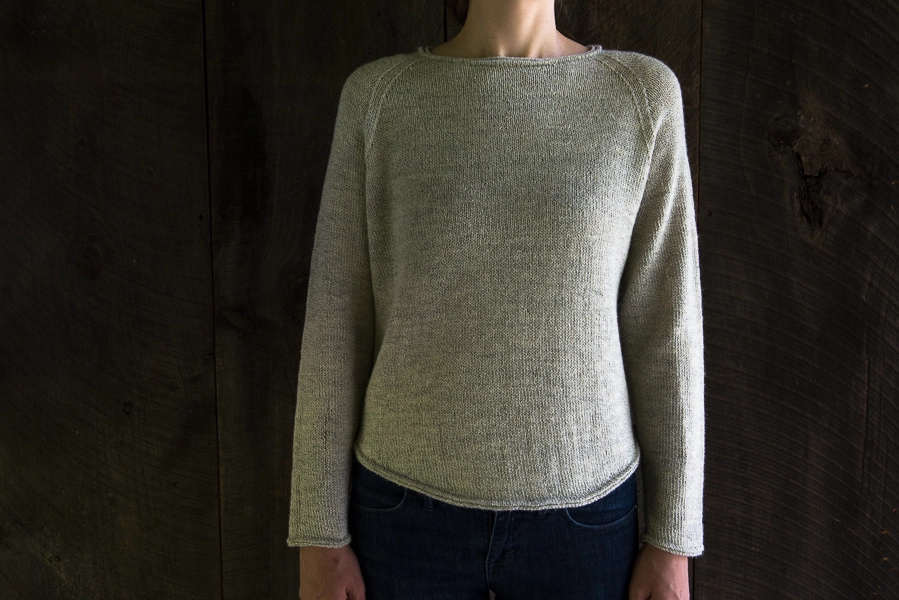
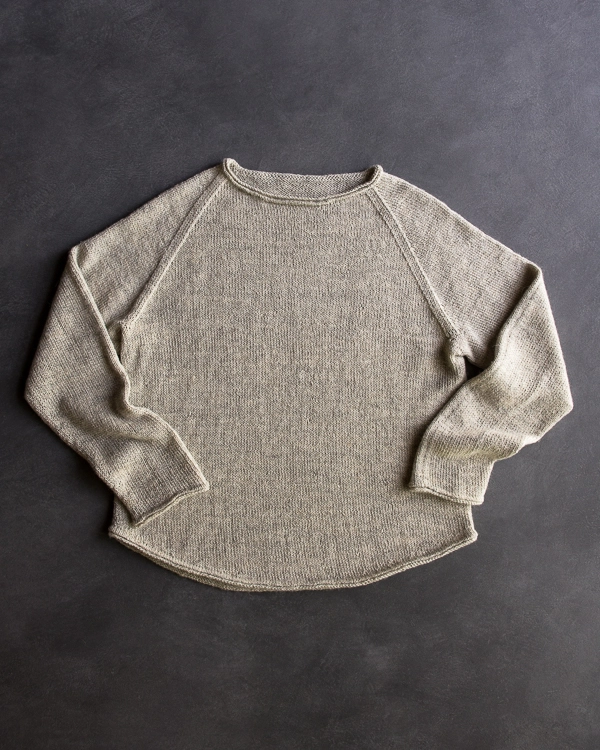
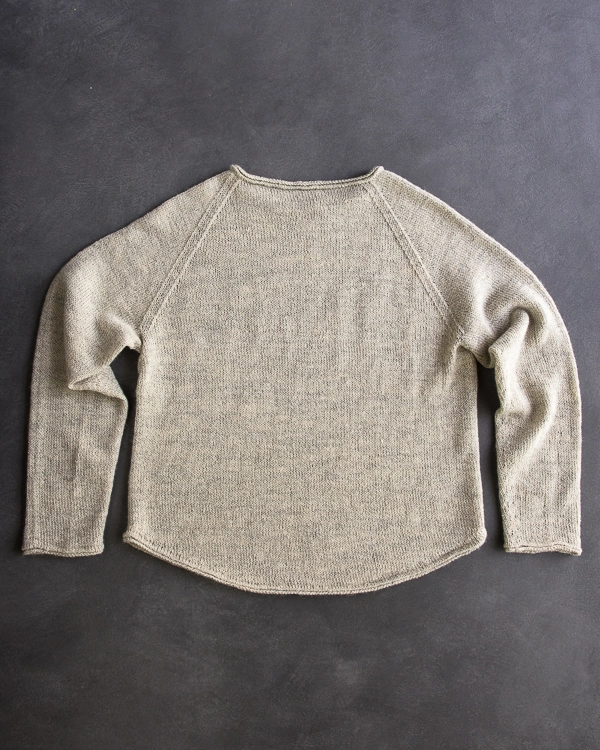
Lightweight Raglan Pullover
A circular raglan pullover is a wonderfully empowering thing for first-time sweater knitters. Creating one is like receiving a decoder ring for sweater-making. It unlocks secret geometries and makes simple sense of what is, after all, a pretty complicated garment.

Who knew you could knit three tubes (i.e. 2 sleeves and a body) and then join them together into a larger tube (i.e. a yoke)!?! From there, regular “raglan” decreases shape the shoulders, from the underarms to the neckline. And in our Lightweight Raglan Pullover, subtle details, like cording stitch edges and short row shaping, give beginners a good challenge and keep experts interested.

Purl Soho’s Linen Quill effortlessly elevates this simple sweater into something truly special. Its blend of wool, alpaca, and linen gives the Lightweight Raglan Pullover a soft bloom, a beautiful drape, and a unique look.

Whether this is your first sweater or your hundredth, I hope you enjoy the magic. No matter how many new tricks I learn, I turn to this intuitive construction method time and time again, loving how it unlocks the world of sweater-knitting! -Laura
Update: Now in Cattail Silk!
August 2018
We love our Lightweight Raglan Pullover in Linen Quill, but for summer, we love it even more in beautiful Cattail Silk… as light and gentle as a warm breeze! Cattail Silk comes in a stunning array of colors and is 618 yards per skein… which means, to make a Cattail Silk version, you’d just need 2 (2, 3, 3, 3) skeins!
UPDATE: NEW COLORS
January 2022
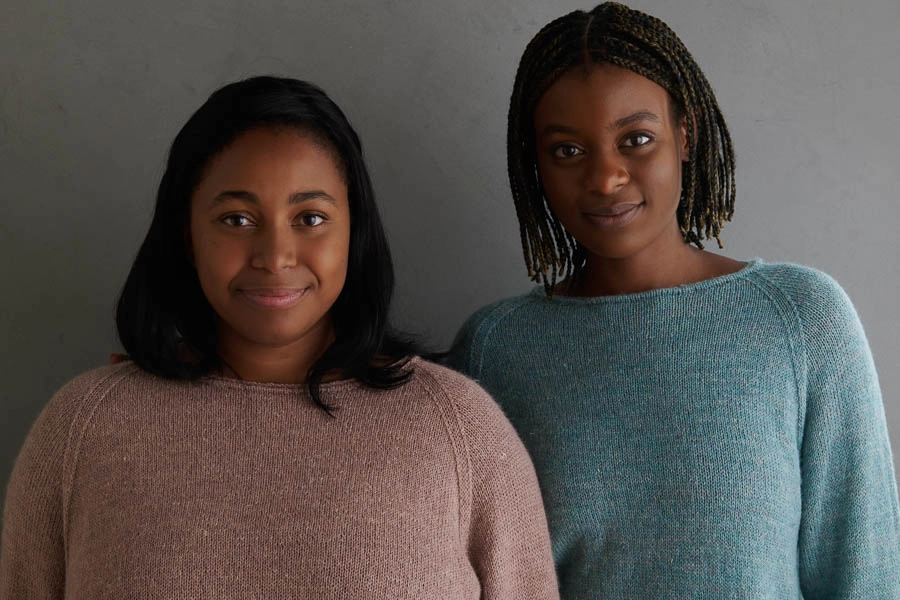
Whether it’s your first sweater or fiftieth, casting on with something special makes the knitting special. And when it comes to our Lightweight Raglan Pullover in Linen Quill, the mix of fine highland wool, alpaca, and linen ensure every stitch of this sweater is a thrill, no matter how many times you’ve knit it. See our two new versions here!
Designed by Purl Soho designer, Laura Ferguson.
Share your progress and connect with the community by tagging your pics with #PurlSoho, #PurlSohoBusyHands, #PurlSohoLightweightRaglanPullover, and #PurlSohoLinenQuill. We can’t wait to see what you make!
Materials

- 3 (3, 4, 4, 4) (5, 5, 5, 5) skeins of Purl Soho’s Linen Quill, 50% fine highland wool, 35% alpaca, and 15% linen. Each skein is approximately 439 yards/ 100 grams; approximately 1155 (1285, 1420, 1555, 1695) (1830, 1955, 2080, 2195) yards required. We used the color Oatmeal Gray.
- US 4 (3.5 mm), 32- or 40-inch circular needles, depending on size you are making
- US 4, 16-inch circular needles
- A set of US 4 double pointed needles
- Stitch markers, including one unique
- Stitch holders or scrap yarn
YARN UPDATE: For a fantastic alternative to Linen Quill, try our Cattail Silk! It has a very subtle shine, a wonderfully earthy texture, and a casual spin speckled by little nubs of color. It comes in a stunning array of colors and is 618 yards per skein… which means, to make this Lightweight Linen Raglan, you’d just need 2 (3, 3, 3, 3) (4, 4, 4, 4) skeins!
NOTE: Looking to knit your sleeves in double-time? Swap the double pointed needles for 32-inch or longer circular needles, and check out our Magic Loop: Two At A Time Tutorial!
Gauge
28 stitches and 33 rows = 4 inches in stockinette stitch
Sizes
NOTE: For help picking the correct size, visit our Understanding Ease + Selecting Your Size Tutorial.
32 (36, 40, 44, 48) (52, 56, 60, 64)
To fit actual chest circumference of 28-31 (32-35, 36-39, 40-43, 44-47) (48-51, 52-55, 56-59, 60-63) inches, with 1-4 inches of ease
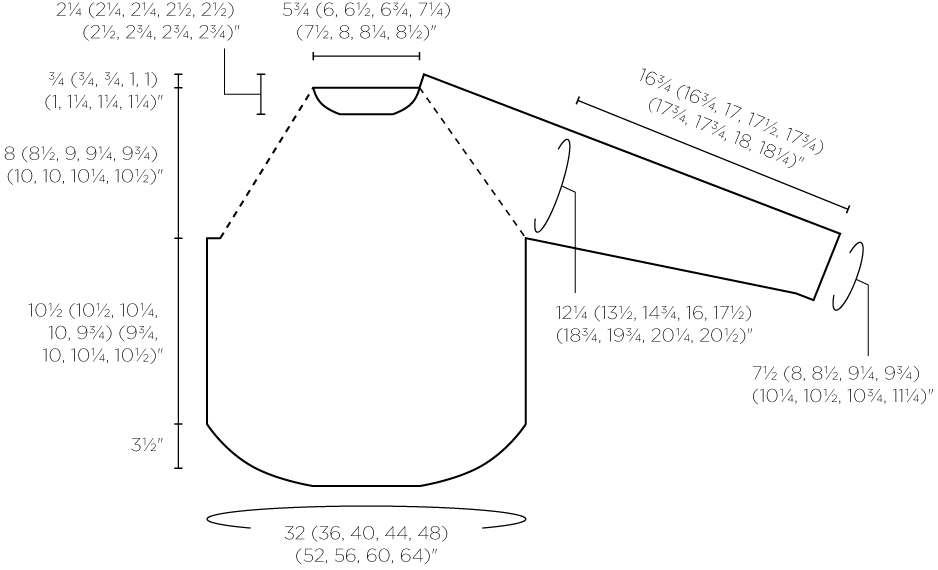
- Finished Chest Circumference: 32 (36, 40, 44, 48) (52, 56, 60, 64) inches
- Finished Length from Shoulder to Bottom Edge of Back: 22¾ (23¼, 23½, 23¾, 24) (24¼, 24¾, 25¼, 25¾) inches
- Finished Length from Underarm to Bottom Edge (measured at side): 10½ (10½, 10¼, 10, 9¾) (9¾, 10, 10¼, 10½) inches
- Finished Length from Underarm to Cuff: 16¾ (16¾, 17, 17½, 17¾) (17¾, 17¾, 18, 18¼) inches
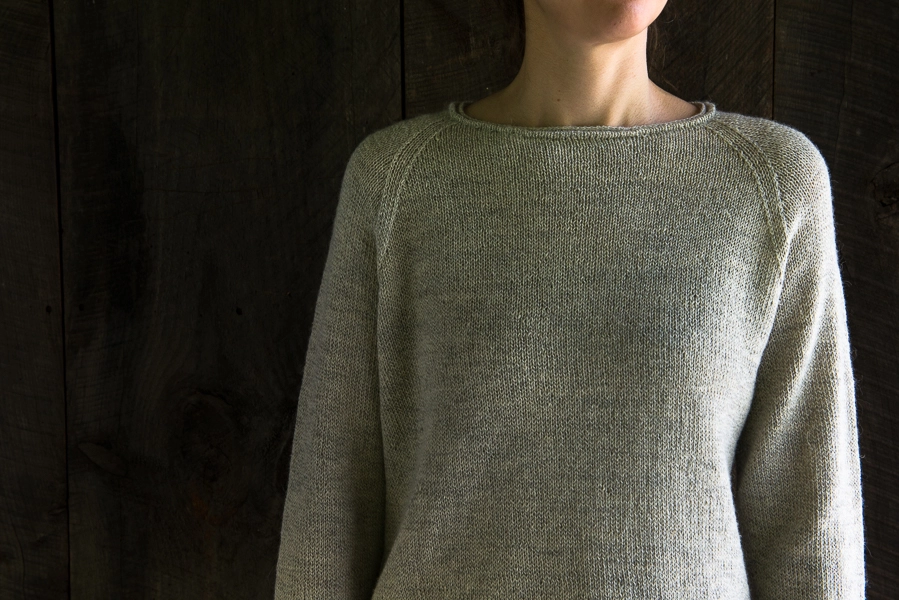
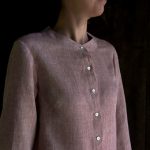
SAMPLE: The sample pictured here is size 36 inches, modeled with 3 inches of ease.
Notes
CONSTRUCTION
This sweater is worked in the round from bottom up. You will begin with the Sleeves, then set them aside and work the Body from bottom to Underarms. There, you will join Sleeves, then work the raglan Yoke to Neckline, which you will shape with short rows. You will finish with the Neckband.
SPECIAL INSTRUCTIONS
CORDING STITCH
NOTE: For a photo how-to of this technique, visit our Cording Stitch tutorial!

*Use tip of right needle to pick up purl bump four rounds directly below next stitch (shown in pink, above)…
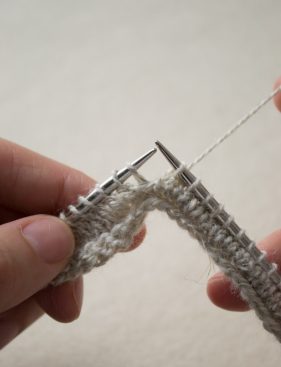
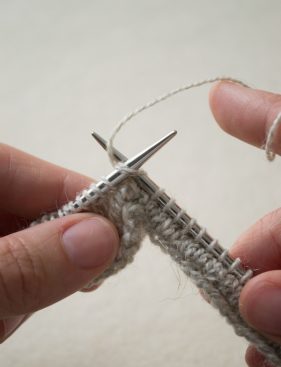
…Place purl bump on left needle, knit next stitch and picked-up stitch together, repeat from * to end of round.
NOTE: If you anticipate having trouble identifying the stitches you need to pick up, visit our Cording Stitch tutorial for tips on adding a “lifeline.” This is a step you do before you work the Cording Stitch that helps indicate which round you’re picking up!
MAKE 1 RIGHT + LEFT (M1R + M1L)
NOTE: For more help with these increases, visit our Make 1 Right (M1R) + Make 1 Left (M1L) tutorial.
Make 1 Right: Use left needle to pick up strand (or “bar”) between last stitch and next stitch, from back to front. Knit into front leg. [1 stitch increased]
Make 1 Left: Use left needle to pick up strand between last stitch and next stitch, from front to back. Knit into back leg. [1 stitch increased]
SHORT-ROW SHAPING: WRP-T (WRAP AND TURN)
NOTE: For more information about this technique, please visit our Short Rows tutorial.
On the right side: Keeping yarn in back, slip next stitch purlwise from left needle to right needle. Bring yarn to front. Return slipped stitch to left needle. Bring yarn to back. Turn work so wrong side is facing you.
On the wrong side: Keeping yarn in front, slip next stitch purlwise from left needle to right needle. Bring yarn to back. Return slipped stitch to left needle. Bring yarn to front. Turn work so right side is facing you.
PICKING UP PURL WRAP ON KNIT SIDE
NOTE: See this situation in action at minute 4:33 of our Short Rows tutorial.
Use tip of right needle to pick up wrap, inserting needle from front to back. Place wrap onto left needle, nudging wrap, if necessary, so it is after next stitch on needle. Slip first stitch knitwise, then slip wrap purlwise. Insert tip of left needle into front legs of two slipped stitches. Wrap working yarn around right needle to knit two together.
Pattern
Sleeves

Cast 52 (56, 60, 64, 68) (72, 74, 76, 78) stitches onto three double pointed needles. We used a basic Long Tail Cast On.
Place marker (pm) and join for working in the round, being careful to not twist the stitches.
Work in stockinette stitch, knitting each round, for 8 rounds. (Note: If you’re planning on adding a lifeline, do so right after finishing your fourth round at the cuffs, collar, and hem!)
Next Round: Work Cording Stitch (see Special Instructions) to end of round.
Continue in stockinette stitch until piece measures 1 inch from cast-on edge.
Shape Sleeve
Increase Round: K1, make 1 left (m1L), knit to last stitch, make 1 right (m1R), k1. [2 stitches increased]
Continuing in stockinette stitch, repeat Increase Round every 7th (6th, 6th, 5th, 5th) (4th, 4th, 4th, 4th) round 12 (18, 5, 22, 12) (29, 23, 22, 24) more times, then every 6th (0, 5th, 4th, 4th) (0, 3rd, 3rd, 3rd) round 4 (0, 16, 1, 14) (0, 8, 10, 8) time(s). [86 (94, 104, 112, 122) (132, 138, 142, 144) stitches]
Continue in stockinette stitch until piece measures 16¾ (16¾, 17, 17½, 17¾) (17¾, 17¾, 18, 18¼) inches from cast-on edge.
Next Round: K5 (7, 9, 11, 13) (15, 17, 19, 21), place previous 10 (14, 18, 22, 26) (30, 34, 38, 42) stitches onto stitch holder or scrap yarn (removing end-of-round marker), knit to end of round. [76 (80, 86, 90, 96) (102, 104, 104, 102) stitches remain]
Cut yarn.
Place remaining stitches onto stitch holders or scrap yarn and set aside. This will be the Right Sleeve.
Make Left Sleeve same as Right Sleeve, but leave the 76 (80, 86, 90, 96) (102, 104, 104, 102) Sleeve stitches on double pointed needles and set aside.
Body
Using a Long Tail Cast On, cast 224 (252, 280, 308, 336) (364, 392, 420, 448) stitches onto longer circular needles.
Place unique marker for end of round and join for working in the round, being careful not to twist the stitches.
Work in stockinette stitch for 8 rounds.
Next Round: Work Cording Stitch to end of round.
Shape Bottom Edge
NOTE: In this section, you will be working back and forth in short rows, turning the work partway through each row. For extra help, see Special Instructions.
Short Row 1 (right side): K75 (84, 93, 103, 112) (121, 131, 140, 149), wrp-t (see Special Instructions).
Short Row 2 (wrong side): P38 (42, 46, 52, 56) (60, 66, 70, 74), wrp-t.
Short Row 3: Knit to wrapped stitch, knit wrapped stitch with its wrap, k3 (4, 5, 5, 6) (7, 7, 8, 9), wrp-t.
Short Row 4: Purl to wrapped stitch, purl wrapped stitch with its wrap, p3 (4, 5, 5, 6) (7, 7, 8, 9), wrp-t.
Short Row 5: Knit to wrapped stitch, knit wrapped stitch with its wrap, k2 (3, 4, 4, 4) (5, 5, 6, 6), wrp-t.
Short Row 6: Purl to wrapped stitch, purl wrapped stitch with its wrap, p2 (3, 4, 4, 4) (5, 5, 6, 6), wrp-t.
Short Rows 7-12: Repeat Short Rows 5 and 6 three more times.
Short Row 13: Knit to wrapped stitch, knit wrapped stitch with its wrap, k2 (2, 2, 3, 3) (3, 4, 4, 4), wrp-t.
Short Row 14: Purl to wrapped stitch, purl wrapped stitch with its wrap, p2 (2, 2, 3, 3) (3, 4, 4, 4), wrp-t.
Short Rows 15-20: Repeat Short Rows 13 and 14 three more times.
Short Row 21: Knit to wrapped stitch, knit wrapped stitch with its wrap, k1 (1, 1, 1, 2) (2, 2, 2, 3), wrp-t.
Short Row 22: Purl to wrapped stitch, purl wrapped stitch with its wrap, p1 (1, 1, 1, 2) (2, 2, 2, 3), wrp-t.
Short Rows 23-28: Repeat Short Rows 21 and 22 three more times.
Short Row 29: Knit to wrapped stitch, knit wrapped stitch with its wrap, k75 (84, 93, 103, 112) (121, 131, 140, 149), wrp-t.
Repeat Short Rows 2 through 28 once more.
Next Short Row (right side): Knit to wrapped stitch, knit wrapped stitch with its wrap, slip marker.
Next Round: *Knit purl-wrapped stitch with its wrap (see Special Instructions), knit to next purl-wrapped stitch, knit purl-wrapped stitch with its wrap, knit to end of round.
Continue Body
Continue in stockinette stitch, knitting each round, until piece measures 14 (14, 13¾, 13½, 13¼) (13¼, 13½, 13¾, 14) inches from cast-on edge (measured at longest point, either at center Back or center Front).
Divide Front + Back
Division Round: K5 (7, 9, 11, 13) (15, 17, 19, 21), place previous 10 (14, 18, 22, 26) (30, 34, 38, 42) stitches onto stitch holder or scrap yarn for Left Underarm (removing end-of-round marker); k112 (126, 140, 154, 168) (182, 196, 210, 224), place previous 10 (14, 18, 22, 26) (30, 34, 38, 42) stitches onto stitch holder or scrap yarn for Right Underarm; knit to Left Underarm (next stitch holder). [204 (224, 244, 264, 284) (304, 324, 344, 364) stitches remain: 102 (112, 122, 132, 142) (152, 162, 172, 182) stitches each for Front and Back]
Yoke
Join Sleeves
NOTE: For help with this section, please visit our Joining Sleeves To Body Tutorial.
Joining Round: Holding Underarms parallel to each other, use working yarn from Body to k76 (80, 86, 90, 96) (102, 104, 104, 102) Left Sleeve stitches, pm; k102 (112, 122, 132, 142) (152, 162, 172, 182) Front stitches, pm; slip on-hold Right Sleeve stitches onto spare needles and holding Underarms parallel to each other, k76 (80, 86, 90, 96) (102, 104, 104, 102) Right Sleeve stitches, pm; k102 (112, 122, 132, 142) (152, 162, 172, 182) Back stitches, place unique marker for end-of-round. [356 (384, 416, 444, 476) (508, 532, 552, 568) total stitches: 102 (112, 122, 132, 142) (152, 162, 172, 182) stitches each for Front and Back; 76 (80, 86, 90, 96) (102, 104, 104, 102) stitches for each Sleeve]


Begin Shaping Raglan
SIZE 32 ONLY
Next Round: Knit to end of round.
Sleeve Decrease Round: [K1, slip slip knit (ssk), knit to 3 stitches before next marker, knit 2 together (k2tog), k1, slip marker (sm), knit to next marker, sm] 2 times. [4 stitches decreased]
Repeat last 2 rounds once more. [348 total stitches: 102 stitches each for Front and Back; 72 stitches for each Sleeve]
Next Round: Knit to end of round.
SIZES 36 AND 40 ONLY
Next Round: Knit to end of round.
SIZES 44, 48, 52, 56, 60, AND 64 ONLY
Next Round: Knit to end of round.
Body Decrease Round: [Knit to next marker, slip marker (sm), k1, slip slip knit (ssk), knit to 3 stitches before next marker, knit 2 together (k2tog), k1, sm] 2 times. [4 stitches decreased]
Repeat Body Decrease Round – (–, –, 2, 3) (3, 7, 11, 15) more times. [– (–, –, 432, 460) (492, 500, 504, 504) total stitches: – (–, –, 126, 134) (144, 146, 148, 150) stitches each for Front and Back; – (–, –, 90, 96) (102, 104, 104, 102) stitches for each Sleeve]
ALL SIZES
Raglan Decrease Round: [K1, slip slip knit (ssk), knit to 3 stitches before next marker, knit 2 together (k2tog), k1, slip marker (sm)] 4 times. [8 stitches decreased]
Continuing in stockinette stitch, repeat Raglan Decrease Round every round 0 (0, 2, 4, 6) (10, 14, 16, 16) more times, then every other round 23 (27, 28, 27, 28) (27, 23, 21, 20) more times. [156 (160, 168, 176, 180) (188, 196, 200, 208) total stitches remain: 54 (56, 60, 62, 64) (68, 70, 72, 76) stitches each for Front and Back; 24 (24, 24, 26, 26) (26, 28, 28, 28) stitches for each Sleeve]
Set Up Neckline + Shoulder Shaping
Set-Up Round: Knit to next marker, sm, k36 (38, 41, 43, 45) (48, 50, 52, 55), place previous 18 (20, 22, 24, 26) (28, 30, 32, 34) stitches onto stitch holder or scrap yarn for Front Neckline, knit to end of round. [138 (140, 146, 152, 154) (160, 166, 168, 174) total stitches remain: 18 (18, 19, 19, 19) (20, 20, 20, 21) stitches each for Left and Right Front; 54 (56, 60, 62, 64) (68, 70, 72, 76) stitches for Back; 24 (24, 24, 26, 26) (26, 28, 28, 28) stitches for each Sleeve]
Cut yarn.
Slip the following markers and stitches from left needle to right needle: slip end-of-round marker, slip 24 (24, 24, 26, 26) (26, 28, 28, 28) Left Sleeve stitches, sm, slip 18 (18, 19, 19, 19) (20, 20, 20, 21) Left Front stitches.
The stitch marker at Back Left now serves as a raglan marker instead of end-of-round marker, and the Front Neckline now marks the end of row.
SHAPE NECKLINE + SHOULDERS
NOTE: In this section you will again be working back and forth in short rows, turning the work partway through each row.
With right side facing you, join yarn to Right Front stitches…
Short Row 1 (right side): [Knit to 3 stitches before next marker, k2tog, k1, sm, k1, ssk] 4 times, knit to last stitch, wrp-t. [130 (132, 138, 144, 146) (152, 158, 160, 166) total stitches remain: 17 (17, 18, 18, 18) (19, 19, 19, 20) stitches for each Front; 52 (54, 58, 60, 62) (66, 68, 70, 74) stitches for Back; 22 (22, 22, 24, 24) (24, 26, 26, 26) stitches for each Sleeve]
Short Row 2 (wrong side): Purl to last stitch, wrp-t.
Short Row 3: [Knit to 3 stitches before next marker, k2tog, k1, sm, k1, ssk] 4 times, knit to last 5 stitches, wrp-t. [122 (124, 130, 136, 138) (144, 150, 152, 158) total stitches remain: 16 (16, 17, 17, 17) (18, 18, 18, 19) stitches for each Front; 50 (52, 56, 58, 60) (64, 66, 68, 72) stitches for Back; 20 (20, 20, 22, 22) (22, 24, 24, 24) stitches for each Sleeve]
Short Row 4: Purl to last 5 stitches, wrp-t.
Short Row 5: [Knit to 3 stitches before next marker, k2tog, k1, sm, k1, ssk] 4 times, knit to last 8 stitches, wrp-t. [114 (116, 122, 128, 130) (136, 142, 144, 150) total stitches remain: 15 (15, 16, 16, 16) (17, 17, 17, 18) stitches for each Front; 48 (50, 54, 56, 58) (62, 64, 66, 70) stitches for Back; 18 (18, 18, 20, 20) (20, 22, 22, 22) stitches for each Sleeve]
Short Row 6: Purl to last 8 stitches, wrp-t.
Short Row 7: [Knit to 3 stitches before next marker, k2tog, k1, sm, k1, ssk] 4 times, knit to last 10 (10, 11, 11, 11) (11, 12, 12, 12) stitches, wrp-t. [106 (108, 114, 120, 122) (128, 134, 136, 142) total stitches remain: 14 (14, 15, 15, 15) (16, 16, 16, 17) stitches for each Front; 46 (48, 52, 54, 56) (60, 62, 64, 68) stitches for Back; 16 (16, 16, 18, 18) (18, 20, 20, 20) stitches for each Sleeve]
Short Row 8: Purl to last 10 (10, 11, 11, 11) (11, 12, 12, 12) stitches, wrp-t.
Short Row 9: [Knit to 3 stitches before next marker, k2tog, k1, sm, k1, ssk] 3 times, knit to 4 stitches before next marker, wrp-t. [100 (102, 108, 114, 116) (122, 128, 130, 136) total stitches remain: 13 (13, 14, 14, 14) (15, 15, 15, 16) stitches for Right Front; 14 (14, 14, 16, 16) (16, 18, 18, 18) stitches for Right Sleeve; 44 (46, 50, 52, 54) (58, 60, 62, 66) stitches for Back; 15 (15, 15, 17, 17) (17, 19, 19, 19) stitches for Left Sleeve; 14 (14, 15, 15, 15) (16, 16, 16, 17) stitches for Left Front]
Short Row 10: [Purl to next marker, sm] 2 times, purl to 3 stitches before next marker, wrp-t.
Short Row 11: [Knit to 3 stitches before next marker, k2tog, k1, sm, k1, ssk] 2 times, k1, wrp-t. [96 (98, 104, 110, 112) (118, 124, 126, 132) total stitches remain: 13 (13, 14, 14, 14) (15, 15, 15, 16) stitches for Right Front; 13 (13, 13, 15, 15) (15, 17, 17, 17) stitches for Right Sleeve; 42 (44, 48, 50, 52) (56, 58, 60, 64) stitches for Back; 14 (14, 14, 16, 16) (16, 18, 18, 18) stitches for Left Sleeve; 14 (14, 15, 15, 15) (16, 16, 16, 17) stitches for Left Front]
Short Row 12: [Purl to next marker, sm] 2 times, p3, wrp-t.
Short Row 13: Knitting wrapped stitches with their wraps as you come to them, [k2tog, k1, remove marker, k1, ssk, knit to 3 stitches before next marker] 2 times, k2tog, k1, remove marker, k1, ssk, knit to end of row. [90 (92, 98, 104, 106) (112, 118, 120, 126) total stitches remain: 13 (13, 14, 14, 14) (15, 15, 15, 16) stitches for each Front; 40 (42, 46, 48, 50) (54, 56, 58, 62) stitches for Back; 12 (12, 12, 14, 14) (14, 16, 16, 16) stitches for each Sleeve]
Neckband
Changing to shorter needles, place a unique marker to indicate end of round.
Round 1: With right side facing you, k18 (20, 22, 24, 26) (28, 30, 32, 34) on-hold Front Neckline stitches, knit to end of round, knitting remaining wrapped stitches with their wraps and removing remaining raglan markers as you come to them. [108 (112, 120, 128, 132) (140, 148, 152, 160) stitches]
Continue in stockinette stitch for 3 rounds.
Next Round: Work Cording Stitch to end of round.
Continue in stockinette stitch for 2 rounds.
Bind off all stitches loosely.
Finishing
NOTE: For help with Kitchener Stitch, visit our tutorial.
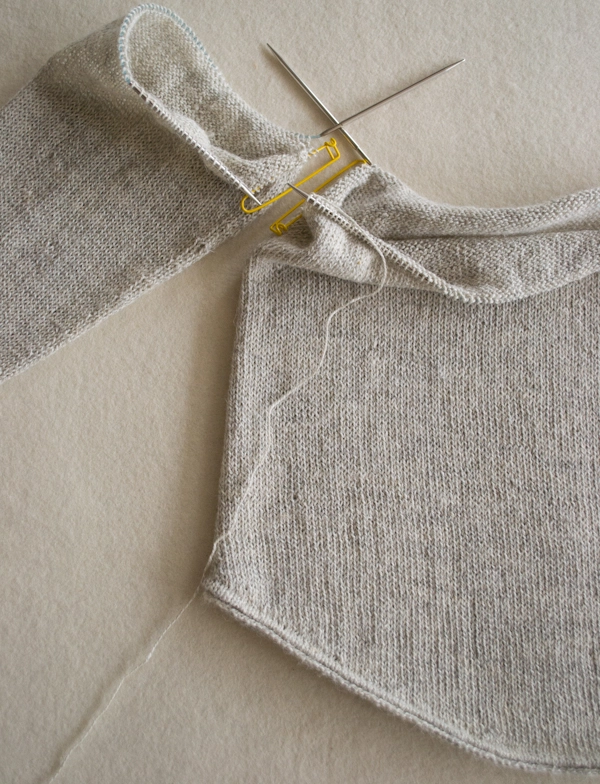
Holding Body and Sleeve Underarms stitches parallel to each other, use Kitchener Stitch to graft Underarm stitches together. Sew up any holes, if necessary.
Weave in the ends and block as desired.


To clarify on the raglan decrease: I am making the small size so after doing the first set of decreases I then decrease every other round 23 times for a total of 46 rows?
HI Peggy,
Thanks for reaching out! For the size 32, you will work the first set of decreases and then decrease every other round 23 times. This section where you repeat the decrease round every other round 23 times will be a total of 46 rounds!
Best,
Cassy
Hi All, for some reason I cannot seem to post my own comment for a question so I am
Asking in a reply.
Continue in stockinette stitch, knitting each round, while repeating the Increase Round every 7th (6th, 6th, 5th, 5th) round 12 (18, 5, 22, 12) more times, then every 6th (0, 5th, 4th, 4th) round 4 (0, 16, 1, 14) times. [86 (94, 104, 112, 122) stitches]
Where is says 0, does that mean every round?
Also, would sweetgrass be good for this pattern? Thank you!
Hi Taylor,
Thanks for reaching out! I am sorry to hear that you are having difficulty with our comment section!
When there is a 0 in place for your size, that means you will not be working that repeat. So for that row for example, you will be repeating the increase round every 6th round 18 times and then you will skip the rest of that section of instructions and go directly onto the next row since there are zeros in place of your size!
Also- in response to your other question, Yes! Sweetgrass would be a great option for this pullover! They are the same weight but I always recommend double checking your gauge when using a yarn different than what the pattern calls for to insure you are consistent!
I hope this clears things up, happy knitting!
Gianna
Thank you!
Hi, I just finished the sweater. It was fun to knit, however, the body of the sweater is twisted: the curved bottom edges are not in the front when I put the sweater on, but to the side. Did I do something wrong? Can it be fixed?
Hi Anya,
Oh no, it sounds like you might have missed a half row right after finishing the short rows at the hem of the sweater! Unfortunately the only way to fix this issue would be to unravel and start over completely, or to cut off the hem. It sounds scary, but I would probably try removing and re-knitting the hem. To do so, you will start by cutting one stitch in the row just above the short rows, and then unpick that row of knitting stitch by stitch, placing the live stitches from the sweater back on your needle as you go. If you don’t mind omitting the curved hems, the easiest thing to do at that point would be to work the cording stitch and cast off, or you could try to reverse the short rows, which might take a bit of trial and error.
I hope that helps, and please let us know how it turns out!
Julianna
Thank you for your reply Julianna, you are always a great help! I blocked it and it fixed it! I retraces my steps and checked for missing short rows, everything was in place. Unfortunately i have to unravel it anyway because my sleeves and torso are too short for my liking. I don’t mind it though. I really learned a lot about sweater construction knitting it. And I am ready to do it again!
Hi, would 550 gr of a 51/49 Merino/silk yarn (1650 yards) be too heavy for this pattern?! I also worry whether it would be enough for the 40 or 44 model? Thanks!
Hi Dagmar,
Thanks for writing in! Based on the yardage per 100 grams, it does sound like your yarn is thicker than the yarns that we have used to make this lovely sweater. Your yarn has about 300 yards per 100 grams and Linen Quill has 439 yards per 100 grams and I think that it could be a bit too thick. However, I would suggest working up a gauge swatch and if you like the fabric at the noted gauge for this sweater, then you could certainly use it!
As to yardage, we used approximately 1365 yards for the size 40 and 1555 yards for the size 44 so if the yarn does work, you should be all set on yardage!
Best,
Cassy
Thanks, Cassy, that is very helpful. I have another stash of 500 g (5 skeins of 100 g / 400 yards each) of 70 % Merino with 20 % Cashmere and 10 % Nylon. It is still about 10% thicker than your yarn linen quill, but much closer than the Merino/silk mix. Again, many thanks for the helpful response.
Cheers, Dagmar
Hi, I guess my question is whether the second yarn might be suitable for this sweater is terms of piling etc. Thanks again.
Hi Dagmar,
Thanks for reaching out! There are lots of factors that go into whether a yarn will pill or be suitable for a sweater besides just the fiber content, so it’s really hard to say. There are many variations of merino, cashmere, and nylon blends, like our Posy, that are great for sweaters! The best way to find out would be to knit up a swatch and see how the fabric feels!
Best,
Julianna
Sigh. If things weren’t the way they are now, I might shed a few thug tears. I’ve gotten to the part where we separate for the front and the back. I have 26 stitches on stitch holders on each side for my arms and 142 stitches for one side. When I counted up the second side, I only have 107 stitches. I’m not sure how it happened as I’m pretty meticulous with stitch count even putting markers every 20 stitches if it’s a really tricky pattern… but alas, here I am, wondering if there is any way to save this without frogging back. Any ideas?
Thanks in advance,
Lisa
Hi Lisa,
Thanks for reaching out! Are you about to start the Shape Neckline + Shoulders section of the pattern? Unfortunately it does sound like you need to start the raglan shaping again if that is the case, since your stitch counts for both the front and back are quite far off. After completing the raglan decreases, the two largest sizes will have 26 stitches left for each sleeve, but only 62 or 64 stitches for the front and back.
Best,
Julianna
Thanks for replying.
I am a beginner knitter and am going to try out this pattern. I am a little intimidated by the double pointed needles. Is there any way to use circular needles for the sleeves? And if so, what kind and size would I use if using the linen quill yarn? Thanks!
Hi Emmaly,
Thanks for your question! There are a couple of options if you want to avoid double pointed needles. One is Addi Easy Knit needles, which are designed for knitting in small circumferences. There’s also the Magic Loop technique, which uses a longer length cord to work small circumferences. In either case, you’d use the same size needle as you use for the body of the sweater – the recommended needle size is US4. Happy Knitting!
Best,
Cassandra
Sorry, this might be a silly question, but how do I know whether to use a circular needle size 4 with a 32 or 40 inch cord? Which sweater size goes with the length? Thanks!
Hi Emmaly –
Thanks for reaching out! The two smallest sizes can be knit on the 32″ length needle, while the two largest sizes would probably be more comfortable with a 40″ cord. The 40 inch size would probably work with either one – most people don’t enjoy having their stitches too squashed together on a too-small needle. Hope this helps – happy knitting!
Best,
Cassandra
I’m relatively new to knitting, so please forgive any knowledge gaps!!! I’m using Linen Quill in Rose Granite which is gorgeous. I’ve done the sleeves and am currently working on the body. Here are my two issues:
1. In spite of the hem design, I have a very significant roll on the body. (the sleeves are fine) Will it relax after blocking? The photo shows a flat hem.
2. The stitches on the sleeves (w/ DPNs) don’t look as clean and tidy as the body (circular) Will they tighten up with blocking?
thanks so much.
Hi Grace,
Thank you for writing in! I’m glad to hear you’re enjoying knitting this raglan in Linen Quill; this is one of our favorite yarns! It sounds like both of your questions are regarding the tension and look of the stitches and edges of your piece. Not to worry, blocking should take care of most of these types of issues- I love our new tutorial for hand washing a sweater as a blocking guide.
As you continue knitting sweaters, if you notice a significant difference in your gauge or stitch quality when switching to DPNs, there are a few things you can do to remedy these kinds of issues. You might want to purchase circular needles in a smaller length specifically for knitting sleeves, or size up/down your DPNs when working on smaller circumferences. For example, I find my gauge to be a bit tighter on DPNs so occasionally I use a larger size needle on my sleeves. You also may not have any issues like this, but please always feel free to reach out with questions!
Happy knitting!
Gaby
Thanks Gaby! I just finished blocking (I never fail to be amazed at the instant transformation knitting makes when dunked in water) and it looks beautiful. This simple sweater was a real learning experience. I ripped the Wrp-t for the body back to the cording stitch, as well as the raglan to the point of sleeve attachment because i did them both incorrectly. Once i figured out what went wrong, it was a light was switched on.
The gauge was right and the measurements all matched up with the pattern, but it’s about 1 size too big. (i used size 32 but am quite small) In hindsight I probably should have used a size 3 needle, but how would i know that at the start?
I think i’ll try shortening the sleeves by matching the cording pattern one more time with a crochet hook or needle.
Thanks for a great pattern and new skills!
Hi! I’ve just finished this pattern using the Linen Quill and everything looks great except the bottom hems are curling up a lot. Is this something that can be fixed by blocking, or do you have any other tips you could recommend to flatten it out a bit?
Thanks so much!!
Catherine
Hi Catherine,
Thank you for writing in! Congratulations on finishing your pullover! Not to worry, blocking should take care of any curling of the hems. A quick hand wash also doubles as a nice first block!
Best,
Gaby
Thanks, Gaby!
I just finished knittng your pullover. Some challenges on the way but I overcome them aldo having learnt some new tricks. Need to do some finishing touches (had to knit sleeves as flat piece as didnt have right DPNs) but already looking forward to wearing it. Thanks for the pattern.
Hi Agnieska –
So glad to hear that you had a great time with the project and pattern! Happy Knitting!
Best,
Cassandra
Hi, I am a beginner knitter and have been given a big bag of 4 ply fingering weight wool. This looks to be the best pattern I’ve seen. Is my yarn suitable and how easy will it be for a beginner.
Thank you. Lola
Hi Lola,
Thanks for reaching out! Most fingering weight yarns will work well for this sweater, but the best way to find out if yours is a match is to knit a gauge swatch and see how it turns out! This pattern is fairly straightforward, and we are always here to help if you have any questions!
Best,
Julianna
Too bad this isn’t a top down pattern because I can’t do wrap and turn I’ve tried it so many times and it never works out
Hi Leslie,
Thanks for writing! I’m so sorry to hear that you’ve had some frustration with wrap + turn. We do have a video tutorial on our site for the technique, here – . Hope this helps a little!
Best,
Cassandra
Hi, Could I use Artesano Alpaca 4ply Yarn for this? I’m a UK knitter so find it hard to do the conversions. Wish someone would create an App for that!
Hi Tania!
Thanks for asking about this (and yes, it is sometimes really hard to go by yarn descriptions, as they vary so much)! I’m not familiar with the yarn you mention, but it looks like the needle size recommendations and gauge are about the same as what we used for the Lightweight Raglan Pullover. I would definitely suggest swatching with it to see if you like the fabric at the recommended gauge of 28 stitches and 33 rows over 4 inches. I hope this helps!
Best,
Cassandra
I would like to make this with Unger Plantation and whatever available wool would go with it for a striped sweater. Do you think this sweater would be good with that yarn? What do you suggest as a comparable yarn for the stripes? (I don’t have enough of the Unger for the whole sweater.)
Hi Carol,
Thanks for writing in! Unfortunately your yarn is significantly thicker than the fingering weight yarn we used for this sweater, so I’m afraid it won’t be suitable for this pattern – I’m so sorry about that! Instead, I would recommend a pattern written for a worsted weight yarn, such as our Purl Soho Pullover. If you need to add another yarn for stripes, our Worsted Twist should be a good match!
Happy knitting!
Julianna
Any suggestions for how to do skinny stripes? I have a cream colored yarn and dark green for the stripes but not sure how far apart to space the stripes. Thanks!!
Hi Em
That’s a great question! The difficulty in adding stripes to this sweater is the number of short rows and creating stripes in short rows is very challenging. The best way to add stripes would be in the sections without short rows (the sleeves and body above the bottom and below the short rows) I would recommend between 2-4 row stripes, so the yarn can be carried loosely up without cutting. We have a great tutorial here for stripes in the round. I hope that this helps!
Happy Knitting!
Jessica
Hello: I am using the Cattail Silk, third size in the parentheses, size 4. I would like to make the length of the body a couple inches longer. Where in the pattern would I add the extra two inches? Also, the picture of the sleeves look like there is a seem joining the sides together. They are knit in the round, so should not have seems. Is it just the photo?
Thanks for helping. Hope we can get the Irvine warehouse open soon.
Sincerely,
Susan
Hi Susan,
Thanks for reaching out! It’s quite easy to lengthen the body of this sweater! In the “Continue Body” section, you will simply keep knitting until the body of the sweater is as long as you would like it to be. The sleeves are indeed knit in the round, so I think the illusion you are seeing is just a slight crease from blocking the sample!
I hope that clears things up, and we’re looking forward to having everyone back in person when we can!
Best,
Julianna
Thank you Julianna. It is so nice to get replies. Thank you for your help. It is much appreciated. I have 3 skeins of the Cttail Slk. There should be about 400 yds left if I follow the pattern exactly. Do you think the 400 yds will cover another 2 to 3 inches in length? I am thinking of putting a salvage thread through the fourth row so I can see where to pick up the purl bumps. So, is the fourth row from the cast on edge the correct row for the salvage thread?
This is the first garment I will be making for myself. I have made a cap-sleeve top for my daughter. Armholes, wrap and turns and necklines are tricky. Hope I get through this without bugging you much. I will be using invisible wrap & turns on the short rows. No problem with those right (same number of stitches)?
Thanks,
Susan
Hi Susan,
Yes, I think 400 yards should be plenty to add a few extra inches! If you would like to make absolutely sure, once you are past the curved hem, you can weigh your yarn using a kitchen scale, knit two to three inches, then weigh your yarn again. 400 yards in Cattail Silk weighs about 64 grams, so as long as you use less yarn than that for your test, you should have enough yarn for your planned length. If you would like to use a lifeline or scrap yarn to assist with the cording stitch, then yes, you will run your scrap yarn through all the stitches on the needle after knitting the fourth row.
I’m not familiar with invisible wrap & turns so I’m not quite sure if they substitute for regular wrap and turns, but you can review our Short Rows: Wrap & Turn tutorial to see how they differ from your method. We’re always here to make sure your sweater turns out just right, so don’t hesitate to reach out if you have more questions!
Best,
Julianna
Thank you again. I am a little more than half way through the right sleeve. Will reach out if I need you again.
Sincerely,
Susan
Hello,
I am in the shaping Raglan section of the pullover (size 40). I would like the make the neckline a little small and closer to the neck.
Do you have any suggestions as to how I should deviate from the pattern?
Thanks 🙂
Jess
Hi Jess,
Thanks for writing in! You should be able to simply continue repeating the raglan decrease rows until the neckline is the size you would like it to be, or you could add a ribbed collar to pull things in a little more! Either way, I would recommend binding off loosely or using a stretchy bind off to make sure the smaller neck opening will still fit comfortably over your head. We don’t have a tutorial for these bind offs, unfortunately, but a decrease bind off or Jenny’s Suprisingly Stretchy Bind Off should work well!
Best,
Julianna
Hi!
This is my first sweater, and so far, so good! I don’t understand joining sleeves to the body: “Round 1: With the working yarn from the Body, knit….80….. Left Sleeve stitches onto Body’s circular needles, [Q: What is the reference for “Left Sleeve” — the wearer, or the knitter viewing the sweater on someone else? Q: what part of the sleeve should I join to the body?] pm, knit…112…Front stitches [Q: Does ‘Front” stitch refer to the front of the sleeve/sweater OR a specific type of stitch?] , pm….”
Thanks!
Hi Lisa,
Thanks for writing in! I think you might find our Joining Sleeves to Body tutorial, which demonstrates the basics of the joining round in a bottom-up sweater, quite helpful! Whenever a knitting pattern refers to the left and right or back and front of a sweater, it is referring to those parts as if you were wearing the sweater, so the left sleeve is the sleeve that will be on your left arm when it is finished, and the front stitches are the stitches that will be on the front or chest of the sweater.
I hope that helps!
Julianna
Julianna
I found the wonderful tutorial shortly after I e-mailed you all. Yay! That did the trick! Thanks so much for the quick reply — much appreciated given y/our collective experience. Be well Purl SoHo friends!
I’ve been scrolling through the questions, looking for an answer to this. I’m at the Body Decrease Round and the Raglan Decrease Round, after having knit a full round following joining the sleeves. The part that is confusing is this: The Body Decrease Round directions indicate […..ssk, knit to 3 stitches before next marker, k2tog, k1, sm] 2 times. [4 stitches decreased]” The Raglan Decrease Round has similar language: “4 times [8 stitches decreased].”
What does the “2 times” refer to? The sequence should be completed twice — once for each sleeve — in a single round?
Thanks!
Hi Lisa
Thanks for reaching out! The body decrease round is [Knit to next marker, slip marker (sm), k1, ssk, knit to 3 stitches before next marker, k2tog, k1, sm] 2 times. [4 stitches decreased] The brackets are indicating your repeat, so you will complete this entire sequence 2x, and will have completed an entire round. The stitches you will be decreasing are part of the body, and check the total remaining stitches when you complete this direction. Similar directions are given for the Raglan Decrease Round, where you will be repeating the bracketed directions 4x. I hope this clears it up!
Happy knitting
Jessica
YES! That’s kind of how I was interpreting the directions based on the stitches decreased. You ROCK, Jessica! Thanks a bunch!
Hello again. I have made it through the sleeves and am working on shaping the bottom of the body. I started with 308 stitches. Lost count on wrap and turn rows. I counted the rows. My question is , after the wrap and turn rows will I be back at the beginning of round marker at the end of row 28 or will there be stitches on each side that are not included in wrap and turn rows?
Hi Susan
Thanks for reaching out! There is only one marker on your sweater for the beginning of the round, and the first time you work rows 1-28 you are working one side of short rows (front or back curve of the sweater), and the second time will be the other side of the sweater. Row 29 should end with half the number of sweater stitches, exactly across from the beginning of the round marker. After this you will repeat rows 2-28 once more creating the same as before. I hope this helps explain it and happy knitting!
Jessica
Thank you Jessica. I must be doing the math wrong. I have 308 stitches to start, one half is 154 stitches. I Knit 103 and follow the wrap and turn rows through rows 28 and still have a couple of stitches left. I have tried adding the additional stitches up that are at the end of the the wrap and turn rows and add that number to 103, but do not come up with 154. I had tried to repair a wrap and lost that stitch, didn’t know how to redo that, decided to think out the row, lost the wrap going in the other direction…. I will rip it out and do it again. Would love to see a video on how to undo a wrap that was made on the previous row so it isn’t lost if you have to undo a row for any reason.
Thanks again for the help. So nice that you all do that. ?
Susan
Hi Susan
I am sorry that you are having trouble with this. It may help you to put a lifeline in before you start the wrap and turns, in case you need to rip back. When tinking back a wrap and turn row, just proceed really slowly when getting close to the wrap and turn, pause when the wrap and turn is the last stitch on your needle, slide it to the opposite needle and unwrap it, slide it back to the previous needle and tink the next row. Unfortunately, we don’t have the resources at the moment to do a video tutorial of this, but I will pass this request on to our team. Hope you can get it worked out!
Best
Jessica
Hi! I have knitted several fairly simple pieces and chose to challenge myself with the lightweight raglan pullover. I have a question on the sleeve directions. After completing the cast on and 8 rounds of the stockinette stitch, the next round states “Work Cording Stitch”. Stupid question but is the “cording stitch” the same as the I-Cord? I watched several tutorials on I-Cord (which is all that I could find) however the directions appear different than the raglan pullover directions. Would you please provide a few additional details on the cording stitch section?
Thanks!
Sue
Hi Sue,
Thanks for writing in! The cording stitch we use for the edges of this pullover is very different from an I-Cord, and although we don’t have a tutorial demonstrating it, the technique is quite similar to a Knit Hem! The only difference is that, instead of picking up stitches from the cast on edge, you will count down four rows to find the correct purl bump to pick up.
I hope that helps!
Julianna
Continuing the discussion of the cord edge ….. Looking on the wrong side of your work (the purl side), is the first row (of 4) the row currently on the needle, or one row down? In other words, when you are counting down four rows, do you include the row on the needle?
Hi Allison,
Great question! The stitches on the needle should not be included when you are counting your rows for this step. The first row you will count will be the purl bumps directly under the needle.
Best,
Julianna
I’m on the raglan shaping section and I don’t understand the decreases – in the image, it looks like there are four decreases on each sleeve (one outside, two inside, and another on the other end), so wouldn’t that make it a decrease of 8 each time? The instructions say decrease of 4/row – what am I missing?
Hi Ellen,
Thanks for writing in! For the first few rounds of the raglan, you will be decreasing on the sleeves only, and will be decreasing two stitches per sleeve, one at the right edge and one at the left edge of the sleeve stitches, for a total of four stitches per round. After working this round the indicated number of times for your size, you will then either work a few rounds decreasing on the body only if you are making size 44 or 48, or for all the other sizes, proceed to the section titled “For All Sizes.” At that point you will begin decreasing 8 stitches per round – two stitches each on the front, the back, and both sleeves. Although you will still only be decreasing two stitches per sleeve, those decreases along with the body decreases will create the columns of paired decreases you can see in our pictures.
I hope that clears things up!
Julianna
Hi!
Yikes! I clearly misunderstood these directions: “Raglan Decrease Round: [….] Continuing in stockinette stitch, repeat Raglan Decrease Round every round 0 (0, 2, 4, 6) more times, then every other round 23 (27, 28, 27, 28) more times. [156 (160, 168, 176, 180) stitches: 54 (56, 60, 62, 64) stitches for each Front and Back, 24 (24, 24, 26, 26) stitches for each Sleeve]”
I’m currently knitting the 24th of 27 alternating decrease rounds. I counted the stitches on front, back, and sleeves and my stitch count is waaaaayyyyy off. I should have 54 stitches for each front and back; 24 stitches for each sleeve. Instead, I have about the right amount of stitches for the sleeves (23 & 26), but the front and back are both 123 stitches! It seems I made the decrease stitches only on the sleeves and not on the front and back…. what do you think? I’d like to make this sweater again and need to understand what I misinterpreted/did. what do you advise I do at this point?
Thanks friends!
Hi Lisa,
Oh dear, it does sound like something has gotten off! It sounds like you are knitting the fourth size which started with 132 stitches each for the front and back, so you did decrease a few times. I think you correctly followed the instructions for the Body Decrease Round, which would have gotten the front and back to 126 stitches, but at some point stopped decreasing on the front and back. I would suggest going all the way back to the beginning of the yoke, right after joining the sleeves and body together, so you can get back on track! Just keep in mind that, while doing the Raglan Decrease Round, you should be decreasing in every section of the sweater, and check your stitch counts occasionally to make sure you don’t miss any!
I hope that helps!
Julianna
Thanks Julianna,
I decided to tear out the work and start over before I got your reply (I know you all are swamped and doing your best to keep up!). I read all the “replies” to questions about the Raglan Decrease, and found answers that explained what I’d misunderstood. Finger crossed!
Hi there,
I’m about half way through the body, and I’m noticing that my edge is curling A LOT. Is there anything I can do? It doesn’t seem like it was a problem with the sample, unless blocking performed some magic.
Should I still measure the 14 inches of the body with the piece pulled flat, or should I take the curl into account when taking that measurement?
Thanks!
Betsy
Hi Betsy,
Thanks for writing in! I know the curling is discouraging, but it is completely natural for knitted fabric to curl before it has been blocked. Blocking helps the stitches settle into place, and you will see the rolled edge have magically flattened.
When you’re measuring your work, do your best to lay it flat.
I hope this helps!
Oscar
Would you please help us (produce a video on how to) eliminate the gap created when you join the sleeves to the body of the sweater? Love this pattern but don’t like the ‘holes’ created at these intersections.
Thank you,
Sue
Hi Sue,
Thanks for writing in! It is actually completely normal and expected to have holes in the underarms when knitting seamless sweaters! There isn’t really a fix to eliminate them while you are knitting, but you can use the yarn tail from joining the sleeves to close up these holes while you are weaving in your ends.
I hope that helps!
Julianna
Victory! I just finished the Raglan Pullover — my first sweater ever! — and couldn’t be happier. The fit initially seemed a little too small for me, but blocking the sweater seemed to lengthen the sleeves and body without stretching them out, and hid most of my beginner stitches and corrections. I used a merino yarn that seems to have worked out. Lastly and most importantly, I’m so thankful for the compassionate and responsive support from you all at Purl Soho for helping me, and other beginners, achieve this important knitters’ right of passage! Thank you SO much!
Hi there!, I´m currently knitting this sweater, but right now are really stuck in the SHAPE NECKLINE + SHOULDERS part. I´ve made short rows before, not many times, but I can manage, but I don´t understand the Set-Up Round, ando how should I join yarn to Right Front Stiches….
Thank you very much in advanced and thank you again for your wonderful patterns.
Hi Marta,
I hope I can clear this up for you! At the beginning of this section, the beginning of the round is at the end of the back stitches and beginning of the front stitches. Once you have completed the round that includes placing the front neck stitches on hold, you will cut your yarn and slip your stitches around the needle without working them until you are at the on-hold stitches. Now, the Right Front stitches next to the on-hold stitches should be on your left-hand needle, so you can insert your left-hand needle into the first Right Front stitch and begin knitting by simply looping your yarn over the needle, just as you would if you were joining a new ball of yarn or color at the edge of a row!
I hope that helps!
Julianna
Measuring my chest circumference I was approximately 39-40 inches. Wasn’t sure if I should plan to follow the pattern for the 40 or 44”. I want the sweater to be relaxed with drape effect but not overwhelming. Ordering the linen quill and would like to add approximately 3 extra inches to the body of the sweater. Would 4 skeins be sufficient? Thanks!
Hi Debbie,
Thanks for writing in! It can be confusing to choose a size when you are right between two sizes! If you go with the smaller size, you will have zero to 1 inch of positive ease, which will look somewhat form fitting. The larger size will result in about 4 to 5 inches of positive ease, which should look more like the sweater on our model, which is worn with 3 inches of positive ease. Another way to decide which size to make is to measure a sweater that you already own and enjoy wearing, no matter whether it is hand made or store bought. You can then compare the chest measurement of that sweater to our finished measurements to choose whichever one is most similar. You should have plenty of extra yarn to lengthen the body by three inches, no matter which size you end up knitting!
I hope that helps!
Julianna
I’m nearing the end of this sweater and have a question about the instructions. I’m in the “Shape Neckline + Shoulders” section and am working on “Short Row 1”. After joining the yarn and doing another decrease row, it says:
“… knit to last stitch, wrp-t”.
If I have knit to the last stitch, there are no stitches left on my left needle with which to “wrp-t”. Should the instructions say instead just “turn work”? Same instructions are on Short Row 2 where you “Purl to last stitch, wrp-t” with no stitches left. Same, just “turn work”? Or is there a way to “wrap and turn” without a stitch on the left hand needle?
Hi Janice,
Thank you for reaching out! The pattern is actually correct, you knit to the last stitch (leaving the last stitch un-knit) and that is where you preform the wrp-t. So there should be one stitch left at the end of the row that is the one that gets wrapped! Same goes for the purl side.
Hope this helps, happy knitting!
Gianna
Ah, yes I suppose it could be read that way too 🙂 Thank you!
I am stuck at Short Row 9 in the neckline shaping instructions. Previous decrease rows have you decrease at sleeve edge four times, thus making a full trip around the sweater to the edges of the neck front. But at Short Row 9, the sleeve edge decrease is only done three times, then the wrap and turn before the fourth marker. Are you changing to wrap-and-turn in the middle of sleeves?
Hi Allison,
Thanks for writing in! Yes, you will be turning the work part way through each row rather than continuing to the end of the row working back and forth in the short rows. This creates that classic Raglan sleeve design!
I hope this helps and feel free to reach out with any more questions!
Gianna
Hello! I have just finished the cording for the lower hem of the sweater. Having difficulty understanding and executing the short rows that follow. I have watched the tutorial numerous times but am still confused . I am making size 44 . I knit 103 st from the marker(beginning of round), then wrp-t on st 104. Row 2, purled 52 st and wrap-t on st 51. Now on row 3 , I knit to wrapped st (st 104), pick up wrapped st, k 5 st wrap-t on st 110 and then turn…I noticed gaps between the stitches when I completed a short row and that my rows are getting longer rather than shorter! Can you try to help me sort this out? Am I off on which stitches I should be wrapping and turning? Thanks so much! As you can tell I am quite confused!
Hi Debbie,
Thanks so much for reaching out! I would love to help you out with this! Please send a photo of your work to our email: customerservice@purlsoho.com and we can trouble shoot from there!
All the best,
Gianna
I think I have worked through my short rows challenge and am knitting the body of the sweater. A few extra steps allowed me to conquer my difficulties and thought it might assist some other novice knitter such as myself. First I wrote out each of the 29 rows, indicating which stitch was the wrap and turn stitch and which stitch was to be picked up. I also placed a marker every 50 stitches so I could ensure that I was following the pattern correctly. Yes it did take longer but the end result was worth it. Thanks as always for your support. I’m sure I‘ll be reaching out to you again before I complete the sweater.
Hi there,
I’m having a bit of difficulty “wrapping” my head around shaping the bottom edges of the body and understanding the short rows for pattern size 40.
When directions say “work work wrapped stitch with its wrap, k/p x,” are we supposed to work x+1 stitches total, or is working the wrapped stitch included in x, so k/p x-1 after working wrapped stitch? I can’t conclude the proper continuation technique from the short row tutorial.
Also, by row 28, should size 40 have 140 worked stitches from start of round, half of the total stitches to “reset” to 0 and start shaping the back?
Clearly I’m having a bit of difficulty with the math here! I hope I’ve articulated this accurately…any help would be appreciated!
Hi Olivia,
Thanks for reaching out! I am happy to help! For each of the short rows you either knit or purl to the wrapped stitch, and like we show in the tutorial, you knit or purl the wrapped stitch together with its paired wrap and then work how ever many stitches we list in the parentheses after that! so for example, in Row 3: Knit to wrapped stitch, work wrapped stitch with its wrap (1 stitch), k5 wrp-t!
For Size 40 by the end of the short rows for the CONTINUE BODY section you will be working across all of the stitches on your needles untill the body measures 14 1/2″ from the cast on edge!
I hope this clarifies things for you, but please feel free to reach out with any more questions!
All the best,
Gianna
Hi. Can you explain “sm – slip marker” direction please? I am using a plastic marker and presume this means just to bypass it? Thanks for your help. I love the sweater’s design. I am an experienced knitter but have found the directions challenging! Kind regards, Sue.
Hi Sue,
Thanks for reaching out! Yes, when we say sm or slip marker it just means to bypass the maker and move it from one needle to the next as you are working the round!
All the best,
Gianna
Hi, I’m totally frustrated.
I’ve almost finished the sweater, but I’m struggling with the final wrt stitches. I’ve pulled out and done it a second time and the same thing happened. On the side where the wrt was done on the knit side I was able to pick up and knit the wrap eliminating any holes, but on the other side/ right side of the front the wrt stitches were created on the purl side and when I came to pick up and knit the wraps with the stitch on the right/knit side of the fabric they created holes..HELP, what am I doing wrong?
Hi Vanessa,
Thanks for reaching out! I am not sure what could be causing this, if you send us a photo of your work to our email customerservice@purlsoho.com we can troubleshoot further from there!
All the best,
Gianna
Loving this sweater pattern, but I’m stuck at the Raglan Decrease Round. The Body Decrease round made sense to me, but I’m curious on how the Raglan decrease differs and is repeated four times instead of twice. This is probably a silly question, but I’ve been puzzling over it for a bit. Thank you!
Hi Kristina,
Thanks for reaching out! The decreases for the sleeve are more dramatic than the body shaping since it is a smaller area and that is why you are repeating it more than in the body section!
I hope this helps, happy knitting!
Gianna
Hello! I just finished working the short rows for the bottom of the body. I tried following the “Short Rows Tutorial”; however, there’s still a big hole between the two sections of short rows (front and back of the final product). Can someone help me figure out where I went wrong? Thanks!
Hi Shannon,
Thanks for reaching out! It is likely that you are not working the stitches with their wraps correctly which would leave behind holes.
I hope this helps, happy knitting!
Gianna
Hi, Shannon! Did you figure out the solution to the “hole” problem? I’m encountering the same issue and have quadruple checked that I followed the Purl Soho video correctly.
Hi and thank you! I’m making the lightweight raglan pullover in a cashmere fingering. Never made such a complex pattern, or worked in a fingering yarn, but it has been so much fun! Learning lots of new techniques and can’t wait to see how it turns out!
Hi Ellen,
Thanks for reaching out! I am so glad to hear that you are enjoying this pattern and please let us know how it turns out!
Happy knitting!
Gianna
Hi. I have reached the yoke/join in sleeves. I am using an 80cm circular needle. I cannot get past adding the first sleeve because the work is too tight. Do I need to use al longer needle or is there something else going wrong. Thanks.
Hi Sue,
Thanks for reaching out! For this Pullover we recommend using a 32″ or 40″ circular needle depending on the size you are making, so if you are having problems fitting the stitches on the 32″ then you should definitely go up to a 40″ circular needles!
I hope this helps, happy knitting!
Gianna
Hello! When I completed the short rows for the body, I had holes when working over the purl side wraps. I saw that other commenters had this problem, but I still couldn’t figure out what I was doing wrong. I have re-watched the video multiple times and am working it correctly.
I made up a solution to fix the body holes, but am now ready to begin the neck short rows. Is there anything that could possibly be missing from the short row videos/instructions that would help me avoid holes? Is there a different short row method that might be better for me?
Thank you!
Hi Sarah,
Thanks for reaching out! When you work over the wrap and turn you will need to pick up the wrap and knit it with its paired stitch in order to close up the holes. My best guess is that you may have missed picking up the wrap which is why you are coming out with a lot of holes!
I hope this helps, please let me know if you have any more questions!
Warmly,
Gianna
Gianna,
Thanks for your response! I actually found out that when picking up the wrap and adding it beside the first loop, it wasn’t twisting correctly. I had to add my own step of twisting the wrap into the right direction before slipping and knitting together.
I am at the shaping neckline/ shoulders section size 34.
A) the 20 stitches on hold currently include a portion of the sleeve stitches, is that correct?
B) slipping stitches from left to right needle did not set me up next to on hold stitches, I didn’t even make it across to slip the next marker. Should I have been slipping from right to left instead?
Oooooooh! I think my end of round marker may have been ay the wrong point. I have it at my right back shoulder/ sleeve. Should it be on my left back shoulder/ sleeve?
Hi Mandy,
Thanks for reaching out! You should have removed the end of round marker when you separated the stitches for the front and back. Then for the YOKE JOIN SLEEVES section, Round 1 you will knit 76 (80, 86, 90, 96) Left Sleeve stitches onto Body’s circular needles, place marker, knit 102 (112, 122, 132, 142) Front stitches, place marker, slip on-hold Right Sleeve stitches onto spare needles and then knit those 76 (80, 86, 90, 96) stitches onto Body’s circular needles, place marker, knit 102 (112, 122, 132, 142) Back stitches, then you will place the unique marker for end-of-round. [356 (384, 416, 444, 476) stitches: 102 (112, 122, 132, 142) stitches for each Front and Back, 76 (80, 86, 90, 96) stitches for each Sleeve. This end of round marker should be located at the left back shoulder!
I hope this helps, happy knitting!
Gianna
Please explain directions : knit 5 stitches then place previous 10 stitches on holder .
Hi Laura,
Thanks for reaching out! In this section of the pattern, you’ll knit the first 5 stitches then turn your work so the wrong side is facing you. Now, the 5 stitches you’ve just worked are on your left-hand needle. Take your stitch holder and slip 5 stitches from the left-hand needle onto it, remove the beginning of round marker, then slip the next five stitches on the holder. You should now have 10 stitches on your holder (five stitches from either side of the beginning of round marker).
I hope this helps clear things up, and please let me know if you have any other questions!
Warmly,
Kelsey
Hi Kelsey
Thank you so much. That did the trick. This is my second purlsoho sweater and I am impressed by the help ya’ll give each time . I am sure I will be checking in again when I get to the next part.
Hi~ there! It’s so beautiful sweater and this is my first sweater. I have some problem here~ so help me!! I’ve done with the right sleeve parts just before make 14 stitch on stitch holder. After that, how do I knit to the end? Or it’s just ok to let it place on scrap yarn. Or do I need to purl the other 80 stitches backward? Thanks again. Waiting for your help.
Hi Kelsey~
Actually I found the answer from upper comment!!! That’s really tricky. I’m just done with my right sleeve!
Thank you.
Carra
Hi Carra,
Thanks for reaching out! So basically you will cut your working yarn when you put the 14 stitches on the stitch holder or scrap yarn and then you will re attach the yarn to continue knitting the 80 stitches!
I hope this clears things up!
Warmly,
Gianna
Hello! I am knitting the second smallest size, the 36″ chest circumference. I’m quite petite, but with a larger bust, about 35″. I knit up the first sleeve and it was much too large on my arms! If I knit the smallest size instead, would I be able to add some room in the body to accommodate my chest? Can I knit the smallest size arms and the second smallest size body? I am using the Purl Soho Linen Quil wool. It’s lovely! My gauge seems to be correct so it’s more of a body measurements issue.
Hi Maisie,
Thanks for reaching out! I think you could certainly knit the smallest size, but add in additional increases around the bust (following the increases fir the 2nd size) or you could make the body of the 2nd size and follow the sleeves for the smallest size! Just be sure to keep in mind that your stitch counts will be a bit different when you reach the YOKE section and the JOIN SLEEVES section!
I hope this helps and please let me know how this turns out and if you have any additional questions!
Warmly,
Gianna
I also had this question about knitting a smaller size for arms and one size larger for body! How do you resolve the stitch count difference when getting to the yoke and join sleeves sections?? Since the stitches on the sleeve and body underarm holders will not match, do you reduce on the body underarm join?
This is my first bottom-up sweater, so maybe I’m just not picturing the logic until I get to this point in the directions.
Hi Amy,
Thanks for writing in! Since making a different size sleeve from the body is a bit unconventional, there isn’t an exact science for getting the pieces to match up correctly. However, since this is a raglan sleeve there is a bit of room for tweaking things! The most important part is making sure you have the same amount of stitches, matching the body, for the underarm. So as long as you have the same amount of stitches on hold for each underarm, you should be okay going into the raglan section, and you can then follow the instructions for either size accordingly depending on the overall fit you desire!
I hope this helps and please let me know if you have any more questions!
Gianna
Hi! I am doing the shortrowspart. The first time i noticed that my rows were not centered cuz it went two stitches past the marker for it being in the round. It seemed wrong so i unwound it to the beginning and tried again. Now, part way through, I checked the stitches to the beginning and middle marker and there is a difference of 26 on one side and 28 on the other. Is the different of two intentional?
Hi there,
I have come to the part where I have to separate the front and the back. I’m not sure how to do this or where to start? If I take the 22 stitches and put them on the place holder… how to I keep knitting the rest of the row on the body? How do I continue through the rest of the stitches on the row without cutting the wool and using a second pair of needles? Sorry if this is really confusing!
Hi Becky,
Thanks for reaching out! There is no need to cut the yarn or use an extra set of needles since all of the stitches will be knit before going on the stitch holders! Keep in mind the work Previous will come up, this means you are knitting past the stitches first and then placing the stitch on the holder.
So you will begin by knitting 5 (7, 9, 11, 13) stitches, you will then place the previous 10 (14, 18, 22, 26) stitches on a stitch holder or scrap yarn for Left Underarm, these stitches will go pas the end of round marker so you will be removing that when you put the stitches on hold. You will then continue knitting 112 (126, 140, 154, 168) stitches from where you left off. Then you will again place the previous 10 (14, 18, 22, 26) stitches on the stitch holder or scrap yarn for Right Underarm. The yarn will again be waiting for your to continue knitting, so you will finish the round by knitting until you reach the Left Underarm (next stitch holder). [204 (224, 244, 264, 284) stitches remain: 102 (112, 122, 132, 142) stitches for each Front and Back]
I hope this clears things up!
Gianna
Do you think it would look ok if I skipped the corded edges and allowed the sleeves and neckline to ‘roll’?
Hi Judy,
Thanks for reaching out! Yes, you could certainly skip the edging if you would like to have a rolled edge instead! I think that would be a pretty look for this pullover!
Happy knitting!
Gianna
Hi
On the sleeves where it says “ Next Round: K5 (7, 9, 11, 13), place previous 10 (14, 18, 22, 26) stitches on stitch holder or scrap yarn, removing end-of-round marker, knit to end. [76 (80, 86, 90, 96) stitches remain]
What does place previous 10 (14, 18, 22, 26) mean .
No offence but I am at that point where I am saying to myself what previous 22/stitches is she talking about.
Any help would be greatly appreciated, as I am really stuck and I am knitting my sleeves in the round.
Thank You
Muriel
Hi Muriel,
Thanks for writing in! So basically, since you are working in the round you will be knitting those 11 stitches, then you will be putting those 11 PLUS 11 more from past the end of round marker (removing the end of round marker when you do). So, you will have 11 stitches on hold from before and after where the marker was (22 stitches total.) These stitches will be the underarm stitches.
I hope this clears things up, happy knitting!
Gianna
Hi and greetings from Toronto, Canada. I have a question about the short rows in the “Shape Neckline and Shoulders” section.
On page 17/19, short row 5 – it says to “knit to the last 8 stitches, wrp-t “……. is this meaning to knit to the last 8 stitches from the end of the row OR does it mean knit to the last 8 stitches from the last wrp-t?
Thanks so much.
Luisa
Hi Luisa,
Thanks for reaching out! This means knit to the last 8 stitches of the row!
Happy knitting!
Gianna
Thank you Gianna for you speedy reply. I am now clear on what to do.
Keep safe
Luisa
Good morning, I’ve finished thru the stockinette section where the piece measures 16 3/4″. I now need some clarification for the “Next Round” section.
So I knit 7 stitches, then take those 7 stiches and 7 more for the total of 14 stitches from the right and place them on a stitch holder?
My working yarn will be on the stitch holder with the 14 stitches. How do I continue to knit the remaining 80 stitches?
Thanks for all your assistance.
Hi June,
Thanks for reaching out! I’d be happy to clarify this section of the pattern for you! You are correct: after you’ve knit the first 7 stitches of the round, you will place those 7 sts and the last 7 sts from the previous round onto your stitch holder for the underarm to work later. While the yarn is attached to the end stitch on your holder, you can simply continue knitting from where you are as if that stitch was on a needle instead of a holder to complete the round before cutting your yarn!
I hope this helps! If you’re still having trouble visualizing it, feel free to reach out to us at customerservice@purlsoho.com for additional assistance!
Warmly,
Kelsey
I’m almost all the way through the Raglan Decrease rounds (round 20 of “repeat 28 more times”) and just realized that since the body decrease rounds started I’ve been decreasing half as fast as I should. Instead of decreasing twice at each raglan “line,” I’ve been decreasing once. Is there any way to fix this, other than frogging back to the very beginning of the “Begin Shaping Raglan” section?
For more info: I’m making the largest size, I intend for the sweater to be oversized, and I have relatively broad shoulders. The look of the raglan “line” is also different than it appears on the website (because I’m only decreasing once)–this is what I get for copying the directions without the photos. Thank you!
Hi Katherine,
Thanks for reaching out. I know how disappointing it can be to realize a mistake so far along! Because you’re only doing half of the necessary decreases, your yoke will end up twice as long, and the raglan lines will probably be twisted towards one direction. So in your case, I would highly recommend frogging back to the beginning of the “Begin Shaping Raglan” section. I have a feeling you’ll be much happier with the result once you redo this section. Hope this helps you get your project back on track!
All the best,
Lili
Thank you so much!