
Mosaic Blanket
What a joy it is to discover those moments in knitting when something seemingly intricate turns out to be very easy!

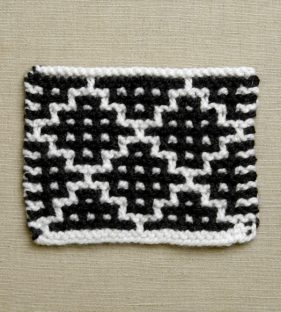
Those are the moments that knitting legend Barbara Walker strove to find as she first learned how to knit. Finding color work’s bobbins and multiple strands of yarn cumbersome, she developed a slip-stitch technique she called “Mosaic Knitting,” a clever way to create elaborate, colorful patterns using only basic stitches (knit, slip and occasionally purl). Soon, she was staying up late into the night inventing hundreds of original mosaic motifs, guided solely by her imagination.
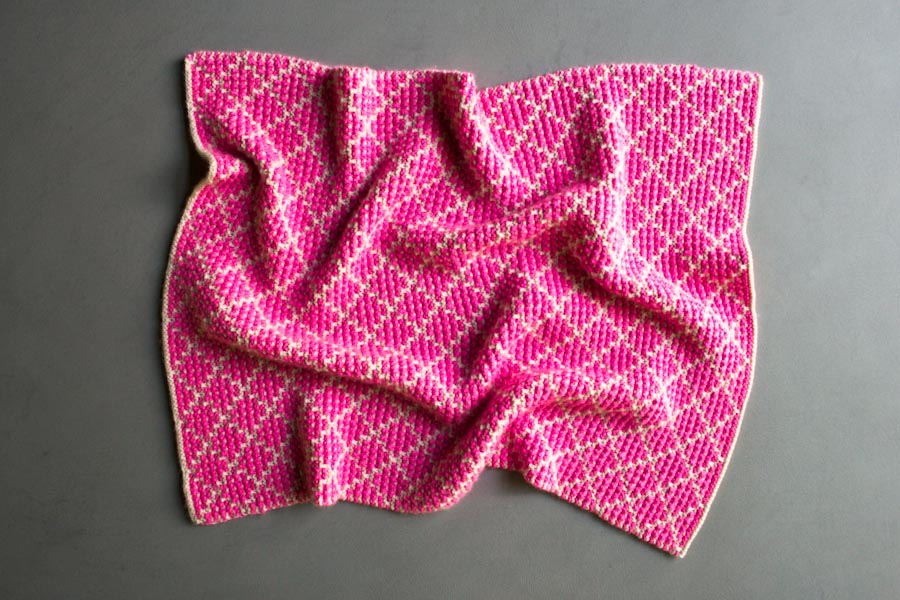
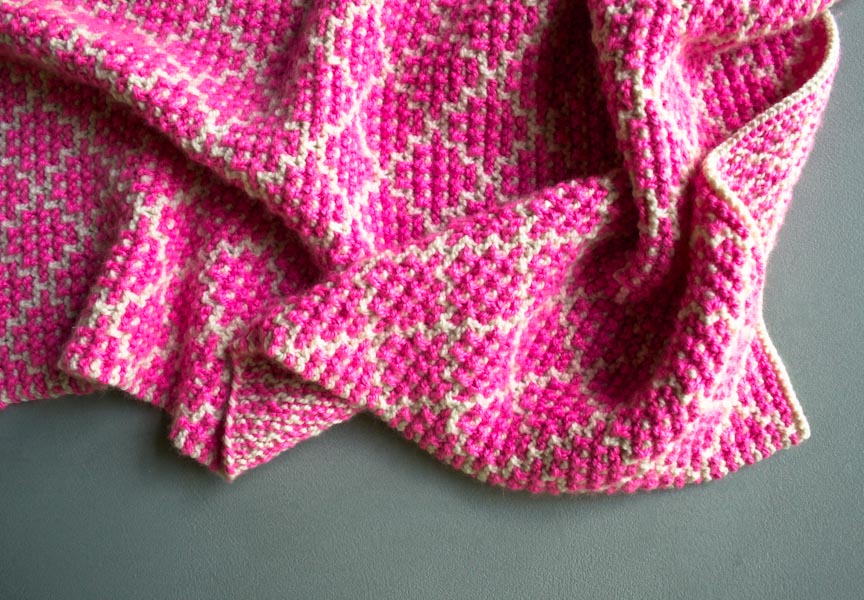
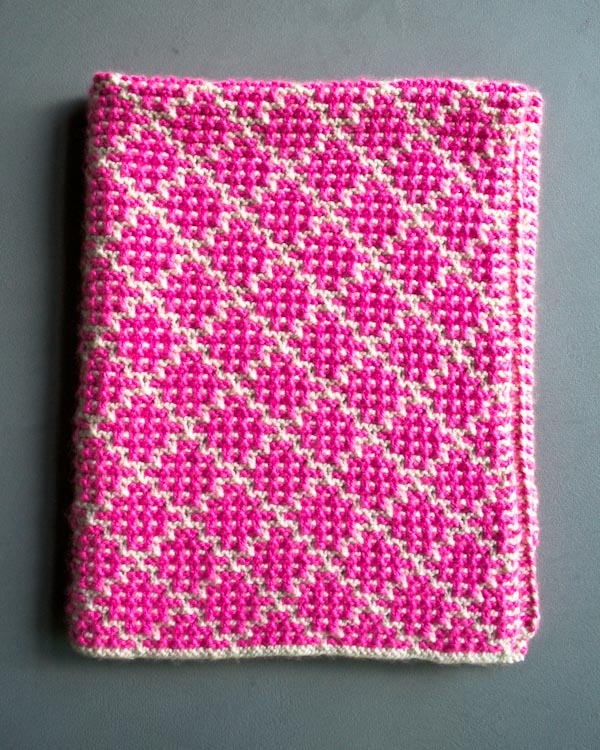
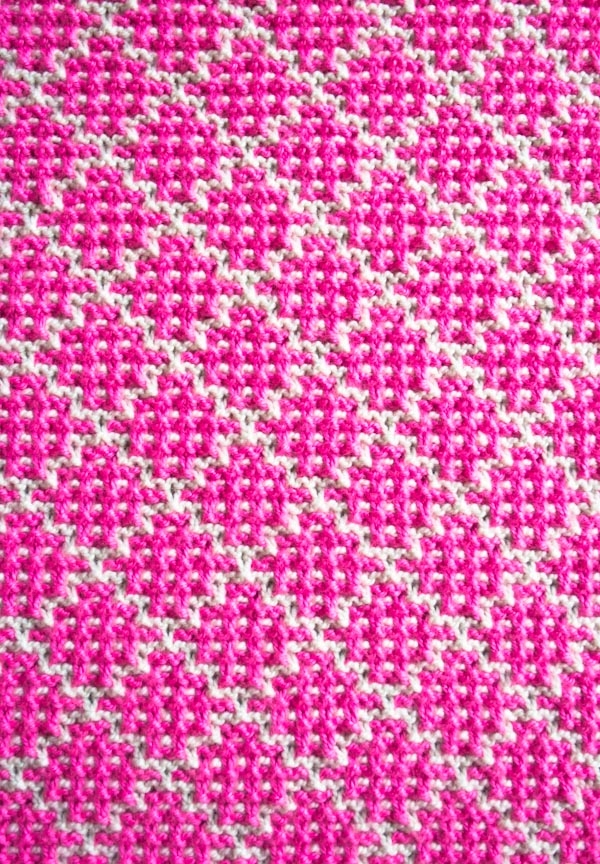
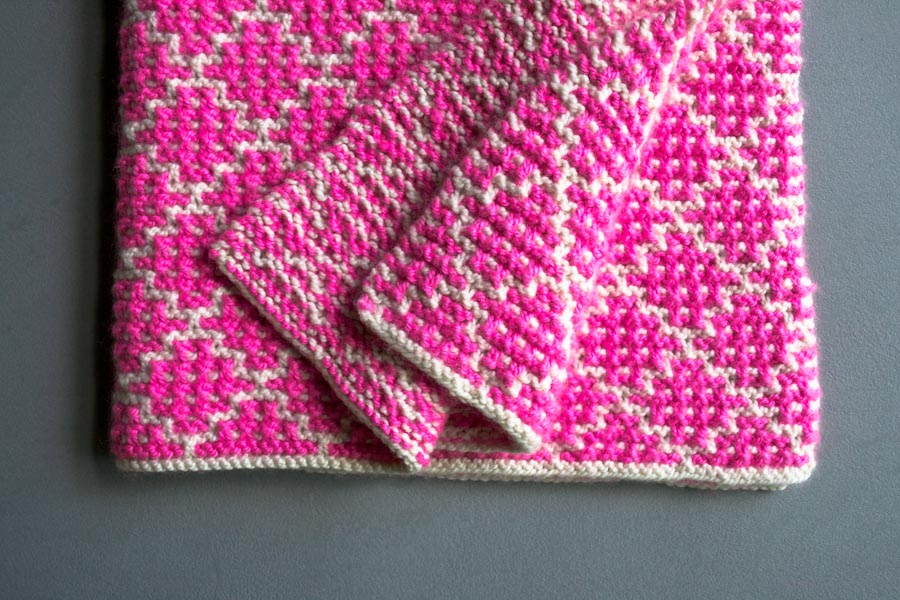
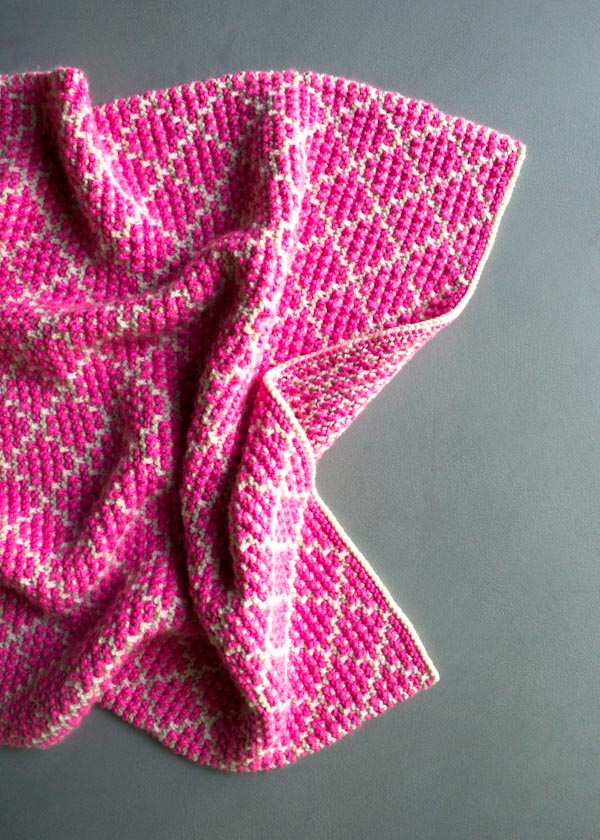
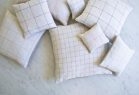
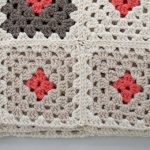
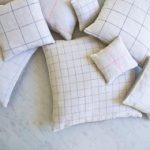
With a motif from Walker’s Second Treasury of Knitting Patterns, we created our Mosaic Blanket, made in Purl Soho’s incredibly soft Alpaca Pure in vibrant, almost glowing Super Pink, and anchored by the sturdy smoothness of Worsted Twist in creamy Heirloom White.
As Barbara Walker herself discovered, there is beauty in simplicity… Although you won’t have to tell anyone just how simple this Mosaic Blanket actually is to make! -Kristy
Update: New Color!
May 17, 2017
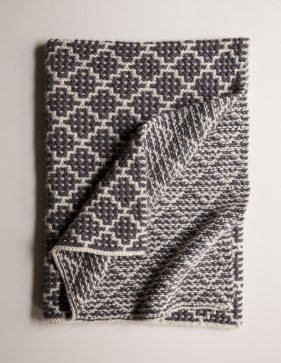
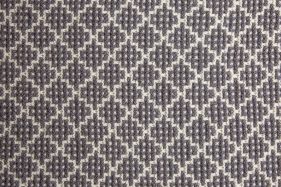
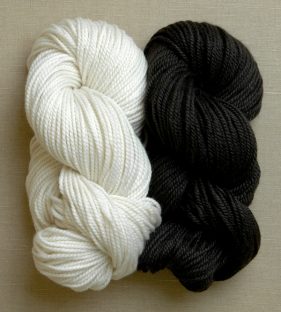
Our Mosaic Blanket has become one of our most popular patterns, which may surprise you, given how complicated it looks to make. But the real surprise is that even an advanced beginner can cast on for this knitting adventure! For this version of our Mosaic Blanket we used Worsted Twist in classic Heirloom White and Alpaca Pure in mysterious Trout Brown, an earthy neutral at heart with a shimmer of blue across its surface. For additional images, check out our new post!
Designed by Purl Soho designer, Kristina McGowan. Click here to see even more of Kristina’s designs!
Share your progress and connect with the community by tagging your pics with #PurlSoho, #PurlSohoBusyHands, #PurlSohoMosaicBlanket, and #PurlSohoWorstedTwist. We can’t wait to see what you make!
Materials
- Color A: 4 (6, 7) skeins of Purl Soho’s Worsted Twist, 100% merino wool. Each skein is 164 yards/ 100 grams; approximately 656 (984, 1148) yards required. (NOTE: We no longer offer Worsted Twist, but choose from one of our other worsted/aran weight yarns.)
- Color B: 6 (8, 10) skeins of Purl Soho’s Alpaca Pure, 100% super baby alpaca. Each skein is 109 yards/ 100 grams; approximately 654 (872, 1090) yards required. (NOTE: We no longer offer Alpaca Pure, but choose from one of our other worsted/aran weight yarns.)
- A US 8 (5 mm), 24 or 32-inch circular needles
Here are four palette ideas, including the one knit up here!
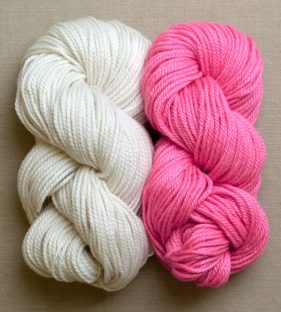
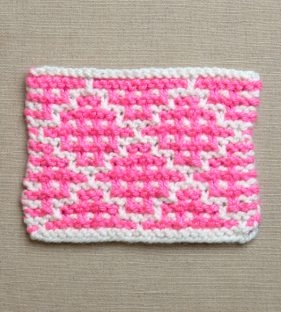
• Color A: Heirloom White
• Color B: Super Pink
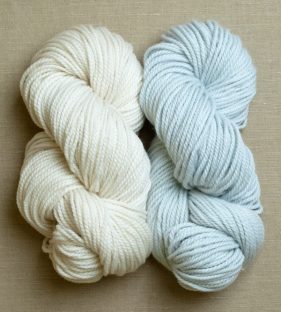

• Color A: Heirloom White
• Color B: Artemisia
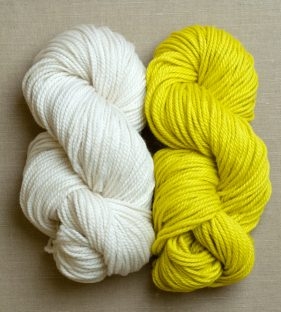
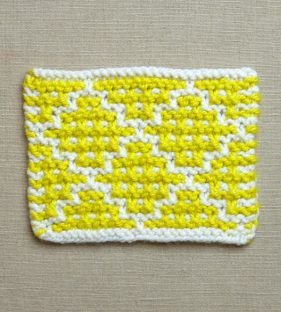
• Color A: Heirloom White
• Color B: Yellow Zest
• Color A: Heirloom White
• Color B: Dark Loam
Gauge
19 stitches x 38 rows = 4 inches in Mosaic Stitch, using Colors A and B
15 stitches x 32 rows = 4 inches in garter stitch, using Color A
Sizes
Baby (Crib, Throw)
- Finished Measurements: Approximately 26 x 35 (33 ½ x 40, 41 x 46 ½) inches
SAMPLE: We knit the Baby size.
Notes
SLIP STITCHES
ON RIGHT SIDE ROWS: Slip stitches with yarn in back.
ON WRONG SIDE ROWS: Slip stitches with yarn in front.
STITCH MULTIPLE
This pattern works over a multiple of 12 stitches + 3. For example, 12 x 4 = 48; 48 + 3 = 51 total cast-on stitches.
MOSAIC KNITTING
To see how easy it is check out this Mosaic Blanket video tutorial, below!
Pattern
With Color A, cast on 123 (159, 195) stitches. We used a basic Long Tail Cast On.
NOTE: To help keep track of the stitch pattern, you may want to place a stitch marker (or piece of scrap yarn) between each 12-stitch repeat on the next row.
Set-Up Row (wrong side): With Color A, knit.
Work Mosaic Pattern either from Written Instructions or Chart, both below.
MOSAIC PATTERN: WRITTEN INSTRUCTIONS
Row 1 (right side): With Color B, k1, *slip 1 (see Notes), k11, repeat from * to last 2 stitches, slip 1, k1.
Row 2 and all following wrong side rows: Knit the same stitches you knit on the previous row, with the same color; and slip all of the same slipped stitches, with the yarn in front (see Notes).
Row 3: With Color A, k4, *[slip 1, k1] 3 times, slip 1, k5, repeat from * to last 11 stitches, [slip 1, k1] 3 times, slip 1, k4.
Row 5: With Color B, k3, *slip 1, k7, slip 1, k3, repeat from * to end of row.
Row 7: With Color A, k2, *slip 1, k3, slip 1, k1, repeat from * to last stitch, k1.
Row 9: With Color B, k5, *slip 1, k3, slip 1, k7, repeat from * to last 10 stitches, slip 1, k3, slip 1, k5.
Row 11: With Color A, k2, *slip 1, k1, slip 1, k5, [slip 1, k1] 2 times, repeat from * to last stitch, k1.
Row 13: With Color B, k7, *slip 1, k11, repeat from * to last 8 stitches, slip 1, k7.
Rows 15 and 16: With Color A, repeat Rows 11 and 12.
Rows 17 and 18: With Color B, repeat Rows 9 and 10.
Rows 19 and 20: With Color A, repeat Rows 7 and 8.
Rows 21 and 22: With Color B, repeat Rows 5 and 6.
Rows 23 and 24: With Color A, repeat Rows 3 and 4.
Repeat Rows 1–24 thirteen (17, 20) more times.
Repeat Rows 1–14 one more time.
Continue to Finishing section, below.
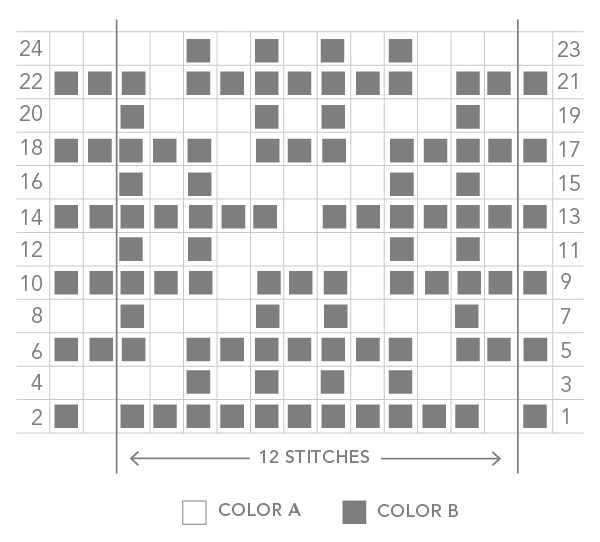
MOSAIC PATTERN: CHART
Instead of following the written text above, you may find it easier to follow this chart instead. A few notes on how to follow mosaic charts …
Starting in the bottom right corner of the Chart below, each horizontal row represents two rows of knitting. Work right-side (odd number) rows from right to left and wrong-side (even number) rows from left to right.
For rows that begin and end with a Color B (gray) square, all Color B stitches are knitted and all Color A stitches are slipped. For rows that begin and end with a Color A (white) square, all Color A stitches are knitted and all Color B stitches are slipped.
Work Rows 1–24 of the Chart 14 (18, 21) times; then, repeat Rows 1–14 one more time.
FINISHING
Cut Color B.
Next Row (right side): With Color A, knit 1 row.
Next Row (wrong side): With Color A, bind off all stitches knitwise.
Weave in the ends, gently wet block and enjoy!


Without border doesn’t the
edge curl?
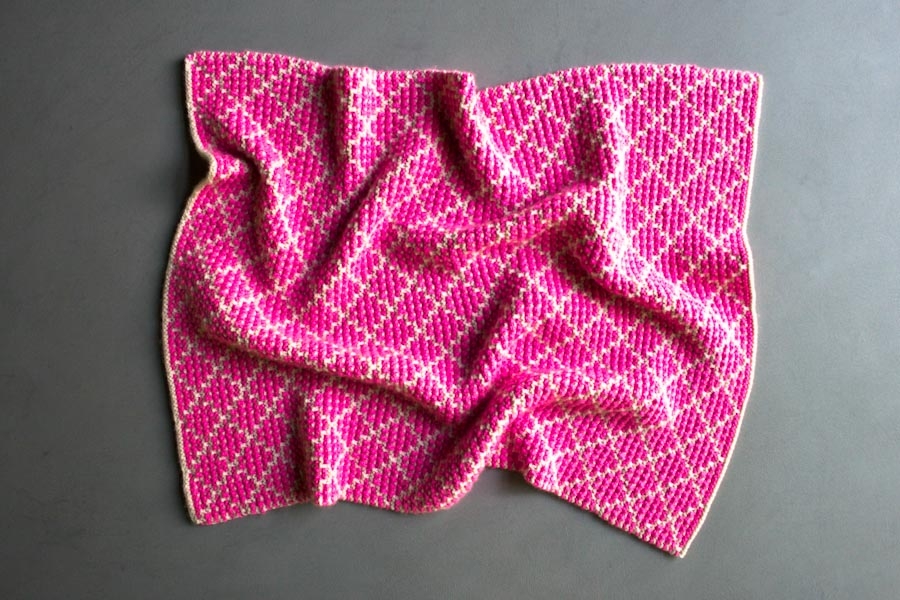
Hi Kathy! Great question! Garter stitch (where every row is knitted) is wonderful in that it produces a fabric that tends to lay perfectly flat. Because the blanket is worked in a slip-stitch garter pattern, there is no curling to worry about, and no need to include a stabilizing border. Thanks for writing! Kristy
Great video! So easy to see and now I’m going to try this technique!
Thanks so much, Melissa!
YES! The video is GREAT and very helpful. Can’t wait to start!
*Swoons and falls over*
*Revives long enough to check yarn stash*
*Realizes must order more yarn to make blanket larger*
*Contemplates telling husband about ordering more yarn*
*Lol, no*
So I’m thinking that this blanket would be amazingly amazing if you used several shades of one color to actually give it the look of mosaic tile….gotta work out this idea so that I don’t have to math it out later. This blanket just made it to the top of my “next project” list!
Beautiful pattern! I’m making a couple of swatches to test colors and I’m a bit confused about the instructions for the end of the blanket. By ending on row 13 your color A seems to be on the wrong end of the needles. Should you slide the work across to do the final row and then bind off?
Hi Kerry! You’re absolutely right! You will work back on Row 13, ending on Row 14 & ready to bind off. Thanks a lot for writing!
Kristy
This is great! I’m getting the hang of it 🙂 The video made it easy to get started. Thank you!
Thanks a lot, Liz! And Kathy, so glad the video helped!
Kristy
Does this technique create a double thickness for the blanket?
Hi Barb,
The pattern creates a fabric that is very similar in feel to garter stitch. And though it has substance, the thickness is not doubled in any way. Hope this helps — thanks for writing!
Kristy
GORGEOUS PATTERN! Thank you for sharing and especially for taking the time to make the video. It was very helpful. Do you have any more-economical suggestions for the alpaca yarn used?
Thanks again!
Hi Robyn! Thanks a lot for writing! You could substitute Alpaca Pure with Worsted Twist, which also comes in lovely shades, including Super Pink, the gauges should be quite close in pattern. If you have any further questions as you try substituting, please let us know! Would be happy to try to help. Thanks again, Kristy
Wonderful video to help me get motivated.
I love Barbara Walker and didn’t think to use her Mosaic for a blanket! Duh!
I have to try this one! I love the colors pink/white & blue/white.
Will make very nice baby gifts.
The video is great. She doesn’t move to fast for my slow mind. 🙂
I love this blanket! Could it be made in a non-wool yarn for a baby who may be allergic to wool?
Hi Jean,
Thanks, a lot! It would be lovely to make the blanket in many types of non-wool yarn too. One suggestion that comes to mind would be Blue Sky’s Dyed Cotton: https://www.purlsoho.com/purl/products/item/721-Blue-Sky-Dyed-Cotton. Colors 80 Bone and 617 Lotus could be particularly striking. Good luck and thanks for writing! Kristy
Gorgeous! I’d love to make this blanket, crib-sized, in Blue Sky cotton. Do I use the same needle size and buy the same number of skeins?
Hi Lisa, thanks for your comment and for writing! The blanket would be lovely in the Blue Sky Dyed cotton and you should be able to use a size 8 needle and get close to gauge. If (after you’ve worked up a swatch in the pattern) you would like to run numbers just to make sure you’re casting on the right amount of stitches, please do so! For the Crib size, 7 skeins of each color (of the Blue Sky Dyed Cotton) would be recommended. Thanks again, Kristy
Fabulous! On second thought, though, I think I’ll scale back to the baby size … how many skeins of the Blue Sky will I need? And can I get away with a 24″ circular?
Hi Lisa! A 24″ circular would work well! Each skein of the Blue Sky Dyed Cotton is approximately 150 yards, and so you’ll need about 5 of each color for the Baby size, with the likelihood of having a small amount of each color left over at the end. I just rather recommend 5 skeins each (instead of 4) than have you run short! Good luck and thanks for writing!
Thanks — just ordered my yarn and can’t wait. Your personal advice can’t be beat 🙂
Wonderful! Thanks so much, Lisa! Good luck with the blanket!
This design looks like something Kristy McGown would design. Lovely.
Thank you so much, Meg!
So excited to start this! I am loving the pattern, skipping all other projects and starting with this one.
Beautiful pattern. Can you specify the rough dimensions of the blankets at their different sizes (CO 123, 159, and 195)? I’d love to be able to get a sense of the three sizes.
I learned how to knit when I was 10 and have made 2 blankets this past winter. I think I’ve just found my next project. 🙂
I made the flying geese throw/crib blanket recently — in Remix because I wanted it to be entirely washable, and it came out really nice. Is there anywhere I can send you a picture? Anyway. That makes me want to do this one. Is there a gauge width to get the knack with, by any chance?
This blanket looks amazing. But the last worsted weight baby blanket took me almost a year!! Would a chunkier yarn turn out as striking?
Hi Taylor,
Blankets sure can be a labor of love, but the great thing about the mosaic technique is that it works well with a variety of yarn types. Chunky yarns would also work beautifully. Good luck!
Kristy
This blanket looks gorgeous and I’m really keen to try it.
I’m just wondering if you can carry the yarn up the sides rather than cutting off and starting with the new colour, thus leaving many many many ends to weave in? (Apologies if this is already explained and I missed it!)
Thanks 🙂
Hi Julia,
The yarn is absolutely carried up the sides of your work — another benefit of mosaic knitting. The brief video clip posted with the pattern provides an illustration of how this is done. Thanks for your question!
Kristy
if i were to use just one color, would i still get that great texture? or would it end up looking just like a regular garter stitch? thanks!
Hi Amber! It’s an interesting question! The slip stitches would definitely help to keep the fabric from looking entirely like garter stitch, and the texture itself wouldn’t change. It’s intriguing for sure! Thanks for writing! Kristy
Really lovely mosaic blanket and great DIY project! Thanks for sharing!
Prudence
http://www.prudencepetitestyle.com
Beautiful blanket. Can you tell me approximate finished size of the throw? thanks!
Hi Anna and Jane,
The sample shown is in the Baby size, approximately 26 x 31 inches. The Crib size is 33 1/2 x 40 inches and the Throw is 41 x 46 1/2. Hope this helps! Thanks for writing in!
Kristy
this is perfect: perfect pattern – perfect timing!
thanks a million – carina.
After reading the pattern I couldn’t see where it tells how much yarn is required of each color and or the different sizes. Could you please point that out in the pattern for me? Thank you
Hi Jennie!
The yarn requirements are listed under Materials. They list the Baby size first, followed by Crib and Throw in parenthesis, Color A: 4 (6, 7) skeins of Purl Soho’s Worsted Twist, and Color B: 6 (8, 10) skeins of Purl Soho’s Alpaca Pure.
Has anyone looked at knitting the blanket in reverse colors? Where the darker color would be yarn A and the lighter color yarn B?
Hi Karen,
The reverse colors look great too! I would encourage you to experiment and see which combination you like best!
Kristy
This is a very pretty pattern. But how do you know which stitch is slipped or knitted on the previous row?
Hi Kaitlyn,
Thanks for writing! The slipped stitches from the previous rows will be the opposite color from your working yarn. The slipped stitches will also be smooth at the base of the stitch, whereas all other stitches will look like purl stitches. I hope this helps. Good luck!
Kristy
Greetings
This is one of the most beautiful blankets I have ever seen.
Thank you for sharing!
Everything else is on the back burner!
Amazing! Many thanks for sharing!
Thanks, Mimi! Happy knitting!
I’m so excited about this pattern! I’d love to try it as a cotton dish towel first- any idea how many stitches I’d cast on for that? Did I understand the chart correctly that this pattern is in increments of 12 stitches?
Hi Alicia! That’s a great idea! You would just need to cast on a multiple of 12 sts plus 3. Thanks for your comment!
have often used the slip stitch technique – think this would look great with one variegated yarn (instead of the pink) and one plain colour (cream or grey) – would add to the mosaic feel
Hi,
Am I right in assuming you make a whole bunch of squares and then stitch together? Also, do you have to have circular knitting needles or could you use standard needles if that all you have?
Ta!
Hi Jo!
You’ll cast on enough stitches to create the width of the blanket and then just knit it straight as one piece, with no squares to sew together. Because the number of stitches you are casting on will be more than straight needles can accommodate, you will need to use a circular needle in order to work this particular pattern. Please let us know if you have any additional questions! Thanks for writing! Kristy
I would like to knit a larger blnket.. for my 3 year old son.
can I?
which one i use?
Hi Orly,
The Crib size might be a good choice if you’d like the blanket to be a bit bigger. It would be about 33 1/2 inches x 40 inches. Kristy
This looks like it turns out to be thick and tightly knit – is it more suitable as a cold weather baby blanket? In cotton would it still be too heavy for a summer baby?
Hi Brittany,
The knit of the blanket is not as thick and tight as it may seem! The weight and feel is much like garter stitch, and although cotton might make it a bit heavier overall, no more so than your average cotton knit blanket. Thanks a lot for writing! Kristy
What a stunning blanket and I love you video- so helpful! This is a really pretty design – thanks so much for sharing x
http://crafternooncabaretclub.com
Hi!! thank you so much for the pattern! I love the look of your blanket! But i have a slight confusion with how to change the pattern. I would like to try to make an adult throw blanket, but how do i figure the cast on stitches with the 12 + 3 ? Should i find out how long and wide i would like the throw blanket to be? What should be times with 12? Sorry for being a hassle, i’m still a newbie. 🙂
Hi Ivane-joy,
It’s a great question! A good place to start in figuring it out is to look at the stitch gauge for the blanket, which is 19 stitches = 4″, or 4.75 = 1″ If you then have an idea of how wide you’d like the blanket to be, you can start by multiplying that number by the stitch gauge. Let’s say you want to make a blanket that’s 50 inches wide. You can start by multiplying 50″ x 4.75 (237.5) and round up to 238. You know then that you’ll need about 238 stitches in order to get the width you’d like.
The next step is to get that number (238) to work with the stitch pattern. In order to work the stitch pattern, your cast on number of stitches needs to be a multiple of “12 + 3.” This just means that the pattern itself repeats over 12 stitches with three stitches that bumper on either side of the repeats — in this case, one stitch on the starting right and two on the left. You can start by dividing 238 by 12, and you’ll see that it’s almost divisible 20 times. So if you multiply 12 times 20 you’ll get 240. You can then add the 3 additional stitches in order to make the stitch pattern work, which will give you a cast on of 243 (12 x 20 +3), close enough to your needed width of 238. You’ll cast on 243 and knit to the length you’d like, just making sure to end on Row 13 — Row 13 is just a nice cut off point that helps you have the top of the motif mirror the bottom, but you can end wherever you like. Let us know if this all makes sense, and please feel free to send along any additional calculations or questions you may have as you figure out the size you’d like to make! Kristy
Thank you so much Kristina!! Your explanation on the math made it really easy to understand. I’m planning to make a 60″ wide blanket. When I get to finish it I’ll try to post a picture. Wish me luck! Thanks again!
Wonderful, Ivane-joy — good luck!
So so glad you asked this because I was wondering the same thing!! I love this pattern and am looking to knit one to that’s more befitting a queen size bed (nowhere near that baby blanket knitting point in my life yet!)
I’m currently working the math out to be cast on 291 stitches, using a 60″ dimension, does that look right? I’m thinking that I’ll use a slate grey base and do the mosaic in an electric limey-yellow.
Fingers crossed this project is successful!
Hi Laura! 291 stitches for a 60″ dimension, ~4.75 stitches to the inch, is great!! And the colors you’ve chosen sound beautiful — best of luck!
Kristy
Great post!
xx
Mademoiselle Coconath
http://mllecoconath.com
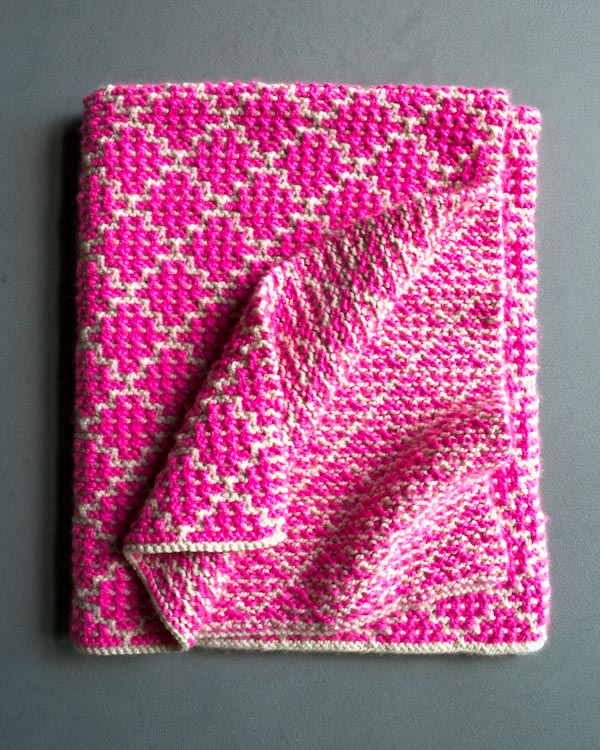
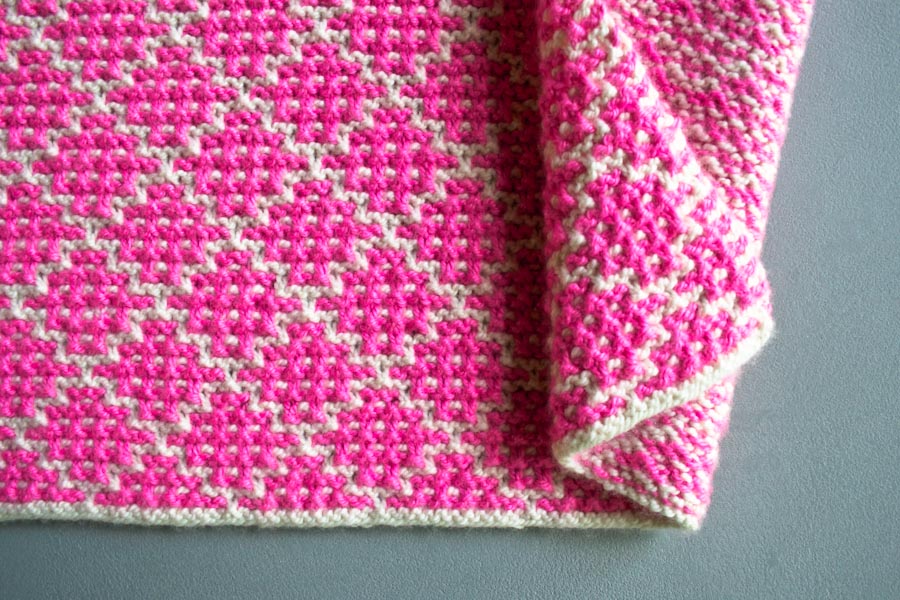
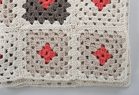
Lovely blanket! I’m wondering what the reverse side looks like?
Thanks
Hi Drea! Thanks!
If you go to the top of the page for the blanket pattern, you should be able to scroll over and see multiple images, one of which includes a pretty good shot of the reverse side — (let us know if you can’t see it!) — it would be the third photo in the line up above as you scroll to the right. The slip and knit stitches help form a rather clean looking reverse side — and although it’s not reversible, the result looks tidy and purposeful. Thanks for writing! Kristy
I love this pattern, but… why is it so hard to print it out? In order to see everything, I had to put it on Landscape. Then when I used your Print button, the printer dialog box happily informed me it was going to print 42 pages. What? I don’t need all of the comments, just the pattern. Plus the menu on the first page overprinted on every page; and the chart was cut in half. Please, can’t you find a way to offer your patterns as a PDF file so all of this won’t happen? I enjoy your patterns but this turns me away.
Hi Sue!
Very sorry that you’ve been having problems printing out the pattern. I know how frustrating that can be! Let’s try to fix it! If you go to the pattern page for the blanket, you should see, on the upper righthand side, a small icon of a printer and next to it, a link that says “Print.” If you click on that, you should be taken to another page where in the upper heading, there are three options given, “Print,” “PDF” and “Email.” (If you are not able to see these options, please try using another browser, as this can often help). If you choose “PDF,” you’ll be given a link to download the file. If you then download the file, you’ll be able to choose to print it out. You can go to “File” and select “Print.” (If you select “Email” you’ll be able to email the pattern to yourself and print the attachment out that way). The pattern is a total of 10 pages, and yes, not all of these are directions (the pages include the introduction and photos). You can choose to print only pages 4-10 and not include the extra material. Please let us know if this works and if not, we can go from there and work until we figure it out. Again, sorry that you are having this trouble and thanks for writing! Kristy
Hi Kristy,
Your blanket is so lovely!
I have scrolled through the comments and have seen you say that the material created knits up like regular garter stitch-my question for you is if you think the material would be stretchy enough for the leg of a sock (in a sock weight yarn, of course!).
My father is looking for argyle socks, and this might be the perfect alternative! Thanks!
Hi Kat,
The pattern would work for the leg of a sock for sure, and it just might be useful to make sure that you include a ribbed cuff of some sort, just to make sure that it stays up. Good luck! Thanks for writing!
Kristy
Beautiful pattern! It’s being awhile since I knitted, I’ll save this pattern so when I am ready to get back to my knitting hobby, I’ll use this. This pattern will make a beautiful baby blanket
Thank you for this pattern! I’ve always wanted to learn mosaic knitting. It is so beautiful. I had some light blue and white on hand, but decided the contrast would be stronger if I made color A blue, and color B white. It’s looking fantastic!! Also, I’ve been practicing lever knitting, so this is a perfect pattern to get faster with it. I watched the video first, then moved onto the written pattern, and I am glad I did. Your video has just enough info to give me the tips I needed, and was very clear. Well done!
Hi Tara! That’s great to hear! It’s a lot of fun to experiment with different colors and I’m sure the blue and white looks beautiful! The lever knitting also sounds really intriguing! It’s always so fun to learn new things! Thanks a lot for writing!
Kristy
I love how simple this pattern is to follow!! I am currently working on this and it looks amazing! Love you loads Purl Bee!!
I love this technique and thanks for the video! Maybe you guys can include more videos with different techniques and patterns.
How long did the making of this blanket take? I’m kind of weary of taking on another baby blanket because the last blanket I took on was your Easy Baby blanket and I am STILL working on it. It was supposed to be a baby shower present…. And now that baby is 2 months old! Lol. My nephew is having twins. Is it possible to knit two of these by September if I get started now?
Hi Hannah,
Glad to hear that the video has been helpful! Blankets sure can be labors of love! Congratulations to your nephew and that’s great that you’ll be making blankets for the twins! I’m not a particularly fast knitter and everyone has a different pace, but I can tell you that the sample blanket took me about an hour an inch. The nice thing is that it’s a fun knit and witnessing the emergence of the pattern is rewarding somehow and helps maintain interest. Best of luck with it and thanks for writing! Kristy
I am wondering if when you slip the stitch – does it matter what color it is? In other words – does the color change between A and B or should all the slipped stitches be the same color? I am starting row 9 and I don’t see the pattern emerging so am wondering if I am doing something wrong. I did put stitch markers every 12 stitch s but that only seemed to line up on the first few rows. The video is great – and I am not sure how I could go wrong – but perhaps I have?
Any advice would be appreciated.
Hi Tracie, thanks for writing! When you work the first row of a new color, you will always be slipping stitches that are the opposite of that color (they will be from the previous row and will be the opposite color). You will work back (all wrong side rows) using the same color — each color is worked for two rows and then you switch. So for example, you’ll work two rows in Color B, followed by two rows in Color A, etc. The stitch markers are handy to place in your work after each repeat, which are the stitches indicated in the pattern between the asterisks, “* — *” and will always be a total of 12 stitches. A good way to set up your markers at the beginning is to skip the first stitch, place your first marker, count 12, place your second marker and repeat this (12 sts at a time) all the way to the end, to just before the last two stitches where you will place your last marker. You will see as you work the rows that the stitches between the markers are all worked in the same sequence and sometimes it’s just a bit easier when working a large number of stitches in pattern to keep track of them this way. Let us know if this makes sense or if it’s still unclear — would be glad to answer any further questions you may have. Good luck, Kristy
I believe that it should read “Repeat Rows 1-14 once more” before knitting one last row and binding off. I decided to trust the directions and ended up ripping the last row out and adding one more Row 14. That way, you can also carry the color up. Is this a misprint or am I missing something?
Hi Sarah! Thanks for writing! You’re exactly right! We’ve fixed the typo and appreciate your writing in!
Kristy
I’m confused about repeating rows 1-14 one more time at the end. In the photos it looks like the pattern is repeated so that the diamond on the edge is “complete” at both the bottom and top. Repeating rows 1-14 again would only create one more half pattern. It seems that in the sample only row 1 is repeated again at the end before binding off.
Hi Anne! Thanks for writing! Repeating Rows 1-14 one more time at the end will allow you to have the pattern at the end of the blanket mirror what it looks like at the start of it. I know it can seem a bit confusing, but that was how the sample was worked. I hope this helps and send my best,
Kristy
Is it possible that there is a mistake in the written pattern? I seem to have every other row look differently than the pattern. So far it looks like the mosaic pattern row 1-14 and then when I go from row 15-24 it looks like a plus sign. It has been in consistent and I’m working on my third round of the pattern. Just noticed this! I’m confused….does this make sense?
Hi Jenna,
I’m sorry that you’ve been having trouble! When you worked Rows 1-14 did everything look okay? When you start Row 15, what you are doing is working the mirrored image of the rows that came before it and that you’ve just worked, so after Rows 1-14, you will repeat Rows 11 & 12 (just as you worked them before) followed by Rows 9 & 10, 7 & 8, etc. Does this make sense? On all wrong side rows, you will be slipping your stitches with your working yarn held in front, and will be working the stitches in the same sequence as the even numbered Row that came before it. I’m hoping that this helps clear up any confusion, but please let us know if you are still getting stuck or have any further questions. Thanks, Kristy
Never mind!! I found my mistake! I was skipping row 1 every round! Ugh!! How do I fix this without ripping out almost 60 rows?!?
Hi Jenna,
It’s rough and we’ve all been there, but the easiest and fastest way to fix the problem is to undo your work and reknit those rows. I’m really sorry!
Kristy
I can’t wait to knit this blanket for a little girl due in January. Her nursery will be grey and white with accents of mint and coral. I was looking at using the blue sky alpaca, do you have any suggestions for fun colors that will go in her nursery.
Hi Taylor! How exciting! For the Blue Sky, were you thinking of their Dyed Cotton? The accents of mint and coral against a backdrop of grey and white for the nursery sounds beautiful, and lends itself to a lot of great color combinations for the blanket! Looking at the palette, (https://www.purlsoho.com/purl/products/item/721-Blue-Sky-Dyed-Cotton) the Aloe/Tulip pairing is very pretty (the mint w the white), Graphite/Drift is also very nice and will likely give you more of a graphic quality. I found that working with colors that have a high contrast is a bit easier when working the mosaic pattern and that colors that are close in tone. (Lotus/Drift would be similar to the colors we chose for our sample!) I’m send good luck and thanks for writing in! Kristy
Do you recommend using DK weight for this pattern? Such as the Blue Sky Skinny Cotton? If so, how many cast on for Baby size. Thanks!
Hi Kitty!
I think that the mosaic pattern would look very pretty in any yarn weight, and that the Skinny Cotton would definitely work! Because you’re using a different yarn than the pattern calls for, your best bet to determine what your cast on # should be (if you want to have the same final measurements as the pattern 26″ x 31″) will be to work a gauge swatch of the pattern in the Skinny Cotton and see how many stitches you are getting per inch. You will then just need to multiply the number of stitches you are getting per inch by 26. Since the mosaic stitch pattern is a multiple of 12 plus 3, you’ll just adjust whatever number you calculated. For example, if you’re getting 6 stitches per inch, you will multiply that by 26 = 156. Then subtract 3 and divide by 12 which gives you 12.75, which you will round up to 13. 12 x 13 = 157, which will be as close as you’ll be able to get to 156, and then just add 3 = 160. So your cast on would be 160. Does this make sense? Please feel free to write and let us know what your stitch gauge is with the yarn you substitute if you have any further questions! Good luck and thanks for writing in! Kristy
hello! Just finished repeating the sequence 14 times. I noticed on the directions at the top it says to knit rows 1-14 once more, then with color A knit across and bind off. For those of us that used the chart, below the chart it says knit rows 1-13 once more, with color a knot across and bindoff. Think yall fixed the top part but not the section for those of us that used the chart directions.
Hi Michelle,
You’re absolutely right! Thanks for letting us know! I just corrected the typo!
Kristy
Hello,
I’m a beginner knitter and I had a question about the row numbering. Some rows aren’t listed does that mean we copy the previous row or is this just a way of numbering patterns? Thanks so much!
Hello Vanessa!
Every even numbered row is the same as Row #2. That’s what it means in the instructions that read, “Row 2 and all following wrong side rows: Knit the same stitches you knit on the previous row, with the same color; and slip all of the same slipped stitches, with the yarn in front.”
Good eye though! Each odd numbered row is written out for you throughout the pattern. Happy knitting! -Alyson
Hi Vanessa!
Great question! The way that rows are numbered in mosaic knitting charts is a bit unique in that each horizontal row represents two rows of knitting. So for Row 1 you’ll be working from right to left (on the right side of your work), and the number 1 will be listed on the right to show this. For Row 2 you will be working the same exact sequence of stitches depicted in the chart that you worked for Row 1, except you will be working from left to right, and so the number 2 will be listed on the left. You are working the same sequence of stitches two rows at a time, the only difference is that when you are working a wrong side row (Row 2 for example) you will be slipping your stitches with your working yarn held in front instead of in back. On all right side rows, you will slip your stitches with your working yarn held in back. Let me know if this makes sense! I know it can be a bit confusing to start! Kristy
This is a stunning pattern. Loved the video. Wondering if you think it would be possible to make a scarf using this pattern?
Thanks so much
Hello Margaret!
We’re so happy you like this stitch pattern! It would be awesome as a scarf! I would simply use the number of stitches per inch you are yielding, multiply it by the number of inches wide you want your scarf to be, and then cast on! Keep in mind that to maintain the pattern you should cast on a multiple of 12 plus 3 stitches. For example, 12 x 4 = 48. 48 + 3 = 51 cast-on stitches.
Best of luck! -Alyson
Thank you for sharing this pattern and techniques. I knitted it as a dish scrubbie by using black & green chunky acrylic yarns and it came out wonderful 🙂 This kind of technique (slip and garter stc) was new to me since I am a beginner, so I enjoyed it very much. I bound off using Elizabeth Zimmermann’s sewn bind off for the symmetrically finished edge and it looks just perfect. Thank you so much! X
Hi Sunny!
That’s wonderful to hear that you enjoyed working with the stitch and that the scrubbie turned out well! (Great idea!) Thanks for writing in!
Kristy
Good morning, I’m considering starting the mosaic blanket in the baby size. Are my calculations correct and this size requires approx. 600 yards of each color? I did see that someone asked if it was double thickness – 1200 yards for a baby blanket seems unusually high. Thanks for the clarification.
Hi Christie,
For the Baby size, you’ll need approximately 650 yards of each color. The blanket isn’t double in thickness, but it is dense like garter stitch. I hope this helps and please let us know if you have any further questions! Thanks for writing!
Kristy