

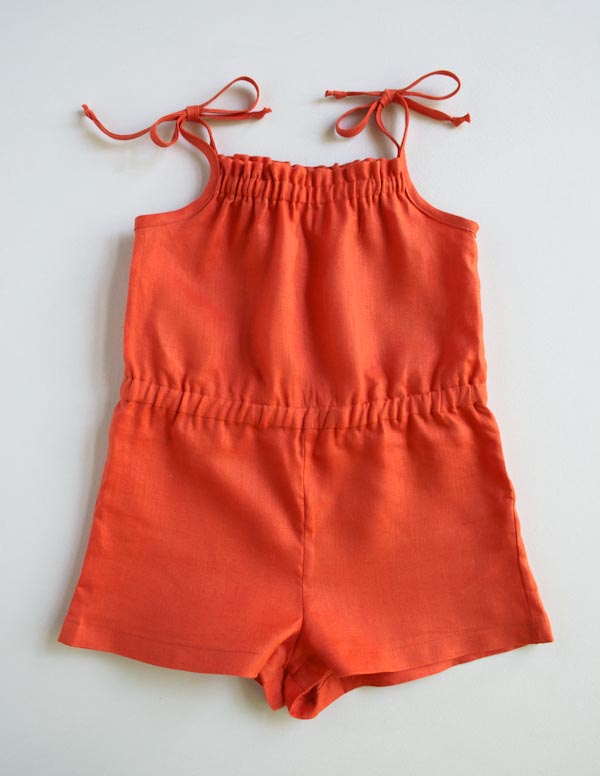


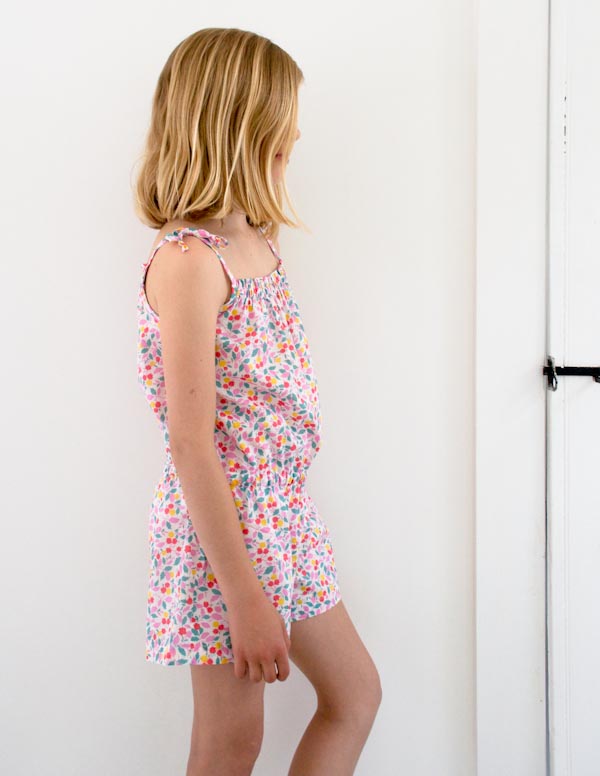
Summer Romper for Kids
When I dress my kids this summer, I plan to adopt a “one and done” philosophy. Rather than layering them up in t-shirts and shorts and tanks, I want to reach for one garment and go… And this Summer Romper for Kids is the garment I am going to grab!

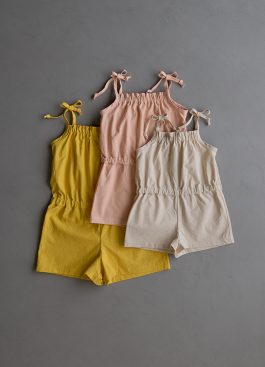
These Rompers are simple to make, fun to wear and so perfectly chic, I can’t imagine wanting to add anything else to the mix. Plus, the free pattern is available in seven sizes, from 2 to 11 years, and features adjustable straps and an elastic waist for a forgiving fit.

I think I may have found the solution to the morning get-dressed battle, but I may have created a new bedtime take-it-off fight! Fine, sleep in it, too. After all, this is the summer of the Romper!
-Corinne

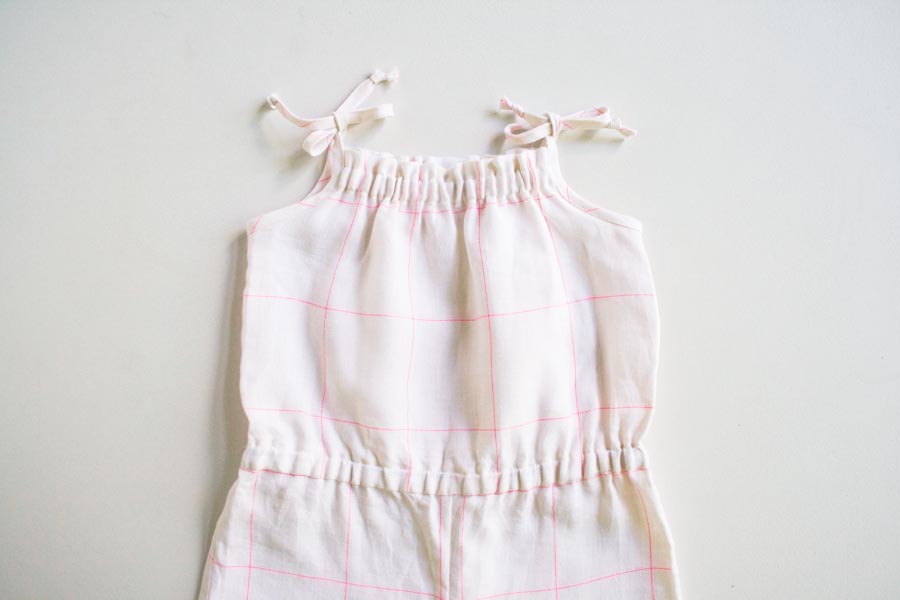
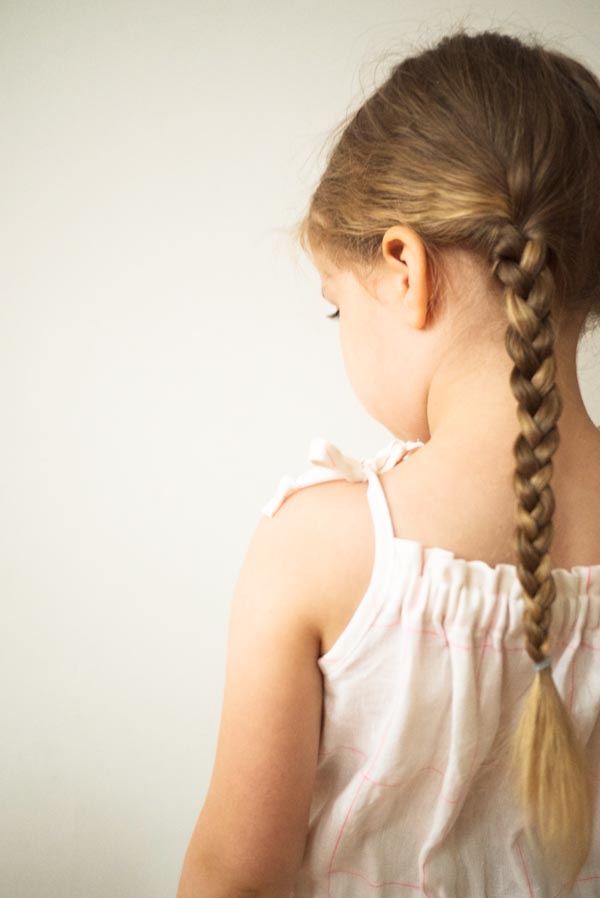
Update: Spectrum Cotton
May 14, 2021

A classic Purl Soho pattern, this version of our Summer Romper is in our Spectrum Cotton. Garment-dyed for softness and beauty, our Spectrum Cotton has the feeling of that shirt you wear everyday (or wish you could!). To view the full story and see even more adorable images, click here!
Materials
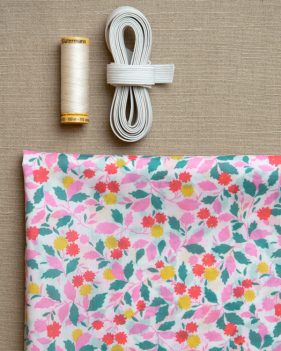
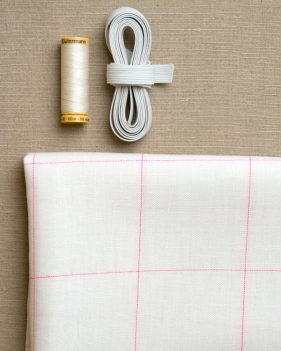
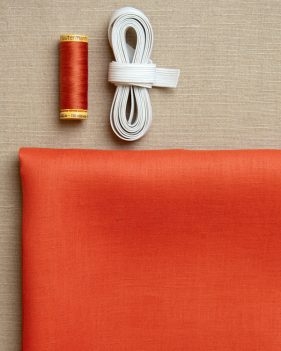
- ¾ (¾, ¾, 1, 1, 1, 1) yard of light to medium weight fabric. We used, from left to right…
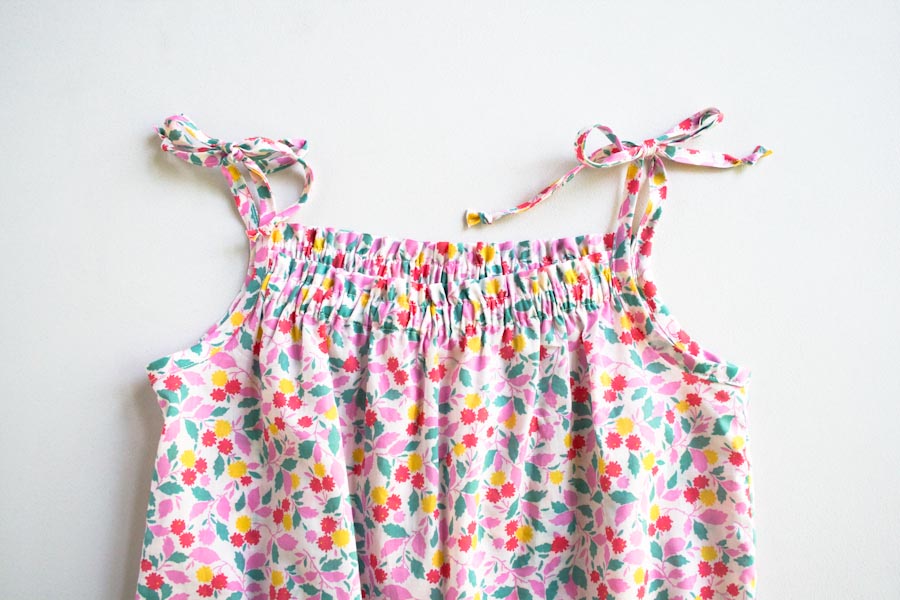
- Liberty of London’s Tana Lawn Classics, Pink Andrea
- Purl Soho’s Handkerchief Linen, Persimmon
- Purl Soho’s Linen Grid, Super Pink
- Please note: We have sold every last bit of our limited-release Linen Grid. As substitutes, we encourage you try our Daily Linen, Handkerchief Linen or Watercolor Linen, all suitable in weight and in a stunning palette of colors!
- 1 (2, 2, 2, 2, 2, 2) yard of ½-inch Braided Elastic, White
- A 110-yard spool of Gutermann’s Cotton Sewing Thread in a color to match the fabric. We used, from left to right, color 1040, 1040 and 4850.
- An 18mm Bias Tape Maker
- A small scrap of ribbon, approximately 2 ½ inches long
- A safety pin
- A free Summer Romper for Kids template, printed, prepared and cut out in the appropriate size (NOTE: The template linked here is our most updated version. For the earlier version, please contact us at customerservice@purlsoho.com)
Sizes
To fit ages 2 (3, 4-5, 6-7, 8-9, 10, 11)
Finished Waist Sizes: 22 (23, 23 ½, 25, 26, 27, 27 ½) inches in circumference, unstretched.
Notes
- To print the PDF template, be sure to first download the pattern and then print it. This means rather than simply clicking the link and opening the PDF in a browser window, you should click on the pattern link using the “right click” or “control click” option on your mouse or keyboard. This will give you the option to “Download the linked file.” Once the file is downloaded, it should print like a charm!
- Prewash all fabric before starting.
- Use ¼-inch seam allowances, unless otherwise noted.
- Backstitch at the beginning and end of all seams.
- For the sake of clarity our instructional photos use Robert Kaufman’s Botanics + Architextures in Tangerine Hatches, a fabric with a clear right and wrong side. When you are working with a fabric without a clear right or wrong side, choose either side as the right side for the first seam and follow this precedent for all subsequent steps.
Pattern
Cut
From the Fabric
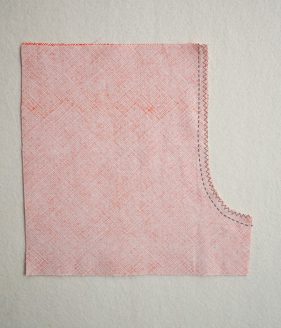
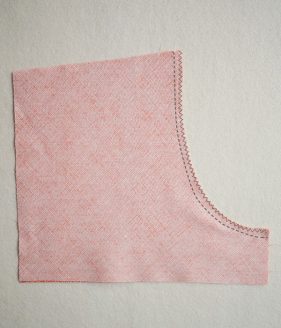
Use the prepared pattern pieces to pin and cut …
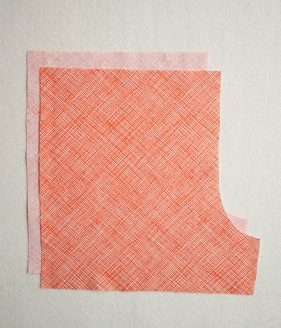
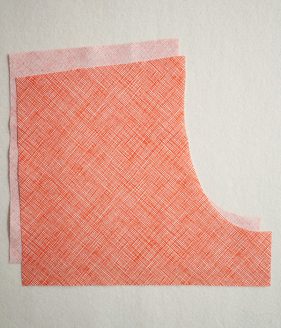
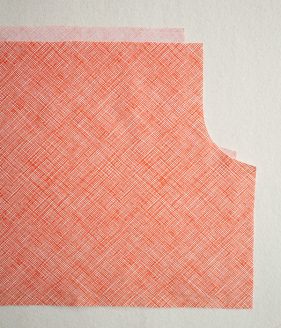
- Two Bottom Front pieces
- Two Bottom Back pieces
- Two Top pieces, on the fold
The two Bottom Front pieces and two Bottom Back pieces should be mirror images of each other. To be sure to cut them with the proper orientation, cut one with the right side of the fabric facing up and one with the wrong side of the fabric facing up, or you can fold the fabric and cut through both layers at once.

Also cut …
One 1 5/8-inch by 26 ½ (27 ½, 29 ½, 31 ½, 33 ½, 35 ½, 37 ½)-inch strip for the Waistband
Two 1 5/8 x 30-inch strips, cut on the bias, for the Straps
You may need to piece the strips to get the appropriate length. For detailed instructions on how to piece binding strips, please visit our Making Single Fold Bias Tape Binding Tutorial.
From the Elastic
- Cut two 6 (6 ¼, 6 ½, 7 ¼, 8 ¼, 8 ¾, 9)–inch pieces for the Neckline Elastic.
- Cut one 22 ½ (23 ½, 24, 25 ½, 26 ½, 27 ½, 28)–inch pieces for the Waist Elastic.
Prepare the Waistband and Straps

Following the manufacturer’s instructions, use the 18mm Bias Tape Maker to press the Waistband and Strap strips into single fold binding.
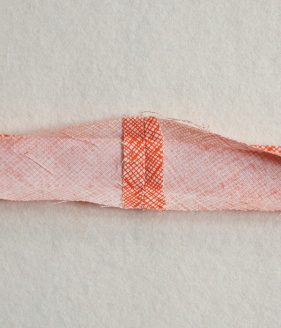

Open up the folds at the two short ends of the Waistband piece. With rights sides together, stack the two ends on top of each other and pin in place. Sew along the short, pinned edge to create a Waistband loop.
Press the seam open and refold the creases.
Piece the Bottom
With right sides facing, stack the two Bottom Front pieces on top of each other. Pin along the concave edge of the inseam.
Sew along the pinned edge.
Sew along the seam allowance with a zigzag stitch.
Press the seam to one side.
Repeat with the two Bottom Back pieces. Place a pin in the Bottom Back to help distinguish between the Bottom Front and Back.

With right sides facing, match up the short crotch ends of the Bottom Front and Back along the raw edge, making sure that the center seams line up. Pin in place and sew along the pinned edge.
Sew along the seam allowance with a zigzag stitch.
Press the seam to one side.

Lay the Bottom pieces so that the right sides of the Front and Back are together and their straight side seams align. Pin together along the raw edges of the side seams. Sew along the pinned edges.
Sew along the seam allowance with a zigzag stitch. Press the seam to one side. This is now the Bottom.
Hem the Bottom

Fold the bottom raw edge of one leg opening ¼ inch towards the wrong side and press. Now, fold the edge ¾ inch toward the wrong side and press again. Pin in place. Sew the hem down with an edgestitch.
Repeat for the bottom raw edge of the other leg opening.
Piece the Top

With right sides facing, stack the two Top pieces. Pin along the two side seams. Sew along the pinned edges.
Sew along the seam allowances with a zigzag stitch.
Press the seams to one side. This is now the Top.
Sew the Neckline Channel

Fold the top edge of one side of the Top ¾ inch towards the wrong side and press. Fold this edge 1 1/8 inch toward the wrong side and press again. Pin in place.
Repeat for the top edge on the other side of the Top.
Sew one top fold down with an edgestitch. Sew the fold again, now with a ½-inch seam allowance. (There will be a little over ½ inch between the two seam lines.)

Repeat for the other top edge, but this time, first fold the small ribbon scrap in half and tuck it under the unsewn fold, at the approximate center. Pin it in place, and then sew the edgestitch, followed by the ½-inch seam allowance. (The ribbon is to mark the back of the Romper. Since the front and back will look very similar but will fit differently, this little ribbon will come in handy!)
Piece the Bottom and Top
Turn the Bottom so that its wrong side is facing out.

Turn the Top so that its right side is facing out. Slip the Top inside the Bottom, right sides together. Make sure the back of the Top faces the back of the Bottom. Align the top raw edge of the Bottom with the bottom raw edge of the Top and match up the side seams. Pin in place along the raw edges.

Next, open up one fold of the prepared Waistband piece. With the right side of the Waistband facing the wrong side of the Bottom, line up its open raw edge with the pinned edges of the Top and Bottom, making sure to align the Waistband seam with one side seam of the Bottom. Pin all three layers together along the raw edges.
Sew the three layers together along the pinned edge with a ¼-inch seam allowance, using the crease in the Waistband as a guide.

Unfold the Romper so the Top is no longer tucked inside the Bottom and the wrong side is facing out. Press the Top and Waistband up, along the seam line.
Edgestitch the top folded edge of the Waistband to the Top, leaving a 1-inch gap in the seam.

Attach the safety pin to one end of the Waist Elastic. Insert this end into the gap. Pull the pin through the Waistband, exiting out the other side. Make sure to not pull the Elastic’s other end into the channel.

Checking that the Elastic isn’t twisted, overlap the two ends by ½ inch. Sew the ends together widthwise with a zigzag stitch.
Tuck the Elastic into the Waistband and close the gap with an edgestitch.
Finish the Neckline

Attach the safety pin to one end of one piece of the Neckline Elastic. Insert this end into the channel at one top edge of the Top.

Slowly pull the pin through the channel, stopping right before the other end of the Elastic is pulled into the channel. Tack this end of the Elastic here, right at the edge of the channel, by sewing a short edgestitch along the raw edge of the Top, sewing through the Elastic and all layers of the channel.

Continue to pull the elastic through until you have pulled the pin out on the other side. Sew the other end of the Elastic to this side of the channel in the same way as described above, making a short edgestitch through all layers. Repeat for the other side.
Attach the Straps
Lay out the Romper with the wrong side facing out.
Fold one Strap piece in half to mark its center.

Open up one fold of the Strap piece. With the right side of the Strap facing the wrong side of the Romper, match up the center of the Strap with the side seam of the Top, aligning their raw edges. Pin in place.

Working in one direction and then the other, continue to pin the open edge of the Strap to the armhole until you reach the top folded edge of the Top. You will have an overhang of bias tape at each end of the armhole, which will be the straps.
Sew the bias tape to the garment along the armhole edge with a ¼-inch seam allowance, using the fold of the tape as a guide.

Fold the bias tape towards the Top’s right side and press flat. The long, raw edges of the bias tape, as well as the raw armhole edge, will be enclosed in the fold.
Sew along the entire length of the tape along the open edge, being careful to catch both sides as you sew.
Repeat with the other Strap piece on the other armhole edge.

At the end of each Strap, tie the bias tape in an overhand knot and trim the end.
Note: You can easily trim the Straps to any length. Simply cut the bias tape down and retie the knot.

The Romper is ready to wear!


Bonjour,
J’aimerais beaucoup essayer de coudre cette barboteuse trop mimi pour mes filles de 6 ans et 8 ans mais je n’arrive pas à avoir le patron… 🙁
Merci de m’aider.
Hi Laetitia,
Thanks for reaching out! You can find the pattern template linked in the materials list above, or by clicking right here!
All the best,
Julianna
Is there a diagram for how the pattern pieces need to be taped together? I’m so confused with this one.
Hi Christina,
Thanks for writing in! Unfortunately we don’t have an image of the completed template, but hopefully I can help you get it sorted out! You should have three pattern pieces when the template pieces are assembled, the Bottom Front, Bottom Back, and Front. If you look under the “Cut” instructions, you can see the shape that each pattern piece will be. As long as you keep the template pieces oriented the same way they print out and match the text on the edges of each piece, the pattern pieces should turn out correctly!
I hope that helps!
Julianna
Bonjour,
Merci pour le patron et ce super tuto très clair! Les marges de couture sont-elles comprises dans le patron?
Je vous remercie.
Hi Berrier
Thanks so much for writing in! Yes, this pattern does include the seam allowance.
Happy sewing
Jessica
Hey! I’m making one for my daughter and am wondering if I could make one for my son. What would you suggest? Maybe straps with buttons instead of ties??
Hi Allyne,
Thanks for writing in, and what a wonderful idea! Rompers are so easy and comfortable for all kids to wear! Although I think a boy could wear this without changes, widening the straps so they button in the front, similar to overalls, would look a little more serious. You might also try tapering the front and back pattern pieces slightly so they will fit without the elastic channel at the top for a cleaner finish.
I hope that helps, and please do let us know how it turns out!
Julianna
Le patron combishort existe il en taille 14 ans? Merci beaucoup
Hi Paumier,
Thanks for reaching out! Unfortunately, this pattern only goes up to age 11, but I will certainly pass your request for larger sizes along to the design team!
Best,
Julianna
Bonjour j’aimerais savoir comment faire pour avoir les explications en français svp du top et short bonne journée MCcouture
Hi Maryline
Thanks for writing in! Unfortunately, we do not currently have the resources to translate our patterns, but thank you for your interest and happy sewing!
Best
Jessica
Can this be made in cotton jersey?
Hi Lynne
Thanks for the great question! Sounds like that would be really comfy! Unfortunately, we do not have instructions for sewing this romper with knit fabric; however, if you would like to give it a try, I suggest sewing a muslin first in an inexpensive knit and sizing down one or two sizes depending on the stretchiness of your fabric. You will also need to use a zig zag stitch or serger for the seams. Just remember, it’s easier to take things in than to let things out! I hope this helps!
Happy sewing
Jessica
I would like translation in french but i dont found it.
Please can you help me ?
Hi Corinne,
Thanks for writing in! At present, our patterns are only available in English, though we certainly appreciate the request!
Best,
Julianna
Thank you so much for this easy to follow free pattern! I just made the 2T size and it’s absolutely adorable. I would consider myself an intermediate beginner and this only took an afternoon and was very fun and easy. Love it!
I have made this adorable romper several times. The last time I made it I added fixed elastic strap rather than the ties, But since I don’t have it in my possession, I don’t remember how I did that! I am wondering if I should add a separate piece at the top rather than the fold over portion, and in that separate piece I should insert the elastic straps. Have you ever had success doing this and if so what are the lengths of elastic you use for the different sizes?
A question…on your waist size is is that the finished garment measurement or the child’s waist measurement?
Thanks for such a wonderful pattern!
Hi Chris,
Thanks for writing in! We haven’t ever tried using elastic for the shoulder straps so I’m afraid I don’t have instructions or lengths, but it does sound like an interesting idea! You would either have to create a separate facing for hemming the top edge to insert the elastic into, or tuck it under the hem as you fold it and then sew it flat to the inside of the hemmed top of the romper. Our waist sizes are the finished unstretched measurements of the waist with the elastic inserted.
I hope that helps!
Julianna
Bonjour pourrais t’ont avoir un patron avec des explications en français ?? Merci beaucoup. Pour le combo short en 10ans .
Hi Bonier,
Thanks for reaching out! At present, our patterns are only available in English, though we certainly appreciate the request!
Best,
Julianna
A number of people have asked for instructions inother languages espec. French. I’ve usually found that Google translate does a sufficient good job to help me translate basic instructions. (Great pattern by the way, I’ve made loads of these. The last few years I’ve made a differetn style top but haven’t written up yet how I did it – but I’ll let you know when I do!
Je suis curieuse de voir votre modèle avec un haut différent.
Sabine
Bonjour,
Pour les traductions en français, c’est très simple : il suffit de la demander dans Google Translate.
Cliquer à droite sur la page et choisir traduire en français.
Ensuite il reste à convertir les “pouces” en “cm”
J’espère avoir aidé…
Merci pour ce modèle que je vais bientôt faire pour mes petites-filles.
Sabine (Bruxelles)
Thanks so much for this pattern! Just finished one for my 4 year old granddaughter. Adorable!
Ce patron est très clair, précis. Ce combishort va tres bien à ma petite fille de 9ans
Votre tuto est fort bien expliqué mais je ne trouve pas le patron !!! Pouvez vous m’aider ? Merci
Hi Martine,
Thanks for writing in! You can find the pattern template linked in the materials list above, or by clicking right here!
Best,
Julianna
Thank you for the pattern! Made a few matching for my daughter and nieces. So cute and easy! Wish I could post a pic.
hi there.. thanks for sharing this wonderful pattern,i love making it. btw im a single mom of one, i was wondering on top of this pattern stated that this pattern are for home use only, so one of my cousins is interested on the romper tht i made for my daughter using your pattern, should i made a free one for her or is it okay if i sell it to her after im done making it? just asking for your suggestion and permission. thanks 😊
Hi Qistina,
Thank you for your interest in our patterns! While we’re happy you like our Summer Romper for Kids pattern, our patterns and designs are copyrighted and are for home use only. This means that you can’t use our patterns to make things for sale. We hope you understand!
Thank you for getting in touch!
All the best,
Gianna
okay, thanks for the reply 👍😊
Wow, I didn’t sew for a really long time, and yet I managed to finish it in one afternoon, even with the “help” of my 21 months old daughter.
I will definitely do another one with an airy gauze garment, because summers here in Greece get very hot.
Maybe I will try also to add fluttery sleeves to the shoulder straps.
Thank you very much for this easy and beautiful idea!
Hi Marika,
Thanks for reaching out! I am so glad to hear that you enjoyed this pattern and the romper turned out so well! Please let us know if you end up making this again and add sleeves or straps, we would love to hear how it turns out!
Warmly,
Gianna
Hi,
I’ve just completed a Summer Romper for my 2 year old granddaughter and it turned out beautifully! So easy to follow your pattern and instructions! Thankyou so much for sharing!!
Hi Cheryl,
Thanks for reaching out and for your kind words! I am so glad to hear that you have enjoyed this pattern!
Happy crafting!
Gianna
Hi,
Thank you so much for this pattern. I tried it out and the instruction are very clear. As a dressmaker I loved working with it. It was a little challenging but i learnt a lot.
My daughter loved her romper (she is 3yrs)
Hi Phili,
Thanks for reaching out and for your kind words! I am so glad to hear that you have enjoyed this pattern and that your daughter loves it!
Warmly,
Gianna
Hi, Are seams allowance included in this pattern?
Hi Lilianne,
Thanks for reaching out! The seam allowance is included in the pattern!
Warmly,
Gianna
How many yards of fabric will I need? The directions were unclear
Hi Madison,
Thank you for asking and I’m sorry this information wasn’t more clearly stated! For sizes 2, 3, and 4-5, you’ll need 3/4 of a yard and for the remaining sizes 6-7, 8-9, 10, and 11, you’ll need one yard. For future reference, our patterns state the required yardage in the “Materials” list and they are formatted in the same way as the sizes. For example, if something comes in sizes Small (Medium, Large), the yardage requirements will read “2 (3, 4) yards,” which means size Small require 2 yards, size Medium 3 yards, and size Large 4. I hope that clears things up and please let us know if you have any other questions!
Best,
Whitney
Comment obtenir le patron de ce modèle ” summer romper for kids” et les explications en français?
merci beaucoup de votre éponse.
Hi Hacquard,
Thanks for reaching out! Unfortunately, we only offer this pattern in English. Thank you for expressing your interest, I will be sure to pass this along to the rest of the team!
Warmly,
Gianna
Sorry if this is completely stupid, but why do you cut 1 5/8in wide strips to make 18mm (3/4in) bias tape? Seems like they should be 1 1/2in wide strips. Am I missing some trick?
Hi Ceecee,
Thanks for reaching out! We recommend using 1 5/8″ to ensure you have plenty for a 3/4″ bias tape! This gives you a bit of wiggle room!
I hope this helps!
Gianna
I soooooo wish this was sized for adults as well! 😉
Hi Amy,
Thanks for reaching out! I think this would be great for adults as well, thank you for expressing your interest! I will be sure to pass this along to the rest of the team!
Warmly,
Gianna
Do you think I could handle this project as a beginning sewer?
Hi Nicole,
Thanks for reaching out! I think you could certainly tackle this project as a beginner sewer! The pattern is very straightforward, and we have easy and clear instructions!
I hope this helps and feel free to reach out with any questions going forward!
Gianna
Are the body pieces of this romper cut on the bias or on the straight? Fabric Pattern in pictures make this a little confusing. I assume all casings and straps are cut on the bias. Is this correct? Thanks, Marianna
Hi Marianna,
Thanks for reaching out! The body pieces are cut straight, you will only cut pieces on the bias if noted, for example, the two 1 5/8 x 30-inch strips, for the Straps!
I hope this clears things up!
Gianna
bonsoir je n arrive paa a comprendre ce que veut dire les pouces pouvez vs m en dire plus
merci
me marechal
Hi Marechal,
Thanks for writing in! I am not sure I understand your question regarding thumbs? Is there a specific part of the pattern I can assist you with?
Warmly,
Gianna
Bonjour,
Les pouces sont une unité de mesure.
1 pouce = 2,54 centimètres.
Bonne couture.
fl
I loved making this romper!! It’s truly doable for a beginner. I used store-bought bias tape for the straps so that I could get a contrast to the floral fabric I used for the body, which turned out to be a really nice effect. Thanks for making these steps all so crystal clear! This thing is the cutest.
Bonjour,
J’ai imprimé le patron de cette combishort. Je voudrai faire le haut dans un coton imprimé et le short dans un lin assorti.
Pensez-vous que c’est jouable SVP ???
Hi Caron,
Thanks for reaching out! That is a great idea and I think you can certainly use two different fabrics, one for the top and one for the bottom! Just be sure to cut the pieces accordingly.
Please let us know how this turns out!
Gianna
Hi,
Can I sew this beautiful summer romper in double gauze ?
Thank you.
fl
Hi Fl,
Thanks for reaching out! I think a double gauze would be beautiful for this romper!
Please let us know how it turns out!
Gianna
Cannot thank you enough for this romper pattern!! The explanations are so clear and the pattern is very well made.
I started sewing these rompers last year, from the smallest size to one size up. Am now working on the 6th one, (for a 6-year old), since my 3 youngest granddaughters are growing so fast. Our daughter, who is working in Africa as a doctor, is begging for more since her small daughters wear them daily in this hot climate.
Thank you so very much for this awesome pattern! Greetings from Flanders.
Hi Marleen,
We’re thrilled to hear that you’ve been enjoying the Summer Romper pattern! We’d love to see your finished pieces, if you have photos you’d like to share! You can send them to us at customerservice@purlsoho.com or use the hashtag #purlsoho or #purlsohobusyhands on Instagram!
Thank you for your kind words, and happy crafting!
Warmly,
Kelsey
Hi
Pls can someone tell me is this right for the bottom front
Are the prices correct like this
I am so confused
Pieces 1 bottom front attached to 3 bottom front
Then on the side 4
Can’t add a photo of my pattern
And can I add inside pockets ???
So want to make this for my 6 year old , as I have a beautiful butterfly fabric & she has been asking no stop
Thank U
Hi Karlene,
Thanks for reaching out! Please email our customer service team the information you have provided along with a clear photo of your work to customerservice@purlsoho.com and they can help you further from there!
Happy crafting!
Gianna
Thank you I’ve just finished making it. Unfortunately the size for my daughter was a bit small. I am definitely making another in a bigger size.
Thank you all the way from a South African based in Nigeria.
Love this pattern
I love this pattern. It is exactly what my daughter-in-law would love for her 5yr old, special needs daughter. I just added snaps to the crotch and it is easy to change her diapers. I am thrilled that the pattern goes to size 11 years, as she will always need diapers.
I appreciate the free pattern, but I have loads of trouble taping it together. my three parts do not look like the pictures of the cut out fabric. I am quite sure the fault is on my part. but I don’t think I am the only one. I am very hesitant to purchase a pattern from your shop, thinking I will have similar issues. maybe a picture of the taped up pattern would have helped. just a suggestion not a complaint.
Hi Nadja,
I am so sorry to hear about the difficulty you are having with arranging the pattern pieces! I’ve gone ahead and reached out to our team and they were able to update the pattern template to include a schematic on the top right corner of each page. You should be able to access the latest version by redownloading the template included on the last bullet point of the “Materials” section. You can also get a copy by downloading directly from this link!
Thank you so much for bringing this to our attention! Hopefully this new template helps, but please let us know if there is anything else we can do to get you started on your romper!
All the best,
Zha Zha
thanks for this pattern, it is very cool but I have a question ….. does the pattern have the seam allowance included?
Hi Petronela,
Thanks so much for writing in! Yes, this pattern does include the seam allowance. You should use ¼-inch seam allowances, unless otherwise noted.
All the best,
Lili
i got the pattern and now trying to make it with long legs
Hi Denise!
Thank you for your comment. To make this pattern with pants instead of shorts, you can make the Bottom Front and Bottom Back pieces longer to fit the leg measurements you had in mind. If you need help adjusting these pieces, please feel free to reach out to us at customerservice@purlsoho.com!
I hope this helps!
All the best,
Margaret
Hi there! Thanks so much for creating this free pattern! I’m so excited to make it for my daughter! I don’t have a bias tape maker but I’m wondering if I can just use a store bought single fold bias tape that matches my fabric? Would I use that both for the straps and the waistband?
Thanks!
Hi Ashley,
Thanks for reaching out to double check! You can absolutely use store bought single-fold bias tape for this project!
All the best,
Lili
Hi,
I’m planning to sew this pattern for my daughter, who is very tall and thin for her age. Therefore she rarely fits to the standard sizes and I have to adapt between 2 sizes. Is there a size chart for this pattern ? I found the waist measurement in the text but not the height corresponding to the various sizes (or the expected child height).
Many thanks in advance for your help,
Hi Anne!
Thank you for leaving your question! Unfortunately we do not have a size chart for this pattern beyond the waist sizes listed, however you can easily adjust this pattern to your daughter’s height by applying her measurements plus 1/4 inch seam allowance on all edges to the Top and Bottom fabric pieces. A great way to help estimate these measurements is to take a pair of shorts and a top that fit her well and measure those garments, to see how long the bottom pieces need to be, and how tall the top needs to be! If you would like some extra help adjusting these pieces, you can always reach out to us at customerservice@purlsoho.com, too!
I hope this helps!
All the best,
Margaret
Tanks
I like it🧡😊
Help! I have verified all printer settings multiple times and am not getting the sizing square on the pattern to 1 inch. At best, it’s a small fraction off that. Should I continue and hope for the best?
Hi Gina,
Apologies for the delayed response! You should be able to move forward if the square is only off by a bit, but we’d like to check if this is printing at 100% first. Please let us know and we hope it’s able to come out to your liking still!
All the best,
Zha Zha
Bonjour et un grand merci pour ce patron et ce superbe tuto très bien expliqué
Cependant je ne comprends pas bien la largeur des biais !!
Pouvez-vous me le dire s’il vous plaît
Merci
Cordialement
Hi Noël,
Thanks for reaching out! In this pattern, you’ll cut one 1 5/8-inch by 26 ½ (27 ½, 29 ½, 31 ½, 33 ½, 35 ½, 37 ½)-inch strip for the Waistband and two 1 5/8 x 30-inch strips, cut on the bias, for the Straps. You’ll then prepare these pieces by folding them into single-fold binding. This decreases the width to half the original measurement, meaning that these pieces will now be only 13/16 of an inch wide. I hope this helps clarify things!
All the best,
Lili
Just finished this for my 2 year old and it is so cute! I’m a beginner and this was easy to follow along. I plan on making a matching romper for my 10 year old tomorrow! Thank you!
I find the instructions for the waistband really confusing. Is there any way I could get help?
Hi Sharon,
We’d be happy to help out! Can you let me know what you find confusing about the waistband?
All the best,
Lili
I just finished making 4 of these in various sizes. The pattern is quick and easy to understand. I used the bias tape for the hem on the bottom. Thank you.
Quelle manip dois-je faire pour avoir les explications du patron en Français. D’avance merci.
Hi Denise,
Thanks for reaching out! I’m afraid we currently are unable to offer our patterns in French, but we would recommend using tools like Google Translate (https://translate.google.com) to translate your patterns! There’s an option to translate PDFs as well via Google Translate; if you’re interested in doing that, you can upload the full PDFs to be translated!
All the best,
Lili
Top ! Merci beaucoup j’ai pu faire cette combi dans une de mes vieilles robes et je suis super contente du résultat. A faire !
Thank you for offering this cute romper pattern for free! One of my granddaughters has been asking me to make her a romper and this pattern is perfect! It sewed up quickly and is so cute. I can’t wait to give it to her on Monday.
Thank you for such a sweet pattern! My grand daughter wants just the top design with no shorts attached. Do you think lengthening the top pattern pieces to her waist length and adding additional length for hemming would work?
Hi Mollie,
Yes, I think your idea will definitely work! Let us know how it goes if you try this out!
All the best,
Lili
The seams are 1/4/?
Hi Ramona,
Thank you for writing in! That is correct, we used ¼-inch seam allowances unless otherwise noted in the pattern. I hope this helps!
Happy making,
Gavriella
Thanks for the quick response