


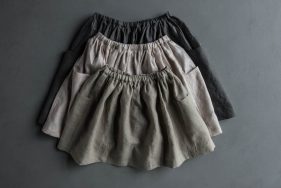
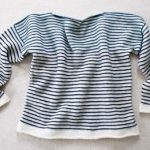
Gathered Skirt for All Ages
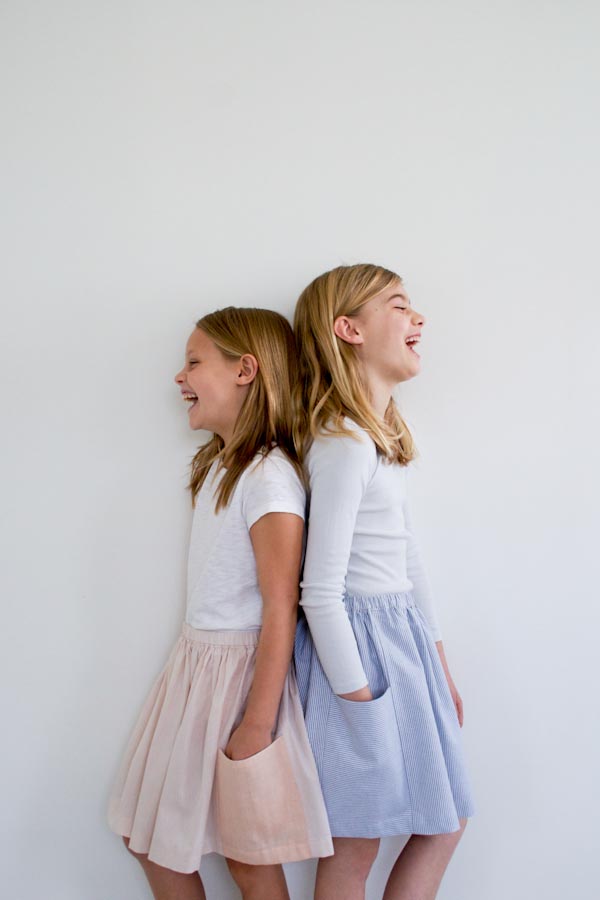
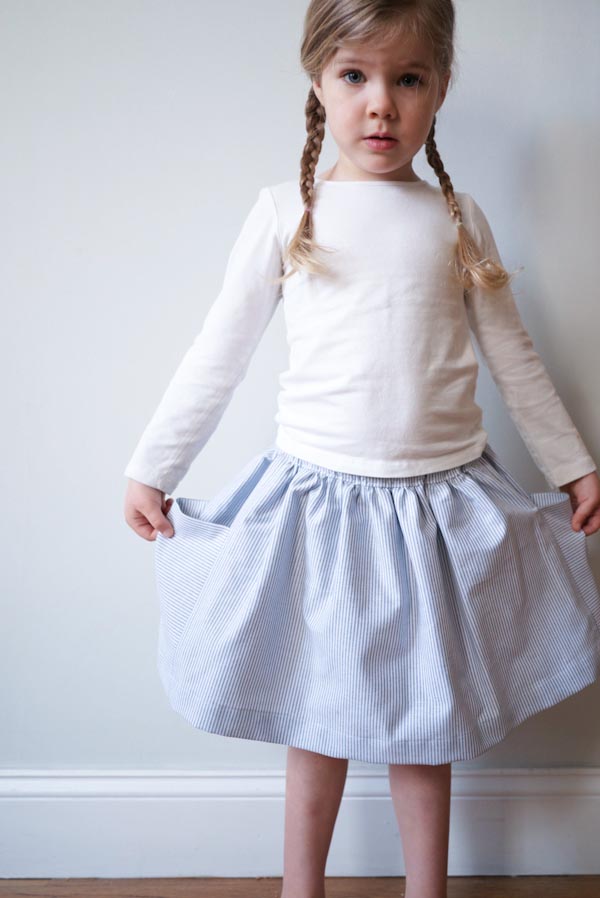
Have you heard of that sociological exercise where everyone’s asked to sketch his or her idea of a simple chair, and everyone’s idea is totally different? In a variation of that experiment, at a recent Purl Bee meeting we each imagined the quintessential summer garment, but in this case, when we revealed our thoughts, it turned out we were all picturing the exact same thing: an elastic-waist, above-the-knee skirt with big side pockets, aka this Gathered Skirt!

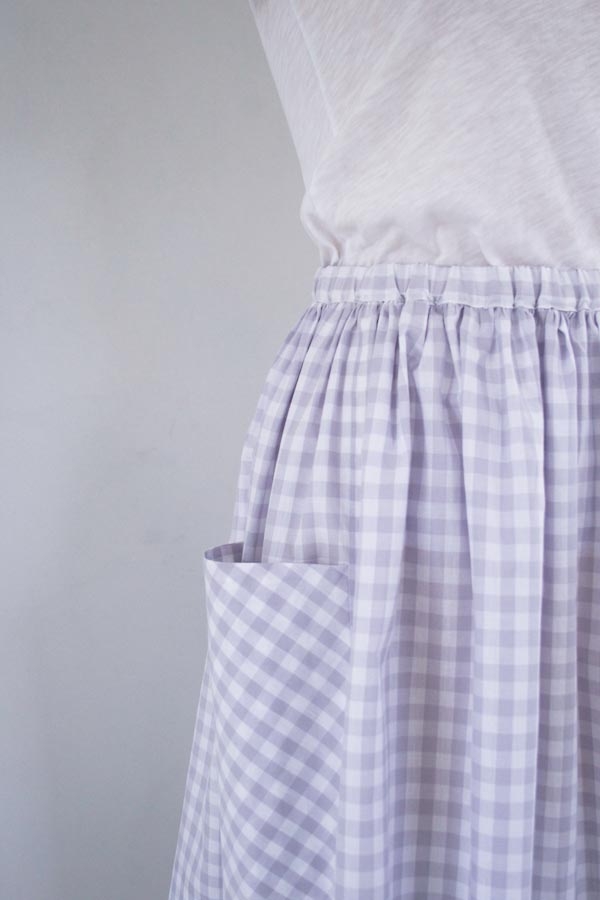
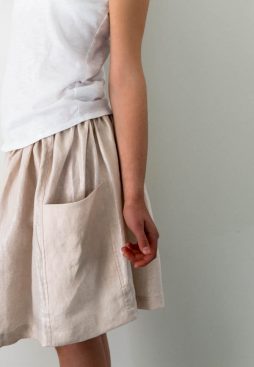
This Skirt’s simple elastic waistband makes it easy to pull on and comfortable to wear, while its deep inset pockets are a useful (and stylish!) detail. And, because I knew we’d all be clamoring to make a few, I designed three pocket variations (Contrast, Cross-Cut, and Bias-Cut), picked a handful of favorite fabrics and wrote up instructions for eleven (!) sizes from kids to adults… exactly how we imagined it! -Corinne

Update: New Fabric
May 2, 2016
We’ve made this quintessential skirt in Purl Soho’s exquisite new Mineral Linen! Check out our Gathered Skirt for All Ages in Mineral Linen post to see this simple summer skirt in one of our most unique fabrics!
Materials
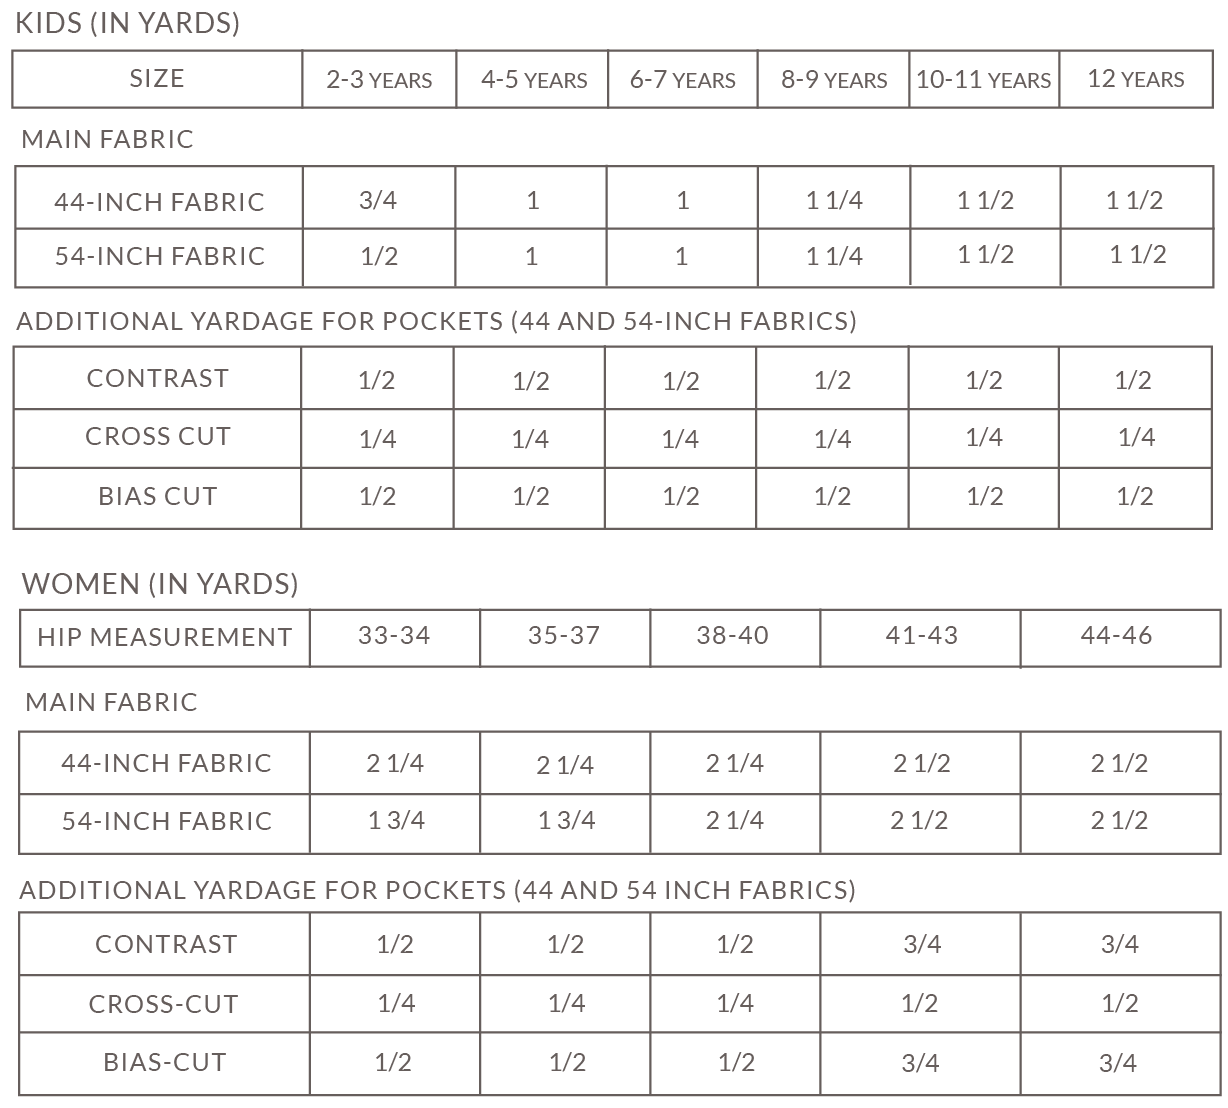
Fabric Requirements
You will also need . . .
- 3/4-inch Braided Elastic, White
- 1 yard for Kids
- 1 (1, 1, 1, 2) yards for Women
- A 274-yard spool of 100% cotton thread to match the fabric
- A safety pin
For the Skirt with Contrast Pockets we used . . .
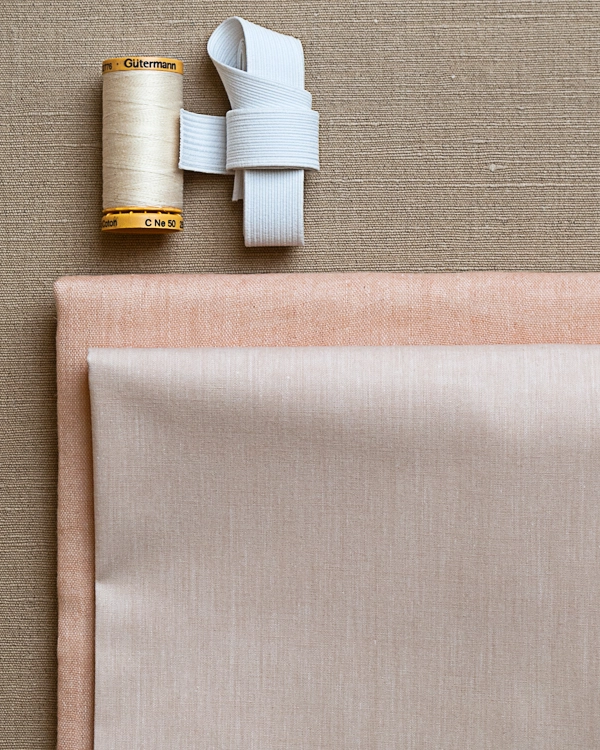
- Main Fabric: Kiyohara’s Fine Solids in Light Beige
- Contrast Fabric: Kiyohara’s Kokochi Double Gauze in Pink
- Gutermann’s 100% Cotton thread in color 1040
For the Skirt with Cross-Cut Pockets we used . . .

- Main Fabric: Robert Kaufman’s Oxford in Small Black Stripe
- Gutermann’s 100% Cotton thread in color 1006
For the Skirt with Bias-Cut Pockets we used . . .

- Main Fabric: Kiyohara’s Large Gingham in Grey
- Gutermann’s 100% Cotton thread in color 1040
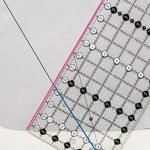
Recommended tools . . .
- A quilting ruler
- A rotary cutter
- A self-healing cutting mat
Sizes
Kids
To fit ages 2-3 (4-5, 6-7, 8-9, 10-11, 12) with finished waist sizes 18 ½ (19 ½, 20 ½, 21 ½, 22 ½, 24) inches in circumference, unstretched. (Instructions are given for adjusting this waist size.)
Women
To fit hip sizes 33-34 (35-37, 38-40, 41-43, 44-46) with finished waist sizes 25 ½ (28 ½, 31 ½, 35 ½, 40 ½) inches in circumference, unstretched. (Instructions are given for adjusting this waist size.)
Note
Prewash all fabric before starting.
Pattern
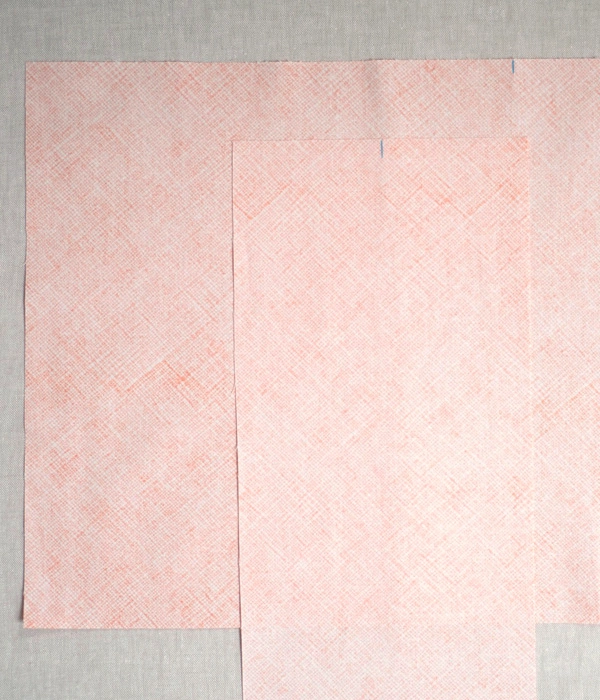
Cut
Main Panels, Side Panels and Waistband
Use the measurements in the charts below to cut the pieces for the Main Panels, Side Panels and Waistband from the Main Fabric.
The shorter sides of the Main Panel pieces and the longer sides of the Side Panel pieces should run parallel to the selvage edge.
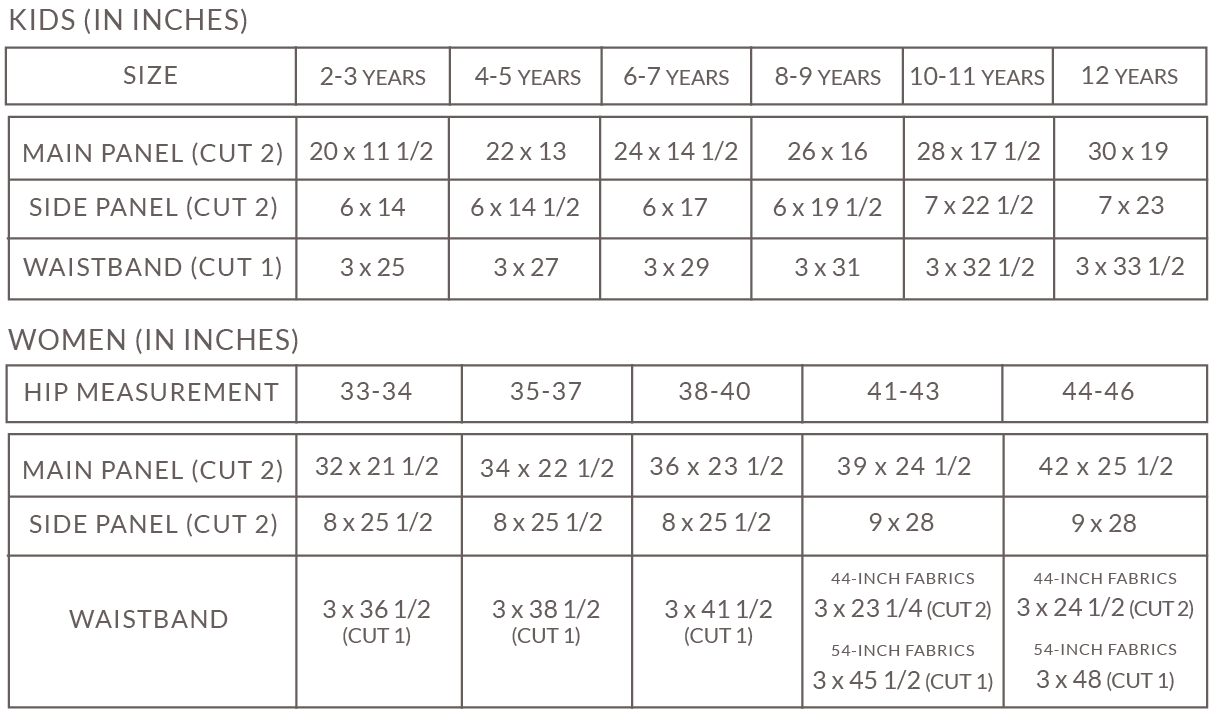
Pockets
Use the measurements in the chart below to cut 2 Pocket pieces. The style of Skirt you are making determines how exactly to cut the Pocket rectangles. Specific instructions for each style of Skirt are listed below the chart.

Contrast Pockets
Cut the Pockets from the Contrast Fabric. The long side of the rectangles should run parallel to the selvage edge.
Bias-Cut Pockets
Cut the Pockets from the Main Fabric. The long side of the rectangles should run at a 45-degree angle to the selvage edge.
Cross-Cut Pockets
Cut the Pockets from the Main Fabric. The long side of the rectangles should run perpendicular to the selvage edge.
Elastic
For the most accurate fit, measure the circumference of the true waist (or where you would like the Skirt waist to fit) and add ½ inch. Cut the elastic to this length.
If you are making this Skirt for someone who is not available for measuring, you can use these lengths as a guide . . .
For Kids, cut the elastic to 19 (20, 21, 22, 23, 24 ¼) inches.
For Women, cut the elastic to 26 (29, 32, 36, 41) inches.
Piece the Waistband
For Women’s Hip Sizes 41-43 and 44-46 inches in 44-inch Fabrics Only
Stack the two Waistband pieces with right sides together matching up the raw edges on two short sides. Pin the pieces together along this short side. Sew along the pinned edge with a ½-inch seam allowance.
Open the Waistband and press the seam to one side. Sew it down with an edgestitch.
Prepare the Waistband
All Sizes

Fold one long raw edge of the Waistband piece ½ inch towards the wrong side and press.
Repeat with the other long raw edge.
Now, fold the Waistband piece in half lengthwise, wrong sides together, so that the two long folds meet and the raw edges are encased in the fold. Press the fold.
Open up the folds at the two short ends. With right sides together, stack the ends together, matching up their raw edges. Pin in place. Sew along the short edge with a ½-inch seam allowance.
Press the seam to one side and sew it down with an edgestitch.
Refold the Waistband and press if needed.
Mark the Center Points
Note: The fabrics that we used in this project are non-directional and have no clear top or bottom. If you are using a directional fabric, please take this into account when you make your markings.
Main and Side Panels
Fold one Main Panel piece in half so that its two short sides meet. Use a fabric marker or pencil to mark the center point along one raw edge. This is now the Top of the Main Panel.
Repeat with the other Main Panel piece.
These marks will represent the Center Front and Center Back of the Skirt.
Now, fold one Side Panel in half so that its two long sides meet. Use a fabric marker or pencil to mark the center point along one raw edge. This is now the Top of the Side Panel.
Repeat with the other Side Panel piece.
These marks will represent the Center points of the Skirt sides.
Waistband
For Women’s Hip Sizes 41- 43 and 44-46 inches in 44-inch Fabrics Only
Your Waistband has two seams, which will align with the two Center points of the Skirt sides. Here’s how to find the Front and Back Center points of the Waistband…
Fold the Waistband loop so that the two seams are stacked on top of each other.
The two resulting folds represent the Center Front and Center Back. To mark these points, open up the pressed folds of the Waistband and use a pencil or fabric marker to mark one raw edge. Make sure that you mark the same raw edge at both the Front and Back Center points.
For All Other Sizes
Your Waistband has one seam, this seam marks the Center Back.
Fold the Waistband loop at the seam. The other fold that results represents the Center Front.
At the Center Front, open up the pressed folds of the Waistband and use a pencil or fabric marker to mark one raw edge.
Now, lay the Waistband loop flat so that the Center Back and Center Front points are stacked on top of each other. The two resulting folds represent the Center points of the Skirt sides. Mark these points as described above. Make sure that you mark the same raw edge as you marked for the Center Front.
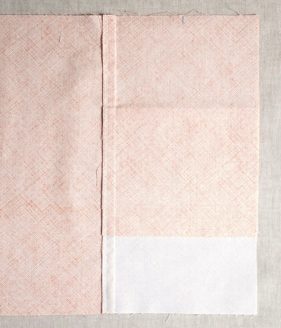
Piece the Side Panels and Pockets
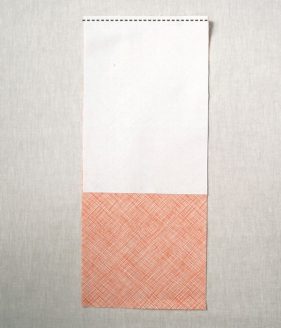
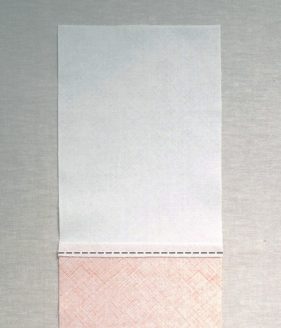
With right sides together, stack one Pocket piece on top of one Side Panel piece, lining up one short raw edge of the Pocket with the bottom edge of the Side Panel. Pin along this edge. Sew along the pinned edge with a ½-inch seam allowance.
Press the seam toward the Side Panel. Sew the seam allowance to the Side Panel with an edgestitch.
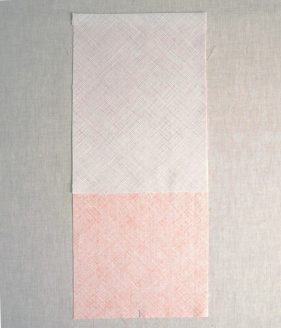
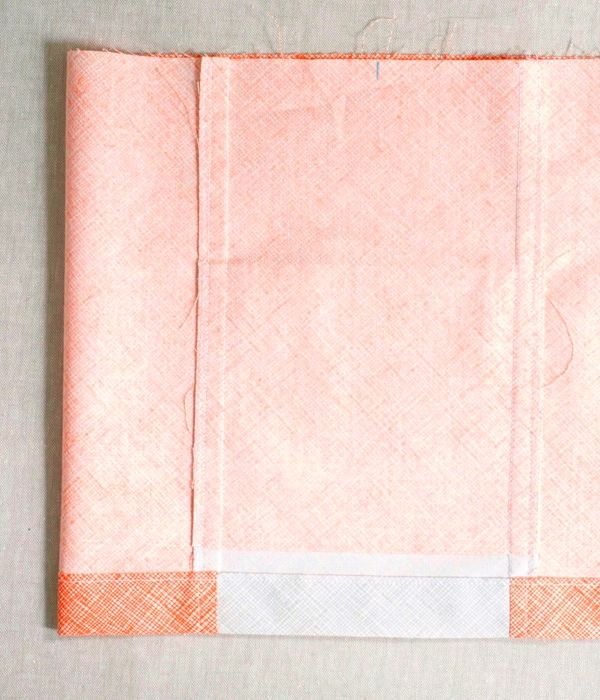
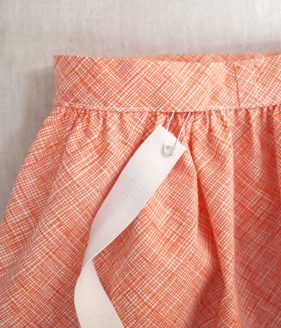
Fold the two pieces along the joining seam so that the wrong sides are facing. Press to create a sharp crease. This is now the Pocket Panel. Orient it as it is in the above photo, with the top edge of the Side Panel at the bottom and the seam at the top.
Fold the Side Panel piece up so that its right sides are together and its top edge is now above the Pocket piece. Adjust the placement of this fold so that the long side of the Pocket Panel is equal in length to the short side of one Main Panel.
Press this fold to create a sharp crease.
Repeat with the other Side Panel and Pocket pieces.
Here’s a short video that may clarify this step…
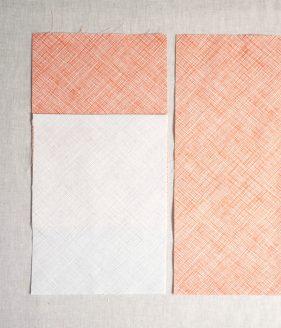
Piece the Pocket and Main Panels
With right sides together and top edges at the top, stack one Pocket Panel on top of one Main Panel, lining up the raw edge of one short side of the Main Panel with the raw edge of one long side of the Pocket Panel. Pin along this edge. Sew along the pinned edge with a ½- inch seam allowance.
Sew along the raw edge of the seam allowance with a zigzag stitch and press the seam toward the Main Panel. Sew the seam allowance to the Main Panel with an edgestitch.
Repeat with the other Pocket Panel on the other short side of the Main Panel.

Now, sew the other long sides of the Pocket Panels to the two short sides of the remaining Main Panel in the same manner.
You have one long loop of fabric, which is now the Skirt.
Hem the Skirt
Fold the bottom edge of the skirt ½ inch towards the wrong side and press.
Now, fold the bottom edge in toward the wrong side again, 1 inch for Kids or 2 inches for Women. Press and pin.
Sew the hem down with an edgestitch.
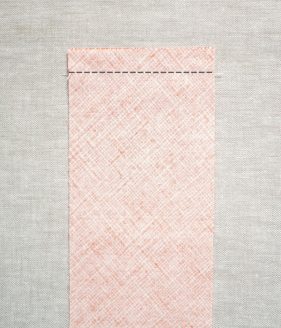
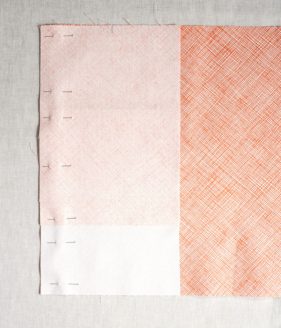
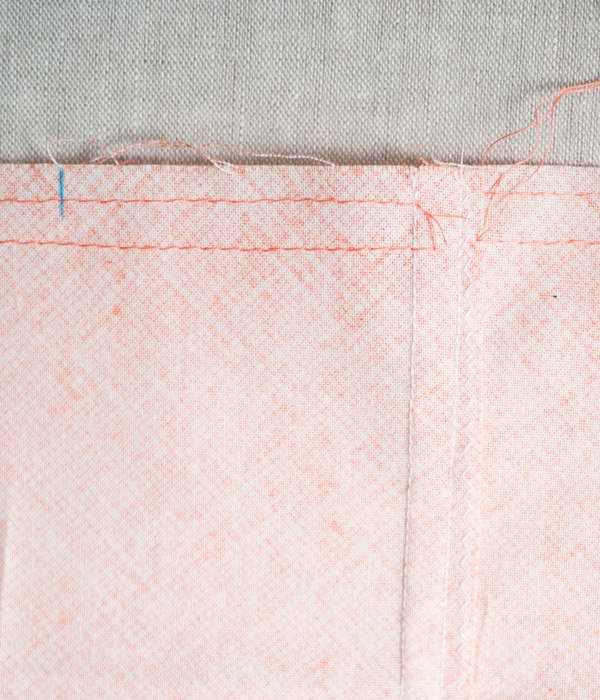
Baste the Top Edge
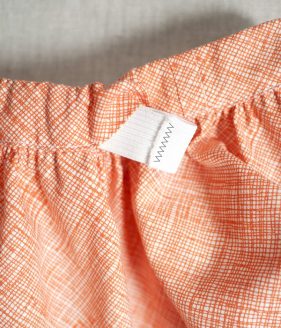
Note: If you are working with the Oxford Stripe fabric, I recommend sewing along the top raw edge of the Skirt with a zigzag stitch before you begin this section. This fabric frays easily, and the pulled threads can get in the way as you work.

Sew a series of basting stitches 1/8 inch from the top edge. Start and stop the basting stitches at each seam line (the ones that joined the Panels) and leave a 3 or 4-inch tail of thread at each end.
Now, sew another series of basting stitches ¼ inch below the first in the same manner.
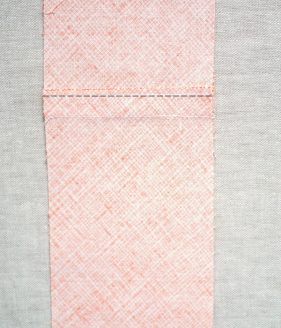
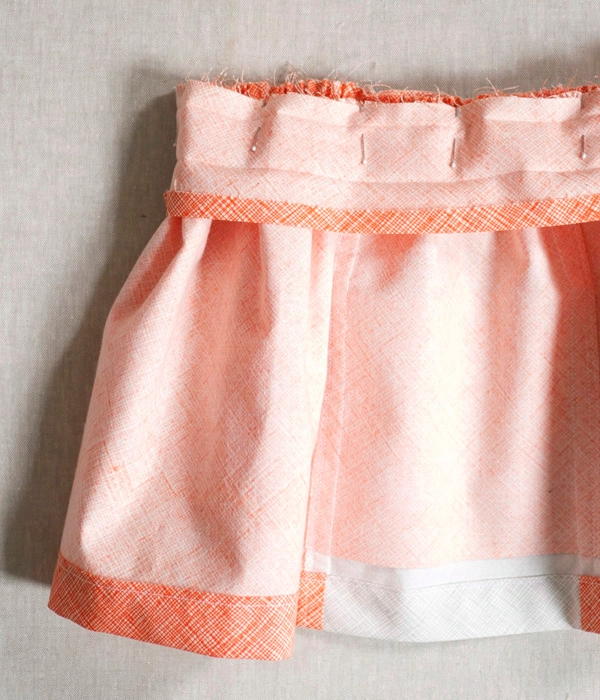
Gather the Skirt Top
Tie the thread tails together at one end of each pair of basting stitches. First tie the two top threads together and then the two bobbin threads. Trim the threads about ½ inch from the knots. Leave the threads at the other end of the stitch lines loose.
Working one section at a time, pull the loose (unknotted) top threads to gather the fabric. Pull gently so that the thread does not break.

Gather the Side Panels so that they measure 3 (3, 3, 3, 3 1/2, 3 1/2) inches across the top edge from seam to seam, for Kids, and 4 (4, 4, 4 1/2, 4 1/2) inches across the top edge, from seam to seam, for Women. Knot the threads again, as described above, and space the gathers evenly.
Next, gather the Main Panels so that they measure 9 (10, 11, 12, 12 1/4, 12 3/4) inches across the top edge for Kids, and 13 3/4 (14 3/4, 16 1/4, 17 3/4, 19) inches across the top edge for Women. Tie knots in the top and bobbin threads, as described above. Space the gathers evenly.
Attach the Waistband
Turn the Skirt inside out.
Open up the fold of the Waistband that you marked with the Front, Back and Side Center points. With the right side of the Waistband facing the wrong side of the Skirt, line up the top raw edge of the Skirt with the raw edge of the Waistband. Match up the Center Front, Center Back and Side points of the Skirt and Waistband and pin together along the raw edge.
Sew along the pinned edge with a ½-inch seam allowance, using the crease in the Waistband as a guide.

Now, turn the Skirt so that its right side is facing out. Fold the Waistband over the Skirt’s raw waist edge and pin in place.
Edgestitch along the bottom of the Waistband’s bottom fold, leaving a 1 ½-inch gap.
Attach a safety pin to one end of the Elastic. Insert this end into the gap. Pull the pin through the Waistband, exiting out the other side, Make sure not to pull the Elastic’s other end into the channel.
Checking that the Elastic isn’t twisted, overlap the two ends by ½ inch. Sew the two ends together widthwise with a zigzag stitch.
Tuck the elastic into the Waistband and close the gap with an edgestitch.

At the approximate center point of one side, make a ¾ inch long vertical seam through all layers of the Waistband. Sew the seam forward, then backstitch over the seam, and sew forward again.
Repeat at the approximate center points of the other side, front and back.
These seams will prevent the Elastic from twisting as the Skirt is worn.
Pull out any basting stitches that show below the Waistband edge and you’re done!


Hi!
I was wondering what sizes of skirts the girls in the photographs are wearing? Thanks!
Hello Jane,
Thanks for writing in! I just measured the samples in the shop and I believe they are wearing sizes 12, 10-11, and 6-7.
I hope this helps! let us know if you have any further questions.
Warmly,
Marilla
OMG! The first garment I ever made was a skirt (sans pockets!) just like this! It was for 4-H and I was in the 4th grade!! (Why yes, I did get a blue ribbon!)
So nice to see this piece with your fantastic directions!
In high school I moved on to making all of my own clothing and then my business attire.
Now, years later I’m making bunnies and bears from old jeans…!
Sewing skills start with sewing straight lines just like this skirt!
With practice and confidence, the potential is endless!
Sew on!
I am nearly finished with my first of three of these–one each for my three daughters. I am having a terrible time getting the elastic to be flat within the waist. Even if I get it flat, when I stretch it, it seems to curl within the waist. I’m considering purchasing the same width of elastic, but a “non-roll” variety this time. Was there a particular reason to use braided elastic? Thank you in advance!
Hi Lisa,
What I usually do when putting elastic into the waistband to keep it from twisting is once in, I stitch it down usually in the center back of the waistband.
Hope this helps,
Melissa
Thanks for the follow-up. For my own learning, I was actually more curious about the specific reasoning behind why a woven elastic was specificed. Was it just what was used? Is woven elastic superior to non-roll elastic? Is it a price thing? A longevity thing? A fit thing? Thanks in advance.
Hi Lisa,
Thanks for the clarification! To be honest, I have not worked much with non-roll elastic, having always used woven elastic. I think that both would work well here! The use of woven versus non-roll is simply a preference issue and I would give it a go!
Best,
Cassy
hello, would love to try this! 🙂 However, not certain about the sizes, and I am slightly confused as I live in Europe and I am not accustomed to your sizes.. What would be a similar to a size 10/12 or M/L. I am tall, but a normal build. Thanks! 😉
Hi Ellen,
The pattern for Women is based on your hip measurement, it is in inches however once converted it will tell you what size you would cut everything in.
I hope this helps,
Melissa
Hi.
Am I being blind as I can’t see where to download the pattern.
Thanks
Sarah
Hi Sarah,
Thanks for writing in! It is not a traditional tissue or printed paper pattern. The skirt is constructed using simple cut rectangles. A Cutting Chart with a full list of dimensions is included as well as a Cutting Guide for proper layout on your fabric.
I hope that this helps and happy sewing!
Cassy
I can’t find the pattern. I keep checking this page… am i missing it all the time? Can someone help me please.
Hi Heidi,
Thanks for writing in! It is not a traditional tissue or printed paper pattern. The skirt is constructed using simple cut rectangles. A Cutting Chart with a full list of dimensions is included as well as a Cutting Guide for proper layout on your fabric.
I hope that this helps and happy sewing!
Cassy
HI, I am trying to sew the gathered skirt, but Ihave a problem, when I follow the video I find that the pocket is not as deep as the length of the skirt. Am I right? thank you for your answer
I find the skirt beautifull
Hi Suzanne,
Thanks for writing in! You are correct! The pocket will not be the full depth of the length of the skirt. It will be a few to several inches shy of the bottom of the skirt!
I hope that this helps!
Cassy
I am making skirts for my granddaughters…and have their waists measured….should I make the elastic a little smaller than the waist measurement?
Hi Pamela,
Thanks for writing in! Under the “Cut” section, the pattern states to cut the elastic to one half inch larger than the actual waist measurement. When you sew the ends of the elastic together you will overlap by one half inch again, resulting in a comfortable, not-too-tight waistband when using a more rigid woven elastic. Different types of elastic do behave differently, so if yours feels particularly “stretchy” or does not recover quickly from being stretched between your hands, you may wish to cut it slightly smaller than your granddaughters’ waist measurements.
I hope that helps!
Julianna
I am quite tall and believe I would need to add length to the skirt. What is the finished length of the woman’s skirt, please? How do you recommend I lengthen the skirt?
Hi Kathy,
Thanks for writing in! The length of the skirt does vary from size to size; however, if you know how long you want your finished skirt to be, you can customize it with just a bit of math!
The length of the Main Panel piece (this is the shorter side of the Panel) should be the desired length of the skirt, plus 2 1/2 inches for a hem. To figure the length of the Pocket piece (this is the longer side of the piece), subtract the original Main Panel length from your new length (x – 25 1/2 = y). Then, add this number to the long side of the pocket (y + 18 1/2 = z). You should not make any changes to the length of the Side Panel piece.
I have made these modifications myself and the skirt turned out beautifully for someone on the taller side! I hope this helps, and happy sewing!
Julianna
Hi, Thanks for the tutorial. I really like the design of the pocket. However, I am still a bit confused about the math you did to lengthen the pocket piece. I want to make a longer skirt instead of a knee length one. According to your comment, “To figure the length of the Pocket piece (this is the longer side of the piece), subtract the original Main Panel length from your new length (x – 25 1/2 = y). ” However, the Main Panel length is different for different sizes according to your chart. For example, my hip measurement is 33-34 so the Main Panel length in the chart is 21 1/2. In this case, do I subtract 21 1/2 instead of 25 1/2? And for the second part, you mentioned “add this number to the long side of the pocket (y + 18 1/2 = z).” I am not sure where is the number 18 1/2 from? Do you do the meth based on hip measurement 44-46?
Thanks for your help!
Hi Amy,
Good catch! Yes, I did use size 44-46 for all these sample calculations and I probably should have specified that! If you are making a different size, you will need to use Main Panel length for your size in place of 25 1/2 in the first calculation, and the Pocket length for your size in place of 18 1/2 for the second calculation.
I hope that clears things up!
Julianna
Hi there,
Could you please advise how I can get a hold of the skirt pattern.
Many thanks
Hi Lix,
Thanks for reaching out! You can find the entire pattern for our Gather Skirt for All Ages in our post above! Rather than printable patterns or templates, the pattern includes dimensions for all the rectangles to cut out for the skirt. If you would like to print a copy of the pattern, on a desktop version of the site, you will find a “print” icon in the right column just below the date and tags. If you’re on a mobile version of the site, you will find a “print” icon below the pattern and above the comments.
Follow the easy on-screen instructions to delete whichever parts of the pattern you don’t want to print or save. For example, you may decide to shorten the pattern by omitting certain images or the list of materials. To remove images, click the drop down next to the image icon and change from 100% to 0%.
I hope that helps!
Julianna
This skirt looks easy and I will probably make a couple for myself. I will sew a smaller pocket just inside one of them to hold my keys and some money – that way they on’t show!
I am so looking forward to making these! In the past I’ve made skirts and the waistband always twists. One great technique to stop this is to stitch in the ditch right along the side seams at the waistband. It’s very subtle and stops the twisting. Thanks for the beautiful project!
Hello! Thanks for the great pattern. I love the style of the pockets! I find gathering difficult and too time consuming for my liking. I was wondering if you think skipping the waist band and the gathering, and simply adding extra length to the panels, then folding over and sewing the top down to add the elastic would work? I can see how it might look neater to do it the way the pattern suggests, but I’m making two small children’s sizes and I can’t think of a reason to not do it this way, can you? Someday I need to practice gathering, but I don’t think today is that day! 🙂
Hi Theresa,
Thanks for writing in! While it would probably be okay for a children’s skirt, this will result in a bunchier/bulkier waist band. The adult skirts have quite a bit of extra volume in the skirt that could make this uncomfortable, but you could certainly try it for a child’s size!
I hope that helps!
Julianna
Perhaps I am just missing it but where are the adjustments for making this skirt in bigger size? I have a 49 inch hip measurement and really want to make this. What would the yardage be- 3 yards?
Hi Brittany,
Thanks for writing in! I see from your other comment that you found Corinne’s guide to sizing up the skirt! Although exactly how much yardage you will need depends on how much larger your making the skirt, and whether or not you are also adding length, I think 3 yards would be a fairly safe bet in case of shrinkage!
Best,
Julianna
I adore this pattern and have already made two for my granddaughter – one in Wiltshire Liberty print in contrasting colours and the other white on blue and blue on white daisies – fabulous! However there is a problem with American sizing and I have always had to add 2 years to her age for a good fit – she is now just seven I am having to decide which of the last two sizes to choose so would like your suggetions please! She is 4ft 5inches tall with a 24″ waist so age do you suggest I choose from?
Hello Jane,
Thank you for reaching out! The largest size is 24″ unstretched, so it could be a good size to grow into. The second to largest size is 22 1/2 inches unstretched, so it could be a bit to small.
I hope this helps and happy sewing!
-Marilla
Love this skirt. I made it quite a few years for my Granddaughter. I’m wanting to make it again for both Granddaughters. I’m having trouble finding how to adjust the waist size, or should I just look at women’s size for her waist? Appreciate your help.
Sandy
Hi Sandy,
Thanks so much for writing in! If your granddaughters have sized out of the kids sizes, then yes, I would go by their waist measurements and make the womens sizes. If necessary, you can always hem the skirts a little shorter!
Best,
Julianna
Do you have a video of what you mean by the waist band directions? I can’t make heads or tails of what I’m supposed to do with “ Open up the folds at the two short ends. With right sides together, stack the ends together, matching up their raw edges. Pin in place. Sew along the short edge with a ½-inch seam allowance.”. I’ve had these instructions printed out for two years and am finally making this for my daughter, but I cannot visualize these words.
I’m a beginning sewer, but I thought a basic skirt was a good place to start!
Thank you!
Hi Sarah,
Thanks for reaching out! Unfortunately we don’t have a video of this step, but hopefully I can explain it a bit better! You will essentially be sewing together the two short ends of the waistband strip with the right sides together, so that it becomes a loop. In the previous step, you pressed the two long edges under, but you will unfold these edges while sewing the two short ends together so that the seam is flat.
I hope that clears things up!
Julianna
thank you for this awesome pattern!
i have one suggestion though. i don’t know if i just missed it in the instructions, but for dummies like me who like to do first and think after i’d add which short side of the pocket to sew onto the side panel when the fabric has a pattern that needs to be one way. i sew the bottoms of both pieces together, that of course resulted my pocket fabrics print to be upside down 😀
Hi Krista,
Thanks for that suggestion – I’ll pass it along to our design team! So happy you enjoyed the project!
Happy Crafting!
Cassandra
hi,
Sorry, but I don’t see the pattern for download
thank you very much
miriam
Hi Miriam,
Thank you for reaching out! There should be a gray printer icon with a Print link next to it on the right side of the pattern page. Once you click this you will see options for Print, PDF, and Email- click the PDF option and hit Download. I hope that helps!
Happy stitching!
Gaby
Hello
the print sign opens to the possibilities of printing, downloading or emailing the explainations but not the patern itself. could you tell me where I can find it please?
thank you for giving so many free paterns, it is so kind of you
cheers
Hi Alice,
Thanks for reaching out! If you’re looking for pattern pieces or templates to print, there actually aren’t any for this super simple pattern! In the section titled “Cut,” you will find dimensions for the rectangles to cut for each piece of the skirt.
Best,
Julianna
Hi! I plan on making this in a tencel/lyocell fabric, but am wanting to adjust based on what I have in my fabric/notion stash. Instead of having to go out and get the 3/4” elastic I (sadly) don’t have, I was wondering if it would be doable to use the 2” wide elastic I do have. I would have the elastic visible, so I wouldn’t need to cut the waistband from fabric. Would I need to make adjustments to the gathering step to fit the elastic (sans fabric waistband)?
Hi Pamela,
Thanks for writing in! Yes, you could certainly sew this skirt with an exposed elastic waistband! The only modification will be to skip the “Gather The Skirt Top” step. Instead, you will pin your waistband to the ungathered skirt, making sure to match up the side and center front and back markings, and then stretch the waistband elastic to the width of the skirt as you sew. This should be even easier than the original waistband instructions!
Happy sewing!
Julianna
hello
my granddaughter is 3 years old and her actual waist measures 22 inches
what size skirt should I make
Hi Ruth!
Thank you so much for your comment! This skirt fits waist measurements of 18 ½ (19 ½, 20 ½, 21 ½, 22 ½, 24) inches in circumference, unstretched, so I would recommend making the 8-9 years size, for a 21 ½ inch unstretched waist circumference.
I hope this helps!
All the best,
Margaret
Dear PurlSoho Team,
this is a beautiful skirt!! and I will try my first self sewed skirt :-))
It looks quite easy going – but I’m a little confused by the large width of the skirt.
Won’t it be very voluminous with linen fabric?
And is there anything against making the skirt narrower?
thanks in advance – Corinna
Hi Corinna,
Thanks for writing in! We are so excited to hear that you’re planning your first self-sewn skirt using the the Gathered Skirt Pattern!
The large diameter of the skirt might seem like it would be too much fabric, but the small gathers at the elastic will cinch in the fabric giving a lovely tapering at the waist. Using linen in particular is great for a skirt like this because it’s soft and light enough that the pleats aren’t too firm and hold a nice natural shape. This skirt can certainly be made narrower, but it won’t be as full as our sample skirts, which is just a design feature of ours!
I hope this helps, and please feel free to send any questions you have our way!
All the best,
Carly
Could you make this pattern with a different fabric? Like a jersey knit? Thanks!
Hi Nik!
Thank you for your question. You can certainly make this pattern with a different fabric, like a jersey knit! Different fabrics will flow and drape differently, so that is one thing I recommend keeping in mind when using another fabric, however I think a jersey skirt would be a lovely version of this pattern!
All the best,
Margaret
Awesome! Thanks for the quick reply, really appreciate it.
Hi there. I was hoping you could tell me the finished length of the girls size 12 version of this skirt. I have one very tall (for her age) granddaughter and want to be sure it’s long enough.
Thanks
Suzanne C.
Hi Suzanne,
Thanks for reaching out! The length of the Main Panel piece (this is the shorter side of the Panel) should be the desired length of the skirt, plus 2 1/2 inches for a hem. So for the 12 Years size, this would be 19 – 2 1/2 = 16 1/2 finished length. Hope this helps!
All the best,
Lili