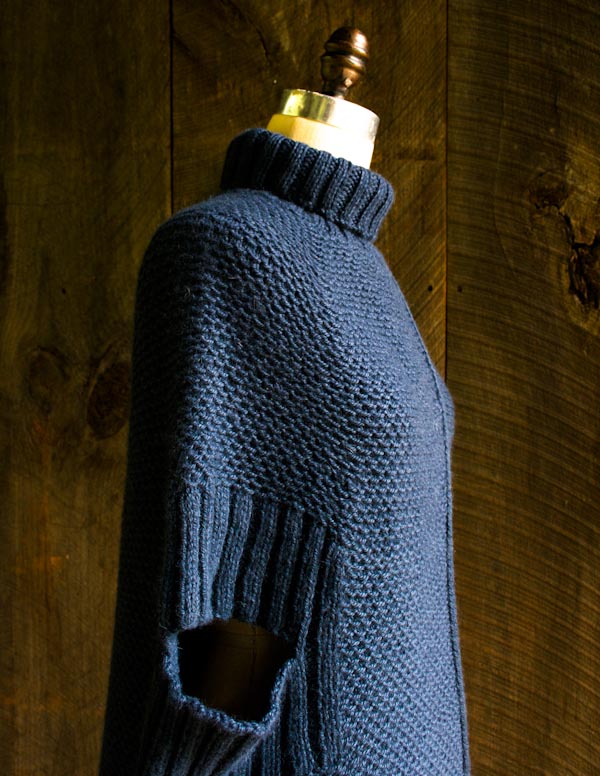
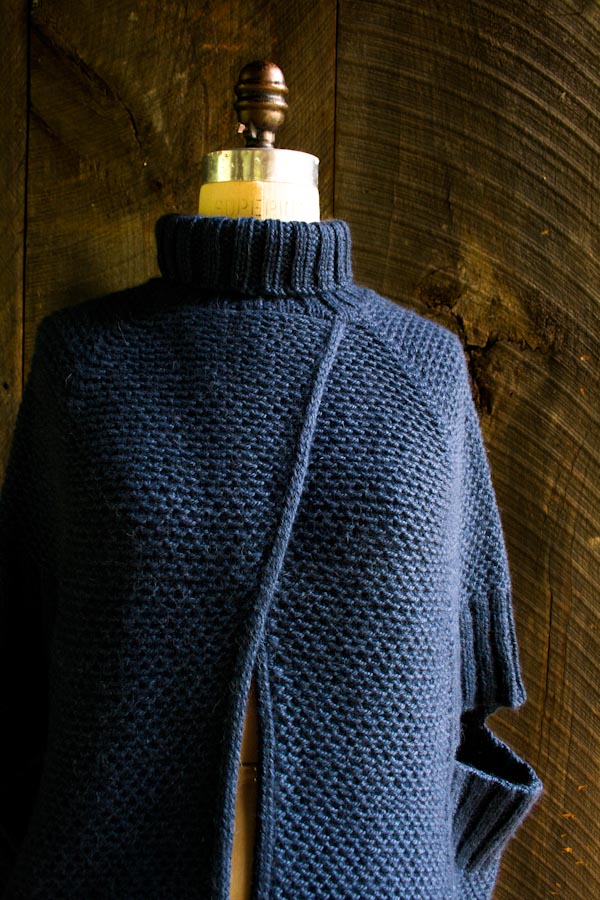
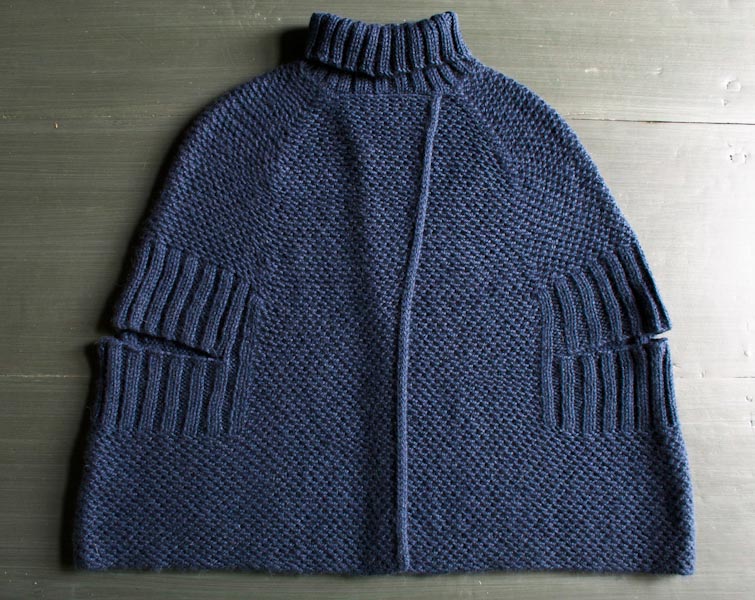
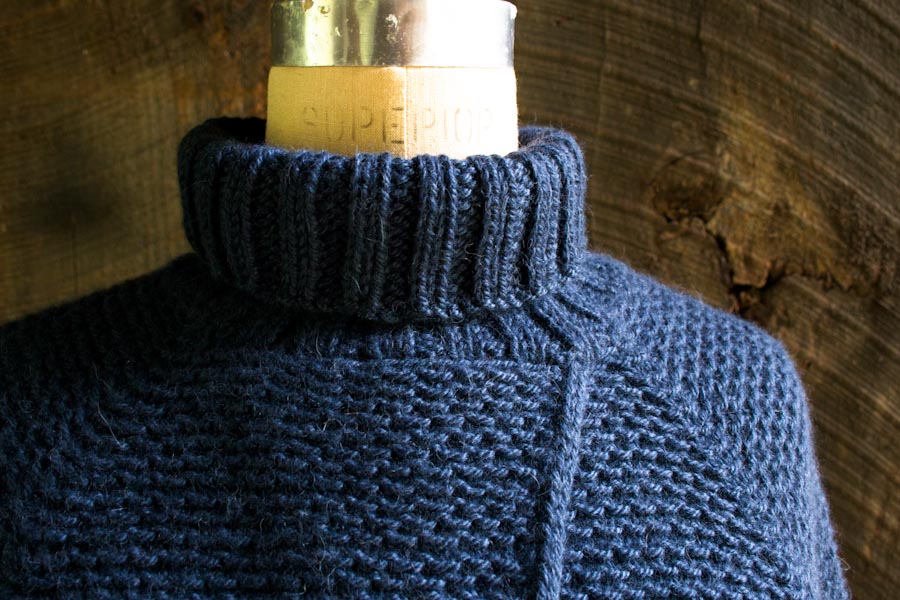
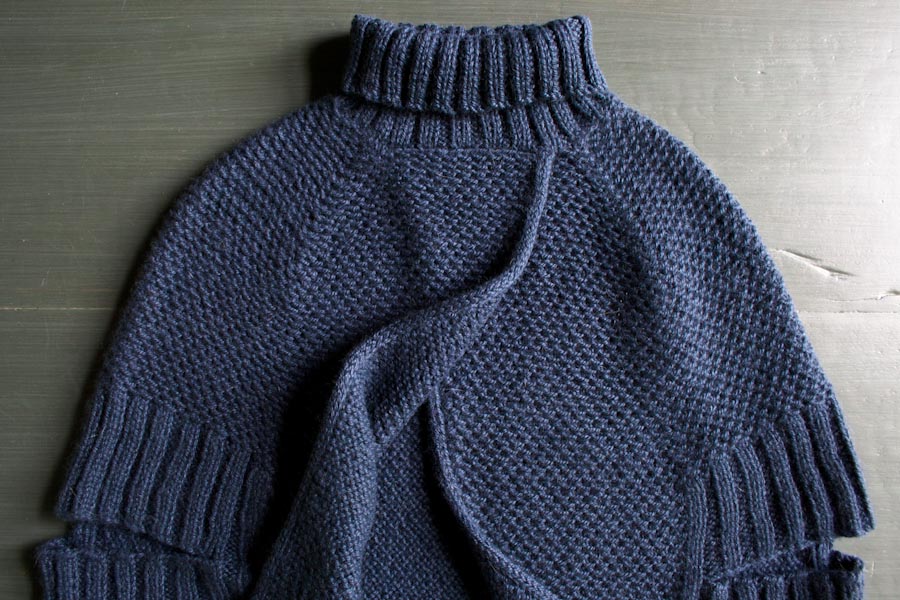
City Cape
The moment Honeycrisp apples make their seasonal debut at the Union Square Farmer’s Market, I start thinking about what I want to knit for my cold weather wardrobe. First on my list this year was a cape but not a fussy Little Red Riding Hood affair. Instead, I envisioned something more modern, something for layering over leggings on weekends and also for running errands in the city on weekdays.

Our own Purl Soho Alpaca Pure ensures that my City Cape is seriously cozy and soft. It pops right over your head but has a pretty open front for a breath of fresh air. And precisely positioned armholes at elbow height leave my hands free at the market to pick all the Honeycrisp apples I want! -Gina
Designed by Purl Soho designer, Gina Rockenwagner.
Share your progress and connect with the community by tagging your pics with #PurlSoho, #PurlSohoBusyHands, and #PurlSohoCityCape. We can’t wait to see what you make!
Materials
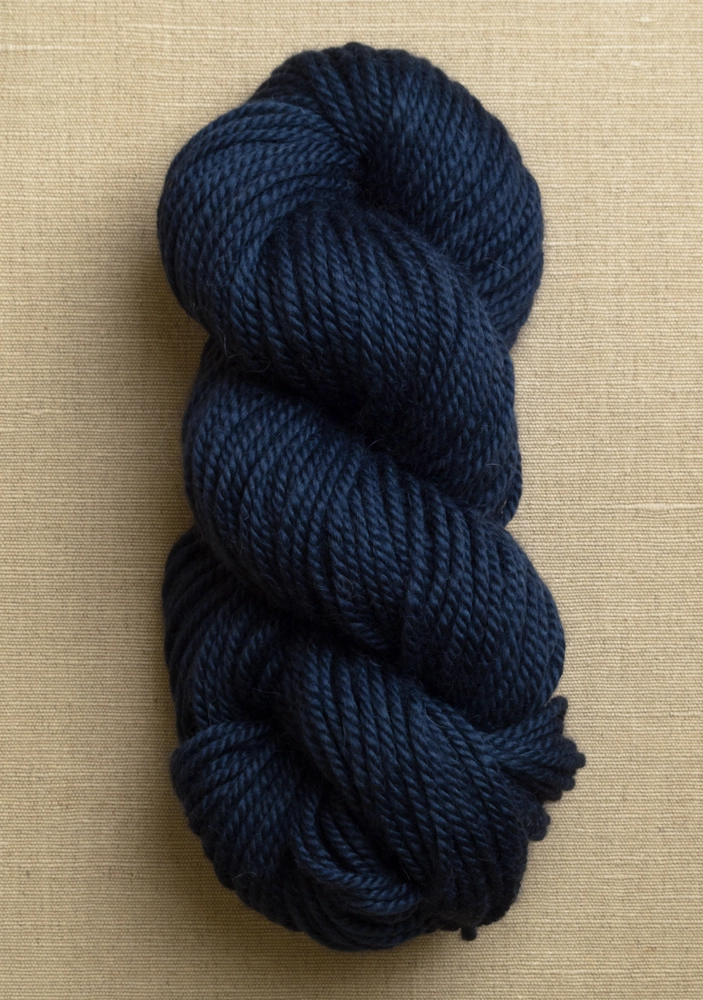
- 9 (11) skeins of Purl Soho’s Alpaca Pure, 100% alpaca; approximately 980 (1165) yards required. (NOTE: We no longer offer Alpaca Pure, but choose from one of our other worsted weight yarns.)
- US 9 (5.5 mm), 32-inch or longer circular needles
- US 8 (5 mm), 16- or 20-inch circular needles
- A set of US 6 (4 mm) double pointed needles
- 4 stitch markers
Gauge
16 stitches and 36 rows = 4 inches with larger circular needles in Woven Slip Stitch pattern (blocked)
20 stitches and 24 rows = 4 inches with smaller circular needles in 2×2 rib (relaxed)
Sizes
NOTE For help picking a size, please check out our Understanding Ease + Selecting Size Tutorial!
To fit chest circumference: 30–38 inches (38–46 inches)
- Finished circumference at bottom edge: 60 (66) inches
- Finished length from high point of shoulder to bottom edge: 22¼ (24) inches
- Finished neck circumference: 17 (19½) inches
Notes
Sl1 (slip 1): Slip the first stitch of every row by slipping purlwise with the yarn in front, then bring the yarn to the back in order to work the next stitch. This makes a nice edge and will make the Attached I-cord simpler.
Sl1 wyib (slip 1 with yarn in back): Slip 1 purlwise with yarn in back.
Woven Slip Stitch Pattern
Row 1 (wrong side): Sl1, *k1, sl1wyib, repeat from * to last stitch, k1.
Row 2 (right side): Sl1, knit to end of row.
Row 3: Sl1, *sl1wyib, k1, repeat from * to last stitch, k1.
Row 4: Repeat Row 2.
Repeat Rows 1–4.
(The Woven Slip Stitch is worked over an even number of stitches.)
Pattern
NOTE: This pattern is available as a printable PDF. Just click here.
Using larger circular needle, cast on 240 (264) stitches. We used a basic Long Tail Cast On. Do not join for working in the round.
Begin
Work Woven Slip Stitch pattern (see Notes, above) until piece measures 7 (8) inches from cast on edge, ending with a wrong side row.
Armholes
Row 1 (right side): Sl1, k31 (35), [k2, p2] 9 (10) times, k2, k100 (108), [k2, p2] 9 (10) times, k2, k32 (36).
Row 2 (wrong side): Sl1, work 31 (35) stitches in Woven Slip Stitch pattern, [p2, k2] 9 (10) times, p2, work 100 (108) stitches in Woven Slip Stitch pattern, [p2, k2] 9 (10) times, p2, work 32 (36) stitches in Woven Slip Stitch Pattern.
Repeat Rows 1 and 2 until piece measures 10 (11) inches from cast on edge, ending with a Row 2. (Because the ribbing portion of the Armhole has a different row gauge than the Woven Slip Stitch pattern, please measure the length over a section of only Woven Slip Stitch pattern).
Next Row (right side): Sl1, k31 (35), k2, p2, bind off 30 (34) stitches, p2 (first purl stitch is last stitch from bind off), k2, k100 (108), k2, p2, bind off 30 (34) stitches, p2, k2, k32 (36). [180 (196) stitches]
Next Row (wrong side): Sl1, work 31 (35) stitches in Woven Slip Stitch pattern, p2, k2, turn and Cable Cast On 29 (33) stitches, turn, pick up and knit 1 stitch from row below (where bound off stitches began), k2, p2, work 100 (108) stitches in Woven Slip Stitch pattern, p2, k2, turn and cable cast on 29 (33) stitches, turn, pick up and knit 1 stitch from row below (where bound off stitches began), k2, p2, work 32 (36) stitches in Woven Slip Stitch pattern. [240 (264) stitches]
Repeat Rows 1 and 2 until piece measures 13 (14) inches from cast-on edge, ending with a Row 2.
Decrease for Yoke + Increase for Front Overlap
Row 1 (right side): Sl1, k31 (35), place marker (pm), k58 (62), pm, k60 (68), pm, k58 (62), pm, k32 (36).
Row 2 (wrong side): Work in Woven Slip Stitch pattern to end, slipping the markers as you come to them.
Yoke Decrease Row (right side): Sl1, [knit to 2 stitches before marker, Knit Two Together (k2tog), slip marker (sm), ssk] 4 times, knit to end. [8 stitches decreased]
Work 3 rows even in Woven Slip Stitch pattern.
Repeat the last 4 rows two more times, then repeat the Yoke Decrease Row once more. [208 (232) stitches: 28 (32) stitches before first marker and after fourth marker, 50 (54) stitches between first and second markers and third and fourth markers, 52 (60) stitches between second and third markers]
Work 1 row even in pattern.
Front Increase Row (right side): Sl1, knit into front and back (kfb), knit to last 2 stitches, kfb, k1. [2 stitches increased]
Work 1 row even in pattern, working new stitches into pattern.
Repeat the last 2 rows three more times, then repeat the Front Increase Row once more. [218 (242) stitches]
Work 3 rows even in pattern.
Next Row (right side): Repeat the Front Increase Row. [2 stitches increased]
Repeat the last 4 rows two more times. [224 (248) stitches]
Work 1 row even in pattern.
Next Row (right side): Repeat the Front Increase Row. [226 (250) stitches]
Work 3 rows even in pattern.
Next Row (right side): Repeat the Front Increase Row. [228 (252) stitches: 38 (42) stitches before first marker and after fourth marker, 50 (54) stitches between first and second markers and third and fourth markers, 52 (60) stitches between second and third markers]
Work 1 row even in pattern.
Piece should now measure approximately 18 (19) inches from cast on edge.
Yoke Decrease Row (right side): Sl1, [knit to 2 stitches before marker, k2tog, sm, ssk] 4 times, knit to end. [8 stitches decreased]
Work 3 rows even in pattern.
Repeat the last 4 rows two (three) more times, then repeat the Yoke Decrease Row once more. [196 (212) stitches]
Work 1 row even in pattern.
Next Row (right side): Repeat the Yoke Decrease Row. [8 stitches decreased]
Work 1 row even in pattern.
Repeat the last 2 rows eight (nine) more times. [124 (132) stitches: 25 (27) stitches before first marker and after fourth marker, 24 stitches between first and second markers and third and fourth markers, 26 (30) stitches between second and third markers]
Shape Neckline
Row 1 (right side): Bind off 20 stitches, (1 stitch remains on right needle from bind off), k2 (4), k2tog, sm, Slip Slip Knit (ssk), k20, k2tog, sm, ssk, k22 (26), k2tog, sm, ssk, k20, k2tog, sm, ssk, knit 23 (25). [96 (104) stitches]
Row 2 (wrong side): Bind off 20 stitches, work in Woven Slip Stitch pattern to end. [76 (84) stitches]
Row 3: Sl1, k1 (3), k2tog, sm, ssk, k18, k2tog, sm, ssk, k20 (24), k2tog, sm, ssk, k18, k2tog, sm, ssk, k2 (4). [68 (76) stitches]
Row 4: Sl1, k2tog, work in Woven Slip Stitch pattern to last 3 stitches, k2tog, k1. [66 (74) stitches]
Row 5: Sl1, k1, [ssk] 0 (1) time, remove marker, k2tog, k16, k2tog, remove marker, ssk, k18 (22), k2tog, remove marker, ssk, k16, k2tog, remove marker, [ssk] 0 (1) time, k2. [60 (66) stitches]
Row 6: Sl1, k2tog, work in Woven Slip Stitch pattern to last 3 stitches, k2tog, k1. [58 (64) stitches]
Row 7: Bind off all stitches.
Finish Front Opening Edge
With right side facing and using the double pointed needles, work a 4-stitch Attached I-cord along both front opening edges, picking up one stitch for every slipped front edge stitch, beginning at the neck edge for the left front and at the bottom edge for the right front. Overlapping the right side over the left side, align the two 20-stitch bound off neck edges and pin them together.
Collar
Using the smaller circular needle and with the right side facing you, rejoin yarn at center back neck edge. Pick up and knit 32 (36) stitches from center back neck to front left neck, just before overlapped edges begin. Continue to pick up and knit 20 stitches across overlapped bound off edges, making sure to insert the needle through both bound off edges as you pick up each stitch, thus joining the two layers together. Pick up and knit another 32 (36) stitches along right neck edge, stopping when you reach the first stitch you picked up. [84 (92) stitches]
Place a marker and join to work in the round.
Round 1: *K2, p2, repeat from * to end of round.
Repeat Round 1 until Collar measures 6 inches from picked up edge.
Bind off loosely in pattern.
Weave in ends and block as desired. Enjoy your City Cape!


love this concept! Any photos on a person? I would like to see how it drapes over arms.
Thanks, Joy! We will post a picture of the cape on a person on our Instagram account later this week, probably sometime tomorrow. I hope you’ll check it out there! -Gina
I must start by saying that this is gorgeous!
Now for my question. I’m one of those people that constantly pull on the neck if I wear a turtleneck. So would it be possible to make the neckline into a cowl? if yes, do you have any suggestions as to how to go about doing so?
Thank you!
So agree with your comment!
This Capelet is classic! Thank you!
Love it and can’t wait to finish the sweater I am knitting!
If I wanted to use a Manos del Uruguay yarn, which would you suggest for gauge? Thank you!
Hi Diane,
Thank you so much for your comment.
Which Manos del Uruguay yarn were you thinking of using? Maxima or Classica would be fabulous knit up in the same gauge as the pattern, but I’m afraid Silk Blend and Fino are too fine for this project. I hope that helps!
Gina
Gorgeous – any chance we can see on a person?
lovely! i’ve been waiting for a sophisticated cape pattern to emerge, and this is it. i can also imagine it using the lofty brioche stitch (a la Sweater Shawl). must put this on my to-knit list.
Wonderful to have a downloadable pdf as an option – thanks for simplifying life!
I, too, would love to see this on a person. Please post that picture if possible. Love the pattern and look.
Hi Mari,
Thank you for your kind words! We will post a picture of the cape on a person on our instagram later this week. Make sure you check it out!
Gina
Beautiful! My Gram who taught me to knit loves cape coats. This will be a wonderful gift to her. Would the Brooklyn Tweed be a good alternate yarn choice? Thanks!
Thank you, Megan! Yes, I think Brooklyn Tweed Shelter would be a great choice.
You guys always make me happy! I am coming to visit this weekend
can not answer the 7+ nine = the answer block only allows one digit!
If i wanted to use a lighter weight yarn for this how would i adjust the pattern to fit ?
Hi Debbi,
Sorry you were having some problems with the comment moderator. I did receive both your comments, so it did work after all! Thanks for writing in!
Gina
I love the pattern, but live in a less chilly climate. How could I adjust the pattern to work with a lighter weight yarn, (sock/dk maybe?
Hi Debbi,
Thanks for your comment! Adjusting the pattern for a lighter weight yarn is not a simple fix. We don’t currently have plans to make the same pattern for a lighter weight yarn, but we will certainly keep it in mind! Thanks for the suggestion!
Gina
It is beautiful and just what I’ve been looking for! Love the way the front overlaps. Would you happen to have a picture of someone wearing it that you could post?
I’d love to knit this, but would really like to see a picture of someone wearing it first. It looks gorgeous — I am thinking Madelinetosh Pashmina would also be a gorgeous yarn choice….
Hi Robin,
Thanks so much for your comment. Tosh Pashmina Worsted would make a great choice! We will post a picture of the cape on our Instagram later this week!
Gina
This is great! I have actually been plotting Christmas knitting in September (i KNOW!!) and I think this might be just the thing for a friend. Thanks for the pattern.
Gorgeous cape!
I tend to pull at turtleneck type necklines. Is it possible to do a cowl neck? If yes, any suggestions as to how to go about doing so? And of course, do you think a cowl neck will look nice on this cape?
Thank you!
Hi Liz,
Thank you for writing in! An easy way to transform the collar into a cowl: After you pick up and knit the stitches for the collar, instead of going directly into the ribbing, work the first round as (kfb) into every stitch. You will have double the number of stitches for the collar as the patter indicates. Now continue in K2, P2 ribbing until the cowl is as long as you’d like. Bind off in pattern. Let me know if you have any additional questions on this!
Gina
Ok my husband helped me pick out the yarn for this. He’s so supportive:) We decided on Madelinetosh Tosh Merino instead of the Brooklyn Tweed. That will work well, correct? Thank you again for such a lovely pattern. Great to start my fall knitting with this.
Hi Megan,
Sounds like you have a great husband! Madelinetosh Tosh Merino is a wonderful choice. I’d love to see a picture of your cape in Tosh! Thanks for writing in and happy knitting. – Gina
Hi! Thank you for the pattern i love it!
Do you think i can use jade sapphire cashmere? 6 or 8 ply?
G
Thanks
Ciao
Francesca
Hi Francesca,
The cape would be absolutely lovely in cashmere! I recommend the 8 ply for this project. Thank you! – Gina
https://www.purlsoho.com/purl/free-pattern/1b6MTM0NDA3fA~~384
this address whith the new letter doesn’t work. Too bad !
Hi Marie-
I’m so sorry you’re having trouble with our newsletter. Please email customerservice AT purlsoho DOT com and they will sort this out for you.
Thank you!
Molly
I love this so much! Can you suggest any other yarns, for more color options? Alpaca pure seems to be a heavy worsted, am I right?
Hi Alexis,
You are correct, Alpaca Pure is a heavy worsted weight. Some other good options for the cape are Purl Soho Worsted Twist, Manos del Uruguay Maxima, or Tosh Merino. You can also search yarns by gauge on our site, which is really handy for choosing yarns! Just click here to browse all Worsted/Aran yarns. Thanks for your question! -Gina
Awesome, thanks! I love you guys!
Ooh, contemplating knitting this to wear while babywearing this fall and winter. Any of you purl bees own an Ergo or similar? I’m hoping the cape would fit over a soft-structured carrier worn in front.
Hi Kate-
I think this could work well with an Ergo. My daughter is too big for her Ergo now but I did use one and I can see that this would work! But it wouldn’t go over the baby very much unless you added a closure or button at the bottom- does that make sense?
Let us know if you have any more questions!
Best-
Molly
Posting additional pictures on Instagram is nice but I don’t have an Instagram account and I do not want one. Seeing a garment on a person – especially a garment that will require as much effort as this one – is really important. Do you have another alternative?
Hi Jane-
You don’t need your own account on Instagram to see our photos. You can see our entire Instagram photostream here: http://instagram.com/purlsoho
And the specific photo of the cape can be found here: http://instagram.com/p/tnLmZsjhXe/?modal=true
Thank you!
Molly
any suggestions for making it a bit bigger, for a 50″ to 55″ chest?
Hi Katherine,
We don’t have plans to offer the pattern in additional sizes, but we will definitely keep it in mind. You could add additional stitches to the back and front portions of the cape, then work more “yoke decrease” rows in the later part of the pattern. Thanks for writing in! – Gina
Can you recommend a wool yarn (non-alpaca ) for this pattern? Thanks!
Hi Im,
Purl Soho Worsted Twist or Manos del Uruguay Maxima would be great wool yarn choices for the City Cape! Thank you for your question. – Gina
My chest circumference measures at 37.5″. Would you recommend the smaller size, or sizing up to the bigger size. I took the measurement while wearing a lightweight sweatshirt. I love your input!
Hi Janelle,
Great question. Unless you have particularly broad shoulders, I would recommend the smaller size for you. I have a 40 inch bust line myself and moderately broad shoulders and the S/M size is slightly too small for me. Thanks for writing in! Let me know if I can help with any other questions. – Gina
My chest circumference measures at 37.5″. Would you recommend the smaller size, or sizing up to the bigger size. I took the measurement while wearing a lightweight sweatshirt. I love your input!
(No sure if this went through the first time.)
Vintage, yet Modern, Outstanding blend.
Thank you.
This is simply beautiful, thank you!
I am wondering how the worsted twist would work for this and how it would be different from the result of the alpaca?
Also, approximately how long does this pattern take to knit up (for a relatively experienced knitter, with not much free time!)
Thanks again 🙂
Hi Pastille,
Thank you so much for your question and kind compliments! The cape took me about 2 weeks to knit, working about 8 hours per day. Assuming you could knit 4 hours per day, I would guess it would take you about 4 weeks to knit.
To answer your first question about the Worsted Twist, I think the result would be lovely! It may drape less than the alpaca, because it is slightly lighter, but for this project that is fine! Does that make sense? – Gina
This is gorgeous! Is there a way to transform this into a crochet pattern? Is this even possible? Thank you!
Hi Ellie,
I’m not a crochet expert, I will admit. We don’t have a crochet version of this pattern in the works currently, but I will keep it in mind. Do you know any crochet patterns that mimic ribbing? The arm holes would be the most important detail to duplicate, so it would be important to find a crochet stitch that acts like a rib knit stitch. Thanks for your question! – Gina
I bought the yarn to make this today! But, would it (pretty please!) be possible to see the larger size modeled. I am thinking I need to make the larger size, but I’m afraid I will be swimming in it.
Thanks! Love your designs!
xoxo
Beth
This might be a stupid question, but should I measure around the largest part of my bust, or under the bust? I am right smack in the middle of the 2 sizes and I can’t decide if I should size up or not!
Hi Shelley! Great question, I’m glad you asked. You should measure around the fullest part of the bust. Regarding the sizing, I’ll say it’s mostly a matter of preference. If you want a looser, longer cape, make the larger size. If you want more of a capelet, make the smaller size. I hope that’s helpful! Please don’t hesitate to ask anymore questions. Thanks! -Gina
Hi,
This cape is so pretty! I’m wondering if I can just buy it as I know nothing about knitting. Thanks!
Dear Joline-
Thanks so much for getting in touch about this and for your kind words about this project. Unfortunately we don’t sell any of our finished projects but if you’d like to find a knitter to make it for you you can contact our store at 212-420-8796.
We also have classes in case you want to learn to knit!
Best-
Molly
Do you think Blue Sky Extra would be suitable for this and have a similar drape?
Hi Kate,
Yes, I think Blue Sky Extra would be a suitable yarn for this project. Blue Sky Extra, however, will not drape as heavily as Purl Soho Alpaca Pure, so I would advise getting an extra skein in case you need more yardage to get the length you want. Thanks for writing in and let me know if you have any more questions! – Gina
Lovely cape….just in time for a new project.
Thank you
I am 18 inches into my cape and I am in LOVE! I am not sure if I will do the cowl or the turtle neck as designed. I am afraid of the edging..but hope to figure it out. I am racing towards the finish line. This yarn…this Alpaca Pure..is heaven in my hands! thank you, thank you THANK YOU!
Hi GG! Thank you so much for your kind words. Let me know if you can’t figure out the edging. I’d be happy to suggest an easier way to do it if you can’t get the hang of it. Make sure you refer to the tutorial for attached i-cord! All my best, Gina
Hi! I am 2 inches in using the suggested yarn, what a lovely knit. This is the first thing I am making for myself…so excited. I have never knit anything this large before, and notice the bottom looks to be ‘curling/wavey’ (not rolling up though). I am wondering if this is temporary…or…should I start over (but don’t know what I would change). Thoughts? Many thanks…
Hi Becky,
Thanks for your question! I’m wondering, in what way is the bottom curling? When I knit the cape, the front edge (not the bottom edge, but the opening edge) did curl slightly towards the right side of the garment. The curling when away completely once I stabilized the edge with the attached i-cord. Blocking or steaming helps tremendously as well. If what you are experiencing is different, let me know! I want to help you trouble shoot. Thanks again! – Gina
I’m about halfway, and realizing that I’m contemplating no large collar. Besides a roll collar or attached icord, can you think of any other suggestions? I saw GG wear it with a different cowl for rheinbeck, and I love the option to pair with scarves or cowls to complement instead of being built in. Thank you, you guys rock!! (@cheriwan ravelry @yarnologie IG)
Hi Jillian,
Great question, thank you for asking! In lieu of the large collar, a roll collar, or attached i-cord around the neckline, you could follow the same instructions to pick up and knit the collar, but only knit the ribbing for 1 inch or 2 inches. This will make a crew neck. I hope my suggestion is helpful! Let me know if you’d like other suggestions, I can keep them coming! All my best! – Gina
Wow I love this cape, and this is a pattern I have been looking for – you really have an eye for design. Sadly I live in Scotland but hoping a friend who is visiting NY can pick up some yarn for me. In the meantime can you recommend any yarn in the UK – I was wondering about drops alpaca silk?
Hi Frances-
I’m afraid we don’t have any experience with that yarn, or yarn in the UK in general. But if you find something warm with a similar gauge you should be fine!
Thanks for writing in!
Molly
hi Gina – it had been getting wave-y along the bottom edge, but now that I’ve got a few inches knit, it seems to be settling out. Thanks, it’s knitting up beautifully!
Hello. My question is concerning the gauge of 16 stitches x 36 rows = 4 inches with size 9 needles in woven slip stitch pattern. Is there a possibility that gauge might should read 16 stitches x 32 rows?
Hi Michelle,
Great question. Row gauge can vary a lot, even if you are hitting the stitch gauge exactly on the nose! The cape has a lot of drape to it, meaning it gives in the length when it is worn, so if you are getting a slightly different row gauge, the over all shape of the cape will not be affected much. I hope this helps! If I can answer any further questions, please do not hesitate to ask! Thanks for writing in! – Gina
hi,
could you give specific instructions on knitting a rolled collar, not a cowl?
also, has there been any pattern corrections or errata?
thanks
Hi Mary,
To knit a rolled collar:
Follow the instructions in the pattern to pick up and knit the stitches for the collar. Instead of working a rib stitch over these stitches, simply knit every stitch for 5 or 6 rounds (longer if you want a bigger roll). Loosely bind off these stitches.
There have been no pattern corrections so far, but I will be sure to respond to this comment again if there are any in the future!
Thanks for your questions! All my best, Gina
Great pattern- I’m enjoying knitting this one up! I do have a question though. I just finished the first decrease for Yoke section and I didn’t end up with the same stitches on my needle as shown in the pattern. The decrease (K2tog, SSKx4) only occurs on the front right side, correct or am I not reading the pattern properly? I end up with 28 stitches to the first marker, but still have 32 after the last marker, and I also have more stitches between the middle markers. Since its not a tight fitting garment, maybe its not a big deal, but I am wondering if I should skip some of the increase stitches to try to maintain the total number of stitches for the next section.
Hi Brenda,
Thanks for your question! You should work the Yoke decreases on every section, not just the front right. This should explain why you had some stitch discrepancies after working the first Yoke decrease round. Please do let me know if you have any more questions. Thanks again! – Gina
I’m sorry if I am asking a question with an obvious answer but I’m a little stuck. I knit the cape, which is beautiful, but once I got through the neck shaping and tried it on there was something off, the back was big and boxy and the front panels did not meet until the very top. In the pictures it seems the panels meet from the bottom up. I frogged and was about to start again but first decided I should analyze the numbers. I am working on the large. If the cast on is 264 sts, and 36 is the each side panel, then 42 the ribbing for the sleeve, and 108 for the back panel, then the 36 plus 21 for half of a sleeve will be one front half, giving 57 each side. Doubled is 114. The back is then the other half of each sleeve 21 x2 plus 108, so 150. Can you explain how the panels in the front are meeting? I had a large gap, which would be the 36 stitch difference. I know I must be missing something, but I would rather ask, than do it wrong a second time. I love the Cape and definitely want to give it another go. Thanks for the lovely pattern
Hi Gina,
Thank you for this awesome pattern! I am either being very thick or I am not getting something, but is there an easy way to tell which row of the woven slip stitch pattern I should knit and whether to start with a knit stitch or a slipped stitch when knitting around the armholes. Do you know what I mean? 🙂
Hi Irina,
Thank you for your kind words and question!
You are right, sometimes it is tricky to tell what row of the woven slip stitch pattern you are on! Luckily, this stitch pattern is very forgiving, meaning it hides little stitch errors well.
What I did, as I was knitting the cape, I used markers to mark where the armhole ribbing stitches begin and end. In addition, on right side rows, I placed a marker through the first and last stitch I came to before and after each armhole section. If it’s a purl stitch, I place the marker directly through the purl bump. If it’s a slip stitch, I place the marker directly through the little slip stitch that hangs down from the row before. Then when I’m working the wrong side row, I can easily glance over my needles, to the right side of the work, and the marker tells me which stitch I worked on the last pattern row. If I see a purl bump, I know in this row I need to make a slipped stitch on the same stitch, and vice versa. Let me know if that makes sense! – Gina
I’m sorry if I am asking a question with an obvious answer but I’m a little stuck. I knit the cape, which is beautiful, but once I got through the neck shaping and tried it on there was something off, it didnt lat propefly, the back was too big and boxy and the front panels did not meet until the very top. In the pictures it seems the panels meet from the bottom up. I frogged and was about to start again but first decided I should analyze the numbers. I am working on the large. If the cast on is 264 sts, and 36 is the each side panel, then 42 the ribbing for the sleeve, and 108 for the back panel, then the 36 plus 21 for half of a sleeve will be one front half, giving 57 each side. Doubled is 114. The back is then the other half of each sleeve 21 x2 plus 108, so 150. Can you explain how the panels in the front are meeting? I had a large gap, which I think would be the 36 stitch difference. I know I must be missing something, but I would rather ask, than do it wrong a second time. I love the Cape and definitely want to give it another go. Thanks for the lovely pattern
Hi Sharon,
Thanks for your message. When you tried on the cape, did you overlap the two parts of the front neck that were bound off at the beginning of the neck shaping? The overlap swings some of the back fullness towards the front body, eliminating the back being boxy, as you described.
To help the front panels meet sooner, you can gently block the front edge into the shape you like, when you block the cape. Blocking also helps the fabric to drape more, which gives the garment a better fit. Let me know if this is helpful. Please don’t hesitate to ask if I can clarify more! – Gina
I have finally gotten around to starting this cape. I have been knitting a swatch but I am feeling pretty slow. I am not sure how I should be counting the stitches. Am I counting the slipped (looking stitch) as one stitch? I keep getting confused. Thanks.
Hi LaLa,
Thanks so much for writing in! The stitch took me a little while to get the hang of, but once I got into the rhythm of it, knitting became much faster.
To count the stitches, each purl bump is one stitch and each slip stitch is one stitch. To count the rows, similar to garter stitch, each “ridge” is 2 rows.
Please let me know if I can help with any other questions! Have a great day. – Gina
Hi Gina
Great pattern but am wondering if this would work work with stocking stitch or seed stitch?
Hi Lynn – Thank you so much for writing in! Unfortunately I wouldn’t recommend doing this cape in a stocking stitch or a seed stitch. The slip stitch pattern helps to keep the structure of the knit fabric intact and prevent it from sagging. You are totally welcome to try it in another stitch, but the cape may turn out different than anticipated. I hope that helps to answer your question. Please don’t hesitate to ask if I can clarify more! – Gina
Hi, I was just wondering if you could substitute the yarn for a doubled dk weight yarn? How would that affect the look of the stitches?
Thanks,
Shelley
Hi Shelley! You could definitely substitute a doubled DK weight yarn. That may take away a bit of the stitch definition, but over all I think the stitch pattern will still look great. Thanks for writing in! – Gina
hi – I’m at the armholes, and am confused. When it says work for 31 stitches in woven slip pattern, do I slip one, then start the knit/slip, or do I skip the slipping?
Sorry if the answer is obvious, but i want to get it right!
Thanks so much,
Becky
Hi Becky,
Thanks for writing in with your question! Yes, you do continue to slip the first stitch of every row throughout the whole pattern. After you slip the first stitch, then you go into the woven slip stitch pattern. I hope that helps ease your confusion. If you have any more questions, please do not hesitate to ask! All my best, Gina
I’m contemplating making this with a contrasting color for the armhole ribbing, i-cord, and collar. Anyone who’s knitted this, do you know how many skeins of yarn you used for those parts of the garment? I’d be making the larger size. Thank you!
Hi Stacie,
Thanks for writing in with your question! I don’t have an exact answer for you but would estimate I used about 4 skeins for all the parts of the cape you mentioned. I hope others will weigh in as well! All my best, Gina
I have a stupid question about gauge, because I struggle and struggle with gauge…. (Forgive me Elizabeth Zimmerman!) I’ve promised myself to knit from my stash and I have some cascade duchess yarn (discontinued) that gets 3.5 st/in. I have about a 35-36″ bust (depending on the week;)) but kind of broad shoulders. Could I just knit the smaller size and it would come out a little on the larger size (assuming I’m on gauge)? Thank you for your help! (I just love this pattern.)
Hi Robin,
Thanks for writing in! And we are always happy to answer any question – this is a no judgement zone!
I think you are exactly right – knit the smaller size and it will accommodate your shoulders with a little room for layering, if that’s how you choose to wear it. I’m not familiar with that yarn. What is the fiber content? I would be careful with the gauge – The cape may stretch (length wise) if it is knit too loose, especially if the yarn contains cotton, silk, or alpaca. If my answer raises more questions, please don’t hesitate to ask! Enjoy!
-Gina