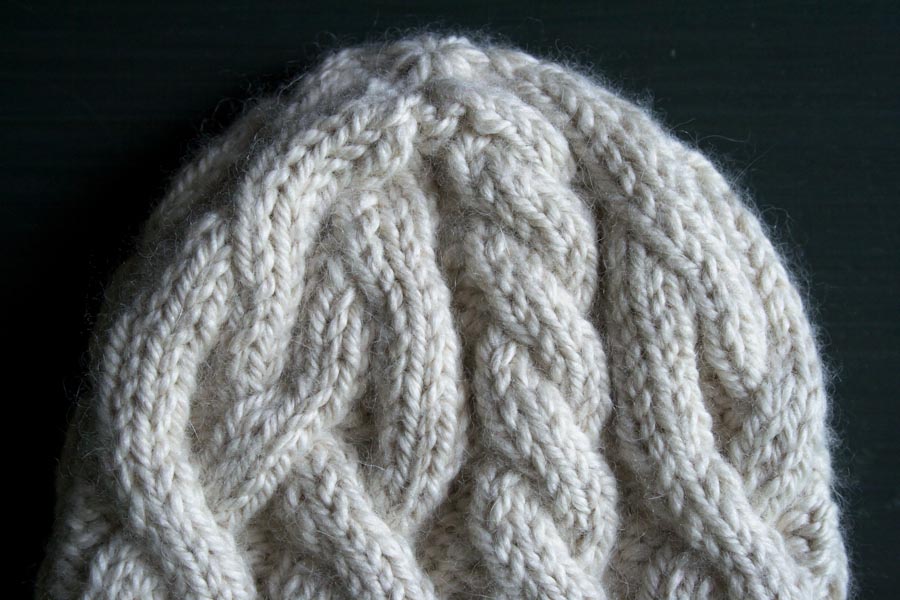
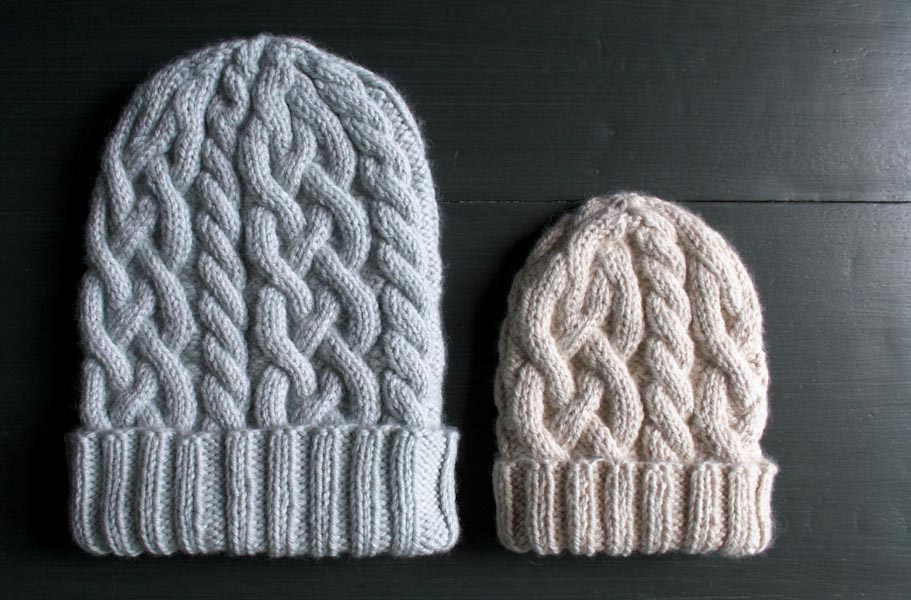
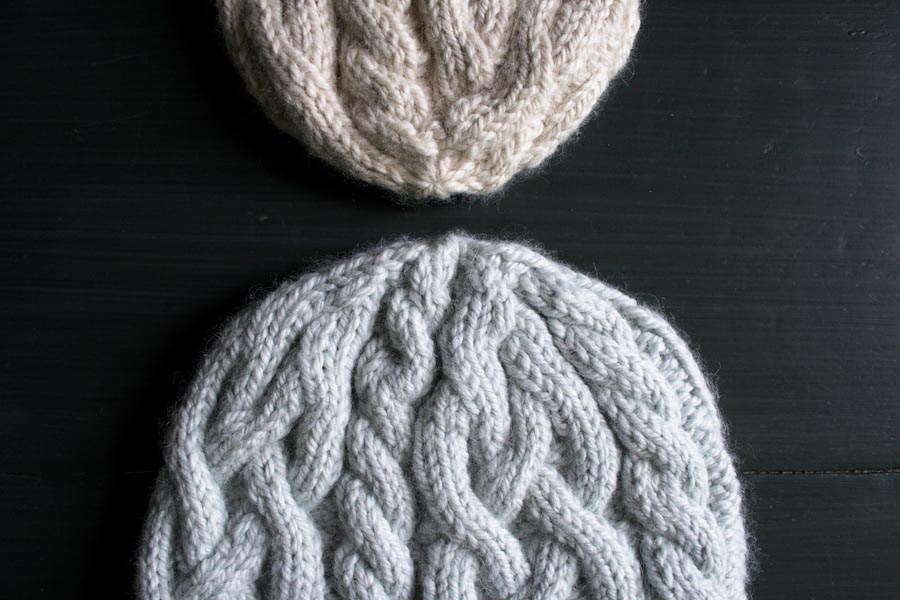
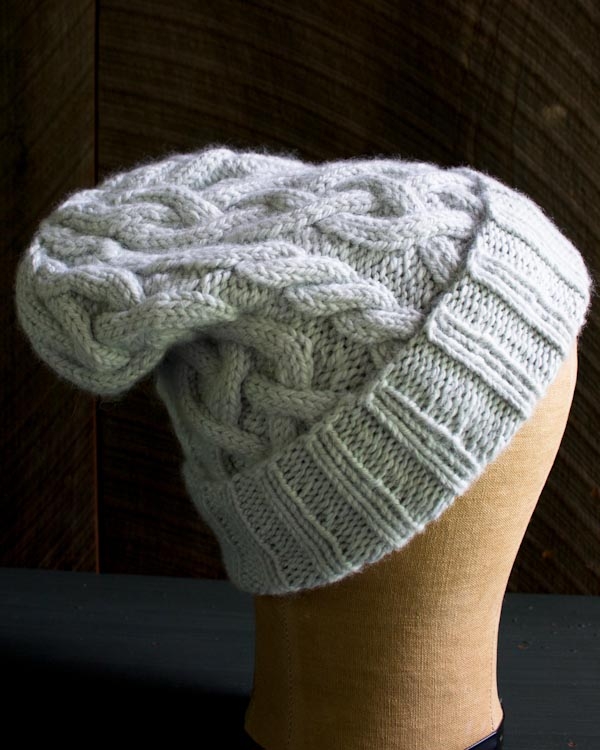
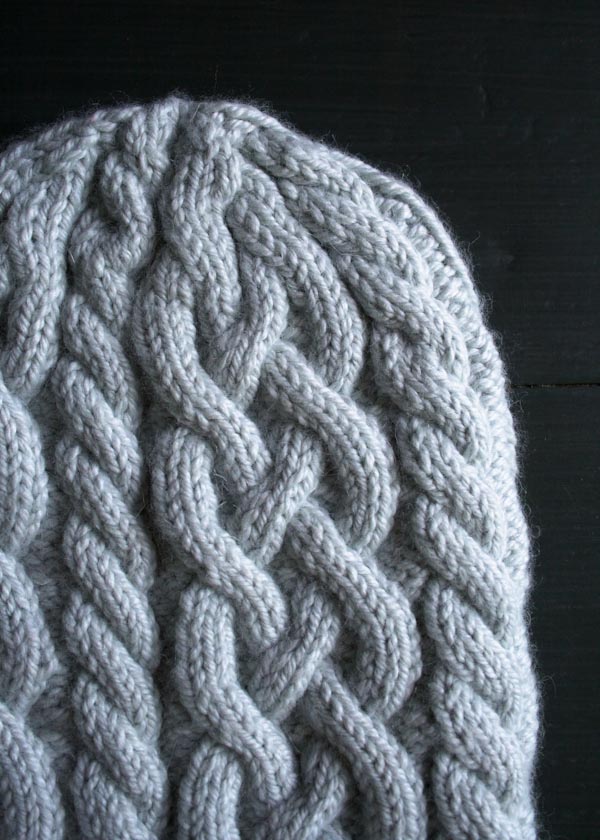
Traveling Cable Hat
Although cables look complicated, they’re only slightly more difficult than putting one foot in front of the other! These Traveling Cable Hats present the perfect opportunity to hone your cabling skills. Where an Aran sweater is the marathon of cable knitting, these hats are the 100-meter dash, every bit as beautiful but with the finish line in sight!

And with its remarkable stitch definition and undefeated softness, Purl Soho’s Alpaca Pure is the ideal yarn to show off the hard work (and beauty!) of cable knitting.
Update: November 2014

We now have a Traveling Cable Hat for Kids! Rather than casting on 3 repeats, like I did for the Alpaca Pure Baby size, I cast 2 repeats onto some big ol’ needles in our Super Soft Merino! For more photos and the full pattern, click here!
Designed by Purl Soho designer, Gina Rockenwagner.
Share your progress and connect with the community by tagging your pics with #PurlSoho, #PurlSohoBusyHands, and #PurlSohoTravelingCableHat. We can’t wait to see what you make!
Materials
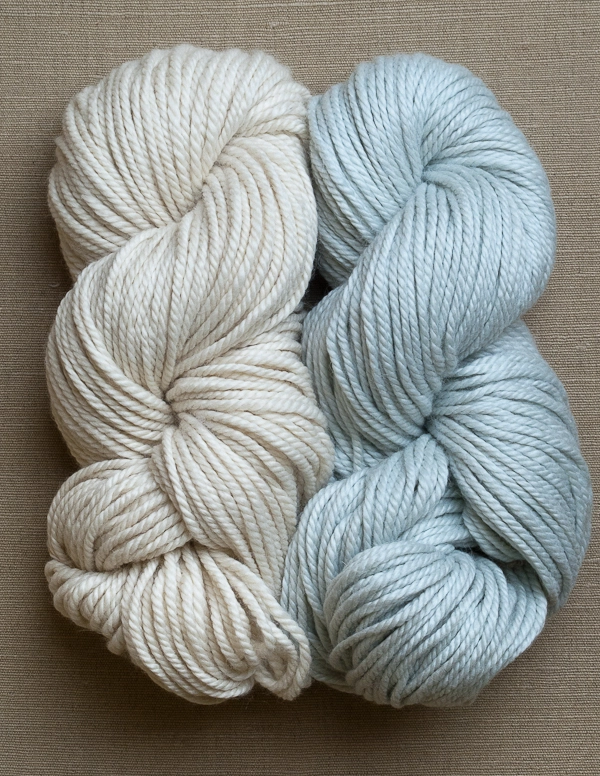
- 1 (2) skein(s) of Purl Soho’s Alpaca Pure, 100% alpaca. Each skein is 109 yards/ 100 grams; approximately 109 (218) yards required. We used Heirloom White and Artemisia Green. (NOTE: We no longer offer Alpaca Pure, but choose from one of our other worsted weight yarns.)
- US 5 (3.75 mm), 20-inch circular needles, or a set of double pointed needles
- US 6 (4 mm), 20-inch circular needles
- A set of US 6 double pointed needles
- Stitch markers, including 1 unique
Gauge
30 stitches and 14 rows = 3½ inches by 2⅛ inches in cable stitch pattern, using larger needles
22 stitches = 3 inches in rib pattern (unstretched), using smaller needles
Sizes
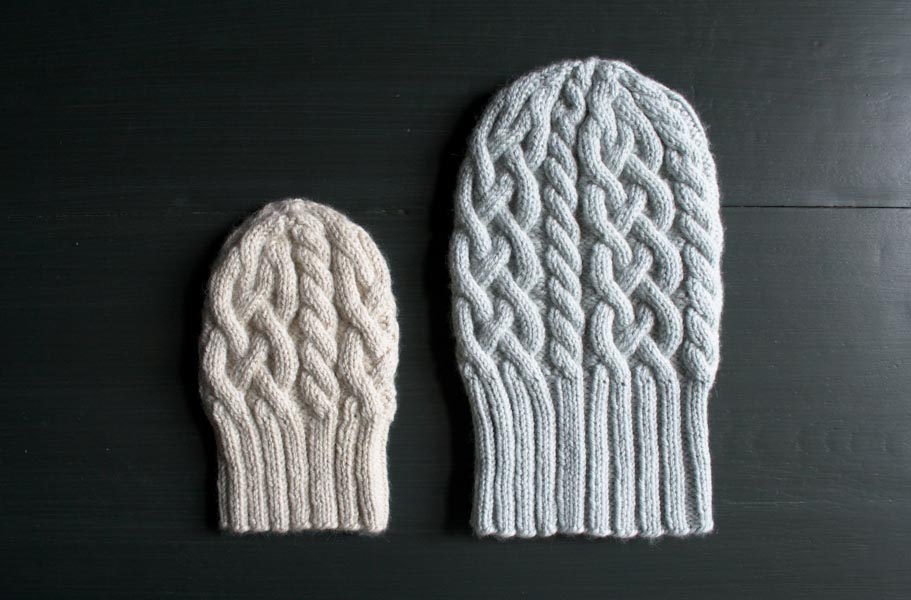
Baby (Adult)
To fit actual head circumference of 14–16 (20–23) inches
- Finished Circumference at Widest Point of Body: 10½ (13½) inches
- Finished Circumference at Ribbing: 9 (12) inches
- Finished Length: 8½ (12) inches
Samples: The Heirloom White hat is the Baby size, and the Artemisia Green hat is the Adult size.
Note
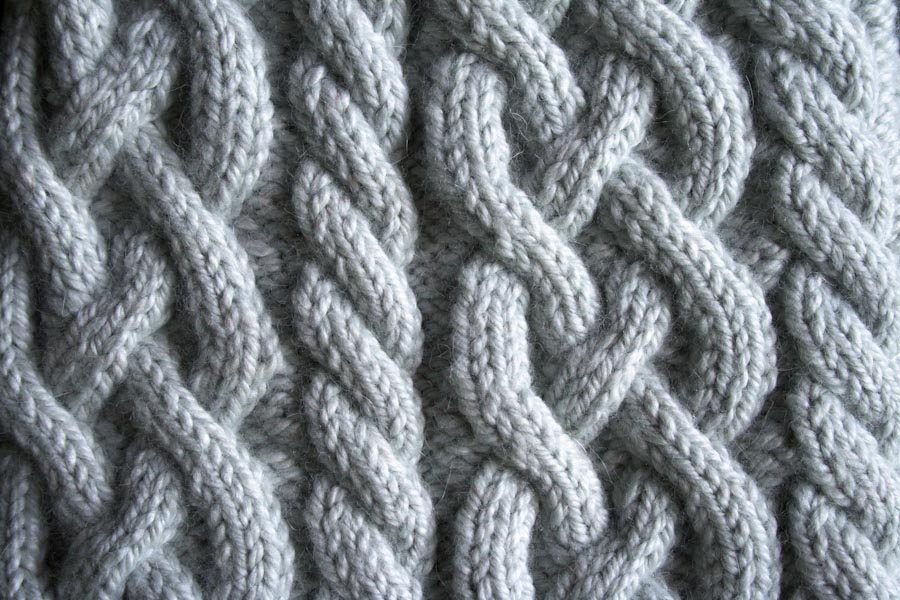
Cables
NOTE: For help with the following cables, including photo tutorials, visit purlsoho.com/create/cable/. The only cable you won’t see in our tutorial is the Cable 4 Front, but it’s just like the Cable 6 Front, only worked over 4 stitches instead of 6!
3/1 Left Purl Cable (3/1 LPC): Slip 3 knit stitches to cable stitch holder and hold in front of work, p1 from left hand needle, k3 from cable stitch holder.
3/1 Right Purl Cable (3/1 RPC): Slip 1 purl stitch to cable stitch holder and hold in back of work, k3 from left hand needle, p1 from cable stitch holder.
Cable 6 Front (C6F): Slip 3 knit stitches to cable stitch holder and hold in front of work, k3 from left hand needle, k3 from cable stitch holder.
Cable 6 Back (C6B): Slip 3 knit stitches to cable stitch holder and hold in back of work, k3 from left hand needle, k3 from cable stitch holder.
Cable 4 Front (C4F): Slip 2 knit stitches to cable stitch holder and hold in front of work, k2 from left hand needle, k2 from cable stitch holder.
Pattern
Ribbing
With smaller needles, cast on 63 (84) stitches. We used a basic Long Tail Cast On.
Place a unique marker and join to work in the round, being careful to not twist the stitches.
Round 1: *P1, [k2, p2] 4 times, k3, p1, repeat from * to end of round.
Repeat Round 1 until ribbing measures 3 (4) inches from cast on edge.
Round 2: *Purl front and back (pfb), [k1, make 1 right (m1R), k1, p2] 3 times, k1, m1r, k1, pfb, p1, k1, m1r, k1, m1r, k1, m1r, p1, repeat from * to end of round. [90 (120) stitches]
Body
Switching to larger circular needles…
NOTE: In the following round, place a marker every 30 stitches to separate cable repeats.
Round 1: *[P2, k3] 4 times, p3, k6, p1, repeat from * to end of round.
Round 2: *[P2, 3/1 LPC (see Notes), 3/1 RPC (see Notes)] 2 times, p3, C6F (see Notes), p1, repeat from * to end of round.
Round 3: *P3, [k6, p4] 2 times, k6, p1, repeat from * to end of round.
Round 4: *P3, [C6F, p4] 2 times, k6, p1, repeat from * to end of round.
Round 5: *P3, [k6, p4] 2 times, k6, p1, repeat from * to end of round.
Round 6: *[P2, 3/1 RPC, 3/1 LPC] 2 times, p3, k6, p1, repeat from * to end of round.
Round 7: *[P2, k3] 4 times, p3, k6, p1, repeat from * to end of round.
Round 8: *P1, 3/1 RPC, p2, 3/1 LPC, 3/1 RPC, p2, 3/1 LPC, p2, C6F, p1, repeat from * to end of round.
Round 9: *P1, k3, p4, k6, p4, k3, p2, k6, p1, repeat from * to end of round.
Round 10: *P1, k3, p4, C6B (see Notes), p4, k3, p2, k6, p1, repeat from * to end of round.
Round 11: *P1, k3, p4, k6, p4, k3, p2, k6, p1, repeat from * to end of round.
Round 12: *P1, [3/1 LPC, p2, 3/1 RPC] 2 times, p2, k6, p1, repeat from * to end of round.
Repeat Rounds 1–12 one (3) more time(s).
Repeat Rounds 1 and 2 one more time. [Piece measures approximately 6¾ inches (10½ inches) from cast-on edge]
Crown
NOTE: Change to double pointed needles as needed.
Round 1: *P3, k2, slip slip knit (ssk), k2, p4, k2, ssk, k2, purl two together (p2tog), p2, k6, p1, repeat from * to end of round. [81 (108) stitches]
Round 2: *P3, k2, ssk, k1, p4, k2, ssk, k1, p3, k6, p1, repeat from * to end of round. [75 (100) stitches]
Round 3: *P3, k2, ssk, p4, k2, ssk, p3, k6, p1, repeat from * to end of round. [69 (92) stitches]
Round 4: *P1, p2tog, k2, ssk, p2, knit two together (k2tog), k2, p2tog, p1, k6, p1, repeat from * to end of round. [57 (76) stitches]
Round 5: *P2, k2, ssk, k2tog, k2, p2, k6, p1, repeat from * to end of round. [51 (68) stitches]
Round 6: *P2, k2, k2tog, k2, p2, C6F, p1, repeat from * to end of round. [48 (64) stitches]
Round 7: *P2tog, k1, k2tog, k2, p2, k1, [k2tog] 2 times, k1, p1, repeat from * to end of round. [36 (48) stitches]
Round 8: *P1, k2tog, k2, p2, k4, p1, repeat from * to end of round. [33 (44) stitches]
Round 9: *P1, k2tog, k1, p2, k4, p1, repeat from * to end of round. [30 (40) stitches]
Round 10: *K2tog, k1, p2, C4F (see Notes), p1, repeat from * to end of round. [27 (36) stitches]
Round 11: *K1, ssk, k2tog, k2, ssk, repeat from * to end of round. [18 (24) stitches]
Round 12: [K2tog] 9 (12) times. [9 (12) stitches]
Cut yarn.
Thread tail onto a tapestry needle and draw twice through remaining stitches, pulling taut to secure. Bring tail to inside of hat to weave in.
Weave in any remaining ends and enjoy your Traveling Cable Hat!


I love that the pattern is written out; I have such a hard time with charts! Thank you!!
Is there a way to print the pattern without having to print all the pictures? There are several patterns that I love & want to make but the pictures being printed would make it a small book :0)
Thanks!
Hi Erin-
We are working on making printing our patterns easier but in the meantime we recommend that you copy and paste the pattern into a Word or Text doc and print from there.
Thanks so much for getting in touch!
Molly
If you use Print Friendly (http://www.printfriendly.com/) you can delete any pictures you don’t need and then safe as pdf. It’s very useful!
Have a nice day,
Sabrina
Thank you for the link to the printer friendly site, it works a treat and I now have this lovey cable hat pattern on pdf.
Thank you so much. Very helpful. Will definitely visit that printfriendly website again.
Hi,
Lovely design! Loving that you included the tutorial photos/breakdown. If I wanted to make it less slouchy and more of a toque, would you suggest maybe leaving out one of the 12 round repeats?
Also, out of curiosity-I have no experience creating patterns!-why does the rib repeat end with k3, p1? Would it be that different if I did p1(k2p2k2)p1?
Thanks!
Hi Katrina,
Thanks for writing in! Leaving out one of the 12 round repeats would be a great way to make the hat have less of a slouchy fit. The great thing about wearing this hat is you can easily adjust the length by folding the cuff more or less generously according to your desire.
To answer your question about the ribbing – the rib is designed to transition seamlessly into the cable pattern. It seems unconventional to have a K3 in a rib that is other wise mostly K2 P2, but the K3 portion becomes the 3×3 cable after the increase round. If you were to follow another stitch pattern for the ribbing, your ribbing will not align perfectly with the cable pattern. I hope that makes sense, let me know if I can clarify more!
Gina
Will you be uploading the pattern to Rav so we can link to it? Thanks! It’s beautiful!
Hi Christina-
This project info is up on Ravelry: http://www.ravelry.com/patterns/library/traveling-cable-hat
But the pattern is only available here on the Purl Bee!
Thank you for getting in touch!
Molly
Row 4 of the body appears to be incorrect? This is my first time knitting and I’m making the baby hat.. all the other rows have 30 st but this one has 34. Please help!
Hi Cerrine,
Thank you so much for catching that! Round 4 should read:
Round 4: *P3, [C6F, p4] 2 times, k6, p1, repeat from * to end of round.
I’ve corrected the pattern above. Please let me know if I can help with any other questions!
Gina
Hats look great! And your patterns have been my favorite for the last two years!
What kind of cast on do you use? It looks much neater than mine…
Hi Natalie-
We recommend using a long tail cast on. Here’s a tutorial: https://www.purlsoho.com/create/2006/09/29/long-tail-cast-on/
Thanks for getting in touch!
Molly
Hi, thank you so much for this pattern, cables on a smaller scale than an Aran sweater, works for me! My question is I want to use a skein of the Purl Worsted twist for the adult size, will one skein by enough?
Hi Tamara,
Worsted twist would be a great substitution, but to make the full adult size hat you need about 200 yards. I would advise getting 2 skeins unless you want to make the hat shorter than the pattern suggests. Thanks for your question!
Gina
I’ve ordered the yarn and can’t wait to start! One question: I saw a photo on Ravelry showing the cap as worn. What is the overall length of the hat? If I want more of a cap and less “toque,” how long would you recommend that I knit before decreasing? Thank you!
Hi Megan!
Please see my response to Katrina above. Thanks for your question!
Gina
Hi there, I have two boys but they are nearly one and two and a half. I’d like to make this for them but I think I would need a toddler size. Is there one or if not, any recommendations as to how to alter the size to fit toddlers?
Thanks,
Manuela
Hi Manuela,
There are 2 different ways you could size this hat to fit a toddler.
1. Use the Alpaca Pure yarn, but knit with the yarn held double throughout. For a more detailed explanation on how to do this, please see my response to Tonya’s question above.
2. Follow the baby pattern but use Purl Soho Super Soft Merino yarn in place of the Alpaca Pure yarn. I would suggest using US #8 needles for the ribbing and US #9 needles for the body, but make a gauge swatch just to make sure.
Please don’t hesitate to let me know if you have more questions!
Gina
I will make one for my kid this winter.
I love the pattern, and I just received the yarn to make a few for my family. How should I modify the pattern to make it for a child?
Hi Tonya,
A great way to make this hat for a child would be to follow the pattern for the baby hat, but knit with the yarn held double and use slightly larger needles. I would suggest an 8 for the ribbing and a 9 for the body, but as always you should make a gauge swatch to judge that the tension feels right. For a child’s hat, you’ll want the hat to have a circumference around 19-20 inches, so aim for each repeat of the cable to be 6.5 inches wide. I hope that helps! If I can help to clarify more, please ask away!
Thanks!
Gina
Hi there,
Somewhat in line with Erin’s question about being able to print a pattern, I like to upload my patterns to KnitCompanion on my iPad. It’s super easy to mark which row I’m on, so I always know where I am even when I put the work down for a few days. KnitCompanion requires a PDF version of a pattern to get started… I’d love to be able to access your pattern in PDF form, perhaps with just one or two of the more helpful photos. Is there a way to do that?
Thanks!
Hi Beverly-
Unfortunately this pattern isn’t available as a PDF but this is something we are working on for future patterns. You can save it as a PDF yourself by copying and pasting all the info you need into a Word or Text doc and saving as a PDF from there. I’m sorry there’s not a simpler solution! Thanks so much for writing in!
Molly
Hi,
I’m fairly new to knitting, so I’m not yet a pro on gauge/swatches/etc. I have a skein of 100% baby alpaca in my stash that I would love to knit this hat with. It is 100g/218 yd, 4.75 stitches per inch on US 7. Is there a way to convert the pattern to accommodate the yarn I have and achieve the same size hat?
Thanks for your help!
Hi Sarah,
Great question! I would suggest, rather than altering the pattern, to knit with the yarn held double throughout. This will bring the yarn closer to the weight of the Alpaca Pure.
Thanks for writing in!
Gina
I am one of those rare souls who is allergic to alpaca. What other yarn would you recommend for the traveling cable hat?
Thanks
Hi Genia,
I know Alpaca allergy is rare, but surprisingly, you are not the first person I have heard of being allergic to Alpaca!
Our Worsted Twist is a great choice, assuming you are not also allergic to wool! It’s soft and equally enjoyable to work with. You will need 2 skeins to knit the Adult sized hat. Let me know if I can suggest more substitutions.
Best,
Gina
I’m knitting this now and trying to knit relaxed and not too tight but the adult hat still seems like it’ll be too small on the head. What circumference is the adult hat supposed to be? Just to put my mind at ease…
Hi Heather,
When completely relaxed and laying flat, the widest point of the hat should measure about 7 inches wide. It should easily stretch to fit a 22-23 inch circumference head. That being said, I am a pretty loose knitter myself, so if you are a tight to normal knitter, it may be wise to use a needle one or two sizes bigger for the body. Let me know if that helps, and thanks for your question!
Gina
I’d say your gauge is pretty incorrect in the pattern, especially if any yarn substitutions are made. Using a worsted weight yarn, I cast on the number of stitches for the adult hat, knit the ribbing, and then checked the gauge. Though it was correct according to the pattern, even with a very stretchy cast on the hat barely fit over my 11 year old sister’a head. I have to rip it all out and start again, which is very frustrating considering I’m normally a loose knitter and also have repetitive motion stress problems and can’t knit for long periods of time. Expecting any hat to double in circumference when put on a head is too much of a stretch, and I’m very disappointed.
Hello Mary!
We’re so sorry this hat didn’t come out as you would like! If your gauge is indeed 8.5 stitches per inch in the cabled pattern, the finished body circumference should be 17 inches and the hat is designed to fit an 18 to 21-inch head, so it’s not expected to double. I would recommend trying to block the hat so that it stretches a little more so that you don’t have to rip it out!
Best of luck and please write in again should you continue to have any issues with any of our patterns. We appreciate your feedback! -Alyson
I love this pattern.
Can I use a size 4 needle for the ribbing instead of a size 5?
Hi Mayuri-
You can use any size you need to get the correct gauge for the ribbing section. Many people find that they need to go up or down a needle size (depending on how loosely or tightly you knit) to get the correct gauge. If you are a loose knitter the size 4 needle might be the best. The only way to tell for sure is to knit a gauge swatch with the needles you’d like to use.
Thanks so much for your question!
Molly
I just finished knitting this and it may be my favorite item I have ever knit. I have already had two friends request that I make one for them, too. Thank you for continuing to provide such amazing free patterns!
I’m having trouble with copy and paste for this pattern and the links don’t work. Is it me or you? thanks, deb
Hi Deb-
The links seem to be working alright for us. Can you maybe try from another browser? Let us know if you’re still having problems.
Best-
Molly
Beautiful pattern! I am a tight knitter, so I used size 7/8 needles the first time I knit this hat.
I was wondering if I could alternatively use 5/6 size needles as suggested, but make the hat bigger by adding another repeat (5 instead of 4 repeats) of the ribbing/body (i.e start with CO 105 stitches)? It seems like the pattern is set up so that this would be okay, but I just wanted to check.
Thanks!!
Hi Camila,
It would certainly be ok to knit the hat at a tighter gauge and add an extra repeat. You are right, I set up the pattern so you can easily change the number of repeats (I wouldn’t recommend making a hat with less than 3 repeats though. 2 repeats would make more of a mitten shape!). You will need more yardage to make the hat with 5 repeats, so be sure to buy a little extra yarn. Thank you for your question! – Gina
Beautiful hat, lovely squishy yarn. Dropped by Purl Soho for something else and just had to grab this too. Was wondering whether anyone has charted the cable pattern? I’d do it myself but don’t have the software. Thanks!
Hi Jo-
We don’t have a chart of it but if anyone else has done it maybe they’ll post you a note here!
Thanks
Molly
Hi,
love this pattern bought some yarn to knit it up! I was just wondering though (and i’m not sure if I just missed this in the pattern…are we knitting in the round or is this Magic Loop?
Hi Irene-
This is knit in the round.
Thanks for your question!
Molly
This is a beautiful pattern. I needed a present that I could mail flat with a card to my dad for his birthday in a couple weeks and this fit the bill. I used US 6 and US 8 needles and left out one 12 round repeat so it would fit his wider head and not be too slouchy. Best of all I could finish the hat in a couple evenings. Thank you for providing a pattern that was so fun to knit!
Hi,
I absolutely love this pattern, and I’m doing a bit of translating at the moment (I’m a dane) to get knitting asap. I’ve encountered a slight problem (might just be my poor translating):
In the ribbing “round 1” has 21stitches in each repeat. That fits well with the 63 stitches alltogether for the babysize and 84 stitches for the adult. “round 2” is where I seem to get lost.
I’m supposed to end up with 30 stitches in each repeat as this is an increasing round. There are 9 pbf’s and m1r’s alltogether, and that adds up to 9 increases + the 21 stitches = 30. Yipee I thought, it all fits, but there are more stitches.
If i count all of the stitches I get 28 stitches, instead of the 21 i have from “round 1”. 28 stitches + the 9 increases (from pbr and m1r) = 37 stitches. What do I do with these extra 7 stitches? Or am I reading this pattern the wrong way.
Best regards from a desperate Dane 🙂
Hi Hanne,
Thank you for writing in! I think I have figured out what may be confusing you. It’s the difference between pfb and m1r. pfb takes one stitch and doubles it. Meaning, you have one stitch, then you work pfb, and that one stitch becomes two.
M1r adds a stitch between two stitches. M1r basically makes a stitch out of thin air, whereas pfb makes 2 stitches out of one. Knowing that, can you recount the stitches as you were counting, and let me know if you get a different result? I want to help you figure this out! All my best, Gina
Hi Gina!
Thank you so much for your answer – now it all adds up and I can get started on making these gorgeous hats! (Just wish I saw your reply before now)
Thank you for your help, and thanks for a great knitting community here on PurlBee.
Merry Christmas to you and your loved ones!
– The not-so-desperate Dane, Hanne 🙂
Hi,
I’ve just started to knit this fantastic hat and I’ve a question right away 🙂
When knitting the rib you say “*P1, [k2, p2] 4 times, k3, p1, repeat from * to end of round”.
and for the second round:
“Repeat Round 1”
but I see a different stitch than what I’m supposed to knit, i.e. I start with a P1 and I see a K1, then K2, P2 and I see P3 etc. Should I stick to the pattern or I have to knit what I see?
Thank you so much!
Eleftheria
Hi Eleftheria,
Thank you for writing in!
Are you working the hat in the round, on circular needles? If so, then you should follow the pattern for each row of ribbing, which would be the same as “knitting what you see”. Let me know if that makes sense. All my best, Gina
Can you suggest the best way to swatch the body of the hat? I knit a flat swatch last night before I realized that it wouldn’t work since the pattern is written for knitting in the round. Do I basically have to cast on 60 stitches, knit 2 repeats of the hat in the round and then fold it in half?
Hi Christina,
Thanks for writing in with your question! We have a tutorial for swatching in the round, just click here. Please let me know if I can help with any other questions! – Gina
Thank you for the pattern. I am wondering which ssk method you recommend; slip knit wise twice or slip knit wise, slip purl wise before knitting the two stitches. The latter method offers a flatter stitch. Which method do you recommend?
Hi Laura,
Great question! I use the latter method. This tutorial shows you how: Let me know if I can help with any other questions! Thank you for writing in! – Gina
I cannot find how to do the ssk referred to in the pattern. There is no tutorial attached on your Nov 13 2014 post.
Thank you
Hi Claudia,
Thanks for writing in! We do have a tutorial for ssk available. It can be found here: https://www.purlsoho.com/create/2013/08/13/slip-slip-knit-ssk/
We hope that this is helpful!
-Cassy
Is there a place I can get this pattern in .pdf format? When I print it from here it is really tiny. My eyes are too old for tiny.
Thanks, this looks like a challenging project for me.
Hi Lisa-
This pattern is available as a PDF. It is linked directly under the “Pattern” headline.
Thanks for getting in touch and good luck with the project!
Molly
Hi, I was wondering how much extra yarn you have left over from the baby size? I have a skein of alpaca pure from the garter ear flap hat left over that I would like to use. It is a pretty full skein, I didn’t need much to finish the hat, but if the baby size uses the entire skein I doubt I would have enough.
Thanks!
Hi Shelley, I used about 3/4 (three quarters) of the skein for the baby hat. Thanks so much for writing in with your question! I hope you enjoy knitting the hat. – Gina
Thanks so much for providing such a wonderful, free pattern! I’m having a difficult time finding 20″ needles, though. Do you think it would be possible to knit the pattern on a 16″ circular needle?
Hi Kerry, Thank you for writing in! 16 inch circulars would absolutely work for this project. All my best and happy knitting! – Gina
Hi, I’m about halfway through the adult sized hat and I’m realizing it’s much too small, even though I’m using a needle size larger than the pattern indicates. I’m freaking out because I’ve spent a lot of time on this, and just wondering if there’s anything I can do to stretch out the finished hat without ruining it? Thanks!
Hi Ruby,
Thanks for writing in with your question!
100% alpaca yarn has a lot of give and stretches very easily. You may notice that it stretches out after a couple wears. If the hat is still too tight for your liking, you can block the hat and stretch it in the process. To stretch the hat, soak it in luke warm water for 15 minutes. Squeeze out the excess water. Stretch the hat gently with your hands. Lay the hat flat to dry, stretch it again periodically as it dries. I hope that helps! Please let me know if I can answer any other questions. – Gina
I am trying to knit the Baby size, on page 1 the description the it says “Baby (Adult). When I get to the pattern part, round 1 (P2, k3) 4 times is the directions in the () for baby or adult? Sorry I am just a little confused.
Thanks, Jodi
Hi Jodi,
Thanks for writing in with your question! The brackets like this [] contain information for all sizes. The parenthesis like this () contain information for the adult size only. Please let me know if I can clarify further! Enjoy! -Gina
Hi there. The cable in this kid’s hat is beautiful and I’d love to make it for myself! I’m an adult with a 22 inch head. Can you give me any advice on how to modify the pattern so I can make this hat for myself? Thanks!
Hi Elena-
There is pattern is for both adults and children! Check out this information under the “sizes” headline!
Thanks for getting in touch!
Molly
Your most recent freebie pattern (Traveling Hand-Warmers) uses Mulberry Merino. I’d like to knit both the hand-warmer sand this hat out of the Mulberry Merino. Would you provide the conversion for the yarn change for this pattern?
Hi Julia, Thanks for writing us with your question! It’s not possible to knit the Traveling cable hat in Mulberry Merino without substantial pattern adjustment. A quick fix would be to knit with 2 strands of Mulberry Merino instead. Then you can follow the pattern as written. You’ll need around 360 yards of Mulberry Merino to knit the hat this way. Happy knitting! -Gina
Thank you absolutely love it
What is the weight category of this yarn?
Hi Donna,
Thanks for writing us with your question! This is a worsted weight yarn.
Have a great day, Gina
Is there any way I could get the cable in chart form? It’s easier for me to know which cable I am knitting that way. Or could you tell me which of the instructions are the traveling cable? Or is it from a book? Thanks so much.
Hi Molly,
Great question!
I’ve heard that someone made a chart for this and uploaded it to ravelry. I would check there! Let me know if you find it. Thanks for writing us! -Gina
BrenBoone charted it, bless her.
http://www.ravelry.com/projects/BrenBoone/traveling-cable-hat
Thanks for sharing, Jo!
I love this hat and I’m so excited to make it! But I can’t even get passed the first row … I’m not a new knitter and I cannot, for the life of me, figure out what I’m doing wrong. I’ve restared the hat 3 times and the frustration is intense.
I’m assuming that the first row ends where the pattern ends with a k3, p1 … but I’m ending up with 12 extra stitches. Where am I going so wrong!?
Hi Emmie! Thanks for writing and very sorry that you’ve been having trouble! Let’s figure out what might be happening! Have you finished the ribbing and have you worked Round 2 of the Ribbing, which would leave you with 120 stitches on your needle? Let us start from there and we’ll figure out where you may be getting stuck!
I am having the same problem – I must be reading the round 1 repeat incorrectly? You cast on 84 stitches but round 1 is in a pattern of 24, which divides into 84 3.5 times – shouldn’t it repeat/end evenly? I do the 4 sets of 5 and then the 1 set of 4 and it doesn’t seem right. Thanks for any help!
I don’t know how to delete my previous comment, but I figured it out!
Kristy,
Hello! We are so glad that you figured it out! If you have further questions, please let us know!
Best,
Kumeko
Hi,
I’m quite new to knitting and I love this pattern but I’m not quite sure what wool to buy. Do you know of an equivalent wool I can use that is available in the UK? I’ve been searching for 100% baby alpaca but have not had any luck finding anything yet.
Many thanks!
Hello Chantal!
While we love our Alpaca Pure, you can definitely use any heavier worsted weight yarn for this project. Keep in mind that this hat is knit very densely, so make sure to check your gauge!
If you want to go with our yarn, we ship internationally! Its available here: https://www.purlsoho.com/purl/products/item/9307-Purl-Soho-Alpaca-Pure
Happy knitting! -Alyson
The circulars I have are all 24″. Do you think that would be terribly uncomfortable to knit an adult size hat with?
Hello Becky,
Since the circumference of the hat is much smaller than 24″, you will be essentially using the magic loop method if you proceed with that length of needle. Its not impossible, you will just have to pull the cord and it would be slightly uncomfortable.
Hope this helps and happy knitting! -Alyson
Hi! Anyway this could be modified for sport weight yarn? I REEEAAALLLLY want to make both the fingerless gloves and hat but the yarn I want to use for the gloves only comes in a sport weight.
Hi Jasmine,
We don’t currently provide these patterns in sport weight yarn, but they shouldn’t be too difficult to modify. The first thing you would need to do is work up a gauge swatch in pattern of the yarn you’d like to use and see what your measurements are. Since sport is a finer weight, you would just need to figure out how many more repeats of the pattern would give you the circumference you need. Feel free as you proceed to write back with any additional questions. Good luck and thanks for writing!
Kristy
Great pattern! I’ve been a knitter for over 40 years, and it’s still exciting to find a pattern that is not difficult and looks great. I’ve also cheated and with a pattern this intricate lookng it worked, and used straight needles and just seamed it. Since there’s so much going on people look at the pattern not the seam. Going to try the arm warmers next… Thanks!
We’re so glad you like the pattern! Enjoy! -Alyson
Hi
I’ve can’t get away with the round so is it easy to convert to straight needles.
Hello Linda!
This pattern is written in the round, so in order to convert it to straight knitting, after the ribbing, you would have to make every other row purl all, while keeping all the cable rows on the right side of the piece. You’d also have to break the round and then seam it up at the end.
It won’t be too hard–give it a shot! Best of luck! -Alyson
I love this pattern. But I am new to knitting in the round, but ironically, I feel more comfortable knitting with double pointed needles than the circular needles. If I want to knit an adult size hat, with 84 stitches, how many needles do I use? I guess I’m a little confused because it says in the pattern if you want to use just double pointed needles you could put 30 stitches on each needle…since winter is coming I d
would love to knit this soon but just want to wnow what to do before I do! Thanks. 🙂
Hello Hannah!
If the size you’re making calls for 84 stitches, then its perfectly divisible by 4, so I would put 21 stitches on each needle. I wouldn’t want to try and squish a pattern like this on only 3 needles, it would feel too snug! Congrats on mastering double pointed needles! Keep up the good work! -Alyson
Hello,
I had a few questions about using the tubular cast on for this pattern. If I use a 1×1 tubular cast on, does it work with this kind of ribbing? Or do I need to alter the tubular cast on to fit this type of ribbing? If so, how do I do that? What type of cast on is used in the image on this page and Is there another type of cast on other than a cable cast on that would work well for this pattern?
Hello Megan!
Good eye! Because of the unusual ribbing in this pattern, it would take a lot of extra work to adapt a tubular cast on for this pattern. Throughout our patterns, unless otherwise specified, we tend to use the Long Tail Cast On method. Take a look at our tutorial here: https://www.purlsoho.com/create/2006/09/29/long-tail-cast-on/
Best of luck and happy knitting! -Alyson
Hello to do it for adult how many stitches do I need to cast on?
I did´t understand the adult measures and I love it!
Thank you,
Valeria,
Hello Valeria!
The adult size is in parenthesis () throughout the pattern and you’ll need to cast on 84 to get started! Best of luck and thanks for your kind words about the pattern! -Alyson
Really want to make this pattern, it’s gorgeous! But I need it to be a bit wider for a larger man’s head. I don’t want to use bigger needles as that will only make the hat less dense & less warm. I’m using acrylic yarn so it doesn’t stretch much. Can you tell me how many more stitches I could add & then how I would decrease properly? Really appreciate any help!!
Hello Rose!
So sorry for the delay in responding. Since this pattern is quite intricate and very carefully planned out, the best bet really would be to use slightly larger needles and slightly thicker yarn, so that you don’t have to change all the mathematics of the pattern. Then you wouldn’t have to change the density of the yarn, just the proportions of the item entirely.
Please let us know if this makes sense and if you need any other tips! I would make sure to do a gauge swatch so that you can measure how many stitches per inch you get and then figure out if it would be large enough for the size you would like. Hope this helps a bit, sorry its not an exact answer. Best of luck! -Alyson
Thanks for the reply! Was really hoping to use a worsted weight yarn but if there’s no way then I will try with a bulky & a bit bigger needles as you suggest. Such a beautiful pattern… Cheers 🙂
i have tried row 2 3 times and never come out correct. The pattern I am following makes 26 stitches . Is this correct? i have 26 times 4 with 10 stitches over.and not completing
Hello Aimee,
With the smaller size, you should be increasing a total of 27 stitches in the second row. Remember to do the original pfb before the bracket in your repeats, since that is included in the asterisks as well. Please let us know how it turns out! -Alyson
Hi there! Beautiful pattern. I am a little confused about the size of the circular needles — in the pattern, it says to use 20″ circulars. I have an interchangeable set and a short 16″ cable. When attached to the needles, the total measures 18.5″; however, there are way too few stitches to join in the round to make the baby-sized hat. Am I doing something wrong? Should I just be using size 5 DP needles for this project instead of circulars? Help! Thank you!
Hello Vanessa!
Yes you’re correct. You can use the double points only for the entire Baby sized hat and for the adult size you can totally use the 16″ instead of the 20″. Best of luck and thanks for writing in! -Alyson
Hi,
I accidentally ordered the purl soho super soft merino 2 skeins for this hat as I was looking at the kids travelling hat. Is there a way to make the adult travelling hat with the super soft merino? Was wondering if I could either add a repeat to the kids hat or use the adult pattern and take off a repeat?
Thx!
Hi, Dana!
Thank you so much for writing in! Sorry about the delayed response! If the hat is for a women’s small and the head measurement is not larger than 21 1/2 inches (measuring around the largest part of your head), you won’t need to make any changes to the hat and it should fit just fine. If the head is larger than 21 1/2 inches, you could knit the hat longer (2 repeats of the cable pattern instead of 1). This will give you a little more space. The yarn has a lot of give, especially when knit at the correct gauge for this pattern, so it should stretch to fit with the extra rows added. Again, thank you for your question. If you have further questions please let us know!
Happy knitting,
Kumeko
I’m new to knitting and have never followed a pattern before. I’m confused about the joining in the round. The first stitch of round 1 is a purl. Does this mean I purl to join in the round? Or do I knit to the first stitch passed my marker and then begin with my 1 purl stitch?
Hello, Erik!
Thank you for writing in and sorry for the delayed response! You are correct, you will purl (instead of knit) to join in the round. If you have further questions please let us know!
Best,
Kumeko
I really love this hat and really would like to make it but i usually have a hard time with written patterns rather than just watching a video about it so if anyone knows a link to a video tutorial on this hat or just on the traveling cables please write it down 😀 Thank you!