Boyfriend Hat
In Levis, flannel button downs, canvas sneakers, and grandpa cardigans, a friend of mine and I used to laugh that rather than dressing for the boys we wished we were dating, we dressed like the boys we wished we were dating. And the funniest part was that despite our different taste in men, somehow our fantasies of their wardrobes were identical. Some things are for the everyman and, as it turns out, for the everywoman too.
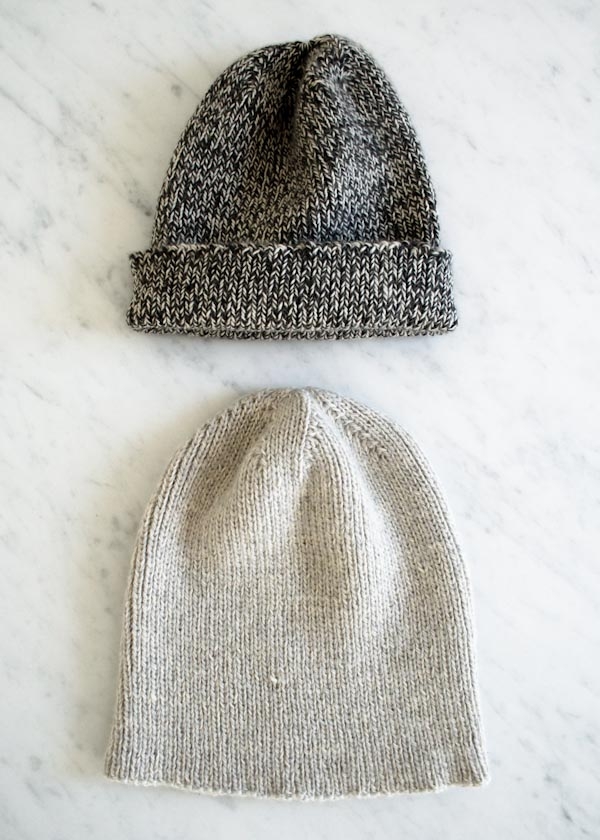
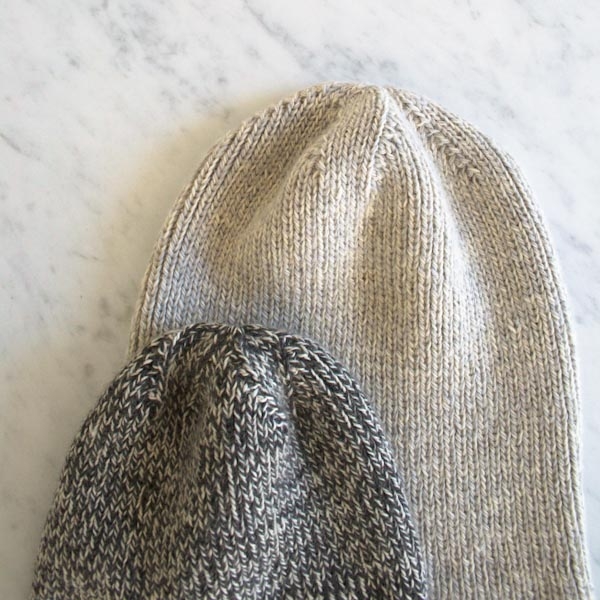
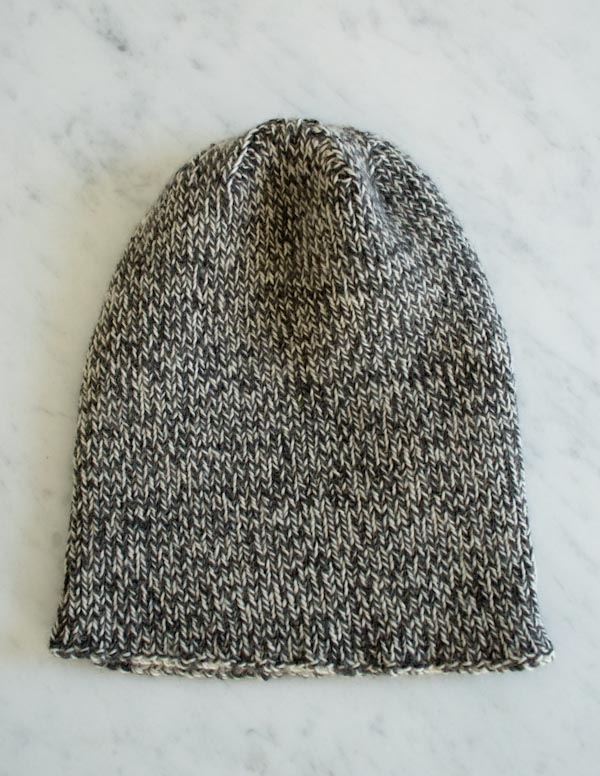
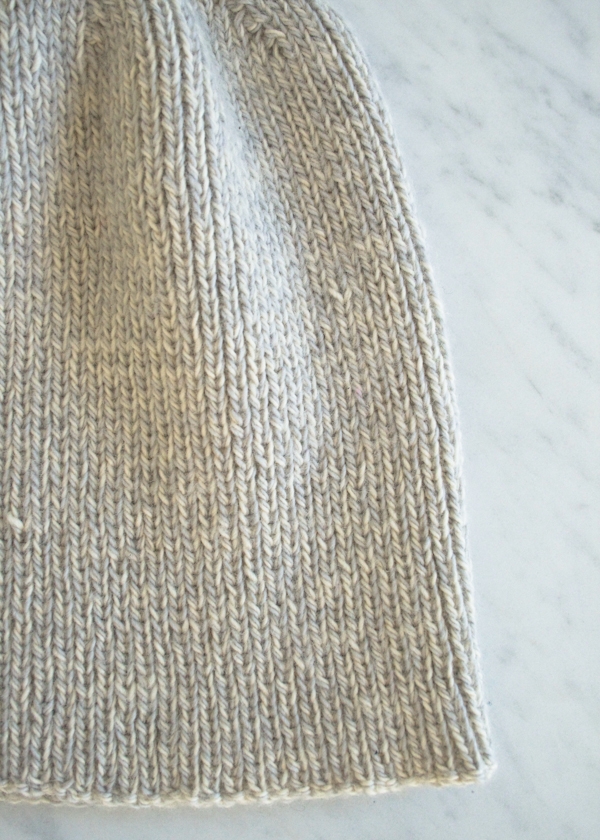
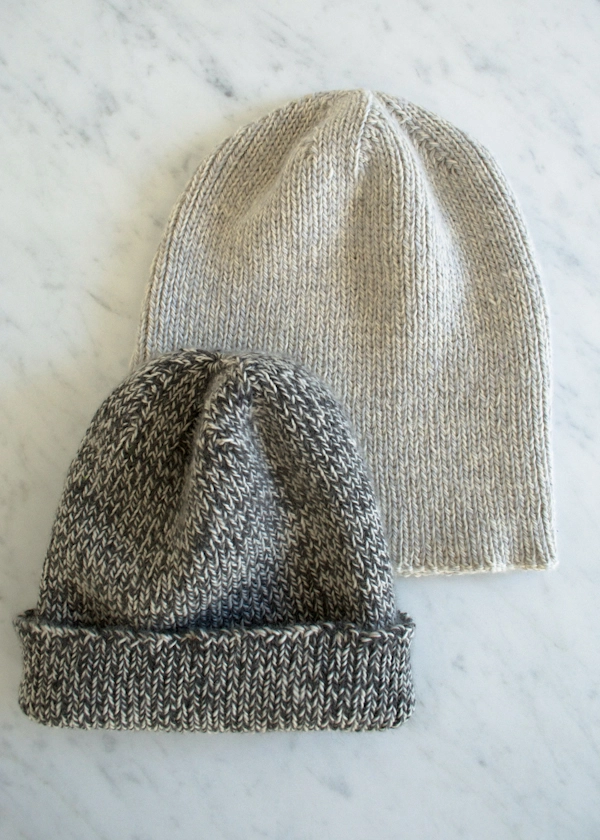
I designed the Boyfriend Hat with the versatility of any timeless article of clothing. Man or woman, wear it slouchy or cuffed. Pull it down taut or let it hover above the ears. Cuff it twice for a Wes Anderson style watchman cap.
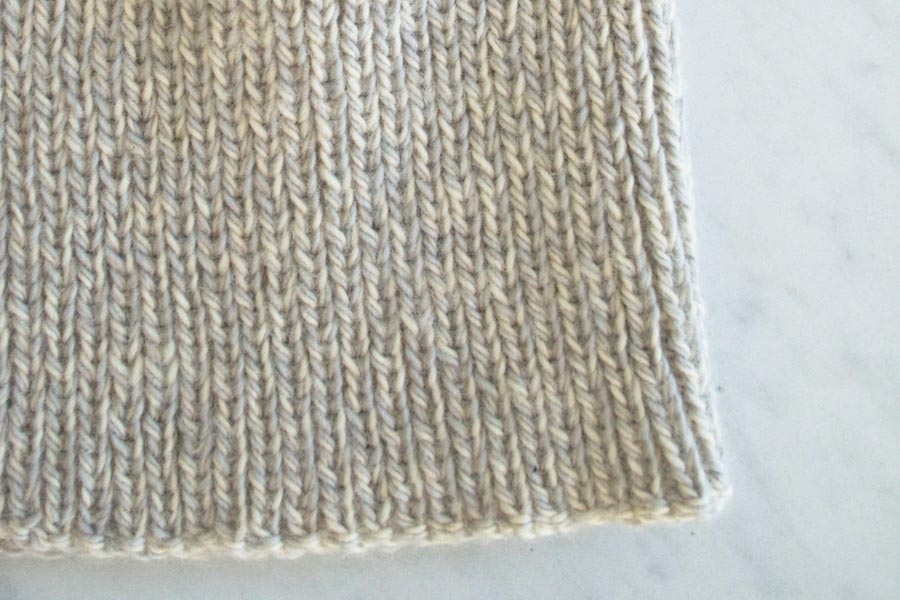
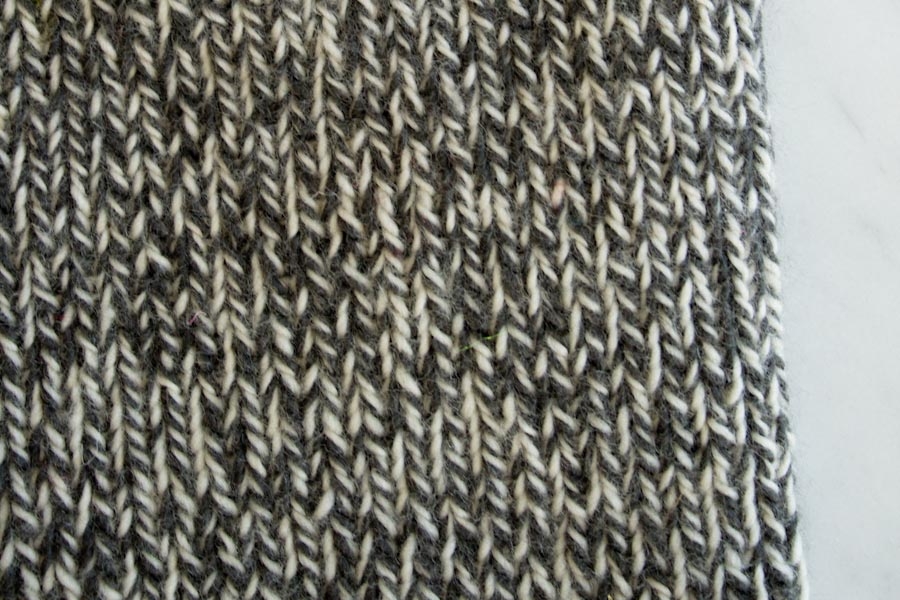
Knit up with two different colored strands of Purl Soho’s Line Weight merino, the effect is gently marled and toasty warm. In a tight 1 x 1 rib, this hat is also exceptionally elastic and durable, hugging the head and feeling decadently soft, even through winter’s wear and tear.
The Boyfriend Hat is the hat you wish he had so you could steal it from him. Or is it the hat you have that he wants to steal from you? I don’t know… Just make two. -Laura
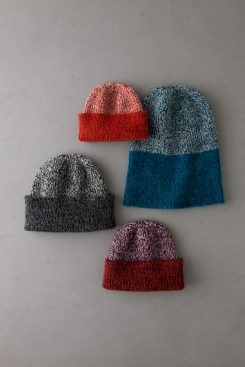
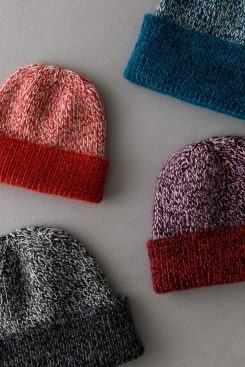
Update: New Colors
October 2014

To celebrate Line Weight’s newest colors we made a fall 2014 set of Boyfriend Hats, this time in the rich and spicy colors of the season! For the full story, additional pictures and all the yarn details, just click here!
Update: New Style + Sizes
September 2020
We’re revisiting the classic details of our beloved Boyfriend Hat with expanded sizing and a new color motif. Our Best Friend Hat is the perfect accessory for you and your friend circle! View the updated pattern and color combinations by clicking here!
Designed by Purl Soho designer, Laura Ferguson.
Share your progress and connect with the community by tagging your pics with #PurlSoho, #PurlSohoBusyHands, #PurlSohoBoyfreindHat, and #PurlSohoLineWeight. We can’t wait to see what you make!
In September 2014, we made a new set of Simple Stitched Hot Pads in the wild and painterly prints of the newest Nani Iro fabrics! For the full story, additional pictures and the materials list click here! – See more at: https://www.purlsoho.com/create/2013/12/14/mollys-sketchbook-simple-stitched-hot-pads/#sthash.vraYvY2V.dpuf
In September 2014, we made a new set of Simple Stitched Hot Pads in the wild and painterly prints of the newest Nani Iro fabrics! For the full story, additional pictures and the materials list click here! – See more at: https://www.purlsoho.com/create/2013/12/14/mollys-sketchbook-simple-stitched-hot-pads/#sthash.vraYvY2V.dpuf
In September 2014, we made a new set of Simple Stitched Hot Pads in the wild and painterly prints of the newest Nani Iro fabrics! For the full story, additional pictures and the materials list click here! – See more at: https://www.purlsoho.com/create/2013/12/14/mollys-sketchbook-simple-stitched-hot-pads/#sthash.vraYvY2V.dpuf
Materials
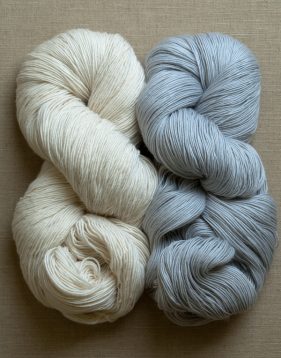
- 2 skeins of Purl Soho’s Line Weight, 100% merino. Each skein is 494 yards/ 100 grams.
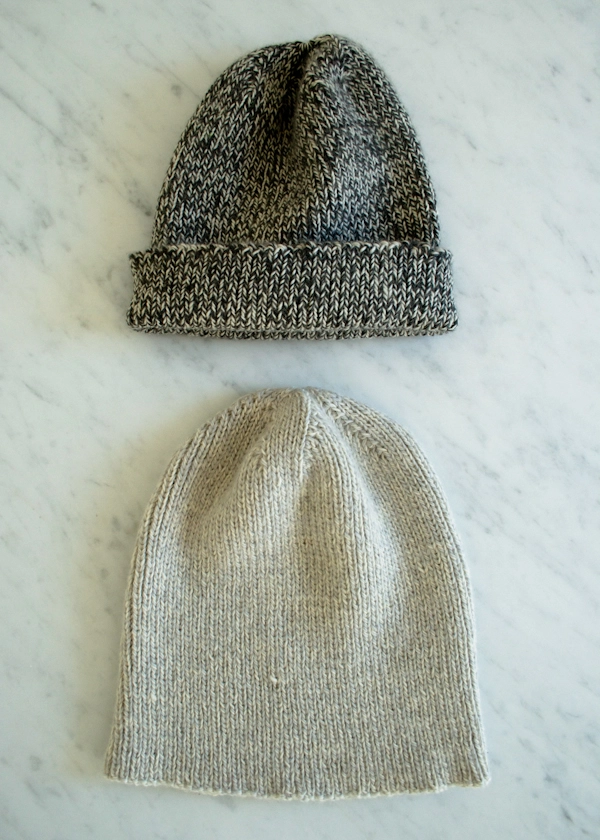
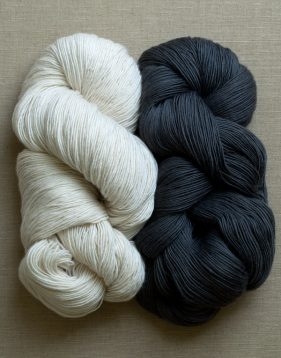
- Color A: 1 skein; approximately 235 (265, 305, 355) yards required. We used the color Heirloom White.
- Color B: 1 skein; approximately 235 (265, 305, 355) yards required. We used the color Toasted Charcoal for the Adult Small and Oyster Gray for the Adult Medium.
- A US 3 (3.25 mm), 16-inch circular needle
- A set of US 3 double pointed needles
- Stitch markerss, including one unique
NOTE: If you are making a solid color hat (using two strands of a single color) rather than a marled hat (using a strand of two different colors), you’ll need 1 (2, 2, 2) total skeins of Purl Soho’s Line Weight.
Gauge
39 stitches and 34 rows = 4 inches in 1 x 1 rib, unstretched, holding together a strand of Color A and a strand of Color B
Sizes
Adult Small (Adult Medium, Adult Large, Adult Extra Large)
- Finished Circumference: 14¾ (16½, 18, 19¾) inches, un-stretched, comfortably stretching to approximately 19¾ (21½, 23, 24¾) inches
- Finished Height: 9½ (9¾, 10, 10¼) inches
Pattern
Begin
With one strand of Color A and one strand of Color B, cast 144 (160, 176, 192) stitches onto circular needles. We used a basic Long Tail Cast On.
Place marker and join for working in the round, being careful not to twist stitches.
Round 1: *K1, p1, repeat from * to end of round.
Repeat Round 1 until piece measures 8 inches from cast-on edge.
Shape Crown
NOTE: Switch to double pointed needles when necessary.
Set-Up Round: [Work 36 (40, 44, 48) stitches in established 1 x 1 rib pattern, place marker] 3 times, work in established pattern to end of round.
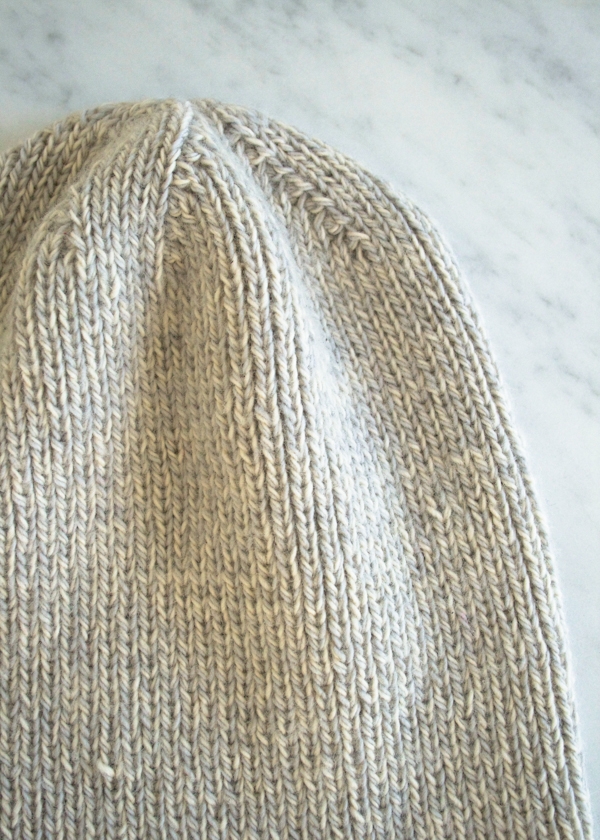
Round 1: *[K1, p1] four times, k1, knit 2 together (k2tog), work in established pattern to 2 stitches before next marker, slip slip knit (ssk), repeat from * to end of round. [8 stitches decreased]
Round 2: *[K1, p1] 4 times, k1, purl 2 together (p2tog), work in established pattern to 2 stitches before next marker, p2tog through back loop, (tbl) repeat from * to end of round. [8 stitches decreased]
Repeat Rounds 1 and 2 five (6, 7, 8) more times. [48 stitches]
Next Round: *Ssk, [k1, p1] 2 times, k1, k2tog, p1, k1, p1, repeat from * to end of round. [40 stitches]
Next Round: *Ssk, p1, k1, p1, k2tog, p1, k1, p1, repeat from * to end of round. [32 stitches]
Next Round: *Ssk, k1, k2tog, p1, k1, p1, repeat from * to end of round. [24 stitches]
Finish
Cut yarns and thread them onto a tapestry needle. Draw the needle through the remaining stitches. Pull tight and bring tails to inside of hat to weave in.
Weave in remaining tails and block as desired.


Hi, could you knit this whole hat on US size 3 (3.25mm) double pointed needles, to avoid the expense of buying both circular and DPNs? Thanks for your help!
My head circumference is about 22inches so I am planning on knitting the women’s small?
Hi Seona,
Great question! You can definitely knit an entire hat on double pointed needles if you wish! You will, however, want to make sure your double pointed needles are a bit longer than usual to accommodate the number of stitches in the body of the hat. I would recommend using at least 8 inch long needles, such as the longer length of our Double Pointed Bamboo Knitting Needles.
I hope that helps!
Julianna
I’ve been trying to complete this hat for 2 years ( I’m serious! But not consistently knitting obviously but really – no way this should take this long.) I’ve had to rip down the top crown decrease area at least 5 times – just don’t know what I’m doing wrong. When you get to the “repeat rows 1 & 2 (5,6,7,8) times do you mean a total of (5,6,7,8) rows or double this amount?
Hi Barbara,
Thanks for reaching out! For this section of the pattern, the numbers following the instructions to repeat rows 1 & 2 refer to each size of the hat – for instance, if you are knitting the smallest size of the hat, you will repeat rows 1 & 2 five times for a total of ten rows, if you are knitting the second size of the hat you will repeat them six times for a total of 12 rows, and so on. There’s still plenty of winter to enjoy your hat in, so I hope that clears things up so you can finish it quickly!
Best,
Julianna
Hi Barbara,
I love the shape and size of this hat. It is exactly what I have been looking for. I did want to do a duplicate stitch design on the hat or an intsrsiavir fair isle design. Is this possible on this right 1×1 rib?
Best,
Debbie
Hi Debbie,
Thanks for reaching out! Unfortunately I would not recommend either intarsia or duplicate stitch over 1×1 ribbing. First, it will be quite difficult to predict how your design will look when the hat is worn since the ribbing will stretch out, and both techniques reduce elasticity, so you will end up with puckered areas where the colorwork is. Instead, I would suggest our Classic Cuffed Hat without a pom pom. The shape is quite similar to our Boyfriend Hat since the decreases are worked in the same manner, but you can easily add a design with the colorwork of your choice on the stockinette body of the hat.
I hope that helps!
Julianna
Hi, if I were making this hat starting out with 120 stitches how would I adjust the shaping the top of the hat? Would I do the set up round with 30 stitches and then putting a marker, then following the rest of the pattern as stated. Or would I also alter round 1 and so on?
Hi DD,
Thanks for reaching out! The decreases in this hat are written for a multiple of 16 stitches, so I would recommend starting with either 112 or 128 stitches – fortunately the ribbing is quite stretchy and forgiving! You can then place your markers for the decreases so that your stitches are divided evenly into four sections and work the decreases as written.
Happy knitting!
Julianna
I’ve knitted this hat many times and love it. As I get to the end though once more I wish there was one more round of decrease to reduce the final number of stitches from 24 to say 16. No matter how tight I pull I end up with a small hole because of number of stitches (24). The pattern of the decrease is so perfect I don’t want to mess it up by guessing what to do. Is there another easy decrease round you can suggest? Maybe not or you would have included it in the first place. Here’s hoping but love it anyway!
Hi and thanks for writing in! We stopped the decreases at this point because working one more decrease round will use up all your purl stitches, leaving you with one round of stockinette at the top of the hat. However, I think it will look fine since you will be cinching the top shut – especially since it will be easier to get it even tighter! The final decrease round would be:
Next Round: *Ssk, k1, k2tog, k1, repeat from * to end of round. [16 stitches]
Best of luck and I hope that helps!
Julianna
Thank you so much. I am much happier with less stitches to cinch in and the round of only stockinette stitches is not detectable at all. From now on I’ll always finish this way.
Hi! Thanks for the gorgeous hat pattern. I have been looking for a double knit/yarn hat pattern like this for a while but I have sport weight yarn to use. Is there a way to convert this pattern for that yarn weight?
Hello Bri,
Thank you for reaching out! The first thing to do is to knit up a little gauge swatch to see how many stitches per inch you are getting. Once you have this number you can multiply it by your desired hat circumference to get you cast on number. I would cast on a multiple of 16 as this will be the easiest number to convert your decreases to.
I hope this helps and happy knitting!
-Marilla
I started this hat a few days ago and found that it has a LOT of capacity for stretch. I ripped it out as I anticipated it would stretch far too much. I started with the men’s medium and its resting circumference was just shy of 20.” When i ripped it out i could stretch it comfortably to about 25″ but could stretch it all the way to about 30″ (without it being too uncomfortable). Would it be too much to size down 32 or even 48 stitches? My SO likes beanies that fit snug so I want to factor in an appropriate amount of stretch and am not sure if I should go off the “comfortable stretch” or the over stretch.
Hi Lulu,
Thanks for reaching out! It sounds like your gauge might be off, since our measurement for the unstretched Men’s Medium is 18 inches. In that case, it may be best to size down to the Women’s Small since it will turn out equivalent to a Women’s Medium/Men’s Small.
Happy knitting!
Julianna
I don’t understand why I can’t figure this out, but I’m here:
SHAPE TOP OF HAT
NOTE: Switch to double pointed needles when necessary.
Set-Up Round: [Work 36 (40, 44, 48) stitches in established 1 x 1 rib pattern, place marker] three times, work in established pattern to end of round.
Round 1: *[K1, p1] four times, k1, k2tog, work in established pattern to 2 stitches before next marker, ssk, repeat from * to end of round. [8 stitches decreased]
After I work Round 1 ([K1, p1] four times, k1, k2tog) I have 3 stitches left before the next marker – not 2. I have 36 stitches and the pattern only accounts for 33. Can you tell me what I’m doing wrong?!?
Hello Francine,
Thank you for reaching out! For this section the pattern says “*[K1, p1] four times, k1, k2tog, work in established pattern to 2 stitches before next marker, ssk, repeat from * to end of round. [8 stitches decreased]” This means that your first set of 36 stitches you will work “[K1, p1] four times, k1, k2tog” (a total of 11 stitches worked) and then you will “work in established pattern to 2 stitches before next marker, ssk” This means you will (P1, K1) 11 times, P1, SSk.
I hope this clears things up for you and let us know if you have any further questions!
-Marilla
Amazing! I interpreted the pattern the same way as Francine and was really frustrated that it seemed more difficult than it should be. Was really hoping the comments would clear up my confusion and it has! Thank you so much, both! Now I can finally finish this hat 🙂
Can you tell me the total number of yards needed to knit this up?
I have line weight at home and want to make sure I have enough. Thank you.
stephanie
Hi Stephanie,
Thanks for reaching out! I would be happy to let you know the exact yardage! Can you tell me which size you want to knit?
Best,
Julianna
I am trying to follow your instructions to P2tog tbl, but they don’t match what I am seeing on YouTube, and now 6 rows in to my decrease I feel like I’ve messed something up. Can you offer any guidance??
Hi Christina,
I’m sorry to hear that you are having some trouble with the decreases! It’s hard to say what might be going wrong without seeing your work, but you can send us a picture of your decreases at customerservice@purlsoho.com and we would be happy to take a look!
Best,
Julianna
I CO 176 stitches and started the decrease. I did Round 1, Round 2, and have repeated Round 1 and 2 five times. But I have 120 stitches in this fifth repeat; if I do two more repeats I will have 104! What am I doing wrong?
Hi Keipop,
Thanks for reaching out! It sounds like you must be missing some of the decreases in either Row 1 or Row 2. Every round in the decrease section should remove 8 stitches, and it sounds like you are only decreasing by 4 stitches each round. After the set-up round, you should have markers dividing your stitches into four equal sections. In Decrease Round 1, you will work both a k2tog and a ssk each of the four sections, and in Decrease Round 2, you will work a p2tog and a p2tog tbl in each section. I would suggest double checking the rows to see which of these decrease you are missing or possibly working incorrectly.
I hope that helps!
Julianna
I am having a hard time determining which size hat to knit. It will be for someone who’s head circumference measures 23 inches. The Men’s Medium had “comfortably stretches” to 23″, while the Men’s Large stretches to 24.75″. Which size would you recommend? Thank you for your help. I am anxious to get started on this project with lovely PurlSoho yarn!
Hi Kelly,
Thanks for reaching out! This hat is meant to fit fairly snugly, so I would recommend knitting the Men’s Medium size for the most comfortable fit.
Happy knitting!
Julianna
It seems to me there is a mistake in the ‘”shape top of the hat” round 2 paragraph. After decreasing 8 stitches in round 1, I have 42 stitches between the markers. I round 2, I am instructed to k1,p1 four times, k1, p2tog, up to two stitches before marker.
This does not add up. Each round adds up to 11 stitches; 11+11+11=33. What am I supposed to do to get to 40 stitches (2 stitches before the market)?
Hello Michal,
Thanks for reaching out! For round 2 your p2tog is in the middle of this section so you will “[K1, p1] four times, k1, p2tog, work in established pattern to 2 stitches before next marker, p2tog tbl, repeat from * to end of round” When the pattern says to “work in established pattern” it just refers to your rib stitch, so you will be following the established rib stitch pattern.
I hope this makes sense and happy knitting!
-Marilla
Hey! sorry if this is a silly question, but for the gauge do we use double strands of the yarn or single strand? It looks like all of the hat is knitted using a double strand so not sure if that’s what I should do for the gauge also. Thank you! 🙂
Hi Helen,
Thanks for writing in! The gauge for this pattern should be knit with the yarn held double, just as you will knit the hat.
I hope that clears things up!
Julianna
I love the look of this hat!!not sure if this is a silly question but does it have to be knit using two strands of yarn or can it be knit with a single strand?
Thank you!
Hi Orna,
Thanks for writing in! Yes, you can knit this hat with a single strand of yarn, but you will have to use a slightly heavier weight yarn to make up for it, and I would strongly recommend knitting a gauge swatch. A sport weight yarn, such as Mulberry Merino, should be just about the right weight to use as a single strand in this pattern.
I hope that helps, and happy knitting!
Julianna
Hi Julianna, now that Purl Soho has discontinued Mulberry Merino, what yarn do you suggest to knit this with a single strand? Thanks for letting me know!
Hi Marcela,
Thank you for reaching out! As a substitute for Mulberry Merino, I’d recommend Wigeon (https://www.purlsoho.com/wigeon.html) or Season Alpaca (https://www.purlsoho.com/season-alpaca.html). Both of these yarns are soft and cozy alternatives to Mulberry Merino, and as they are both sport weight, they should work as a gauge substitute! Wigeon is spun from 100% fine Falkland Merino Wool, and as it is more tightly spun with more plies, it’s a warm and sturdy choice. If it is cozy and plush you are after, then Season Alpaca’s 100% super baby alpaca fiber content is what I would recommend! Hope this helps!
All the best,
Cat
Hello! I got to eight inches of length and realized I’d cast on 148 stitches ??♀️
I decreased four in the set up round, in hopefully unobtrusive places, being careful to maintain the established 1×1 pattern.
However, now I seem to be running into trouble in round two of the shaping – I found two knits next to each other and then when I undid that, of course I had an uneven number on my needle.
Is there any way to save this?
Hello Meg,
Thank you for reaching out! It sounds like you may have missed a decrease. sense it’s not to far back I would just un- knit, back to where you had an even number and start from there.
I hope this helps and happy knitting!
-Marilla
Thank you so much Marilla ? And can I ask another question, should the decreases always result in continuous knit purl pattern? Meaning I would never have two knots or two purls beside each other?
Hello Meg,
This is a great question! You will have knits next to knits and purls next to purls throughout your decrease section, however because you are decreasing every row this will resolve itself as you go.
I hope this helps and let me know if you have any more questions!
Best,
Marilla
Hi! This is my first time attempting to make this beautiful hat and I have some questions:
1. Are the DPNs truly necessary? I’ve grown accustomed to knitting in the round, but have never used DPNs before and I’m honestly nervous to use a new tool/confused as to how they’re supposed to be used.
2. Is there a full video tutorial somewhere? I’ve just started casting on, but looking forward to the ‘Set-Up Round’ and on has me getting anxious haha
Thanks!
Hello Margo,
Thank you for reaching out! When you get to the decrease section of this hat, the circumference of the hat will become smaller than the circumference of your needles. When this happens you will need to switch to double pointed needles, flexiflips, or Magic Loop. There is not a video tutorial for this project, but we do have explanations of Knit Two Together, Slip Slip Knit, Purl 2 Together (p2tog) + Slip Slip Purl (ssp) which are the only new techniques you will be taking on with this project.
I hope this helps and happy knitting!
-Marilla
Quick question.
I am on the first round in the shaping section.
I k1,p2 4xs then I k1 the k2tog until the next marker. But I am left with 3 instead of 2. There’s 36 stitches in between markers?
Hello Victoria,
Thank you for reaching out! For round 1, in shape top of hat, after you [K1, p1] four times, k1, k2tog, you then “WORK IN ESTABLISHED PATTERN”. This means you are knitting in your rib pattern until your last two stitches, when you have three stitches left you will knit your third to last stitch in your established pattern.
I hope this makes sense and happy knitting!
-Marilla
Hi, I was thinking of trying the tubular cast-on here. What do you think?
Hello Natalie,
Thanks for reaching out! A long tail tubular cast on would be beautiful for this project.
Happy knitting!
Marilla
Hi,
I made this hat for my wife’s birthday and I would love to make a matching one for our babe who is due end of November. If you could tell me the number of stickers to cast on I think I could figure the rest out. thank you so much.
Hello,
Thank you for reaching out! The first thing to do is to knit up a little gauge swatch to see how many stitches per inch you are getting. Once you have this number you can multiply it by your desired hat circumference to get you cast on number. I would cast on a multiple of 16 as this will be the easiest number to convert your decreases to.
I hope this helps and happy knitting!
-Marilla
Hi! I have a question…is the gauge in 1×1 ribbing done in single strand or double strand? thanks!
Hi Asha,
Thanks for reaching out! The gauge swatch should be worked with the yarn held double. Please let us know if you have any other questions!
Best,
Julianna
I have a question about the decrease section:
“Round 1: *[K1, p1] four times, k1, k2tog, work in established pattern to 2 stitches before next marker, ssk, repeat from * to end of round. [8 stitches decreased]”
“Round 2: *[K1, p1] four times, k1, p2tog, work in established pattern to 2 stitches before next marker, p2tog tbl, repeat from * to end of round. [8 stitches decreased]”
How do you determine which stitch to start with when you “work in established pattern”? I.e. after the k2tog, am I to start with a knit, or a purl? Same question for after the p2tog.
Thanks!
Hello Kate,
Thank you for reaching out- this is a great question! Basically, you are following the lead of your previous row to maintain your ribbed pattern. In your ribbed patted you are switching between purl bumps and knit vs, if the pattern asks you to “work in established pattern” you will knit your knits and purl your purls, using your previous row to guide you.
I hope this makes sense, but let us know if you have any further questions!
Happy knitting,
-Marilla
Hello!
I was hoping to make this hat with some letters on it. At first I planned on doing duplicate stitches but saw a note on how that would mess with the ribbing. Is there any way to do some intarsia with the ribbing? If not would it be possible to straight knit a couple inches in the middle of the body without messing with the shape too much?
(I’ve made the classic cuffed hat before but I was hoping to do lettering on something a bit warmer/ wind resistant).
Thank you!
Hi Alison,
Thanks for reaching out! Unfortunately intarsia won’t work for adding letters to any hat, as intarsia cannot be worked in the round, and I’m afraid that a stockinette area in the hat would distort the shape of the hat quite a bit. You could certainly try duplicate stitching over ribbing on a swatch to see how it would turn out! Just be sure to stretch your swatch to see how the duplicate stitching will look when the hat is worn to make sure you are happy with it before adding the monogram to the actual hat.
Best,
Julianna
Hi,
Do you think I could double knit this hat so that it is reversible? I’ve never double knit before, so a bit nervous about problems that might come up!
Hi Charlie,
Thanks for the question! This lovely hat is more or less reversible as knit! So long as you weave in your ends to be pretty much invisible, the hat is completely reversible!
I hope that this helps!
Cassy
Hello. Do you think this hat would work with 1 skein line weight Marino and 1 skein cattail silk? Knitting for someone who lives in a moderate climate.
Thanks.
Hello Betsy,
Thanks for reaching out! I think this is a wonderful idea. I would be sure to knit up a gauge swatch before getting started to avoid any unpleasant surprises.
I hope this helps and happy knitting!
-Marilla
Hi! I’d love to knit this hat for my husband whose head measures 23.75”. I’m guessing I should go with the men’s large just to be safe, but I’m concerned that it might not be snug enough. Which size would you recommend? Thanks!
Hi Jenny,
Thanks for reaching out! Ribbing, especially 1×1 rib, is extremely stretchy and forgiving, so you have a bit of wiggle room on the sizing! Both the Women’s Large/Men’s Medium and Men’s Large should fit, but the Women’s Large/Men’s Medium will be a bit snugger and more fitted, while the Men’s Large would be more on the slouchy side. If you aren’t sure, I would probably go with the smaller size!
Happy knitting!
Julianna
Hi, I am a little confused with the end of round 2 in shaping the top of the hat. The pattern says p2tg tbl, but then the link in the video shows p2tg and p2tg tbl + ssp. I am unclear which I am supposed to be doing for this final step, am I also supposed to be doing ssp? is p2tg tbl the same as doing ssp? (For a beginner knitter I am easily confused with the different terms not being consistent).
Thanks a lot! Otherwise, super excited about the hat.
Hi Liv,
Thanks for writing in! For this pattern, you will be working a p2tog, which is very similar to the ssp we show in the video. The only difference is that you won’t have slip the two stitches first, and can go straight to purling them together through the back loop. The ssp and p2tog tbl are interchangeable – although they look slightly different, they lean the same direction so you could use whichever one you prefer!
I hope that clears things up!
Julianna
Hi,
What would most closely replicate the Toasted Charcoal/Heirloom White combo? Could I sub Soft Black or River Rock?
Hi Natalie,
Great question! River Rock would be the most similar color to Toasted Charcoal.
Happy knitting!
Julianna
Hi! Would an alternating cable cast-on work for this hat? Wondering what cast-on is most appropriate. Thank you 🙂
Hi Nathalie!
Thanks so much for your question! While we used a long tail cast on for our samples, an alternating cable cast on would also be great for the 1 x 1 rib.
Happy Knitting!
Cassandra
Can anyone help? I am at the part where the pattern says there should be 48 stitches left. Meaning, I only have the three rounds to do before the part where it says “finish hat”. My problem is that I have 49 stitches instead of 48. Is this a major problem? Will it resolve when I get to the end anyway? Or what do I need to do on the step that follows the row where I was to end with 48 stitches but ended up with one more? I just don’t know if I should 1) rip back which is hard in the round with decreases or 2) do something different with the remaining rounds to get the hat to work
Hi Rebecca,
Thanks for reaching out! If your knits and purls have all lined up properly so far, I think it’s likely that you have only missed a decrease in the very last row, so first, I would recommend going over the previous row very closely to see if you can spot the error. Hopefully taking out just this one row will fix the problem! If not, I would recommend continuing on with the pattern, but pay special attention to the stitches between the decreases to make sure your knits and purls are stacking correctly. You may have to knit or purl an extra stitch at some point, but I think you will be able to knit the rest of the hat with an extra stitch!
I hope that helps!
Julianna
This is a perfect hat pattern. It is well written, easy to make and looks wonderful. The timing was great since I was looking for a quick, easy, last minute gift. I almost have it finished and it will make a great stocking stuffer. Your yarn for this hat is amazing. Thanks Chandi. I loved knitting this beanie so much I had knitted up two! I referred to your video to get the hang of it as I am a beginner. It’s easy and simply enough that I had brought it with me to knit on a 6 hour flight! Thank you so much!
Hi! I made the men’s small. I would love to knit a matching newborn hat. Do you have any recommendations for how to adjust this, or another pattern to use with this yarn? Because the yarn is doubled, I’m not sure how to look for other patterns that use this weight yarn.
Hi Ali,
Thanks for writing in! This pattern works with any multiple of 16 stitches, so for a newborn-sized hat, I would cast on 112 stitches and knit the body of the hat to about six inches before beginning the crown decreases.
Happy knitting!
Julianna
The boyfriend hat sample in heirloom white and toasted charcoal is pretty. Do you no longer offer toasted charcoal? What color (or combination of 2 others) would be closest?
Thanks!
Hi Andrea,
Thanks for reaching out! Unfortunately, Toasted Charcoal has been discontinued, but I think you could get a very similar look by combining Heirloom White and Fieldstone Gray!
Happy knitting!
Julianna
Hi! I am fairly new to knitting. I’m wondering if it’s possible to do this great marled pattern with two different colored fingering weight yarns, if each of those yarns is 4 ply rather than 1 ply. Do people ever knit double stranded with yarns that are each multiple ply, or do you have to use single ply yarn if you’re going to knit double stranded? And if this is possible, can any 2 fingering weight yarns be used together on US #3 needles? Thank you!
Hi Rachel,
Thanks for reaching out! You can knit double with any yarn of any ply that you would like! It isn’t necessary for the yarn to be single ply in order to be knit double! In the case of the Boyfriend Hat, as long as the yarns are a fingering weight you are good to go! I would recommend working up a gauge swatch before beginning the pattern to make sure that your gauge is consistent with the patten!
I hope this helps, happy knitting!
Gianna
Hi,
This is my first time trying to knit a boyfriend hat and I find it difficult. I casted my yarn for a women’s medium size (160 stitches). I did the 8 inches in length and then I did the beginning of the shape of the hat, I knitted the round 1 and 2, 6 times each. That would mean that by the end of those 12 rounds I have decreased from 160 stitches to 64 stitches. Then with my 64 stitches, if I follow the next step, my round doesn’t decrease from 64 to 40 stitches. I know I am doing something wrong but I can’t pinpoint it. Would you please help me. Thank’s a lot 🙂
Hi Audrey,
Thanks for reaching out! It looks like you are on the right track if you are working all the decrease rounds accurately and the correct amount of repeats. The number at the end in the brackets is the amount of stitches for the smallest size and then it goes up from there for the larger sizes!
I hope this helps and feel free to reach out with any more questions going forward!
All the best,
Gianna
I am confused how to switch to double pointed needles with this pattern. Since it’s split into 4 sections (with shape top of hat round 1 and round 2) should I cast in to 4 double pointed needles using the 5th to knit with, so I can keep the 4 sections or do I have to use 4 double needles?
Hi Liv,
Thanks for reaching out! With this pattern there is not a specific formula for transferring to DPNs, once it becomes tight working on your circular needles you will start knitting on the DPNs and you can either use 3 or 4 needles and divide the stitches evenly across. You then either use the 4th or 5th needle to work with depending on your preference! The stitch markers determine where you work the decreases, so the placement on the double pointed needles is not crucial! You should also not be casting on any stitches at this point, you should only be working with the pre existing stitches.
I hope this clarifies things, happy knitting!
Gianna
Hello! Just finished this guy, and while it looks (and feels) good rolled up, it looks a little too bell-shaped when unrolled. The cast-on row looks a tiny bit loose (although I definitely couldn’t have made it any tighter), and I’m realizing that I wish I’d cast on with a smaller needle and/or fewer stitches. Do you happen to have any suggestions for tightening up the cast-on edge? Or even cutting it out to redo, etc.?
I used the recommended yarn, needle size, and # of stitches for a men’s medium. (Only change I made was knitting 7 vs. 8 inches from cast-on edge before starting crown.) I’ve made lots of hats before and never had this problem for some reason, but this is my first time trying this pattern.
Thanks so much for any help!
Hi Alena,
Thanks for reaching out! Did you work a gauge swatch prior to beginning the hat to make sure your gauge was consistent with the pattern? I would recommend measuring your gauge now if you haven’t already! I would also recommend blocking the hat. Blocking is a great way to re-shape your knitting and re-distribute stitches to get the best fit and look! I suggest checking out our All About Gauge and Blocking tutorials, they are both excellent resources to use.
Warmly,
Gianna
Hi! I really would love to make this hat, however I’m interested in making it with a worsted weight yarn. Do you have any recommendations on how to go about using a different yarn/needle size for this pattern OR a similar pattern for what I am looking for? I love the shape of this hat.
Thanks so much!
Hi Olivia,
Thanks for reaching out! If you would live to make this hat with worsted weight you would need to adjust the gauge and needle size! I would recommend working a gauge swatch with the yarn you plan on using and an appropriate needle size (typically when working a rib you go down from the recommended size so a US 5-6 for a worsted weight!) you can then calculate the cast on number from there. I recommend checking out our All About Gauge tutorial, it is an excellent resource to use!
If you don’t want to re-gauge the pattern, we do have a similar pattern available that is already written for a worsted weight yarn called the Lovely Ribbed Hat In Linen Quill Worsted!
I hope this helps and please feel free to reach out with any more questions!
Warmly,
Gianna
Hi, I love this pattern and am making it as my first ever hat (for my BF)! I do have a question, I used different yarn so that meant that I had to adjust the gauge. I want to make a men’s large and in order to do that with my yarn I casted on 96 stitches and I have knitted 54 rows and I have now a little more than 8inches so I have gotten to the set up round. And here my questions come in: First, do I have to knit a round in this set up round or is it just the division of the stitches into four sections? Then my second question: I have divided my work into four sections of 24 stitches so if I get to round 1 and 2 I should decrease 8 stitches in the normal pattern but should I also decrease 8 stitches when I already started with fewer stitches than the pattern called for? Or should I decrease less but then what would the pattern look like? Then my third question: when repeating rounds 1 and 2 should I go for 8 rows because I want to make the men’s large or should I also do this fewer times since I am using a different gauge? And then for the last part of decreases, should I adjust this also to my gauge as in round 1 and 2 and what should that pattern look like? Woow this is a very long story, I’m sorry! Usually I would ask my gran but because of the lockdown I can’t, I’m really enjoying getting into knitting and this website is a great resource! Thanks so much!
Hi Florine,
Thanks for reaching out and for your kind words! I am happy to help! Unfortunately, when going off from the written pattern and working with a different weight of yarn and making adjustments to the gauge and cast on, it takes a bit of trial and error to get things like decreases to work accurately! I would recommend starting out working the decreases as written and if its comes out a little wonky you can make adjustments from there! And yes, you will be working the set-up round meaning you will knit x amount of stitches and place the stitch maker and continue this till all your stitch makers are placed and you reach the end of the round!
I hope this helps and please let me know if anything comes up or if you have any more questions!
Warmly,
Gianna
Hello there, I am wanting to make this hat (my first ever!) for my husband in a Men’s Medium. I have some line weight yarn, but don’t know if it is enough for making this hat. Could you please tell me how many yards this hat requires? Thank you so much! christy
Hi Christy,
Thanks for reaching out! This is a great pattern for a first time hat (one of my favorites!!) For the Mens Medium we used approximately 305 yards per color of Line Weight (approximately 610 total.)
Please let mw know if you have any more questions, happy knitting!
Gianna
Hey there –
I bought some Posy recently because I loved the yellowish green color. Would this hat work with Posy? If not, do you have a suggestion for a hat that would work with Posy?
Thanks!
Hi Peggy,
Thanks for reaching out! I think you could certainly use Posy for this hat! I do recommend working a gauge swatch prior to beginning since Posy is a bit heavier than Line Weight, and you may need to make a few adjustments!
Warmly,
Gianna
thank you!!!
Hi!
I’m looking forward to starting this pattern, and wondering about yardage…
Am hoping to use 2 skeins of Madeline Tosh Merino Light, but the skeins come with 420 yards each. I see the Line Weight comes in 494-yard skeins. Is there quite a bit extra leftover from the Line Weight or should I plan to purchase 3 skeins total?
Nevermind 🙂 I see the pattern calls for 1 skein of Line Weight. I suppose I should plan to still purchase 2 skeins since the Madeline Tosh skeins are 70+ yards smaller.
Hi Stephanie,
Thanks for reaching out! This pattern works with two skeins of Line Weight, one in each color, and you knit holding the two strands together, or if you are making a solid color hat (pulling two strands of a single color) rather than a marled hat (pulling a strand of two different colors), you’ll need 1 (1, 2, 2) total skeins of Purl Soho’s Line Weight. So depending on the style and size, you are making you will need 494 (494, 988, 988) yards total. So if you are planning on using Madeline Tosh I would recommend 2 skeins per color to ensure you have enough!
I hope this helps, happy knitting!
Gianna
Thank you so much, Gianna! I was wondering if I could make it through with just 420 yards, but you answered my question. Really appreciate your help.
Hi!
Beautiful additions!!
Seeking some advice/ suggestions – Would clear sky go well with fieldstone grey when making these for men?
I am thinking to make the hat a bit lighter in color than the sample ones. Thought clear sky could give a little more unique mixing and a little more pop than heirloom white.
Thank you so much for your help!
Hi Park,
Thanks for reaching out. I think that Clear Sky and Fieldstone Gray would look lovely together in a hat for anyone! Happy knitting!
All the best,
Lili
Hi! I am having a harder time understanding how to use two yarns than I hoped. I’m still a beginner but have made a few hats so far. I purchased the River Rock and Heirloom White colors which I think will look great together if I can ever figure it out. Is there a video tutorial that demonstrates how to use two colors?
Hi Danielle,
Thanks for writing in. For this pattern, you will need to hold one strand of each color of yarn at the same time! All this means is that while you’ll be holding onto two strands at once, you just need to treat them as if they were one strand and knit as usual. I hope this helps clarify things!
All the best,
Lili
I am a fairly new knitter but have been able to make socks. So I am familiar with decreases.
I am not able to understand the shaping.
Am I correct that the decreases will all be on top of each other?
Row 1 knit2together, 9 stitches from marker and SsK 2 stitches from marker.
Row 2 I do the same thing with Purl. So the decreases stack on top of each other?
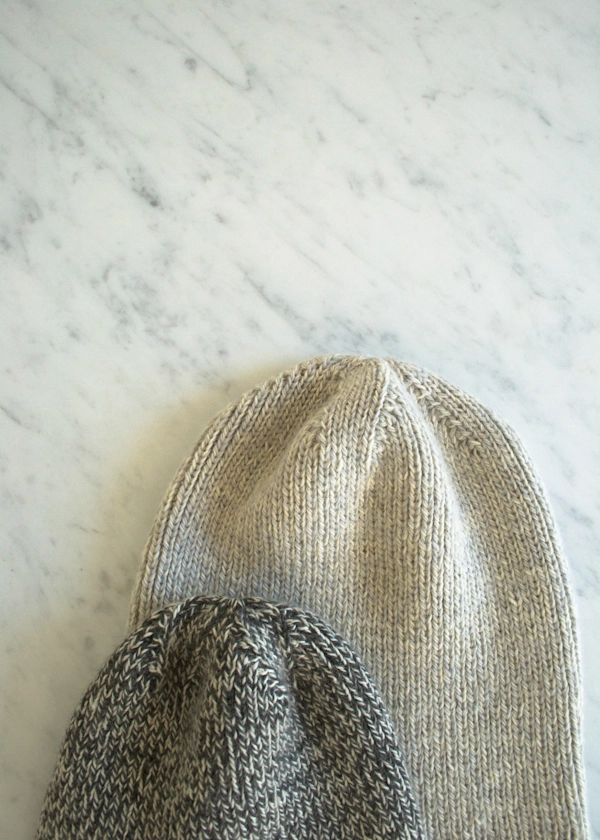
Hi Deborah,
Thanks for reaching out. You are absolutely correct that the decreases stack on top of each other! This creates the nice and neat “seams” on the crown of the hat. I hope this helps clarify things!
All the best,
Lili
Do you test the gauge blocked or unblocked, and are the hats in the photo blocked?
I knit the gauge and got close to what is needed (slightly less stitches, so looser knitting?). Once wet, it looks much looser than the photos. Does this mean I should switch to smaller needles?
Hi Hanna,
Thanks for writing in! The gauge is measured post-blocking and the photos are also of the hats blocked! When wet, the yarn will want to stretch, so it helps if you shape the hat to the dimensions listed so that it will dry to the right size! For more tips on gauge and blocking, I would suggest checking out our All About Gauge and Blocking tutorials!
I hope this helps!
Gianna
Thank you! I was thinking you would always stretch it once blocked, but good to know you can keep it tighter weave.
I’m almost done with my first hat and it is really lovely. The feel of this yarn is so soft and cozy. I have just ordered yarn to make 3 more (in different colors) as gifts. I used the alternate cable cast on and notice that it is a tiny bit “ripply” on the edge. Should I use a smaller size needle to cast on with my next hat? If so, how many sizes smaller should that be? I tried the tubular cast on, but couldn’t get it right (despite many frustrating attempts!) so went to the alternate cable cast on. What do you think?
Hi Lin,
Thanks for reaching out! I am so pleased to hear that you enjoy the yarn and making this hat! I actually just finished one for myself and it has become my new favorite go to hat! For that method, I would go down one needle size and see how it looks to start, however, we actually used a basic Long Tail Cast On for this pattern, it gives a nice clean edge without the added steps of a Long Tail Tubular Cast On. I used the Long Tail Cast On for my hat and it turned out lovely!
I hope this helps, happy knitting!
Gianna
I was hoping to this the Boyfriend hat using the Canada National Parks Collection fingering wool . I see on Ravelry that other people have used this yarn and they double the yarn for the Boyfriend hat. When I made a gauge, it was way off. The gauge on the wool is 26sts to 4 cm using 3.25 mm needles.
Perhaps I should not be using this yarn?
Thanks for your help
Hi Jane,
Thanks for reaching out. Did you knit your swatch in 1 x 1 ribbing or in stockinette? Our gauge measurement of 39 stitches in 4 inches is for a swatch knit in the stitch pattern of the hat, which is 1 x 1 ribbing. Generally, yarn labels will give you an idea of the gauge for stockinette, which is very different than gauge for ribbing.
If you’re still not achieving gauge on your swatch though, you’ll need to adjust your needle size! You may need to size up or down your needles in order to get the correct gauge. If you would like to learn more about this, we have a handy tutorial called All About Gauge, which you can find right here: https://www.purlsoho.com/create/2020/08/20/all-about-gauge/. I hope this helps!
All the best,
Lili
Hello, has anyone decreased size to make this hat for a 6-9 month old baby? I’ve made this hat for myself and my husband, and now want to make it for our newest addition to the family! Any recommendations for cast on amount?
Thanks!
Hi Madison,
Thank you for your question! We released baby and toddler sizes for this hat in an updated post which you can find right here! The smallest size has a cast on of 112 stitches for a head size of 15-16 inches.
Congratulations on your newest family member, and we can’t wait to see your matching hats!
All the best,
Margaret
Making a hat for a gentleman who wants it to be made of cotton yarn: I was thinking of using your Tulip Cotton ~ wondering if I should knit w/ a single strand or to double as the pattern is written. Thanx in advance for your assistance.
Hi Lyn,
Thanks so much for your comment! I’m afraid Tulip Cotton would be too thick for this pattern, since the original hat is made by holding 2 fingering weight yarns together and Tulip Cotton is a worsted weight yarn. I’d recommend Santolina (https://www.purlsoho.com/santolina.html) as a great plant-based fiber option! It’s fingering weight so it would work well held double for a marled look, and is made of 70% organically grown cotton, 20% rayon from bamboo, 10% hemp. I hope this helps!
All the best,
Cat
Thanx so much Cat!!!! You have been most helpful!!!!
Enjoy your holidays in good health and may your days be filled with all things Merry & Bright!