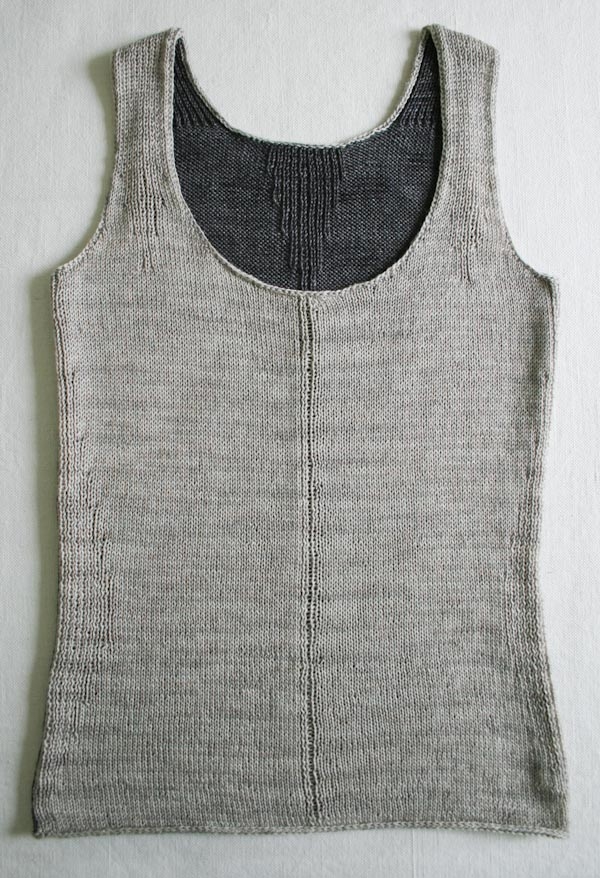
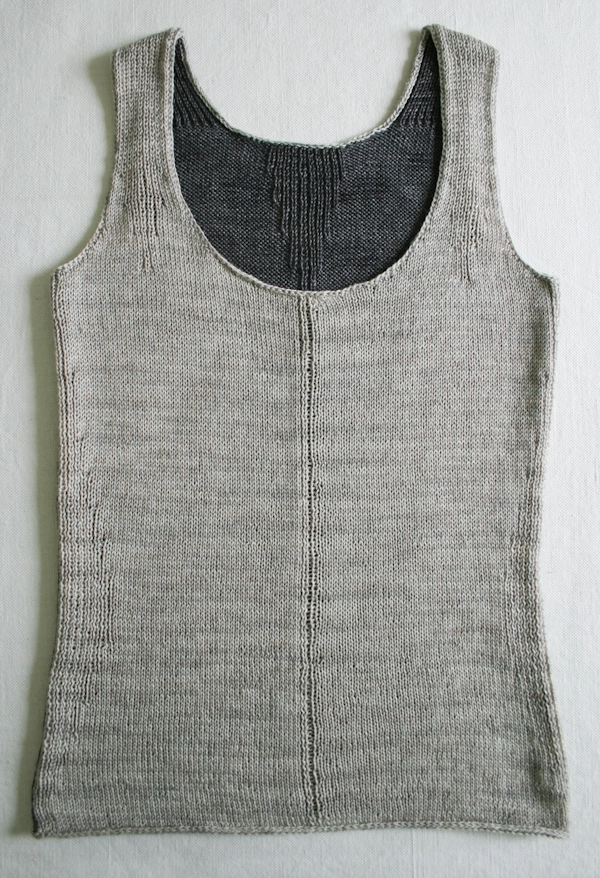
Rib-Wise Tank
“It’s tank top season y’allllllll!!!!!!!” This was recently yelled in my direction by a peppy pilates instructor who I think would have rather been teaching a 90s hip-hop sculpt class. As my arms began to burn, I bristled at the proclamation, but once in the comfort and security of my couch, knitting needles in hand, I had to admit that she was right. It IS tank top season, y’all.

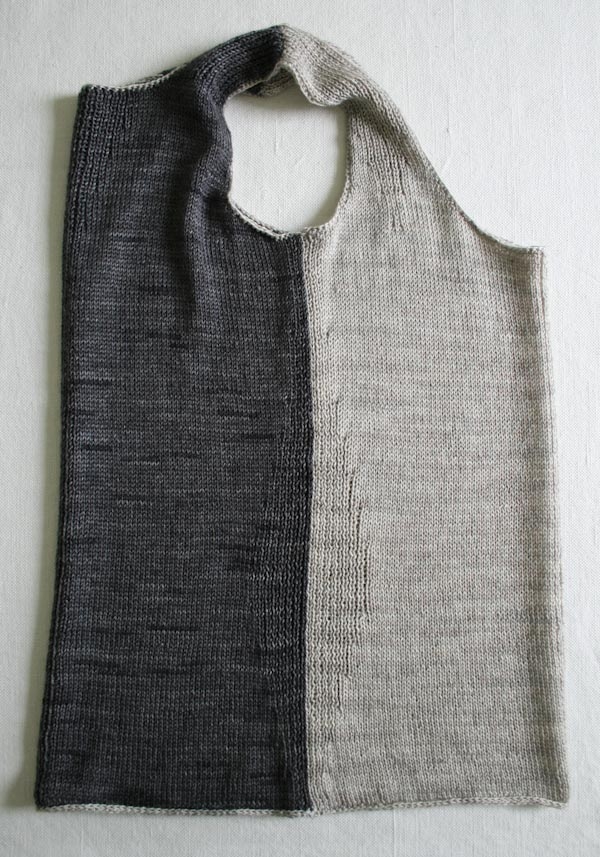
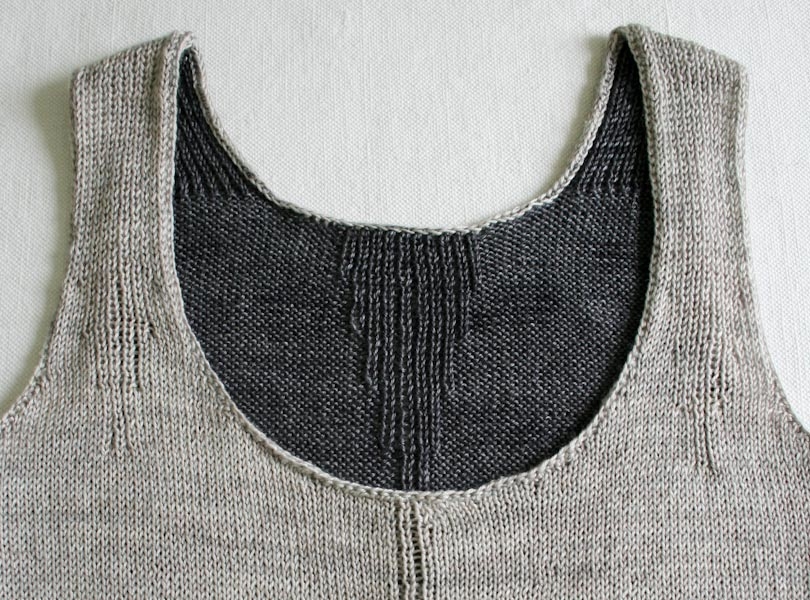
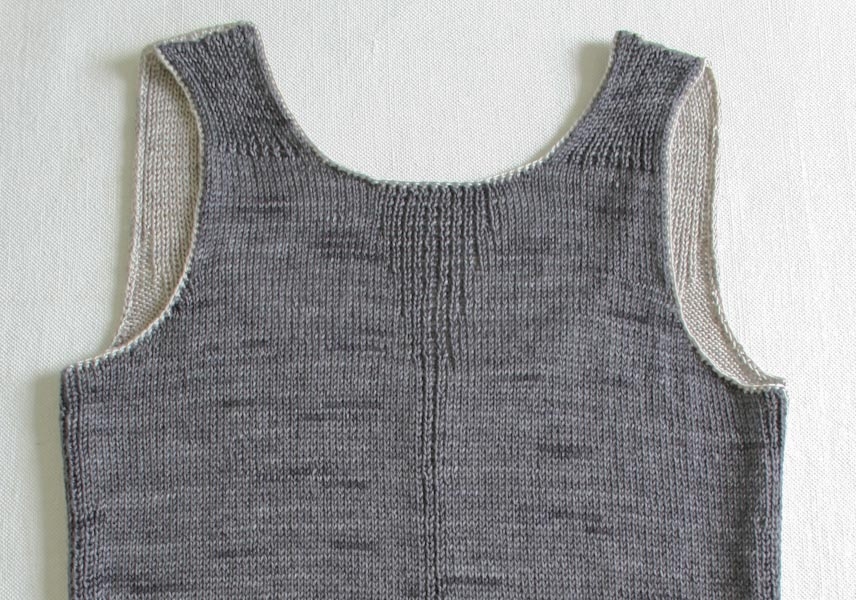
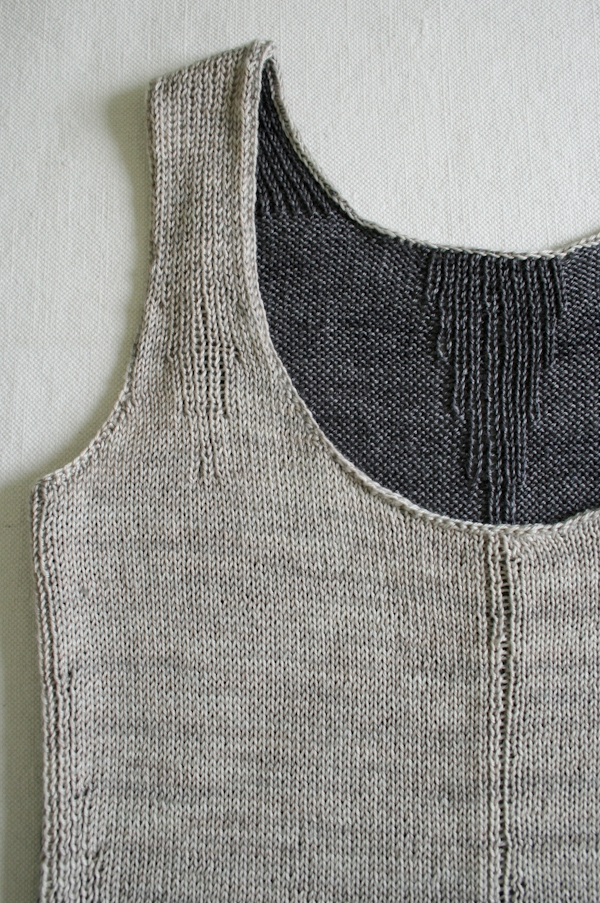
This simple Rib-Wise Tank is just right for the season with a bit of room to breathe but not so much that you’re weighed down in the heat. Ribbing along the sides, straps and between the shoulder blades creates subtle shaping and streamlining, while Anzula’s beautiful new Milky Way offers a soft shine, a slight drape and a cool touch.
You know, I learned something else that day at the gym… It’s SHORTS season y’alllllll!!!! But don’t worry, I need to spend a lot more time in the gym before you see knit shorts from me! -Laura
Designed by Purl Soho designer, Laura Ferguson.
Share your progress and connect with the community by tagging your pics with #PurlSoho, #PurlSohoBusyHands, and #PurlSohoRibWiseTank. We can’t wait to see what you make!

Materials
- Color A: 1 (1, 1, 1, 2) skein(s) of Anzula’s Milky Way, 80% Milk Protein, 20% Superwash Merino; approximately 500–1000 yards of a fingering weight yarn required. This color is Seaside.
- Color B: 1 (1, 1, 1, 2) skein(s) of Anzula’s Milky Way, 80% Milk Protein, 20% Superwash Merino; approximately 500–1000 yards of a fingering weight yarn required. This color is Black.
NOTE: If you want to work this Tank all in one color, you would need 2 (2, 2, 2, 3) skiens of Milky Way.
NOTE: Since this pattern was published, we have stopped carrying Anzula’s Milky Way yarn. Other great suggestions for this pattern are Anzula’s Squishy, Koigu’s Koigu Premium Merino and Manos del Uruguay’s Fino!
- US 3 (3.25 mm) straight or circular needle
- A set of size US 2 (3 mm) double pointed needles
- Stitch holder or scrap yarn
- A crochet hook size E or F (for Provisional Cast-On) (optional)
Gauge
28 stitches and 32 rows = 4 inches in stockinette stitch
Sizes
NOTE For help picking a size, please check out our Understanding Ease + Selecting Size Tutorial!
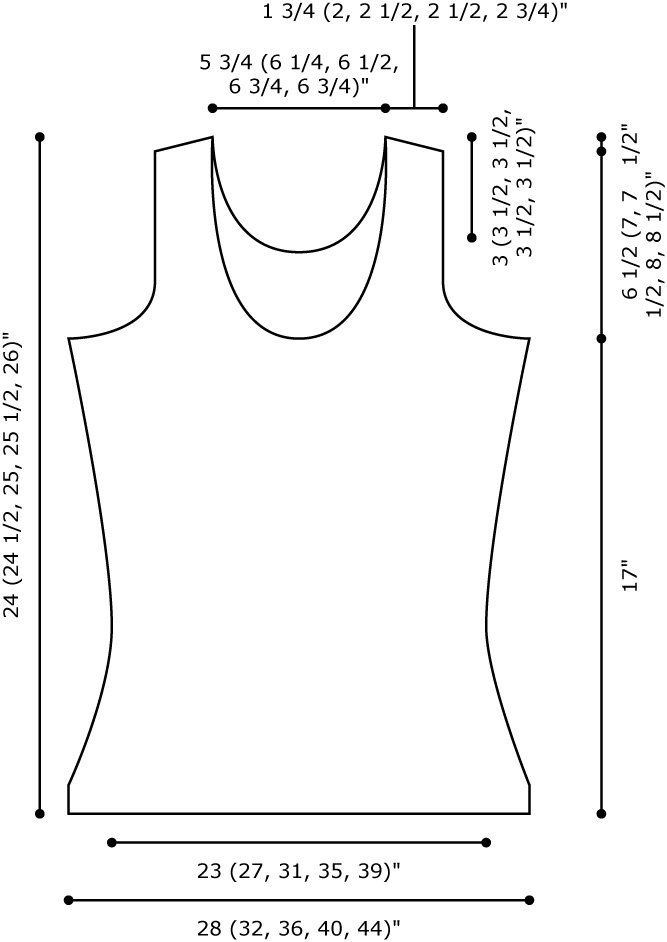
28 (32, 36, 40, 44)
- Bust Circumference: 28 (32, 36, 40, 44) inches
- Waist Circumference: 23 (27, 31, 35, 39) inches
- Length from Underarm to Bottom Edge: 17 inches
Notes
Stitch Patterns
Right Edge Ribbing
(panel of 17 stitches; 136 rows)
Set-Up Row (wrong side): P2, k1, p1, k1, p12.
Rows 1, 3, 5, and 7 (right side): K12, p1, k1, p1, k2.
Row 2 and all Wrong-Side Rows: Knit the knit stitches and purl the purl stitches as they face you.
Rows 9, 11, 13, and 15: K10, p1, [k1, p1] twice, k2.
Rows 17, 19, 21, and 23: K8, p1, [k1, p1] 3 times, k2.
Rows 25, 27, 29, and 31: K6, p1, [k1, p1] 4 times, k2.
Rows 33, 35, 37, and 39: K4, p1, [k1, p1] 5 times, k2.
Rows 41, 43, 45, and 47: K2, p1, [k1, p1] 6 times, k2.
Rows 49, 51, 53, 55, 57, 59, 61, and 63: P1, [k1, p1] 7 times, k2.
Rows 65-72: Repeat Rows 41 and 42.
Rows 73-80: Repeat Rows 33 and 34.
Rows 81-88: Repeat Rows 25 and 26.
Rows 89-96: Repeat Rows 17 and 18.
Rows 97-112: Repeat Rows 9 and 10.
Rows 113-136: Repeat Rows 1 and 2.
Left Edge Ribbing
(panel of 17 stitches; 136 rows)
Set-Up Row (wrong side): P12, k1, p1, k1, p2.
Rows 1, 3, 5, and 7 (right side): K2, p1, k1, p1, k12.
Row 2 and all Wrong-Side Rows: Knit the knit stitches and purl the purl stitches as they face you.
Rows 9, 11, 13, and 15: K2, p1, [k1, p1] twice, k10.
Rows 17, 19, 21, and 23: K2, p1, [k1, p1] 3 times, k8.
Rows 25, 27, 29, and 31: K2, p1, [k1, p1] 4 times, k6.
Rows 33, 35, 37, and 39: K2, p1, [k1, p1] 5 times, k4.
Rows 41, 43, 45, and 47: K2, p1, [k1, p1] 6 times, k2.
Rows 49, 51, 53, 55, 57, 59, 61, and 63: K2, p1, [k1, p1] 7 times.
Rows 65-72: Repeat Rows 41 and 42.
Rows 73-80: Repeat Rows 33 and 34.
Rows 81-88: Repeat Rows 25 and 26.
Rows 89-96: Repeat Rows 17 and 18.
Rows 97-112: Repeat Rows 9 and 10.
Rows 113-136: Repeat Rows 1 and 2.
Basic Rib Pattern
(odd number of stitches; 2-row repeat)
Row 1 (right side): P1, *k1, p1; repeat from * to end of pattern.
Row 2 and all Wrong-Side Rows: Knit the knit stitches and purl the purl stitches as they face you.
Front Shoulder Ribbing
[panel of 15 (15, 15, 23, 23) stitches]
Set-Up Row (Front Left Only): Purl.
Rows 1, 3, 5, 7, and 9 (right side): K6 (6, 6, 10, 10), p1, k1, p1, k6 (6, 6, 10, 10).
Row 2, 4, 6, and 8: Knit the knit stitches and purl the purl stitches as they face you.
Row 10: P4 (4, 4, 8, 8), k1, [p1, k1] 3 times, p4 (4, 4, 8, 8).
Rows 11-17: Knit the knit stitches and purl the purl stitches as they face you.
Row 18: P2 (2, 2, 6, 6), k1, [p1, k1] 5 times, p2 (2, 2, 6, 6).
Rows 19-25: Repeat Row 2.
Row 26: P0 (0, 0, 4, 4), k1, [p1, k1] 7 times, p0 (0, 0, 4, 4).
Row 27: Repeat Row 2.
SIZES 28 (32, 36) ONLY
Repeat Rows 26 and 27 for remainder of piece.
SIZES 40 and 44 ONLY
Rows 28-33: Repeat Row 2.
Row 34: P2, k1, [p1, k1] 9 times, p2.
Rows 35-41: Repeat Row 2.
Row 42: K1, [p1, k1] 11 times.
Row 43: Repeat Row 2.
Repeat Rows 42 and 43 for remainder of piece.
Back Neck Ribbing
(panel of 19 stitches)
Rows 1, 3, 5, and 7 (right side): K6, p1, [k1, p1] 3 times, k6.
Row 2 and all Wrong-Side Rows: Knit the knit stitches and purl the purl stitches as they face you.
Rows 9, 11, 13, and 15: K4, p1, [k1, p1] 5 times, k4.
Rows 17, 19, 21, and 23: K2, p1, [k1, p1] 7 times, k2.
Rows 25, 27, 29, and 31: P1, [k1, p1] 9 times.
Row 32: Repeat Row 2.
Repeat Rows 31 and 32 for remainder of piece.
Pattern
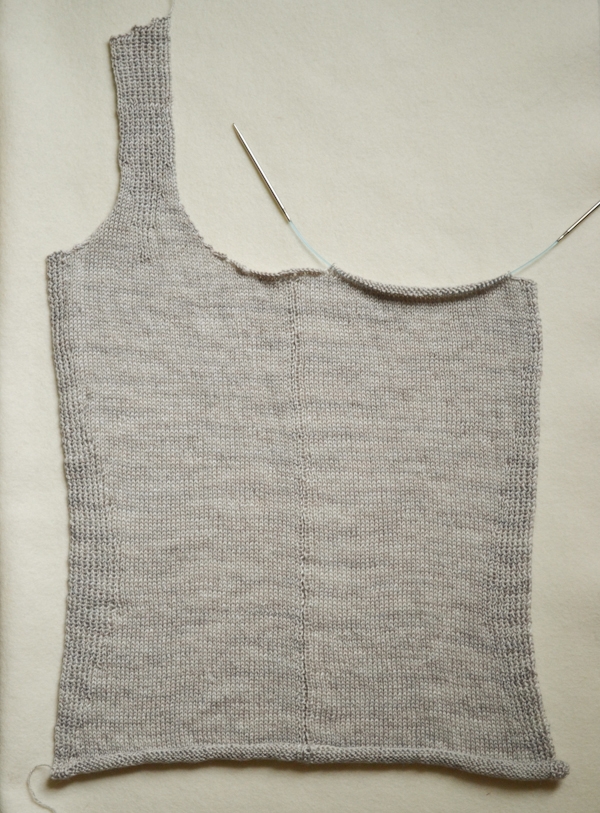
Front
Begin Front
With Color A, cast on 101 (115, 129, 143, 157) stitches. We used a basic Long Tail Cast On.
Set-Up Row (wrong side): Work in Right Edge Ribbing for 17 stitches, beginning with Set-Up Row, place marker (pm), p32 (39, 46, 53, 60), pm, k1, p1, k1, pm, purl to last 17 stitches, pm, work in Left Edge Ribbing to end, beginning with Set-Up Row.
Row 1: Work Left Edge Ribbing as established to first marker, work in stockinette stitch to second marker, work Basic Rib Pattern as established to third marker, work in stockinette stitch to fourth marker, work in Right Edge Ribbing as established to end.
Continue to work in patterns as established until Right and Left Edge Ribbing patterns are complete, ending with a wrong-side row, and removing first and last markers on final row. Place new markers 13 (17, 22, 22, 28) and 28 (32, 37, 45, 51) stitches in from each side edge, to mark Front Shoulder Ribbing.
Divide for Front Left and Front Right
Row 1 (Decrease Row, right side): Bind off 5 (7, 8, 9, 13) stitches in pattern, knit to 5 (7, 8, 9, 9) stitches before third marker, place previous 39 (42, 47, 52, 55) Front Left stitches on hold using a stitch holder or scrap yarn, bind off next 13 (17, 19, 21, 21) stitches in pattern, removing markers, work to end. [44 (49, 55, 61, 68) stitches remain for Front Right]
Shape Front Right Armhole and Neck
NOTE: You will work the Right and Left sides of the Front separately, starting with the Front Right. Stitch counts in the following section do not include the Front Left stitches on hold.
Row 2 (Decrease Row): Bind off 5 (7, 8, 9, 13) stitches in pattern, purl to end. [39 (42, 47, 52, 55) stitches remain]
Row 3: Bind off 4 stitches, work to marker, work Front Shoulder Ribbing, beginning with Row 1, to next marker, knit to end. [35 (38, 43, 48, 51) stitches remain]
Row 4 (Decrease Row): Continuing to work patterns as established, bind off 2 stitches, work to end. [33 (36, 41, 46, 49) stitches remain]
SIZE 28 ONLY
Row 5 (Decrease Row): Bind off 3 stitches, work to last 2 stitches, k2tog. [29 stitches remain]
Row 6: Work in established pattern.
Row 7 (Decrease Row): Bind off 2 stitches, work to last 2 stitches, k2tog. [26 stitches remain]
Row 8: Work in established pattern.
Row 9 (Decrease Row): Ssk, work to last 2 stitches, k2tog. [24 stitches remain]
Row 10: Work in established pattern.
Rows 11 and 12: Repeat Rows 9 and 10. [22 stitches remain]
Row 13 (Decrease Row): Ssk, work to end. [21 stitches remain]
Row 14: Work in established pattern.
Rows 15-18: Repeat Rows 13 and 14. [19 stitches remain]
SIZE 32 ONLY
Rows 5-12: Work Rows 5-12 of size XSmall. [25 stitches remain]
Rows 13 and 14: Work Rows 9 and 10 of size XSmall. [23 stitches remain]
Rows 15-18: Work Rows 13 and 14 of size XSmall. [21 stitches remain]
SIZE 36 ONLY
Row 5 (Decrease Row): Bind off 3 stitches, work to end. [38 stitches remain]
Row 6 (Decrease Row): Bind off 2 stitches, work to end. [36 stitches remain]
Rows 7-12: Work Rows 7-12 of size XSmall. [29 stitches remain]
Rows 13-18: Work Rows 9 and 10 of size XSmall. [23 stitches remain]
SIZE 40 ONLY
Rows 5-18: Work Rows 5-18 of size Medium. [28 stitches remain]
Row 19 (Decrease Row): Work to last 2 stitches, k2tog. [27 stitches remain]
Row 20: Work in established pattern.
SIZE 44 ONLY
Rows 5-18: Work Rows 5-18 of size Medium. [31 stitches remain]
Rows 19-22: Work Rows 19 and 20 of size Medium. [29 stitches remain]
ALL SIZES
Continuing to work first and last 2 (3, 4, 2, 3) stitches in stockinette stitch, and stitches between markers in Front Shoulder Ribbing, work even until armhole measures 6 1/2 (7, 7 1/2, 8, 8 1/2) inches, ending with a right-side row.
Shape Front Right Shoulder
Row 1 (Decrease Row, wrong side): Bind off 7 (7, 7, 9, 9) stitches in pattern, work to end. [12 (14, 16, 18, 20) stitches remain]
Row 2: Work in established pattern.
Row 3 (Decrease Row): Bind off 6 (7, 8, 9, 10) stitches in pattern, work to end.
Row 4: Work in established pattern.
Next Row: Bind off remaining 6 (7, 8, 9, 10) stitches in pattern.
Shape Front Left
With wrong side facing, rejoin Color A.
NOTE: To avoid confusion, the row numbers for this section will begin with Row 2 so that all right-side rows are worked on odd-numbered rows, as for the previous sections.
Row 2 (Decrease Row): Bind off 4 stitches, work to end. [35 (38, 43, 48, 51) stitches remain]
Row 3: Bind off 2 stitches, work to marker, work Front Shoulder Ribbing, beginning with Row 1, to next marker, knit to end. [33 (36, 41, 46, 49) stitches remain]
Row 4 (Decrease Row): Continuing to work patterns as established, bind off 3 stitches, work to end. [30 (33, 38, 43, 46) stitches remain]
SIZE 28 ONLY
Row 5 (Decrease Row): Continuing to work patterns as established, ssk, work to end. [29 stitches remain]
Row 6 (Decrease Row): Bind off 2 stitches, work to end. [27 stitches remain]
Row 7 (Decrease Row): Ssk, work to last 2 stitches, k2tog. [25 stitches remain]
Row 8: Work in established pattern.
Rows 9-12: Repeat Rows 7 and 8. [21 stitches remain]
Row 13 (Decrease Row): Work to last 2 sts, k2tog. [20 stitches remain]
Row 14: Work in established pattern.
Rows 15 and 16: Repeat Rows 13 and 14. [19 stitches remain]
SIZE 32 ONLY
Rows 5-12: Work Rows 5-12 of size XSmall. [24 stitches remain]
Rows 13 and 14: Work Rows 7 and 8 of size XSmall. [22 stitches remain]
Rows 15 and 16: Work Rows 13 and 14 of size XSmall. [21 stitches remain]
SIZE 36 ONLY
Rows Row 5 (Decrease Row): Bind off 2 stitches, work to end. [36 stitches remain]
Row 6 (Decrease Row): Bind off 2 stitches, work to end. [34 stitches remain]
Rows 7-16: Work Rows 7 and 8 of size XSmall. [24 stitches remain]
Rows 13-18: Work Rows 13 and 14 of size XSmall. [23 stitches remain]
SIZE 40 ONLY
Rows 5-18: Work Rows 5-18 of size Medium. [28 stitches remain]
Row 19 (Decrease Row): Ssk, work to end. [27 stitches remain]
Row 20: Work in established pattern.
SIZE 44 ONLY
Rows 5-18: Work Rows 5-18 of size Medium. [31 stitches remain]
Rows 19-22: Work Rows 19 and 20 of size Medium. [29 stitches remain]
ALL SIZES
Continuing to work first and last 2 (3, 4, 2, 3) stitches in stockinette stitch, and stitches between markers in Front Shoulder Ribbing, work even until armhole measures 6 1/2 (7, 7 1/2, 8, 8 1/2) inches, ending with a right-side row.
Shape Front Left Shoulder
Row 1 (Decrease Row, right side): Bind off 7 (7, 7, 9, 9) stitches in pattern, work in established pattern to end. [12 (14, 16, 18, 20) stitches remain]
Row 2: Work in established pattern.
Row 3 (Decrease Row): Bind off 6 (7, 8, 9, 10) stitches in pattern, work to end.
Row 4: Work in established pattern.
Next Row: Bind off remaining 6 (7, 8, 9, 10) stitches in pattern.
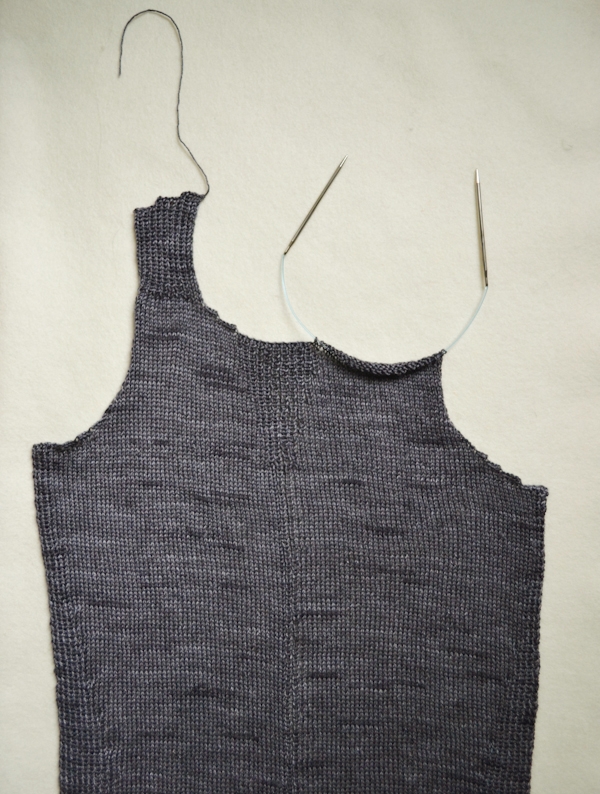
Back
Begin Back
With Color B, cast on 101 (115, 129, 143, 157) stitches.
Follow pattern for FRONT to beginning of armhole shaping, ending with a wrong-side row, removing markers on last row. Place new markers 41 (48, 55, 62, 69) stitches in from each side edge to mark Back Neck Ribbing.
Shape Armholes
Row 1 (Decrease Row, right side): Bind off 5 (7, 8, 9, 13) stitches in pattern, knit to first marker, work in Back Ribbing to next marker, knit to last 5 stitches, work in pattern as established to end. [96 (108, 121, 134, 144) stitches remain]
Row 2 (Decrease Row): Bind off 5 (7, 8, 9, 13) stitches in pattern, work in patterns as established to end. [91 (101, 113, 125, 131) stitches remain]
Row 3 (Decrease Row): Bind off 4 (4, 5, 5, 5) stitches, work to end. [87 (97, 108, 120, 126) stitches]
Row 4 (Decrease Row): Repeat Row 3. [83 (93, 103, 115, 121) stitches remain]
Row 5 (Decrease Row): Bind off 3 (3, 4, 4, 4) stitches, work to end. [80 (90, 99, 111, 117) stitches remain]
Row 6 (Decrease Row): Repeat Row 5. [77 (87, 95, 107, 113) stitches remain]
Row 7 (Decrease Row): Bind off 2 (2, 2, 3, 3) stitches, work to end. [75 (85, 93, 104, 110) stitches remain.
Row 8 (Decrease Row): Repeat Row 7. [73 (83, 91, 101, 107) stitches remain]
Row 9 (Decrease Row): Ssk, work to last 2 stitches, k2tog. [71 (81, 89, 99, 105) stitches remain
Row 10: Work in established pattern.
Repeat Rows 9 and 10 two (three, four, five, six) more times. [67 (75, 81, 89, 93) stitches remain.
Work even in pattern as established for 18 (16, 18, 20, 22) rows, ending with a wrong-side row.
Divide for Back Right and Back Left
Row 1 (Decrease Row, right side): Removing markers as you come to them, k26 (28, 30, 34, 36) and place these stitches on a stitch holder or scrap yarn for Back Right, bind off next 15 (19, 21, 21, 21) stitches in pattern, knit to end. [26 (28, 30, 34, 36) stitches remain for Back Left]
Shape Back Left Neck
NOTE: You will work the Right and Left sides of the Back separately, starting with the Back Left. Stitch counts below do not include the Back Right stitches on hold.
Row 2: Purl.
Row 3 (Decrease Row): Bind off 4 stitches, work to end. [22 (24, 26, 30, 32) stitches remain]
Row 4: Purl.
Row 5 (Decrease Row): Bind off 3 stitches, k1 (2, 3, 1, 2), pm, work Basic Rib Pattern to last 2 (3, 4, 2, 3) stitches, work in stockinette stitch to end. [19 (21, 23, 27, 29) stitches remain]
Continuing to work first and last 2 (3, 4, 2, 3) stitches in stockinette stitch and stitches between markers in Basic Rib, work even until armhole measures 6 1/2 (7, 7 1/2, 8, 8 1/2) inches, ending with a right-side row.
Shape Back Left Shoulder
Row 1 (Decrease Row, wrong side): Bind off 7 (7, 7, 9, 9) stitches in pattern, work to end. [12 (14, 16, 18, 20) stitches remain]
Row 2: Work in established pattern.
Row 3 (Decrease Row): Bind off 6 (7, 8, 9, 10) stitches in pattern, work to end.
Row 4: Work in established pattern.
Next Row: Bind off remaining 6 (7, 8, 9, 10) stitches in pattern.
Shape Back Right
NOTE: To avoid confusion, the row numbers for this section will begin with Row 2 so that all right-side rows are worked on odd-numbered rows, as for the previous sections.
With wrong side facing, rejoin Color B.
Row 2 (Decrease Row, wrong side): Bind off 4 stitches, work to end. [22 (24, 26, 30, 32) stitches remain]
Row 3: Knit.
Row 4 (Decrease Row): Bind off 3 stitches, work to end. [19 (21, 23, 27, 29) stitches remain].
Row 5: Work 2 (3, 4, 2, 3) stitches in stockinette stitch, pm, work Basic Rib Pattern to last 2 (3, 4, 2, 3) stitches, work in stockinette stitch to end.
Continuing to work first and last 2 (3, 4, 2, 3) stitches in stockinette stitch and stitches between markers in Basic Rib, work even until armhole measures 6 1/2 (7, 7 1/2, 8, 8 1/2) inches, ending with a right-side row.
Shape Back Right Shoulder
Row 1 (Decrease Row, right side): Bind off 7 (7, 7, 9, 9) stitches in pattern, work in established pattern to end. [12 (14, 16, 18, 20) stitches remain]
Row 2: Work in established pattern.
Row 3 (Decrease Row): Bind off 6 (7, 8, 9, 10) stitches in pattern, work to end.
Row 4: Work in established pattern.
Next Row: Bind off remaining 6 (7, 8, 9, 10) stitches in pattern.
Finish

Sew left and right shoulders together.
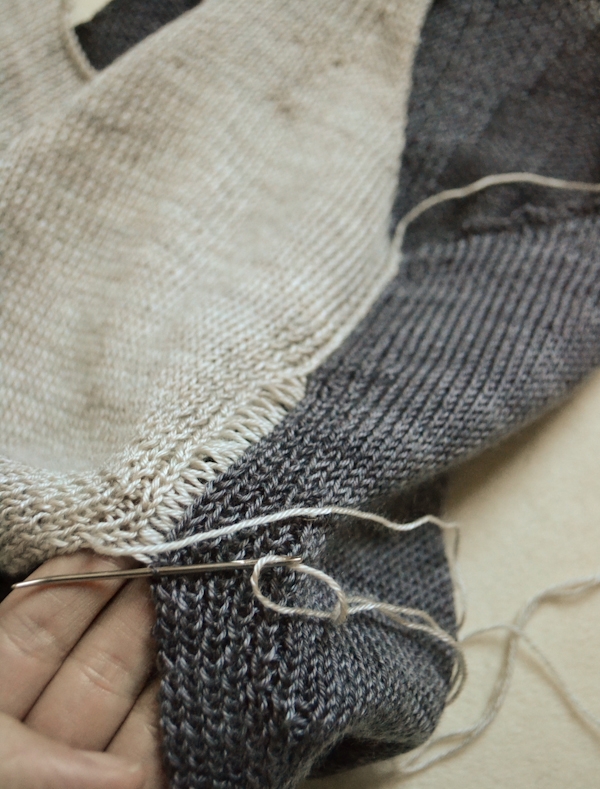
Using mattress stitch, sew the Front and Back together along each side.
Finish Bottom Edge, Armholes and Neckline
Cast 2 stitches onto a double pointed needle (for the neatest possible finishing, use a Provisional Cast-On). Knit an Attached I-cord around the bottom hem of the sweater, picking up 1 stitch for each of the cast-on stitches. When you are finished: If you used a Provisional Cast-On, join the beginning and end of the I-cord with the Kitchener Stitch. If you just cast on normally, bind off the I-cord and sew the beginning and end together.
In the same way, work Attached I-cords around the Armhole edges and Neckline.
Weave in your ends and block as desired.


deseo recibir instrucciones. muy bellos los modelos. Gracias,
Maria
Hello Maria.
Unfortunately, at the moment, we are only offering this free pattern in English.
Thank you for writing in and for your interest.
Best,
Laura
My elderly arms won’t like this – but *I* sure do!!
When I was young and thin there was never time for me to really knit as I would have liked.
Now, when I have the time, I want to do everything!!
You are so generous with your creativity and very much appreciated.
Hi! Thank you for the great pattern!
I’m not sure if I read the pattern correct. So when I’m working on the front pattern it says “continue to work in patterns as established until Right and Left Edge Ribbing patterns are completet”. Do I overlook something in the Right Edge and Left Edge Ribbing or when do I have to increase stiches to get the shape of the waist line ( 32″ to 27″ to 32″) or is it just an “optical increase because of the Ribbing” and the waist line is straight? I hope you understand what I mean. 🙂
Hello Dagmar,
Thanks for writing us and for your kind words. There is no traditional waist shaping in this pattern, as in decreasing and increasing. You are correct that the ribbing does the waist shaping for you. Best of luck! This pattern is beautiful.
Best,
Adam
3 markers or 2 markers??
“DIVIDE FOR FRONT LEFT AND FRONT RIGHT
Row 1 (Decrease Row, right side): Bind off 5 (7, 8, 9, 13) stitches in pattern, knit to 5 (7, 8, 9, 9) stitches before third marker”
Where did the 3rd marker come from? Previously it is said: “Place new markers 13 (17, 22, 22, 28) and 28 (32, 37, 45, 51) stitches in from each side edge, to mark Front Shoulder Ribbing.”
You mention only 2 new markers. So where did the 3rd come from?
Hi Anna,
Thanks for writing in! I am sorry to hear that you are having difficulties. In the Set-up row at the beginning of the pattern, you place 4 markers and then you place an additional 2 markers for a total of 6 markers. So in row 1 of the Divide for Front Left and Front Right, you will be knitting to the indicated number of stitches before the 3rd out of the 6 markers.
I hope that this clears things up and let us know if you have any further questions!
Cassy
The section SHAPE FRONT RIGHT ARMHOLE AND NECK ends with “work even until armhole measures 6 1/2 (7, 7 1/2, 8, 8 1/2) inches, ending with a right-side row.”
And then what? Bind off?
Hi Anna,
Thanks for writing in! After completing this section you will move onto Shape Front Right Shoulder section. In the first row, you will bind of a number of stitches and then work to the end. Follow the rest of this section at the conclusion of which, you will be binding off all remaining stitches!
I hope that this helps!
Cassy
But my yarn is at the end of Front Left Shoulder – how do I move from there to Front Right Shoulder without binding off first?
Oh, sorry, I get it! Thanks!!
This pattern calls for size 3 circulars or straights and size 2 dpns but nowhere in the pattern does it indicate when to use which needles! A clarification would be greatly appreciated. Thanks! 🙂
Hi Linda,
Thanks for writing in. You’ll use the US 3 for the entire piece until the end when you use the US 2 DPNs to finish the hems. You’ll see this direction at the end of the pattern. Thanks!
-Adam
I love this tank top but as a beginner, I find it too confusing to follow the instructions. I would be prepared to pay for this pattern if it had line by line instructions. I really hate patterns that require you to jump back and forth – it just leaves more room for error. I guess you assume that we are all experts at pattern reading.
Hi Linda,
I’m sorry you are not happy with the format. This pattern is written as such because it would otherwise be too wordy, long and redundant if everything were written out. Most patterns with as many row by row instructions like this one are formatted like this to save space and paper. Lots of knitters, however, prefer to make spreadsheets of their patterns so they can check off each line as they do it. Hope you’ll try it!
-Adam
Hello, Laura, and thank you for sharing your beautifully elegant tank top pattern! I am wanting to use Purl Soho’s Field Linen, but am unable to find the yardage required anywhere :/
Can you suggest how many skeins of that I would need for the size 36?
Thank you!
Hello Julie,
I love that idea! I believe you will need four skeins of the Field Linen to make this Tank Top. Anzula’s Milky Way Yarn is approximately 500 yards so this tank top will take about 1,000 yards to complete in size 36.
Let me know if you have any further questions!
-Marilla
I love it, I’m not a teen but I am definitely making this one for myself.
Hello! I am knitting this one in size 40. I am almost finished, but have 2 doubts as to the back instructions…
DOUBT 1
BACK / SHAPE ARMHOLES
Instructions /
Repeat Rows 9 and 10 five more times. [89 stitches remain.
Work even in pattern as established for 20 rows, ending with a wrong-side row.
Doubt
After repeting rows 9 and 10 five times (ends in row 20), some extra 20 more rows are to be knitted, until a total of 40 rows? Because the center rib pattern step (23stitches) after 40rows is visible longer than the one on the instructions photo… I end up with 16 rows of the last rib pattern width when each new change in rib width is 8 rows…
DOUBT 2
SHAPE BACK LEFT NECK
Instructions
Row 2: Purl.
Row 3 (Decrease Row): Bind off 4 stitches, work to end. [30 stitches remain]
Row 4: Purl.
Row 5 (Decrease Row): Bind off 3 stitches, k1, pm, work Basic Rib Pattern to last 2 stitches, work in stockinette stitch to end. [27 stitches remain]
Continuing to work first and last 2 stitches in stockinette stitch and stitches between markers in Basic Rib, work even until armhole measures 8 inches (20cm), ending with a right-side row.
Doubt
The 8 inches are counted since the beginning of the reductions to shape the armholes, right?
I hope the doubts are understandable… 😉
Thank you so much!
Hello GIsela,
Thanks for reaching out and for giving us so much information! To answer your first question, yes. The photo is of a smaller size so it will not match up exactly with the size 40 instructions. I hope this answers your first question, but is it doesn’t let us know.
The answer to your second question is also yes, these 8″ are measured from where the decreases for the armhole begin.
I hope this helps and happy knitting!
-Marilla
Oh thank you so much Marilla ?
All is clear and now I can relax, knowing I understood the instructions well, and end this sweet project.
Thank you for all the knowledge you share at Purl Soho and the lovely patterns (free and purchasable). I do wish it would be more easy to visit you in NY. I absolutely love all your wool / fiber options.
Wooly warm regards!!
Gisela
I was wondering if I could use cotton yarn. however the stretch will not be the same as merino superwash, so please tell me if it will work as an alternative yarn. Thanks!
Hi Thelma,
Thanks for writing in! As long as you swatch carefully and keep in mind that cotton doesn’t hold its shape quite as well as wool, you could certainly substitute a cotton yarn for this top! Because cotton tends to stretch out when worn, I would also recommend making sure you choose a size that has zero or slightly negative ease so that your top has a tailored fit, even if it the cotton stretches out a bit.
Happy knitting!
Julianna
Hi –
I love this tank top pattern and much of the esthetic of everything I see on this site. It’s all so timeless, elegant and classic.
Would this top pattern work with a yarn like Burnish or the Habu Silk Wrap Paper N-94? I think either would be fantastic as a lightweight summer option.
I’m a size 40 and am wondering how many skeins would be required for a one-color version. Based on everything I’ve read my guess is about four if Burnish and about 10 for the Habu.
What would you recommend and can you confirm how much yarn would be needed? Any advice on things to look out for given these yarn choices would also be welcome.
Thanks so much!
Helen
Hi Helen,
Thank you so much for the kind words and for writing in! Although you will have to knit a gauge swatch to make sure, I think Burnish and Silk Wrap Paper would both be great options for this top! The two yarns will result in very different tops, however. Burnish is super drapey and will result in a flowing top, while Silk Wrap Paper is much more structured and even somewhat stiff, though it will soften up after washing. For size 40, you will need 1,005 yards of a single color, which would be 3 skeins of Burnish or 9 balls of Silk Wrap Paper.
I hope that helps, and happy knitting!
Julianna