


Bear’s Rainbow Blanket

Like many parents, I soon discovered after having a baby that I’d never actually been busy before. Basic things like taking showers and returning phone calls suddenly seemed overrated. But for me, one thing that has never been dispensable is crafting things for my son, Bear.
I’m not saying that I sit around for hours, dreamily stitching away. No, it’s more like a stolen moment here and a quick minute there; a few squares at jury duty, a couple more in a waiting room, and two years later a blanket is born!

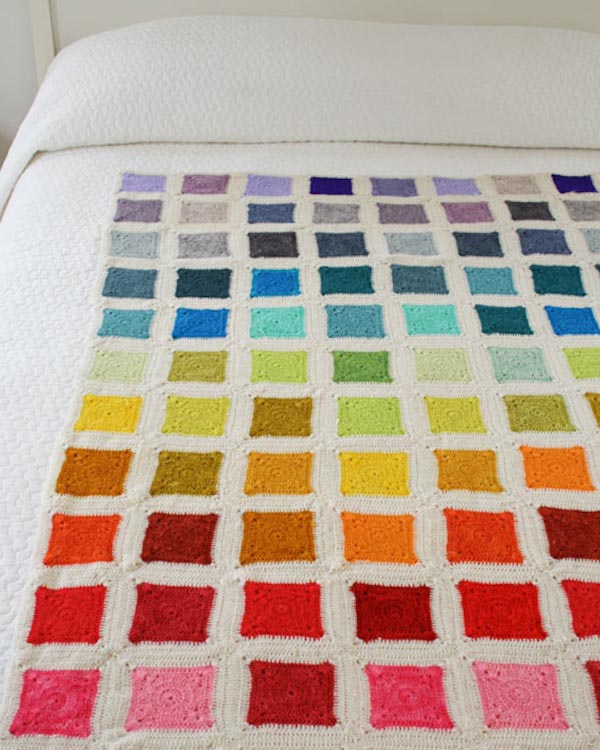
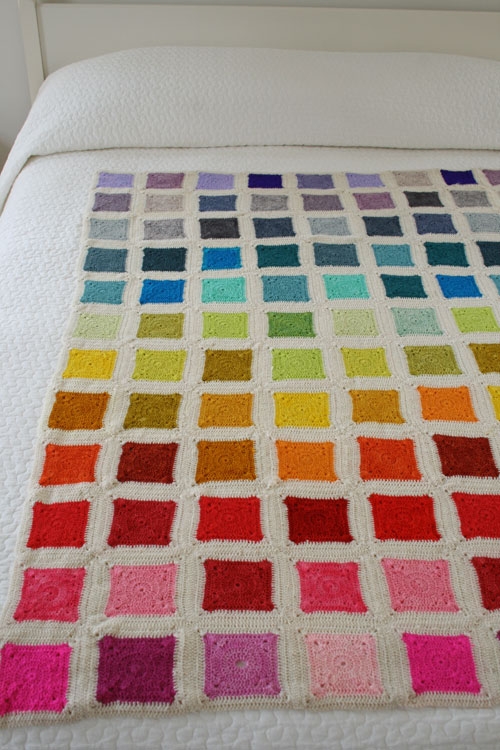
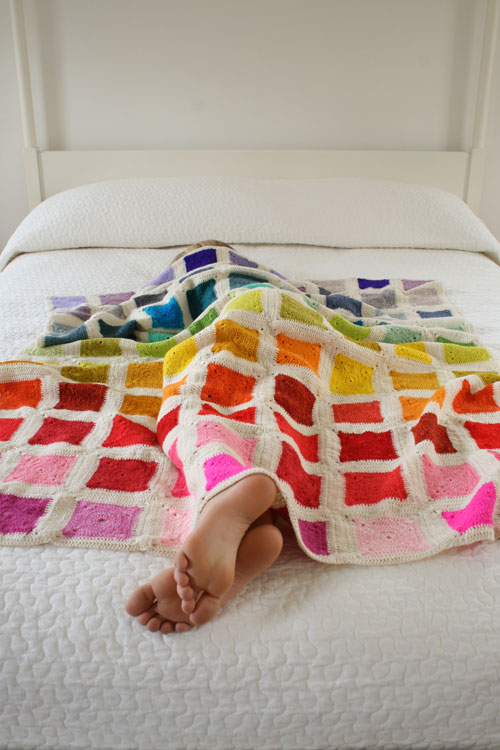
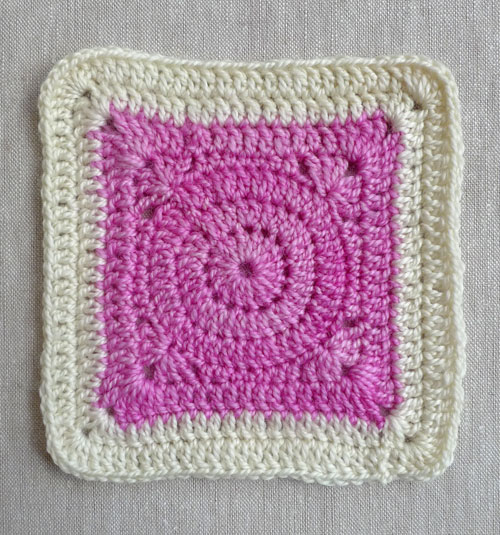
As drawn out as the process was, making Bear’s Rainbow Blanket was always an exhilarating ride. Each step contained a world of wonderment, from Koigu Premium Merino‘s incredible hand dyed colors to this fascinating stitch pattern that magically turns a circle into a square; from the arrangement of dozens of colors and 108 squares to the daydreams of Bear dragging his Rainbow Blanket off to college!

I think I could have crocheted these squares for the rest of my life, but I finally stopped myself when I had enough to make a 40 x 54-inch blanket, the perfect size for my four year old. The bed pictured here is a queen, but this blanket is also right at home on a twin bed… or under a circle of picnicking stuffed animals!

I’ve crafted quite a few things in my life, and though I have so much fondness for many of those things, this is perhaps the dearest to my heart. This blanket expresses not only my love for my son but for crafting too. To pursue a grand plan to its very end is the chocolate cake of crafting: a rich and deeply satisfying experience!
To start concocting your own grand plan, read on! -Whitney
Designed by Purl Soho designer, Whitney Van Nes.
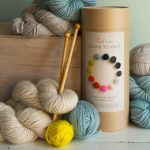
Materials
To Make the Exact Same Blanket
FINISHED SIZE: 40 x 54 inches (9 squares x 12 squares)
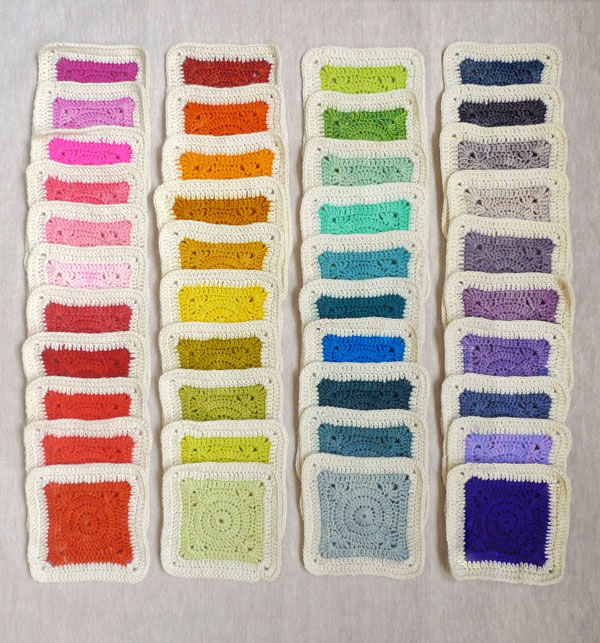
To make your blanket just like mine you can order the 52 skeins of Koigu Premium Merino (KPM), 100% Merino Wool that I used. They are:
- 11 skeins of color #00 for the borders.
- 41 skeins for the inside squares. One skein of each of the following colors:
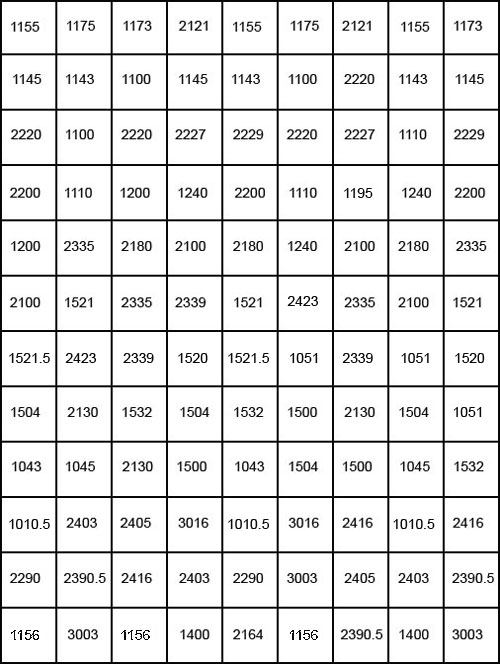
- First column (far left, from the top):1175, 1173, 1155, 1145, 1143, 2121, 1100, 2227, 2229, 2220, and 1195
- Second column: 1110, 2200, 1240, 1200, 2180, 2100, 2335, 2423, 1521, and 1521.5
- Third column: 2339, 1520, 1051, 1532, 1504, 1500, 2130, 1045, 1043, and 1010.5
- Fourth column: 3016, 2405, 2403, 2390.5, 2290, 3003, 2164, 2416, 1156, and 1400
You will also need:
- A size D crochet hook
To Make a Crib Size Blanket
FINISHED SIZE: 32 x 41 inches (7 squares x 9 squares)
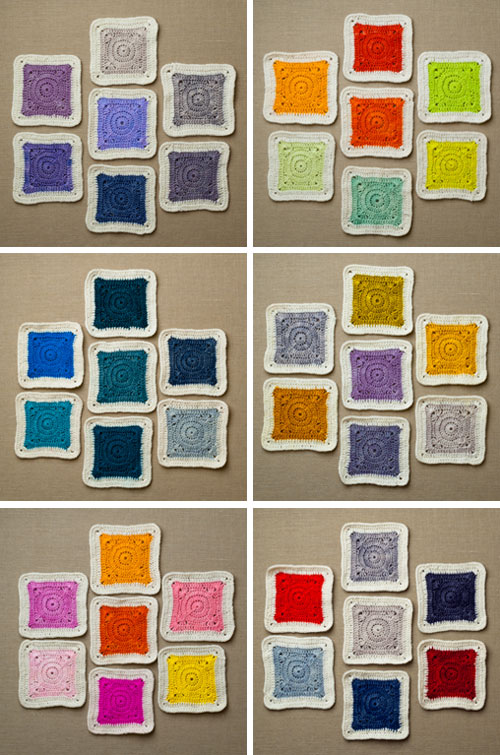
To make a smaller version of the Rainbow Blanket, you can order one of our crib-size Rainbow Blanket Bundle right here (no longer available). It includes a total of 13 skeins of Koigu Premium Merino: 7 colors for the inside squares and 6 of color #00 for the outside borders. Arrange the 63 finished squares however you want!
Choose from six different Rainbow Crib Blanket Kits (shown above):
- Pebble (top left): 2390.5, 3003, 1156, 2403, 2164, 2416, and 2290 + 6 skeins of 00
- Kitchen Garden (top right): 1195, 1240, 2200, 2339, 1521.5, 1051, and 1521 + 6 skeins of 00
- Dolphin (middle left): 1500, 2130, 1043, 3016, 1504, 1045, and 1010.5 + 6 skeins of 00
- Mineral (middle right): 2335, 2403, 3003, 2180, 1200, 2290, and 2390.5 + 6 skeins of 00
- Pixie (bottom left): 1240, 1173, 2200, 1143, 2121, 1155, and 2100 + 6 skeins of 00
- Pickup Truck (bottom right): 2403, 2229, 2390.5, 2405, 1010.5, 3016, and 2227 + 6 skeins of 00
You will also need:
- A size D (3.25 mm) crochet hook
To Design Your Own Blanket
Here is what you need to know to:
- Each skein of KPM is 50 grams and 175 yards.
- Bear’s Rainbow Blanket is 9 x 12 squares (108 squares total). To make the same size, you’ll need at least a total of 22 skeins of KPM. If you want a border color, you’ll need 11 of it, plus at least 11 more skeins for the inside squares.
- Each square uses about 32-34 total yards of KPM; 17-18 yards for the inside square and 15-16 yards for the outside border.
- 1 skein of KPM can make 10 inside squares or 11 outside borders.
- Each square measures 4 1/2 x 4 1/2 inches.
- A skein of KPM Needlepoint Yarn is 3.125 grams and 10.9 yards, so for 1 inside square you need 2 KPM Needlepoint skeins.
- Purl Soho always has a beautiful selection of Koigu’s KPM. Click here to see it all, and have fun!
Notes On Koigu
- Koigu Premium Merino is hand dyed in small batches so please know that each dye lot is unique. This means that if you use one of our kits, it will look a lot like ours but will have some variations. It also means that if consistency is important to you, buy enough!
- KPM is machine washable on a cold, gentle cycle. However, please be aware that, while Koigu does its best to set their hand-dyed colors, they do note that “Under certain water and/or soap types this yarn may bleed.” For thorough instructions and excellent tips on setting your yarn’s dye before you begin, please visit our Re-fixing Dyes Tutorial!
Crocheted Square Pattern
Gauge
6 1/4 double crochets crochets = 1 inch
Finished Size
Each square is 4 1/2 x 4 1/2 inches
Inside Square
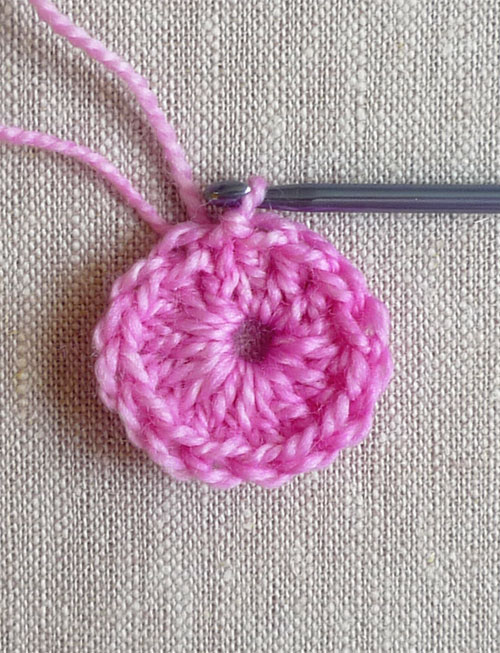
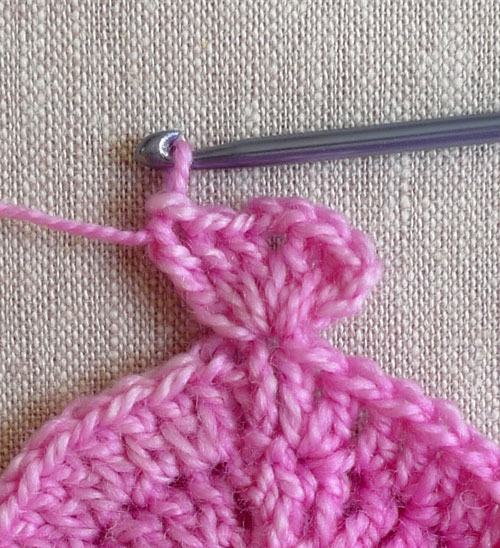
Round 1: With the Inside Color, chain 3 into an adjustable loop, make 15 double crochet (dc) into the loop…
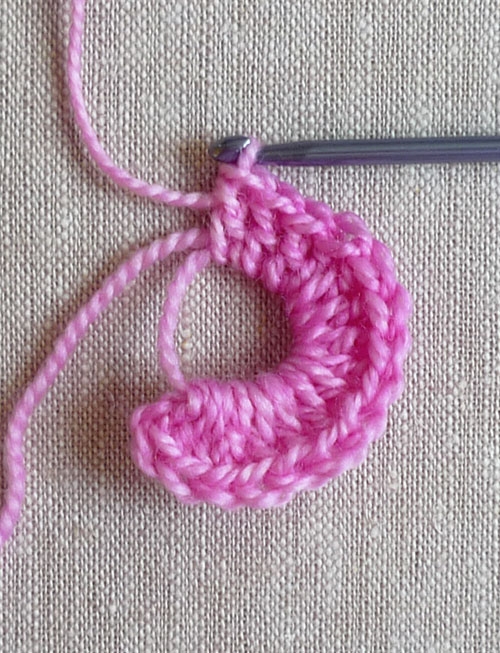
… join to third stitch of beginning chain with a slip stitch. (16 stitches)
Round 2: Chain 3, [2 dc into next stitch] 15 times to beginning chain, 1 dc into base of chain…
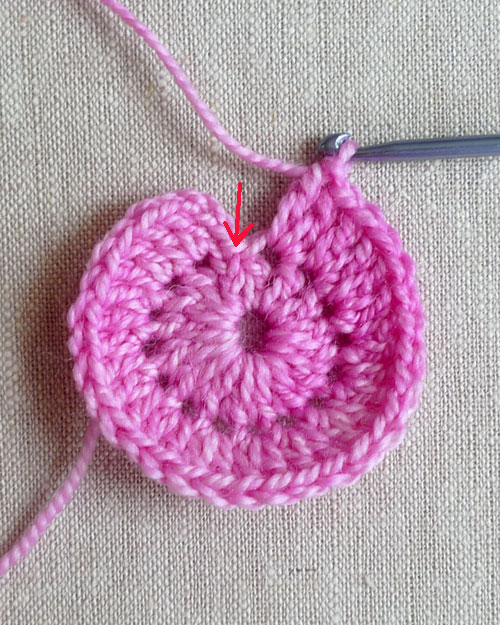
… join to third stitch of chain with a slip stitch. (32 stitches)
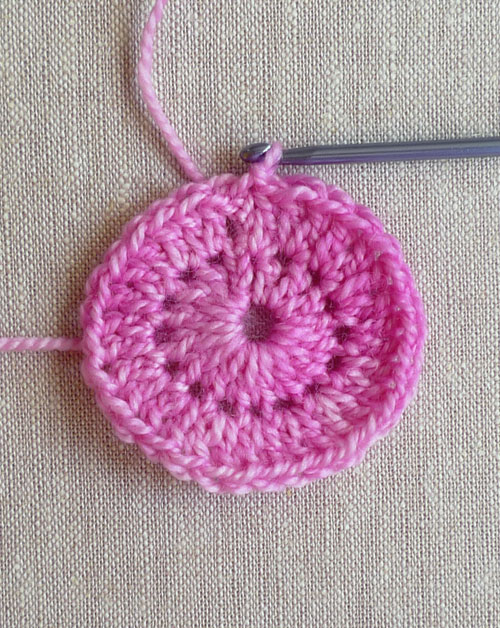
Round 3: Chain 3, *2 dc into next stitch, 1 dc into next stitch, repeat from * to last stitch, 2 dc into last stitch, slip stitch into third chain. (48 stitches)
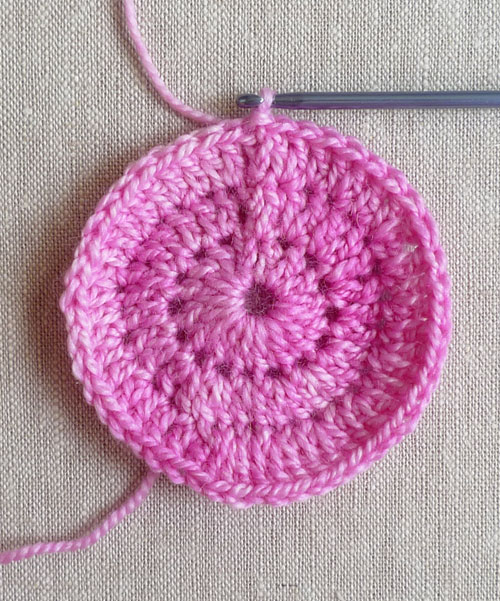
Round 4: Chain 4, (2 dc, ch 2, 2 dc, 1 treble crochet [tr]) into the base of the chain…

..*skip 2 stitches, 1 half double crochet (hdc) into next 2 stitches, 1 sc into next 3 stitches, 1 hdc into next 2 stitches, skip 2 stitches, (1 tr, 2 dc, chain 2, 2 dc, 1 tr) into next stitch, repeat from * 2 more times, skip 2 stitches, 1 hdc into next 2 stitches, 1 sc into next 3 stitches, 1 hdc into next 2 stitches, slip stitch into 4th chain.

Round 5: Chain 3, 1 dc into next 2 stitches, *(1 dc, 2 tr, ch 2, 2 tr, 1 dc) into corner space, 1 dc into each stitch to corner (13 dc’s), rep from * 2 more times, (1 dc, 2 tr, ch 2, 2 tr, 1 dc) into corner space, 1 dc into each stitch to beginning chain (10 dc’s), slip stitch into 3rd chain. Cut the yarn and pull it through the last stitch.

Outside Border
Round 1: Join Border Color into a corner space. (Chain 3, 1 dc, chain 2, 2 dc) into corner space, *1 dc into each stitch to next corner space (19 dc’s), (2 dc, chain 2, 2 dc) into corner space, repeat from * 2 more times, 1 dc into each stitch to beginning corner (19 dc’s), slip stitch into 3rd chain.

Round 2: Chain 3, 1 dc into next stitch, *5 dc into corner space, 1 dc into each stitch to next corner space (23 dc’s), repeat from * 2 more times, 5 dc into corner space, 1 dc into each stitch to beginning chain (21 dc’s), slip stitch into 3rd chain. Cut the yarn and pull it through the last stitch.
Weave in whatever ends you didn’t already crochet over.
Layout
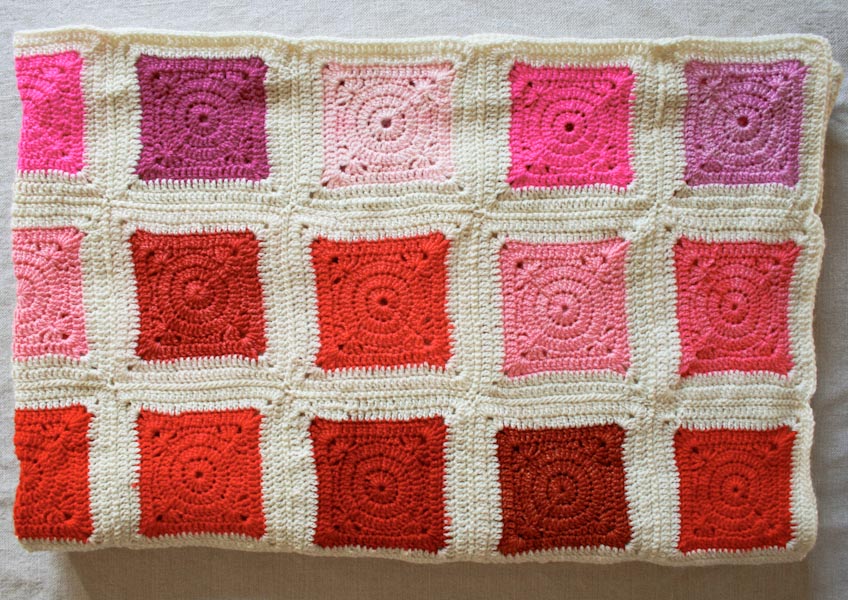
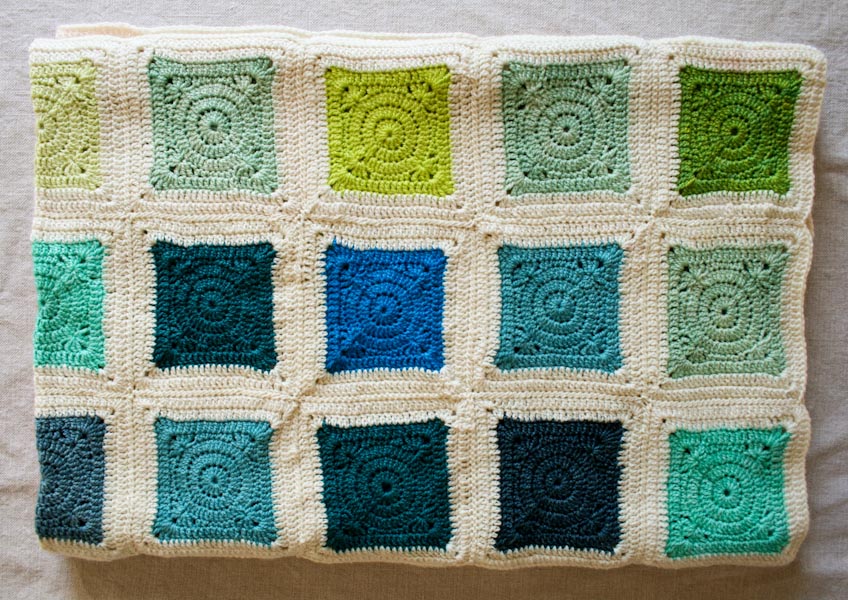
If you are making the same exact blanket as this one, here is the layout of all the squares. (Note that in some of the story’s photos the blanket is flipped over so that this layout is a mirror image of what you may see in the photos.)
Assembling
There are lots of ways to attach your squares together. Some people like to crochet them together using a slip stitch or even a single crochet, but I prefer to sew them together with a length of yarn and a tapestry needle. And again there are several of ways to do that: a running stitch, some variation on a blanket stitch, or my preferred method, a whip stitch. Experiment and decide what you like best!
To whip stitch, I brought the needle under both strands of the edge stitches. Instead of turning the needle around to come back the other way, I pushed my needle through in the same direction for every stitch.
Remember to save yourself some trouble and sew over whatever ends you can!

I hope you enjoy this project as much as I did! And happy hooking!


Hi Lois,
The hook size depends on the yarn you choose (even worsted weight yarns come in many weights, from "light" to "heavy"), but in general, a G, H or I hook would be a good place to start your experiments. And I don't know how big each square will end up, but I imagine about 7 inches…?? Try one out, and remember that if it feels too tight or looks too loose, try a different hook size.
Thanks so much for asking and please let us know if you have any other questions!
Whitney
Hi Whitney, after 6 months I've finally completed all the squares for the 3 rainbow blankets I am doing for my daughters!!! I just loved doing the squares and am so sad to be finished but of course am now faced with the task of sewing them all up!!! I've completed one blanket but am concerned that the squares aren't sitting nice and flat like yours, they're a little puckered. I attached squares using the single crochet method and am wondering if this (and it's tension) is the problem or is there something I should do such as iron it?
I'd really like to get this right before I move onto the next two, particularly after all the beautiful work I've put into them.
I don't know how to attach a photo so I hope you get what I mean!!
Thanks so much for the gorgeous pattern, it's been such a wonderful journey.
Kate
Hi Kate,
Wow, congratulations on coming so close to finishing such an endeavor! I hope you figure out how to attach photos so we can see all three blankets when they're done!
I would say that some puckering is normal (especially around the corners) and that as the blanket stretches and settles with wear, the puckering works itself out. However, if you're experiencing serious ripples and bumps, then yes, it could be a tension problem with your single crochets (maybe try a bigger hook).
It could also be that you haven't quite sorted out the way the four corners meet. I suggest starting and ending each side by crocheting together the center stitch of the two corners you're attaching. This means that each corner stitch will eventually get crocheted twice (one time for each adjoining square).
Please let us know if you need any more advice, because I want all of that hard work to end beautifully too! Thanks so much for your question and good luck!
Whitney
Would the Cascade 220 Superwash Sport yarn work well for this? Is it a soft yarn? I would love to use the Koigu brand but I have 2 daughters who would love for me to make a blanket and I am looking for something a little less expensive without risking softness and comfort. Thanks so much!
Diane,
Did you use the Cascade 220 Superwash Sport yarn? I am also interested in a more affordable option without sacrificing softness and color. I love the Koigu but I simply can’t afford it for the size I would like to make.
If you did use it, what colors/color pattern did you use?
Thanks,
Jennifer
Jennifer, I used the Cascade 220 Superwash Sport, with a size 5.0 hook and it’s turning out really nicely!! I’m in the assembly phase now. I made the blanket with 8 colours, blues, greens and yellows. Each skein made 5 squares. I lost count of the number of whites steins I used, sorry. My blanket is going to be able 56″ by 35″ when it’s done. Hope that helps 🙂
What lovely blanket. Wonderful colors. Thank you so much for the easy to follow intruction. I already tried one square with a cotton yarn and love it. I willl be looking for to find the rainbow colors and make one for my dougther.
Is there any differences between merino wool and the wool?
http://artikkizimicinoruyorum.blogspot.com.tr/2014/07/battaniye-yapacagm-3.html
Hi Hulya-
Thanks! I'm not sure I understand your question about the wool. Our version of this blanket is made with 100% merino wool, which is a soft and smooth and comes from a Merino Sheep, but the pattern will work with almost any fiber (like cotton, as you know!)
If I didn't answer your question please let me know and thanks for the kind words about this pattern!
Molly
Hi Diane,
Yes, I think that would be a very nice (and affordable!) choice! The Cascade Superwash Sport may be a little thicker than the Koigu KPM, but that just means you'll either make fewer squares or make a bigger blanket!
Thanks for your question and good luck!
Whitney
Hi, I have a question about fixing the colors. I have been dutifully soaking the skeins with the vinegar solution and found that, despite doing this over and over, and rinsing and rinsing, the deeply saturated colors are still running. I’ve been at it for two days, and when I rinse the skein the water is still lightly tainted. Should the rinsing water be clear? I must admit that the intense blue skein may now be ruined. So before I attempt this again I was hoping to find out what I am doing wrong. I’d hate to ruin any more skeins, or worse, not have them fixed properly and have them run into the white when I wash the blanket. Thanks in advance for any help…
Hi Nicole,
Some dye colors are very stubborn, especially, as you say, deeply saturated colors. But even so, you should not have to nearly ruin a skein before the water runs clear! We have been in touch with Koigu about this, and they were sorry to hear your story and are happy to replace your skein for you. We will be directly in touch with you to make sure this happens!
Thank you so much for alerting us to this problem!
Whitney
Thanks Whitney. I appreciate your reply and the offer to replace the skein. I was actually at the store and the girls were so helpful and sorted out the replacement. It does sound like the blue skein was behaving abnormally. I’m pleased to report, however, that I’ve made a good start on the squares and am excited at how they’re turning out!
any ideas on what to do with the leftover yarn? 🙂
Hi Summer,
How about starting with a pair of Crocheted Striped Hand Warmers? https://www.purlsoho.com/create/2011/02/13/whits-knits-crocheted-striped-hand-warmers/
Maybe a smaller, more colorful version of our Granny Stripe Blanket: https://www.purlsoho.com/create/2011/04/16/elegant-granny-style-the-granny-stripe-blanket/
Some wild Granny Circle Placemats? https://www.purlsoho.com/create/2011/06/19/whits-knits-granny-circle-placemats/
Or how about another Rainbow Blanket?
Thanks for asking!
Whitney
Thanks so much for sharing! I love this pattern ^_^
I’ve been looking for inspiration for a comfort blanket for my nearly 10 year old grandson and have found it in this pattern. Thank you so much.
Love the combination of colours. You did a wonderful job! 🙂
This is so terrific looking! Searching for an “easy to travel with” car project and crochet projects work best for me as I need a break from my long term knit projects in progress and this is it. My Mother in Law was FAMOUS, in our family of course, for her Granny Square ‘Ghans so this will be a perfect future gift for her son, my hubby, in fall/winter/masculine color gradations. I just love it! Thank you!
This blanket is great ! Thanks for sharing !
In putting the blanket together, do you whip stitch with wrong sides together? I am trying to decide whether to whip or slip and am almost finished with my 84 squares, so I’ll need to decide soon! Is there any downside to sewing the pieces together using the whip stitch? Is it a sturdy seam?
Hi Linda D.,
I guess I would say I whip stitched with wrong sides together, but more accurately, I sewed my pieces side by side. That way I was able to get the tension just how I wanted it. If you sew with the wrong sides pressed together, you could find that when you lay the pieces flat, there is a tight ridge along the seam. However, if you sew with the pieces how they’re going to be, that’s less likely to happen.
I’m very happy with the way the whip stitch has held up. Not a single hole yet!
Thanks for asking and congratulations on having come this far! We can’t wait to see your blanket when it’s all done. Send us a photo or a link!
Whitney
Thanks, Whitney! I’ve tried several different techniques for joining the squares, but your choice of the whip stitch looks best. How do you secure the ends of the yarn, slip stitch? Please advise. I am hoping to finish this project in time for Christmas and have 16 squares to go plus the joining. I have developed fairly severe tendonitis in my right hand from crocheting, so am limiting myself to no more than one square a day. My left hand developed the same problem from knitting and resulted in surgery. My hope is to be able to complete this lap blanket before my hand situation makes that impossible! Wish me luck!
Hi Linda D,
The easiest, fastest and best way to secure the ends is to crochet or sew over them! Otherwise, you can thread each tail onto a tapestry needle and weave it indiscreetly into the fabric.
And I do wish you luck! I can’t stand to think that this blanket will end in surgery for you, so I hope you’re able to stick to your one-square-a-day schedule and I hope you think it was all worth it!
Whitney
Hi there!
I am about to begin Bear’s Rainbow Blanket for my son Javier and to start, have bought about half of the colors from your Soho store and online. At my request, my purchased skeins were wound into balls. After requesting this, I remembered that the instructions called for soaking the darker colors in a white vinegar solution. I think if I soak wound balls they will never fully dry so then I was thinking I can soak and then block the darker colored crocheted squares once completed. Then a friend pointed out that they could shrink, which is why you would usually soak before using the yarn. She came up with another solution, which is to soak and block all the squares, regardless of color on completion, soaking the darker colors in vinegar and then a cleansing bath and the lighter colors only in a cleansing bath. If you have any other suggestions or if you think I would be better off unwinding the balls and soaking before I begin, please let me know.
Many thanks in advance for the advice!
Hi Jen!
I think you have some great ideas! If it were me, I would probably crochet the inside squares (excluding the white border), and block all of them following your idea on using vinegor or some other mordant for the darker colors. Then I would crochet the white borders, and block all of the squares; that way during the second time blocking, you can make sure every square is the same exact size before assembling the blanket together.
Happy Crocheting!
Thomas
would this method also work for closing a seam on a flat knitted hat?
Hi Linda!
You could definitely use this kind of stitch to close a hat. I would use a mattress stitch instead, however. Click here for a tutorial!
Thanks for your question!
Thomas
I want to cry. I have spend 3 hours trying to read these instructions and watching you tube videos and I can’t figure out how to do this. Do you know of a video that will show a complete noob how to make this? Your instructions are more for people who have done this before and seeing this blanket I just have to give crochet a go (i’m a sewer). I have all the supplies but no idea on how to follow these pics 🙂
Hi Esther-
Is this your first crochet pattern ever? If that’s the case I would recommend you maybe make a few traditional granny squares first to get the basics down: https://www.purlsoho.com/create/2007/03/30/granny-squares/
If that’s not the case, and you have crocheted before, let us know what specific steps you’re having problems with and we can try to talk you through it.
Thank you for getting in touch!
Molly
Yep it’s the first time ever to crochet. I had to watch a you tube video on getting the tension correct. I’ll give the granny squares a try, thank you. Hopefully someone in my extended family will take pity on my over Christmas and give me personalised instructions 🙂
Hi, I love this pattern but $780 is a bit steep for me. What is an affordable alternative to this wool (and has the corresponding colours if possible)? I live in the UK.
Thank you.
Hi Claire!
The Koigu is actually the least expensive yarn per skein we have! I think the best thing to do would be to plan a smaller blanket using a couple of our smaller kits found here. You can also make the yarn go a little further by doing fewer colors, and doing more squares out of each color.
You might also be successful by doing many more squares of the same color using another fingering weight yarn that has more yardage in each skein. See our full range of fingering weight yarn here!
Happy Crocheting!
Thomas
I love love this blanket and I am currently practicing squares using cheap yarns. I live in the tropics (Indonesia) and I might be crazy to use KPM blanket as an everyday blanket, so can you give me suggestions on cotton yarns suitable for this pattern that you carry?
Hi Jun!
We’re so glad you like this blanket! You could use our Cascade Ultra Pima, though it is a little bit thicker than the yarn called for on the pattern. If you’d like a fingering weight, you might check out our Anzula Milky Way, or Anzula Sebastian, which both are blends with plant fibers.
Happy Crocheting!
Thomas
Thank you for your reply. If I am to go with Cascade Pima, how much bigger (or thicker) would the blanket turn out? The amount of yarn needed would also change, I believe? I can’t wait to start
Hi Jun,
Unfortunately, I wouldn’t be able to say for certain the difference it would make. I would suggest just making a couple of squares, and see how big you could make the blanket based on that!
-Thomas
Whitney,
I’ve communicated with you before regarding this handsome blanket. I’m down to the wire on this project and am pushing to finish joining the 96 squares before Christmas. I am knotting the ends of the yarn using a slip stitch before working the tails in because I’m afraid of the yarn loosening. Is that okay? Also, I am unsure about joining the four corners of my squares. I am putting the squares together by whip stitching the rows separately and then attaching each row to the blanket. Should the corners of the squares be stitched together so they have more of a straight line or should I be keeping the rounded edges free until joining to the row above? I’m finding that it’s easier to stitch the four corners together when the corners of the squares are stitched all the way to the center of the point (creating more of a straight line). Is this correct? After so much work, I don’t want to mess up with the joining! By the way, my blanket will be 8 squares wide by 12 squares long and my squares measure 5″ using Madelintosh merino fingering (sock) yarn. I have a border in sage (for summer), and the interior is in gold, orange, red, dark green, and two shades of brown (for autumn). It will be given to my stepdaughter on Christmas morning, but I hope to visit it often.
Hi Linda!
Congrats on getting this far! Your blanket is going to be so beautiful! Regarding the slip knot, I think that is totally ok – as long as you work your ends in, the blanket will be secure. As far as your corners go, it sounds like you have a great plan for the corners. Whip stitching the pieces together is more of an art than a science, so it is up to you to decide how you’d like it to look! As long as you continue doing the same thing each time, it will look consistent!
Happy Stitching!
Thomas
I finished whip stitching the 96 squares on the Tuesday night before Christmas! It looked fabulous! I’d like to send you a photo of it electronically. Is there a way to do that?
Linda
Hi Linda!
You can either send it to us on facebook, or you can send it to us at purlbee AT purlsoho DOT com.
Thanks!
Thomas
This is one of the very few patterns I like. I’m a newbie when it comes to crocheting and whatnot. I had a very hard time understanding the instructions. This is where a video tutorial would benefit me 🙁
Was anyone able to replicate this pattern?
is this uk or us pattern please
Hi Jo!
This is a US pattern.
-Thomas
I just finished my Rainbow Bear Quilt and what a beauty! It was really great visiting Purl Soho and purchasing the Koigu yarn over a few months. I ended up with 72 different colors in mine, but I did keep the same progression of color.
Thank you for the inspiration.
Hi I have just started making this blanket and as I am using a 5 ply 100%pure wool, with a size D hook. My square doesn’t look neat and flat like yours, it seems to buckle and fold, I am wondering if you have any advice for me please.
Hi Bernadine!
You can try to wet-block each piece to see if you can get it to lay flat. If that doesn’t work, I am just suspicious that perhaps the wool you are using is to thick? Make sure you are using a fingering to sport weight wool so that the circle part of the pattern increases at the right rate.
Thanks for your question!
Thomas
Hi thanks for your rely, 5 ply in Australia is apparently the same as 2 or Fine , Sport, Baby, 3-ply in America, so it appears that I am using the right weight, I am now wet blocking as i go an this seems to have fixed the problem. I do have one other question and that is as hard as I try and redo I always seem to be 2 stitches short by the time i get to round five and the 2 boarder rows. So when you say stitch to next corner space do you mean into the corner space and then do the eg 2dc 2c 2dc etc or do you mean crochet to the space before the corner space and then do the 2dc,2c,2dc in the corner, when I get to the last boarder row I only have five stitches in the corner is this correct, or should I have 6. I just seem to be making a small error somewhere and despite pulling out rows and recounting I can’t quite figure out where I am going wrong.
thanks for your help
Hi Bernadine!
Whenever it says “stitch to next corner space” it means do do DCs up to and including the stitch before the corner. You won’t do any stitching in the corner space until you begin the direction to do 5 DCs in the corner.
It’s hard to say where you might be getting 2 stitches short, but that could definitely be contributing to the difficulty getting the square to lie flat. If blocking helps, that’s great!
Hope this helps!
Thomas
Thanks Thomas, that clears up my confusion over how far to crochet, and yes despite pulling the first 3 squares apart several times and recounting, I can’t work it out where I am loosing stitches, but blocking is certainly helping and they look fine, so I will keep going on my crib blanket. I wish we had a shop like yours here is Brisbane Australia. it is my favourite sewing/ knitting site and I get lots of lovely ideas from you. If ever i cone to NY, you are on my to visit list.
Hi, if I wanted to find a video to help me with the granny square, where could I find one? I can’t seem to find one that is similar to this pattern. Thanks. 🙂
Hi Madi-
We don’t have a video for a Granny Square but I’m sure you can find one by going to You Tube and searching “Granny Square”- it’s a fairly standard pattern!
Thanks for getting in touch!
Molly
Hi there,
I’m new to crochet and while I’m picking up the basic stitches ok, I seem to be having trouble and my square just isn’t looking right. I’m only up to the second row, but instead of being flat like the one pictured, mine is going wavy… I’m using what I believe is 4ply but I’m using a H/5mm hook as that’s all I’ve got at home at the moment, could this be the problem or am I doing something wrong??
I absolutely love this pattern and am hoping to finish one by the time I have a baby (I’m currently single, so I have plenty of time up my sleeve!)
Hope you can help, thanks : )
Hello Aimee,
Can you send us a few more details about the yarn you’re using? Most companies, depending where they are made, use different ply systems that could mean many different things. If its coming out very wavy, it could mean that you’re crocheting too tight. Feel free to send over some more information at purlbee@purlsoho.com and we can get you sorted out!
Alyson
Thanks, I will email you now
I love this blanket, but I am not a crocheter. Have you or anyone else created a pattern for this in knitting that would similar?
Hi Bonnie-
We don’t know of a similar pattern for knitting but you can check out all of our knitted blanket patterns here:
https://www.purlsoho.com/create/category/knit/projects-knit/home-projects-knit/blankets-decor-home-projects-knit/
Thank you for getting in touch!
Molly
Hi there. My question is in regards to sewing the squares together. Everyone always shows the nice finished edge of the stitches, but no one shows the sides of the squares where you turn at. Mine never look very neat along the sides. Any tips?
Thank you
Hi Kristine,
To make the corners lie flat where they come together, be sure that the very corner of each square is stitched to the very corner of each adjacent square. This means that each corner (except the ones that are at the edge of the blanket) will be stitched through twice: once when joining it to the square to its right and once when joining it to the square to its left.
I hope this helps you get the neat finish you’re hoping for. If not, please write back with more questions and we’ll get you on the right path!
Thank you so much for asking and good luck,
Whitney
What a gorgeous pattern! I’ve made two squares in cotton yarn for a friend’s baby to make a smaller baby blanket. So gorgeous. Thanks for sharing!
thank you verry mach
After years of longing for this blanket I bit the bullet and purchased the kit. I have seen many different solutions to use for soaking the yarn, but I would prefer to use the proven combination of water and vinegar (i.e. 1/2 cup vinegar and 1 cup water) for this particular yarn. Could you share? Also, would it be okay to rinse the yarn in Woolite after the soak so the yarn doesn’t smell like salt ‘n vinegar chips?
I learned to crochet just so I could make this blanket and don’t want to mess up any of the steps…any mistake would be too costly:-)
Thank you!
Hi Kate,
I’m so glad you hear you like the blanket. I agree that a vinegar soak would work great. I don’t see any reason a Woolite rinse would be bad for the yarn. We also sell a blocking rinse called Soak which smells great and would work to get rid of the smell: https://www.purlsoho.com/purl/company/240-Soak
Thanks for your question!
Jake
Hi Jake.
Thanks for the response regarding the post-vinegar bath rinse. However, you didn’t address my initial question…what is the ratio of vinegar and water for the vinegar bath?
Thanks!
Hey Kate,
The ratio I usually use is a teaspoon of vinegar for a cup of water unless there is a lot of excess dye in which I would put in a tablespoon of vinegar. Blue dye is notorious for bleeding a lot so you can be more generous with the vinegar for those yarns.
Thanks for your questions!
Jake
Hi Jake and Purlbee,
I made a similar blanket for my first crocheting project–much smaller and with grey instead of white, but otherwise all bright Koigu colors. I washed it once in cold water on delicate with no incident, and recently washed it again the same way, and the colors bled very badly! I wonder if there is a way to undo his?
Hello Kate!
What a tragedy! How odd that the blanket didn’t react during the first wash and did react in the second. Unfortunately there isn’t a full proof method to un-do the color bleed, but if you email customerservice AT purlsoho DOT com with your address we’d be happy to send you some Shout Color Catchers that may help a lot with picking up the excess yarn dye.
I would recommend trying this product with your blanket in just a tub of cool water or in the sink with very little agitation. I wouldn’t let it soak for too long, no more that 10-15 minutes.
Please let us know how it goes and best of luck! -Alyson
I’m drooling over this blanket. I’m in love! But I’m a knitter and I never crocheted before. (Is that the correct past tense?) I thought about coming in to learn to crochet but I was wondering if you have any suggestions on how to knit this instead and still get the same beautiful, yummy look?
Hi Bonnie-
Crocheted is the correct past tense!
An enterprising Purl Bee reader actually did create a knit version of this blanket that you can see here: http://blueberryhillcrafting.com/2013/03/16/rainbow-blocks-blanket-the-end-finally/
http://blueberryhillcrafting.com/2012/11/21/rainbow-blocks-blanket-the-beginning/
We haven’t tested the pattern but it turned out beautifully for her!
Thanks for getting in touch!
Molly
After some serious lusting after this project, I’m ready to buy my yarn! One question relating to joining: could you obtain the same look by employing a join-as-you-go process? Thanks!
Dear Alana,
Of course you can! What a responsible and disciplined way of going about it! Then you can see the blanket grow! Happy stitching!
Alyson
I tried this pattern yesterday in a practice square. I love the way it looks, and your step-by-step photos really helped me as I don’t have a lot of experience crocheting in rounds. I see more of squares these in my future!
Hi I have been practising the squares and think I am ready to start making my blanket…. but I am in the uk and am struggling to find a place that stocks enough different colours of KPM to make the complete set. Can You recommend either somewhere I can order from which will ship to the uk, a similar brand which will have enough colours in uk, or can you ship to uk? any advice appreciated!
emma
Hi Emma,
Thank you for the comment! You can order from our website and we ship internationally! We actually have all the needed yarns being sold together in a kit which you can purchase here; https://www.purlsoho.com/purl/products/item/8943
If you’d prefer to choose your own colors you can browse our selection here; https://www.purlsoho.com/purl/products/item/410-Koigu-Wool-Designs-Koigu-Premium-Merino-KPM
If you have anymore questions feel free to write us back and good luck with your color selection!
Happy Crafting!
Jake
I’m having some trouble with this pattern. Rnd 4 requires 48 sts, which is what I’m supposed to have at the end of Rnd 3, but if I do the
“2 dc into the last stitch” as Rnd 3 indicates, then I will end up with 50 sts not 48 and then I have too many sts to do Rnd 4 properly. However, Rnd 5 seems to require more than 48 sts to work properly, yet no sts have been added in Rnd 4.
The only way I can get the math to work is if I delete the part that says “2 dc into the last stitch” in Rnd 3, and change Rnd 5 to put 1 dc in 11 of the side sts instead of the 13 the pattern calls for. I haven’t even gotten to the outside border yet.
Hi Alyssa,
Thank you for the comment! If you slip the last stitch in round 3 you should end up with 48 crochets. That slipped stitch is what kicks off round 4 so as long as it isn’t included in round 3 you should end that round with 48 crochets. Then the following rows should work out properly.
I hope this helps and feel free to write us back if you are still having issues!
Good Luck!
Jake
Hi!
I have been wanting to add a double crochet border to my blanket, in a different color. I’d do 3 treble knots where the squares meet (and there is a dip).
Do you have any tips or advice?
Thank you,
Asmah
Hi Asmah,
Thank you for the comment! I think that this would all work great. I think that there will be a little bit of a dip regardless of the technique used in order to turn the corner nicely. I would go forth with this plan and if there is anything that you would like more advice on feel free to respond or send us an email with photos of your work and we can help figure it out!
Good Luck!
Jake
I am new to crochet and am enjoying this project very much. However, I have noticed that my squares have a slight difference in look when I turn the square over…there is a definite front and back. Should there be? And if there should not be how do I correct this? Any advice would be much appreciated.
Thanks!
Stacy
Hi Stacy,
Thank you for the comment! Crochet does have a noticeable front and back, it’s not as drastic of a contrast as a knit vs purl side of a knit fabric but it is noticeable. You are probably doing everything correct but if you would like to double check we have some really great crochet tutorials you can view here; https://www.purlsoho.com/create/crochet/tutorials/
I hope this helps and feel free to write back if you have anymore questions!
I’m thinking of making this as a baby blanket for my first baby 🙂 Do you think it will be difficult for a beginner crocheter? Also, would cotton yarn be a good choice of so that it is easily washable or would it lose its shape? Thanks so much!
Hi Alexis,
This isn’t an intrinsically difficult blanket, but maybe you should try a square with some scrap yarn and see how it goes. We’d be happy to answer any questions you encounter!
The Koigu KPM is actually machine-washable (on a gentle cycle), but if you’d prefer a cotton, I think that would be great too. You’re right that it will stretch a bit, but I’m not sure that should stop you! Cascade’s Ultra Pima would be a nice choice: https://www.purlsoho.com/purl/products/item/7117-Cascade-Yarns-Ultra-Pima
Thank you for your questions and congratulations on expecting your first baby. I’m sure he/she will love whatever you make!
Whitney
Hi Whitney,
Thank you for your response. I would definitely prefer to use the Koigu, but I didn’t think it was machine washable. Could you tell me how many inner color pieces I would be able to make out of one skein if I plan on making multiples of each color?
Thanks again!
Hi again Alexis,
Koigu is machine washable (again, on a gentle cycle), although the label errs on the side of caution and says to hand wash it. If you are using saturated colors, you should soak them in a bath of warm water and white vinegar before you wind them into balls (and/or use a “color catcher” when you first launder your blanket [Shout makes one]). And to dry your blanket, I would lay it flat, rather than put it in the dryer.
You can make 9 or 10 squares with one skein of Koigu KPM. There’s lots more information about yardage in the section of the pattern called To Design Your Own Blanket.
Keep the questions coming!
Whitney
Would a sport weight yarn work as well?
Hi Alexis,
Yes, absolutely! In fact, practically any weight yarn would work. The only thing to keep in mind is that the weight of yarn you use will change the size of each square, and thus, perhaps, the number of squares you want to make. And, of course, the warmth and weight of the finished blanket will change!
Actually, Mammaj71 just left a comment (the one following this one) that shares her experience using a worsted weight yarn. Check it out!
Whitney
Hi. I was wondering if there were more pictures of the layout of the crib size blanket? I am using 7 colors (9 of each) and I am trying to figure out how to lay them out. Thanks!
Hello Alexis,
We’re so glad you’re making this fun and colorful blanket! Unfortunately we don’t have any other photos of these blankets at this time. I would lay it out flat and have fun mixing and matching up the colors!
Best of luck! -Alyson
I have to say…I used this pattern with worsted yarn and it turned out just as stunning as the small blocks…I use an “H” Hook and everyone loves them…it is a nice change of pace from my granny squares. Each stitch and angle is beautiful and displays colors beautiful array as well! Thank you!
I am just getting started on this pattern, it’s so beautiful and can’t wait to make if for my baby girl. I do have a question about round 5, it says to make the stitches into the corner space, does this mean it’s not into the actual stitch but the space inside of the stitch? I want to make sure I’m doing this right before I get too far into the project.
Hello Jamie!
You’re right! You won’t be inserting your hook into the actual “v” of the stitch, but just into the little hole created by the previous stitches. Please don’t hesitate to write back if anything else turns out to be tricky! Best of luck! -Alyson
Hi!
I see that I can still order the complete kit for the blanket but since I could do 3 blankets with the kit, I would like to order 33 skeins of color #00 for the borders. I cannot do it if I simply order the kit and I cannot see the yarn available anymore. Can you please tell me how I can order the additional 22 skeins in color #00?
Thanks,
Jenya
Hello Jenya!
That yarn is still available here: https://www.purlsoho.com/koigu-painter-s-palette-premium-merino-kpppm-and-premium-merino-kpm.html
Make sure you chose the color KPM 0000 and you will be getting the creamy white color we used in this pattern for the borders. Thanks for writing in! If you have any further issues with your order, please feel free to email directly customerservice AT purlsoho DOT com. Thank you! -Alyson
Hi,
Thank you for pointing out the yarn. I didn’t realize it is the same as the one used for the blanket.
May I ask you to update the links in the pattern description since they are pointing to nowhere currently. Seems you did some web-page restructuring and it would be nice for all of us trying this patter to see the detailed instructions.
Kind Regards!
Jenya
Hello Jenya!
We are still working on the links–thank you so much for letting us know they’re still not functioning correctly! Best of luck and happy knitting! -Alyson
So I am almost finished with this behemoth (10 squares by 14!) and now am facing LOTS of end weaving and whip stitching. My main question concerns laundering and colorfastness. I was planning a “handwash” cycle in my machine – gentle detergent a la Woolite, cold water with minimal agitation. I did use KPM with a few Tosh lights thrown into the mix. I initially pre-soaked all with 50/50 vinegar and water. Even so, my worst fear, after a more than a year’s work, is bleeding and the white borders going dingy.
So I have a box of these Shout color catchers… I guess what I can’t figure out is whether or not that is a one-time process. Like if I toss one in on the first gentle wash, can I assume it did its job and I can then subsequently gentle wash without one? Or in theory would I need to use one every time? The ones I got have a really strong artificial fragrance that I’m sensitive to, so I’m hoping it’s a one-shot thing then I can wash them in something unscented the next time!
I’m probably overthinking this, but I am so paranoid about the colors through the first few washes. I also know you guys aren’t the Shout Customer Advisory Panel , but I’d still appreciate some advice!
Thank you so much for this pattern. It’s been quite a journey!
Hi, Allison!
Thank you so much for writing in! Sorry about the terribly late response! Congrats on nearly finishing this blanket, I am sure you put a lot of time into it! It sounds like you’ve done everything that you can do keep the yarn from bleeding. Soaking all the wool in the vinegar mix will really prevent major bleeding. Because you did this step, you may not need to use the color catcher at all. But I recognize that you’ve put A LOT of work into this blanket, so I’d use the color catcher once. If you’re really concerned there are some great tutorials on how to make your own color catchers (so that you can avoid the artificial fragrance).
Please keep us updated on the colorfastness of your blanket!
Best wishes,
Kumeko
I have been slowly working on this wonderful blanket for a year and I am finally to the point where it is time to block my squares and sew them together… So exciting!… Does the 4.5 x 4.5 measurement include the white border? If so, mine seem to be bigger…
Hi, Jeanine!
Thank you so much for writing in! Congrats on nearly completing this project! The 4.5″x4.5″ measurement includes the border. If your squares are larger you may have had a looser tension. Larger squares are okay for this project since it’s a blanket. The larger squares just mean that you’ll have a larger blanket, more to cuddle up with!
If you have further questions, please let us know! Again, thank you for writing in!
Best wishes,
Kumeko
What a lovely pattern! I’m considering making this blanket with a self-striping yarn to help make it both colorful and economical. I can’t seem to find the actual yardage that I should purchase, though. What is the yardage ratio of colored to white yarn? Will I use the same amount of colored yarn as white yarn? or should I purchase more of one or the other? Thank you for providing such an inspiring pattern for free!
Hi Samantha,
Thank you for your kind words about our design! We love getting to see all the different versions of the projects that our designers create! Each square uses about 32-34 total yards of Koigu KPM; 17-18 yards for the inside square and 15-16 yards for the outside border. You will also need additional yarn for the outside borders. Our blanket is made of 108 squares and for the border we used 11 skeins of Koigu KPM for a total of of 1925 yards.
You may want to make your blanket larger or smaller. I hope that this information helps you decide how much yarn will work for you!
Best,
Cassy
Thank you! That is exactly what I needed to know!
Was or could this pattern be converted to knitting instead of crochet?
Thanks
Hi Susan,
Thanks for writing in! This pattern has not been converted to a knitting pattern. However, you could use our Log Cabin Washclothes as a base for creating your own knit version. You would knit the squares to approximate Bear’s Rainbow Blanket, using the washcloth pattern but a similar gauge yarn and needle to the blanket. You would then probably have to either sew the squares together or crochet them together.
I hope that this helps and let us know if you do end up making a knit version!
Happy knitting!
Cassy
Hi. Do you recommend blocking each square before assembling them?
Hi Alexis,
Thanks for writing in. Though not necessary, the right thing to do would be to block each square. Since Koigu is a hand dyed yarn, I recommend that you block similar colors together and add a Shout Color Catcher to each bath. Blocking the squares will make seaming a lot easier because they will all be flat and measure the same height and width. Hope this helps!
Best,
Adam
Thank you! I actually didn’t use koigu, but I may still do the color catchers when I wash my squares. Is that what you would recommend once the blanket is assembled as well? I want to be able to wash it without worrying!
Also, for blocking, should I use blocking wires or pins?
Hi Alexis,
If you are working with a hand dyed yarn, then I would definitely use color catchers. This way your white edges will stay white even if the dye runs. I don’t think you need to use blocking wires. Rather, you will just get the squares wet and lay them flat to dry. If they are all measuring within a 1/2″ of each other, then there is no need to pin them down. Since crochet can curl slightly after blocking, I would just gently steam the squares after blocking for those whose edges are turning up. This, however, is the most professional way of going about this and like I said in my previous response, you could get away without blocking at all.
Best,
Adam
Thank you, Adam!