New Super Easy Baby Blanket

One of our most popular projects over the years has been the Super Easy Baby Blanket. When I made it over four years ago, I was newly pregnant and full of dreams for the tiny baby who would be wrapped up inside. Now, that that baby is old enough to write his name, we thought it was time for an update to this wonderfully straightforward pattern!

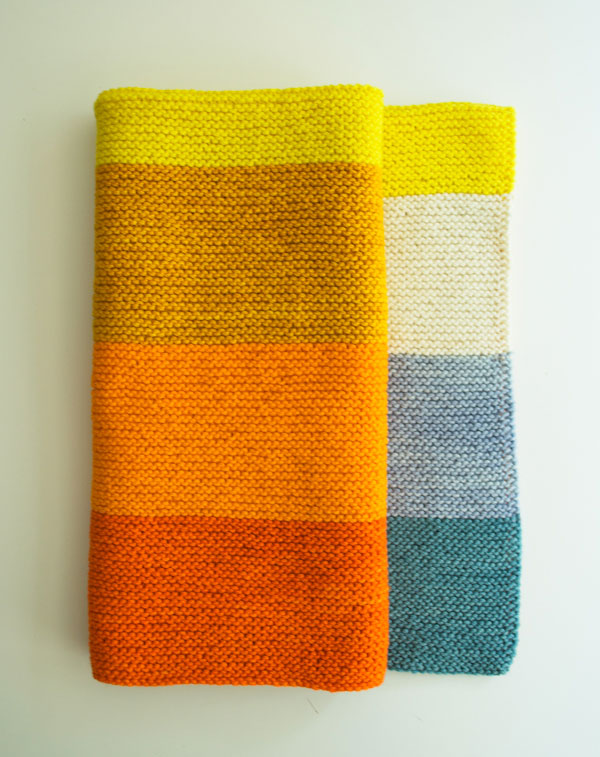
Faye, whom you may know (and love!) from shopping at our store, suggested this time trying the Super Easy Baby Blanket with Koigu’s Kersti Merino Crepe. Since in the last few years Faye, too, has become a mother, she thought Kersti’s ultra springy loftiness would be perfect not just for a soft and cozy blanket, but also for a comfy play mat.
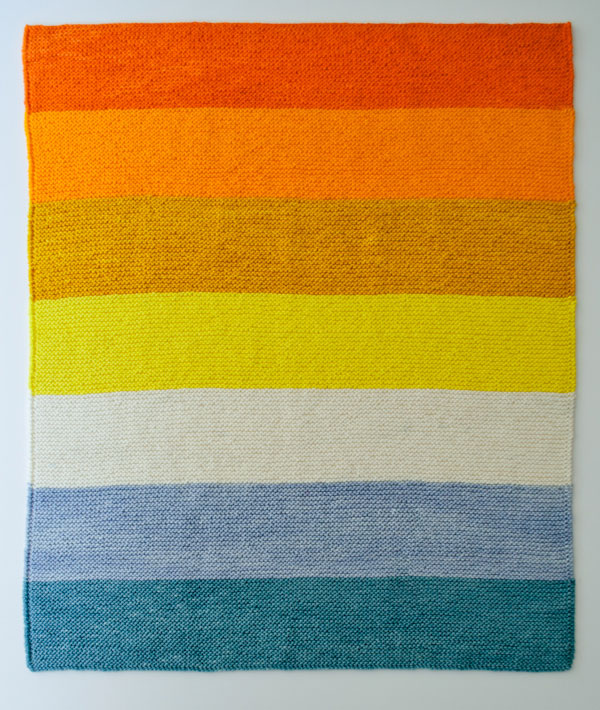
Plus, since Faye is one of Purl Soho’s very first employees, she has spent nearly a decade with Koigu, contemplating its vast array of colors, playing with combinations and developing favorites. So she already had up her sleeve a beautiful summertime palette that starts with the blues of the cool ocean, passes into the bright light of the horizon and then rises to the hot flames of the sun. Spectacular!
If you know how to cast on, knit and bind off, you’re ready to start your own Super Easy Baby Blanket! And if you’re curious about the original, you can check it out right here. Enjoy both!
Designed by Purl Soho designer, Whitney Van Nes.
Share your progress and connect with the community by tagging your pics with #PurlSoho, #PurlSohoBusyHands, and #PurlSohoSuperEasyBabyBlanket. We can’t wait to see what you make!
Materials
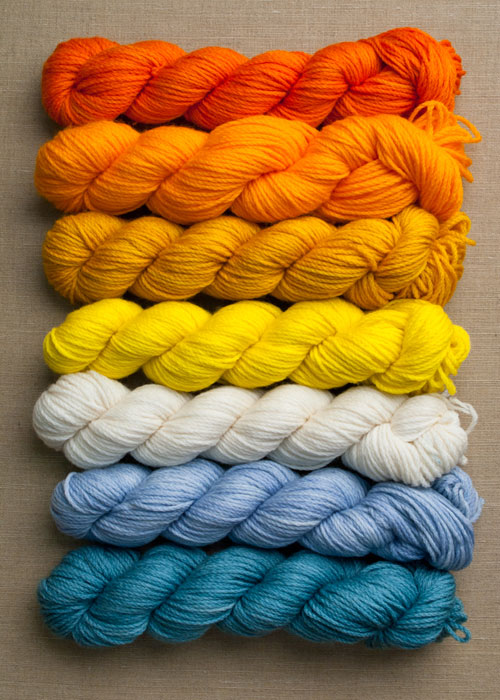
- A Super Easy Baby Blanket requires 7 skeins of Koigu’s Kersti Merino Crepe, 100% Merino Wool. Each skein is 114 yards/ 50 grams; approximately 798 yards required.
These colors, from the top, are:- 2200
- 1240
- 2180
- 2100
- 0000
- 2171.5
- 1043
- US 7 (4.5 mm), 24- or 32-inch circular needles
GAUGE
20 stitches and 40 rows (20 ridges) = 4 inches in garter stitch
Size
Finished Dimensions: 24 inches x 28 inches
Note
To get the same nice, neat edge as Faye, just slip the first stitch of every row knitwise with the yarn in back. When you’re changing colors, knit the first stitch instead of slipping it.
Pattern
With a US 7 needle (or size required by you to achieve the correct gauge) and the first color, loosely cast on 120 stitches. We used a basic Long Tail Cast On.
Knit every row until you have knit the entire skein (which should be about 4 inches).
Switch to the second color at the beginning of the next row, and knit every row until you have knit the entire skein (or until this stripe measures the same as the first stripe).
Repeat with each color, making sure to always switch colors on the same side.
After knitting the seventh color, loosely bind off.
Weave in the ends and you’re done! Super easy!
NOTE: We slightly changed this pattern on October 28, 2014 to reflect the experience of our readers over the years.


Just received my yarn and am very excited to start the project. The yarn instructions suggest prewashing the yarn. I have not seen this recommendation with other yarns that I have used. Do I wash before knitting? If so, any tips on preventing a massive yarn tangle?
Hello Jen,
Thank you for reaching out! We suggest this for the Koigu yarns because they are hand dyed. This will prevent any bleeding when blocking. We have more tips and tricks in our tutorial for re-fixing dyes.
I hope this clears things up for you and happy knitting!
-Marilla
I purchased a super easy baby blanket bundle and got some shout color catchers with it. When I called the store, someone said to go ahead and knit the blanket and then wash it using the color catcher.
Should I follow that directions, or prewash each skein of yarn before starting to knit.
Hello Beth,
Thank you for reaching out! I would reccomend giving each skein a wash before jumping into this project. Because Koigu is hand dyed I tend to lean on the side of caution, particularly when a blanket is at stake. 🙂 For full instructions on how to color set your skeins check out our Re-Fixing Dye tutorial!
Happy knitting,
Marilla
Thank you!!!
Hello,
I would love to knit this blanket. I am on a budget. My daughter is having Twin boys so I need to knit 2!
I wanted to knit this in blanket in Worsted weight yarn and a little bit larger. Can you suggest a Cast on amount> 120- 160? 7 skeins?
Thank you so much.
Brand Berroco
Blend 50% Nylon 50% Acrylic
Needles US 8 (5mm) – US 9 (5.5mm)
Ball Weight 3.5oz
Yarn Length 211yds (193m)
Gauge 18-20 stitches, 24-27 rows to 4″
Yarn Weight
Worsted
Hi Sandra,
Thanks for reaching out! I would suggest following the instructions for our Super Easy Baby Blanket in Worsted Twist, as it is already written for worsted weight yarn. We used 7 skeins of Worsted Twist which has 164 yards, or about 1,140 yards total. The blanket is sized quite generously, but if you would like to adjust it, you can multiply your stitches per inch by your desired width to determine your cast on.
Happy knitting!
Julianna
Has anyone tried a 2- or 3-stitch I-cord selvedge? What do you think? That would make a nice neat edge, no? I’m looking for a Looks-Finished-As-You-Go option.
Hello Elise,
Thank you for reaching out! I love this idea- I think it would look very cute. We did an Attached I-cord for our Flying Geese Baby Blanket, I would reccomend checking it out for an example of how your blanket might turn out.
Happy knitting!
-Marilla
I feel like there’s something missing in the instructions…how did you get that nice ridged edge? Certainly not by simply knitting every line to the very edge…
Hi Julia,
Great question! For most versions of this blanket, we did nothing more than knit every stitch but here we did slip the first stitch on each row. In the “Notes” section of the pattern, we note “To get the same nice, neat edge as Faye, just slip the first stitch of every row knitwise with the yarn in back. When you’re changing colors, knit the first stitch instead of slipping it.”
We apologize for any confusion!
Cassy
Ohhh, I must have missed it. Thanks for clarifying!
Hi I am really new to knitting. What do you mean by slip the first stitch?
Hi Liz,
Thanks for writing in! This means that you will insert your right hand needle into the first stitch as if you were going to knit it, but then move it over to the right hand needle without wrapping your yarn or actually knitting the stitch. You can then continue on knitting the rest of your row!
I hope that helps!
Julianna
Ohhhh. Ok I hope I get it right. I will let you know. Thank you!
Just the first stitch and not the last?
Hi Sage,
Yes, just the first stitch! Since you’re slipping the first stitch on every row, you will get the same slip stitch edge on either side that way!
All the best,
Lili
Brilliant. Thank you!
Hello, I have this in the old kit that came with the Purl SOHO super soft merino. Yes, I am now getting around to completing this project 🙂 would you recommend blocking this blanket?
thanks in advance!
Mary.
Hello Mary,
Thank you for reaching out and congrats on jumping into your blanket! Super Soft does best with a light blocking or no blocking at all. If you do block it, I would reccomend steam blocking it.
Happy knitting!
-Marilla
I love this blanket and the yarn is the softest! Is there any way at all to avoid the dotted line on the wrong side when you change your colour? Tips, trick?
Thanks!
HI Natasha,
Thank you for your kind words! Unfortunately, there is no way to avoid the dotted line on the back! This is an unavoidable part of knitting stripes in garter stitch. We embrace this little dotted line on the back side as a natural part of garter stitch and when we don’t want to see it, treat it as the back side!
Best,
Cassy
I would love to make this blanket but I only crochet (is that a naughty word on this site?). Do you have a pattern for crocheting this?
Hello Callie,
Thank you for reaching out! You can find the Crocheted version of this blanket here!
-Marilla
Hello
I just received my yarn Kersti super easy baby blanket bundle and I am eager to start with the project.
I read the comments but I am stil not clear how to start.
Should I wash the yarn with cold water and soap or do the re-fix dye?
Do I need to use the shout color catches?
Thank you for your help
Maria
Hello Maria,
Thank you for reaching out! I would reccomend re-fxing the dye before beginning this lovely project! This tutorial goes in-depth on what to do!
Happy knitting,
Marilla
I have tried the dye refix proposed on this website for the koigu kersti 2200 – the red/ dark orange several times and I cannot get it to not bleed orange. Has anyone succeeded in using the dye refix for this yarn?
Hi Julia,
Thanks for reaching out, and I’m so sorry that you are having trouble with the dye re-fixing process! It can be normal to go through several dye fixing sessions before some yarns stop bleeding, but it can be frustrating! If you are up for one more try, I would suggest a more intense re-fixing process than our Re-Fixing Dye tutorial. You will need to fill a stainless steel pot (that you aren’t planning on using for food again) with cold water and about a half cup of vinegar or several tablespoons of citric acid. Add your yarn to the cold water and bring it up to a simmer, and hold at a simmer for about 15 to 20 minutes. Once you are done simmering, turn off the heat let the pot return to room temperature. You can then soak the yarn in tepid water with a bit of wool wash to finish the process.
If the yarn is still bleeding, please do contact us at customerservice@purlsoho.com and we will be happy to send a replacement from a different dye lot or come up with another solution. I’m so sorry you have run into so much trouble with this color, but we will do our best to make it right!
Best,
Julianna
can this be done in bulky wool for a baby blanket and 3 colors 2 skeins each
it gets 3.5st=1inch on size 11
100g=130 yards
how many stitches would you suggest to cast on -i would be alternating the colors 1,2,3,1,2,3,
thanks for any help
oops sorry – isee youhave this in a baby blanket in chunky and the count is 14s plus 21 rows=1 inch
using only 6 skeins-whatwhould the rec cast on amount of stitches be thanks
Hi Lisa,
Thanks for writing in! Since you are using a bulky yarn, do you mean 14 stitches per 4 inches? At that gauge, you would need to cast on 105 stitches for a blanket the same size as yours. You could then stripe your colors however you wish until the blanket measures 28 inches long.
Happy knitting!
Julianna
Hi ,
I really like this blanket and would like to knit it for my son, he will be born in December 😉 is this item going to be back in the stock?
I can see you have them all except 1240 and 2171.5
Thanks,
Pegah
Hi Pegah,
Congratulations! It looks like we will be getting more Kersti Merino Crepe later this Fall. I’m sure you are eager to cast on so I would suggest taking a look at our Super Soft Merino. We even have a Super Easy Crib Blanket pattern for this yarn. While some of the colors are currently sold out we will be getting them restocked in about 2-3 weeks. If you like you can sign up for notifications on either of the product pages and we will email you as soon as they are available.
I hope this helps!
Happy knitting,
Oscar
Hi there
I love the look of this blanket but I am not sure I have the courage to fix the dyes of the koigu yarn, I haven’t had to do this before and as this is a gift I am a bit wary?! Can you suggest any other alternative yarns, pref merino? Many thanks
Charlotte
Hi Charlotte,
Thanks for writing in! I would suggest following our updated version of this classic blanket: The Super Easy Crib Blanket in Worsted Twist! Our Worsted Twist is an excellent 100% merino yarn that wont require re-fixing the dye.
Warmly,
Gianna
Thanks so much for this, I don’t know why I didn’t see the version in Worsted Twist! You are all always so helpful…
Such a beautiful blanket! Can you please recommend what to do for selvedge stitches to create a nice neat edge like your photos?
Hi Em,
Thanks for reaching out! To get the edge like in the photos simply follow the pattern as written and make sure you knit every stitch!
Warmly,
Gianna
Hello,
Thank you for this lovely pattern. I love the water and sky colors of this blanket but would like to knit it using Supersoft Merino. Looking at the colors, it seems like the orangey options for Supersoft Merino are very close to each other (Super Orange and Red Poppy). Do you have any suggestions for alternatives that might achieve a similar (though maybe not identical) effect?
Thanks,
Melissa
Hi Melissa,
Thanks for reaching out! I would love to suggest a palette for you in Super Soft Merino! Super Orange and Red Poppy do look similar in the photos (due to the brightness of both shades) but they are actually quite different, Super Orange is a bright true orange shade while Red Poppy is actually a warm-toned bright red! To replicate the color palette in the blanket I would actually suggest using Red Poppy and Super Orange, followed by Turmeric Yellow, Yellow Yellow, Heirloom White, Sapphire Blue, and High Tide. Alternatively, you could change the colors a bit by adding an additional blue shade. I would then suggest using Super Orange, Turmeric Yellow, Yellow Yellow, Heirloom White, Eggshell Blue, Sapphire Blue, and High Tide!
I hope this helps and please let me know if you have any more questions!
Gianna
Hi Melissa,
I totally forgot to mention this yesterday, but we actually have a pattern that uses both Super Orange and Red Poppy together and the pictures really show off how different they are from each other! Our Knit Around Tree Skirt uses the two next to each other (the second photo when you pull up the pattern shows Red Poppy and Super Orange next to each other on the right side of the tree skirt) so you can get a better idea of the difference!
I hope this helps!
Gianna
I would love to make this blanket in Worsted Twist for my new granddaughter. Would it be machine washable on gentle, no dryer? If not, can you recommend a washable yarn(I know new parents are super busy and will not want to hand wash). I love this blanket. Thanks.
Hi Paula,
Thanks for reaching out! Unfortunately, if you were to use our Worsted Twist for this blanket it would not be machine washable, but I’d be happy to recommend some alternative yarns for you that would be!
I’d suggest you take a look at our Super Easy Baby Blanket in Morning as a great option for a machine-washable version of the blanket! We are currently sold out of the pre-made bundles, but you can always create your own bundle by purchasing individual skeins of the colors we do currently have in stock!
Another option would be our Campo, which is another great machine-washable worsted weight yarn! It’s close in gauge to Worsted Twist, so you could even use the pattern for the Super Easy Crib Blanket as a guide. Be aware that you might end up needing to buy two skeins of each color of Campo, as it has 120yrd per skein compared to Worsted Twist’s 160yrd per skein.
Lastly, you could take a look at Anzula’s For Better Or Worsted as another option! It’s very similar in gauge to Worsted Twist, has 200yrds per skein, and is completely machine-washable. This would be another great option for working the Super Easy Crib Blanket pattern!
I hope this gives you some ideas for your blanket!
Warmly,
Kelsey
I am almost finished with a baby blanket and have loved this yarn. I would like to make my sister this blanket as a throw. Not a huge throw, but more like a throw or lap size for an adult. Would I need to skeins of each yarn or three and how many stitches do I cast on? Still kind of new to knitting . Have finished 5 baby blankets. Thank you! Vivian
Hi Vivian,
Thanks for writing in! 2 skeins of each color should be plenty! A typical throw-size blanket is approximately 43 inches wide, so based on how many stitches you have per inch you can calculate your cast on from there! for example, if you have 5 stitches for 1″ you would take 5 x 43 = 215 stitches, and that would be your cast on! I would also recommend checking out our tutorial All About Guage, it is an excellent resource to use! You can then knit until you have used both skeins, then switch to the next color, and so on!
I hope this helps and please let me know if you have any more questions!
Gianna
Thank you!! What length of circular needle would you recommend? 40 or 47 or longer? I love Purl Soho.
Hi Vivian,
Thanks for your response! A 40″ circular should be plenty long!
Happy knitting!
Gianna
Hello!
Thanks for the beautiful pattern and lovely yarn palate!
I am wondering if I could make this in a seed (or miss) stitch instead of garter. Would it be the same size?
Hi Tara,
Thanks for reaching out! You can certainly use a seed stitch for this blanket! I would suggest working a gauge swatch prior to beginning to calculate your stitches per inch and the right amount to cast on for the dimensions of the blanket. Seed stitch is actually a much different gauge from garter stitch, so you will want to adjust the cast on (fewer stitches than the original pattern) so that the blanket doesn’t come out too big!
I hope this helps and please let me know if you have any other questions!
Gianna
Hi, could this be knitted in Cotton Pure?
Hi Fay,
Thank you for writing in! You can definitely knit this blanket in Cotton Pure but you will need to make some slight modifications to your cast on to get the same size blanket. To modify this pattern you will want to start with a gauge swatch. You will then measure your stitches per inch and multiply that number by the desired width of your blanket and that will give you your cast on number. I hope this helps!
Happy knitting,
Gavriella