Mini Quilt of the Month, November: Striped Star

My great-great grandmother and her daughter, my great grandmother, were both from Herber Springs, Arkansas, and like many women of their time and place, they were accomplished quilt makers. One of my great-great grandmother’s creations, a queen-size quilt with appliquéd sunflowers, hung in my childhood home. I remember spending hours studying its delicate stitches and beautiful colors! We also had a large unfinished quilt top made by my great grandmother. It was comprised of hundreds of tiny cotton feed sack diamonds, all hand sewn together to form a gigantic eight pointed star. Later in life, I learned that this pattern is usually called a “Lone Star”. (If you’re unfamiliar with the traditional Lone Star quilt pattern, here is a link to a nice example.)
I have always loved this pattern, but I’ve never sewn one because it usually involves slanted angles and scary “Y” seams. With our Mini Quilt of the Month Series almost finished, I thought now would be the perfect time to tackle this seemingly impossible shape. But since we’re not our great-great grandmothers, I decided to give the pattern a more approachable modern spin, eliminating the “Y” seams and the hundreds of tiny diamonds. Phew!

This Striped Star Mini Quilt is a simple take on a complicated classic. Strip-pieced stripes convey a sense of dimensionality and movement, and a pretty assortment of neutral dots and stripes add a clean, modern aesthetic. The pattern comes together unexpectedly in fascinating puzzle that will delight your quilting mind!
Materials
To make one approximately 22-inch x 22-inch mini quilt:
- 1 yard of Robert Kaufman’s Kona Cotton, White
- Assorted 1/2 yards of various dots and stripes (I also used Moda’s Chicken Wire)
- Craft size Quilter’s Dream Natural Request Dream cotton batting
- 100% cotton thread, color 1040
If you’d like to make the star in the center of this quilt out of a single fabric you will just need a 1/2-yard of that fabric. If this is the case you can start the instructions from the “Piecing the Squares” section of this journal.
You will also need . . .
- A clear rotary cutting ruler with a 45-degree marking
- An erasable fabric marker
Size
22 inches by 22 inches
Note
All seam allowances in this project are 1/4-inch unless otherwise noted.
Pattern
Cut + Piece the Striped Panels

Cut the printed 1/2 yard pieces each to be 14-inches wide from selvage to selvage. From the 14-inch width cut strips varying in width from 1-inch to 3-inches. You will have an assortment of 14-inch long strips as shown above.
Note: When cutting simple rectangular shapes for patterns such as this, straight, clean cuts are key. The best way to make these cuts is with a rotary cutter and a non-slip quilting ruler on a self-healing cutting mat. If you have limited experience using a rotary cutter, I recommend visiting our Rotary Cutting Tutorial.

Piece strips along their 14-inch sides, right sides together in a random order, until piece measures at least 14-inches by 28-inches. Press all seam allowances in the same direction.
Repeat to create a second panel also 14-inches by 28-inches.

Starting at the bottom left corner of the first panel and using the 45-degree marking on your ruler slice the panel diagonally into 4-inch wide strips.
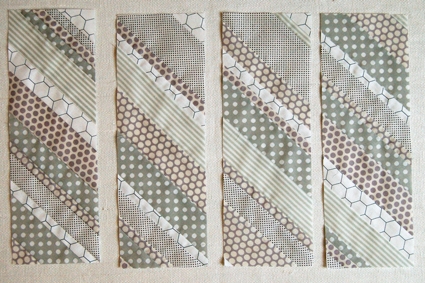
Then cut these strips into four rectangles, 4-inches X 12-inches each. The stripes should be slanting down from left to right as shown above.

Cut the second panel into 4-inch strips in the same manner only this time start at the bottom right corner so that the stripes will be facing in the opposite direction as the ones cut from the first panel.

Cut these strips into four rectangles, each 4-inches by 12-inches. The stripes on these should be slanting up from left to right, the opposite direction of the ones cut from the first panel.
Piece the Squares

You will have eight 4-inch by 12-inch rectangles, half with the stripes running down from left to right and the other half with the stripes running up from left to right. (If you are sewing the star with one fabric cut eight 4-inch by 12-inch rectangles from that fabric and ignore all the talk about which direction your stripes should face in the directions below.)
From the white fabric cut:
- eight 6-inch squares
- eight 8-inch by 4-inch rectangles

This quilt top consists of four identically pieced quilt squares.
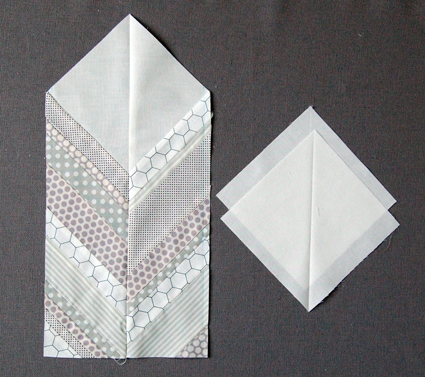
Pick out two opposite facing striped pieces and lay them next to each other veritcally so that the their stripes would meet and make a “V” shape.
Place a white rectangle along the top of the left striped piece lining up their raw edges, so that it makes an upside down “L” shape pointing to the left. Using a Hera maker or an erasable fabric marker mark a diagonal line on the white fabric from the upper left corner of the striped piece to the lower right corner of the white rectangle. Pin the two pieces together on either side of this marking.
Place a white rectangle along the top of the right striped piece lining up their raw edges, so that it makes an upside down “L” shape point to the right. Using a Hera maker or an erasable fabric marker mark a diagonal line on the white fabric from the lower left corner of the striped piece to the upper right corner of the white rectangle. Pin the two pieces together on either side of this marking.

Sew the white triangles to both of these pieces along their marked lines. Then trim off the excess triangle of fabric on the outside of these seams, 1/4-inch above the seam.

Press the sewn pieces flat with the seam allowances towards the striped pieces.

Sew the two strips right sides together along their inner long raw seams so that the striped pieces make a “V” shape. Try to line up the point where the striped pieces meet the white pieces as exactly as possible.

You are now going to cut the top white section of this piece into a square on point. Do this by lining up a horizontal line of your ruler to the seam between the white and the striped piece on the right side of your piece and lining up the top cutting edge to make a 90-degree angle going from the right hand seam through the middle seam as shown above.

Cut the left top of the piece in this same manner so that the top of the piece is now also 90-degree angle. The top of the piece is now a white square with the middle seam running through it’s center and meeting perfectly at the top corner.
Using a Hera marker or fabric marker mark two of the 6-inch white squares in half diagonally.
Using an erasable fabric marker mark 1/4-inch from the left and right vertical sides of the original piece.
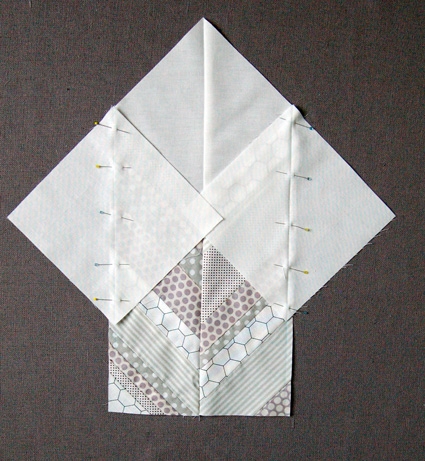
Pin center markings of the squares to marked lines, starting at the top of the marked lines.

Here is a more close-up shot of the pinned on squares. Notice how the upper right edge of the top is smoothing continuing the angle of the top white diamond.
Sew the squares to the piece along the marked lines. Cut off the excess triangles from the white fabric leaving a 1/4-inch seam allowance.

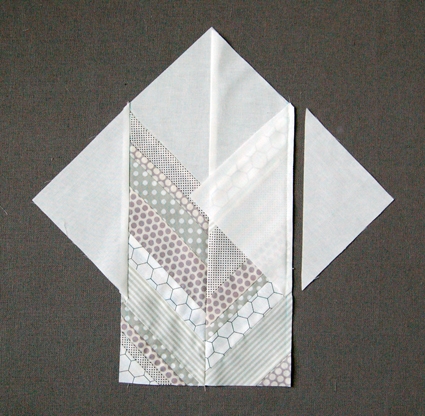
Press the white pieces outwards so you get the shape pictured above.

Using the bottom right edge of the right triangle piece you just sewed on as a guide cut off the bottom right edge of the piece creating a bottom right edge that is totally straight.
Repeat this for the bottom left edge.

Turn your piece so that it’s oriented like a square.
Repeat three more times so that you have four total squares.
Piece the Top

Arrange the four squares with their points facing out so that they form a star as shown above.

Sew the top left square to the bottom left square right sides together, being careful to match up their seams neatly.
Sew the top right and bottom right squares together in the same manner.

Sew the two sides right sides together being careful to line up all the seams, especially the center, neatly.
Baste

From the white fabric cut:
- A square, 28-inches x 28-inches
- Three 2 1/4-inch strips from selvage to selvage (set these aside for the binding)
From the batting cut:
- a square, 26-inches x 26-inches
Tape the white square smoothly down on a flat surface. Lay the batting on top of it. Then lay the quilt top, right side smoothly in the center of top of the previous two pieces.
Pin all three layers together with bent arm safety pins every few inches.
Quilt

Quilt in the ditch along the vertical, horizontal, and diagonal seams then around the perimeter of the star shape.

Here is a back view to see the quilting a little more clearly.
Bind

Bind the quilt with the three white strips you cut at the beginning of this section.
If you haven’t bound a quilt before please visit the binding instructions from our January Mini Quilt of the Month: Courthouse Steps at this link. This quilt (and all quilts!) can be bound in exactly the same manner. Once you get to the story, scroll down near the end to the sections called “Prepare the Binding” and “Bind the Quilt”.


I love how you made this star! I was wondering how you were going to do it without the Y seams. Fantastic tutorial
Gorgeous! Putting this on my to do list!
I've been asked to do a queen-sized star quilt for a friend and was having a tough time finding just the right pattern … until you posted this! Finally, a star pattern that looks simple and gorgeous! Thank you!
This is simply beautiful!!! Thank you so much for sharing 🙂
Thank you so much. My grandmother made one and we had on our bed for a long time. I wanted to make a small on to match. Now I can thanks to you.
I would like to make a larger quilt with smaller blocks. Do you know where I can find a pattern like that?
LaVaughn Ray
Hi LaVaughn-
I don't know of a quilt that uses a smaller version of this particular block. However, you could always just make a bunch of these in a smaller size. You could easily half the dimensions of the cut pieces and end up with a block half as small.
Or, you can check out our quilting patterns here: http://purlbee.squarespace.com/the-purl-bee/2011/11/6/mini-quilt-of-the-month-november-striped-star.html
And our books here: https://www.purlsoho.com/purl/products/83-idea-center-books?filters%5B%5D=118
Thank you!
Molly
Hi! I just love this! If I want to make it into a throw size (60"x60") how do I convert the measurements? Multiply everything by 3? Will that work? Thanks!
Hi Shelby-
Yes! You just need to multiply everything by 3.
Good luck with it and thanks for writing in!
Molly
I have been wishing for a pattern like this. Very beautiful and intricate. Love it. Thanks. Will be making it for a very special person
I just received this pattern from a quilt newsletter I receive. I read your story of you Grandmothers being from Heber Springs, Arkansas. My Great-Grandmother and Grandmother and Mother are also Heber Springs Area, Pangburn to be exact which is 13 miles east of Heber Springs. My Grandmother taught me how to quilt when I was 8 years old, all by hand. Now I do it all by machine. I have a quilt top she had sewed when she was 94 years old, it's a bow tie pattern, it was her favorite.
Thank you for sharing this great pattern. Stars are my favorites to make.
Blessings to you.
Love this pattern. Any idea how to do it in 12.5 blocks as we are doing a friendship quilt and I am almost done and ready to exchange our blocks. Half would be just a little too small. Great idea though!
Hi Marla-
Thanks! This isn’t a very simple thing to size down but good luck with your quilt!
Thanks for getting in touch!
Molly
I love this pattern! Just two quick questions:
Can this be handsewn? Do I need to worry about seams unravelling when I cut the panels to size (with hand sewing or on a machine)?
Hi Tina-
Because of the way you the panels are cut I wouldn’t recommend hand sewing this project as is. But you could hand sew the basic star shape if you start from the “Piece the Squares” section. I hope this is helpful, thanks for getting in touch!
Molly
Just found this while looking around, am going to make it using scraps, will have to look around for similar fabrics you have used, like their look. Thanks for the pattern!
The fabric choices are beautiful. I love the softness of the hues. Thank you for free pattern. Great tutorial.
Do you think this could be done with a bundle of fat quarters?
Hi Meghan,
Great question! Given that you will be cutting stripes that are 14 inches long from the source fabrics, I think that you should be fine working with fat quarters. All together the star in the center uses about 1/2 yard of fabric so as long as you have 2-3 fat quarters, you should be fine!
Happy sewing!
Cassy
Awesome, thanks so much!
I would love to make this. Do you have a kit?
Hi Janet,
Thanks for writing in! We do not offer a kit for this project but we do sell materials that you can purchase a la carte. Just follow the links in the materials section and you should be good to go!
Happy sewing!
Cassy
A couple of comments now that I’m almost done (just quilting left) that would have helped – I’m not new to piecing/quilting but more used to seeing how large to make something – example – cutting the top into the square – how big of a square should it be? Looking at the picture – about 5 inches? I think after all said and done – maybe it should be 5 1/2 inches? I made mine 5 1/4 and think a tad small. Similar comment at the very beginning making that first cut on the 45 – how much to cut off and still be left with enough for your 4 cuts? I pondered so much before realizing and then saw how much waste I did end up with. I also did not cut a 14 inch strip selvage to selvage – that would have resulted for me lots of waste on 1/2 yds. So – just a few suggestions to think of. I do really like that way you’ve done this – and will quilt it for a gift today…. Thanks
Hi Becki,
Thanks for the suggestions!
-Adam
Thank you so much for sharing you’re pattern! you’re star is beautiful!
I just love this pattern, and the detailed instructions with pictures (I’m a visual learner). My mother taught me to sew when I was about 7-8 years old, but never saw her quilt. So, I never learned or was interested in teaching myself until now. My grandmother quilted and I’m fortunate to have two of her handmade quilts. One is the bow tie and the is Sunbonnet Sue, which needs mending. I’m like a kid in a candy store, I want to make everything but know I need to start small. So I’ve been looking at simple patterns for placemats, table runners and mug rugs. Hopefully I’ll be able to tackle this beautiful star pattern soon.
Hi Rebecca,
Thank you so much for sharing and for your kind words!
Happy sewing!
Cassy
This is the most interesting and beautiful star that I have seen. I have been quilting for about 8 months now and love making stars. This star looks so complicated but you have made it look so easy. I plan to give it a try! Thank you for sharing the pattern and your lovely story!
Hi Ida,
We so appreciate your kind words!
Happy quilting and best of luck!
Cassy
Thank you for the detailed instructions. You made it where even a novice quilter, like myself, could understand.
Loving this quilt. I can’t wait to start!
Hi Janice,
We are so happy to hear you will be making this quilt! Please let us know if you have any questions along the way!
Happy making,
Gavriella