Nautical Flag Napkins

Every summer of my childhood was spent up in Maine at my grandfather’s house, once his parents’ house. My grandfather was a Navy man, as his father was, which is evident upon walking into their small country home. The walls are covered with pictures of men in uniforms and the ships they sailed. There are model boats built in glass bottles; there are books about tying knots and paperweights shaped like anchors. It was in this home that I first discovered nautical flags, the shapes and bright colors delighting me as a way of communication. I had long wanted to work them into a crafting project and this idea for transforming them into set of napkins came to me as our ever-expanding family gathered for yet another annual Maine trip.
As our family grows, so does the number of dishes and napkins we repeatedly wash. But now, everyone proudly remembers which nautical napkin is ‘theirs’, happily re-using it at each meal. So while the dishes still pile up, the loads of laundry do not. Currently we’re a group of about 15, but I look forward to the day when we are using all twenty-six.
On top of making a cheery summer table setting, guessing which napkin represents which letter is like having built-in dinner party game. (A game I love because, having made all the napkins, I tend to win!)

I hope you enjoy making these as much as I did! I am already thinking of how to apply all the piecing techniques and nautical alphabet symbols to another project!
Designed by Purl Soho designer, Laura Ferguson.
Materials
For twenty-six 16-inch Nautical Flag Napkins:
- 1/2-yard Rowan’s Shot Cotton in Coal
- 2-yards of Rowan’s Shot Cotton in Cobalt
- 2 1/2-yards of Rowan’s Shot Cotton in Persimmon
- 2 1/2-yards of Rowan’s Shot Cotton in Lemon
- (Please note: Rowan’s Shot Cotton is currently discontinued. To view similar lightweight quilting cottons, view our entire fabric collection by clicking here. For a slightly heavier napkin with suitable color options, we recommend using Kona Cotton from Robert Kaufman!)
- 8 1/2-yards of White Muslin
- Hera Marker
- Cotton Thread for piecing and seaming. I used an off white for demonstration purposes, no 1040. A medium gray would work nicely or you can always uses threads to match each color fabric.
- Cotton Thread for applique, no 1001.
- 1/4-yard of Pellon’s Lightweight Fusible Interfacing
- 8 to 8 1/2-inch round object to use as a circle template. I used a bowl.
Twenty-six napkins is a lot of napkins. If you are only making certain letters or perhaps a portion of the set, you can reference the instructions below, where the sizes are each cut piece you will need is listed, to help calculate the quantities of fabrics you will need. Just remember, for each of the napkin fronts listed below, you will need a 16 1/2-inch piece of White Muslin for the napkin back.
Piecing Together the Alphabet
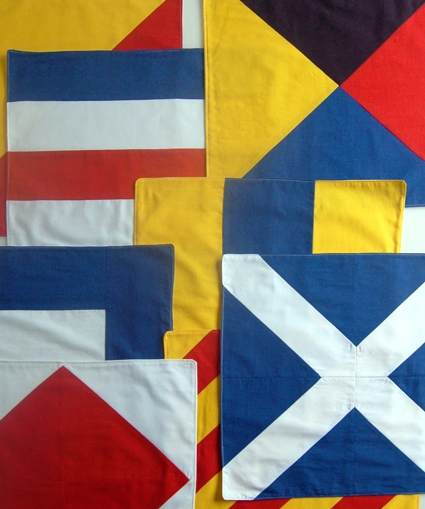
To avoid being overwhelmed by the twenty-six nautical flag designs in front of me, the first thing I did when approaching this project was group the flags by patchwork piecing technique. I found five main categories: Simple Square, Basic Piecing, Courthouse Steps, Half Square Triangles and Variations of HSTs, and Applique.
Also, please note, the grid of flags above is arranged in alphabetical order!
A Simple Square
Napkin Q
Starting with the most straight forward, there is napkin Q, a simple yellow square. This is the only napkin that does not require piecing for the front side.
To calculate what size to cut the fabrics, simply take the finished dimension, 16-inches, and add the seam allowance, 1/4-inch, to each side of the square. (I will be using a 1/4-inch seam allowance for the majority of this project.)
For napkin Q, you will need to cut:
- One 16 1/2-inch yellow square
- One 16 1/2-inch white square
Place one square on top of the other square, carefully aligning the edges. Pin the two fabrics together on all four sides.
Sew a seam 1/4-inch away from the edge, starting at the middle of one of the sides. Sew along the four sides of the pinned fabric, pivoting at the corners. Stop sewing approximately 2-inches before you reach the starting point, leaving a hole.
Trim the four corners at a 45 degree angle to the sides of the fabric. Turn your sewn square right side out through the 2-inch hole. Poke out the corners and press the square.
Return to your sewing machine. This time, top stitch 1/8-inch from the edge. Sew along all four sides, pivoting at the corners. Top stitching closes the 2-inch hole as well as provides a finished look and helps secure the shape of the napkin over time through use and washing.
Press once more. You have completed your first napkin!
The steps you have just followed for napkin Q are the same steps you will follow once you have pieced the fronts of the rest of the napkins, finishing them into nautical napkins.
Basic Piecing
The next grouping of flags is Basic Piecing. Below are the steps for piecing the front sides of napkin C, napkin U and napkin R. Once you have pieced the fronts of C, U and R, follow the instructions above, for napkin Q, to turn your patchwork fronts into finished Nautical Napkins. Making napkins C, U and R will help you understand the steps for making D, E, G, H, J, K, L, N, T and X, pictured above.Napkin C
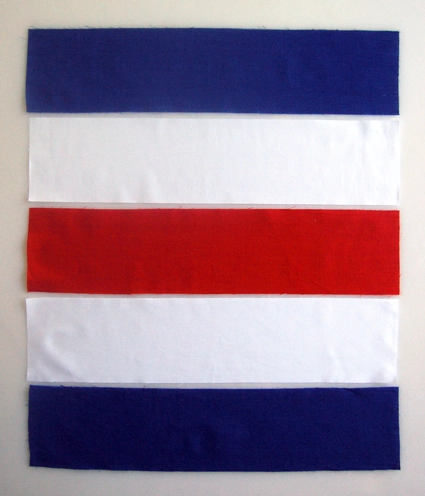
For the front of napkin C, you will need to cut:
- One 4 1/2-inch by 16 1/2-inch red rectangle
- Two 3 1/2-inch by 16 1/2-inch white rectangles
- Two 3 1/2-inch by x 16 1/2-inch blue rectangles
Place one blue rectangle over one white rectangle, right sides together, and align the edges. Pin the fabrics together along one of the long edges. Sew a seam 1/4-inch from the edges of the fabrics. Open up the sewn piece. Iron the seam to the darker side, the blue side.

Lay your freshly-sewn rectangle on your work surface, right-side up. Place the red rectangle over the white portion of the rectangle and align the edges. Pin the fabrics together along the long edge. Sew a seam 1/4-inch from the edges of the fabrics. Open up the sewn piece. Iron the seam to the darker side, towards the red fabric.
Continue in this fashion: lay, align, pin and sew. Attach the second white rectangle to the red and then the second blue to the white. Always iron the piece after sewing, pressing the seam to the side with the darker color fabric.

Napkins D, E, G, H, J, K and T are all pieced in the same fashion as Napkin C.For the front of napkin D, you will need to cut:
- One 6 1/2-inch by 16 1/2-inch blue rectangle
- Two 5 1/2-inch by 16 1/2-inch yellow rectangles
For the front of napkin E, you will need to cut:
- One 8 1/2-inch by 16 1/2-inch blue rectangle
- One 8 1/2-inch by 16 1/2-inch red rectangle
For the front of napkin G, you will need to cut:
- Three 3 1/8-inch by 16 1/2-inch yellow rectangles
- Three 3 1/4-inch by 16 1/2-inch blue rectangles
For the front of napkin H, you will need to cut:
- One 8 1/2- inch by 16 1/2-inch white rectangle
- One 8 1/2-inch by 16 1/2-inch red rectangle
For the front of napkin J, you will need to cut:
- One 6 1/2-inch by 16 1/2-inch white rectangle
- Two 5 1/2-inch by 16 1/2-inch blue rectangles
For the front of napkin K, you will need to cut:
- One 8 1/2-inch by 16 1/2-inch yellow rectangle
- One 8 1/2-inch by 16 1/2-inch blue rectangle
For the front of napkin T, you will need to cut:
- One 5 1/2-inch by 16 1/2-inch red rectangle
- One 6 1/2-inch by 16 1/2-inch white rectangle
- One 5 1/2-inch by 16 1/2-inch blue rectangle
Napkin U
Napkin U is a patchwork block known as a Four Patch. Its name comes from its composition; it is made up of four equally-sized squares in a quadrant formation.

For the front of napkin U, you will need to cut:
- Two 8 1/2-inch red squares
- Two 8 1/2-inch white squares

Place one of the red square on one of the white squares, right sides facing, and align the edges. Pin the fabrics together along one edge. Repeat these steps for the other white and red square.
Sew a seam 1/4-inch from both of the pinned edges. Open up the sewn pieces and press them, ironing the seams to the darker side, the red sides.

Lay one of the sewn rectangles on your work surface oriented with the red square on the left. Lay the other sewn rectangle over it, right sides facing, with the red side on the right. The white square of the top piece should be over the red square of the bottom piece and vice versa. Align the edges. Pin the pieces together making sure to carefully align the center seams.
Sew a seam 1/4-inch from the edges of the fabrics. Open up the sewn piece and press.

Napkins N and L are pieced in the same fashion as Napkin U. Napkin N is known as a Quadruple Four Patch. For the front side of napkin L, you will need to cut:
- Two 8 1/2-inch yellow squares
- Two 8 1/2-inch black squares
For the front side of napkin N, you will need to cut:
- Eight 4 1/2-inch blue squares
- Eight 4 1/2-inch white squares
Variation for Napkins U, L and N: Strip Piecing
To minimize the amount of aligning, pinning, sewing and pressing you could use a technique known as Strip Piecing. Strip Piecing consists of cutting long strips, sewing them together, cutting them into pieces, rearranging them and sewing them back together.
For piecing the front of napkin U and L, rather than cutting two 8 1/2-inch red squares and two 8 1/2-inch white square, you could cut one 8 1/2-inch by 17-inch red rectangle and one 8 1/2-inch by 17-inch white rectangle. Place one on top of the other, align the edges, pin together, sew with a 1/4-inch seam allowance and press. Open the sewn together strips, then, cut the pieced fabric into two 8 1/2-inch wide pieces.
For piecing the front of napkin N, rather than cutting eight 4 1/2-inch blue squares and eight 4 1/2-inch white squares, you could cut one 4 1/2-inch by 36-inch blue rectangle and one 4 1/2-inch by 36-inch white rectangle. Place one on top of the other, align the edges, pin together, sew with a 1/4-inch seam allowance and press. Open the sewn together strips, then, cut the pieced rectangle into eight 4 1/2-inch wide pieces.
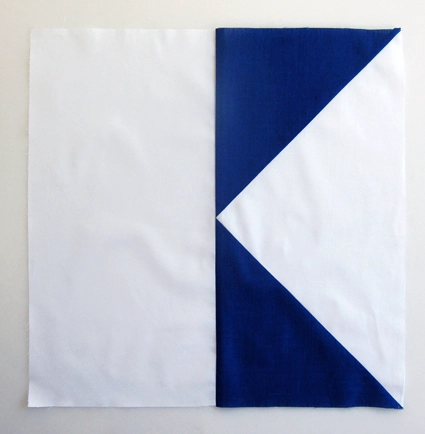
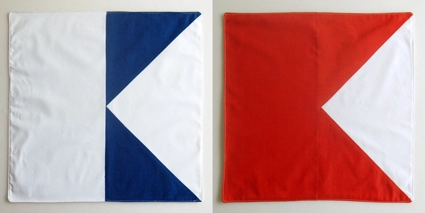
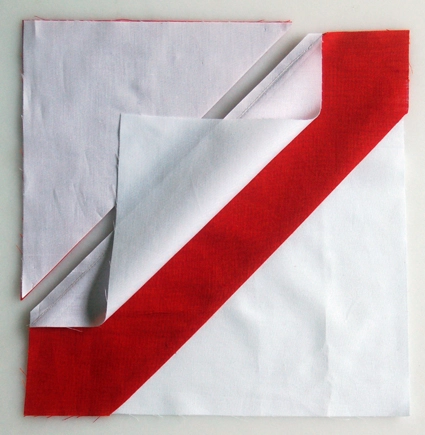
Napkin R
Napkin R (and X) is a common patchwork block and definitely one of my favorites. I think my affinity for it comes from its resemblance to a number of national flags such as Denmark, Finland and Sweden.
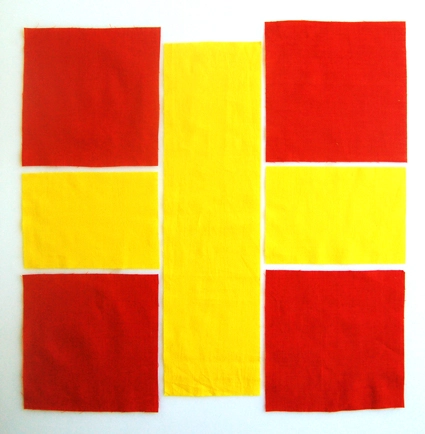
For the front of napkin R, you will need to cut:
- One 4 1/2-inch by 16 1/2-inch yellow rectangle
- Two 4 1/2-inch by 6 1/2-inch yellow rectangles
- Four 6 1/2-inch red squares
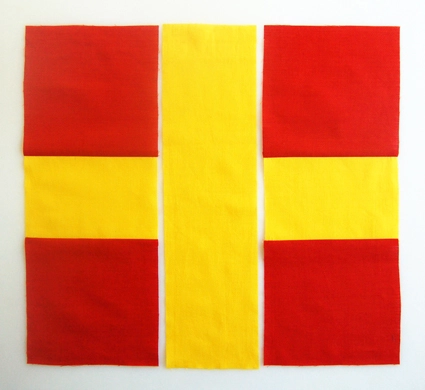
Place one of the small yellow rectangles on one of the red squares, right sides facing, and align the edges. Pin the fabrics together along the edge. Repeat these steps for the other small yellow rectangle and one of the other red squares.
For both pinned pairs of fabrics, sew a seam 1/4-inch from the edge of the fabrics. Open up the sewn pieces. Iron the seams to the side with the darker fabric, the red side.
Lay one of the sewn pieces on your work surface. Place one of the unused red squares on top of the sewn piece, right sides facing, and align the edge of the red square with the yellow edge of the sewn rectangle. Pin the fabrics together along the aligned red and yellow edge. Repeat these steps for the second sewn piece and last unused red square.
For both pairs of pinned fabrics, sew a seam 1/4-inch from the pinned edge. Open the sewn pieces. Iron the seams to the darker side.
Lay one of the sewn pieces on your work surface. Place the large yellow rectangle on top of the sewn piece, right sides facing, and align the edge. Pin the fabrics together. Sew a seam 1/4-inch from the pinned edge of the fabrics. Open up the sewn piece. Press it.
Lay the larger sewn piece on your work surface. Place the smaller, remaining, sewn piece on top of it, right sides facing. Align the edge of the top piece with the yellow edge of the bottom piece. Pin along this edge. Sew a seam 1/4-inch from the pinned edges. Open the sewn piece and press.

Napkin X is pieced in the same fashion as napkin R. For the front of napkin X, you will need to cut:
- One 4 1/2-inch by 16 1/2-inch blue rectangle
- Two 6 1/2-inch by 4 1/2-inch blue rectangles
- Four 6 1/2-inch white squares
Variation for Napkins R and U: Strip Piecing
There is an alternate method for piecing Napkins R and X. To minimize the amount of aligning, pinning, sewing and pressing you could use a technique known as Strip Piecing. The process consists of cutting long strips, sewing them together, cutting them into pieces, rearranging them and sewing them back together.
For piecing the front of napkin R, rather than cutting two small yellow rectangles and four red squares, you could cut two 6 1/2-inch by 9-inch red rectangles and one 4 1/2-inch by 9-inch yellow rectangle. Place, align, pin and sew one red rectangle to the yellow rectangle. Then, press and open. Next, align, pin and sew the second red rectangle to the previously sewn piece, along the yellow edge. Press and open. Cut this striped piece in half, rendering the pieces for the right and left sides of the center yellow vertical rectangle.
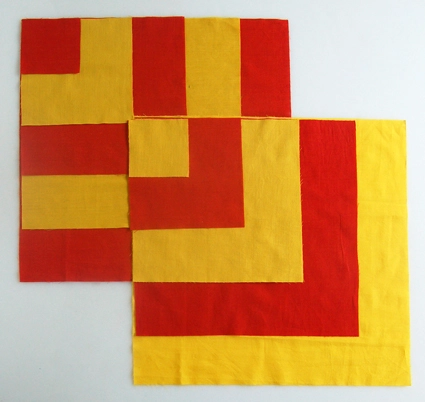
Courthouse Steps
A Court House Steps block is composed of a central square with surrounding, graduated strips of fabric oriented in a stepping out formation. Traditionally and as Molly has shown us, the fabric of the ‘steps’ on the right and left contrast the fabric of the ‘steps’ at the top and bottom in order to showcase the piecing technique. We, however, are using Courthouse Steps piecing to achieve the appearance of concentric squares. Another technique that could achieve a similar look is Log Cabin (you can check out some Log Cabin piecing in Molly’s Mini Patchwork Pincushions project journal).
Napkins W

For the front side of napkin W, you will need to cut:
- One 4 1/2-inch red square
- Two 3 1/2-inch by 4 1/2-inch white rectangles
- Two 3 1/2-inch by 10 1/2-inch white rectangles
- Two 3 1/2-inch by 10 1/2-inch blue rectangles
- Two 3 1/2-inch by 16 1/2-inch blue rectangles
Lay the red square on your work surface. On top of it place one of the small white rectangles, aligning the 4 1/2-inch side of the white rectangle with the left edge of the red square. Pin these two pieces together. Sew a seam 1/4-inch from the pinned edge. Open the fabrics and press the seam to the side with darker fabric.
Lay the sewn piece face up. Place the other small white rectangle on the sewn fabric, along the side opposite its twin. Align the edges and pin the fabrics together. Sew a seam 1/4-inch from the pinned edge. Open the sewn piece and press the seam to the side with the darker fabric. You have now sewn on the first two ‘steps’.
Place the sewn fabric right-side up, oriented with the white rectangles at the right and left sides of the center red square. Lay one of the large white rectangles on top of the pieced rectangle, aligning the white rectangle’s edge and the top edge of the pieced rectangle. Pin the fabrics together along the aligned edge. Sew a seam 1/4-inch from the pinned edge. Open the sewn fabrics and press the seam to the side with the darker fabric.
Lay your pieced and pressed rectangle right-side up, oriented with the most recently attached rectangle at the bottom. Lay the second large white rectangle on top of the pieced fabric, aligning the white rectangle’s edge and the top edge of the pieced fabric. Pin the fabrics together. Sew a seam 1/4-inch from the pinned edge of the fabrics. Open the sewn piece. Press it. You have now sewn on the second two ‘steps’.

Lay your pieced fabric on your work surface with the two longer white pieces running along the top and bottom of the rectangle. Place one of the small blue rectangles on the pieced fabric, along the left side. Align the edges of the blue rectangle with that of the pieced fabric. Pin the fabrics together. Sew a seam 1/4-inch from the pinned edge of the fabrics. Open the sewn piece. Press it. Next align, pin and sew the second small blue rectangle along the side opposite its twin. Open and press
Attach the last two ‘steps’ along the top and bottom of the pieced rectangle, continuing in the same fashion established above.
Now that you have pieced the front of W, follow the instructions above, for napkin Q, to turn your patchworked front into a finished Nautical Napkin.
Napkins P and S are pieced in the same fashion as napkin R. For the front side of napkin P, you will need to cut:
- One 8 1/2-inch white square
- Two 4 1/2-inch by 8 1/2-inch blue rectangles
- Two 4 1/2-inch by 16 1/2-inch blue rectangles
For the front side of napkin S, you will need to cut:
- One 8 1/2-inch blue square
- Two 4 1/2-inch by 8 1/2-inch white rectangles
- Two 4 1/2-inch by 16 1/2-inch white rectangles
Half Square Triangle and Variations of HSTs

The Half Square Triangle is one of the most commonly used quilt blocks. A Half Square Triangle unit or block is a square composed of two triangles. While it is possible to create a HST by sewing two triangles together, the more common and accurate way of piecing these blocks involves sewing two squares together, eliminating the need to deal with the stretchy bias edge of the fabric.
Once you have pieced the fronts of O, A, F, V and Y, follow the instructions above, for napkin Q, to turn your patchwork fronts into finished Nautical Napkins.
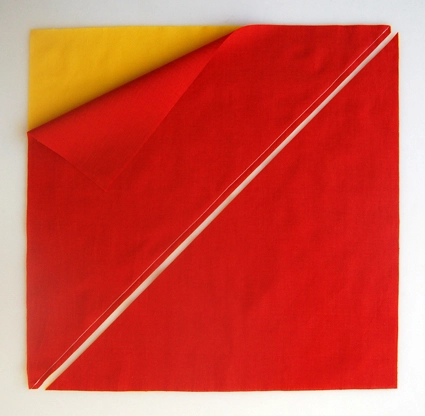
Napkin O

For the front side of napkin O, you will need to cut:
- One 16 1/2-inch red square
- One 16 1/2-inch yellow square
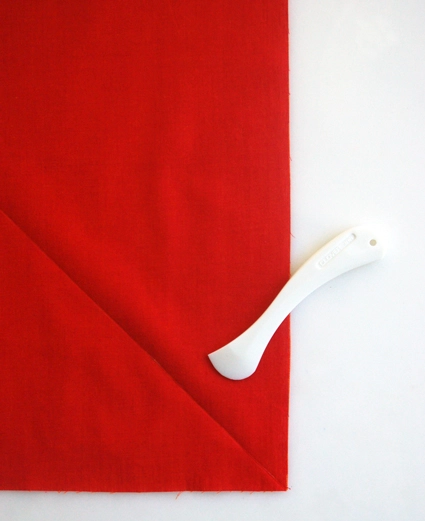
Make a crease, using your Hera marker, on the red square, diagonally, from corner to corner.
Place the creased red square on top of the yellow square, carefully aligning the edges. Pin the two fabrics together.
Sew a seam along the crease you made on the red square.
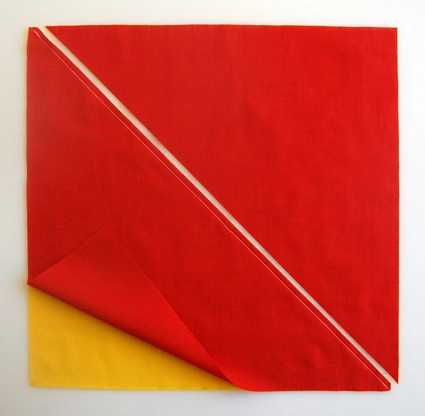
Using a grid ruler and a rotary cutter, cut through both layers of fabric 1/4-inch from the seam.

Open the sewn piece and press.
Napkin Z is pieced in the same fashion as napkin O. For napkin Z, make two HSTs, one that is red and black and one that is blue and yellow. Then sew these two blocks together, making the Z napkin, a classic hourglass block. For the front side of napkin Z, you will need to cut:
- One 16 1/2-inch black square
- One 16 1/2-inch blue square
- One 16 1/2-inch red square
- One 16 1/2-inch yellow square
Variation on Calculating and Cutting for Half Square Triangles: Two at a Time
There is an quick way to make two HSTs at a time. For instance, if you would like to have two 16-inch napkin Os, rather than cutting one 16 1/2-inch red square and one 16 1/2-inch yellow square, you will need to cut:
- one 16 7/8-inch red square
- one 16 7/8-inch yellow square
Follow the first step above, making a crease on the red square with the Hera marker, diagonally, from corner to corner.

Rather than sewing along the Hera marker line, sew a seam 1/4-inch from the line, on both sides…

Cut along the crease, between the two seams. Open both sewn pieces and press. You have two napkin O fronts.
Napkin F
Napkin F is similar to a Half Square Triangle Four Patch. F is composed of four equally-sized square blocks in a quadrant formation (like with napkins U and L). However, the square blocks are not quite Half Square Triangle units.

For the front of napkin F, you will need to cut:
- Four 8 1/2-inch white squares
- Four 8 1/4-inch red squares
Notice the red squares are a 1/4-inch smaller than the white square. This difference in size keeps the blocks from being a proper Half Square Triangle unit. With the red squares slightly smaller than the white, the white portion ends up being more than half of each square.

As with napkin O, using a Hera marker, make a crease on the red squares, diagonally, from corner to corner.
Place one creased red square on top of one of the white squares, carefully aligning two of the edges, the bottom and right edges. Orient the red square so the Hera marker is running from the lower left to upper right corners. Pin the two fabrics together. Sew a seam along the crease on the red square.
Place the sewn fabrics on your cutting mat, oriented so that the red square is at the bottom right. With a grid ruler and rotary blade, cut the sewn fabrics parallel to the seam, 1/4-inch away, on the lower-right side of the diagonal seam. You will be cutting off the smaller side of the square.
Open the sewn fabrics and press.
Repeat the steps above, making three more blocks.
Once you have four (not quite) Half Square Triangles, arrange the blocks, rotating them so that the red corners of each meets in the center. This creates a diamond shape. Sew the four blocks together in the same fashion as above, with napkin U, in the Basic Piecing section.
Press the sewn fabric.
It appears as though the red diamond is floating in the center of a white square. The white fabric beyond the points of the diamond provide seaming space for turning this pieced front into a finished Nautical Napkin. If we had started with the cut pieces being equal in size, making proper Half Square Triangles, the points of the diamond would touch the edges of the pieced front. Then, when the front is sewn to the back, the tips of the diamond would look cut off, lost in the seam allowance.
Napkin A
Napkin A involves piecing together a rectangle and a traditional block known as Flying Geese. Flying Geese quilts are among Purl Bee’s favorites. (Spoiler Alert: Watch out for some Flying Geese coming up on Molly’s Mini Quilt of the Month series!)

For the front of napkin A, you will need to cut:
- Two 8 1/2-inch blue squares
- Two 8 1/2-inch by 16 1/2-inch white rectangles

With a Hera marker, mark a line, diagonally on the two small blue squares.
Lay one of the white triangles vertically on your work surface. Place one of the blue squares on top of it, orienting the blue square so the marked line runs from the upper right to the lower left corner. Align the edges and pin the fabrics together. Sew a seam along the marked line.
Lay the sewn pieces on your cutting mat, oriented as before. With a grid ruler and rotary cutter, cut parallel to the seam, 1/4-inch to the upper left side of it. Open the fabrics and press.
Lay the sewn rectangle on your work surface, as shown above. Place the second blue square on top sewn rectangle, orienting the square so that the marked line runs from the upper left to the lower right corner. Align the edges and pin the fabrics. Sew a seam along the marked line.
Lay the sewn pieces on your cutting mat, oriented as before. With a grid ruler and rotary cutter, cut parallel to the seam, 1/4-inch to the lower right side of it. Open the fabrics and press.
You have just made a Flying Geese block!
Place the Flying Geese block on top of the white rectangle, right sides facing. Align the edges and pin the fabrics together along the long edge to which the white triangle of the Flying Geese appears to be pointing. Sew a seam 1/4-inch from the pinned edge.
Open the sewn fabrics and press.
Napkin B is pieced in the same fashion as napkin A. For the front of napkin B, you will need to cut:
- One 8 1/2-inch by 16 1/2-inch white rectangle
- One 8 1/2-inch by 16 1/2-inch red rectangle
- Two 8 1/2-inch red squares
Napkin V
V and M are made from blocks known as a King’s Cross.

For the front of napkin V, you will need to cut:
- Four 8 5/8-inch red squares
- Eight 6 5/8-inch white squares
Technically speaking, you should cut the squares 8 1/2-inch and 6 1/2-inch rather than 8 5/8-inch and 6 5/8-inch. Since trimming the edges of this block does not effect the overall look of it, I added 1/8-inch to the original squares pieces to give myself a bit of leeway. There are a lot of seams and it’s always easier to cut things down than magically make them larger.
As with napkin F, crease the smaller squares with the Hera marker, diagonally, from corner to corner.
Place a creased white square on a red square, aligning the bottom and right edges. Pin the fabrics together. Sew a seam aong the Hera line. With a grid ruler and rotary cutter, cut parallel to the seam, 1/4-inch away, to the lower right side of it. You are cutting off the smaller portion of the sewn square. Open the sewn fabric and press.
Lay the sewn fabric on your work surface. Place a creased white square on top of it, aligning the top and left edges. Pin the fabrics together. Sew a seam aong the Hera line. With a grid ruler and rotary cutter, cut parallel to the seam, 1/4-inch away, to the upper left side of it. You are cutting off the smaller portion of the sewn square. Open the sewn fabric and press.
You have now completed one of the four blocks that make up a King’s Cross. Repeat the steps above for the remaining three blocks.

Sew the four blocks together in the same fashion as with the other four patch blocks above, napkin U and F.

Napkin M is pieced in the same fashion as napkin V. For the front of napkin V, you will need to cut:
- Four 8 5/8-inch white squares
- Eight 6 5/8-inch blue squares
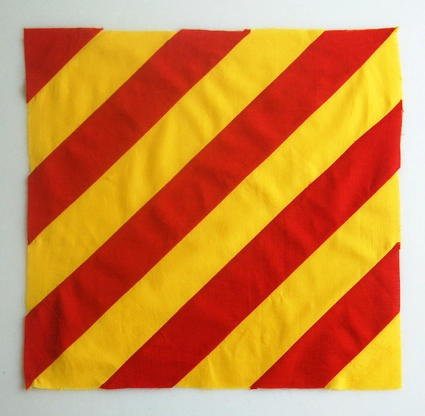
Napkin Y
I am not sure if this block has a proper name. It is comprised of ten diagonal stripes of alternating colors. You could make this block by sewing together very long strips (approximately 23 1/4-inches by 3 5/8-inch) of the red and yellow fabrics and then cut the block down at a 45 degree angle making a 16 1/2-inch napkin front. By doing this though, the edges of the block would be entirely bias. When working on the bias, it is hard (for me, near impossible) to get an accurate square shape.
I chose to make this napkin out of a series of not-quite-Half Square Triangles.
For the front of napkin Y, you will need to cut:
- One 16 5/8-inch red square
- One 16 5/8-inch yellow square
- One 13 3/8-inch red square
- One 13 3/8-inch yellow square
- One 10 1/8-inch red square
- One 10 1/8-inch yellow square
- One 6 7/8-inch red square
- One 6 7/8-inch yellow square
- One 3 5/8-inch red square
- One 3 5/8-inch yellow square

The first step of making napkin Y is the same as making the front of napkin O.
Using a Hera marker, make a crease on the largest red square, diagonally, from corner to corner. Place this creased red square on top of the largest yellow square. Align the edges and pin the fabrics together. Sew a seam along the Hera line.
With a grid ruler and rotary cutter, cut parallel to the seam, 1/4-inch to either side.

Open the sewn and cut fabrics. Press the seam to the darker side, the red side. In the following steps, always orient the sewn square with the yellow half to the upper left side. First we will build on to the lower right half of the block, and then repeat the steps for the upper left.

Make a diagonal line from corner to corner on wrong side of the 13 3/8-inch yellow square. Place this square, on top of the large sewn square, right sides facing. Align the smaller yellow square with the red edges of the sewn square, the bottom and right edges.
Sew a seam along the Hera line. With a grid ruler and rotary cutter, cut parallel to the seam, 1/4-inch from the seam, to the lower right side of it. You are cutting off the smaller portion of the sewn square. Open the sewn fabric and press.

Make a diagonal line from corner to corner on wrong side of the 10 1/8-inch red square. Place this square, on the large, sewn square, right sides facing. Align the small red square with the new yellow edges of the sewn square, the bottom and right edges.
Sew a seam along the Hera line. With a grid ruler and rotary cutter, cut parallel to the seam, 1/4-inch from the seam, to the lower right side of it. You are cutting off the smaller portion of the sewn square. Open the sewn fabric and press.
Continue working in this fashion. Next you will crease and attach the 6 7/8-inch yellow square, followed by the 3 5/8 red square. Then piece the currently yellow half of the block.
Like with the King’s Cross blocks above, I added an extra 1/8-inch to sizes of the squares used to make this block. Due to all the seams, I wanted to give myself some leeway. Press this block carefully one you have finished piecing it. Measure it and trim if neccessary.
If you like the methods of Half Square Triangles (or not-so-Half Square Triangles), this napkin is definitely for you! It is a pinch more labor intensive than some of the other napkins, but that is what is so rewarding about it.
Applique
Applique is the final category of Nautical Napkin blocks. I used Molly’s February Mini Quilt of the Month: Liberty Circle Applique as a guide for the applique portion of this napkin front. Molly provided extremely clear step-by-step instructions and photos of this process.
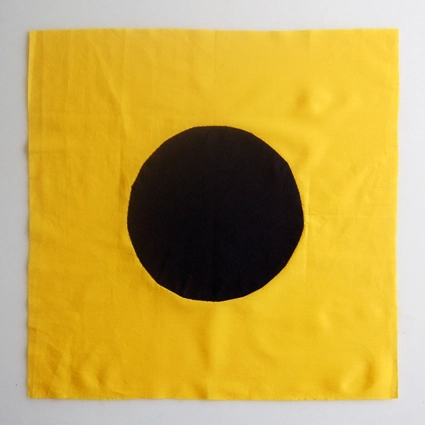
Napkin I
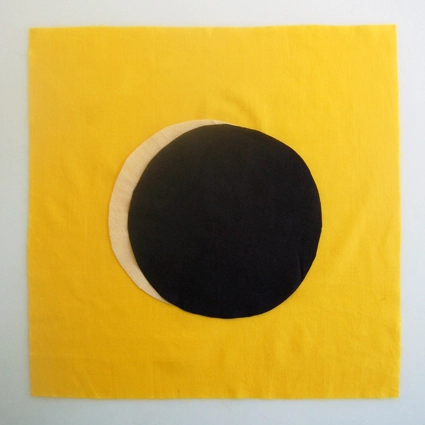
For the front of napkin I, you will need to cut:
- One 16 1/2-inch yellow square
- One 8 1/2-inch black square
- One 8 1/2-inch square of interfacing
Using your 8-inch bowl or plate as a template, trace a circle onto the wrong side of the fabric. Pin it wrong side up to the square of the fusible interfacing, facing fusible side up.
Sew all the way around the drawn circle, directly on the marked line of the circle. Trim the seam allowance to approximately 1/8-inch.

Flip the circle over and cut an opening into the middle of the interfacing. Turn the circle right sides out through this cut in the interfacing. Finger press your hemmed circle flat.
Fold the circle in half, so that the black fabric is together. Finger press the circle along the fold, making a crease. Open up the circle. Fold the circle in half, in the other direction, so that the black fabric is together. Finger press the circle along the fold. Open up the circle. There should now be an cross-shaped crease on the circle.
Do the same as above for the yellow square. Fold the yellow square in half. Finger press it along the fold. Open the fabric. Fold the yellow square in half, in the other direction. Finger press the fold. Open the fabric.
Place the circle, interfacing-side down, on to the yellow square. Align the fold marks of the circle to those of the yellow square.
The circle is now perfectly centered! (Joelle taught me this trick for centering circles. Pretty great, huh?!)
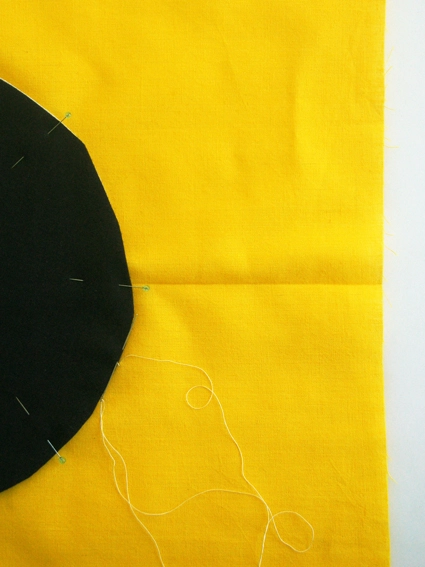
Use a hot iron to lightly press the circle into place. Please note, sometimes through handling the fuse comes loose so I also pinned the circle to the yellow square to keep it from shifting around during the applique process.
To applique the circle use dark thread to match the Coal Shot Cotton. We used a contrasting thread for the example so you could see it clearly in the photos.
Stary by making a quilter’s knot. Draw the needle though the edge of the black circle, giving the thread a light tug to ‘pop’ the knot through the fabric to the inside of the item to be appliqued and exiting right at the edge of the circle, just catching the edge of the circle fabric as you exit.
Take a tiny stitch from the background fabric just at the edge of the circle. Push your needle back into the edge of the circle just at the point where you exited the background fabric. Then slide the needle through along the inner edge of the circle and pull it out approximately 1/4-inch beyond where you went in.
Take another tiny stitch from the background fabric just at the point where you exited the circle. Then push the needle through the edge of the circle once again for approximately 1/4-inch. Repeat to complete the perimeter of the circle.
That’s It!
You are now prepared to complete the entire nautical alphabet. When I started it seemed like I had so much work ahead of me, but before I knew it I was saying “That’s it? That’s the whole alphabet?!”
Enjoy the napkins! –Laura


Love those napkins; what a great idea! This might be a summer project now that I'll be ashore for a few months.
Wow. That's an awesome project you've done and a great story too. It looks like a lot of work but I suppose once you get going on all those, it isn't that bad. Amazing tutorial as well. Thank you so much.
what an awesome idea!!! My dad and his wife spend a lot of time sailing so I think I'll keep this project in mind for the next time I need a gift idea for them!!
These napkins are neat & I can't help but think what a great quilt idea this would be!
These napkins are SO COOL! Thank you so much for an excellent tutorial. I now know what I am going to make for Christmas gifts for my friends and family. I think I will also adapt it to make placements.
I had already decided to put letters around my son's Navy quilt (Ohio Star w/ Navy-themed fabric). This, along with a discussion about flags with him during Fleet Week NYC solidifies my decision.
Thanks for the tips, from a grateful Navy-Mom. 🙂
Amazing job: well done!!
I am totally making these!!! If I may, you can do felted coasters like the citrus coasters, or do cloth coasters with interfacing to give it some substance. Also, place mats. I don't need to tell you what to do, you always got it going on!
Landis, I love the idea of reinterpreting the flags! I think it would be fun to make them with some fabrics with really tight, small prints and similar colors. Thanks for commenting. –Laura
Terrific!
Thanks for such great instructions, too.
Wow, this is amazing! I'm not sure if I can commit to actually DOING them myself (with my project ADD it would probably take a year to finish), but I love the idea. I graduated from the Naval Academy and memorizing the nautical alphabet was one of the first things they made us learn as 'plebes' (freshmen). Never would have thought to make them into napkins…
Many great things come out of your place (inc. (esp!) the fabric). But I have to say that this is the most brilliant, genius idea. Inspired. Thank you for sharing so generously.
I love this project and agree, I immediately thought what a fun quilt it would be, particularly for a little boy's room. You could also make a fun pennant flag if you didn't want to sew all the flags! Thanks so much for this amazing tutorial.
Great post and loved how you broke it down. We make signal flag but ours are 8″ x 8 “. Since we have been making them and selling them from our website we have the alphabet memorized. People also love spelling there names out in Signal flags.
Brilliant! Thank you so much for this amazing project and clear instructions. The way you have grouped napkins by technique type is sheer genius and makes the project seem approachable. I am sure I will not be the only person cherishing these directions as a perfect tutorial to quilting in general. As daunting as making the napkins might have been, writing such clear directions must have been more so. You have outdone yourself! Thank you.
What a fabulous project. I can't say I'll try making them all but possibly a few for my DB who's in the Navy 🙂
Very excited! I'm going to make a baby quilt spelling out his first and middle name using the flags. His mama and I used to teach little kids how to sail together. Thanks!
OMG!! looking for the nautical alphabet for a pattern for a quilt to keep on our new sailboat!!! About 3/4 thru! great idea!
What a great idea and thank you for the clear instructions. Picnics on our little boat will be positively smart once I’ve made these napkins!
Love these and going do to the families initials for my Mother in law for Christmas! Can then add to if she wants and I only need to do 9 to get started! Thank you for the comprehensive instructions!
Thank you for this – I think this is the second or third of your tutorials I’ve done now (LOVE the railroad tote!) I did nine of them for the family initials for my amazing mother in law for Christmas (first project for Christmas – SOooo many more to go!) xx
Wow Elizabeth! Great job for starting your holiday crafting so early! We’re so happy to hear that you love our patterns.
Keep up the lovely crafting! -Alyson
Wish I had come across your site a year ago, I redid a bedroom in a nautical theme and have been trying to figure out how to do pillows with our last name using flag patterns ever since. Your directions are very complete and easy to follow.
I am making a quilt of these flags for a Grandson and not able to find a pattern . I found your insights very valuable . The measurements were not what I needed but your method of grouping similar construction flags together was perfect for tackling the project. You saved me much time in that I did not have to think through the best construction methods, for that I am grateful!
Hi Mary,
How exciting to make a quilt using Nautical Flags! Your grandson is lucky boy! Thank you so much for your kind words! We aim to be helpful!
Happy sewing!
Cassy
Just reading about your awesome nautical flag napkins….so, do I understand correctly that the napkins are actually lined? Do the two layers stay together or do they kind of flail apart? I want to make these for my beach house, but confused about the lining.
Thanks so much.
Evelyn
Hi Evelyn,
What a wonderful decorative touch to have these at a beach house! The napkins do have two layers which are not quilted through; however, the topstitching around the edges will keep the two layers together during normal use.
I hope that helps!
Julianna
Are the backs of these napkins just white, or are they various colours depending on the front colours?
Thanks,
Joy
Hi Joy,
Thanks for writing in! We lined all of our napkins with a white backing, though you could always make double the amount of pieced fronts and use those for instead of white fabric for completely reversible napkins!
Best of luck and happy sewing!
Julianna
Great napkin idea! I make pillows with the same flags, and your tutorial is right on point! I will use your tips about the layouts for the more complicated flags, you beat my system totally- LOL.
Thank you!
Margot
Love the pattern and want to start as a next project. But 1 question… it says in the materials that I’d need 2 1/2 yard of Persimmon-colored fabric. I don’t see any orange colored fabric used in the photos. Do I read it right? Or should I get 5 yards of Yellow colored fabric instead? Or does orange colored fabric go on the back of some napkins? Tiny bit confused… Help!
Hi Kate,
Thanks for reaching out! The Persimmon Shot Cotton is the dark orange-red you can see in most of the napkins. Shot Cotton was an unusual fabric with contrasting warp and weft threads, so it does look closer to red in most of the pictures! The most similar color would probably be Terra Cotta or Orange Russet in our Spectrum Cotton, but you could use just about any dark orange or red fabric that goes with your color scheme. All of the napkins are backed with white muslin.
Happy stitching!
Julianna
I’ve been mulling over making a quilt, but I love the idea of making the flags into napkins instead. This will be a great COVID-19 quarantine project (assuming I can get the fabric)!
I’d love to make this – but it seems like the photos are no longer working? Can you advise? 🙂
Hi Melissa,
Thanks for reaching out! We’re noticing some issues on our website because of a recent update and are still ironing out some residual kinks. We’re aware of this problem now and are urgently looking into it, so thank you for bringing this to our attention! I’m sure this is frustrating (we’re anxious to have them back too!), so we appreciate your patience as we troubleshoot in the meantime. We hope to have the photos back up again soon!
All the best,
Gianna