Margaret Oomen’s Little Urchin Crochet Covered Sea Stones

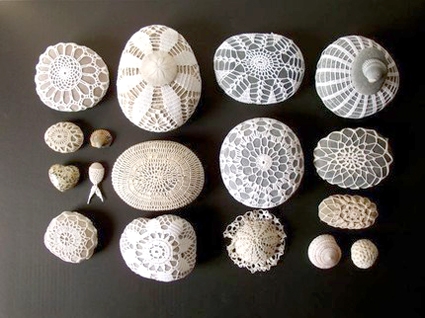
For quite some time now we have been mesmerized and inspired by the work of the unsurpassable artist Margaret Oomen – we are particularly drawn to her crocheted stones. Her creations and her talent leave us absolutely speechless, as does her wonderfully kind personality. Resurrection Fern is her blog about her life as a mother of four, rural physician and textile designer. She also has an Etsy Shop where you can purchase her gorgeous crocheted stones (if you’re quick enough since they go so quickly!) as well as beautiful still-life photographs of her crocheted stones. Today marks a very special day for us because Margaret generously agreed to create an exclusive Crocheted Stone pattern for Purl Bee readers (pictured above). Below is one of our favorite shots of Margaret’s work from her Etsy Shop.
The Materials

- a smooth flat stone
- Valdani 100% pearl cotton hand embroidery thread (one ball of any color is more than enough for one stone)
- small size crochet hook size 9
- scissors
- embroidery needle
The Pattern

In this tutorial I will show you how to crochet a cover for a smooth sea or river stone inspired by the lovely sea urchin. The instructions are for a stone about 5 cm in diameter but can easily be adapted to any size. If you can crochet a chain, make a single and double crochet stitch then you are ready to make a covered stone. –Margaret


Step 1: Make a chain 10 stitches long. Join chain to form a circle.


Step 2: Chain 1, single crochet (sc) from the center of the circle 12 times. Join with a slip-stitch (sl).


Step 3: Chain 2, 2 double crochet (dc) in each sc, slip-stitch to make a circle.


Step 4: Chain 2, *work 3 dc into next stitch, chain 3, skip 2 stitches; repeat from * 7 more times. Always slip-stitch to join the circle.

Step 5: Chain 2, dc in next opening, *chain 3, dc 2 times in next opening, dc in next 2 stitches; Repeat from until the round is completed.

Step 6: Chain 5, * dc 2 times in next opening, dc in next 3 stitches, chain 3; repeat from * until the round is complete.

Step 7: Chain 5, * dc 2 times in next opening, dc into next 4 stitches, chain 3; repeat from * until the round is complete.

Time to measure your work thus far against your stone. They should be almost exactly the same diameter. If it is smaller just add another round or two following the pattern you see developing. Now for the fun!!


Step 8: Chain 2, *make 1 dc in the opening between every stitch; repeat from * until you have completed a round.
If you have done this correctly this round will curl inwards a little appearing like a low basket. Time to slip your stone inside the basket. The remainder of the pattern is worked with the stone inside. This is my favorite part of covering smooth stones.


Step 9: Chain 2, *dc in every second stitch pulling tightly to make the cover very snug on the stone; repeat from * to end of round. Join this last circle and then cut the fiber leaving a 10 cm long tail and pull the thread through the last stitch.
 Thread the tail on your needle and sew in invisibly through the last row. (Note, the beautiful pincushion in the photograph above is from Cozy Memories Etsy Shop.) Time to admire your little urchin stone and think about which stone you will cover next.


It is next to impossible to only make one. They look so lovely in a small group along with a few natural treasures. A small flatter stone or piece of sea glass could be covered in this way and turned into a lovely summer necklace.


Simple
Beautiful
Natural
Art
namaste
Hello, I love resurrectionfern creations that have inspired quieted summer crochet lessons to my daughter (10 years hold). On the beaches of Sardinia stones echo the magic of canadians stones. Thank you for the tutorial!
http://www.neimieipanni.blogspot.it/2013/07/stones-crochet.html
Cristina
Thanks so much for the pattern and tutorial. I love nature and have collected a lot of rocks and stones in my outdoor adventures. I yearned to display them specially. When I saw the crocheted stones, I thought this would be perfect, but I couldn't find a pattern for a long time. A friend helped me to find you. Thanks again!
is this size 12? or 8?
Amazing crochet idea! I have never this before, soo lovely. Thank you for sharing!
Hi there 🙂
I am currently in year 12 and in the process of creating my HSC major artwork. I came across your beautiful crochet stones and I would love to make some to include in my collection. For the past few days I have been trying to follow your tutorial and I just keep getting it wrong. My attempts look nothing like your pretty little pieces. My little circle is so tight and keeps curling up into a tiny teacup shape. Can you give me any tips? Or point me to some good youtube/video tutorials that would help?
xx
Hi Bronte,
In general, it sounds to ma like your work is too tight. Perhaps you have chosen too small a hook for the yarn or thread you are using? Or it could be that you crochet with a tight tension and need to go up a hook size or two. Make sure, too, that you are making the correct number of chains between your double crochets since that number is pivotal to creating a flat shape.
I hope this helps get you on the right path. Please let us know if you have any more questions and thanks for this one!
Whitney
awesome tutorial thanks for sharing
Thank you for such clear instructions. The photographs make them so much easier to follow. I am off to the seaside (England, UK.) tomorrow to gather some stones.
Thank you for these instructions. The photographs make them so easy to follow. I am going to the beach (England, U K.) tomorrow to look for some suitable stones. So all my friends will have pretty pebbles next Xmas.
Thanks for share it!! It’s amazing.
Just made my first one for my daughter-in-law’s birthday. I know she will love it. Thank you for your easy pattern.
Doing these crocheted stones have been such thearpy for me. I’m taking care of my two parents who have Dementia. Do you have any other pattern tutorials for stones or know who might. I’d love to try a different one now that I’ve conquered this one. Thank you so much!
Hi Meryle,
Thank you so much for writing in! We are very glad to hear that this pattern has helped you with such a difficult experience. Unfortunately, we do not have any more patterns for stones. I recommend checking out the website Ravelry for more stone patterns.
Again, thank you for very kind words and please let us know if you have further questions!
Best wishes,
Kumeko
thank you so beautiful and lovely idea
I love these crochet stones. Where can I get stones like these. Is there a source where I can purchase some?
Hi Carole,
Thanks for writing in! You can certainly go out and gather stones at your local stream of rocky beach. I am not sure of a particular retailer that might carry, these stones but you may try a florist supply or your local big box craft shop!
I hope that this helps!
Cassy
Thank You! I love your pattern and video they are fantastic! Can’t wait to do it!
any chance to get the other patterns for the rocks? i super love them❣️
thank you so much for sharing your creations
Hello Beth,
Thank you for writing us and for your interest in this pattern! I will pass your suggestion along.
Happy knitting!
-Marilla
thanks you for sharing, you are very kind.
Thank you for the inspiration I have been looking for for believe it or not 50 years. It was the first rock my toddler gave me. I also have the ones my second daughter and granddaughter both gave me. Little treasures that can finally come out of the jewelry box and shown off!
Thank you!
Merci !!!!
HAPPINESS IS A CROCHETED ROCK. LOOKS AMAZING ?