Fabric Beach Balls
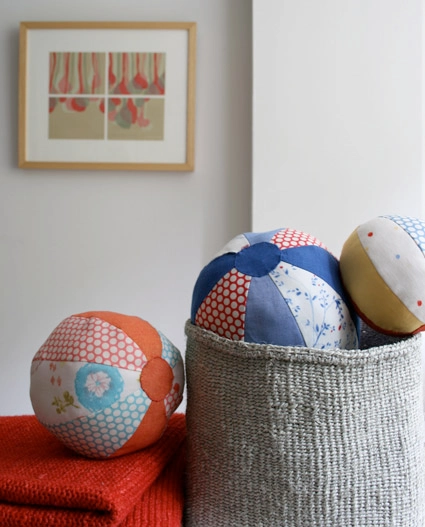 These fabric balls are the perfect handmade baby gift, multicolored, soft and round…..what’s not to love! Sewers of all levels will have fun making these toys that will be worthy of passing down from generation to generation.
Enjoy! –Page

Materials

We recommend 1/4 yard of each fabric to leave room for error.
These are the fabric I used:
Large Ball
- Nani Iro White Tossed Flowers
- Yuwa Honeycomb in Red
- Kaffe Fassett Shot Cotton in True Cobalt
- Carolina Chambray in Royal
Medium Ball
- Nani Iro Pink Blooms
- Yuwa Honeycomb in Pink
- Yuwa Honeycomb in Aqua
- Net of Jewels in Carnelian
Small Ball
- Nani Iro White Scattered Dots
- Robert Kaufman Kona Cotton in Daffodil
- Kaffe Fassett Shot Cotton in Persimmon
- Yuwa Honeycomb in Blue
Other Materials
- Cotton Stuffing
- Cotton Thread that blends with chosen fabrics – We used #1040, #5910, and #6800
- Fabric scissors
- Applique needle
The Pattern
Finished Measurements
- Small ball: approximately 5-inches diameter
- Medium ball: approximately 7-inches diameter
- Large ball: approximately 9-inches diameter
Download this template for the small and medium balls, and this template for the large ball.
You will need to cut eight fabric pieces total to make each ball. We used two each of four different fabrics for ours.

Fold fabric in half by lining up the selvages so that you can cut two pieces at a time. Lay template on the fabric and trace with a pencil. Cut the fabric on the drawn line. Repeat this process with the remaining fabrics so you have eight pieces total.

Pin the cut pieces in pairs right sides together, carefully aligning the points and edges.
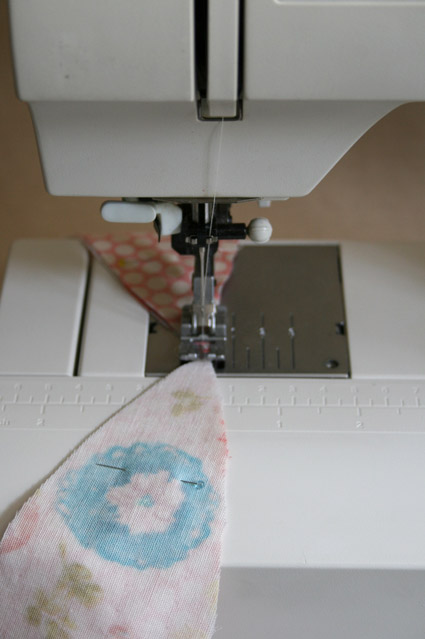
Chain-piece the pairs, sewing past the points at each end using a 1/4-inch seam allowance. You don’t need to backstitch because you’ll reinforce these seams when sewing the pairs together. Be sure to make smooth curves as you are sewing so that the ball will be nicely rounded. After chain-piecing, carefully cut the threads between each pair. Press the seams to the side of the darker fabric.
Pair the pieces once more, aligning their cut edges with right sides together and pin them together. Sew them together to create two half-sphere shapes with four pieces each. Press seams to the side of the darker fabric.
Turn one half-sphere right side out, and tuck it inside the other half-sphere, with right sides together. Align the points and edges, and pin the two pieces together. You’ll want to begin one of your seams 1- inch from the point to leave an opening for you to turn the ball right side out and to stuff it. Take care not to sew over the nice points you’ve made at the ends when stitching the previous seams. Your top seam should just intersect the point where the previous seams meet.

Turn the ball right side out through the opening, and stuff it firmly, making a spherical ball.
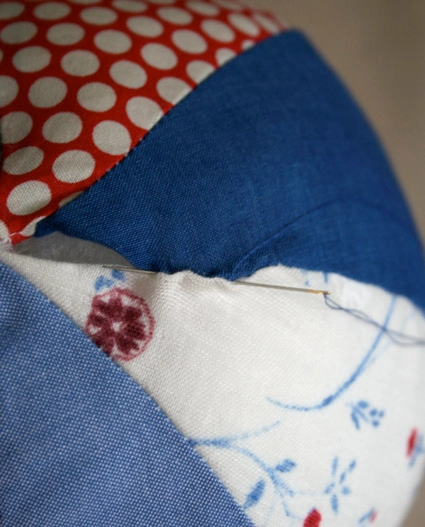
Fold and finger-press the edges of the opening 1/4 inch to the inside to create a clean edge. Using a blindstitch, carefully hand-sew the opening closed, stitching just inside the fold for an invisible seam.


Cut two circles for each ball to sew at each end. We recommend using the darkest solid fabric for this since it is a way to cover the part where all the seams come together which isn’t always perfect. We cut a 2 -inch circle for the large ball, a 1 3/4-inch circle for the medium ball, and a 1 1/2-inch circle for the small ball. Fold and iron the edges of the circle approximately 1/8-inch. Hand-sew the circles on each end of the ball using a hand stitch.

If the balls have gotten a bit misshapen while sewing on the circles, manipulate them back into a nice spherical shape and you’re good to go!


I love this pattern, made them for my great nephew and I am going to make a set for my granddaughter!!!
Thanks for the tutorial! I made a small ball for my son and he loves it.
You can see it here, if you like: http://thesewingme.blogspot.de/2013/06/soft-ball-tutorial.html
I linked to your tutorial of course :))
Very good job!
Ciao
i love this… can't wait to make this for my 5 month old, will add some ribbon around for more fun… 🙂 thanks for sharing..
Great tutorial! I'm going to try making this out of vinyl and adding a bit of cat nip to make some handmade cat toys 🙂
I saw these years ago, but instead of being stuffed with fiberfill, they put a balloon in it.
Is anyone else balls coming out sort of oval on one end? What am I doing wrong?
Try sewing the two halves then putting them together. It might help.
Make sure you cut your fabric pieces with the wider part on the crosswise grain (the top of the segment should be pointing toward the selvedge). This helps prevent the fabric from stretching as you stuff.
If you cut your fabric on the bias your ball will turn out nice and round.
Utube has some videos if you don’t know how to do this.
love these! i'm working on 2 sets – one for my daughter and one for my niece 🙂
I've made something similar, and instead of stuffing it, I've made a button hole in the end (circle) to push a balloon inside. Once the balloon is inflated, the tied end is hidden inside. This makes a very bouncy ball, which doesn't hurt.
I loved the idea of fabric beach balls and decided to make one for my son, who is 17 months. Thank you for an easy and clear tutorial. I posted a review on my shop blog and am planning to make more for him.
I love this pattern – even if I am so late seeing it… I am going to make several and instead of putting batting in it I am going to put scrunchies in them… making a lighter ball for little fingers.
Thanks
I just found this tutorial and am very anxious to make these for my grandchildren only I can’t seem to get the templates to come up. Is there something I am doing wrong or has the website been closed. Is there someway that someone could email me the templates, please?
Hi Pam-
The templates seem to be loading fine on our end. Can you try from another browser? If you still can’t get them to load please email me at Molly AT purlsoho DOT com and I can send them to you directly.
Thank you!
Molly
Fabric Beachball template
Hi Dorothy,
Thanks for writing in! The template for the small and medium beach balls can be found here: https://www.purlsoho.com/create/wp-content/uploads/2008/08/smallmediumball.pdf The template for the large ball can be found here: https://www.purlsoho.com/create/wp-content/uploads/2008/08/largeball.pdf
Please let us know if we can be of any further assistance!
Happy sewing!
Cassy
Going to a baby shower and now I have a ball to match my blanket and burp cloths. Thanks!
love baby patterns
Thankyou so much for the pattern and easy to follow instructions. I have so many scraps of material after years of sewing and have been looking for a project to use them up. I make quilts and toys for our birthing unit in local hospital.
I have two new great grandchildren. Would love to make them one.
Hey. I have all my pieces cut to sew… but am trying to figure out which ones to pin together? Am I pinning the same fabrics together? Or how do you choose? Thanks
Hi Lindsey-
It’s totally up to you! I would suggest not pinning two of the same prints together but other than that there are no rules 🙂
Thanks for getting in touch and please let us know if you have any more questions!
Molly
I’m making a few of these for my nephew who is 18 months. I am using college football fabrics, but I have made these for baby shower gifts and used prints to match the other items I made. I tend to use felt or fleece for the circles on the ends of the balls, because I have trouble turning under the edges neatly. I also put a large bell in the center of each. So far the new moms and babies have loved them.
What an awesome gift! Thanks so much for sharing your tips, Amanda! -Alyson
love the pattern balls go together good, am making them for christmas presents for grandkids, came back for the large pattern, will try that made 5 of the medium balls so far
I linked to your tutorial on my “Baby DIYs you can do BEFORE you find out the gender” Round up: https://aredheadmarriedageek.wordpress.com/2016/02/13/roundup-baby-diys-you-can-do-before-you-find-out-the-gender/. Let me know if this isn’t okay.
I’m excited to make a ball for my Little C soon!
nice pattern but my ball looks like a rugby ball is there anything that I could of done wrong
Hi Ashlee,
Thanks for writing in! I am not sure what could have gone wrong. The only thing that would cause something like that might be that your seem allowance was slightly over 1/4 inch. That would account for the shape being slightly less than round. You may also try adding in an additional section to round out the balls.
I hope that this helps!
Cassy
Mine is a rugby ball shape too!
Have unpicked and will give it another go!
Hi Elizabeth,
I am sorry to hear that you are having difficulties! The only thing that would cause something like that might be that your seem allowance was slightly over 1/4 inch. That would account for the shape being slightly less than round. You may also try adding in an additional section to round out the balls.
I hope that this helps!
Cassy
I love this project and blogged about 3 balls that I made using your tutorial. I found that using sweatshirt fleece for the center circle worked best for me:
http://theredchairblog.blogspot.com/2016/03/sweet-and-simple-cloth-beach-balls.html
This is great but I really wish you included the instructions in with the template all in one pdf so I have all info in one place
Hi Micaela,
Thanks for writing in! I will pass your request on for the future!
Happy sewing!
Cassy
Mom used to make these. After she died I kept her house 5 years and before selling I traded washing machines. Her machine worked in my house for the better part of a year, then failed to empty. I took the pump apart and found one of the baby ball sections clogging it. What were the chances? It worked for months and months again, before it clogged. You guessed -another baby ball section! MOM, WHAT ARE YOU TRYING TO TELL ME? I think she was just saying Hi, I’m good! A grand baby coming made me think of Mom’s baby balls.
Thank you for sharing, Brian! And congrats on the new addition!
Wonderful balls! perfect stretching, looking nice balls now ready to play in beach, thanks for sharing…
wow! these balls are looking so awesome and you shared amazing guide to design it. I really like and will try at home.
I have now made many of these large balls for gifts. THANK YOU!
So fun. I found I liked leaving a two inch opening on one side
For stuffing rather than the top, though.
Also, I put a balloon into them when done to “iron” the finished ball
Before stuffing. (Dollar Store ballon size – big and round)
Also fun to play with just leaving balloon in without sewing the side opening, of course.
I want to cover a bonce ball I figured the pattern but how did I get it on the ball when it’s sewn together. Please help
Hi Carmie,
Thanks for writing in! In order to insert a ball rather than stuff the finished piece, you may need to use a ball the deflates and can be placed through the small hole and inflated once inside the sewn outside. If the ball is hard, you may try leaving off one panel and then hand stitching it in place. I am not sure of how well this will work out as we have not tried it ourselves. Do let us know how it turns out!
Best,
Cassy
I learned an easy way to make the round circles for the ends. Trace the size of the finished circle on a scrap of card stock. Cut a circle of fabric about 1/4 inch bigger than the paper circle. Using a running stitch, sew about 1/8 inch from the edge of the fabric. Put the paper circle in the center and use your running stitch to gather the fabric around it. Using an iron and lots of steam, press the fabric flat against the paper circle. Pop out the card stock circle, and you will have a beautiful fabric circle with the edges pressed under smoothly. I like to edge stitch the circle on my machine before sewing it on by hand.
How can I get the pattern of this ball?
Hi Ineke,
Thanks for writing in! The templates for these lovely balls can be found linked above in the The Pattern section just after the list of supplies!
I hope that this helps!
Cassy
Thank you so much for the patterns of the beach balls .I’m going to see them up for my grandkids Thank you again
Lindas! Obrigada por partilhar, também os moldes. Já tinha experimentado mas as minhas saíram muito pouco esféricas 🙂
Do you happen to have a pattern for a clutch ball or grab ball? Thank you
Karen
Hi Karen,
Thanks for writing in! I think you might be interested in our Hand Sewn Puzzle Balls pattern or kit! You can purchase either a hardcopy or download only version of the pattern at this link.
Happy stitching!
Julianna
I do not own a sewing machine, but I’m going to hand stitch these together this week thank you for the idea!
Hopefully, the hand stitching will look decorative and not too messy!
Hi there! I love this! Does anyone know how to easily enlarge this pattern? I would love to make the ball even larger!
Hi Kahla,
Thanks for reaching out! I think that the easiest way to make the pattern even larger would be to enlarge the template when you print it. You can probably do this by printing out the template over the span of two pages and then taping the pieces together once you cut them out. Hope this helps!
All the best,
Lili