Sashiko
Sashiko embroidery is one of my favorite crafts. It’s easy to master and the process is very meditative and relaxing. Although the patterns can look difficult, they are just a matter of breaking down the whole into linear parts. –Mari
The Materials
There are four key materials to sashiko – needle, thread, thimble and fabric. As you’ll see, no embroidery hoop is necessary, which makes sashiko a very portable craft.
Needles

- left – traditional sashiko needle
- middle – modern sashiko needle
- right – 1mm embroidery needle
Traditional sashiko needles are very long (about 2 inches) with a small eye. The width of the needle is uniform all the way to the top. Modern sashiko needles have a larger eye so the needle can be more easily threaded. In the photo, I included the largest embroidery needle in my collection, a 1mm width needle to show the difference between the needles. As you’ll see below, a long needle is necessary to the sashiko embroidery technique.
Thread

- left – sashiko thread
- middle – embroidery floss
- right – Pearl Cotton Embroidery Thread
Sashiko thread is more twisted than embroidery floss and not made to be separated into strands. Sashiko thread doesn’t have a sheen as embroidery floss or the Valdani embroidery thread have. Either thread could be used a substitute for sashiko thread but the look will be slightly different.
Thimble
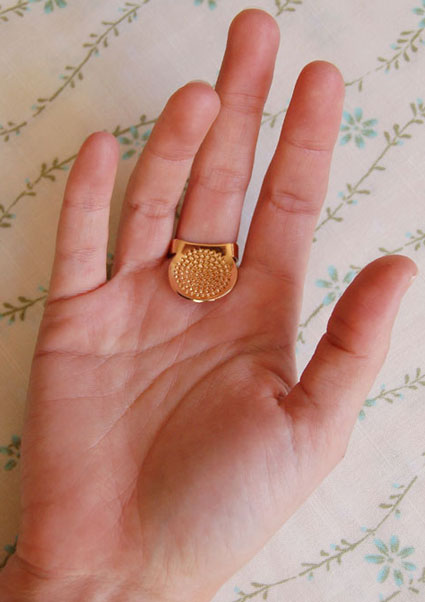
This is a traditional sashiko thimble that is used to push the needle through the cloth. We have a similar thimble made of leather which you can find here.
Fabric
The ideal fabric for sashiko embroidery is one that is not too tightly woven, such as Robert Kaufman’s Essex fabric, which is a linen/cotton blend. Because sashiko thread is so thick, a fabric that is too tightly woven will show puckering or the holes quite easily.
The Technique
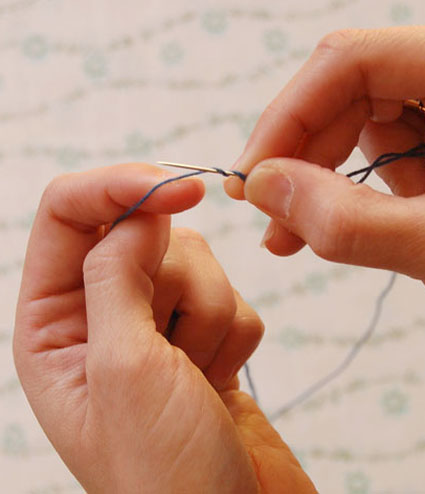
To begin your project, cut a piece a thread that will be long enough to go from one end of the section you are working on to the other end. Create a quilter’s knot by wrapping the thread around the needle twice and pulling it through.
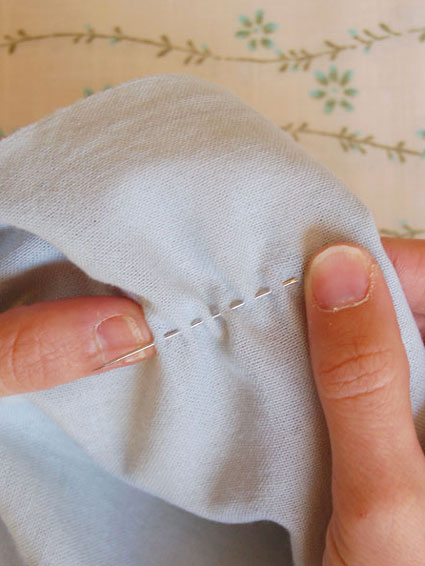
Next, take your fabric and insert the needle through the fabric without pulling the thread through. The proportion of the sashiko stitch is about 3:2, with the longer stitch on the right side of the fabric. Continue running the needle through the fabric without pulling the thread through until you have multiple stitches on the needle.
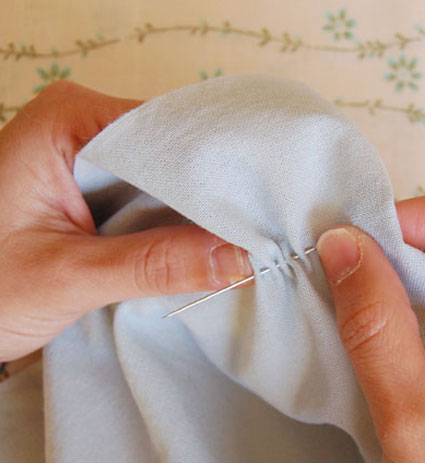
After you have several stitches on the needle, whatever number you are comfortable with, push the needle through the fabric and pull the thread all the way through. Use the sashiko thimble to push the needle through the fabric.

Pull the fabric taut to ensure there is no puckering. Continue until you have reached the end of the row and tie another quilter’s knot, leaving some slack at the end to compensate for any puckering.

If you are doing a pattern with any change in direction or angles, leave a little loop at each point on the wrong side of the fabric, again for puckering.
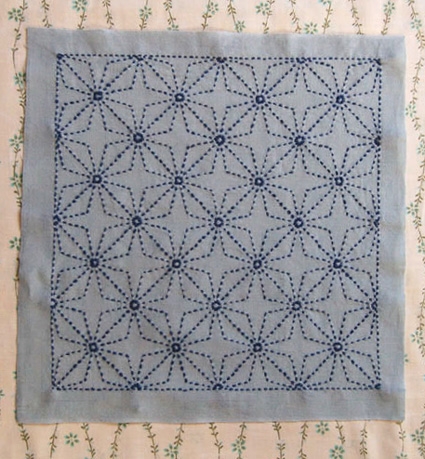
“Water Surface” Kit
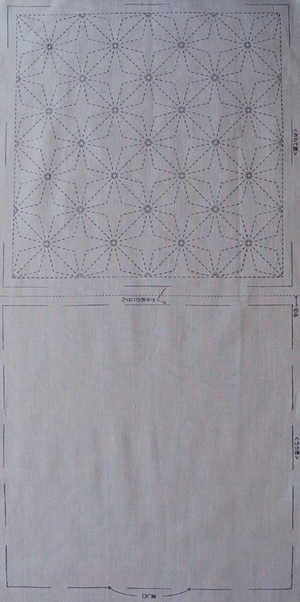
The sashiko patterns we have all have easy to follow instructions which have the stitches printed on the fabric in washable ink. I chose the traditional sashiko kit “water surface” to show how to do a pattern from beginning to end. I paired the kit with the Cobalt Blue Sashiko Thread (#10). The fabric has a second side that could be used to cover up the wrong side of the embroidery in a pillow or handkerchief.

Before beginning the embroidery, decide how to do the pattern. Typically, the horizontal and vertical lines are done first (except for the outside lines). Next, the diagonal lines are stitched. Finally the remaining shapes are embroidered. Since this pattern does not have any horizontal or vertical lines, start with the diagonal lines, from one end to the other.
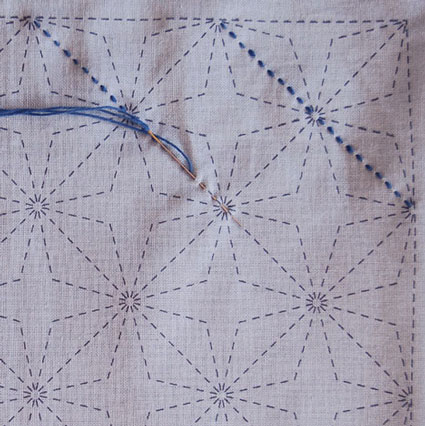
When the first line is finished, start with the next line, but start in the opposite direction to avoid any puckering or skewing of the fabric. Make sure you have enough thread on the needle to get from one end of the pattern to the other, to avoid having any knots in the middle of the fabric.

After completing all of the diagonal lines, the figures remaining create a diamond pattern. To do this part of the pattern, start at the top, then follow the arrows around the pattern back to the top.

This is how the diamond pattern looks when completed. Work your way from one side of the fabric to the other, just as you did the diagonal lines. Finally, embroider the outside lines. The ink of the pattern will come out easily in a cold water hand wash with a little agitation. Your sashiko sample is complete!


Thank you for the tutorial! Would you mind if I post a link to it on my blog? newinnippon.blogspot.com.
Respectfully,
SJarry
Hi SJarry-
Yes you may, as long as you link any photos directly back to us for the instruction and patterns.
Thanks for asking!
Should the stitches of Sashiko be the same size on the front and the back of the piece? My stitches in the back are much smaller than the front. Thanks for your help
jleibfried@aol.com
Hi Jacque-
The back stitches are usually a bit smaller than the front stitches, but as you get more practice they might even out a bit.
Thank you for your question.
Molly
Thank you for this wonderful tutorial… my first lesson in Sashiko Embroidery.
I love this technique for quilting!
This post was really helpful, thanks! I plan to start my first sashiko project tonight and now have a better idea of what I'm trying to do!
Did I read somewhere that you could sew this on a sewing machine?
Please reply to my e-mail so that I don't miss the posting for the response.
Thank you so much,
Jeanettte
Yes. You can do this on a sewing machine with invisible thread on the top and coloured thread in the bottom. There is a special stitch on modern machines and a little experimenting with tension
Hi Jeanette-
You cannot do this stitch on a sewing machine. But it is fun and easy to do by hand.
Thank you!
Molly
Wonderfully clear pictures and descriptions. Thank you. Someone gave me a piece of what I now realise is a kit. However, the only thread I have to hand is DMC stranded cotton. Will this work and how many strands should I use?
Hi Carrie-
Yes, you can use the DMC embroidery floss. You can use all 6 strands. Please see the section of this story called "Thread" for more info.
Thank you!
Molly
Jeanette, Babylock company makes a Sashiko sewing machine.. The reviews I read indicate that the Sashiko II version is better. This is a single purpose machine which costs several thousand dollars.
Babylock does make a single purpose Sashiko II machine that has adjustable stitch length and stitch distance. I have one and love it. Using a pre-printed pattern would be great so the adjustments could be made to fit the printed stitches. I paid less than $2,000 for a new model at my local Babylock dealer in town. I'm glad I stumbled upon this website so I can look at getting the pre-printed patterns!
that's a great explanation! Thank you so much for explaining the difference between the needles.
What is the best way to tie off the sashiko thread. I couldn't find it in your tutorial. Apologies if I missed it,
Thank you
Hi Susan-
You can finish it in one of 2 ways. Once you're towards the end of your length of thread you can weave the tail through the back of some of the stitches and then snip it without tying a knot. Or you can tie a french knot at the end if you want to make sure it's ultra secure. Here's a short explanation of a French Knot: https://www.purlsoho.com/create/embroidery-tutorials/2007/7/20/french-knot.html
Thanks for your question!
Molly
Great tutorial, do you need to stabilize the fabric before you start stitching, is so , what do you recommend? Thanks Vicki
I bought my first sashiko kit to sew a pre-printed pattern to make a table-mat. There's a fold in the fabric and I'm wondering if I should be embroidering through just 1 layer or through both fabric layers?
Hi Lian-
It should be just through one layer of fabric.
Thank you!
Molly
HI Vicki-
No need to use stabilizer, just follow the instructions as given above and you should be in business!
Thanks!
Molly
Excelente tutorías, si tienes otro(s) sobre cualquier manualidades japonesa, por favor envíemela a mi correo. dios te bendiga
Excelente tutoras, si tienes otro(s) sobre cualquier manualidades japonesa, por favor envemela a mi correo. dios te bendiga
buenas noches gracias por compartir esta tcnica que me encanta yo lo voy hacer en lino panam gracias y saludos de mexico city.
That for you Beautiful tutorial.
I made a small practice pattern and stitches were 1/16th to 1/8th long. look good. but wonder what is the official stitch length ?
Hi Jody-
If there is an official stitch length I’m not aware of it. The most important thing is to get them even.
I hope this helps and thanks so much for getting in touch!
Best-
Molly
lovely, thanks
Thank you! This is most helpful!!
Thank you
What would be the best way to go about using a sashiko pattern on a quilt? Would it be a bad idea to stitch through the batting and bottom layer as well or just the top layer?
Hi Barclay-
You can stitch through all three layers (top, batting, and backing)! It sounds like a beautiful project!
Thanks you!
Molly
Perfect! I’ve been wanting to try out hand quilting. Do you have any suggestions for making a pattern and transferring that will be large enough for a quilt? I’m a little stumped on how to get the lines so nice without a pre-printed pattern
Hey Barclay,
Thank you for the comment! If you are doing a simple design you draw it free hand right onto the quilt with a fabric marker. You can browse all of those options on our website here;
https://www.purlsoho.com/purl/products/16-sewing-patchwork-notions-tools?filters%5B%5D=892
I hope this helps and feel free to respond if you need anymore suggestions!
Happy Knitting!
Jake
I’ve used two layers, usually cotton, with the cotton batting between, it’s not too thick, and quilts easily with Sashiko stitching. It’s one of my favorite ways to make a lap quilt.
I am excited to try this, and glad to see you have all the materials in one place. If I do this kind of stitching on a quilt square, will it hold up to being washed a couple times a year? Thanks for a very clear and helpful tutorial.
Hey Alix,
Thank you for the comment! I actually have not tried quilting with the Sashiko squares before! My general rule for sewing patchwork projects is to pre-washing all fabrics before stitching on them. However with the Sashiko squares the printed design will wash off when wet. Therefore I would recommend doing all your stitching before you wash the squares. Then I would gently hand-wash the squares before sewing them together to create the quilt top and to ensure you don’t have any extra shrinkage. It also might be a good idea to try using the Sashiko thread on a piece of scrap fabric that is a similar weight to the fabric your ultimately using for the quilt to see how it will react!
I hope this helps and I’d love to hear how this turns out!
Good Luck!
Jake
Thanks for sharing this useful post. It is very helpful.
Should I be using a hoop to keep the fabric stable? I can wait to get started.
Hi Barbara,
Thank you for the comment! Traditionally this technique does not use a hoop however you are more than welcome to try it. It might actually be a little more difficult with a hoop since it is done with a running stitching!
I hope this helps and feel free to write back if you have anymore questions!
Happy Crafting!
Jake
This is such a beautiful simple embroidery method. I just keep asking myself why I have never tried it. No matter though, I am going to create a pattern of my own from some special books I have and create a project. Thank you for including this in (I can not remember which link I clicked on that led me here….hee, heee, heeee..) your post tutorial link. I am totally committed to your site and this wonderful new (to me) technique! Thank you for sharing and inspiring me to engage in learning more embroidery techniques and projects! Have a wonderful day!
Does the sashiko stitch only look good on solid fabrics? I made a patchwork quilt out of off white solid fabrics and printed fabrics — will sashiko work for that too?
Hello Linn,
Sashiko, while being decorative and beautiful, is also intended as a hand-quilting technique. The stitches will be most visible on a solid background, but still absolutely functional and applicable for printed fabrics.
Happy stitching! -Alyson
what is the black sashiko palm thimble made of
Hi Diane-
It’s made of leather and you can find it here: https://www.purlsoho.com/purl/products/item/3745
Thanks so much for getting in touch and please let us know if you have any more questions!
Molly
I have read the following instructions for sashiko stitching on a regular machine:
12 wt. cotton thread on top
medium weight such as 40wt in bobbin
use light color bobbin for light fabric or dark color bobbin for dark fabric
116 topstitching needle for machine sewing
Hello! I just ordered some of your supplies for a Sashiko sampler. As I look over the tutorial you say to do the diagonal lines first. When you finish one line do you carry the thread across the back or do you start a new length of thread? Does that question make sense? I want to make sure I do it right so I don’t run out of thread but also have it look nice. Thank you!
Hello Olivia!
If you are planning to frame your sampler or hide the back of the work in some way, I would say don’t worry about carrying the thread across the back of the work. If you are making large floats of thread on the back of the work, I would make sure to get an extra skein of thread. If you want to make use of what you’ve already purchased, I would be more frugal with the floats in the back of the work and only use that technique for lines that are worked closely on the pattern.
I hope this helps and happy stitching! -Alyson
Can these gorgeous patterns be used for small placemats? Perhaps using felt as the wadding? They are truly beautiful!!
Hello, Jane!
Thank you for writing in! These patterns are all 13″x13″, so they could definatly be used as small placemats. You can use felt as the wadding, but only if you are going to be handwashing and drying the placemats. If you are going to be machine washing them, then I recommend using a thin cotton batting because the cotton batting will shrink in a similar fashion to the cotton fabric. Wool felt tends to shrink a bit more than cotton when aggitated so felt wadding might distort your beautiful stitches a little. I hope this helps! If you have further questions, please let us know!
Happy crafting!
Best wishes,
Kumeko
New technique to try out Does it also work on Tricot?
I was thinking on the front of a T-shirt
Tku vm for sharing
Hello, Lelia!
Thank you for writing in! Yes, you can use sashiko stitching on tricot fabric! Please let us know if you have further questions!
Best,
Kumeko
I was given a kit consisting of a piece of fabric, 3 long needles, some thick thread and a thimble like you displayed from a friend. My only problem was no pattern could you tell me how to proceed to get a pattern on the royal blue fabric
Hello Dawn,
Thanks for writing in! I do believe that you have the tools to do a Sashiko pattern and you can find Sashiko patterns on cotton here. If you’d like to do a Sashiko pattern on your royal blue fabric, you can use a chalk pencil to draw a pattern directly on to your fabric. However, it is just easier to buy the pre-marked fabric. Good luck on your project!
Best,
Adam
Thank you very helpful
Mil gracias por este tutorial, hace unos días por pinteres supe de esta técnica y con su guia voy a iniciar mi primer proyecto
Hi! I bought a ‘one stitch’ (35cm x 35cm) dish cloth. I’m very new at this. How do I finish off and make good at the end of the row so my work doesn’t look ‘daggy’ pls?
Many thanks
Glenys
Hi Glenys,
Thanks for writing in! The only way you can end a row is by knotting the thread close to the wrong side of the fabric. You’ll want to do this on an edge and then finish that edge with a rolled hem to conceal the knot. Let me know how it goes!
-Adam
I am a designer and online ship featuring southwest-inspired sashiko. May I include your JANUARY 19, 2008 sashiko blog on my site?
http://www.sashikosouthwest.com
Hello, Joyce!
Thank you so much for thinking of us! You may include our post on your site, we just ask that you clearly state that the post is from our site and that you give the direct link to the blog post. Again, thank you!
Best,
Kumeko
Thanks you so much for all the work you have shared with us, I really appreciate all your efforts I have followed you becuase I think that your work is the greatest I have ever seen before.
I was wondering if you had either iron-on Sashiko patterns or Sashiko patterns available printed on Robert Kaufman’s Essex Fabric? I love the color of this fabric and prefer it to the brighter white fabrics I found in your shop. I also had trouble finding the Cobalt Blue Indigo Sashiko Thread (#10). Do you still have this color available.
Thank you!!
-Kyla
Hi Klya,
Thank you for writing in! We do not carry iron-on Sashiko patterns and we only carry the pre-printed patterns on white and navy cotton fabric. You could copy a Sashiko pattern onto other fabric using an iron on transfer pen. IN that way, you could use a brighter fabric!
We do currently have the Cobalt Blue Indigo Sashiko thread in stock. It can be found here: https://www.purlsoho.com/sashiko-thread-20-meters.html
Best,
Cassy
When you sashiko what batting if any to you use or prefer?
Hi Charleah,
Thanks for writing in! For our Reversible Sashiko Placemats, we used a mid loft batting. I would suggest using a mid loft or lighter as they will be easier to hand sew through!
I hope that this helps!
Cassy
What is the best way to remove the inked pattern after completing all stitching? The white inked pattern is flaky and it’s on Indigo cotton with a batting backing to give dimension.
Hi Deborah,
Thanks for writing in! Once you are finished stitching your Sashiko sampler, washing the completed piece per the directions included with the sampler will remove the pre-printed design!
I hope that this helps!
Cassy
Thank you for a great explanation. I was looking online for a similar idea and really appreciate it
Do you use a double or single thread stitch. I have seen tutorials for single as the stitches are easily undone if you make a mistake. What is the correct way?
Thank you so very much
Lynda
Hi Lynda,
Thanks for writing in! Sashiko is traditionally done with a single thread. As Sashiko thread is a nice round thread, the single strand creates the lovely patterns and textural feel that you see here!
Best,
Cassy
Thank you! Your little tutorial answered all of my questions. What a practical and easy tutorial it is.