


Sideways Garter Vest
From now until spring, if you happened to stumble into Purl Soho’s backroom during a Purl Bee meeting, you’d most likely find us all cloaked in various Bee projects, fending off the draft from our backroom’s elegant but quite drafty fenestration.

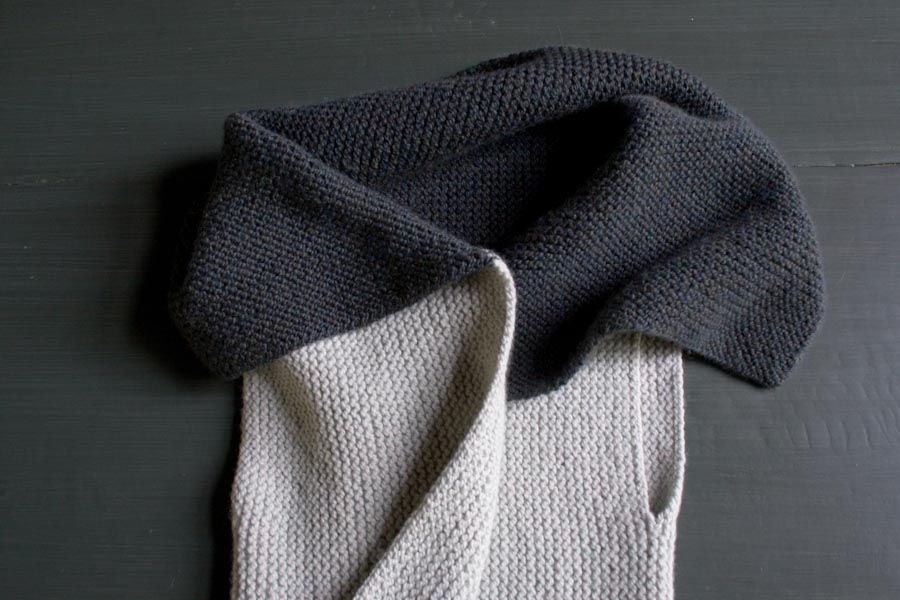
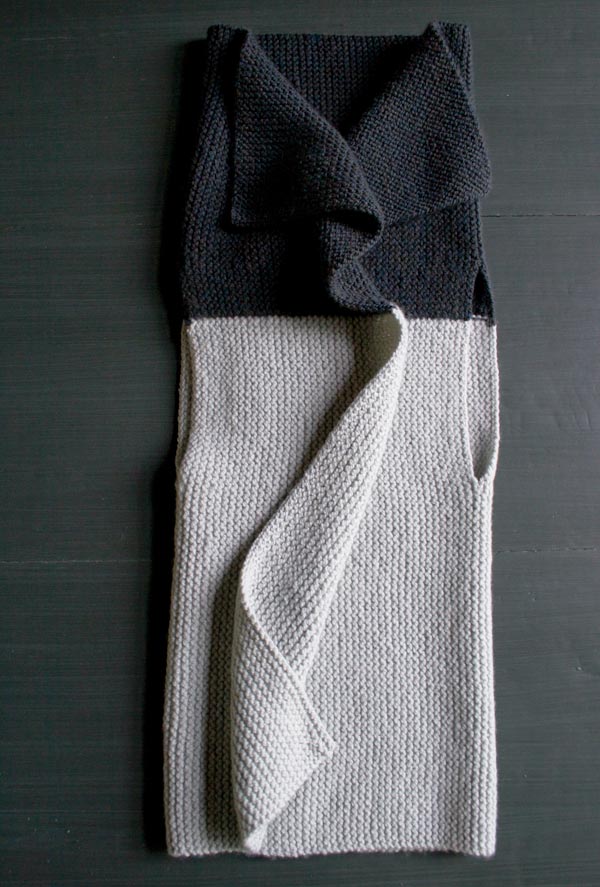
My co-workers usually rush for the sweaters and shawls, but I always beeline to a Super Easy Blanket. I adore its comfort, how its garter stitch is so sumptuous and cushy and how its ridges embrace me. Then one day I thought, Why not just pop some holes in that blanket and let the fabric speak for itself? And the Sideways Garter Vest was born.
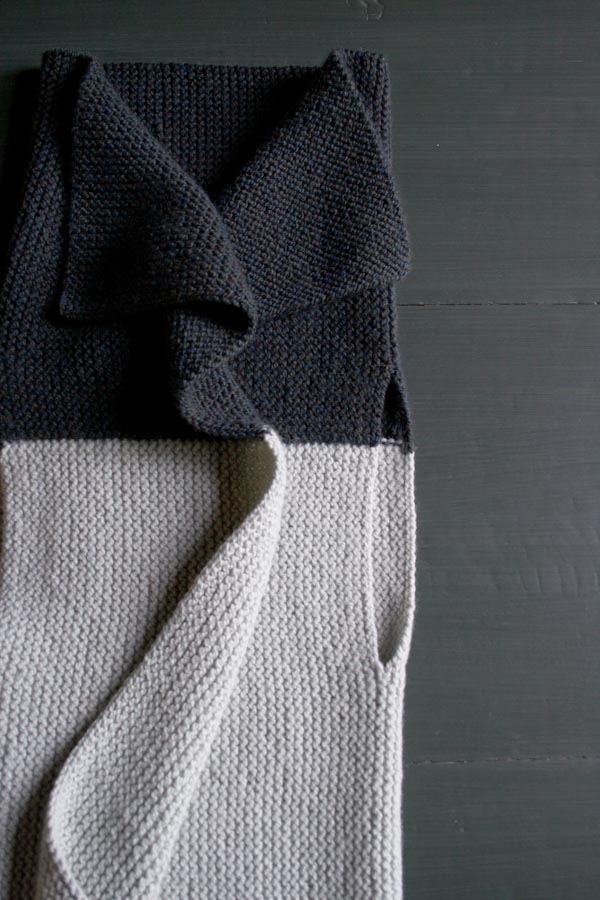
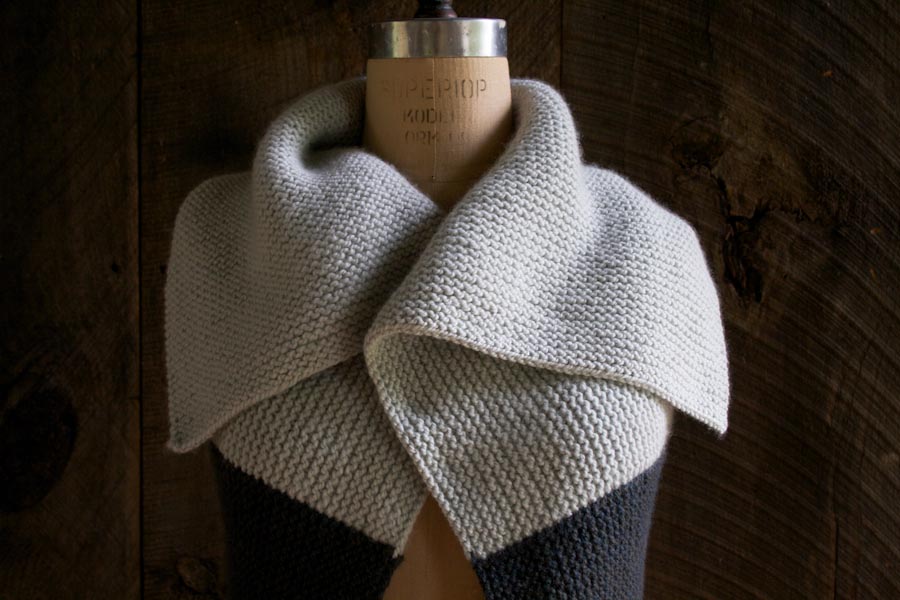
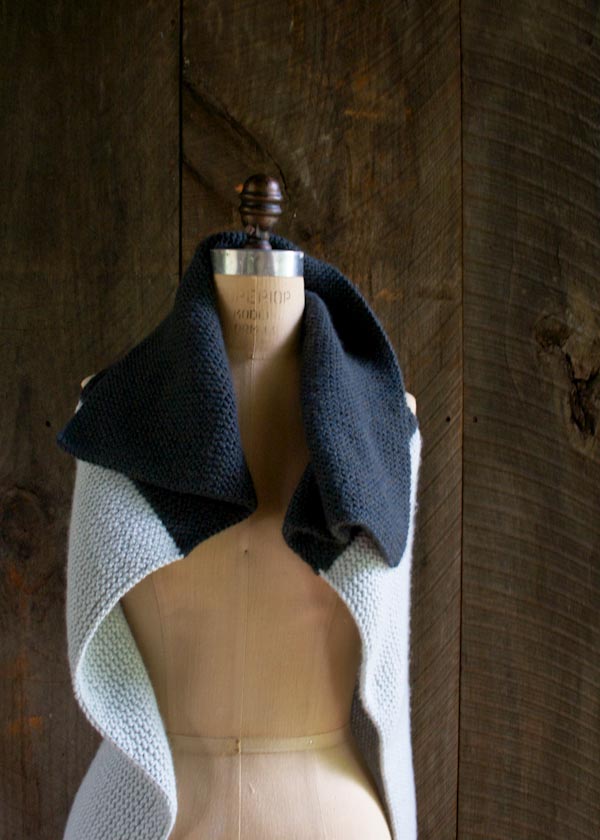
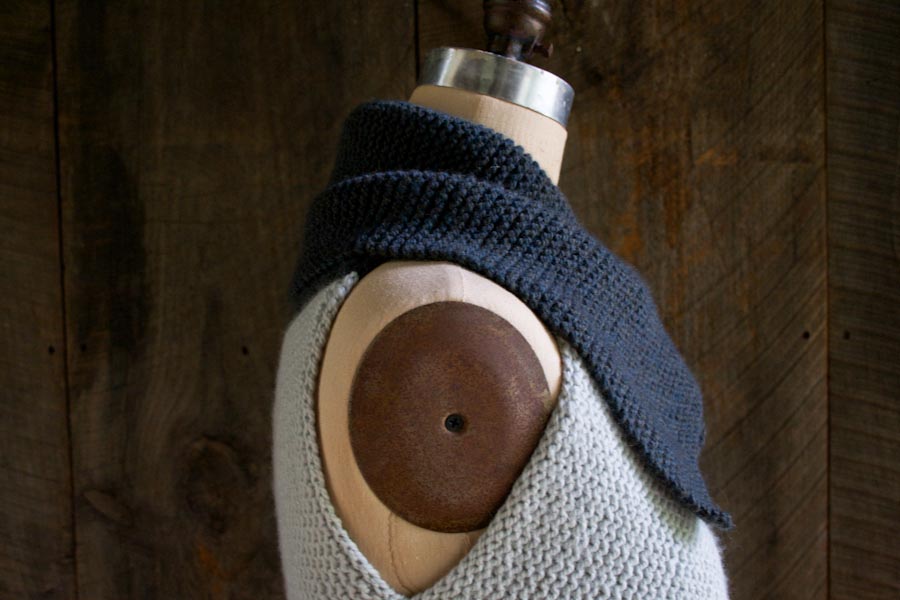
A rectangle of garter stitch with two well-placed slits for armholes, nothing could be simpler to make… or wear. “Sideways” because I knit it that way, the Sideways Garter Vest is designed for effortless versatility. Wear it longer in the torso and shorter at the collar, or for those especially windy meetings, flip it upside down for a more generous collar and cropped body. The Sideways Garter Vest, knit in a combination of Purl Soho’s Worsted Twist and Worsted Twist Heather, is definitely my new go-to for Purl Bee meetings and beyond! –Laura
PS: For extra security and warmth, pin the collar shut with one of Fog Linen’s gorgeous Brass Cloth Pins!
Designed by Purl Soho designer, Laura Ferguson.
Share your progress and connect with the community by tagging your pics with #PurlSoho, #PurlSohoBusyHands, #PurlSohoSidewaysGarterVest, and #PurlSohoWorstedTwist. We can’t wait to see what you make!
Materials
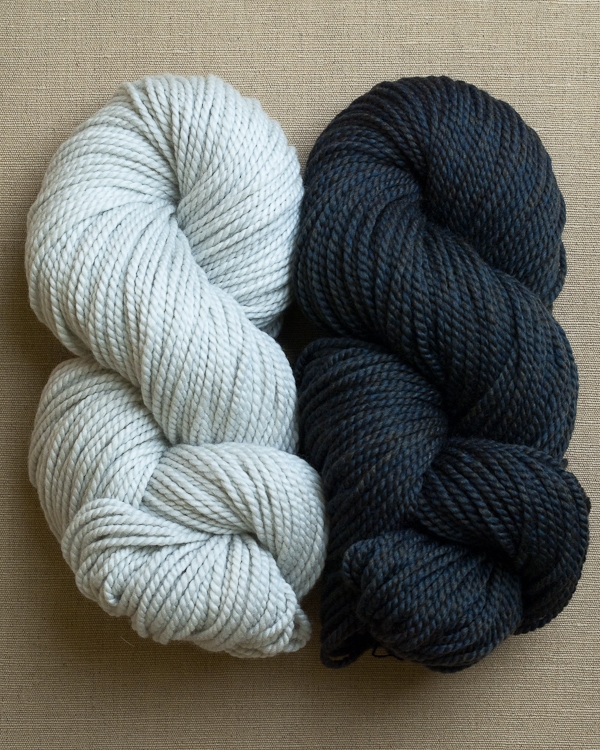
- Yarn A: 3 (4, 4) skeins of Purl Soho’s Worsted Twist, 100% merino. Each skein is 164 yards/ 100 grams; approximately 492-656 yards required. I used the color Artemisia Green. (NOTE: We no longer offer Worsted Twist, but choose from one of our other worsted/aran weight yarns.)
- Yarn B: 2 (3, 3) skeins of Worsted Twist, 100% merino; approximately 328-492 yards required. I used the color Stillwater Blue.
- A US 8 (5 mm), 32-inch circular needle
- A spare US 8, circular or straight needle
- A few yards of scrap yarn
Gauge
16 stitches and 32 rows = 4 inches in garter stitch
Sizes
To fit shoulder widths measuring 14-15 (16-16½, 17-17½) inches
- Finished Dimensions: 30 (35, 37½) inches across x 30 inches from top to bottom (including fold-over collar)
- Finished Height of Armhole: 8 inches
- Finished Width across Shoulders: 12 (14, 15) inches
- Finished Width of Fronts: 9 (10½, 11¼) inches
FIT: The length measurements are the same for all three sizes, and you have a choice of how to wear the vest: either 12 inches from hem to underarm with a 10 inch collar; or upside down with 10 inches from hem to underarm and a 12-inch collar.
Notes
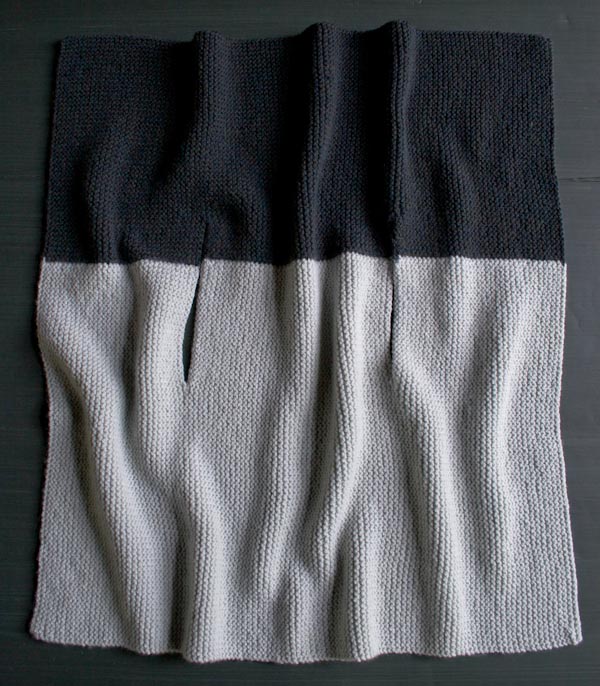
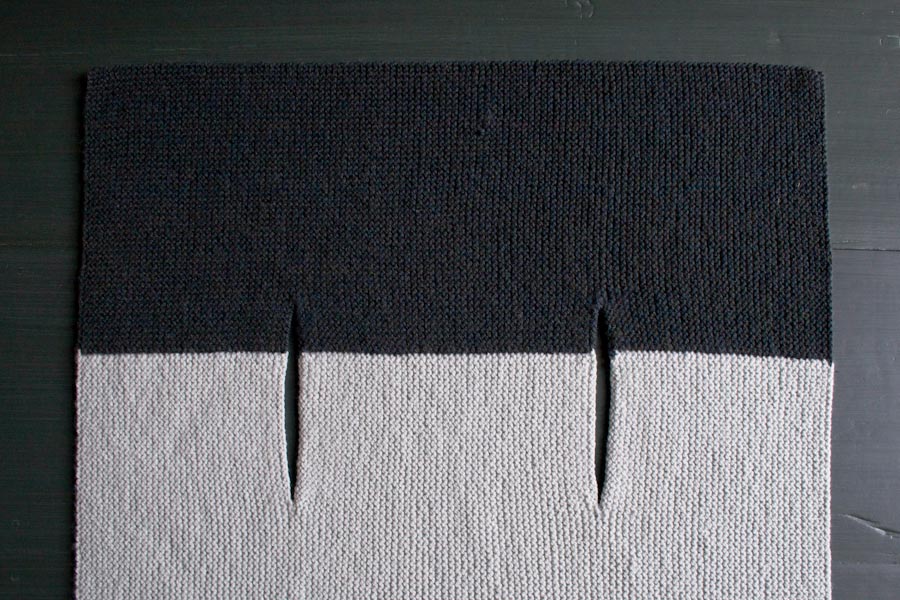
This piece is knit ‘sideways’ from one vertical edge to the other, rather than from top to bottom or bottom to top.
The colorwork is done with a technique called Intarsia in Garter Stitch. Each row will involve two balls of yarn, which is much easier than it may sound! To work intarsia in garter stitch on the right side…
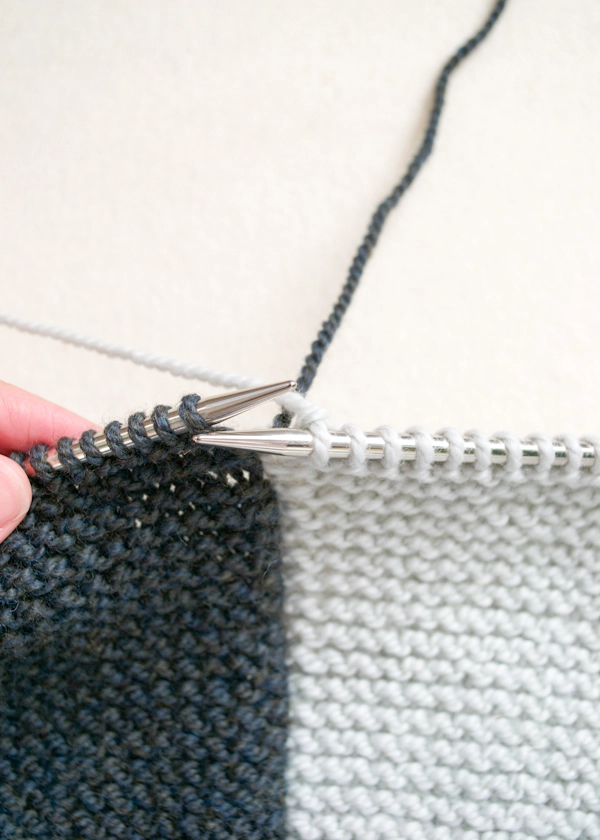
Cross Yarn A over Yarn B and knit the next stitch with Yarn B.
To work intarsia in garter stitch on the wrong side…
Bring Yarn B to the front purl position, and cross Yarn B over Yarn A.
Bring Yarn A to the back knit position and knit the next stitch with Yarn A.
Pattern
Begin with Front Left
With Yarn B, cast 48 stitches onto the longer needle. We used a basic Long Tail Cast On. Put Yarn B to the side; do not cut it.
With Yarn A, cast 72 stitches onto that same circular needle. [120 total stitches]
NOTE: When you switch colors in the following rows, be sure to use the intarsia techniques described in the Notes, above.
Row 1 (right side): With Yarn A, knit 72 stitches; with Yarn B, knit to end of row.
Row 2: Slip one knitwise; with Yarn B, knit 47 stitches; with Yarn A, knit to end of row.
Row 3: Slip one knitwise; with Yarn A, knit 71 stitches; with Yarn B, knit to end of row.
Repeat Rows 2 and 3 until piece measures 9 (10 ½, 11 ¼) inches from cast on edge, ending after working a right side row.
Cut Yarn A.
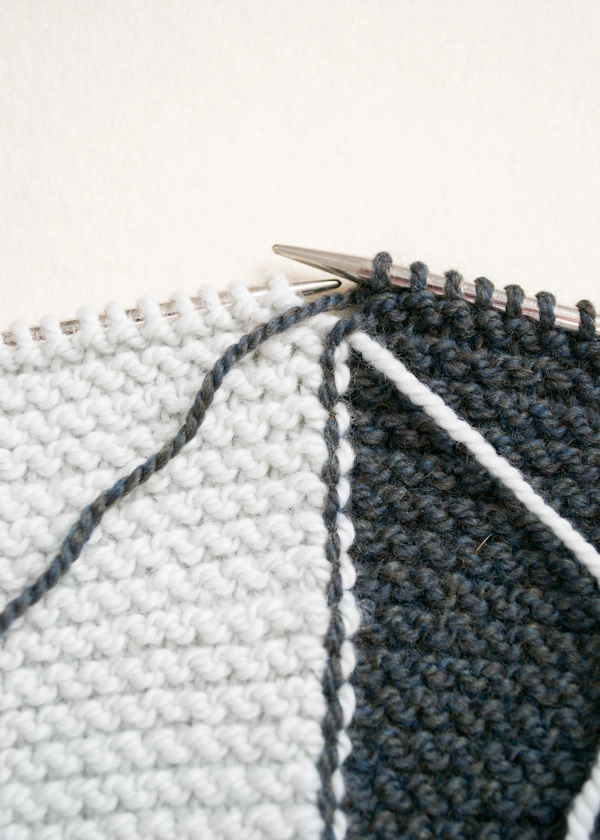
Make Left Armhole
Next Row (wrong side): Slip one knitwise; with Yarn B, knit 39 stitches, cut Yarn B; with scrap yarn, k32, cut scrap yarn; join Yarn A and knit to end of row.
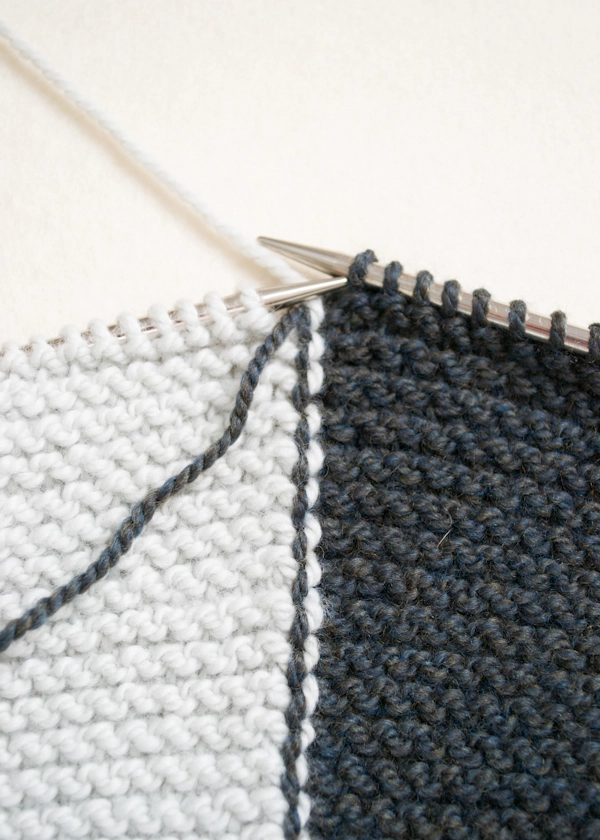
Work Back Vest
Next Row (right side): Slip one knitwise; with Yarn A, knit 71; join yarn B and knit to end of row.
Repeat Rows 2 and 3 from FRONT LEFT section until piece measures 12 (14, 15) inches from scrap yarn, ending after working a right side row.
Cut Yarn A.
Make Right Armhole
Next Row (wrong side): Slip one knitwise; with Yarn B, knit 39 stitches, cut Yarn B; with scrap yarn, k32, cut scrap yarn; with Yarn A, knit to end of row.
Work Front Right
Next Row (right side): Slip one knitwise; with Yarn A, knit 71; join Yarn B and knit to end of row.
Repeat Rows 2 and 3 from FRONT LEFT until piece measures 9 (10 ½, 11 ¼) inches from scrap yarn for Right Armhole, ending after working a right side row.
Bind Off (wrong side): With Yarn B, loosely bind off 47 stitches knitwise (one Yarn B stitch will remain on the left needle), cut Yarn B; with Yarn A, bind off remaining stitches knitwise, cut Yarn A.
Armholes
Weave in Ends
Note: Work the following instructions for each Armhole.
At each set of scrap yarn stitches, where the colors transition, there is one Yarn A end and one Yarn B. To weave in these ends, first orient the garment with the wrong side facing you and in same direction as it was knit (with the cast on edge nearest you).
To weave in the Yarn A tail…
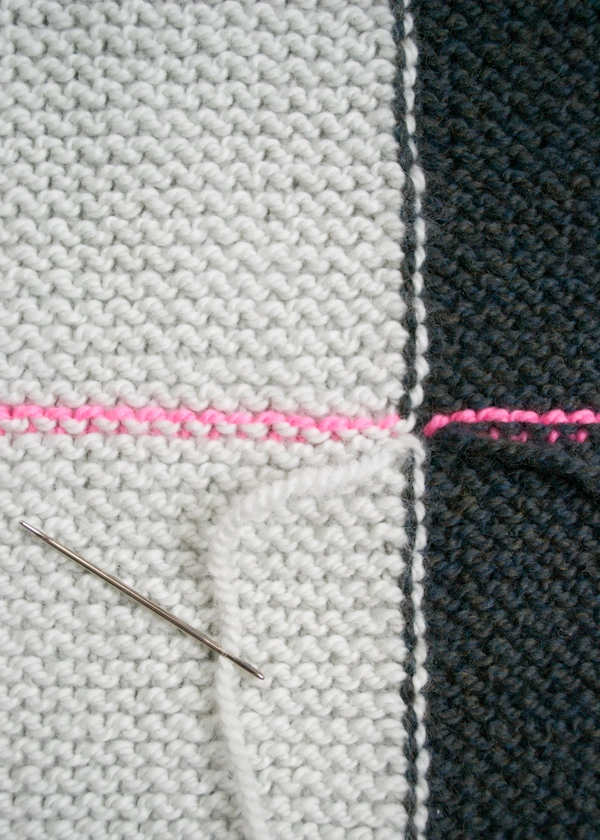
Thread the tail onto a tapestry needle. Gently tug the threaded tapestry needle to close any gap in the fabric.
Then insert the needle (in a downward motion) through the purl bump of the stitch just below the scrap yarn and just to the left of the color transition, as well as through the next purl stitch below. From there, weave in the tail to secure it.
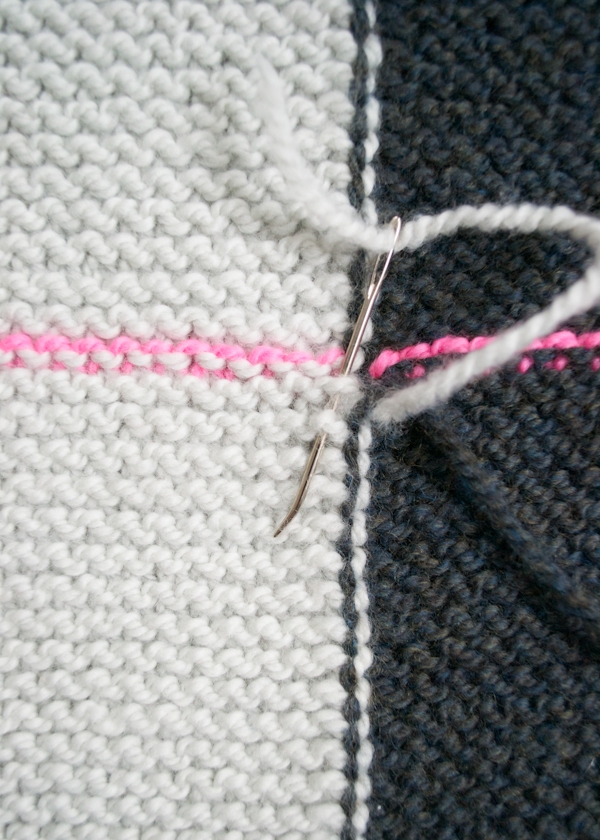
To weave in the Yarn B tail…
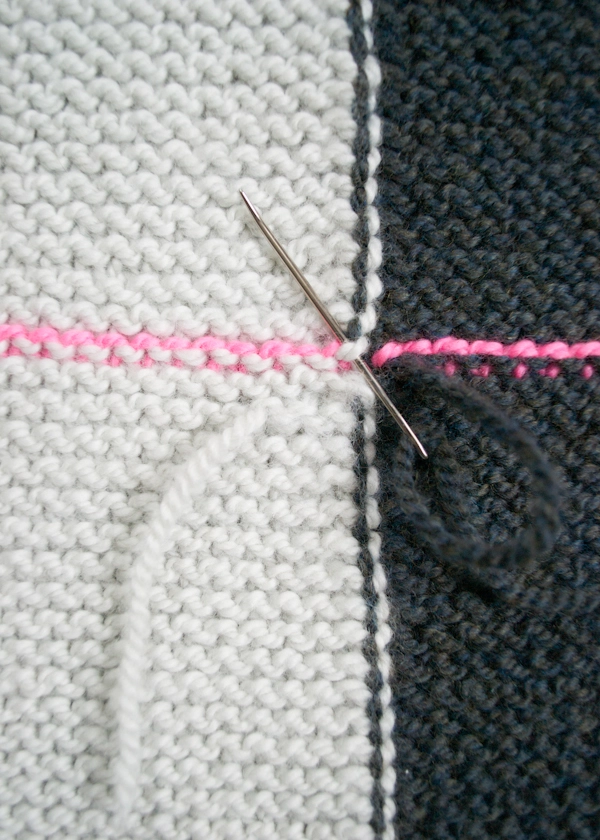
Thread the tail onto a tapestry needle. Gently tug the threaded tapestry needle to close any gap in the fabric. Then insert the needle (in an upward motion) under the nearest vertical strand of Yarn A.
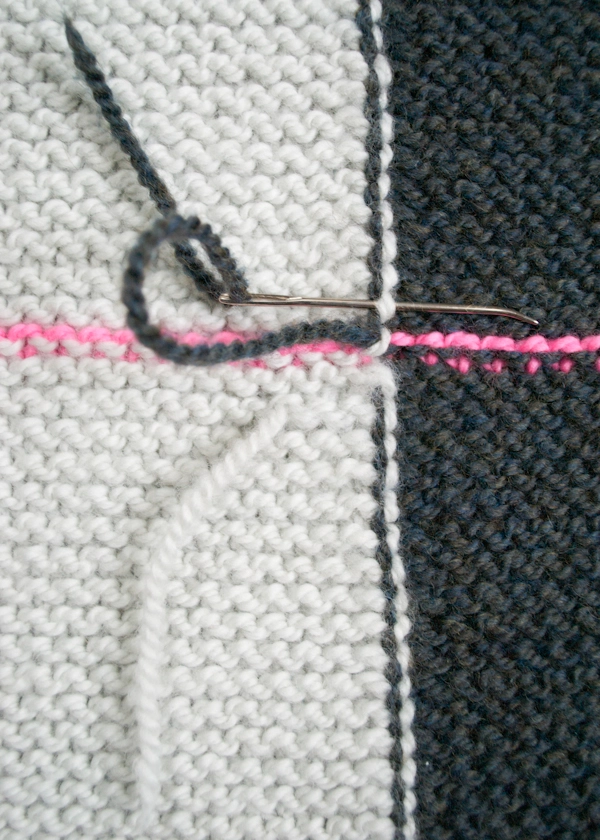
Now insert the needle (in a leftward motion) under the vertical strand of Yarn A one row up. From there, weave in the tail to secure it.
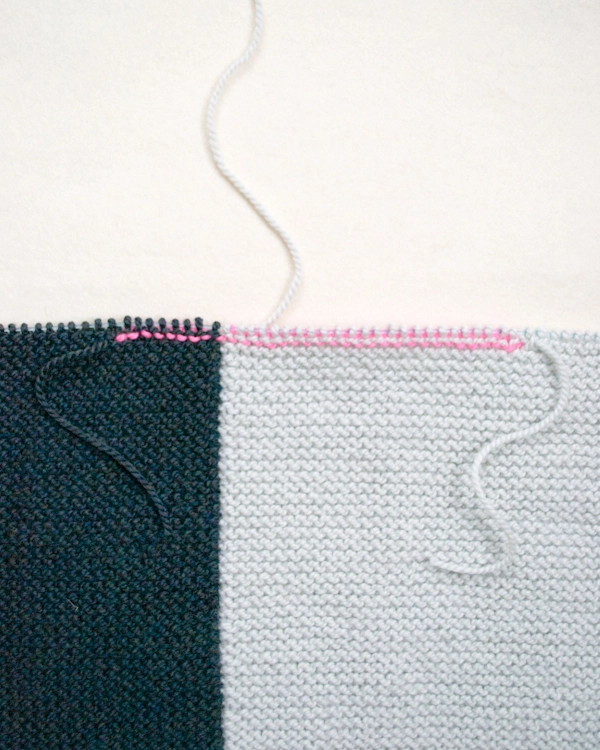
Pick Up + Bind Off
Note: Work the following instructions for each Armhole.
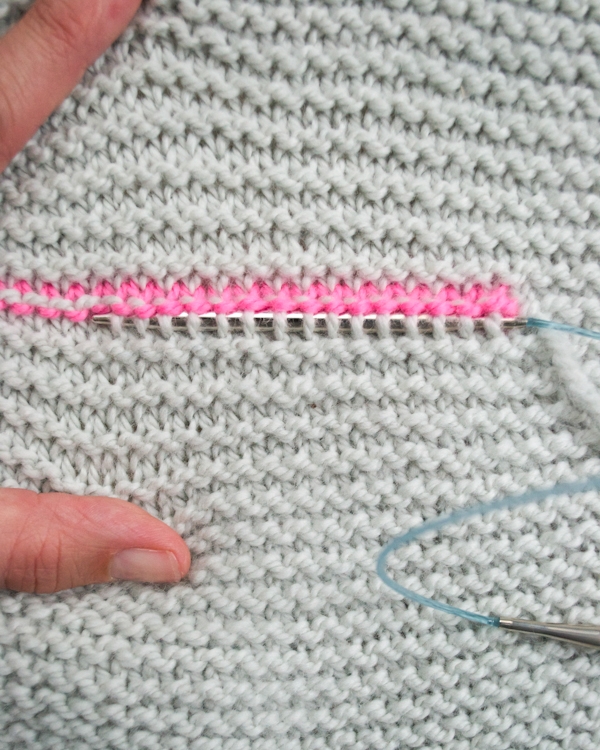
With the right side facing you, slip the 32 stitches just below the scrap yarn onto the shorter circular needle; continuing with the same end of the needle, slip the 32 stitches just above the scrap yarn onto the needle. [64 total stitches]

Use the tip of a tapestry needle to pull out the scrap yarn.
Bind off (right side): Join Yarn A and bind off 24 stitches purlwise (one Yarn A stitch will remain the right needle), cut Yarn A; join Yarn B and bind off 16 stitches purlwise (one Yarn B stitch will remain on the right needle), cut Yarn B; join Yarn A and bind off remaining stitches purlwise.
Use the ends at the top and bottom of the armhole to close up any gaps.
Weave + Block
Weave in the remaining ends and block as desired.


I am so in love with your Sideways Garter Vest (but I do not Knit! I have tried many times, it is thou I have 2 left hands and I just can not grasp the technique.)
I LOVE your pattern and the tutorials are great! Thanks
I love this vest, however I would prefer to make it with sleeves. Do you have any tips on how to add them?
Hi Mijke.
As for the sleeves… YES! you can definitely very easily pick up from armholes and knit in the round to make sleeves. If you are making this with sleeves though, I would size up quite a bit so that the piece becomes a drop shoulder garment. As it’s size now, this vest is based on shoulder widths. If you make the size that aligns with your shoulder width and then pick up and add sleeves, there may not be enough fabric to accommodate for movement in the arms… it’ll be awkward and too tight. But, if you size up and add width to the back… adding sleeves would be no problem at all. You can follow the pattern as written and then pick up the live stitches left over from making the armholes!
Let me know if you have any questions! Or maybe even comment to Pastille who has commented here and has actually done this! She may have more tips.
Thanks for writing in.
Laura
This is a really cute and easy pattern – I’ll have to try it out!
Also, just wanted to point out that I think there is a repeated/missing picture under weaving in the yarn B tail…
Shelly!
Thank you so much.
I cannot believe I missed this and that no one else has pointed it out to me! What eagle eyes you have.
Thanks for letting me know. I will remedy this immediately.
Laura
I just found your site through a post by my local knit shop on Facebook. I came because I love the style and ease of this vest pattern, and because I have a knitting buddy that loves to just do the garter stitch constantly. I’ve read through this pattern, and I have to tell you how pleasant it is to never be too old to learn new tricks! I love the way this is made and found the pattern to be fairly simple to follow. This will definitely be my next larger project! Thank you for posting this tutorial which is very complete! I think I’m in love with your site already!! I’ve subscribed!!
Would love to attempt this!
I’m not a great pattern follower though … Don’t suppose you have a video of this to follow do you?
Hi SJ-
We don’t have a video for this pattern but we are happy to help with any specific questions you have as you go!
Thanks for getting in touch!
Molly
I love this, but usually avoid garter stitch because it stretches so badly and loses its shape. It occurred to me that the vertical orientation of the rows might mean this vest wouldn’t stretch as much.
Can you report how well the vest retains its shapes after a few wearings?
Candace.
I’m so glad you wrote in. I love that you asked this question.
The vest holds up very well, even after lots of wearings. In fact, working the garter stitch sideways, I think it adds to the structure and design of the sweater. That stretching that garter stitch fabric has, I tried to use it to my advantage. With this piece, the garter ridges gently give and subtly stretch and contract where your body may need it too (along the hips or bust).
Hope this information helps.
Please let me know if you have any questions.
Laura
Love, love , love this vest pattern….
am trying to download the pattern, but 28 pages?
Do you have a “friendly download” site?
Perhaps you do, but I have overlooked it.
thank you
Hi Dana.
We do have a print feature that allows you to eliminate any text or photos you’d like.
If you’re on a desktop version of the site, you will find a “print” icon in the right column just below the date and tags. If you’re on a mobile version of the site, you will find a “print” icon below the pattern and above the comments.
Follow the easy on-screen instructions to delete whichever parts of the pattern you don’t want to print or save. For example, you may decide to shorten the pattern by omitting certain images or the list of materials.
Hope this helps!
Laura
This looks like a great vest! Does it really have such a large gap over the stomach area or is that just how it is draped on the mannequin?
If so, any ideas on how to prevent the gap? Short rows?
Hey Signe.
Thanks for writing in.
This is an closure-less cardigan. It is almost more of a wrap with two armholes. It does drape open in the front. Although, a pin somewhere around chest-plate height would nicely close it partially.
Have you seen our other garments? https://www.purlsoho.com/create/category/knit/projects-knit/garments-projects-knit/
Perhaps you’d prefer the Cardigan Vest: https://www.purlsoho.com/create/2014/03/20/lauras-loop-purl-sohos-cardigan-vest/
Thanks again for writing in.
Laura
I’m inspired to make this and have purchased my yarn, but I am a crocheter only. I’ve studied the pattern and photos and I’ll be using slip stitch crochet to mimic the garter stitch. I’d still like to do this “sideways.”
My question – should I crochet one piece each of color A and B and then use a seaming technique (mattress stitch) to connect? Or is there a crochet technique that mimics the knit pattern of a row of stitches with x stitches in color A and y stitches of color B? I think I’m interpreting the written pattern correctly, but I’m not a knitter — yet. Thanks.
Hi CML.
I can’t wait to see what this project looks like crocheted!
I sadly am of little help to you. Other than a bit of edging, I don’t really crochet. I am going to reach out and see if someone else can help you with this though.
Stay Tuned!
Laura
If I want to do this in all one color…just add the two stitches together?
Hi Suzanne.
Yes! Simply add the two stitch counts together. So, for casting on and working the armholes and binding off… Simply treat color A and color B as one color, so for instance, at the beginning, you’ll cast on 48 and then you’ll cast on 72, all with the same yarn. At then underarms, you’ll slip one knitwise, knit 39 stitches, cut your working yarn; with scrap yarn, k32, cut scrap yarn; join working yarn and knit to end of row.
Thanks for writing in.
Let me know if you have any questions along the way.
Laura
Hi, I would like to know if I can just BF the arm holes instead of using the scrap yarn method, thank you much I love this easy pattern!
Hi Chiu Mei.
Did you mean BO (bond off)? If so, the answer is yes! You can definitely do the armholes that way instead.
Thanks for writing in. Hope you enjoy it!
Laura
Getting ready to try this one and I do not follow patterns well. For the armholes, can I just treat them like buttonholes and bind-off at the location of them, instead of using the scrap yarn and picking it up just to bind-off later?
Thanks.
Hi Sara.
You sure can! That’s definitely another method that will work.
Thanks for writing in.
Laura
Hi, love this pattern. Just one question. Do I have to use circular needles!
Hi Altha.
If you can fit all the stitches onto a long straight needle, I think you can make it work on straights. It’s just a really wide fabric, that’s why I suggested circulars. Also, picking up the armhole stitches with a straight may be a bit tricky, but I bet you could work around it. Let us know if you have any questions. Thanks for writing in. -Laura
Is it me or there is a mistake in yarn A, yarn B. Yarn A corresponds to the dark blue wool but then according to the pattern is the color with higher number of stiches. Should it not be opposite?
Hi Maria.
Thanks for writing in.
Some of the photos may be misleading, but this pattern requires more of Yarn A as it makes up a greater portion of the vest. It also has a greater cast on number. If you take a look at some of the images of the vest laid on the table, you may notice that the lighter color makes up more than 1/2 of the piece.
Please let us know if you have any questions! Thanks. -Laura
I love this pattern too but I am stuck at the point of 9 inches where:
ake Left Armhole
Next Row (wrong side): Slip one knitwise; with Yarn B, knit 39 stitches, cut Yarn B; with scrap yarn, k32, cut scrap yarn; join Yarn A and knit to end of row.
as it states to reduce one st at each row I no longer have 39 B stitches: sucks being a beginner… regards julie
– S
Hi Julie.
I’m not entirely sure I understand your question but I’m going to do my best to describe the section of the pattern…
At the end of the previous section you’ve cut Yarn A.
And now it’s time to make the Left Armhole.
You slip one knitwise, then with Yarn B, you’ll knit 39 stitches, then with scrap yarn you’ll knit 32 stitches, then you can cut your scrap yarn and join Yarn A to knit to the end of the row.
As for your comment about reducing one at each row… it does not say to reduce, it just says to slip a stitch. This is just an optional way to work the edge stitches, you can definitely knit that stitch as well.
I hope this helps.
Please let us know if you have any questions!
Laura
I am also confused about the sleeves. When the pattern says “knit with yarn B”…I’m stuck. My working yarn B tests in the middle of the garmet. Am I using a new strand of yarn B? Or have I set up he garmet wrong? Picture of this specific step would be helpful. It’s a gorgeous piece that enhances garter stitch.
Hi Meridith.
Thanks for writing in. I’d love to help get you back on track!
Where exactly are you in the pattern? Are you making the first armhole? When you make the armholes are you asked to cut and then rejoin Yarn B. You’ll see that in “Next Row” under “Make Left Armhole”… after you k39 in Yarn B, you are instructed to cut Yarn B and then continue in Yarn A. Then in the following row under “Work Back Vest”… after you k71 in Yarn A, you are instructed to rejoin Yarn B.
Other than when you make the two armholes though, there is no reason to cut and rejoin Yarn B. I’m wondering if perhaps you’ve cast on differently than I did. The pattern asks you to cast on 48 with Yarn B, then continue casting on with Yarn A, 72 more stitches. Then turn your work, and knit those 72 Yarn A stitches with Yarn A, do the intartia trick described in the NOTES section and then knit the 48 Yarn B stitches with Yarn B.
I do hope I have answered your question. If you’re at a different point in the pattern… please let me know!
Laura
Hello,
I’m new to knitting and this question may sound absolutely dumb, but how can I tell side is the right side? I don’t see the typical garter stitch that gives you “purls” on one side and “v’s” on the other side (i usually call wrong side the one with the purls and the right side the one with the v’s).
Instructions say to knit all the way on both sides :/
Thank you
Hi Mischa.
It sounds like maybe you’re describing stockinette stitch, where the right side it knit and the wrong side is purled. Grater stitch is a bit different. You knit both sides which creates a reversible fabric with ridges.
Although garter stitch is reversible, for this pattern, you have to assign one side as the right side and one side as the wrong side because certain steps are done on the right side and certain steps are done on the wrong side.
I hope this helps.
Please write us back with any questions you have!
Laura
Hello,
I do like the work. Could you please advise what type of cast on you have used? Is it a loop cast on method?
Thanks
Irina
Hi Irina.
Thanks for writing in.
I used a long-tail cast on.
Please let us know if you have any additional questions!
Laura
Thank you very much.
I love the sideways garter vest n hope to have the pattern
Such a cool vest – does the body hang straight or curve out like an A-frame?
Hi Robin.
Thanks for writing in!
The way the vest hangs depends on the body type. On a curvier figure, it will hang off the body more. On a more of a bean-pole gal, the piece will fall closer to the body.
Also, the piece can be work right side up or up side down. If you have it oriented with a longer collar and shorter body, it will be closer to you, but if you flip it around, wearing it with a longer body, the piece will curve out more like an A-frame.
I do hope this helps. Please write us back with any questions you may have!
Thanks.
Laura
I know a couple of people have asked about this but this would be my first time doing armholes or buttonhole techniques. I really want to try to use the BO method for the armholes but would i be BO in the middle where you would knit 32 sts with the scrap yarn and knitting the beginning and end? I’m just a bit confused.
Thanks! I’m super excited about this project!
Hi Kim.
Yes! You’re absolutely right… Bind off over those same stitches where I use the scrap yarn to knit.
Thanks for writing in.
Best,
Laura
I just left a comment about the number of pages I would need to print if I want a hard copy of this pattern which I do!
I saw another comment about a print-friendly version and read your reply which instructs me to click on text and/or photos I want to delete.
Well, the photos are fantastic and/or necessary so I don’t want to delete them but I would like to make them smaller. An entire page for a photo is overkill. Is there a way to do that? Does it have to be all or nothing?
I tried to copy and past the pattern into Word but none of the photos came across.
Thank you for any help you can give me.
Hi Kate.
Thank you for writing in.
Unfortunately our print feature does not have the capability to edit the size of photos. Usually if people want to resize the photos, we suggest they copy and paste the pattern into a Word document and editing it from there. I’m sorry to hear the photos didn’t come through though when you tried this. I have not encountered that issue before.
Maybe another commenter has some suggestions for you. I’m afraid this these are all the tricks I know.
Our apologies for any frustration this has caused. I do hope you enjoy the pattern!
Laura
Hi, love the vest. I have just started it. Just a query…at the beginning as I am repeating row 2 and 3 until it measures around 10 inches before the armhole, do I slip a stitch on each row or just knit? thanks
Hi AM,
I slipped one knitwise at the beginning of each row. I like the resulting edge, but it’s totally optional. You can knit that first stitch instead if you prefer!
Thanks for writing in. Let us know if you have any quesitons! -Laura
I love this pattern and can’t wait to start on it however i’m confused on the armhole? Cutting the yarn and using a scrap piece I really don’t understand what or how to do that? I knit pretty much easy projects….so this has me stumped??
Hello! Thanks for writing in! This is a tricky bit!
This is a technique to essentially put the stitches on hold without leave them on a stitch holder. If you prefer, you may bind off this length of stitches allotted for the armhole and then re-cast them on once you get to that spot in the next row.
If you would like to try doing the technique that we recommend in the pattern, you will need to just knit these stitches with a bit of contrast colored yarn and then just let the tails hang loose. Carefully follow the instructions when weaving in the ends of the yarn that is actually making up the body of the vest. Once you pick out the contrast colored yarn, you will be left with the stitches that surround the armhole and can proceed in giving them a nice finished edge.
Any chance you’re in the NYC area? Feel free to stop by our shop and get some more tips! Best of luck! -Alyson
I want to thank your for your generosity and compliment you on your infinite creativity!
Barbara!
Thank You!
What an amazing and encouraging comment to receive.
Laura
Hello, I have written in several times about this pattern and have really appreciated your helpful answers… I knit this lovely vest with sleeves and it did turn out quite nicely… however I did have one technical annoyance and since I plan on knitting another one I was hoping to get to the bottom of it! I used the same technique as in your instructions for the arm holes but instead of binding off I picked up the live stitches and knit the sleeves in the round. Unfortunately I have a little hole on either end (where I move from one row to the other in the round). Do you have any idea why this would have happened and what I could do next time to avoid it? Thank you so much in advance 🙂
Hi Pastille!
I remember our correspondence! I’m so glad that you added the sleeves and it worked out nicely.
About those holes though… Did you work the sleeves in stockinette stitch (knitting each round) or in garter stitch (knitting one round then purling the next). The reason I ask is because sometimes when you work garters stitch in the round, if it’s with medium or thick yarn, the join (where the end of the round is) can create a jog and sometimes a small gap. Is this what you’re talking about? Some folks will slip the last stitch of the round purlwise, every other round to minimize the hole. It will of course create a different little mini-pattern, but if it’s at the underside of the arm, it’s pretty unnoticeable.
I guess my other advice would be to make sure that you pick up the armhole/sleeve stitches so that the join falls at the underarm and not on top of the arm, this way it’s even more hidden. I know this piece can be worn right side up or up side down, but if you do have a preference on how you’ll wear it, then you can intentionally pick up your for your sleeve stitches accordingly!
Let me know how it goes.
Glad to hear from you again.
Laura
Hi Laura,
Thank you so much for your response. I knit the sleeves in stockinette (knitting each round) except for the garter cuff at the end but the garter cuff turned out nicely. The join is also on the side that will be worn more often as the underarm. But there is a hole where the sleeves join the body, under the arm and at the top so I must be doing something wrong! (in other words where the first and last stitch of the contrasting yarn is). I managed to camouflage this with some hand stitches but I would love to know how to avoid this problem! It doesn’t seem as though the answer is obvious though! I had never used this technique so maybe it is just a question of practicing a bit but it seems quite straightforward… Do you have any other ideas as to what it could be? Thanks again for your time and for sharing your knitting knowledge and creative ideas 🙂
Hi Pastille.
Thanks for writing back in.
Without having the piece in my hands, it’s hard to suggest anything different. I’m thinking you dealt with it as best you could… going back in and taking some hand stitches to close up the holes. A similar step is required when finishing a raglan sweater, typically two holes are left at each sleeve and the solution is to tidy them up by sewing them closed.
I wish I had a more elegant solution for you! I’ll keep my thinking cap on…
Always good to hear from you!
Laura
Hi. I recently bought some Purl Soho Super Soft Merino and was wondering if I could work up this vest in that material? If not, could you give me some suggestions of patterns to use with the super soft merino? Thanks so much!
Hi Katiusca.
Thanks for writing in! Unfortunately, Super Soft Merino is too think for this pattern. The Sideways Garter Vest is written for a worsted weight yarn. But the good news is that we have loads of other patterns that are just perfect for Super Soft Merino!
https://www.purlsoho.com/create/tag/purl-sohos-super-soft-merino/
Let us know if you have any questions!
Laura
Hi,
I find yr armholes hv neat finishes but I still cannot figure out how to do it from yr pictures.. I’m a beginner 🙂 Is there a website where they show clearly how to stitch yr kind of armholes .. what is this method called?
Thanks Trudy
Hi Trudy.
Thank you for writing in. I got the idea of doing the underarms that way from a technique used when adding a thumb to a mitten. I’m not sure it has an official name, maybe… scrap yarn thumb. We use it on our Seed Stitch Mittens + Hand Warmers as well as our Classic Mittens. Maybe some of the photos in those tutorials will help?!
Thanks again for writing in and please do not hesitate to write us back with any additional questions!
Laura
I am getting ready to knit this wonderful vest, and I am wondering if I should add a couple of inches to the length. I have a very long body. I can’t tell from the photos where it comes to on a normal sized body;therefore, I am not sure how much to add. Any suggestion would be appreciated!
Hi Kerry.
If you’re very long bodied, adding a few inches might not be a bad idea.
This piece can be worn right side up or up side down, depending if you’d like a longer body or a more full collar. With it oriented so the (light gray) body is longer… from the underarm to the bottom edge measures 12 inches. I think 2 to 3 inches more might be nice for you! You may want to measure some of your favorite pieces to see compare the length from shoulder to bottom edge is. This piece measures 20 inches from the shoulder to the bottom edge (again if oriented so that the body is longer and the collar is shorter.
Please let us know if you have any questions Kerry.
Thanks.
Laura
Like Kerry above, I am interested in knitting this a tad longer. (I’m thinking this would make a cute after-pilates coverup to throw on over workout tights and I’d love to hide my booty a little more!) Instead of adding inches to the light gray portion though, I was wondering what it would look like to add to the dark blue side. Basically, make the two sides identical in length. Would this destroy the collar effect if you had more than 12 inches up top?
Thanks!
Kelley
Hi Kelley.
This would make for a great coverup, especially with a few more inches at the body. I’m not sure I would add too many much more inches to the 12-inch collar side. The 12-inch collar is generous but not too heavy. With too much fabric up there it might start to pull on the rest of the garment, weighing it down. I’m curious about your modifications! Write us back with how it goes!!
Thanks for writing in.
Laura
I am just about to the left armhole, and I think that I want to make my armhole the same way you would make a buttonhole. How does that work with the two different colors/intarsia?
Hi Kaitlynn.
Thanks for writing in! Unfortunately at this time we only have this pattern written with the one armhole technique. I’d love to help you out as best I can though! There are so many buttonhole techniques, I’m not entirely sure which you’re thinking of using here, but if you’re just binding off and then casting back on in the following round… I believe that you can bind off the Yarn B stitches with Yarn B, cut Yarn B, then twist the working yarns as instructed for garter stitch intarsia and then bind of Yarn A stitches with Yarn A. In the following row, you can cast on the same number of stitches with Yarn A as you bound off, then rejoin Yarn B to cast on the same number of Yarn B stitching you bound off. I do hope these tips work! Thanks again for writing in.
Laura
Hello,
I am thinking of knitting another one of this lovely design and I was wondering if I could have some colour advice as it is so difficult to buy colours from the screen! I would like to work with pink grapefruit this time, and most likely a worsted twist grey or another worsted twist neutral (but not white as it is not practical!). What would you recommend with pink grapefruit?
Thanks so much!
Pastille
Hello Pastille!
If you would like the entire item to be sort of colorful and bright, I would match Pink Grapefruit with Ballet Pink. If you’d like a more neutral to balance out the vibrant Grapefruit color, I would use Wheat Flour! Best of luck!
-Alyson
Hi Alyson,
Thank you for the colour advice. I am not a huge fan of ballet pink. Wheat flour could be a nice option but I’m worried it might be too pale and therefore impractical (small kids!). Would oyster grey, storm grey, charcoal grey or sea salt be a nice match with pink grapefruit? Also, do you guys have any colour yarn samples? It would be so much easier to buy colours on line with physical samples! Thanks do much!
Hi, Pastille!
Thank you so much for writing in! I think that either the storm grey or charcoal grey would look amazing next to pink grapefruit. Both of those greys are on the darker side causing the pink grapefruit to really pop! Unfortunately, we don’t have color yarn samples, sorry!
Again, thank you very much for your question.
Best,
Kumeko
Hi Kumeko,
Thank you so much for the colour advice! I think Storm grey would be the better choice, charcoal may be too dark for my liking. I was wondering though if you could describe sea salt for me please? On the screen it looks like a medium warm grey, tonally in between oyster and storm. Would that be correct? If not how would you describe it?
Thank you very much 🙂
Hello, Pastille!
Sorry for the delayed response! The Sea Salt looks grey in the photo, but in person it’s more of a soft taupe.
Best,
Kumeko
Hello,
Really enjoying the pattern so far, it is pretty straightforward but I am having trouble with one thing. I am working on the left arm hole and have knit the 32 stitches with the scrap yarn and it is time to join yarn A and knit to the end. Should I cut yarn A and start up with it at the end of the 32 scrap yarn stitches or just drag the yarn over to where I am and let it dangle on the wrong side? This is a little awkward, I wasn’t sure how to properly bring yarn A over. Thanks!!
Kaitlyn
Hi Kaitlyn.
I’m glad you wrote in. If you take a look at the end of that first section of the pattern, you’ll see it tell you to cut Yarn A. Then in the following section, once you’ve knit the 32 stitches (where you are) you’ll join Yarn A (start knitting with it) to complete the row. This way you don’t have to worry about that awkward dangling strand.
Let us know if you have any questions! Enjoy your Sideways Garter Vest!
-Laura
Good Morning,
Is there a way to lengthen the vest (at the bottom) after i am finished?
Thank you!
Hello, Teal!
Thank you for writing in! Sorry about the delayed response! To add length to a completed vest is tricky since this the garment is knit sideways. You’re best option may be to knit another rectangular section and then seam that to the bottom of the vest. If you have further questions please let us know!
Happy knitting,
Kumeko
I am finally going to treat myself to this pattern and yarn. I love it. I am unable to locate the worsted twist Artemisia. Is it discontinued? If so, what would be a good substitute with the worsted twist heather Stillwater Blue?
Thank you.
Hi Jane,
Thanks for writing in! I’m sorry that it looked as though we no longer had Aretmisia Green in Worsted Twist. We do have it! If you are still looking for an alternate color to go with Stillwater Blue, Oyster Gray is a great alternative!
Happy knitting!
-Cassy
Hi,
I absolutely love how creative and approachable your patterns are for intermediate beginners like myself. Thank you for all of the detailed pictures and descriptions to go along with the beautiful projects. I am just about to finish this vest (very excited) but am nervous about binding off the armholes. Would you be able to provide a little more description on how to “join Yarn A and bind off purl wise”. Do you use the piece of Yarn A that is still attached or do you start with a new piece? Do you need to slip the first stitch at all? Thank you for your help!!
Hi Jennie,
Thank you for your kind words! Joining yarn A means that you will need to start binding off with a new piece of yarn. To bind of purlwise is like binding off when knitting. All you do is purl two stitches and then pass the first stitch over the second stitch and continue in that pattern. Finally, there is no slipping needed when binding off. I hope this answers your question!
Best,
Adam
Please help! I’m almost finished with this project and I’m stuck. I’m at the pick up and bind off step. I’ve inserted my circular needle but I’m nervous to pull out my scrap yarn because I’m not sure how to bind off. The pattern says to join yarn A but does that mean I need a new yarn piece?
Thanks!
Hi Allison,
You are almost there! Yes, you do need to join a new piece of yarn to bind off purlwise and mid bind off you will switch to the CC. I think you’ll be quite pleased with the finished vest!
Best,
Adam
Hi! I’m so excited to be at the end of this lovely and oh so fun project! It’s my first garment and your directions were superb! As a knitting noob, I was wondering if you could suggest a tutorial for how to bind off? I’ve never liked the way my bind off have been tight and awkward when finishing a scarf, and I’m anxious to get this bind off right since it is so visible on the front of this lovely vest. What would you suggest?
Hi Stephanie,
Thank you for your question. Have you tried Elizabeth Zimmerman’s better bind off? It’s perfect for getting a just right finish! Here’s a link to our tutorial:
https://www.purlsoho.com/create/2012/03/16/elizabeth-zimmermanns-better-bind-off/
While ours is shown in ribbing, it can be used to bind off any edge. Please let us know if you have any more questions!
Happy binding off!
Anna
Dear people at Purl Soho!
I am nearing the arm holes on my Sideways Garter Vest and noticed that a lot of knitters have commented that rather than following the pattern’s instructions to use scrap yarn to mark the spot and return afterwards to complete the holes – they preferred casting off and casting on right then and there. I am wondering if you think that the method used in the pattern is preferable and if so – could you help me understand why?
Thanks a lot!!
Margie
Hi Margie,
Thanks for writing in! Both techniques are acceptable. I prefer to use scrap yarn for the armhole because it reinforces the area. If you decide to bind off and cast on, the armholes can sag from knitting and turning the garment as you move on. As I mentioned before, this is just my preference. The choice is yours!
Best,
Adam
Dear Purl Bee,
I have been dreaming of making this vest since I first saw it. I was thinking of Storm Grey with Black Green in Worsted Twist. Do you think these colours will work well or should I go for a less blue toned light colour?
Many thanks,
Nicole
Hi Nicole,
Thanks for writing us! I think that you should knit the colors that inspire you! After all, you’ll be staring at them for a long time. I like your color combo, but I personally think that the Black Green and the Artemisia Green go well together too. I hope you enjoy knitting this!
Best,
Adam
Thanks so much Adam, I will give it a go! Best regards… Nicole
I made the vest. Love it. It was easy. I used a bucele’ yarn in light blue and in navy blue. This yarn was from my stash. l also made it A-symetrical because that’s just me. Thank you for the pattern. archer
Hello, I absolutely adore this pattern. I have been searching for patterns to knit something like a long vest. I think thins would look lovely worn as a long vest. I am not experienced enough to make the necessary calculations and adjustments
Do you think you could possibly adjust your existing pattern for ke to be able to follow instructions?? Could you also let me know how much yarn would be required. I am very keen to make it my next project.
I will wait eagerly for your response!
Hi Saggy,
Thanks for the nice comment! I think that lengthening this garment is easier than you think! All you have to do is cast on more stitches of the bottom color. I’d cast on 25% more stitches or however many you see fit for the length you desire. For the armholes, you’ll place them in the same spot as the pattern — just take in account the extra amount of stitches you cast on. I would buy one more skein of the main color to lengthen the vest, but if you would like it to be significantly longer, I’d buy two more. Good luck on the project!
Best,
Adam
Hi there,
Do you think the super soft merino would be too bulky for this pattern?
Kind regards,
Karen.
Hi Karen,
Great question! I do think that the Super Soft Merino would be too thick for this pattern. The Worsted Twist that this pattern is knit in comes in at 4.5-5 stitches per inch and the Super Soft Merino is 2-3 stitches per inch, quite a bit thicker than the Worsted Twist. If the Worsted Twist is not to your liking, I would recommend substituting another worsted weight yarn. All of our worsted weight yarns can be found here: https://www.purlsoho.com/yarn.html?yarn_stitches_per_inch_filter=971
I hope that this helps and happy knitting!
Cassy
How many yards of yarn does this pattern use?
Hi Lynsey,
Great question! This lovely vest uses between 750-1150 yards depending on what size you are making. You will use a little more of one color than the other but sadly I do not have exact measurements for that.
I hope that this helps!
Cassy
Thank you a lot for this tutorials. I have saved the picture long ago in my Pinterest, but today I fount the pattern at Purl Soho. This knitting project will be a present for myself.
Have a great knitting day!
I like this pattern? I would like to make one color to avoid all the color changes. How do I do this?
Hi Jo Ann,
Thank you for writing in. If you would like to knit this in a solid color, all you do is get the same yardage of yarn in one color. You don’t have to switch colors in the pattern. If you feel like skipping this part, that won’t affect anything about the vest. Thanks again!
-Adam
I might just be dense, but the armholes baffle me. Since my yarn A color was in the middle, the pattern doesn’t work. What have I done incorrectly? I am on the lift armhole and have cut yarn B no problem. Slipped stitches to get to middle to k it yarn A but this is just wrong.
Please help.
Hi Diane,
Hopefully I can clear this up for you. You will be inserting a scrap yarn piece into the middle of yarn A and B sections for the armhole. This yarn will get taken out at the end and you’ll bind off in order to finish the armhole. If you notice in the picture below the Left Armhole section you’ll see that with yarn A the knitter knits on top of the scrap yarn on the right side of the garment. This inserts the scrap yarn into the fabric, which will later be taken out and strung on to a needle for bind off. I hope this makes things clear! Maybe if you read to the end of the pattern you’ll get a better gist of what you are doing. Let me know if you have any other questions!
Best,
Adam
How many stitches do I cast on if I want this the second size up? Seems to only list CO numbers for first size. Additionally how does this change the number of stitches to make the arm holes?
Hi Libby,
Great question! All of the sizes call for the same number of cast-on stitches. Because this pattern is knit sideways, you will knit further before creating the arm holes for each size. If you take a look at the last picture on the pattern above, you should be able to get a sense of how this pattern is knitted from one side to the other and not top to bottom or bottom to top!
I hope that this helps!
Cassy
I can read a pattern. It states end on right side and cut yarn b. This leaves the cut at the bottom and the yarn a in the middle of the fabric. Did you not understand the question? I can continue the yarn b up the fabric and then start the armhole instructions at that point in yarn a. That is not how the pattern reads. Please help. I might try what others mentioned and bind off and then restart.
Hi Diane,
After the row where you join the scrap yarn you will knit back with yarn A for 71 stitches and then switch to yarn B by joining a new end. I hope this was your question!
-Adam
I would like to make this wider in shoulders than 17-1/2″ ( about 20″) how do I do this.? . I have to have shoulder replacements, keep shoulders warm and easy to put on..looks like this will work
Thankyou, June
Hi June,
Thank you for writing in! The great thing about this pattern, is that it is easy to increase the distance between the shoulders. After you make the left armhole, you will repeat Rows 2 and 3 from FRONT LEFT section until piece measures 18 inches from scrap yarn, ending after working a right side row. Then continue on with the pattern as written!
I hope that this helps and happy knitting!
Cassy
I just purchased the yarn for this and cannot wait to start! The armholes are a bit tricky so I want to just do a bind off, if I did that, how many stitches should I bind off to make the same armhole size? Thank you!
Hello, Amber!
Thank you for writing in! You would bind off over those same stitches where we use the scrap yarn to knit. So, you would BO in the middle where you would knit 32 sts with the scrap yarn, knitting the beginning and end. Does that make sense? Please let us know if you have further questions! Again, thank you for your question.
Best,
Kumeko