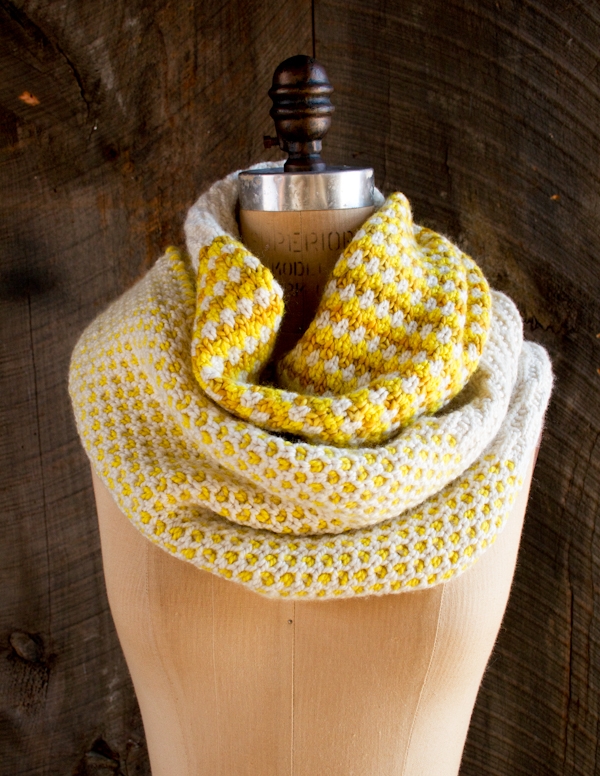
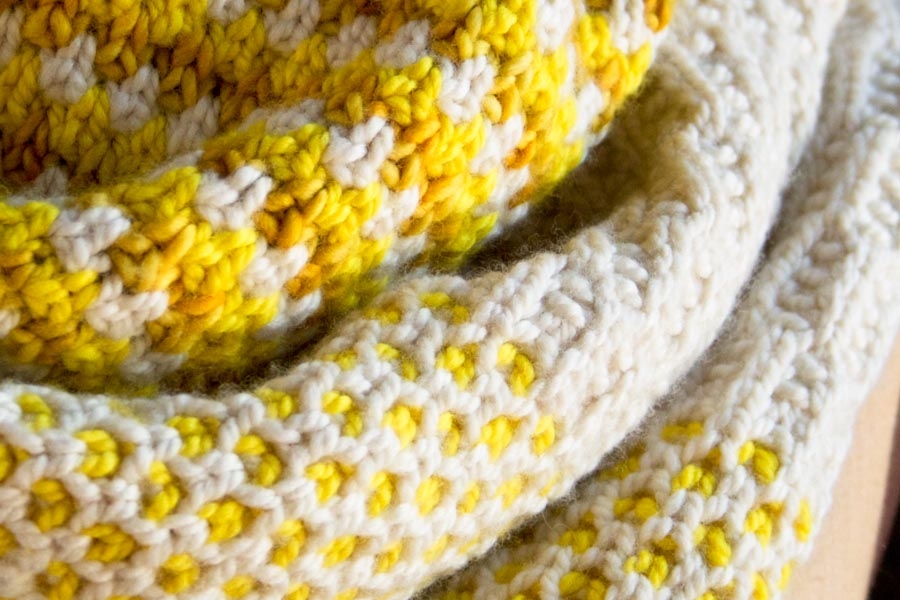
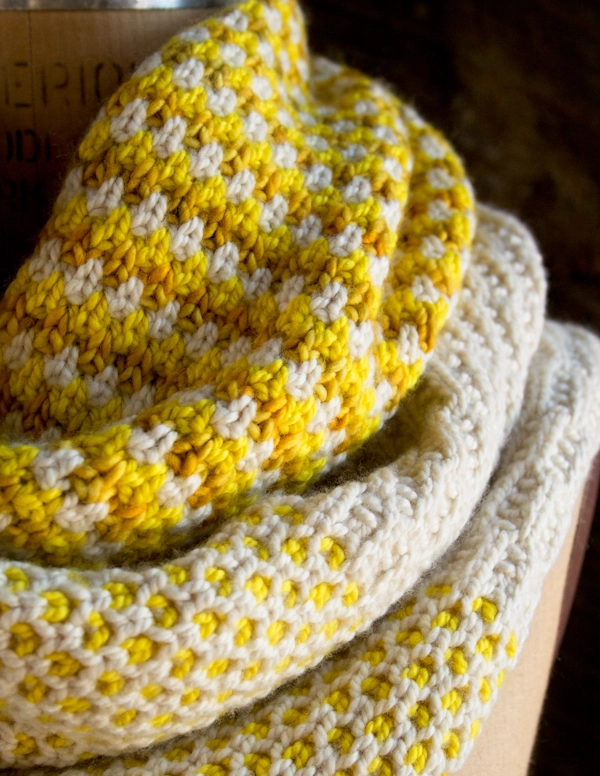
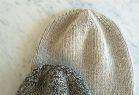
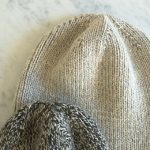
Stitch Block Cowl
Knitters who have made their fair share of garter stitch scarves, ribbed hats and stockinette sweaters, will understand the hankering to shake things up a bit. I love the rhythm and certainty of the basic stitches, but every now and then I relish the challenge of stitch patterns that unfold in surprising ways, that teach me yet something else about the wondrous potential of knits and purls!

I’ve done a lot of knitting in my life, so much that I sometimes wonder if there are any stones left unturned, but this Stitch Block Cowl took me into new terrain. I’ve knit colorwork and I’ve knit “in the row below”, but I’ve never done the two together. It’s terrifically easy and proves, once again, that knitting is inexhaustibly interesting.

Each of the three stitch patterns in our Stitch Block Cowl employ this simple technique of knitting stitches in the row below (don’t worry, we explain what that means in the pattern with photos and everything!). This is ultimately a lot like slipping stitches and has the same effect of creating a very cozy fabric with a whole lot of squish and depth. Add to that the remarkably soft merinos of Purl Soho’s Worsted Twist and Madelinetosh’s Tosh Merino and you’ve got one voluptuous cowl!

Ready to take your own journey into uncharted knitting territory? Make sure you pack materials to knit your very own Purl Soho’s Stitch Block Cowl, in this warm and sunny Yellow or any other of our pretty palettes. And don’t forget to send a postcard! -Whitney
Designed by Purl Soho designer, Whitney Van Nes.
Share your progress and connect with the community by tagging your pics with #PurlSoho, #PurlSohoBusyHands, #PurlSohoStitchBlockCowl, and #PurlSohoWorstedTwist. We can’t wait to see what you make!
Materials
To knit your own Stitch Block Cowl, you will need five skeins in the following breakdown…
- Color A: 3 skeins of Purl Soho’s Worsted Twist, 100% merino wool. Each skein is 164 yards/ 100 grams; approximately 492 yards required. (NOTE: We no longer offer Worsted Twist, but choose from one of our other worsted/aran weight yarns.)
- Color B: 1 skein of Worsted Twist; approximately 164 yards required.
- Color C: 1 skein of Madelinetosh’s Tosh Merino, 100% superwash merino. Each skein is 210 yards/ 100 grams; approximately 60 yards required.
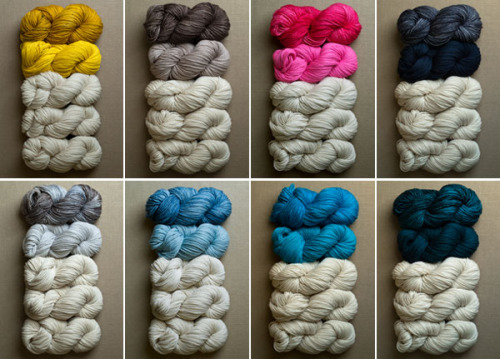
The eight colorways are, clockwise from the top left corner…
Yellow
- Color A: Worsted Twist, Heirloom White
- Color B: Worsted Twist, Yellow Yellow
- Color C: Tosh Merino, Candlewick
Oatmeal
- Color A: Worsted Twist, Heirloom White
- Color B: Worsted Twist, Sea Salt
- Color C: Tosh Merino, Weathered Frame
Pink
- Color A: Worsted Twist, Heirloom White
- Color B: Worsted Twist, Super Pink
- Color C: Tosh Merino, Pop Rocks
Navy
- Color A: Worsted Twist, Heirloom White
- Color B: Worsted Twist, Timeless Navy
- Color C: Tosh Merino, Charcoal
Aegean
- Color A: Worsted Twist, Heirloom White
- Color B: Worsted Twist, Peacock Blue
- Color C: Tosh Merino, Esoteric
Aqua
- Color A: Worsted Twist, Heirloom White
- Color B: Worsted Twist, Dragonfly
- Color C: Tosh Merino, Oceana
Pale Blue
- Color A: Worsted Twist, Heirloom White
- Color B: Worsted Twist, Ice Blue
- Color C: Tosh Merino, Well Water
Gray
- Color A: Worsted Twist, Heirloom White
- Color B: Worsted Twist, Oyster Gray
- Color C: Tosh Merino, Whiskers
Please note, we are no longer carrying the pre-built bundles for this project as several of these colors have been discontinued but a range of options are still available for inspiration in Worsted Twist and Tosh Merino!
You will also need…
- US 7 (4.5 mm), 24-inch circular needles (You need a circular needle because one of the stitch patterns requires you to slide the stitches from one of the needle to the other.)
Gauge
5 stitches = 1 inch in garter stitch, using the Color A.
4 stitches = 1 inch in any of the three stitch patterns.
Size
Finished Dimensions: 12¾ inches wide by 60 inches around
NOTE: To change the width of the finished cowl, cast on any odd number and follow the directions as written.
Note
All three of these stitch patterns use the technique of “knitting into the row below.” Here’s how to do it…
Insert the right needle into the center of the stitch below the first stitch on the left needle. The place to insert the right needle is indicated below by the arrow.

And here is the needle going into that place…

Now knit as normal, bringing the working yarn around the right needle in a counter clockwise direction and pulling through a stitch. When you allow the stitch to fall off the left needle, it will actually be two stitches: the one from the previous row and the one from the row before that. It may feel like you’re doing something dreadfully wrong, but if you’ve properly inserted the right needle, then all will be well!
Pattern
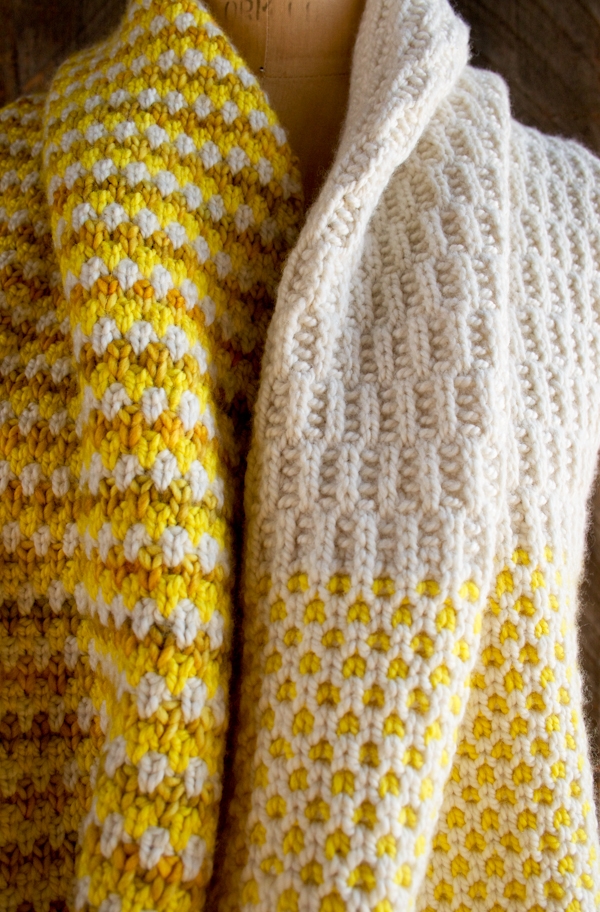
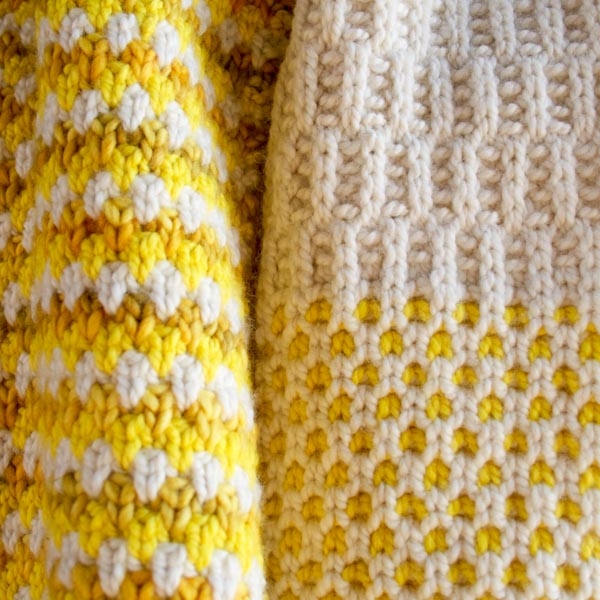
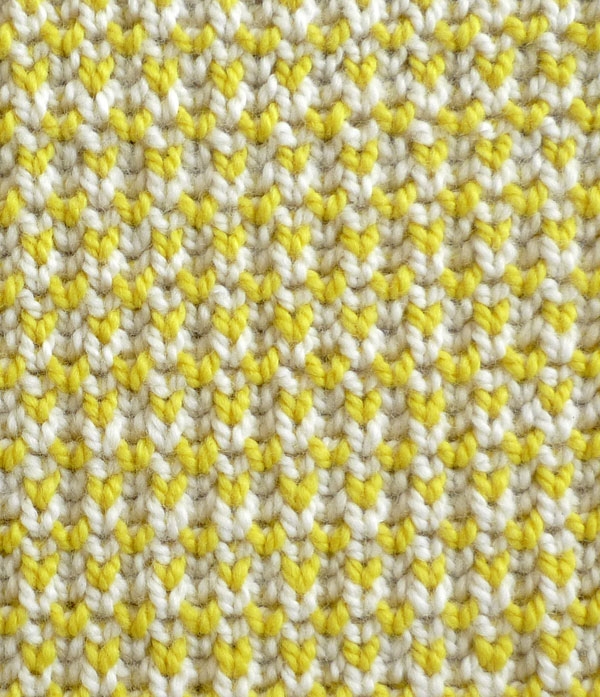
Block #1, Rambler Pattern
Here’s the right side of the finished Rambler Pattern:

And here’s the wrong side:

With Color A, use a Provisional Cast On to cast on 51 stitches. (Why a provisional cast on? So that at the end of the project you can graft together the two ends, avoiding a seam. However, if you find a Provisional Cast On a bit overwhelming, then just use a regular long tail cast on, and when you’re done, you can sew the two ends together. Your cowl will still be beautiful!)
Row 1 (wrong side [ws]): K2, *p1, k1, repeat from * to last stitch, k1.
Row 2 (right side [rs]): K1, *k1 in the row below, p1, repeat from * to last 2 stitches, k1 into row below, k1. (See Pattern Note, above, for “k1 in the row below” instructions.)
Rows 3-8: Repeat Rows 1 and 2 three more times.
Row 9 (ws): K1, *p1, k1, repeat from * to end of row.
Row 10 (rs): K1, *p1, k1 in the row below, repeat from * to last 2 stitches, p1, k1.
Rows 11-16: Repeat Rows 9 and 10 three more times.
Repeat Rows 1-16 until piece measures 20 inches from cast on edge, ending with Row 14.
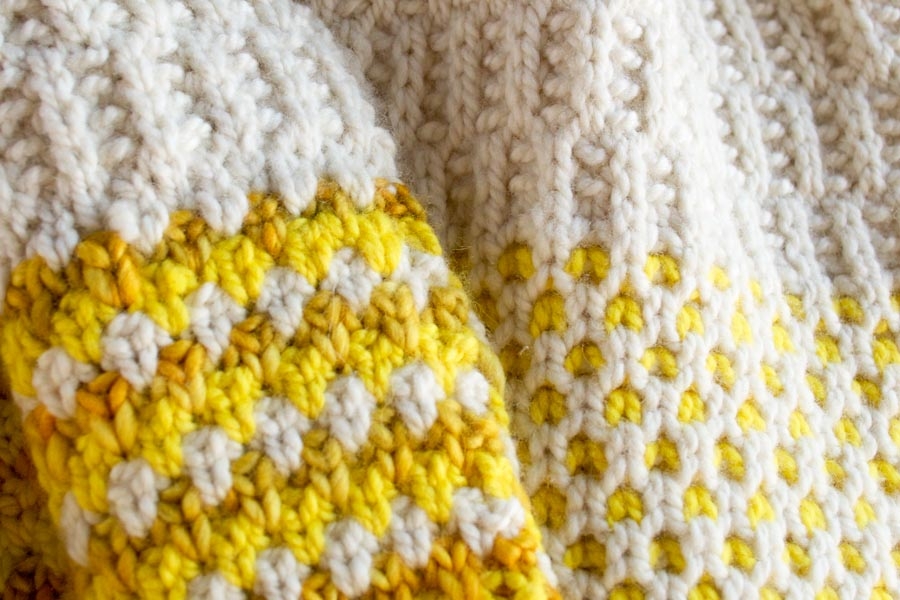
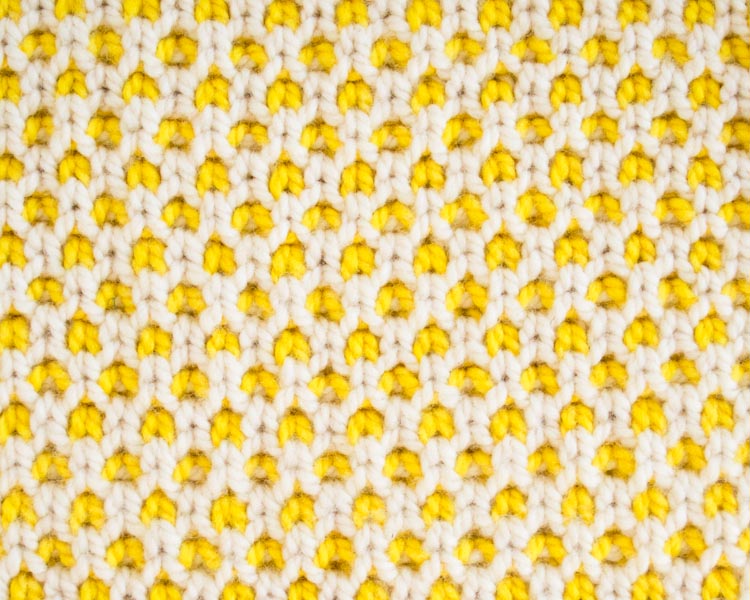
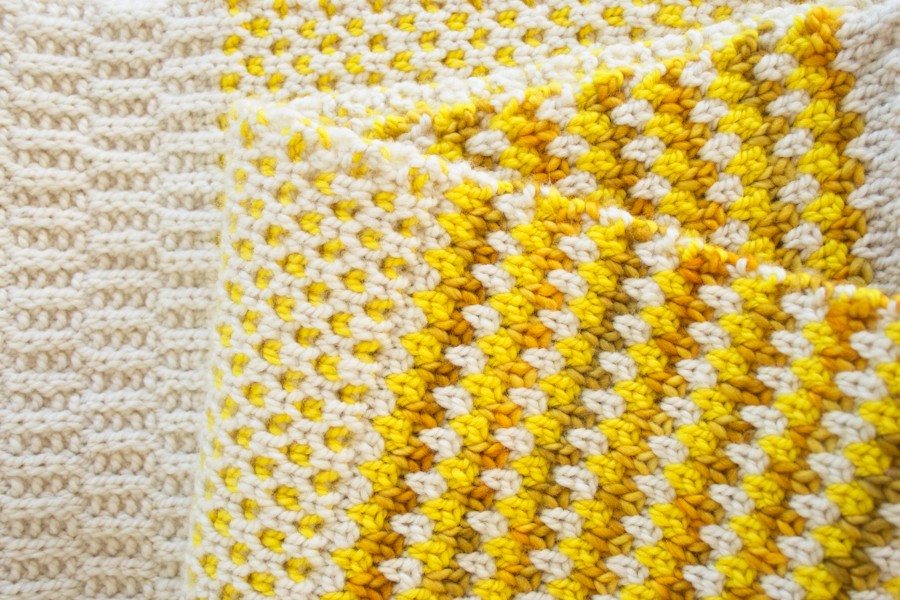
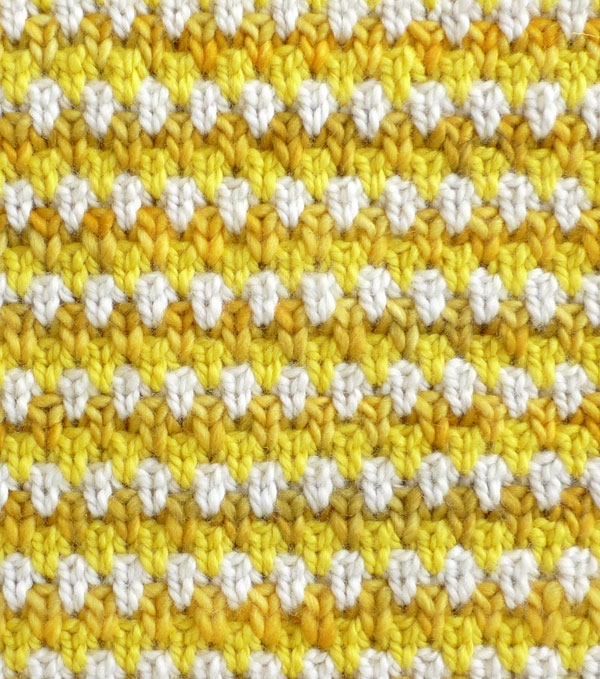
Block #2, Checked Rose Fabric
Here’s the right side of finished Checked Rose Fabric:

And here’s the wrong side:
Row 1 (ws): With Color A, k1, *k1 in the row below, k1, repeat from * to end of row.
Row 2 (rs): With Color A, k2, *k1 in the row below, k1, repeat from * to last stitch, k1.
Row 3 (ws): With Color B, repeat Row 1. Do not turn the work at the end of the row.
Row 4 (ws): Keeping the wrong side of the work facing you, slide the stitches to the right end of the needle and with Color A, repeat Row 2. Turn the work.
Row 5 (rs): With Color A, repeat Row 1. Do not turn the work.
Row 6 (rs): Keeping the right side of the work facing you, slide the stitches to the right end of the needle and with Color B, repeat Row 2. Turn the work.
Repeat Rows 1-6 until piece measures 40 inches from cast on edge, ending with Row 5.
Block #3, English Rose Tweed
Here’s the right side of finished English Rose Tweed:
And here’s the wrong side:
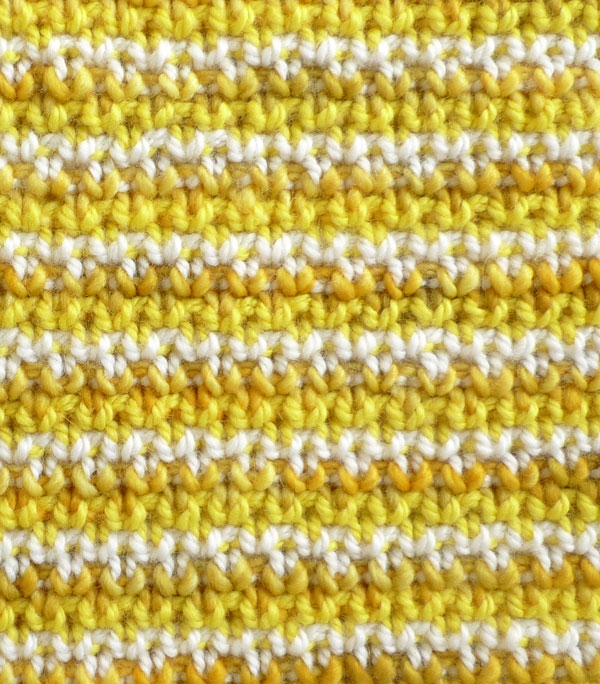
Set-Up Row (ws): With Color A, k1, knit into front and back, knit to end of row. (52 stitches)
Row 1 (rs): With Color B, k1, *p1, k1 in the row below, repeat from * to last stitch, k1.
Row 2 (ws): With Color B, knit.
Row 3: With Color C, k1, *k1 in the row below, p1, repeat from * to last stitch, k1.
Row 4: With Color C, knit.
Rows 5 and 6: With Color A, repeat Rows 1 and 2.
Rows 7 and 8: With Color B, repeat Rows 3 and 4.
Rows 9 and 10: With Color C, repeat Rows 1 and 2.
Rows 11 and 12: With Color A, repeat Rows 3 and 4.
Repeat Rows 1-12 until piece measures 60 inches from cast on edge,…
If You Used a Provisional Cast On
…ending with Row 4.
Next Row (rs): With Color A, k1, *p1, k1 in the row below, repeat from * to last 3 stitches, k2tog, k1. (51 stitches)
Cut all the yarns, leaving a 32-inch Color A tail.
Put the Provisional Cast On stitches onto a second (preferably smaller) needle.
Thread the Color A tail onto a tapestry needle. With wrong sides together (being careful to not twist the cowl), hold the two circular needles parallel to each other and use the Kitchener Stitch to graft together the cowl’s two ends.


If You Used a Long Tail Cast On
…ending with Row 5.
Next Row (ws): With Color A, bind off in purl.
Cut all the yarns, leaving a 32-inch Color A tail.
Thread the tail onto a tapestry needle and with wrong sides together and making sure the cowl isn’t twisted, sew together the two ends. Sew under one cast on stitch and then across under a bind off stitch, continuing back and forth until you’re done!
Either Way…
Weave in the remaining ends and gently block your cowl, if desired. Then wrap yourself up!


Is there a way to get a printer friendly copy of the pattern? right now I would have to print 41 pages
Hi-
We are working on converting our older patterns into PDFs but it’s unfortunately kind of slow going! For now we recommend that you copy and paste the pattern into a text or Word Doc and print from there, or use a free site like printfriendly.com. Sorry this isn’t ideal and thanks so much for your question!
Molly
Try copying and pasting into a word document and reducing the font size. : ) (That sometimes works for me!)
I also wondered the same thing! So I grabbed my iPad and took screen shots of each page that I needed for instructions. Now I just go to my photos and knit directly from there. Hope this helps.
Hi Sheila-
I like your ingenuity! However, since this first comment was left we added a print feature that allows you to print or save each pattern as a PDF that you can work from. For instance: I save the patterns as PDFs and then read them in the Kindle App on my phone. I hope this works for you and thanks for getting in touch about this!
Best-
Molly
Hi all,
I too want to make a baby blanket, but don’t see anywhere the total yardage needed if we use a worsted weight yarn as you call for. How much more yardage do we need if we go DK instead? Approximately. Thanks.
Hi Lynn,
I used the following amount of yarn to make this cowl: Color A- 275 grams / 451 yards; Color B- 97 grams / 160 yards; and Color C- 34 grams / about 55 yards. A DK weight would take slightly more yarn, but I’m sorry to say, I don’t know exactly how much more! I’d guess 150-300 more yards?
Please let us know if you have any more questions and thanks for this one!
Whitney
I’m having a horrible time deciding what color to order! Do you have any images of this completed in any of the other color combinations? Thanks.
Hi Jennifer-
We don’t, unfortunately! But you might try searching on Ravelry? I’m sorry we can’t be of more help!
Best-
Molly
ps- if I were making this for myself I would get the Aqua colorway! 🙂
I just finished this as a gift for a friend and just WOW!! Thanks for the great pattern!
Would it be possible to make this as a single-loop cowl? I realize I’d have to greatly shorten each section or even leave out one of the sections, but it’s (although absolutely stunning!) just too much yarn for me to have around my neck. Do you think that would be possible or just too much of a change for it to still be attractive? Any and all suggestions welcome!
By the way, I’m thrilled to read that you’re converting your patterns to PDF. I’ve made all the patterns of yours that I’ve done into Word documents. Thank you so very much for all these wonderful patterns you’ve made available to us!
Hi Kris,
I think that’s a cool idea! Maybe it would be nice to do each block a different length, instead of evenly spaced (like they are here).
Let us know how it goes and thanks for the suggestion!
Whitney
HI I love this pattern but in the first block I am having a hard time with rows 9-16….when I am knitting it , it turns out in seed stitch but in the picture it doesnt look like that at all…….what am i doing wrong???
Thanks again
Hi Liz,
If your Rows 1-8 are looking good, but your Rows 9-16 are looking like seed stitch (which, you’re right, they shouldn’t!), then I would guess that you’re making a simple mistake reading the pattern. Make sure that you’re knitting a one-stitch garter stitch edging and only repeating the stitches that come after the asterisk.
If you’re still having problems, please let us know and we’ll try to get you on the right path!
Whitney
Hello! I ordered the yellow kit and was SOOO excited to start! My rambler pattern does not look as well defined as the picture and I can’t figure out the problem! Could it be too loose? I usually knit too tight! Anyway, I just ripped it all out and am starting over. Hopefully the same thing doesn’t happen. Any advice?
Hi Stephanie,
You’re probably having the same problem a few other customers have reported. Here’s what I’ve recommended to them!
Some people seem to have an easier time knitting into the row below if the stitch above is a knit stitch rather than a purl stitch (and it doesn’t matter which it is, since it’s getting dropped!). This may seem radically different than the pattern as written, but the result is actually the same. Try this…
Rows 1, 3, 5, and 7: K2, purl to last stitch, k1.
Rows 9, 11, 13, and 15: K1, purl to last stitch, k1.
I hope this helps you get the embossed texture of the stitch pattern. Please let us know if you have any more questions and thank you so much for this one!
Whitney
Hello Whitney,
I think I am having the same issue as described above, but on the Checked Rose block. Block 1 turned out beautifully, but it seems that the little flecks of yellow in Block 2 are not *popping* the way they do in your photos. Am I not knitting tightly enough perhaps? I do find it awkward to knit below certain stitches. Thanks for any advice!
Hi Allison!
I am uncertain what would be causing this issue. If your Block 1 turned out correctly, then I can only assume that you are performing the “knit into the row below” correctly. I would just double check and be sure that you haven’t made a small error following the second block’s directions. When I knit my own, it even took me a few rows to feel comfortable with the way the rows repeated!
Happy Knitting!
Thomas
Hi,
Thanks for posting this pattern. I want to make this over the fall/winter season, but I’m confused by 2 points in the instructions.
After the 3 blocks are worked, the patt states:
If you used a Provisional Cast On, ending with Row 4 …
Then it goes on to state the next row. I don’t understand where or what is the row 4? None of the blocks end on a row 4 ore repeat back to row 4. Can you shed a little light for me? Also, if a long tail cCO was used, further down, it states ending with row 5 … and then goes on to give next row directions. I’m confused as to what or where I should be left off after completing the major knitting of the cowl.
Thanks for any clarification you can offer.
Eileen
Hi Eileen,
Those instructions mean that if you used a Provisional Cast On, you should end the English Rose Tweed section with that pattern’s Row 4, which is, indeed, in the middle of the stitch pattern’s repeat.
The same is true if you used a long tail cast on, except in that case, you would end with the English Rose Tweed’s Row 5.
I hope that this clears things up for you. Please let us know if you have any further questions and thank you for this one!
Whitney
I just finished Laura ‘ s Bobble Sheep pillow and cannot wait to start the cowl! I’m not very experienced with color changes….. Do you just carry the yarn up the sides?
Hi Mandi S.-
Yes! I always carry the working yarn in front of the non-working yarn for consistency. It’s also important to keep an easy, even tension on the yarns as you carry them up the selvedge (but don’t get too worried about it; it’s not a super sensitive situation!).
Thanks for asking and please let us know if you have any more questions!
Whitney
About this. More particularly, when you reach the transition from the rose checked fabric to the English tweed, would it be alright to carry color b up the 3 or 4 rows to start the tweed pattern? Or would it be best to just cut it and start fresh on the first color b row of the tweed?
Hi Stephen!
I would definitely leave the color attached! There’s only 2 rows inbetween, and the yarn is left on the correct side to start the next block.
Happy Knitting!
Thomas
Hi,
I just finished the rambler section of the pattern, and am slightly confused by the next block (Checked Rose). When knitting rows with colour b, am I still using colour a? If not, I am unsure how to transition between colour a yarn and colour b yarn.
Thanks!
Hi Brittany,
Each row only uses one color at a time. When you need to switch colors, you simply stop using the “old” color and pick up the “new” color (from one or two rows down). You want to keep the tension easy when you make the first stitch with the new color so that you’re not pulling up the selvage too tightly, but other than that, there’s not much to think about!
Please let us know if you have any other questions and thank you for this one!
Whitney
I love this pattern, but have a question. I am in the second block, English rose. I gave finished rows 1-6, and about to begin the repeat, on rows 1 and two do it continue to use color A?
Hi Janet,
Yes! You repeat Rows 1-6 exactly as they’re written.
Please let us know if you run into any more questions and thank you so much for this one!
Whitney
This is beautiful! I don’t knit so I’m working on a crocheted approximation of this design: Block 1 is Moroccan tile stitch in cream and mustard; Block 2 is linen stitch in cream, mustard and yellow; Block 3 will be some kind of textured stitch in cream. It’s not as elegant in crochet but still lovely. Can’t wait to finish and wear it!
Hi DC,
And we can’t wait to see it! Thanks so much for sharing!
Whitney
Hey, DC. Did you figure it out in crochet stitches yet? I absolutely love this….but also don’t knit! Been googling stitches but not having much luck. Which crochet stitches did you end up using? Would love to see yours.
Keri
Do you have any patterns with only the Checked Rose Fabric?
Hi Jessie-
We don’t, but you could certainly do a cowl or scarf entirely in that stitch if you like!
Thanks for getting in touch and please let us know if you have any more questions!
Best-
Molly
Thanks so much! 🙂
I assume you carry the colors up the side of the cowl.
Are the yarns colorfast?
Is there a good way to carry the yarn up the sides for the two stitch blocks with multiple colors? I can’t make it look good!
Hi Alyssa!
The best thing to do when carrying the yarn up the side is to always pick up the new color from the same side. In other words, bring the yarn around and to the right of the other color(s) each time you start with it again. As long as you go from the same side every time, it will be consistent. Also, very importantly, don’t pull the first stitch of the new color very tight at all! You need to leave space for that yarn to create a float.
Happy Knitting!
Thomas
Hello, I submitted my question a few minutes ago but am not sure if it went through. Thus, I’m submitting it again.
I would like to make a flat scarf using the Checked Rose Fabric stitch. How would I adapt the pattern for double pointed needles (instead of knitting in the round) so that I don’t have to cut yarn A and B at the end of each row that uses the colors once. For example, at the end of row 3 I would have to cut yarn B and at the end of row 5, I would have to cut yarn A.
Thank you
Hi Gita!
This pattern is actually knit flat! We made it into a cowl simply by sewing the cast-on to the bind-off! You need the circular needles because of the very same issue you brought up. If you follow our pattern as written, you will be “turning” the work at the end of some rows, and “sliding” the work to the other end at the end of other rows. No cutting necessary!
Hope this helps!
Thomas
Thank you Thomas. It’s so wonderful to be on a site whose owners actually answer questions. Thank you for that and thank you for the beautiful projects and patterns. I only found your site recently and will certainly let all me knitter friends know about it.
I’ve asked my Mom if she could knit this for me. I hope she can. I love it!
I wish I had learned to knit.
Maybe one day.
Love from Canada
Upon starting the pattern I draw through a stitch between the 2 needles and under the bar of yarn as instructed. I drop the stitch off the left needle and it unravels all the way down the piece! I don’t understand how to keep this from happening.
What to do with the stitch on the left needle is my problem. Any help you can provide will be much appreciated. Thank you.
Hi Lou Anne!
The reason you are getting a run is because you haven’t performed the “knit into the row below” quite right. Instead of knitting into the bar between the two needles (like you would were you doing a M1), you are going to knit into the stitch below the stitch on the left needle. You should be putting your needle in just a little bit to the left of where you were trying before. Take a look at the photo in the “notes” section one more time, and hopefully that will clarify!
Happy Knitting!
Thomas
I love this scarf. I got through the rambler patter with little problems, but now on the rose it’s not so easy. I’m pretty sure I’m doing it right, as my rambler patter looks great, but the contrast color is not in the two neat lines in between the cream color like in the pics. Mine is separated and there’s just a lot more space in the pattern, in between tbe stitches, and it just looks kinda sloppy. I thought it was bc I was knitting too tight, but I tried loosening my tension and that didn’t help either. Please help!
Hi Lisa!
It’s very hard to say without looking at your knitting. Maybe double check to be sure you are following the pattern correctly, and make sure that when you knit into the row below that the stitch above falls through all the way. It might also be that you are knitting looser?
Thanks for your question!
Thomas
Same problem as Lisa’s. I have knitted and unravelled block 2 several times (have lost count) because it does not looks sloppy, unlike the photo–block 1 looks fine. Could there be something missing from block 2 instructions? Has anyone knitted from the instructions and got it right?
Hello Nishta!
Many customers and employees have been able to get it right, but each stitch pattern gives different knitters different gauges. If you think that stitch pattern 2 is coming out too loose and sloppy, I would recommend you go down a needle size. If you’re worried about keeping the block the same width as the others, make sure to give it an extra tug into place when blocking the finished piece.
Hope this helps! -Alyson
When you knit into the row below you end up with additional stitches. When you knit the next row, are you supposed to treat those stitches as two or one stitch? I’ve been treating them as individual stitches and having to start over. Trying treating the two stitches as one now…. Thanks!
Hi Carrie!
You shouldn’t be ending up with any extra stitches when you knit into the row below. Make sure that you aren’t knitting into the row below as well as the row on the needle. After knitting into the center of the stitch in the row below, you should remove the stitch above it from the left needle, and it will fall out into a “brioche” looking stitch, with only 1 new stitch made on the right needle.
Hope this clarifies!
Thomas
So delighted to have found this site!
Since I’m a beginner, I’m trying a sample work before making a decision to buy yarns. I have a few questions:
1. Should I knit 3 blocks seperately and connect the work later?
2. On block 3, the pattern says to make increase stitch in the set up row, and I wonder if I have to cast on 26 and knit front and back to make 51 stitches in total.
3. Will it do if I just work in the order of block 1-block3-block2 and combine the end of the block 2 with 1? In that case, is there anything to do between block 1 and block 3?
4. Do you ship to South Korea too? What will be the postage like?
Thank you in advance.
Hi Cindy!
I’ll try to answer your questions!
1. Do a small sample using an odd number of stitches and knit through all three blocks subsequently together; do not knit them separately.
2. I don’t understand why you need to cast on half the number of stitches. Simply cast on the number needed for the first block, and continue knitting through to the third block. If you want to swatch to practice, simply knit for fewer inches.
3. Since there are three blocks in a circle, there is actually no way that you can knit that will change the order of the stitch sections. Try it out: your option of 1, 3, 2 is actually just 3, 2, 1 if you start the circle in a different place, and the reverse order is exactly the same as 1, 2, 3. I would personally knit them in the order that the pattern is written!
4. We do ship internationally! Click here to see our information about shipping.
Happy Knitting!
Thomas
Why oh why aren’t these knit stitches easily converted to crochet stitches? This is absolutely stunning! Great choice of color and beautiful workmanship!
Hi, I love this pattern and I’m really excited to start! Quick question – I have interchangeable circulars but only 14″ or 22″ and 30″ are closest. Will it matter if they are a little short or long?
Thanks!
Hi Spruha!
Since you aren’t every actually joining to knit in the round, it doesn’t matter too much how long the cord is! You simply just need the circular needle because you will slide to the other end at the end of some rows. Just use whichever is most comfortable for you!
Happy Knitting!
Thomas
Hello! This is such a fun pattern to knit but I’ve made a few mistakes in the second block and have a hard time taking the stitches out, putting them back on the needle correctly so I can fix the pattern. (Mostly, I get out of pattern by just a stitch). The knitting in the row below is what is tripping me up. I can fix stitches very easily in regular knit rows but can not figure out how to do it with the knit below stitches. Any advice you have would be appreciated!
Hi Kelly!
Moving forward, I would suggest using “Life-lines.” As far as fixing a mistake you might have already, I would just mention that as you pick-up or tink back, you have to pick up both the stitch (that was from the row below) and the strand that was the above stitch.
Happy Knitting,
Thomas
Hi,
I love this cowl, it’s so beautiful, I decided that I absolutely had to knit this for myself. I am however, very new to knitting. Everything was going very well until I made a mistake and I have no idea how to fix it. I’m still in the first block on row 16. I wasn’t paying close enough attention and I’ve K1 in the row below and then accidentally P2 and then K1 in the row below again. I don’t know how to fix the area where I’ve knit in the row below to get back to take the extra purl out.
Thanks so much for you help!
Hi Meghan!
As you tink back, for any stitch in which you have performed a knit into the row below, you’ll need to pick up both the stitch, and the extra strand going around it. When you knit forward again, instead of knitting into the row below again, you’ll knit those stitches together with the extra strand you picked up.
I would also suggest this as a great pattern to use a “life-line” with.
Happy Knitting!
Thomas
If I am reading these directions correctly, all I need to do to practice the second section is to work on an odd number of stitches. I would rather give it a go on a small number of stitches before I work on the real scarf. Am I reading this right?
Thanks!
Robin
Hi Robin!
You are correct! The first two blocks just need an odd number.
Happy Knitting!
Thomas
I am so excited to make this scarf!! However, I am allergic to wool and, this is probably a silly question, am wondering if I can just substitute a cotton worsted weight instead with no ill effect….
Hi Danike!
That should be fine! Worsted weight is what you need!
Happy Knitting!
Thomas
Agree. Copy and paste is a technique used often by me. Allows for editing/ blocking to the number of pages and pictures preferred. This pattern is gorgeous ! ” Droolicious” 🙂 Thank you!
Hi Barb-
We actually have a new print feature that allows you to print and save as a PDF without copying and pasting. You can also omit any pages or pictures that you don’t need. Just click on the “print” text on the right hand side of this, or any, pattern!
Thank you!
Molly
Hi! For Block #3, English Rose Tweed, I’m unsure about row 3 and row 4. Are they knitted on the right side or the wrong side?
Thank you.
Hi Allison!
In this section, each color will be knit across in a right side row followed by a wrong side row. So row 3 is right side, and row 4 is wrong side.
Happy Knitting!
Thomas
Hi! Thank you so much for the beautiful pattern! I’m a beginner but I really would like to buy the yarn and try this project.
I was wondering how you start with the wrong side(1st row)? I would like to try with the long tail cast on but in the case, both the working yarn and the tail should be on the same side, which indicates “right side”?
I hope you can help me with this!
Thank you.
Hi Yuka!
It actually does not matter which side you start with after the cast on. In this pattern, specifically, you will be sewing the two ends together, so you’ll be covering up the cast on anyway.
In other patterns, it is common to have row 1 be a wrong side row, because a long tail cast on functions as an already made row of knits.
Thanks for your question!
Thomas
I got the Aegean colorway over the holidays and whipped up my cowl before break was over! I wear it all the time because it’s so comfy and wanted to use up my scrap yarn to make a matching headband or hat. I ended up making the “Fjord” cap colorblocked by using the leftover oatmeal yarn as the brim and the body of the hat in my Madelinetosh! The cap and cowl look so great together!
Has anyone else had trouble with their gauge on the second section? It’s way looser than the first.
Hi! I’m just working on this beautiful cowl at the moment and have finished the 1st block without too many problems. Now in the 2nd block, do I understand it correctly, that the “knitting into the row below”-stitch is done with a knit stitch (and not with a purl stitch as in the first block)?
Hi Ines,
Thank you for the comment! Yes, knitting into the row below should be done with a knit stitch and the second section is done with all knit stitches.
I hope this clarifies and feel free to write us back if you have anymore questions!
Happy Knitting!
Jake
I am almost finished the with cowl and I’m wondering if I should block it flat before doing the Kitchener stitch.
Hi Betsy,
Thank you for the comment! I would recommend blocking after you finish the Kitchener and weave in your ends. That will help the piece to set in its new structure and secure that seam as well as the ends! Since the stitch pattern doesn’t curl at all you shouldn’t have to worry about pinning it flat.
Happy Knitting!
Jake
Hi!
I’m just starting this beautiful cowl as a gift but am a bit concerned about the blocks being the same size. I’ve read many reviews on Ravelry and it seems that Block #2 is a little to much slimmer than Block #1 (depending on the knitter). Do you have any recommendations to avoid this? I’ve read through the comments and don’t see anyone else asking.
Thanks so much!
Tiffany
Hello Tiffany!
Since each stitch pattern is unique, the gauge can definitely differ amongst them. Make sure to practice each stitch pattern a little and check your gauge before starting on the entire block!
Depending on the fiber content of your yarn, blocking will help make the shape and width of the cowl more uniform. Pure wool and all other animal fibers block out especially well!
Hope this helps! Enjoy! -Alyson
Planning a dramatic wrap using your pattern in super-bulky malabrigo rasta, so will be using massive needles and a very much smaller number of stitches. I am not certain how to scale down section three especially – would you be able to give me a small number of stitches that could be multiplied up to work for all thee sections please? I’d be so grateful.
Very many thanks from London, both for pattern and advice!
Hello Carolyn,
Thanks so much for writing in! What a fun idea to change the scale of this graphic pattern. What gauge are you getting for this yarn? The sizing will always depend on the tension of the fabric that you would like.
Once you figure out how many stitches you can get in each 10cm measurements and determine how wide you would like it to be you can multiply the number of stitches by 10cm and figure out how many stitches to cast on. Make sure that you turn it into an odd number (if it isn’t already) so that the stitch patterns are distributed correctly.
Best of luck! -Alyson
Muito bonito
I started this cowl for my daughter who is 2 years old.. I have reduced the width a bit but am having trouble deciding the length (circumference) of the cowl. Could you suggest a length that would be OK for a toddler? Also i do not want to knit the third block.. Just the first and the second… What row should i end with then when i am joining the two ends?
Hello Aisha!
From a quick google search, it looks like a standard circumference for a toddler/child’s sized cowl is about 48″. I would make each color block about 24″ so that you have equal parts! Did you do the provisional cast on so that you can graft the pieces together? If you did, I would recommend ending with Row 5 of the second block as the pattern suggests. If you are going to stitch them together in the end then it really doesn’t matter which row you end with.
Best of luck! -Alyson
Any suggestions on how to get the edges to look near and flat like yours? I’m two thirds done and they look more nobbly with each color. I can’t seem to figure out the best way to carry the yarn up.
Hello Emily!
This is a very difficult thing to achieve for most knitters despite their years of experience! Carrying yarn up the edges of a pattern takes very careful tension control. There isn’t a full proof method to make sure your edges are smooth, just make sure you are keeping it taught enough, but not too tight so the fabric will pucker. I wish I had some more tangible advice! Best of luck! -Alyson
So I bought this kit today and I was so looking forward to knitting it. Unfortunately, I’m having the worst trouble with the rambler stitch. It simply looks like a rib stitch no matter how many times I try, and has no resemblance to the pictures posted. I have tried the modification of purling on the wrong side and it still doesn’t work. Is it a problem with my tension? is the pattern affected by the fact that I knit continental?
Hello Donna!
How frustrating! Knitting Continental shouldn’t affect the pattern at all, as long as you’re knitting the knits with the yarn in the back and the purls with the yarn in the front then you should be golden! Do you think you’re having trouble with knitting in the row below? Are you remembering to switch the row sequence after every 8 rows?
If you’d like to send over a photo feel free to write into customerservice AT purlsoho DOT com. Thanks for writing in! -Alyson
Hi,
I’m very new to knitting, when the pattern says to measure 20 inches from first cast does that mean to use a tape measure or to count the rows (previously the pdf states that 4 stitches is an inch, so does that also mean 4 rows=1 inch?)
Thanks!
Hello Britt!
Unfortunately just because the stitch gauge is 4 stitches to the inch, it doesn’t automatically guarantee that the row gauge is the same. If the dimensions are given in inches, like they are in this pattern, you can always feel free to measure with a tape measure!
If another pattern you have gives # of rows to measure your progress by, chances are they will also give you a more precise row gauge. Hope this helps! Best of luck! -Alyson
Hello,
I am currently working on the checked rose pattern, but it is not looking like your pictures. The yellow in the first half of the pattern is looking stretched out, but the yellow for the 2nd half of the pattern looks like the V’s in your picture. I’ve started over several times and it’s always coming out the same. Any idea’s as to what I’m doing wrong?
Hello Courtney!
How frustrating! Feel free to send us over a photo to customerservice AT purlsoho DOT com so that we may better be able to troubleshoot together! Thanks for writing in and best of luck! -Alyson
I used the provisional crochet cast on one step method. Before I get too far, I did rows 1-8 and then went back to the cast on to see if I could figure out which stitches to pick up at the end. It doesn’t seem real clear. Because row 2 dips into the cast on row with the k1 in the row below it now looks like I pick up one stitch and then it looks like I pick up 2 for the next stitch and then one and then 2. I know that is probably clear as mud, so maybe I’ll try another cast on with some other yarn and see if I can figure it out. I read somewhere to do a row of knit first before doing the knit below row. Maybe knit one row then start with row 1? not sure how that will look seamed up at the end. thanks.
Note to self: Use Provisional Cast On: a Two-Step Method. Works much better. Do over. Thanks for the great tutorials. 🙂
Hello, Katherine!
We are so glad that you like our tutorials! Thank your for writing in.
Best wishes,
Kumeko
Hello Katherine,
Provisional cast on is great because it leaves the stitches live within the crochet chain you’ve created. They aren’t super visible when you still have it attached to the crochet chain. Once you remove the chain, the stitches will sort of reappear and you won’t have to really pick up or recreate any new stitches. I would recommend doing it one stitch at time so that you make sure to catch each one!
Regarding knitting into the row below, you can finagle it to start this technique right after you do the cast on, but many knitters prefer to do one row of knitting first, just as you suggested.
I hope this helps! Happy knitting! -Alyson
I’m having problems with the Checked Rose stitch and I’m not sure what I’m doing wrong. I have unpicked a number of times and also tried test samples, but the pattern does not look the same as your picture. I’ll email over a picture of a sample piece to your customer service email account. The picture shows a loose V line that is appearing above and below a more compact V. Can you help please ?
Hello, Fiona.
Thank you so much for writing in! Have you recieved help for this stitch? If not, please let me know.
Happy knitting,
Kumeko
Hi,
I just wanted to say thanks for showing the reverse side of the pattern. It’s so helpful to have that visual aid! I see so many beautiful patterns that look beautiful on the right side but that are blah on the wrong side. I don’t know how to wear a cowl/scarf so that the wrong side never shows, so I like to knit patterns that are attractive on both sides. Please continue to include wrong-side photos with your patterns!
All the best,
-hazel
P.S. – I used the Rambler Pattern section to knit a cowl in the round, and I have linked back to your pattern. Pix coming once blocking is complete. Thanks again!
I have just transitioned from block 1 to block 2 and it looks like I have somehow made the block 2 right side match the wrong side of block 1. I am 99% sure that I ended on row 14 for block 1 (the row where you were knitting into the row below). I am going back to try again but don’t want to make the same mistake twice. How would I have made this mistake? Does it have something to do with turning or not turning the work?
Thanks so much!
Hi Sheridan,
Thanks for writing in and my apologies for the much delayed response. I am not sure how this happened. It does take several rows for the pattern of block 2 to appear. Block 1 finishes on the right side and block 2 should start on the wrong row. When in doubt I like to use a removal stitch marker to mark the front so that I do not get confused.
I hope that this information helps!
Happy knitting!
Cassy
Hello,
I’m in the progress of the first block, but the result of my knitting is flat (even flatter than the rib stitch!). How to make it looks like one up one down in the picture? I’m pretty sure I’m doing the “knitting into the row below” right. Is it because of the tension? Should I change the needle size (larger or smaller)? Thank you.
Hello, Yolanda!
Thank you very much for writing in! I am so sorry for the delayed response! I am sorry to hear that your knitting is looking flat! It could be your tension, are you getting 4 stitches to the inch? If not, try going up a needle size if you are getting more stitches per inch or going down in needle size if you are getting fewer stitches per inch. Please let us know if that helps or if you are still having trouble. We really want to help you get this!
Best wishes,
Kumeko
I was in the Checked Rose Fabric section, in the middle of Row 1, and mistakenly knit instead of knitting into the row below or vice versa. How do I fix what looks like a dropped stitch when knitting into the row below? I have two different coloured strands (Colour A and B) of yarn stretched between the two knitting needles, and a loop (Colour A) coming up from the row below.
Hi Shannon,
Thanks for writing in! While we do not have a tutorial on how to fix fisherman’s rib, you can click here to see a YouTube tutorial on how to rip back fisherman’s rib and restart. I have been there and this can be so frustrating! Good luck!
Best,
Adam
Can the checkered rose pattern be done in the round?
Hello Bora,
Thanks for writing in. I have never seen this stitch done in the round, but I am sure that it can be done and that it exists. Though I searched the internet high and low for an in-the-round version of this stitch, I came up with nothing. Though we do not customize patterns, if you are interested in developing this stitch in the round, I have some advise. Since you are working in the round you will be substituting knit 1 below for purl 1 below. Also, you will be adjusting the beginning stitches for working in the round. For example, row 2 begins with a knit 2 — this is the selvedge, which is not necessary for knitting in the round. I hope you are able to make this stitch work in the round!
Best,
Adam