
Quilted Computer Sleeve

Sometimes when people hear about my job at the Purl Bee they imagine quilting bees and sewing circles, floral tea sets and lace doilies. Sounds lovely indeed, but the reality is that my life entails an incredible amount of time on my laptop! In fact, I hardly go anywhere without my computer. It gets thrown into my bag as I rush off to daycare pick-up; it rides the subway on my way into the store; and it bounces up the four flights of stairs to my sewing studio daily. With all this time in transit, my laptop needs protection!

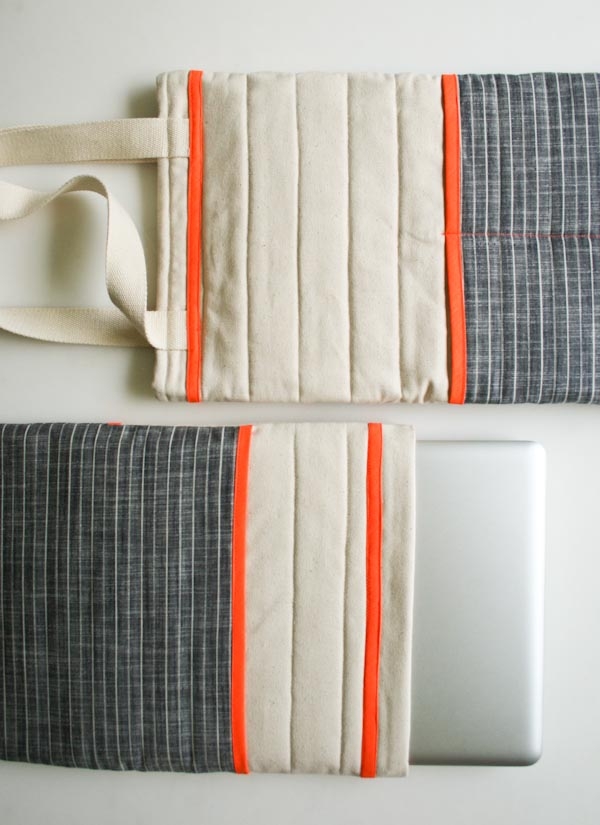
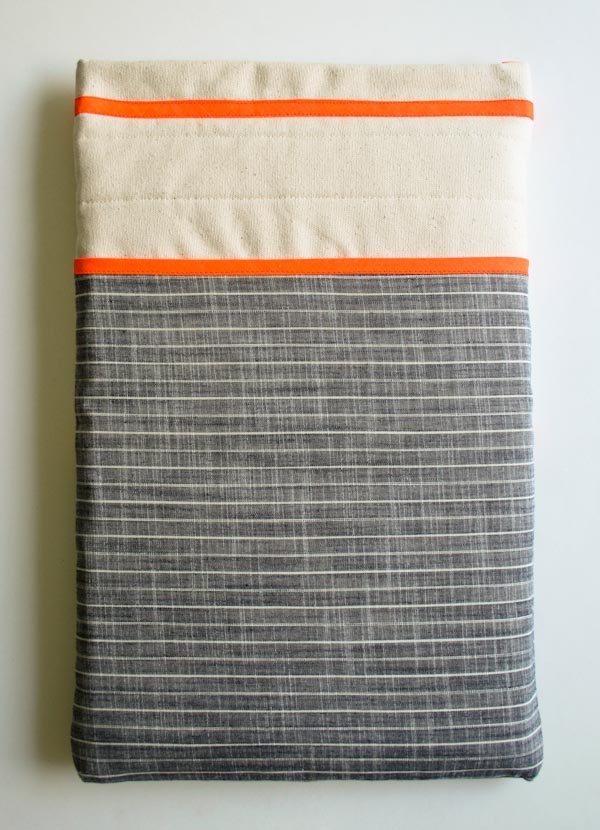
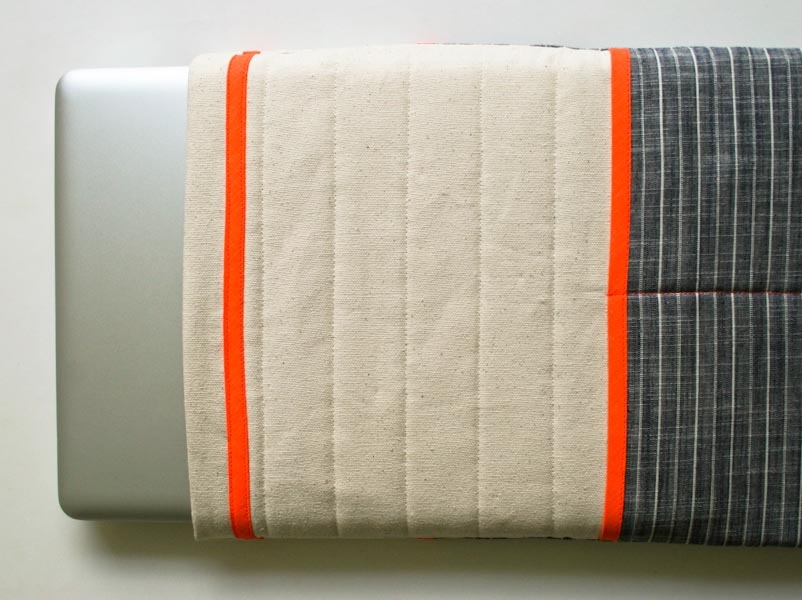
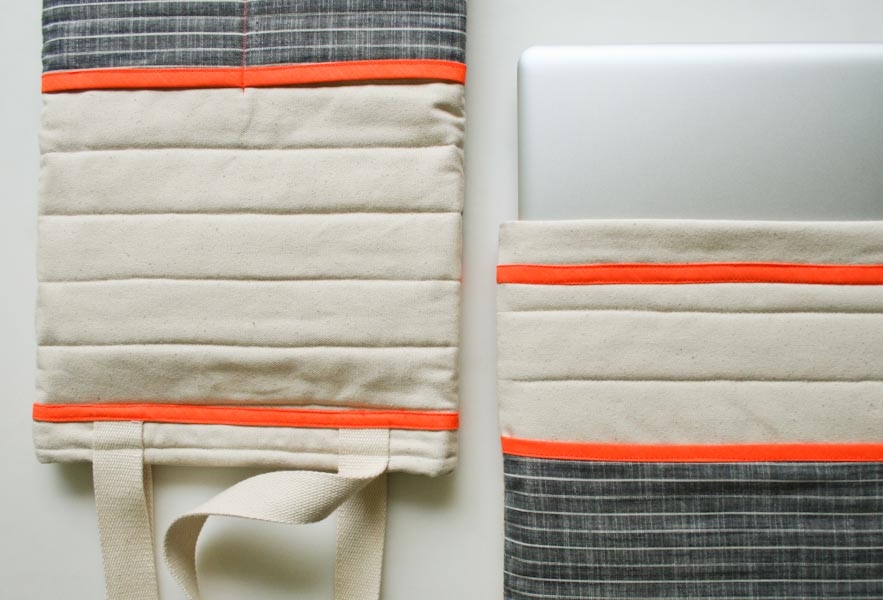
My Quilted Computer Sleeve brings together the two seemingly contradictory sides of my life: needle and thread, plus latest technology! I made my Sleeve with sturdy Organic Canvas and quilted it with our thickest cotton batting, so it is truly heavy duty. And for style, I made the pocket out of pretty yarn-dyed Slub Denim Stripes, finished with a bold neon bias tape. 
Using old-fashioned quilt making techniques to make an engineered laptop sleeve creates the perfect mix of quaint and modern, timeless and timely. And best of all, my trusty computer sidekick will be safe and secure on our daily travels! –Molly
Materials

- 1 yard of Purl Soho’s 10 oz Canvas in Natural
- ½ yard of Robert Kaufman’s Slub Denim Stripe from the Railroad Denim collection
- 3 yards of Neon Bias Tape in Orange
- Gutermann’s 100% Cotton Thread in color 1040
- Mettler’s Neon Thread in Devil Red (or Orange)
- One craft sized Supreme Cotton Batting
- 1 package of 5/8-inch Velcro in white
If you’d like your sleeve to have handles you will also need 2 yards of Sangle Cotton Webbing in Natural.
Tools:
- A package of curved safety pins
- A Hera Marker
- An erasable fabric marker
Size
Small (Large): To fit a 13-inch Macbook Pro (to fit a 15-inch Macbook Pro).
Note
You can make this cover to fit any laptop. Please follow the notes in the pattern for instructions on making a sleeve for other computers and sizes.
Pattern
Cutting
From the Canvas:
- Front Panel: 11 ½ inches X 31 inches (12 ¼ inches X 34 inches)
- Back Panel: 15 ¼ inches X 36 inches (16 inches X 39 inches)
From the Batting:
- Batting Panel: 9 ¼ inches X 31 inches (10 inches X 34 inches)
From the Railroad Denim:
- Packet Panel: 11 ½ inches X 18 ½ inches (12 ¼ inches X 20 inches)
Cut both sides of the Velcro into 9 ¼ -inch (10-inch) lengths
If you are making the version with the handles cut the Cotton Webbing into two 21-inch pieces.
Note for Other Sizes: Close your laptop and measure the width (the long side.) This will be represented as “W.” Then measure the depth (the shorter side.) This will be represented as “D.” You do not need to measure the height, which is usually around an inch and a half. Cut as follows:
From the Canvas:
- Front Panel: (D + 2.5) X (2W + 5.5)
- Back Panel: (D + 6.25) X (2W + 11.5)
From the Batting:
- Batting Panel: (D + 0.25) X (2W + 5.5)
From the Railroad Denim:
- Pocket Panel: (D + 2.5 ) X (W + 5.75)
Cut both sides of the Velcro into (D + 0.25) lengths
If you are making the version with the handles cut the Cotton Webbing into two 21-inch pieces.
Marking and Quilting
Note: The Canvas is the same on both sides but for the purposes of this pattern you’ll need to assign one side to the right side and one to be the wrong side.
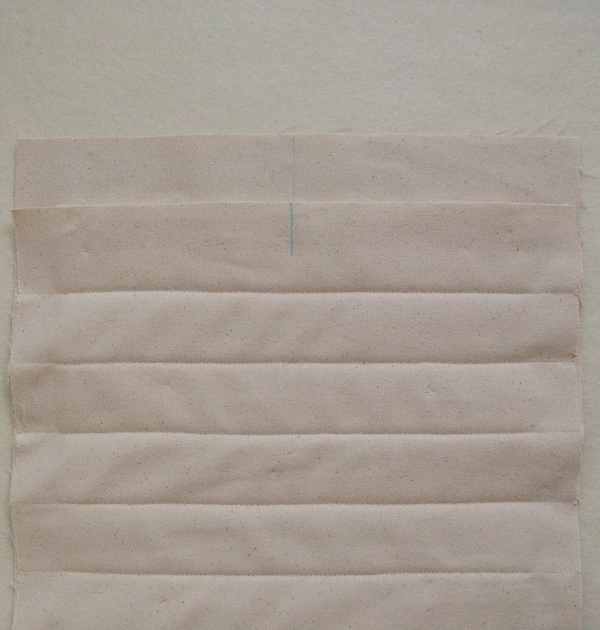
Mark the middle of each edge of the Front Panel, Back Panel, and Batting Panels with the erasable fabric marker.
Using the Hera Marker mark the right side of the Front Panel with parallel lines every 1 ½ inches across the width of the short side.
Lay the Back Panel wrong side up on a flat surface. Make sure it is smooth with no wrinkles. Using the side markings as a guide, center and lay the Batting Panel on top of the Back Panel.
Then center the Front Panel on top of the previous two, right side facing up. The Front Panel will be the same length as the Batting Panel but wider so you should not be seeing any batting.
This is your quilt sandwich.

Using the curved safety pins, pin the three layers of the quilt sandwich together every few inches. Make sure to keep the Batting and Front Panels centered as you work.
Go over the horizontally marked lines with the Hera marker one more time to make them really stand out.
Using your machine’s walking foot and the cotton thread, quilt along the horizontally marked lines. Quilt across the entire width of the front panel, backstitching at the beginning and end of each line.
Sewing the Main Panel
Cut the long sides of the Back Panel to match the long sides of the Front Panel.
Cut the short sides of the Back Panel to be 1 ½ inches longer than the Front Panel and Batting Panel.
Flip the whole thing over so that the Back Panel is on top.
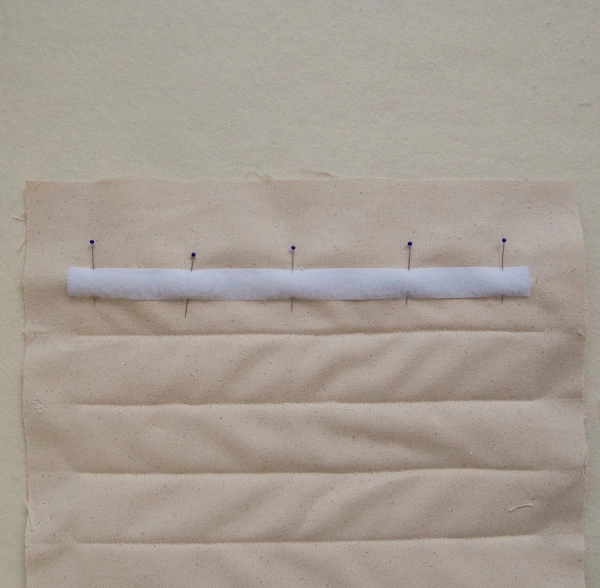
Pin one side of the Velcro, sticky side facing up, 2 ½ inches from the top short edge and centered in the width of the piece.
Repeat with the second length of Velcro along the bottom short side.
Using your walking foot and the cotton thread, edge stitch the Velcro around all four sides.
If you are making the Sleeve without the handles:
Flip the piece back so the Front Panel is on top.
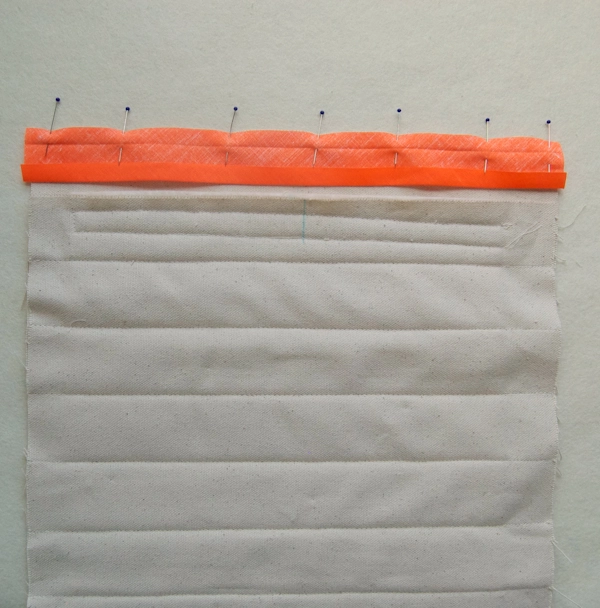
Cut a length of bias tape to match the length of the short side of the piece.
Open up one side of bias tape and with the wrong side of the bias tape facing up, pin its raw edge to a short side of the Back Panel.
Using the Neon Thread and your presser foot sew the bias tape to the Back Panel, using the fold line as a sewing guide.

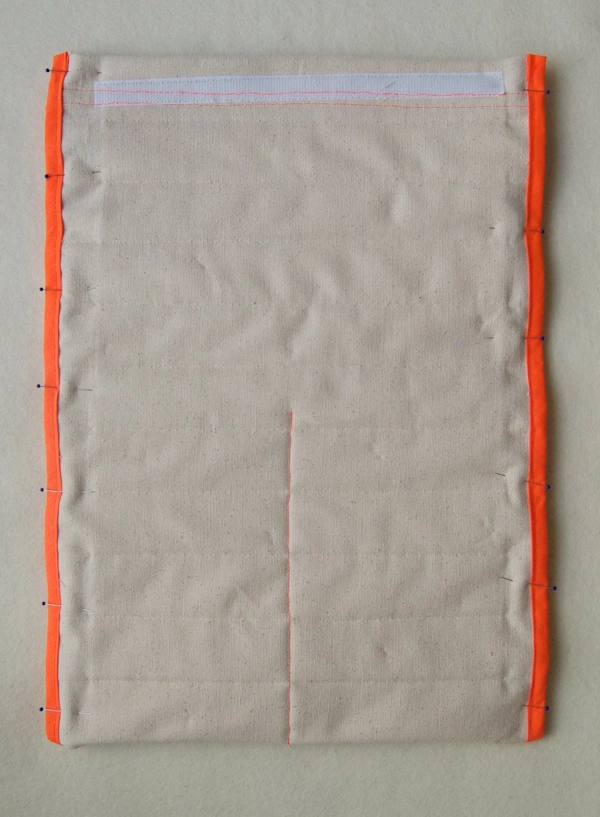
Press the short side of the Back Panel down 1 ½ inches towards the Front Panel. Press the bias tape over to the front side, encasing the raw edge of the Back Panel’s short side.
Pin both the Back Panel and the newly folded bias tape down into place through the bias tape.

Using your walking foot and the neon thread, edge stitch across the top edge of the bias tape, thus closing the bias tape and sewing the top fold down at the same time. Then edge stitch across the bottom edge of the bias tape to secure the fold.
Repeat for the short side at the opposite end.
This is the Main Panel.
To make the version with the handles please see my Inside Out Bag pattern and follow the instructions for attaching the handles. The only difference is that instead of making a 1-inch fold you will be making a 1 ½ -inch fold.
Adding the Pocket

Press the Pocket Panel wrong sides together so that one side is 7 ¼ inches (8 inches) and the other is 11 ¼ inches (12 inches.) This creates the Bottom Crease.
Note: If you are making a different size, fold the Pocket Panel at a roughly 3:2 ratio.
Cut bias tape to match the short sides of the Pocket Panel and edge stitch it onto each short side.

Place the Main Panel with the Front Panel facing up. Make sure you can still see the center markings at the edges of the Front Panel. This will be the bottom fold of your sleeve.
Pin the Pocket to the Main Panel, lining up the Bottom Crease with the Front Panel’s center markings. Using your walking foot and the neon thread, stitch the Pocket Panel to the Main Panel along the Bottom Crease.

Mark a center line on the Pocket Panel’s smaller side perpendicular to the bottom seam. Pin the Pocket Panel to the Front Panel along this line. Then using your walking foot and the neon thread, sew the two panels together along the line.

Cut two lengths of bias tape each 2 inches longer than the long raw sides of the sleeve.
Leaving a 1-inch overhang at each end, pin these lengths over the raw edges. Tuck the raw ends of the bias tape inside itself to hide the ends.
Edge stitch the bias tape using your walking foot and the neon thread. Make sure you catch both sides of the bias tape.
Fold the sleeve in half, right sides together, along the bottom fold and pin the left and right sides together.
Sew the sides together with a ½-inch seam allowance using your walking foot and the cotton thread. Make sure you do not catch any bias tape in this seam.
Turn the sleeve right sides out and you’re all done!


😀 Thank you so much for posting this! I can't wait to try and make one!
this is lovely! I might just be brave enough to give it a try. I've never officially quilted, but this is tiny and tackleable.
This is lovely. I made a quilted sleeve for my daughter's laptop from Liberty fabric from the V&A museum in London. The fabric was reproduced from historical prints seen in the Quilts exhibition there a couple of years ago. I wondered what the originators of those prints, perhaps 200 years ago, would make of how they were being used now! Albeit confused, I hope they would be pleased that we still love their designs.
Loveeeee this!!!!
And I really need one 🙂
Thank you.
Cat.
This is gorgeous!!
I know what you mean about the seemingly contradictory sides of your life… I'm a self-confessed geek, gadget addict and girl-gamer. But I'm also a knitter, crocheter, quilter and cross stitcher. I love that I have diverse interests… I like to keep people guessing! 😉
Fab tute as always. Love your blog!!! Xoxo
This really is pretty. I too am a geeky, gadget (but senior citizen) person. I can't go anywhere without my computer, iPad, iPhone, and a knitting, stitching, crocheting project. I got started in the geek world early on because I was a teacher and yearbook advisor for many years (yearbook all done on computer). Now retired, I use my gadgets to search for sewing, knitting, crochet patterns, and ideas for beautiful handmade cards. It's so easy now to stay up with the newest and best of everything. Love PurlSoho/Purlbee ideas and patterns. I just finished two gorgeous lap duvets in Liberty Lawn and ready to begin a Nani Iro double gauze one. I really love the look of this bag. It would be very handy for my travels. I had never seen the curved safety pins before. Pure genius and so simple. Thanks so much.
Love this and all the projects you so generously share on Purl Bee.
Would you consider a post sometime on how you organize your workspace, tools, ongoing projects? Also one on how you track your sewing projects and inspirations? Yarn folks have Ravelry. But I haven't figured out how to queue up the amazing sewing and craft projects I find on Purl other than just keeping random lists! Lap duvet, needle case, lavender sachets, Sashiko placemats and this bag are on my current list!
Thanks!
Hi Jane!
Thanks for the suggestion, although I'm not sure I can subject our readers to my messy workspace! As for a way to keep track of sewing projects, we use pintrest to keep track of things that inspire us. It's a great way to organize those lists!
Thank you!
Molly
Thanks, Molly. I haven't tried Pinterest yet, but plan to. Will need to get my teen daughter to give me a tutorial! I just browsed Purl's Pinterest boards. Stunning!
Thx,
Jane
This looks like an awesome project, rounding up my materials now to give it a go.
The link to the sturdy Organic Canvas seems to be broken. Do you recommend using the 10-oz or 24-oz for this project?
Hi Claire-
Thank you so much for pointing this out! It should be the 10 oz canvas. I have fixed the link, and it should go to the correct place now.
Thanks again!
Molly
I’ve been looking over your bags to sew since I was wanting to make a book bag. But not the big ones you fill up at the library. Instead something that you can use for commuting to toss in the latest paperback pocketbook.
Although I definitely don’t need it quilted, this may do if I can omit the quilting part.
Hint: if you guys ever thought of adding a wee something simple, a commuters book bag for a pocketbook would sure be appreciated. I love how you make your patterns so easy to understand — Thanks!