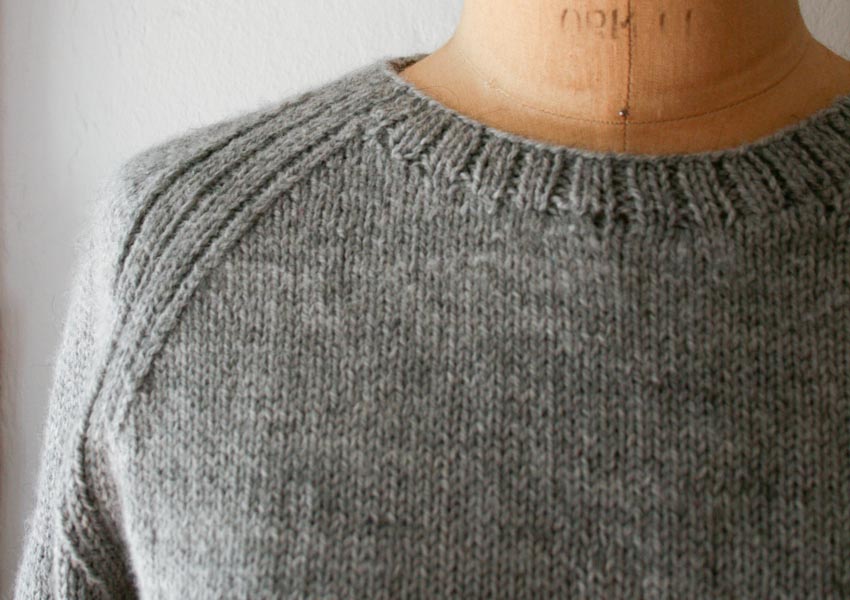
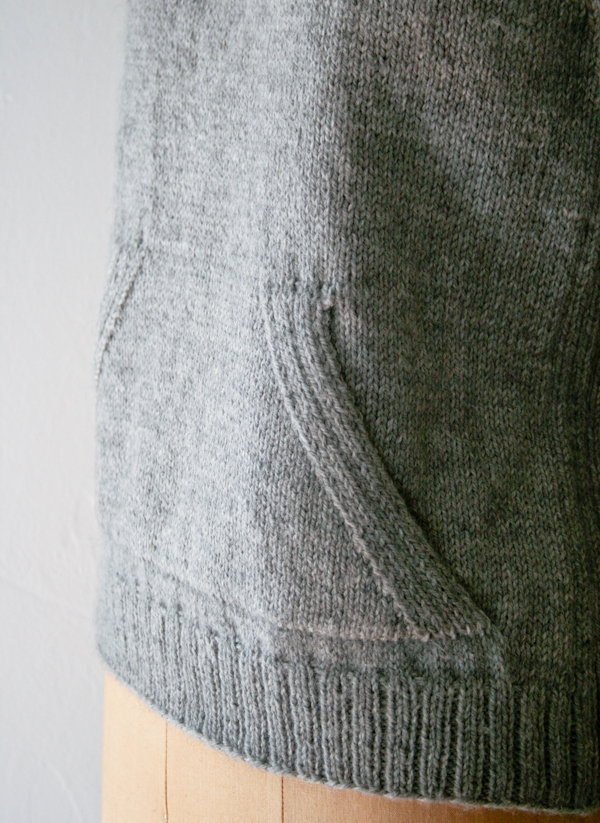
Sweatshirt Sweater
I grew up wearing a school uniform, which, for me, turns out to be a hard habit to kick. Some people seem to totally reject their childhoods of forced attire, opting for recklessly eclectic wardrobes. But I can’t fight it; I’m a uniform kid, through and through.

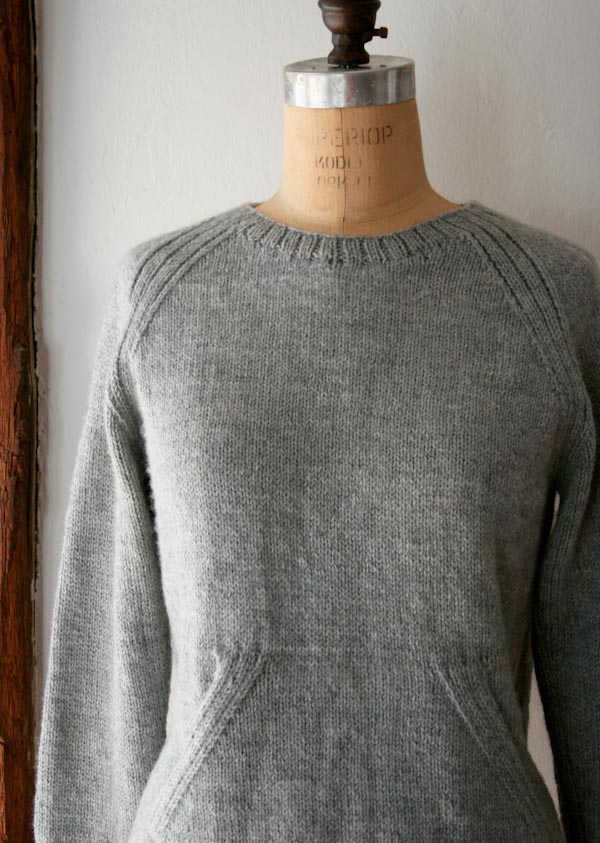
I am sure you’ll be relieved to read I am no longer sporting ill-fitting plaid jumpers, but there is rarely a day that goes by that I’m not in my own personal uniform. Lately, it’s been dark-wash Levi’s paired with some form of a baseball T or an athletic-gray sweatshirt. Naturally, I need handknit interpretations of these basics! I accomplished the first this past autumn when I stitched up the Everyday Linen Raglan. And now, I’m happy to add a thicker, cozier, woolier version to my collection… the Sweatshirt Sweater!

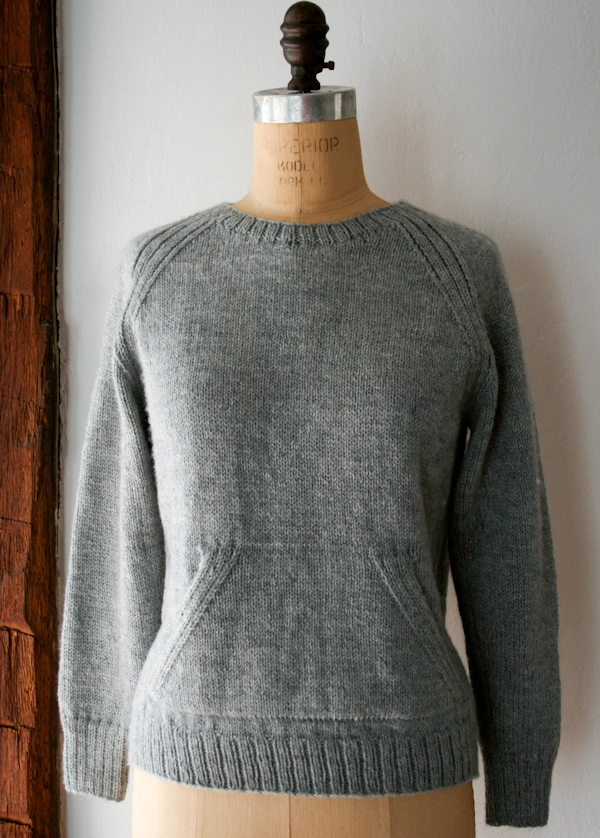
The Sweatshirt Sweater is my new go-to garb, spacious enough for under-layers and soft enough to go without. It’s knit in Swans Island 100% organic merino, a beautiful light worsted yarn that evokes a natural refinement. I’ll be in this uniform for these last snowy days of March, all the way through the crisp nights of spring!
Spoiler alert: as the seasons change, so does my uniform, so keep your eye out for some more knit basics in the months to come! -Laura
Designed by Purl Soho designer, Laura Ferguson.
Share your progress and connect with the community by tagging your pics with #PurlSoho, #PurlSohoBusyHands, and #PurlSohoSweatshirtSweater. We can’t wait to see what you make!
Materials
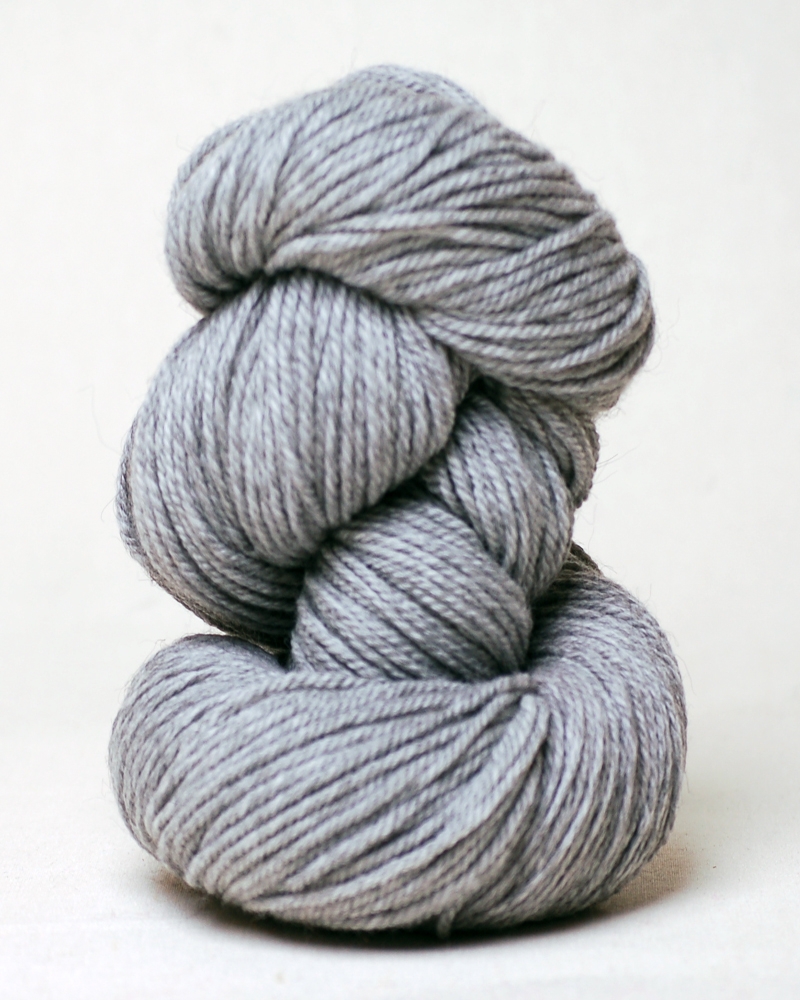
- 5 (5, 6, 6, 7) (7, 8, 9, 9) skeins of Swans Island’s Worsted, 100% organic merino wool. Each skein is 250 yards/ 100 grams; approximately 1095 (1250, 1375, 1495, 1620) (1750, 1940, 2110, 2265) yards required. We used the color Seasmoke.
NOTE: We no longer carry Swans Island’s Worsted. A wonderful alternative is Purl Soho’s Morning, 75% organically grown cotton and 25% yak; approximately 6 (7, 8, 8, 9) (10, 11, 11, 12) skeins required.
You’ll also need…
- A set of US 6 (4 mm) double pointed needles
- US 6, 16-inch circular needles
- US 6, 24-inch or 32-inch circular needles
- A set of US 7 (4.5 mm) double pointed needles
- US 7, 24- or 32-inch circular needles
- Spare US 7, 16-inch or longer circular needles (optional, needed only if making Pouch)
- Stitch markers, including one unique
- A removable stitch marker
NOTE: Looking to knit your sleeves in double-time? Swap the double pointed needles for 32-inch or longer circular needles, and check out our Magic Loop: Two At A Time Tutorial!
Gauge
22 stitches and 28 rounds = 4 inches in stockinette using larger needles
Sizes
33¾ (37½, 41, 44¾, 48¼) (52, 55¾, 59¼, 63)
To fit actual chest circumference of 28-30 (32-34, 36-38, 40-42, 44-46) (48-50, 52-54, 56-58, 60-62) with 4-6 inches of ease.
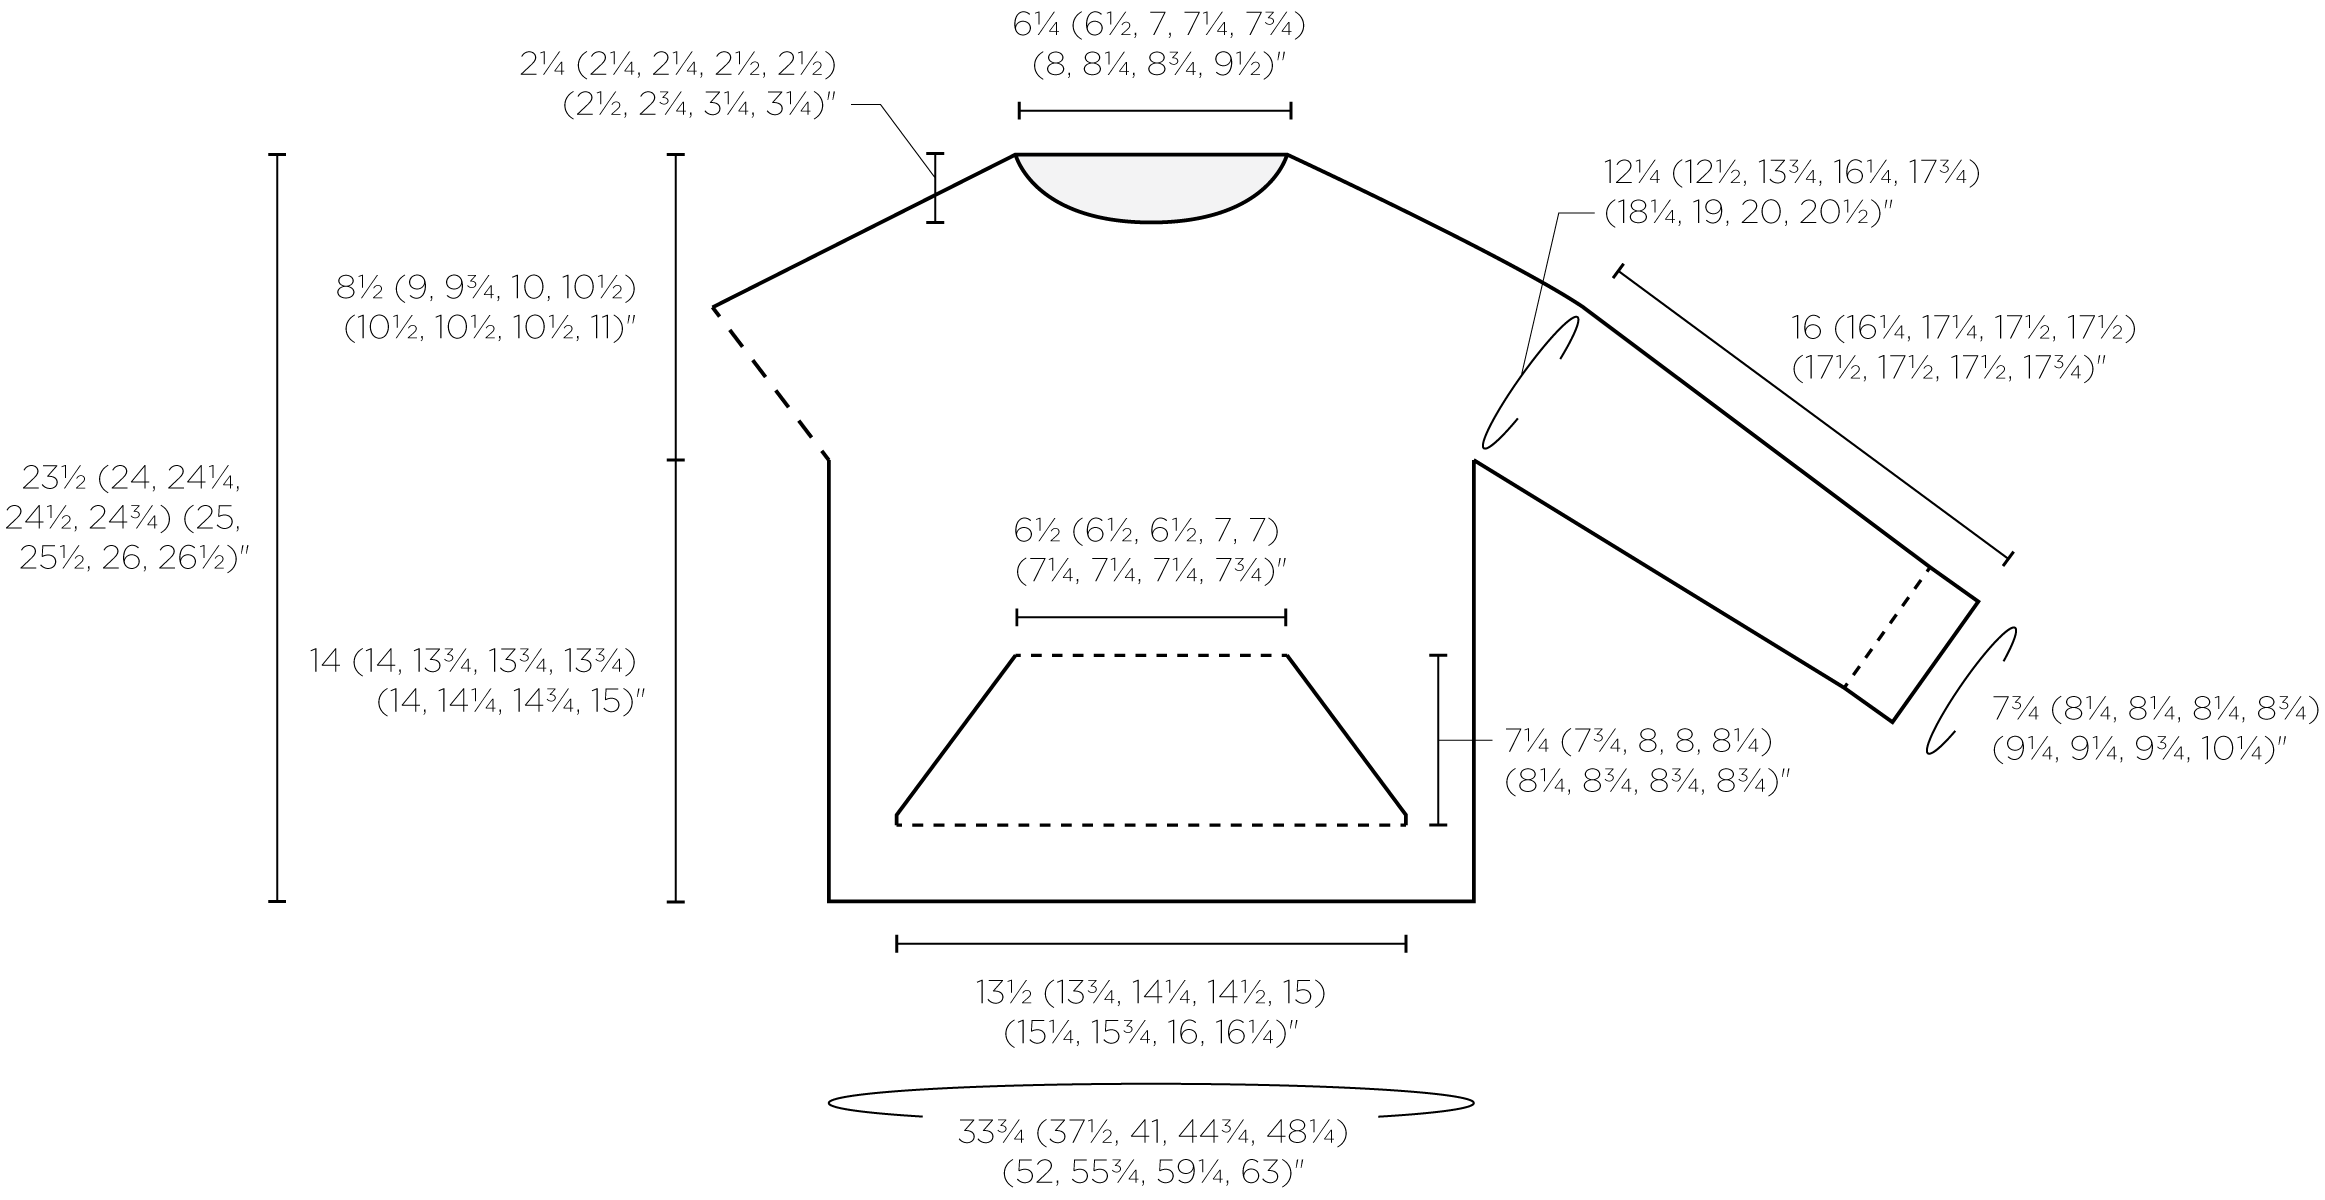
- Finished Chest Circumference: 33¾ (37½, 41, 44¾, 48¼) (52, 55¾, 59¼, 63) inches
- Finished Length from Bottom Edge to Underarm: 14 (13¾, 13½, 13¾, 13¾) (14, 14¼, 14¾, 15) inches, with directions to adjust
- Finished Length from Shoulder to Underarm: 8½ (9¼, 9¾, 9¾, 10) (10, 10¼, 10¼, 10½) inches
- Finished Length from Cuff to Underarm: 16 (16¼, 17¼, 17½, 17½) (17½, 17½, 17½, 17¾) inches, with direction to adjust
Sample: The sweater shown here is size 37½, worn with 3½ inches of ease.
NOTE: We have updated this pattern to include more sizes. If, for some reason, you would like the original pattern, please contact customerservice@purlsoho.com, and we’ll send you the PDF!
Notes
SK2P (SLIP 1, K2TOG, PSSO)
Slip 1 purlwise, knit 2 together, pass slipped stitch over knit stitch and off the needle. [2 stitches decreased]
K3TOG (KNIT 3 TOGETHER)
Insert right needle into next three stitches knitwise, knit all three stitches together as if they were one stitch. [2 stitches decreased]
Pattern
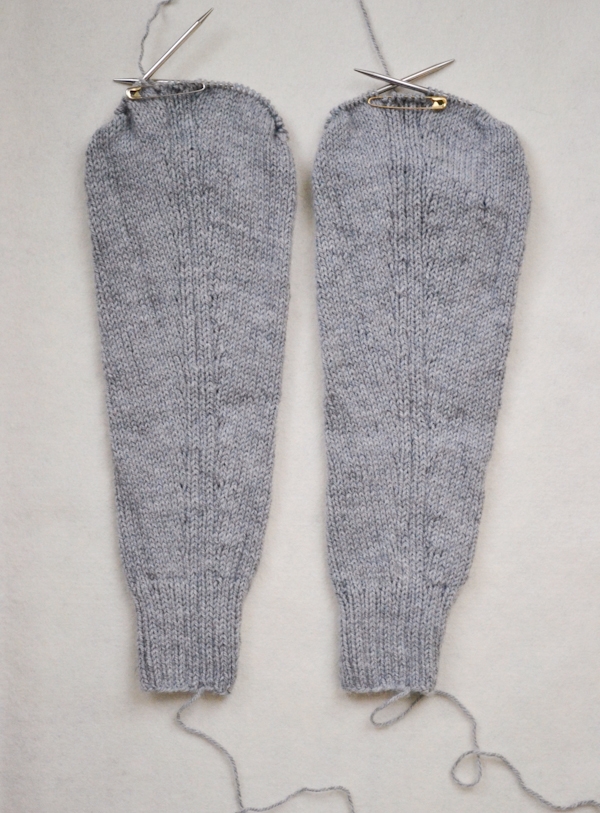
Sleeves
Work Cuff
With smaller double pointed needles, use a Long Tail Cast On to cast on 42 (45, 45, 45, 48) (51, 51, 54, 57) stitches.
Place unique marker and join for working in the round, being careful not to twist the stitches.
Round 1: *K2, p1, repeat from * to end of round.
Repeat Round 1 until piece measures 3 inches from cast-on edge.
Shape Sleeve
Change to larger double pointed needles.
Next Round: K35 (38, 38, 38, 41) (44, 44, 47, 50), place marker (pm), [p1, k2] 2 times, p1.
**Increase Round: Make 1 left (m1L), knit to next marker, make 1 right (m1R), slip marker (sm), [p1, k2] 2 times, p1. [2 stitches increased]
Next Round: Knit to next marker, [p1, k2] 2 times, p1.
Repeat last round 4 (5, 4, 2, 1) (1, 1, 1, 1) more time(s).
Repeat from ** 8 (9, 12, 18, 15) (15, 20, 22, 24) more times. [60 (65, 71, 83, 80) (83, 93, 100, 107) stitches]
***Repeat Increase Round. [2 stitches increased]
Next Round: Knit to next marker, [p1, k2] 2 times, p1.
Repeat last round 6 (7, 6, 4, 3) (3, 3, 3, 3) more times.
Repeat from *** 2 (0, 0, 1, 7) (7, 4, 3, 1) more time(s). [66 (67, 73, 87, 96) (99, 103, 108, 111) stitches]
Repeat Increase Round. [68 (69, 75, 89, 98) (101, 105, 110, 113) stitches]
Next Round: Knit to next marker, [p1, k2] 2 times, p1.
Repeat last round until piece measures 16 (16¼, 17¼, 17½, 17½) (17½, 17½, 17½, 17¾) inches from cast-on edge, or to desired length to Underarm.
Next Round: Knit 0 (1, 3, 5, 7) (9, 11, 13, 15), place previous 7 (9, 13, 17, 21) (25, 29, 33, 37) stitches onto a stitch holder or scrap yarn, removing stitch markers.
Place remaining 61 (60, 62, 72, 77) (76, 76, 77, 76) stitches onto stitch holders or scrap yarn.
Make a second Sleeve identical to the first.
Body
Work Bottom Ribbing
With smaller 24- or 32-inch circular needles, use a Long Tail Cast On to cast on 168 (186, 204, 222, 240) (258, 276, 294, 312) stitches.
Place unique marker and join for working in the round, being careful not to twist the stitches.
Round 1: *K2, p1, repeat from * to end of round.
Repeat Round 1 until piece measures 2¼ (2¼, 2¼, 2½, 2½) (2½, 2½, 2½, 2½) inches from cast-on edge.
Begin Main Body
Increase Round: *K5, knit 1 in front and back (kfb), [k8, kfb] 8 (9, 10, 11, 12) (13, 14, 15, 16) times, [k2, p1] 2 times, repeat from * to end of round. [186 (206, 226, 246, 266) (286, 306, 326, 346) stitches]
Next Round: With larger 24- or 32-inch circular needles, *k86 (96, 106, 116, 126) (136, 146, 156, 166), pm, [p1, k2] 2 times, p1, repeat from * to end of round.
Next Round: *Knit to next marker, [p1, k2] 2 times, p1, repeat from * to end of round.
Repeat last round until piece measures 3¼ (3¼, 3¼, 3½, 3½) (3½, 3½, 3½, 3½) inches from cast-on edge.
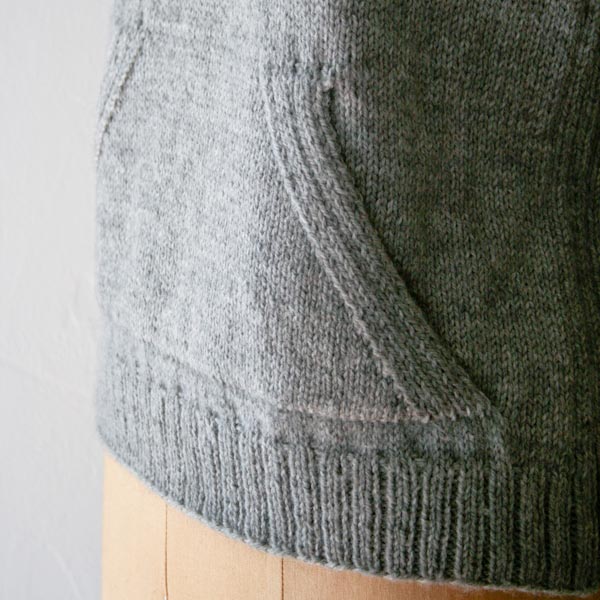
Make Pouch (Optional)
NOTE: If you are not making a Pouch, skip to Continue Body section, below.
MARK FOR POUCH + WORK BODY

Set-Up Round: K7 (11, 15, 19, 23) (27, 31, 35, 39), mark 7th (11th, 15th, 19th, 23th) (27th, 31th, 35th, 39th) stitch with removable stitch marker, *knit to next marker, [p1, k2] 2 times, p1, repeat from * to end of round.
Work in established pattern until piece measures 10½ (11, 11¼, 11½, 11¾) (11¾, 12¼, 12¼, 12¼) inches from cast-on edge.
Leave working yarn attached to Body.
With spare larger circular needles, starting with (and including) marked stitch, slip needle under right leg of next 74 (76, 78, 80, 82) (84, 86, 88, 90) stitches.
Remove removable marker.
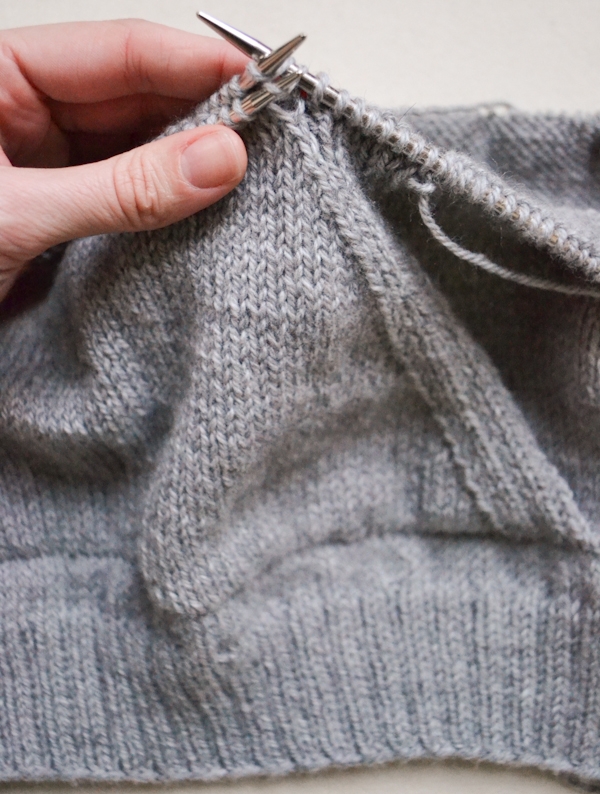
WORK POUCH
With right side facing you, join yarn to Pouch stitches on spare needles and work back and forth in rows over just these 74 (76, 78, 80, 82) (84, 86, 88, 90) stitches…
Row 1 (right side): K1, p1, [k2, p1] 2 times, knit to last 8 stitches, [p1, k2] 2 times, p1, k1.
Row 2 (wrong side): P1, k1, [p2, k1] 2 times, purl to last 8 stitches, [k1, p2] 2 times, k1, p1.
Row 3 (Decrease Row): K1, p1, [k2, p1] 2 times, slip slip knit (ssk), knit to last 10 stitches, knit 2 together (k2tog), [p1, k2] 2 times, p1, k1. [2 stitches decreased]
Row 4-7: Repeat Rows 2 and 3 two times. [4 stitches decreased]
Row 8: Repeat Row 2.
Row 9: Repeat Row 1.
Row 10: Repeat Row 2.
Repeat Rows 3–10 four (4, 5, 5, 5) (5, 5, 5, 5) more times. [44 (46, 42, 44, 46) (48, 50, 52, 54) stitches remain]
Repeat Row 3 then Row 2 four (4, 3, 3, 4) (4, 4, 6, 6) more time(s). [36 (38, 36, 38, 38) (40, 42, 40, 42) stitches remain]
Repeat Row 3 then Rows 8-10 zero (1, 0, 0, 0) (0, 1, 0, 0) more time(s). [36 (36, 36, 38, 38) (40, 40, 40, 42) stitches remain]
Cut yarn, leaving stitches on needles.
GRAFT POUCH TO BODY
Returning to Body and continuing with working yarn, k25 (30, 35, 39, 44) (48, 53, 58, 62); holding Pouch and Body needles parallel to each other with Pouch in front, *k1 from Pouch together with one from Body, repeat from * until all Pouch stitches have been knit; continuing in the round with Body stitches, **knit to next marker, [p1, k2] 2 times, p1, repeat from ** to end of round.
Continue Body

Work in established pattern until Body measures 14 (14, 13½, 13½, 13¼) (13½, 14, 14½, 14½) inches from cast-on edge or desired length to Underarms.
Divide Front + Back
Dividing Round: [Knit to next marker, remove marker, [p1, k2] 2 times, p1, k 0 (1, 3, 5, 7) (9, 11, 13, 15), place previous 7 (9, 13, 17, 21) (25, 29, 33, 37) stitches onto stitch holder or scrap yarn for Underarm] 2 times. [172 (188, 200, 212, 224) (236, 248, 260, 272) total stitches remain: 86 (94, 100, 106, 112) (118, 124, 130, 136) stitches each for Front and Back]
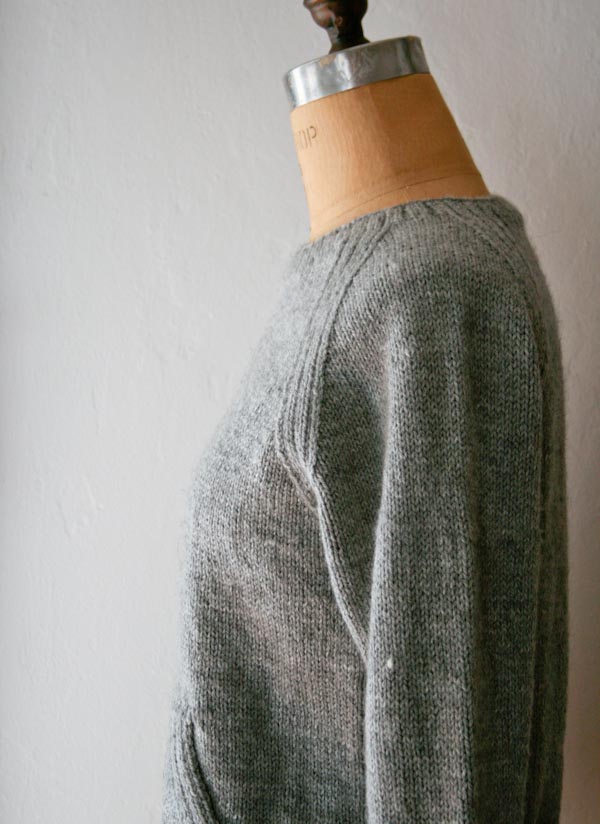
Join Body + Sleeves
NOTE: For help with this step, please visit our Joining Sleeves To Body tutorial.
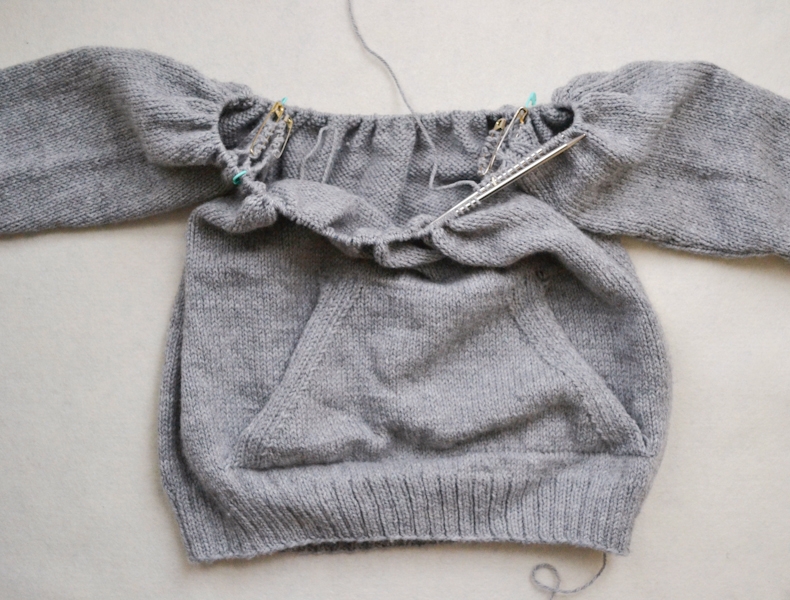
Joining Round: [Knit to next set of on-hold stitches, pm, holding Sleeve’s on-hold Underarm stitches parallel to Body’s on-hold Underarm stitches, knit Sleeve stitches, pm] 2 times, using unique marker for last marker (new end of the round). [294 (308, 324, 356, 378) (388, 400, 414, 424) total stitches: 86 (94, 100, 106, 112) (118, 124, 130, 136) stitches each for Front and Back; 61 (60, 62, 72, 77) (76, 76, 77, 76) stitches for each Sleeve]
Yoke
Begin Raglan Shaping

Round 1: *P1, k2, p1, knit to 4 stitches before next marker, p1, k2, p1, sm, k2, p1, knit to three stitches before next marker, p1, k2, sm, repeat from * to end of round.
Repeat Round 1 two more times.
Decrease Round: *P1, k2, p1, ssk, knit to 6 stitches before next marker, k2tog, p1, k2, p1, sm, k2, p1, ssk, knit to 5 stitches before next marker, k2tog, p1, k2, sm, repeat from * to end of round. [8 stitches decreased]
Repeat Round 1.
Repeat last two rounds 15 (17, 19, 18, 19) (19, 18, 17, 18) more times, then repeat Decrease Round 1 more time. [158 (156, 156, 196, 210) (220, 240, 262, 264) total stitches remain: 52 (56, 58, 66, 70) (76, 84, 92, 96) stitches each for Front and Back; 27 (22, 20, 32, 35) (34, 36, 39, 36) stitches for each Sleeve]
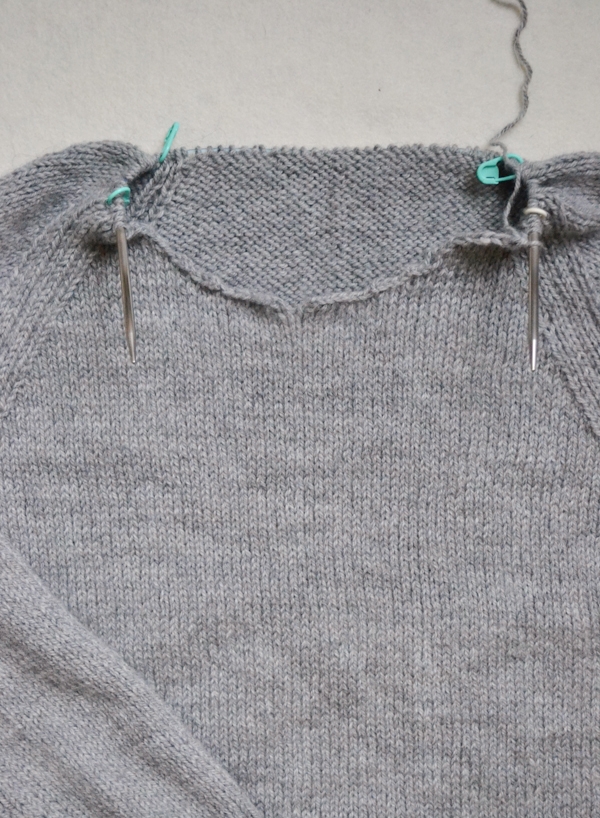
Continue Raglan + Shape Neckline
NOTE: In this section you will be working back and forth in rows, turning the work at the end of each row.
SIZES 33¾, 37½, 41, 44¾, AND 48¼ ONLY
Row 1 (right side): P1, k2, p1, k22 (24, 25, 29, 31) (-, -, -, -), turn work so wrong side is facing you. (This is now the end of the row, and the end-of-round marker is just a regular marker.)
Row 2 (wrong side): Bind off 6 (6, 7, 8, 8) (-, -, -, -) stitches purlwise, [purl to 4 stitches before next marker, k1, p2, k1, sm, p2, k1, purl to 3 stitches before next marker, k1, p2, sm, k1, p2, k1] 2 times, purl to end of row. [152 (150, 149, 188, 202) (-, -, -, -) stitches remain]
Row 3 (Raglan Shaping Row): Bind off 6 (6, 7, 8, 8) (-, -, -, -) stitches knitwise, [knit to 6 stitches before next marker, k2tog, p1, k2, p1, sm, k2, p1, ssk, knit to 5 stitches before next marker, k2tog, p1, k2, sm, p1, k2, p1, ssk] 2 times, knit to end of row. [138 (136, 134, 172, 186) (-, -, -, -) stitches remain]
Row 4: Bind off 3 (3, 3, 3, 4) (-, -, -, -) stitches purlwise, [purl to 4 stitches before next marker, k1, p2, k1, sm, p2, k1, purl to 3 stitches before next marker, k1, p2, sm, k1, p2, k1] 2 times, purl to end of row. [135 (133, 131, 169, 182) (-, -, -, -) stitches remain]
Row 5 (Raglan Shaping Row): Bind off 3 (3, 3, 3, 4) (-, -, -, -) stitches knitwise, [knit to 6 stitches before next marker, k2tog, p1, k2, p1, sm, k2, p1, ssk, knit to 5 stitches before next marker, k2tog, p1, k2, sm, p1, k2, p1, ssk] 2 times, knit to end of row. [124 (122, 120, 158, 170) (-, -, -, -) stitches remain]
Row 6: Bind off 2 (2, 2, 2, 3) (-, -, -, -) stitches purlwise, [purl to 4 stitches before next marker, k1, p2, k1, sm, p2, k1, purl to 3 stitches before next marker, k1, p2, sm, k1, p2, k1] 2 times, purl to end of row. [122 (120, 118, 156, 167) (-, -, -, -) stitches remain]
Row 7 (Raglan Shaping Row): Bind off 2 (2, 2, 2, 3) (-, -, -, -) stitches knitwise, [knit to 6 stitches before next marker, k2tog, p1, k2, p1, sm, k2, p1, ssk, knit to 5 stitches before next marker, k2tog, p1, k2, sm, p1, k2, p1, ssk] 2 times, knit to end of row. [112 (110, 108, 146, 156) (-, -, -, -) stitches remain]
SIZE 33¾ ONLY
Row 8: [Purl to 4 stitches before next marker, k1, p2, k1, sm, p2, k1, purl to 3 stitches before next marker, k1, p2, sm, k1, p2, k1] 2 times, purl to end of row.
Row 9 (Raglan Shaping Row): Ssk, [knit to 6 stitches before next marker, k2tog, p1, k2, p1, sm, k2, p1, ssk, knit to 5 stitches before next marker, k2tog, p1, k2, sm, p1, k2, p1, ssk] 2 times, knit to last 2 stitches, k2tog. [10 stitches decreased]
Repeat Rows 8 and 9 two more times. [82 total stitches remain: 6 stitches each for Right and Left Fronts; 40 stitches for Back; 15 stitches for each Sleeve]
Repeat Row 8.
Next Row (Raglan Shaping Row): K2tog, p1, k2, p1, sm, k2, p1, ssk, knit to 5 stitches before next marker, k2tog, p1, k2, sm, p1, k2, p1, ssk, knit to 6 stitches before next marker, k2tog, p1, k2, p1, sm, k2, p1, ssk, knit to 5 stitches before next marker, k2tog, p1, k2, sm, p1, k2, p1, ssk. [74 total stitches remain: 5 stitches each for Right and Left Front; 38 stitches for Back; 13 stitches for each Sleeve]
Repeat Row 8.
Next Row (Raglan Shaping Row): K1, p1, k2, p1, sm, k2, p1, ssk, knit to 5 stitches before next marker, k2tog, p1, k2, sm, p1, k2, p1, skp2 (see Notes), knit to 7 stitches before next marker, k3tog (see Notes), p1, k2, p1, sm, k2, p1, ssk, knit to 5 stitches before next marker, k2tog, p1, k2, sm, p1, k2, p1, k1. [66 total stitches remain: 5 stitches each for Right and Left Front; 34 stitches for Back; 11 stitches for each Sleeve]
SIZE 37½ ONLY
Repeat Rows 6 and 7 two more times. [86 total stitches remain: 8 stitches each for Right and Left Front; 46 stitches for Back; 12 stitches for each Sleeve]
Next Row: [Purl to 4 stitches before next marker, k1, p2, k1, sm, p2, k1, purl to 3 stitches before next marker, k1, p2, sm, k1, p2, k1] 2 times, purl to end of row.
Next Row (Raglan Shaping Row): Ssk, k2tog, p1, k2, p1, sm, k2, p1, knit to 3 stitches before next marker, p1, k2, sm, p1, k2, p1, ssk, knit to 6 stitches before next marker, k2tog, p1, k2, p1, sm, k2, p1, knit to 3 stitches before next marker, p1, k2, sm, p1, k2, p1, ssk, k2tog. [80 total stitches remain: 6 stitches each for Right and Left Front; 44 stitches for Back; 12 stitches for each Sleeve]
Next Row: [Purl to 4 stitches before next marker, k1, p2, k1, sm, p2, k1, purl to 3 stitches before next marker, k1, p2, sm, k1, p2, k1] 2 times, purl to end of row.
Next Row (Raglan Shaping Row): K2tog, p1, k2, p1, sm, k2, p1, knit to 3 stitches before next marker, p1, k2, sm, p1, k2, p1, skp2 (see Notes), knit to 7 stitches before next marker, k3tog (see Notes), p1, k2, p1, sm, k2, p1, knit to 3 stitches before next marker, p1, k2, sm, p1, k2, p1, ssk. [74 total stitches remain: 5 stitches each for Right and Left Front; 40 stitches for Back; 12 stitches for each Sleeve]
Next Row: [Purl to 4 stitches before next marker, k1, p2, k1, sm, p2, k1, purl to 3 stitches before next marker, k1, p2, sm, k1, p2, k1] 2 times, purl to end of row.
Next Row (Raglan Shaping Row): K1, p1, k2, p1, sm, k2, p1, knit to 3 stitches before next marker, p1, k2, sm, p1, k2, p1, skp2, knit to 7 stitches before next marker, k3tog, p1, k2, p1, sm, k2, p1, knit to 3 stitches before next marker, p1, k2, sm, p1, k2, p1, k1. [70 total stitches remain: 5 stitches each for Right and Left Front; 36 stitches for Back; 12 stitches for each Sleeve]
SIZE 41 ONLY
Repeat Rows 6 and 7 once more. [96 total stitches remain: 11 stitches each for Right and Left Front; 50 stitches for Back; 12 stitches for each sleeve]
Next Row: Bind off 2 stitches purlwise, [purl to 4 stitches before next marker, k1, p2, k1, sm, p2, k1, purl to 3 stitches before next marker, k1, p2, sm, k1, p2, k1] 2 times, purl to end of row. [94 stitches remain]
Next Row (Raglan Shaping Row): Bind off 2 stitches knitwise, knit to 6 stitches before next marker, k2tog, p1, k2, p1, sm, k2, p1, knit to 3 stitches before next marker, p1, k2, sm, p1, k2, p1, ssk, knit to 5 stitches before next marker, k2tog, p1, k2, p1, sm, k2, p1, knit to 3 stitches before next marker, p1, k2, sm, p1, k2, p1, ssk, knit to end of row. [88 total stitches remain: 8 stitches each for Right and Left Front; 48 stitches for Back; 12 stitches for each Sleeve]
Next Row: [Purl to 4 stitches before next marker, k1, p2, k1, sm, p2, k1, purl to 3 stitches before next marker, k1, p2, sm, k1, p2, k1] 2 times, purl to end of row.
Next Row (Raglan Shaping Row): Ssk, k2tog, p1, k2, p1, sm, k2, p1, knit to 3 stitches before next marker, p1, k2, sm, p1, k2, p1, ssk, knit to 6 stitches before next marker, k2tog, p1, k2, p1, sm, k2, p1, knit to 3 stitches before next marker, p1, k2, sm, p1, k2, p1, ssk, k2tog. [82 total stitches remain: 6 stitches each for Right and Left Front; 46 stitches for Back; 12 stitches for each Sleeve]
Next Row: [Purl to 4 stitches before next marker, k1, p2, k1, sm, p2, k1, purl to 3 stitches before next marker, k1, p2, sm, k1, p2, k1] 2 times, purl to end of row.
Next Row (Raglan Shaping Row): K2tog, p1, k2, p1, sm, k2, p1, knit to 3 stitches before next marker, p1, k2, sm, p1, k2, p1, skp2 (see Notes), knit to 7 stitches before next marker, k3tog (see Notes), p1, k2, p1, sm, k2, p1, knit to 3 stitches before next marker, p1, k2, sm, p1, k2, p1, ssk. [76 total stitches remain: 5 stitches each for Right and Left Front; 42 stitches for Back; 12 stitches for each Sleeve]
Next Row: [Purl to 4 stitches before next marker, k1, p2, k1, sm, p2, k1, purl to 3 stitches before next marker, k1, p2, sm, k1, p2, k1] 2 times, purl to end of row.
Next Row (Raglan Shaping Row): K1, p1, k2, p1, sm, k2, p1, knit to 3 stitches before next marker, p1, k2, sm, p1, k2, p1, skp2, knit to 7 stitches before next marker, k3tog, p1, k2, p1, sm, k2, p1, knit to 3 stitches before next marker, p1, k2, sm, p1, k2, p1, k1. [72 total stitches remain: 5 stitches each for Right and Left Front; 38 stitches for Back; 12 stitches for each Sleeve]
SIZE 44¾ ONLY
Repeat Rows 6 and 7 two more times. [122 total stitches remain: 11 stitches each for Right and Left Front; 56 stitches for Back; 22 stitches for each Sleeve]
Next Row: Bind off 2 stitches purlwise, [purl to 4 stitches before next marker, k1, p2, k1, sm, p2, k1, purl to 3 stitches before next marker, k1, p2, sm, k1, p2, k1] 2 times, purl to end of row. [120 stitches remain]
Next Row (Raglan Shaping Row): Bind off 2 stitches knitwise, knit to 6 stitches before next marker, k2tog, p1, k2, p1, sm, k2, p1, ssk, knit to 5 stitches before next marker, k2tog, p1, k2, sm, p1, k2, p1, skp2 (see Notes), knit to 7 stitches before next marker, k3tog (see Notes), p1, k2, p1, sm, k2, p1, ssk, knit to 5 stitches before next marker, k2tog, p1, k2, sm, p1, k2, p1, ssk, knit to end of row. [108 total stitches remain: 8 stitches each for Right and Left Front; 52 stitches for Back; 20 stitches for each Sleeve]
Next Row: [Purl to 4 stitches before next marker, k1, p2, k1, sm, p2, k1, purl to 3 stitches before next marker, k1, p2, sm, k1, p2, k1] 2 times, purl to end of row.
Next Row (Raglan Shaping Row): Ssk, k2tog, p1, k2, p1, sm, k2, p1, ssk, knit to 5 stitches before next marker, k2tog, p1, k2, sm, p1, k2, p1, skp2, knit to 7 stitches before next marker, k3tog, p1, k2, p1, sm, k2, p1, ssk, knit to 5 stitches before next marker, k2tog, p1, k2, sm, p1, k2, p1, ssk, k2tog. [96 total stitches remain: 6 stitches each for Right and Left Front; 48 stitches for Back; 18 stitches for each Sleeve]
Next Row: [Purl to 4 stitches before next marker, k1, p2, k1, sm, p2, k1, purl to 3 stitches before next marker, k1, p2, sm, k1, p2, k1] 2 times, purl to end of row.
Next Row (Raglan Shaping Row): K2tog, p1, k2, p1, sm, k2, p1, ssk, knit to 5 stitches before next marker, k2tog, p1, k2, sm, p1, k2, p1, skp2, knit to 7 stitches before next marker, k3tog, p1, k2, p1, sm, k2, p1, ssk, knit to 5 stitches before next marker, k2tog, p1, k2, sm, p1, k2, p1, ssk. [86 total stitches remain: 5 stitches each for Right and Left Front; 44 stitches for Back; 16 stitches for each Sleeve]
Next Row: [Purl to 4 stitches before next marker, k1, p2, k1, sm, p2, k1, purl to 3 stitches before next marker, k1, p2, sm, k1, p2, k1] 2 times, purl to end of row.
Next Row (Raglan Shaping Row): K1, p1, k2, p1, sm, k2, p1, ssk, knit to 5 stitches before next marker, k2tog, p1, k2, sm, p1, k2, p1, skp2, knit to 7 stitches before next marker, k3tog, p1, k2, p1, sm, k2, p1, ssk, knit to 5 stitches before next marker, k2tog, p1, k2, sm, p1, k2, p1, k1. [78 total stitches remain: 5 stitches each for Right and Left Front; 40 stitches for Back; 14 stitches for each Sleeve]
SIZE 48¼ ONLY
Row 8: Bind off 2 stitches purlwise, [purl to 4 stitches before next marker, k1, p2, k1, sm, p2, k1, purl to 3 stitches before next marker, k1, p2, sm, k1, p2, k1] 2 times, purl to end of row. [154 stitches remain]
Row 9 (Raglan Shaping Row): Bind off 2 stitches knitwise, [knit to 6 stitches before next marker, k2tog, p1, k2, p1, sm, k2, p1, ssk, knit to 5 stitches before next marker, k2tog, p1, k2, sm, p1, k2, p1, ssk] 2 times, knit to end of row. [144 stitches remain: 14 stitches each for Right and Left Front; 62 stitches for Back; 27 stitches for each Sleeve]
Row 10: Bind off 2 stitches purlwise, [purl to 4 stitches before next marker, k1, p2, k1, sm, p2, k1, purl to 3 stitches before next marker, k1, p2, sm, k1, p2, k1] 2 times, purl to end of row. [2 stitches decreased]
Row 11 (Raglan Shaping Row): Bind off 2 stitches knitwise, knit to 6 stitches before next marker, k2tog, p1, k2, p1, sm, k2, p1, ssk, knit to 5 stitches before next marker, k2tog, p1, k2, sm, p1, k2, p1, skp2 (see Notes), knit to 7 stitches before next marker, k3tog (see Notes), p1, k2, p1, sm, k2, p1, ssk, knit to 5 stitches before next marker, k2tog, p1, k2, sm, p1, k2, p1, ssk, knit to end of row. [12 stitches decreased]
Repeat Rows 10 and 11 one more time. [116 total stitches remain: 8 stitches each for Right and Left Front; 54 stitches for Back; 23 stitches for each Sleeve]
Next Row: [Purl to 4 stitches before next marker, k1, p2, k1, sm, p2, k1, purl to 3 stitches before next marker, k1, p2, sm, k1, p2, k1] 2 times, purl to end of row.
Next Row (Raglan Shaping Row): Ssk, k2tog, p1, k2, p1, sm, k2, p1, ssk, knit to 5 stitches before next marker, k2tog, p1, k2, sm, p1, k2, p1, skp2, knit to 7 stitches before next marker, k3tog, p1, k2, p1, sm, k2, p1, ssk, knit to 5 stitches before next marker, k2tog, p1, k2, sm, p1, k2, p1, ssk, k2tog. [104 total stitches remain: 6 stitches each for Right and Left Front; 50 stitches for Back; 21 stitches for each Sleeve]
Next Row: [Purl to 4 stitches before next marker, k1, p2, k1, sm, p2, k1, purl to 3 stitches before next marker, k1, p2, sm, k1, p2, k1] 2 times, purl to end of row.
Next Row (Raglan Shaping Row): K2tog, p1, k2, p1, sm, k2, p1, ssk, knit to 5 stitches before next marker, k2tog, p1, k2, sm, p1, k2, p1, skp2, knit to 7 stitches before next marker, k3tog, p1, k2, p1, sm, k2, p1, ssk, knit to 5 stitches before next marker, k2tog, p1, k2, sm, p1, k2, p1, ssk. [94 total stitches remain: 5 stitches each for Right and Left Front; 46 stitches for Back; 19 stitches for each Sleeve]
Next Row: [Purl to 4 stitches before next marker, k1, p2, k1, sm, p2, k1, purl to 3 stitches before next marker, k1, p2, sm, k1, p2, k1] 2 times, purl to end of row.
Next Row (Raglan Shaping Row): K1, p1, k2, p1, sm, k2, p1, ssk, knit to 5 stitches before next marker, k2tog, p1, k2, sm, p1, k2, p1, skp2, knit to 7 stitches before next marker, k3tog, p1, k2, p1, sm, k2, p1, ssk, knit to 5 stitches before next marker, k2tog, p1, k2, sm, p1, k2, p1, k1. [86 total stitches remain: 5 stitches each for Right and Left Front; 42 stitches for Back; 17 stitches for each Sleeve]
SIZE 52 ONLY
Row 1 (right side): P1, k2, p1, k34, turn work so wrong side is facing you. (This is now the end of the row, and the end-of-round marker is just a regular marker.)
Row 2 (wrong side): Bind off 9 stitches purlwise, [purl to 4 stitches before next marker, k1, p2, k1, sm, p2, k1, purl to 3 stitches before next marker, k1, p2, sm, k1, p2, k1] 2 times, purl to end of row. [211 stitches remain]
Row 3 (Raglan Shaping Row): Bind off 9 stitches knitwise, [knit to 6 stitches before next marker, k2tog, p1, k2, p1, sm, k2, p1, ssk, knit to 5 stitches before next marker, k2tog, p1, k2, sm, p1, k2, p1, ssk] 2 times, knit to end of row. [194 stitches remain]
Row 4: Bind off 4 stitches purlwise, [purl to 4 stitches before next marker, k1, p2, k1, sm, p2, k1, purl to 3 stitches before next marker, k1, p2, sm, k1, p2, k1] 2 times, purl to end of row. [190 stitches remain]
Row 5 (Raglan Shaping Row): Bind off 4 stitches knitwise, [knit to 6 stitches before next marker, k2tog, p1, k2, p1, sm, k2, p1, ssk, knit to 5 stitches before next marker, k2tog, p1, k2, sm, p1, k2, p1, ssk] 2 times, knit to end of row. [178 stitches remain]
Row 6: Bind off 3 stitches purlwise, [purl to 4 stitches before next marker, k1, p2, k1, sm, p2, k1, purl to 3 stitches before next marker, k1, p2, sm, k1, p2, k1] 2 times, purl to end of row. [175 stitches remain]
Row 7 (Raglan Shaping Row): Bind off 3 stitches knitwise, knit to 6 stitches before next marker, k2tog, p1, k2, p1, sm, k2, p1, ssk, knit to 5 stitches before next marker, k2tog, p1, k2, sm, p1, k2, p1, skp2 (see Notes), knit to 7 stitches before next marker, k3tog (see Notes), p1, k2, p1, sm, k2, p1, ssk, knit to 5 stitches before next marker, k2tog, p1, k2, sm, p1, k2, p1, ssk, knit to end of row. [162 stitches remain]
Repeat Rows 6 and 7 one more time. [146 total stitches remain: 15 stitches each for Right and Left Fronts; 64 stitches for Back, 26 stitches for each Sleeve]
Next Row: Bind off 2 stitches purlwise, [purl to 4 stitches before next marker, k1, p2, k1, sm, p2, k1, purl to 3 stitches before next marker, k1, p2, sm, k1, p2, k1] 2 times, purl to end of row. [2 stitches decreased]
Next Row (Raglan Shaping Row): Bind off 2 stitches knitwise, knit to 6 stitches before next marker, k2tog, p1, k2, p1, sm, k2, p1, ssk, knit to 5 stitches before next marker, k2tog, p1, k2, sm, p1, k2, p1, skp2, knit to 7 stitches before next marker, k3tog, p1, k2, p1, sm, k2, p1, ssk, knit to 5 stitches before next marker, k2tog, p1, k2, sm, p1, k2, p1, ssk, knit to end of row. [12 stitches decreased]
Repeat last 2 rows 1 more time. [118 total stitches remain: 9 stitches each for Right and Left Front; 56 stitches for Back; 22 stitches for each Sleeve]
Next Row: Bind off 2 stitches purlwise, [purl to 4 stitches before next marker, k1, p2, k1, sm, p2, k1, purl to 3 stitches before next marker, k1, p2, sm, k1, p2, k1] 2 times, purl to end of row. [116 stitches remain]
Next Row (Raglan Shaping Row): Bind off 3 stitches knitwise, k1, p1, k2, p1, sm, k2, p1, ssk, knit to 5 stitches before next marker, k2tog, p1, k2, sm, p1, k2, p1, skp2, knit to 7 stitches before next marker, k3tog, p1, k2, p1, sm, k2, p1, ssk, knit to 5 stitches before next marker, k2tog, p1, k2, sm, p1, k2, p1, k1, ssk. [104 total stitches remain: 6 stitches each for Right and Left Front; 52 stitches for Back; 20 stitches for each Sleeve]
Next Row: [Purl to 4 stitches before next marker, k1, p2, k1, sm, p2, k1, purl to 3 stitches before next marker, k1, p2, sm, k1, p2, k1] 2 times, purl to end of row.
Next Row (Raglan Shaping Row): K2tog, p1, k2, p1, sm, k2, p1, ssk, knit to 5 stitches before next marker, k2tog, p1, k2, sm, p1, k2, p1, skp2, knit to 7 stitches before next marker, k3tog, p1, k2, p1, sm, k2, p1, ssk, knit to 5 stitches before next marker, k2tog, p1, k2, sm, p1, k2, p1, ssk. [94 total stitches remain: 5 stitches each for Right and Left Front; 48 stitches for Back; 18 stitches for each Sleeve]
Next Row: [Purl to 4 stitches before next marker, k1, p2, k1, sm, p2, k1, purl to 3 stitches before next marker, k1, p2, sm, k1, p2, k1] 2 times, purl to end of row.
Next Row (Raglan Shaping Row): K1, p1, k2, p1, sm, k2, p1, ssk, knit to 5 stitches before next marker, k2tog, p1, k2, sm, p1, k2, p1, skp2, knit to 7 stitches before next marker, k3tog, p1, k2, p1, sm, k2, p1, ssk, knit to 5 stitches before next marker, k2tog, p1, k2, sm, p1, k2, p1, k1. [86 total stitches remain: 5 stitches each for Right and Left Front; 44 stitches for Back; 16 stitches for each Sleeve]
SIZE 55¾ ONLY
Row 1 (right side): P1, k2, p1, k38, turn work so wrong side is facing you. (This is now the end of the row, and the end-of-round marker is just a regular marker.)
Row 2 (wrong side): Bind off 10 stitches purlwise, [purl to 4 stitches before next marker, k1, p2, k1, sm, p2, k1, purl to 3 stitches before next marker, k1, p2, sm, k1, p2, k1] 2 times, purl to end of row. [230 stitches remain]
Row 3 (Raglan Shaping Row): Bind off 10 stitches knitwise, [knit to 6 stitches before next marker, k2tog, p1, k2, p1, sm, k2, p1, ssk, knit to 5 stitches before next marker, k2tog, p1, k2, sm, p1, k2, p1, ssk] 2 times, knit to end of row. [212 stitches remain]
Row 4: Bind off 4 stitches purlwise, [purl to 4 stitches before next marker, k1, p2, k1, sm, p2, k1, purl to 3 stitches before next marker, k1, p2, sm, k1, p2, k1] 2 times, purl to end of row. [208 stitches remain]
Row 5 (Raglan Shaping Row): Bind off 4 stitches knitwise, knit to 6 stitches before next marker, k2tog, p1, k2, p1, sm, k2, p1, ssk, knit to 5 stitches before next marker, k2tog, p1, k2, sm, p1, k2, p1, skp2 (see Notes), knit to 7 stitches before next marker, k3tog (see Notes), p1, k2, p1, sm, k2, p1, ssk, knit to 5 stitches before next marker, k2tog, p1, k2, sm, p1, k2, p1, ssk, knit to end of row. [194 stitches remain]
Row 6: Bind off 3 stitches purlwise, [purl to 4 stitches before next marker, k1, p2, k1, sm, p2, k1, purl to 3 stitches before next marker, k1, p2, sm, k1, p2, k1] 2 times, purl to end of row. [3 stitches decreased]
Row 7 (Raglan Shaping Row): Bind off 3 stitches knitwise, knit to 6 stitches before next marker, k2tog, p1, k2, p1, sm, k2, p1, ssk, knit to 5 stitches before next marker, k2tog, p1, k2, sm, p1, k2, p1, skp2, knit to 7 stitches before next marker, k3tog, p1, k2, p1, sm, k2, p1, ssk, knit to 5 stitches before next marker, k2tog, p1, k2, sm, p1, k2, p1, ssk, knit to end of row. [13 stitches decreased]
Repeat Rows 6 and 7 two more times. [146 total stitches remain: 14 stitches each for Right and Left Front; 66 stitches for Back; 26 stitches for each Sleeve]
Next Row: Bind off 2 stitches purlwise, [purl to 4 stitches before next marker, k1, p2, k1, sm, p2, k1, purl to 3 stitches before next marker, k1, p2, sm, k1, p2, k1] 2 times, purl to end of row. [2 stitches decreased]
Next Row (Raglan Shaping Row): Bind off 2 stitches knitwise, knit to 6 stitches before next marker, k2tog, p1, k2, p1, sm, k2, p1, ssk, knit to 5 stitches before next marker, k2tog, p1, k2, sm, p1, k2, p1, skp2, knit to 7 stitches before next marker, k3tog, p1, k2, p1, sm, k2, p1, ssk, knit to 5 stitches before next marker, k2tog, p1, k2, sm, p1, k2, p1, ssk, knit to end of row. [12 stitches decreased]
Repeat last 2 rows 1 more time. [118 total stitches remain: 8 stitches each for Right and Left Front; 58 stitches for Back; 22 stitches for each Sleeve]
Next Row: [Purl to 4 stitches before next marker, k1, p2, k1, sm, p2, k1, purl to 3 stitches before next marker, k1, p2, sm, k1, p2, k1] 2 times, purl to end of row.
Next Row (Raglan Shaping Row): Ssk, k2tog, p1, k2, p1, sm, k2, p1, ssk, knit to 5 stitches before next marker, k2tog, p1, k2, sm, p1, k2, p1, skp2, knit to 7 stitches before next marker, k3tog, p1, k2, p1, sm, k2, p1, ssk, knit to 5 stitches before next marker, k2tog, p1, k2, sm, p1, k2, p1, ssk, k2tog. [106 total stitches remain: 6 stitches each for Right and Left Front; 54 stitches for Back; 20 stitches for each Sleeve]
Next Row: [Purl to 4 stitches before next marker, k1, p2, k1, sm, p2, k1, purl to 3 stitches before next marker, k1, p2, sm, k1, p2, k1] 2 times, purl to end of row.
Next Row (Raglan Shaping Row): K2tog, p1, k2, p1, sm, k2, p1, ssk, knit to 5 stitches before next marker, k2tog, p1, k2, sm, p1, k2, p1, skp2, knit to 7 stitches before next marker, k3tog, p1, k2, p1, sm, k2, p1, ssk, knit to 5 stitches before next marker, k2tog, p1, k2, sm, p1, k2, p1, ssk. [96 total stitches remain: 5 stitches each for Right and Left Front; 50 stitches for Back; 18 stitches for each Sleeve]
Next Row: [Purl to 4 stitches before next marker, k1, p2, k1, sm, p2, k1, purl to 3 stitches before next marker, k1, p2, sm, k1, p2, k1] 2 times, purl to end of row.
Next Row (Raglan Shaping Row): K1, p1, k2, p1, sm, k2, p1, ssk, knit to 5 stitches before next marker, k2tog, p1, k2, sm, p1, k2, p1, skp2, knit to 7 stitches before next marker, k3tog, p1, k2, p1, sm, k2, p1, ssk, knit to 5 stitches before next marker, k2tog, p1, k2, sm, p1, k2, p1, k1. [88 total stitches remain: 5 stitches each for Right and Left Front; 46 stitches for Back; 16 stitches for each Sleeve]
SIZE 59¼ ONLY
Row 1 (right side): P1, k2, p1, k42, turn work so wrong side is facing you. (This is now the end of the row, and the end-of-round marker is just a regular marker.)
Row 2 (wrong side): Bind off 10 stitches purlwise, [purl to 4 stitches before next marker, k1, p2, k1, sm, p2, k1, purl to 3 stitches before next marker, k1, p2, sm, k1, p2, k1] 2 times, purl to end of row. [252 stitches remain]
Row 3 (Raglan Shaping Row): Bind off 10 stitches knitwise, knit to 6 stitches before next marker, k2tog, p1, k2, p1, sm, k2, p1, ssk, knit to 5 stitches before next marker, k2tog, p1, k2, sm, p1, k2, p1, skp2 (see Notes), knit to 7 stitches before next marker, k3tog (see Notes), p1, k2, p1, sm, k2, p1, ssk, knit to 5 stitches before next marker, k2tog, p1, k2, sm, p1, k2, p1, ssk, knit to end of row. [232 stitches remain]
Row 4: Bind off 5 stitches purlwise, [purl to 4 stitches before next marker, k1, p2, k1, sm, p2, k1, purl to 3 stitches before next marker, k1, p2, sm, k1, p2, k1] 2 times, purl to end of row. [227 stitches remain]
Row 5 (Raglan Shaping Row): Bind off 5 stitches knitwise, knit to 6 stitches before next marker, k2tog, p1, k2, p1, sm, k2, p1, ssk, knit to 5 stitches before next marker, k2tog, p1, k2, sm, p1, k2, p1, skp2, knit to 7 stitches before next marker, k3tog, p1, k2, p1, sm, k2, p1, ssk, knit to 5 stitches before next marker, k2tog, p1, k2, sm, p1, k2, p1, ssk, knit to end of row. [212 stitches remain]
Row 6: Bind off 3 stitches purlwise, [purl to 4 stitches before next marker, k1, p2, k1, sm, p2, k1, purl to 3 stitches before next marker, k1, p2, sm, k1, p2, k1] 2 times, purl to end of row. [3 stitches decreased]
Row 7 (Raglan Shaping Row): Bind off 3 stitches knitwise, knit to 6 stitches before next marker, k2tog, p1, k2, p1, sm, k2, p1, ssk, knit to 5 stitches before next marker, k2tog, p1, k2, sm, p1, k2, p1, skp2, knit to 7 stitches before next marker, k3tog, p1, k2, p1, sm, k2, p1, ssk, knit to 5 stitches before next marker, k2tog, p1, k2, sm, p1, k2, p1, ssk, knit to end of row. [13 stitches decreased]
Repeat Rows 6 and 7 two more times. [164 total stitches remain: 17 stitches each for Right and Left Front; 72 stitches for Back; 29 stitches for each Sleeve]
Next Row: Bind off 2 stitches purlwise, [purl to 4 stitches before next marker, k1, p2, k1, sm, p2, k1, purl to 3 stitches before next marker, k1, p2, sm, k1, p2, k1] 2 times, purl to end of row. [2 stitches decreased]
Next Row (Raglan Shaping Row): Bind off 2 stitches knitwise, knit to 6 stitches before next marker, k2tog, p1, k2, p1, sm, k2, p1, ssk, knit to 5 stitches before next marker, k2tog, p1, k2, sm, p1, k2, p1, skp2, knit to 7 stitches before next marker, k3tog, p1, k2, p1, sm, k2, p1, ssk, knit to 5 stitches before next marker, k2tog, p1, k2, sm, p1, k2, p1, ssk, knit to end of row. [12 stitches decreased]
Repeat last 2 rows 2 more times. [122 total stitches remain: 8 stitches each for Right and Left Front; 60 stitches for Back; 23 stitches for each Sleeve]
Next Row: [Purl to 4 stitches before next marker, k1, p2, k1, sm, p2, k1, purl to 3 stitches before next marker, k1, p2, sm, k1, p2, k1] 2 times, purl to end of row.
Next Row (Raglan Shaping Row): Ssk, k2tog, p1, k2, p1, sm, k2, p1, ssk, knit to 5 stitches before next marker, k2tog, p1, k2, sm, p1, k2, p1, skp2, knit to 7 stitches before next marker, k3tog, p1, k2, p1, sm, k2, p1, ssk, knit to 5 stitches before next marker, k2tog, p1, k2, sm, p1, k2, p1, ssk, k2tog. [110 total stitches remain: 6 stitches each for Right and Left Front; 56 stitches for Back; 21 stitches for each Sleeve]
Next Row: [Purl to 4 stitches before next marker, k1, p2, k1, sm, p2, k1, purl to 3 stitches before next marker, k1, p2, sm, k1, p2, k1] 2 times, purl to end of row.
Next Row (Raglan Shaping Row): K2tog, p1, k2, p1, sm, k2, p1, ssk, knit to 5 stitches before next marker, k2tog, p1, k2, sm, p1, k2, p1, skp2, knit to 7 stitches before next marker, k3tog, p1, k2, p1, sm, k2, p1, ssk, knit to 5 stitches before next marker, k2tog, p1, k2, sm, p1, k2, p1, ssk. [100 total stitches remain: 5 stitches each for Right and Left Front; 52 stitches for Back; 19 stitches for each Sleeve]
Next Row: [Purl to 4 stitches before next marker, k1, p2, k1, sm, p2, k1, purl to 3 stitches before next marker, k1, p2, sm, k1, p2, k1] 2 times, purl to end of row.
Next Row (Raglan Shaping Row): K1, p1, k2, p1, sm, k2, p1, ssk, knit to 5 stitches before next marker, k2tog, p1, k2, sm, p1, k2, p1, skp2, knit to 7 stitches before next marker, k3tog, p1, k2, p1, sm, k2, p1, ssk, knit to 5 stitches before next marker, k2tog, p1, k2, sm, p1, k2, p1, k1. [92 total stitches remain: 5 stitches each for Right and Left Front; 48 stitches for Back; 17 stitches for each Sleeve]
SIZE 63 ONLY
Row 1 (right side): P1, k2, p1, k44, turn work so wrong side is facing you. (This is now the end of the row, and the end-of-round marker is just a regular marker.)
Row 2 (wrong side): Bind off 12 stitches purlwise, [purl to 4 stitches before next marker, k1, p2, k1, sm, p2, k1, purl to 3 stitches before next marker, k1, p2, sm, k1, p2, k1] 2 times, purl to end of row. [252 stitches remain]
Row 3 (Raglan Shaping Row): Bind off 12 stitches knitwise, knit to 6 stitches before next marker, k2tog, p1, k2, p1, sm, k2, p1, ssk, knit to 5 stitches before next marker, k2tog, p1, k2, sm, p1, k2, p1, skp2 (see Notes), knit to 7 stitches before next marker, k3tog (see Notes), p1, k2, p1, sm, k2, p1, ssk, knit to 5 stitches before next marker, k2tog, p1, k2, sm, p1, k2, p1, ssk, knit to end of row. [230 stitches remain]
Row 4: Bind off 5 stitches purlwise, [purl to 4 stitches before next marker, k1, p2, k1, sm, p2, k1, purl to 3 stitches before next marker, k1, p2, sm, k1, p2, k1] 2 times, purl to end of row. [225 stitches remain]
Row 5 (Raglan Shaping Row): Bind off 5 stitches knitwise, knit to 6 stitches before next marker, k2tog, p1, k2, p1, sm, k2, p1, ssk, knit to 5 stitches before next marker, k2tog, p1, k2, sm, p1, k2, p1, skp2, knit to 7 stitches before next marker, k3tog, p1, k2, p1, sm, k2, p1, ssk, knit to 5 stitches before next marker, k2tog, p1, k2, sm, p1, k2, p1, ssk, knit to end of row. [210 stitches remain]
Row 6: Bind off 3 stitches purlwise, [purl to 4 stitches before next marker, k1, p2, k1, sm, p2, k1, purl to 3 stitches before next marker, k1, p2, sm, k1, p2, k1] 2 times, purl to end of row. [3 stitches decreased]
Row 7 (Raglan Shaping Row): Bind off 3 stitches knitwise, knit to 6 stitches before next marker, k2tog, p1, k2, p1, sm, k2, p1, ssk, knit to 5 stitches before next marker, k2tog, p1, k2, sm, p1, k2, p1, skp2, knit to 7 stitches before next marker, k3tog, p1, k2, p1, sm, k2, p1, ssk, knit to 5 stitches before next marker, k2tog, p1, k2, sm, p1, k2, p1, ssk, knit to end of row. [13 stitches decreased]
Repeat Rows 6 and 7 two more times. [162 total stitches remain: 17 stitches each for Right and Left Front; 76 stitches for Back; 26 stitches for each Sleeve]
Next Row: Bind off 2 stitches purlwise, [purl to 4 stitches before next marker, k1, p2, k1, sm, p2, k1, purl to 3 stitches before next marker, k1, p2, sm, k1, p2, k1] 2 times, purl to end of row. [2 stitches decreased]
Next Row (Raglan Shaping Row): Bind off 2 stitches knitwise, knit to 6 stitches before next marker, k2tog, p1, k2, p1, sm, k2, p1, ssk, knit to 5 stitches before next marker, k2tog, p1, k2, sm, p1, k2, p1, skp2, knit to 7 stitches before next marker, k3tog, p1, k2, p1, sm, k2, p1, ssk, knit to 5 stitches before next marker, k2tog, p1, k2, sm, p1, k2, p1, ssk, knit to end of row. [12 stitches decreased]
Repeat last 2 rows 2 more times. [120 total stitches remain: 8 stitches each for Right and Left Front; 64 stitches for Back; 20 stitches for each Sleeve]
Next Row: [Purl to 4 stitches before next marker, k1, p2, k1, sm, p2, k1, purl to 3 stitches before next marker, k1, p2, sm, k1, p2, k1] 2 times, purl to end of row.
Next Row (Raglan Shaping Row): Ssk, k2tog, p1, k2, p1, sm, k2, p1, ssk, knit to 5 stitches before next marker, k2tog, p1, k2, sm, p1, k2, p1, skp2, knit to 7 stitches before next marker, k3tog, p1, k2, p1, sm, k2, p1, ssk, knit to 5 stitches before next marker, k2tog, p1, k2, sm, p1, k2, p1, ssk, k2tog. [108 total stitches remain: 6 stitches each for Right and Left Front; 60 stitches for Back; 18 stitches for each Sleeve]
Next Row: [Purl to 4 stitches before next marker, k1, p2, k1, sm, p2, k1, purl to 3 stitches before next marker, k1, p2, sm, k1, p2, k1] 2 times, purl to end of row.
Next Row (Raglan Shaping Row): K2tog, p1, k2, p1, sm, k2, p1, ssk, knit to 5 stitches before next marker, k2tog, p1, k2, sm, p1, k2, p1, skp2, knit to 7 stitches before next marker, k3tog, p1, k2, p1, sm, k2, p1, ssk, knit to 5 stitches before next marker, k2tog, p1, k2, sm, p1, k2, p1, ssk. [98 total stitches remain: 5 stitches each for Right and Left Front; 56 stitches for Back; 16 stitches for each Sleeve]
Next Row: [Purl to 4 stitches before next marker, k1, p2, k1, sm, p2, k1, purl to 3 stitches before next marker, k1, p2, sm, k1, p2, k1] 2 times, purl to end of row.
Next Row (Raglan Shaping Row): K1, p1, k2, p1, sm, k2, p1, knit to 3 stitches before next marker, p1, k2, sm, p1, k2, p1, skp2, knit to 7 stitches before next marker, k3tog, p1, k2, p1, sm, k2, p1, knit to 3 stitches before next marker, p1, k2, sm, p1, k2, p1, k1. [94 total stitches remain: 5 stitches each for Right and Left Front; 52 stitches for Back; 16 stitches for each Sleeve]
Neckband
NOTE: In this section, you will again be working in the round and no longer back and forth in rows.
Pick-Up Round: Continuing with right side facing you and now using smaller 16-inch circular needles, pm (new end of round), pick up and knit 27 (32, 30, 36, 40) (49, 56, 58, 62) stitches evenly along front Neckline; continuing around remaining live stitches, *k1, p1, k1, repeat from * to end of round. [93 (102, 102, 114, 126) (135, 144, 150, 156) stitches]
Next Round: *K1, p1, k1, repeat from * to end of round.
Repeat last round until Neckband measures 1¼ (1¼, 1¼, 1¼, 1¼) (1½, 1½, 1½, 1½) inches.
Bind off loosely in pattern.
Finishing
Graft Underarms

Slip one pair of Underarm stitches from stitch holders to two double pointed needles. Holding needles parallel to each other, use Kitchener Stitch to graft Underarm closed.
Repeat for second Underarm.
Weave In + Block
Weave in the ends, sewing up any holes at Underarms, if necessary, then block as desired, and you are finished!


")
Hi! I was just wondering, what ply wool I should use?
Thanks, Bridget
Hi Bridget.
Thanks for writing in.
This Swan’s Island yarn is a light worsted yarn / DK / 8 ply.
We no longer sell this specific yarn, but I’d be happy to suggest some alternatives if you’d like!
Thanks again for writing in.
Laura
Would it be too hard to maybe do the XL arms with the L everything else?
Hi Dez.
You could do this, but you’d have to follow one pattern for the shaping at the body and a different pattern for the shaping at the sleeves. Plus you’ll have to choose how many rows to work between joining the sleeves and the neckband because a different number of rounds/rows are worked for the different sizes. Also when you get to the neckband, you’ll have to adjust the pattern in order for the ribbing along the raglan to flow seamlessly into the ribbing at the neckband.
It is possible, it’ll just take a lot of concentration and modifications. If you decide to go for it, let us know how it turns up!
Thanks for writing in, let me know if you have any questions.
Laura
Hey there! I’ve knit the first sleeve of my sweater, and I think I’ve made a mistake. In the pattern, for the sleeves, it says to knit through round three, then round four, and (for the small size), to repeat found four, four more times. I read it as to repeat it four times total, but now that I’ve looked back (since my sleeve measure 14 inches instead of ~18) that it actually meant to repeat it four times plus the initial one, for five total. Is this correct? I just want to make sure before I undo my work!
Thank you!
Hello Caroline! Yes you correctly diagnosed your mistake. You would need to complete Row 4 a total of 5 times for each of the 14 repeats you’re doing. That would have put you back 14 rows which would have made the sleeve significantly shorter. Great job identifying the issue, and good luck finishing this classic sweater! -Alyson
I just did the same thing! Shoot!
I’m in love with this pattern but I am really (and I mean really!) bad at using double pointed needles. Is there a way that I could knit the sleeves using single pointed needles up until the circular needles & join up the seam somehow? Thanks so much
Hi Lauren.
I’m afraid, at this time, we only have this pattern available as it’s written here. But I’d be happy to give you some tips for this modification… You could cast on the same number of stitches as the pattern indicates, plus 2. These 2 will be for seaming. You’ll want to split up the ribbing so it falls on each eadge, that way when you seam, you’ll be seaming up the center of the ribbing. It’ll take some work, but it’s possible.
I really encourage you to try double pointed needles again though! They are magical. Have you seen out tutorial: https://www.purlsoho.com/create/2008/07/25/double-pointed-needles/
I hope this information helps!
Thanks for writing in.
Let us know if you have any questions.
Laura
hey there! I recently started knitting this and I’m stuck just after the ribbing on the body of the sweater. I’m knitting it in a size XL and the following row i s what I’m stuck on.
Next Round (increase round): *K5, k1fb, [k8, k1fb] 8 (9, 10, 11, 12) times, [k2, p1] two times, repeat from * to end of round. 186 (206, 226, 246, 266 stitches)
Am I wrong in reading that as from the * to the end of the first set of brackets should be repeated 12 times and the k2, p1 should follow after? Or should it be from the * until the brackets repeated a total of twelve times around the sweater?
Hi Ash.
I’m glad you wrote in. So just the [k8 k1fb] should be repeated 12 times. And then when you’re instructed to repeat from * it’s the K5, k1fb, [k8, k1fb] 12 times, [k2, p1] two times that all gets repeated.
Please don’t hesitate to write back in if you have any questions at all!
Laura
So the from * repeat is both k5 k1fb [k8 k1fb] 12 times? Or, k5 k1fb once followed by k8 k1fb 12 times?
Hi Sara,
Thanks for writing in! You’ll only repeat k8, k1fb 12 times. Anything in brackets in a knitting pattern is usually followed by directions on how many times you need to repeat that one particular set of instructions. I hope this helps!
-Adam
Hi,
I knit one sleeve and apparently did not add enough repeats between each increase round and the sleeve is a few inches too short. Is there a way to correct this without undoing all the work I’ve done so far? Thank you!
Hi Rebecca.
You could continue, working evenly until the sleeve is your desired length, but keep in mind that since all the shaping is done and you’ve increased up to your total number of stitches you may find that the sleeves are looser than you’d like lower down on the arm. I hate to suggest it… but it might be worth redoing.
Let me know if you have any questions!
Laura
I would love to make this sweater, but I see that the yarn used is no longer available. What other yarns would you suggest?
Hi Vincenza.
Thanks for writing in! I would love to suggest some other light worsted/dk weight yarns that work up nicely at 5.5 stitches per inch…
Purl Soho’s Flax Down: https://www.purlsoho.com/purl/products/item/9658-Purl-Soho-Flax-Down
Woolfolk’s Far: https://www.purlsoho.com/yarn/knitting-crochet/far.html
Koigu’s Kersti: https://www.purlsoho.com/purl/products/item/870-Koigu-Wool-Designs-Kersti-Merino-Crepe-Solids
Anzula’s For Better or Worsted: https://www.purlsoho.com/purl/products/item/7913-Anzula-For-Better-or-Worsted
Please let us know if you have any questions about these suggestions!
Thanks for writing in.
Laura
I tend to knit very small. I am using some left over yarn to see what I can use to get 5.5 stitches to the inch. With size 7 needles and Cascade superwash 128, I am getting 6 stitches per inch. I may be able to eke out 5.5 stitches per inch with a size 8 needle, but I am afraid if i go any bigger it will be too lose and gauze-y. Would Cascade 220 or Purl’s Mulberry Merino be too thick to get 5.5 stitches?
Hi Vincenza. Good to hear from you again!
Considering the fact that you’re getting 6 stitches to the inch with Cascade’s Superwash 128, then I think you’ll get a wonderful fabric at 5.5 stitches oper inch with Cascade’s 220. I think the Mulberry Merino is going to be too thin a yarn for you for this project. I would consider it too thin a yarn to begin with, but definitely if you knit very small, as you said.
Let us know how it goes!
Laura
I am ready to cast on, but I am worried that the ribbing is going to be too small around my hips. I’m wondering if I should cast on an even multiple of three that is less than the final number of stitches for the body but more than the original cast on to give myself a little more ‘wiggle’ room?
Hi Vincenza.
I would recommend either (1) working the ribbing in the same size needle as you plan to work the body, rather than with a smaller needle. This will keep the ribbing from coming in too much OR (2) using a smaller needle for the ribbing and casting on 186 (206, 226, 246, 266) stitches. The ribbing will still pull in a bit, but not drastically, plus if you option (2), you can omit the increase round after the ribbing!
Let me know what you think! And do not hesitate to write back in with any questions!!
Laura
Hi there,
Can you give me an idea of the total yardage required? I am trying to buy some yarn to get started but I am not sure how many balls/skeins to buy. Thanks very much!
Hi Eve.
Thanks for writing in!
We recommend 4 (5, 5, 6, 6) skeins of Swans Island’s Worsted for this project. Swans Island’s Worsted is 250 yards per skeins, so that comes to approximately… 1000 (1250, 1250, 1500, 1500) yards. I hope this helps! Please let us know if you have any questions. Thanks!
Laura
I am starting the Sweatshirt sweater and am having
a problem with going from double pointed needle to circular needle.
A long time knitter just have drawn a blank. Help. Thank you.
Hello Ann!
Are you in the middle of the sleeves or about to join the sleeves to the body? Regardless of your place, all you should have to do is to begin knitting the stitches off the double pointed needles with the circular needles. That will transfer them one at a time directly onto the circular needles while you’re also completing a row. As you knit all the stitches on any individual double pointed needle, you can set it aside and start knitting off of the next one.
I hope this answers your question! Don’t hesitate to write in again with any other doubts! Happy knitting! -Alyson
Would you provide directions for a finished bust size of 54″?
I absolutely love the way this sweater looks, and if I can get the information for the bigger size, this is going to be the first sweater I am going to make! Thank you for posting this…
Hello Rhonda!
We wish that we had unlimited resources and technicians in order to create every size of all our patterns! Unfortunately at this time we’re not able to expand the size offerings of this pattern at this time. I would recommend calculating the changes needed in the pattern based on the finished garment measurements according to the gauge. For example, in this pattern, the gauge is 5 1/2 stitches per inch. If for instance the sleeve was meant to be 12″ in circumference, but I want to make it 18″, then I would multiply 6 x 5 1/2 = about 33 extra stitches needed for the sleeve.
I hope this helps and best of luck on your first sweater! -Alyson
hi, I’m a little confused with the making of the pouch. After slipping the extra circular needle through the 74 stitches, do you have to cast on a new ball of yarn? I’m just not exactly sure what I’m supposed to do. Any help is appreciated! Thanks!
Hello Shannon!
You’ve got it! Once you pick up all the stitches, you join a new strand of yarn and begin knitting. After you finish the pouch, you can weave in the ends to secure everything! Thanks for writing in! -Alyson
K0 (0, 1, 2, 3), place previous 7 (7, 9, 11, 13) stitches on a stitch holder or scrap yarn, removing stitch markers.
I really don’t know what you mean here I’m lost could you please explain it to me
Hello Fatima!
I think you are talking about the section for the underarms, correct? What this technique does, is to place some stitches aside so that you can come back to them later in order to graft the underarm together for a more seamless look. Once you get to these directions, you’ll need to put the previous number of stitches on some scrap yarn or on a stitch holder while you continue knitting the rest of the round.
Please don’t hesitate to write again if this doesn’t clarify! Best of luck! -Alyson
Thank you for this beautiful pattern. My grandson will love it.
Hi!
Thanks for making such an easy to follow and gorgeous sweater. It’s my first and it’s coming along nicely. I’m at the part where I add the pouch. I’ve put my second larger size circular needle into the right leg of 94 stitches following the removable marker. I read a previous comment that indicated to start a new ball of yarn and cast on but I’m still not sure how to proceed. Do I cast on on a third needle? Or do I work the circular need that in the stitches as I would normally work them? If so how do create a new stitch?
Thanks so much for your patience! 🙂
I love how once you learn how to do something in knitting it just seems so easy but until then it seems so hard.
Hello Tasha!
It sounds like you are right on track! Once you insert the needle into the stitches, you’ll simply need to add a new ball of yarn to start knitting the stitches on your needle. You don’t need to cast on anything, you essentially created the new stitches already by picking them up from your previously knitted sweater body.
Knitting can definitely seem overwhelming until you give it a try! Please don’t hesitate to write in again should you still be confused! Thanks! -Alyson
I am wondering if you will ever update this pattern with a hood option?
Hello Oz!
We don’t have a pattern update in the works at the moment, but we will definitely keep this suggestion on file! Thanks for sharing your ideas! Happy knitting! -Alyson
Hello,
This is my first ever sweater and I am finishing up my first sleeve. When I put the stitches onto scrap yarn, should I start the other sleeve with a new ball of yarn? Or can I cut the yarn from the already made sleeve to start the other one?
Thank you
Hello Megan,
Either option is perfectly valid! Make sure to leave an adequate tail for weaving in if you decide to cut the strand from the first completed sleeve. Happy knitting! -Alyson
I’m stuck on this part of the pattern
I’m doing a small size but what should i do in this part?
FOR XS (SMALL, LARGE, XLARGE) SIZES ONLY
Repeat Row 8.
Next Row: [Knit to 6 stitches before marker, k2tog, p1, k2, p1, sm, k2, p1, ssk, knit to 5 stitches before next marker, k2tog, p1, k2, sm, p1, k2, p1, ssk] two times, knit to end of row. 74 (78, 92, 94) stitches: 10 for right and left front, 38 (40, 48, 50) for back, 13 (14, 17, 17) for each sleeve
FOR XS SIZE ONLY
Repeat Row 8.
Next Row: Knit to 4 stitches before next marker, p1, k2, p1, sm, k2, p1, ssk, knit to 5 stitches before next marker, k2tog, p1, k2, sm, p1, k2, p1, skp2 (see pattern notes above), knit to 7 stitches before next marker, k3tog (see pattern notes above), p1, k2, p1, sm, k2, p1, ssk, knit to 5 stitches before next marker, k2tog, p1, k2, sm, p1, k2, p1, knit to end of row. 66 total stitches: 10 for right and left front, 34 for back, 11 for each sleeve
FOR MEDIUM SIZE ONLY
Repeat Row 8.
Next Row: Knit to 6 stitches before marker, k2tog, p1, k2, p1, sm, k2, p1, knit to 3 stitches before next marker, p1, k2, sm, p1, k2, p1, skp2 (see pattern notes above), knit to 7 stitches before next marker, k3tog (see pattern notes above), p1, k2, p1, sm, k2, p1, knit to 3 stitches before next marker, p1, k2, sm, p1, k2, p1, ssk, knit to end of row. 78 stitches: 10 for right and left front, 40 for back, 14 for each sleeve
Hello Isaac,
You’ll only need to do the first section that you included in your comment for the small size. The other two sections are only applicable to the sized that they specify. Hope this helps! Please feel free to write in again should you have more questions. Happy knitting! -Alyson
I may be crazy, but I think I’ve found a mistake in the XL size of this pattern. At the end of raglan shaping, according to the pattern I should have 102 stitches on my needles. Skipping ahead to the next directions for the XL pattern, Next Row: Knit to 4 stitches before marker, p1, k2, p1, sm, k2, p1, knit to 3 stitches before next marker, p1, k2, sm, p1, k2, p1, skp2 (see pattern notes above), knit to 7 stitches before next marker, k3tog (see pattern notes above), p1, k2, p1, sm, k2, p1, knit to 3 stitches before next marker, p1, k2, sm, p1, k2, p1, knit to end of row. 90 total stitches: 10 for right and left front, 46 for back, 17 for each sleeve.
The only problem is that this pattern shows that I should have 90 stitches after completing this row, a decrease of 12 stitches. However, for the life of me I can’t figure out where those decreases are. I only see two double decreases, which gives me a four stitch decrease. I didn’t freak out, just decided to pick up a compensating number of stitches in the neckband to make it even. Instead of 39, I would pick up 40 to keep the pattern. However, I then realized that no matter what, this would leave me with an incorrect pattern stitch on the ribbing. The picked up stitches aside, by the time I follow a KPK ribbing from one side of the back of the neck to the other, the ribbing doesn’t line up with the raglan shaping. There aren’t enough – or maybe there are too many? – stitches to keep the pattern. The rest of the pattern is so seamless and smooth. I don’t want to have to add stitches to compensate. I’m quite frustrated and I just want to finish this sweater. I’ve been working on it for three months now. Can you weigh in with any corrections or just explain if I’ve missed something? I would really appreciate it!
Hi Alyssa.
I’m glad you wrote in and I am so incredibly sorry for our delayed response! You’ve probably already figured this out on your own at this point, but here is my response… I think maybe you might have overlooked one the the XL sections.
After you Repeat Rows 8 and 9 four more times and have 102 stitches, the next section you’ll work for size XL is just below the previous section and reads…
For XS (Small, Large, XLarge) Sizes Only
Repeat Row 8.
Next Row: [Knit to 6 stitches before marker, k2tog, p1, k2, p1, sm, k2, p1, ssk, knit to 5 stitches before next marker, k2tog, p1, k2, sm, p1, k2, p1, ssk] two times, knit to end of row. 74 (78, 92, 94) stitches: 10 for right and left front, 38 (40, 48, 50) for back, 13 (14, 17, 17) for each sleeve
At this point you’ll have 94 stitches having just decreased 8 stitches. Then you skip down to…
For XLarge Size Only
Repeat Row 8.
Next Row: Knit to 4 stitches before marker, p1, k2, p1, sm, k2, p1, knit to 3 stitches before next marker, p1, k2, sm, p1, k2, p1, skp2 (see pattern notes above), knit to 7 stitches before next marker, k3tog (see pattern notes above), p1, k2, p1, sm, k2, p1, knit to 3 stitches before next marker, p1, k2, sm, p1, k2, p1, knit to end of row. 90 total stitches: 10 for right and left front, 46 for back, 17 for each sleeve
After this you’ll have 90 stitches, having worked two double decreases decreasing 4 stitches.
I do hope this helps! And again, I am sorry for the delayed response. I hope you’re enjoying your sweater or will be soon!
Laura
Just wanted to clarify the neckband portion of the pattern. Shouldn’t it be K2P1 to match the hem ribbing and the photos? Just finished my sweater and have to block it. Thanks for a great pattern.
Hi Melissa.
That’s a great question. The neckband pattern of (k1, p1, k1) has the same results as (k2, p1) because that first k1 and the last k1 end up next to one another when you work the repeat. We had to write it in a different format so that the ribs of the raglan would flow right into the ribs of the neckband pattern.
I’m thrilled to hear you enjoyed the pattern. Hope you (or the recipient) enjoys the sweater and your labors!
Thanks for writing in.
Laura
Aha, of course! Forgot about the repeat.
This pattern is awesome, so simple and classic. I made a few modifications, however. I made the XS size for myself, but i have crazy long arms (20 inches from wrist to underarm!) so i had to adjust the 16″ sleeve length. To add a little more detail i added a lace design from a scarf pattern i found on Ravelry (called the ‘best friend scarf’) to the back. It came out beautiful, and now i’m making one for my mom who requested one after she saw mine 🙂 oh, and i used Knit Picks cotton worsted because we have animal fiber allergies.
Hi, Katelyn!
Thank you for writing in! We are so glad that you enjoy this pattern and it’s awesome that you modified it to get a custom fit! Thank you so much for sharing your modifications with our community, I am certain that one of our readers will find it helpful.
Best wishes,
Kumeko
to make this in an XL out of the purl soho flax yarn, how many skeins would I need? thanks!
Hi, Karen!
Thank you for your question! To make the XL Sweatshirt Sweater with the Purl Soho Flax Down you would need 7-8 skeins. I recommend getting 8 just to be safe. If you don’t end up using the 8th skein you can always get store credit or exchange it as long it is in it’s original condition. You will need your receipt and the exchange/credit must happen within six months of purchase. If you have further questions, please let us know!
Happy knittng,
Kumeko
I am allergic to wool. Are there any non wool alternatives you could recomend?
Thanks
Andi
Hi, Andi!
Thank you for writing in! The only non-wool alternataive that we carry is Blue Sky Alpaca’s Worsted Cotton (https://www.purlsoho.com/yarn/knitting-crochet/worsted-cotton.html). I recommend making a test swatch to make sure you get the correct gauge and to see if you like the drape/feel of the cotton. If you have further questions, please let us know!
Best,
Kumeko
I just bought Woolfolk Sno to use on this project as you suggested, since you no longer carry Swans Island Worsted. However, will I have to change my needle size from size #6 and #7 needles to get an accurate gauge, since Sno calls for size #2 and #4 needles? Thank you!!
Oh Ama.
I am so incredibly sorry. I have made an error. I meant to send you a link to Woolfolk’s Far (https://www.purlsoho.com/yarn/knitting-crochet/far.html), not Sno. Sno will be too thin for this project. I am going to reach out to our customer service team and see if they can get the correct yarn to you ASAP.
Please look for an email from them.
And again, I do apologize.
Laura
I have completed the sleeves (they look just like the picture), and completed the body up to joining the sleeves to the body. I don’t understand how to attach the sleeves, if I place the underarm sections together and knit I have a large hole. I know I’m doing something wrong, could you please help me understand this portion. I love the pattern.
Hi, Sandy!
Thank you so much for writing in! Sorry about the large delay in responding to your question! You are correct, there will be a large hole. At this point in the pattern you are simply placing those stitches aside so that you can come back to them later in order to graft the underarm together for a more seamless look. So, here you’ll need to put the previous number of stitches on some scrap yarn or on a stitch holder while you continue knitting the rest of the round. The directions for grafting these holes can be found at the very end of the pattern.
If you have further questions, please let us know! Again, thank you for your question!
Best wishes,
Kumeko
I really love this pattern and i have finally decided to undertake my first sweater. Do you have any suggestions for modifications as I am a petite frame. As such, my measurements for the top half fit within the xSmall range however my hips are a size medium do you think this will be a big issues. I have tons of sweaters that are xSmalls and Smalls.
Hi Amanda.
Thanks for writing in! And no, I don’t this this will be a big issue at all. The ribbing at the bottom will shape to your body, contracting or stretching as needed. My only tip for modifications would be to perhaps work a round or two fewer than instructed between increase rounds on the sleeves and also maybe work an inch or so fewer from the bottom edge to the underarm. I would measure one of your favorite sweaters to see what dimension you’d prefer there.
We’re always here to help, so please don’t hesitate to reach back out. I hope you enjoy the pattern and your soon-to-be new sweater!
Laura
Hi,
Sorry but I don’t really understand the picking up the stitches in the neckline part. First I need to close them and then pick up? Wouldn’t it be easier to just leave it on a stitch holder? If you could explain this issue further I’d be grateful.
Adriane
Hi Adriane,
Thanks for writing in and our apologies for the greatly delayed response! Binding off and then picking up stitches helps to give the garment extra stability. It also gives a nice looking line along the neck that adds to the sweatshirt look of this garment. You can certainly try keeping the stitches on scrap yarn or a stitch holder but the look and feel will be different than our completed object. I hope that this explanation helps!
Happy knitting!
Cassy
Hello,
This is a great pattern and I’m really excited to get started. However, I want to make it for someone as a surprise which makes measuring a little difficult. I was going to judge by size but wanted to know if the sizes given were in men’s or women’s? Thanks.
Hi Laura,
What a thoughtful gift! You could certainly knit this sweater for either a man or a woman. The sizes are more in line with women’s sizes but the measurements for the finished chest circumference are given. You could estimate which size to knit based on the recipients chest dimensions. You may also need to make the body and sleeves a little longer depending on the recipients measurements.
I hope that this information helps!
Happy knitting!
Cassy
I have a similar question about making this pattern for a man. The 44″ chest would be correct, but the narrow hip of 37″ has me concerned that this is not going to work for an older man. Could you briefly elaborate on the intended fit at the hip and tell me if I could just ignore some of your shaping instructions to get a larger hip size? The industry standards shows a hip for a large man size being about 43″-45″.
The large sleeve size for men is correct, 19″, as indicated by industry standards sizing, as is the armhole depth.
This is really a super pattern for a man, something they can wear on a regular basis, so any input would be helpful. I am an experienced knitter so I can follow suggestions you might have.
Thank you
Hi Pat,
Thanks for writing in! The increases after the ribbing let the bottom of the body slouch over, creating a more “sweatshirt-like” feel. These can be easily omitted by casting on the total amount required after increasing on the original pattern. I think that you should start at a cast on of 246 for the 44″ chest and omit the increases. This would allow for a 44″ hip (or belly) measurement. Hope this helps!
-Adam
Thank you for answering so quickly! This makes a lot of sense! I appreciate your help accommodating an older man’s girth without changing the “feel” of the sweatshirt too much!
My best, Pat
Hi everybody,
I am completely lost with the section joining the sleeves…I need to say that I am French and though I read English rather well, I don’t understand where to begin (from the body or from one of the sleeve) with this 1st row:
K0 (0, 1, 2, 3), place previous 7 (7, 9, 11, 13) stitches on a stitch holder or scrap yarn, removing stitch markers.
As well as the next one…
Somebody could help me ?
Thank you
Hello, Lise!
Thank you for writing in! Sorry for the delayed response! Great question. For the first round you are working the body of the sweater. You will attach the sleeves in the second round. When you attach the sleeves you will have holes in the underarm, you will seam these holes together at the very end.
I hope this answers your question, if not, please let us know!
Best wishes,
Kumeko
Question on this, on the first row for joining the sleeves, when you put the underarm stitches in stitch holder, do you need to then start a new yarn ball?and then knit back and forth?im a bit confused…..
Hello Pilar,
Thank you for reaching out! You continue to knit it the round throughout this whole process. For round 1 when you place your stitches on hold you are placing your PREVIOUS stitches, this means that you working yarn is there for you to continue out your round and the same is true for round 2. Also in round 2 you are attaching your sleeves, which will keep you going in the round when you return to the stitches on hold.
I hope this makes sense and let us know if I can clarify anything for you!
Happy knitting,
Marilla
Thank you very much Kumeko,
I finally guessed by looking at the picture of the body and sleeves together…in the JOIN THE SLEEVES part…
Hi,
I have been knitting for a few years now but have not tried anything with shaping. Would this sweater be a good beginning?
Thanks!
Hi Libby,
Thanks for writing in! This sweater has some more tricky elements if you have never knit a sweater before. The pocket and the neckline require some slightly more complex techniques but a an intermediate knitter should be able to confidently tackle these new techniques. There is raglan shaping for the arms but there is no shaping on the body. If you are looking to try body shaping, this might not be the best choice. If you are hoping to try raglan arm shaping, this one would work well. If you are looking for a sweater that has raglan shaping but that is a little bit more simple, you could try our Friendly Fair Isle Sweater. Either way, we are happy to continue to help and I hope that this information was helpful!
Happy knitting!
Cassy
Hi,
This my first time making this sweater and I am not sure what this step means:
Repeat from ** eleven (14, 14, 17, 18) more times. 66 (75, 81, 90, 98) stitches.
Do I have to repeat step 3, step 4 and repeat step 4 then repeat step 3 again. Do all of this 11 more times?
Hi Tanya,
Thanks for your interest in this pattern! It makes a very nice sweater. After completing round 3 you will do round 4 six times in total. You will do round 3 once and round 4 six times 11 more times. I hope this makes sense! Please see this part of the pattern below. To make it more visible, I have inserted {} to make it easier to see what you will be doing 11 more times. After the ending bracket }, you will start at round 3 again.
{** Round 3 (increase round): M1L, knit to next marker, m1R, slip marker (sm), [p1, k2] two times, p1. (2 stitches increased)
Round 4: Knit to next marker, [p1, k2] two times, p1.
Repeat Round 4 five (four, five, four, four) more times.}
Best,
Adam
Hello,
In the Begin Raglan Shaping after the decreasing round. It says to repeat round 1. Is this one time or is this 3 times?
Hello Amanda,
Thanks for writing in! In total you will do round 1 three times. I hope this helps and good luck on this sweater!
Best,
Adam
I love this pattern! Is there instructions on how to add a hoodie to it?
Hi Sandra,
Thanks for writing in and for your kind words. We do not have instructions to add a hoodie, but there are many references your could follow on Ravelry. Essentially a hood is like a giant sock heel — it’s that simple!
Best,
Adam
I am knitting the ribbing of the neckband and by knitting in the round I have a big hole in the middle of the xs sweater. Did i bind off/pick up the wrong stitches or is there a way to fix the hole after I finish ?
I understand this step now, I reread the steps and I don’t know why I picked it up wrong the first time
Hi Amanda,
Thanks for writing in. If the hole is at center front, then you have made a mistake in picking up the stitches. However, if the hole is around the area where you started shaping the neck, then this is actually normal. Small holes form at the beginning of the neck shaping because the fabric starts going in a different direction. To fix this you can tighten up the hole with some yarn and a tapestry needle after finishing the sweater. Good luck and let us know!
Best,
Adam
How do you think this sweater would do with a hood? Would it take a lot of modifications or just add one between the raglan shaping and the neckline? If you think it wouldn’t be too difficult, I may give it a try. (I am good at tearing out stitches, if it doesn’t work.) But since I’ve not actually knitting it yet and you have, I’ll trust your judgment.
Hi Mandy,
Thanks for writing in. I love when customers get creative. Though we have never done this sweater with a hood, it is entirely possible. Instead of picking up and ribbing in the round for the neck band, you will instead pick up the stitches and work back and fourth in short rows, much like a big sock heel. I am sure that there are some free hooded sweater patterns on Ravelry. Those would be a good basis for technique. Good luck and happy knitting!
Best,
Adam
Hello! I’m having a bit of trouble understanding this part of the pattern.
Round (decrease round): *P1, k2, p1, ssk, knit to 6 stitches before next marker, k2tog, p1, k2, p1, sm, k2, p1, ssk, knit to five stitches before next marker, k2tog, p1, k2, sm, repeat from * to end. (8 stitches decreased)
I’ve already done my first and second decrease, (ask, k2tog) from my understanding those are done on the front part of the sweater.
But since there are four stitch markers, knit to the next maker would be a decrease in the sleeve area, and then to the next marker would be in the back of the body?
Thanks!
Hi Lauren,
Thank you for writing in. The front body takes both a SSK and K2tog because these are left and right slanting decreases. You will also be decreasing on the sleeve portion too. Basically, you will decrease on both sides of each marker for a total of 8 stitches decreased. On a sweater it is essential to decrease so drastically at the yoke area because you are going from the width of your shoulders to the width of your neckline in just a matter of inches. I hope this helps.
Best,
Adam
I would like to make this for my granddaughters. Can I use a dk weight yarn so it will make a smaller size.
1 has a 25″ chest and the other has 24″ chest. They wear size 7 and 8 tops in children’s sizes. Or do you have a similar pattern for kids. Thank you.
Hello Elaine,
Thanks for contacting us! You can certainly go down in weight of yarn for this project. Just to be sure that you will get a good fitting sweater, I would make a gauge swatch in stockinette and see how many stitches per inch you are getting. If your granddaughter’s chest is 25″ around, then with ease you’ll want to hit about 27″ total. Multiply your stitches per inch from the swatch by 27″ and see if there is a cast on amount in the pattern that is similar. You’ll then follow the directions from this cast on. I hope this helps and that you’ll be able to make it!
Best,
Adam
Thank you for your quick response. Can you recommend a yarn?
Hello Elaine,
Sure, I’d be glad to recommend yarn! I suggest you use our Mulberry Merino for a wooly sweater with some sheen. If you’d like the sweater to be machine washable, then I would use Madelinetosh Merino DK or Anzula – Cricket. I hope you like something from this selection!
All the best,
Adam
In the beginning of the body section, there’s the instruction “Next Round: *Knit to next marker, [p1, k2] two times, p1, repeat from * to end of round.” After knitting to the first marker and completing the [p1, k2} x2, p1, do I simply knit to the second marker, or do I do the [p1, k2) x2, p1 just before the second marker? Maybe this is straightforward, but I wanted to double-check. Thanks!
Hello Jacquelyn,
Thanks for writing in! You will knit [p1,k1] 2x, p1 once and then continue knitting (not knitting and purling) until the next marker where you will repeat the [p1,k1] 2x, p1 again and then continue on knitting. I hope this is clear! Let me know if you need more help.
-Adam
Hi, Adam! It’s sort of clear – the part where I get tripped up is that the first row begins with knitting to the next marker… If I knit the first row to the next marker, do the purl/knit stitches and knit back to the original marker, do I then begin the second row with the purl/knit stitches?
Hi Jacquelyn,
Thanks for writing back. I’ll try to break this down better. Let’s use the smallest size as an example. The total amount of stitches after the ribbing is 186. From the end of round marker you will knit 86 stitches, place a marker of a different color and then [p1, k2] two times, p1. When you repeat this for the second time you will knit 86, place a marker of a different color and then [p1, k2] two times, p1. This should leave you at the end of round marker. In total you will have three markers: one as the end of round marker and two as the different color markers. I hope this is clearer! Best of luck!
-Adam
Hi Holly,
Thanks for writing us. I’d use the standard pass over bind off. This should do the trick!
Happy knitting,
Adam
Hello,dear.I have a problem with the end of sleeve and I knit the large size.The instruction says k2, palce the previous 11 stitches on the holder,remain 81 stitches.I’m not sure the prevous stitch including the k2 stitch,or the k2 stitch belong to the 81 stitches.Thank you.
Hi Ling,
Thanks for writing us! The two stitches that you knit belong to the 11 stitches you need to put on hold for the underarm. I hope this helps! Let me know if you have any other questions!
-Adam
Hi! I’m about to join the sleeves but this part of the pattern confused me:
“orient the sleeve’s on-hold underarm stitches so they are parallel and next to the body’s on-hold underarm stitches and knit the sleeve stitches (starting with the stitch to the right of the stitches on hold)”.
When I look at the photo it looks like you have to knit starting with the stitches to the left of the stitches on hold, and I can’t imagine how it would work to try to knit into the right needle of the sleeve. Am I misunderstanding the directions? Wouldn’t you have to knit the sleeve onto the main needle by using the right needle of the main one and the left needle of the sleeve? Thanks!
Hi Maia,
Thanks for the question! First you’ll want to orient your on hold stitches parallel to each other and hold everything together with your sleeve closest to yourself. From this angle, your sleeve needle closest to your right-hand body needle becomes your left-hand needle and your right-hand body needle continues to be your right-hand needle. Using your right-hand body needle, knit the stitches from your sleeve needle all the way across the sleeve’s live stitches. I hope this clears things up!
Best,
Adam
Hi Adam, yes I think so! That’s how I thought it might work. I’ll give it a try. Thanks for taking the time to respond!
Hi Virginie,
Thanks for the lovely and kind comment! I’m so glad you are making this for your daughter; I am sure she’ll love it! Unfortunately we cannot accept translations, but we do think it’s great that you took the time out to translate this for yourself. Best of luck with the pattern and please do not hesitate to write in with any questions!
Best of luck!
-Adam
I am trying to decide between the small and the medium size and I think maybe the hip circumference measures are wrong? The small has 31 inches. Maybe this should be 41? Or is this maybe the waist measure?
Thanks for clarifying!
Hi Brigit,
Thanks for writing in! The hip is supposed to be 31″ for the small size. Since the bottom edge is a rib, the sweater naturally cinches in but also stretches to hug the body. Hope this helps!
-Adam
Hello,
I’m unclear on the finished length from sleeve cuff to underarm. Is this the length from the cast-on edge of the cuff or where the cuff ends?
Thank you,
David
Hi David,
Thanks for the question. The finished sleeve length is from the very tip of the cuff (including the ribbing) to the underarm stitches. Hope this helps!
-Adam
I am confused about joining the sleeves. On Round 2, I knitted to the first stitch holder and then knitted the 70 stitches on the sleeve stitch holder. I then continued to knit to the next stitch holder and then knitted the 70 stitches of the second sleeve. This leaves me with 7 stitches on a stitch holder for the body and 7 stitches on a stitch holder for the sleeve. Is this correct?
Thank you.
Hi Diane,
Thanks for writing in! It sounds like you did everything correct! Those stitches still remaining will form the underarm and are connected later in the pattern!
I hope that this helps and happy knitting!
Cassy
I am having difficulty picking up the stitches for the pouch. Can’t seem to keep them straight. Is there an easier way?
Hi Margaret,
Thanks for writing in! I am happy to offer a suggestion to help! One thing that I like to do is thread a piece of contrast yarn on a darning needle and run it through all of the stitches that I will be picking up and then pick them up with my knitting needle. This lets me see if i got all of the stitches in a straight line and lets me correct any issues before actually picking up the stitches.
I hope that this helps!
Cassy
My 14 year old granddaughter selected a bulky yarn for me to use to knit this sweater. I was going to make it in an XL with shorter sleeves because she wants it BIG (you know about teens). Can you help me with suggestions for converting the pattern?
Thx much, Carol
Hi Carol,
Thanks for writing us! Unfortunately we cannot customize a pattern over the comments section. I suggest doing a gauge swatch to calculate your stitches and rows per inch and multiplying your stitches per inch by your desired chest measurement. This number will serve as a rough estimate of how many stitches you’ll have around the chest. If you notice, the cast on at the bottom edge is less than the chest stitch count and you’ll want to take this in to account when casting on your project. Based on your chest stitch count, pick the size that correlates closest to yours and follow the pattern as is, modifying at points where needed. If your chest stitch count doesn’t come close to any of the listed cast ons, you’ll definitely have to improvise a little.
All the best,
Adam
Good afternoon, thank you so much for the pattern, but I stuck right after the start of the section where one has to
Continue Raglan and Shape Crew Neck. It says:
You will no longer be working in the round but back and forth in rows, turning the work at the end of each row.
Row 1 (right side): P1, k2, p1, k22 (24, 26, 28, 30), turn work so that wrong side (the inside of the sweater) is facing you.
I do not know how to turn my work so that the yarn was not on the left needle. I definitely have to knit form the yarn attached to the stitches on my right needle, don’t I? I turned and it is now attached to the stitches on my left needle.
If so, what have I done wrong?
Hi Elena,
Thanks for writing in! I can see how this could be confusing. When you turn your work, you yarn will be attached to the stitches on your left hand needle. You will be working the first stitch using the attached yarn (this may feel a little awkward) and then continue on as normal. You are doing exactly as you should and after completing that first stitch, you should be able to move on as you normally would!
I hope that this helps!
Cassy
Is there a way to print your patterns without all the comments and side bar ads. I love the patterns but hate wasting all the paper!
Hi Marilyn,
Thanks for your comment! There is a little button on right side of the page that says “print”. Use that instead of printing from your computer’s tool bar.
I hope this helps!
Carly
At the end of the sleeves
I didn’t understand which 11 stitches put on holder.
Please reply ASAP. I am stuck at this point
At the end of sleeve for large pattern
K2 place 11 stitches on stitch holder
But in picture there are 7 stitches on holder.
Please explain.
Hi Vandana,
The for the size that you are knitting you would knit 2 stitches at the beginning of the round then slip the previous 11 stitches (including the 2 you just knit) on to a piece of scrap yarn or stitch holders.
There are 7 stitches on the holder in the photograph because the sample is knit in a size small.
I hope this helps!
Carly
Thank you for reply.
Generally round end with P1K2P1k2p1
At this point I was stuck.
So after m1R should I put it on holder including 7 stitches.
And before that should I knit that 7 stitches.
Hi Vandana,
Thanks for getting back in touch! For the size that you are knitting, you will knit 2 stitches, then place those 2 stitches and the 7 before it and a stitch holder. These 7 stitches will be the last 7 stitches of the previous round which will be the last p1, k2, p1, k2, p1.
I hope that this clears things up!
Cassy