


Bear’s Rainbow Blanket

Like many parents, I soon discovered after having a baby that I’d never actually been busy before. Basic things like taking showers and returning phone calls suddenly seemed overrated. But for me, one thing that has never been dispensable is crafting things for my son, Bear.
I’m not saying that I sit around for hours, dreamily stitching away. No, it’s more like a stolen moment here and a quick minute there; a few squares at jury duty, a couple more in a waiting room, and two years later a blanket is born!

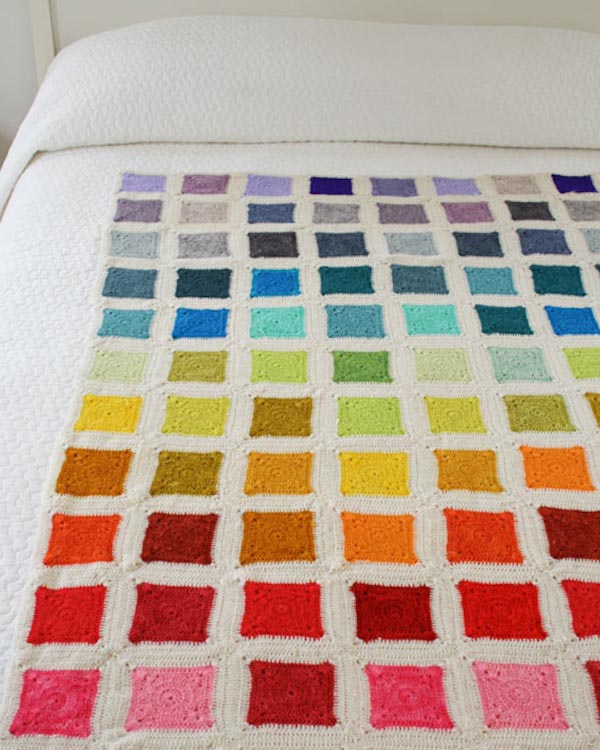
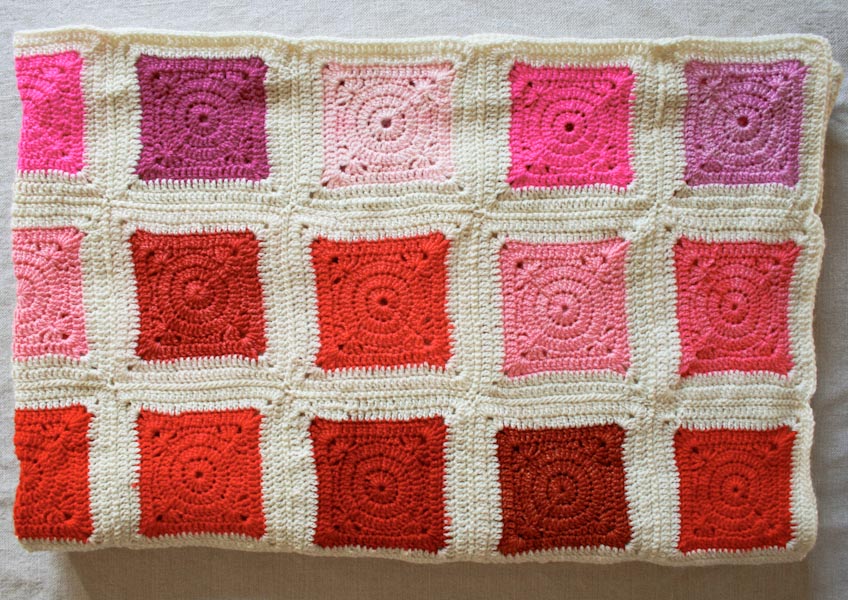
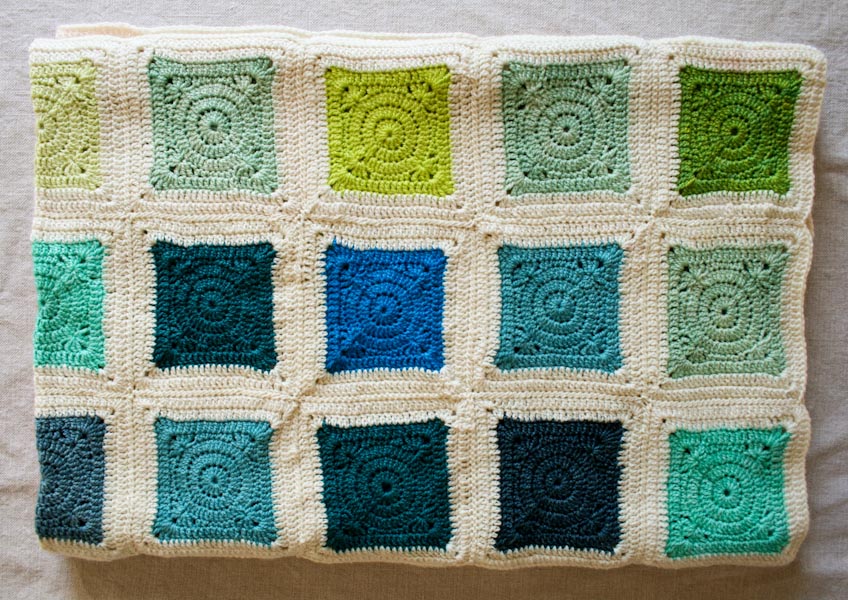
As drawn out as the process was, making Bear’s Rainbow Blanket was always an exhilarating ride. Each step contained a world of wonderment, from Koigu Premium Merino‘s incredible hand dyed colors to this fascinating stitch pattern that magically turns a circle into a square; from the arrangement of dozens of colors and 108 squares to the daydreams of Bear dragging his Rainbow Blanket off to college!

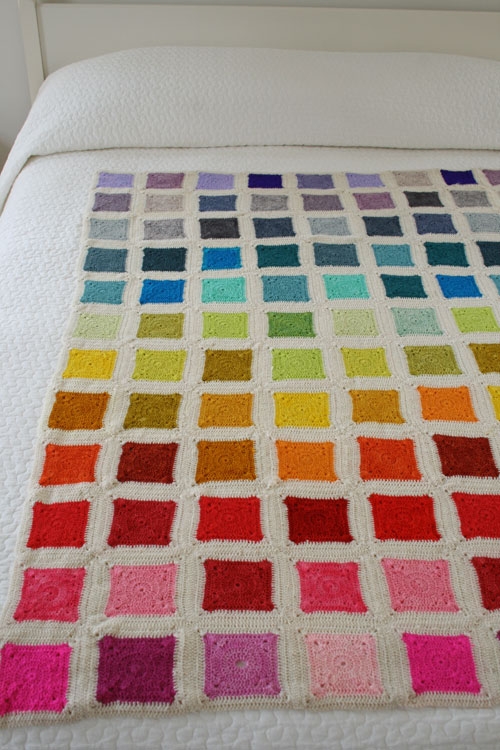
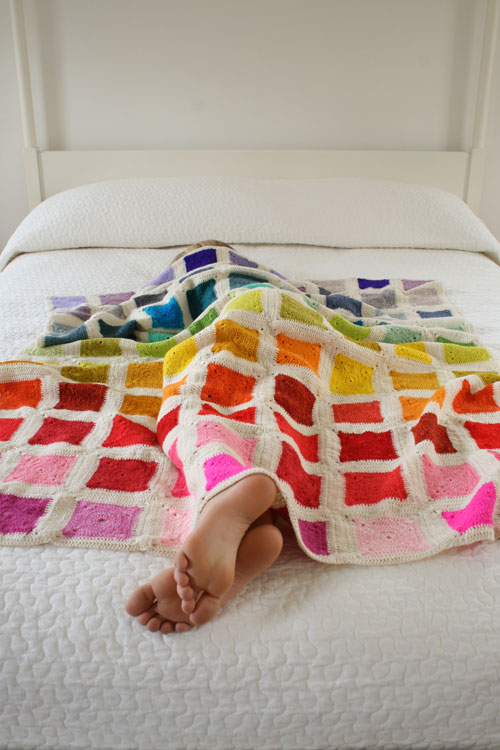
I think I could have crocheted these squares for the rest of my life, but I finally stopped myself when I had enough to make a 40 x 54-inch blanket, the perfect size for my four year old. The bed pictured here is a queen, but this blanket is also right at home on a twin bed… or under a circle of picnicking stuffed animals!

I’ve crafted quite a few things in my life, and though I have so much fondness for many of those things, this is perhaps the dearest to my heart. This blanket expresses not only my love for my son but for crafting too. To pursue a grand plan to its very end is the chocolate cake of crafting: a rich and deeply satisfying experience!
To start concocting your own grand plan, read on! -Whitney
Designed by Purl Soho designer, Whitney Van Nes.
Materials
To Make the Exact Same Blanket
FINISHED SIZE: 40 x 54 inches (9 squares x 12 squares)
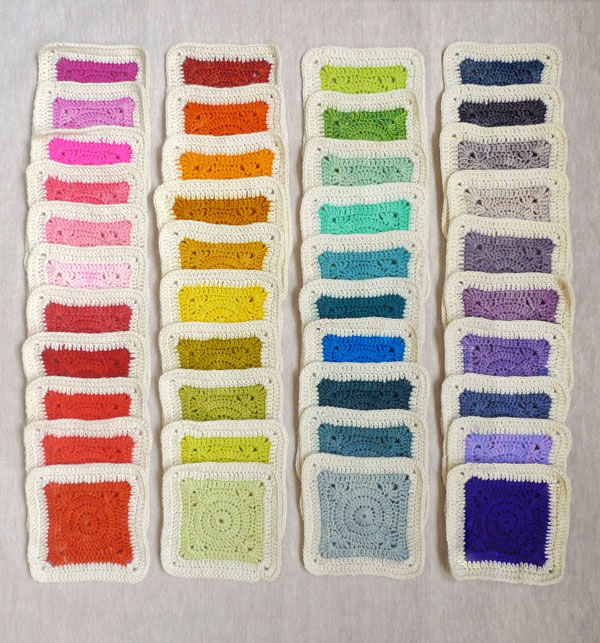
To make your blanket just like mine you can order the 52 skeins of Koigu Premium Merino (KPM), 100% Merino Wool that I used. They are:
- 11 skeins of color #00 for the borders.
- 41 skeins for the inside squares. One skein of each of the following colors:
- First column (far left, from the top):1175, 1173, 1155, 1145, 1143, 2121, 1100, 2227, 2229, 2220, and 1195
- Second column: 1110, 2200, 1240, 1200, 2180, 2100, 2335, 2423, 1521, and 1521.5
- Third column: 2339, 1520, 1051, 1532, 1504, 1500, 2130, 1045, 1043, and 1010.5
- Fourth column: 3016, 2405, 2403, 2390.5, 2290, 3003, 2164, 2416, 1156, and 1400
You will also need:
- A size D crochet hook
To Make a Crib Size Blanket
FINISHED SIZE: 32 x 41 inches (7 squares x 9 squares)
To make a smaller version of the Rainbow Blanket, you can order one of our crib-size Rainbow Blanket Bundle right here (no longer available). It includes a total of 13 skeins of Koigu Premium Merino: 7 colors for the inside squares and 6 of color #00 for the outside borders. Arrange the 63 finished squares however you want!
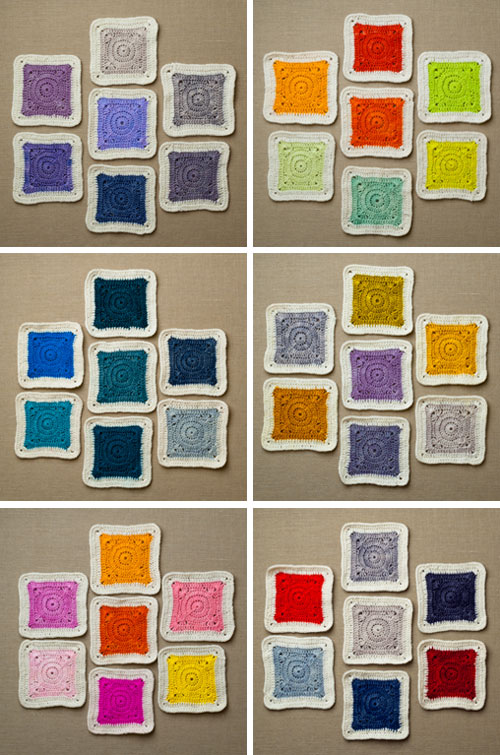
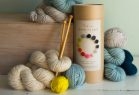
Choose from six different Rainbow Crib Blanket Kits (shown above):
- Pebble (top left): 2390.5, 3003, 1156, 2403, 2164, 2416, and 2290 + 6 skeins of 00
- Kitchen Garden (top right): 1195, 1240, 2200, 2339, 1521.5, 1051, and 1521 + 6 skeins of 00
- Dolphin (middle left): 1500, 2130, 1043, 3016, 1504, 1045, and 1010.5 + 6 skeins of 00
- Mineral (middle right): 2335, 2403, 3003, 2180, 1200, 2290, and 2390.5 + 6 skeins of 00
- Pixie (bottom left): 1240, 1173, 2200, 1143, 2121, 1155, and 2100 + 6 skeins of 00
- Pickup Truck (bottom right): 2403, 2229, 2390.5, 2405, 1010.5, 3016, and 2227 + 6 skeins of 00
You will also need:
- A size D (3.25 mm) crochet hook
To Design Your Own Blanket
Here is what you need to know to:
- Each skein of KPM is 50 grams and 175 yards.
- Bear’s Rainbow Blanket is 9 x 12 squares (108 squares total). To make the same size, you’ll need at least a total of 22 skeins of KPM. If you want a border color, you’ll need 11 of it, plus at least 11 more skeins for the inside squares.
- Each square uses about 32-34 total yards of KPM; 17-18 yards for the inside square and 15-16 yards for the outside border.
- 1 skein of KPM can make 10 inside squares or 11 outside borders.
- Each square measures 4 1/2 x 4 1/2 inches.
- A skein of KPM Needlepoint Yarn is 3.125 grams and 10.9 yards, so for 1 inside square you need 2 KPM Needlepoint skeins.
- Purl Soho always has a beautiful selection of Koigu’s KPM. Click here to see it all, and have fun!
Notes On Koigu
- Koigu Premium Merino is hand dyed in small batches so please know that each dye lot is unique. This means that if you use one of our kits, it will look a lot like ours but will have some variations. It also means that if consistency is important to you, buy enough!
- KPM is machine washable on a cold, gentle cycle. However, please be aware that, while Koigu does its best to set their hand-dyed colors, they do note that “Under certain water and/or soap types this yarn may bleed.” For thorough instructions and excellent tips on setting your yarn’s dye before you begin, please visit our Re-fixing Dyes Tutorial!
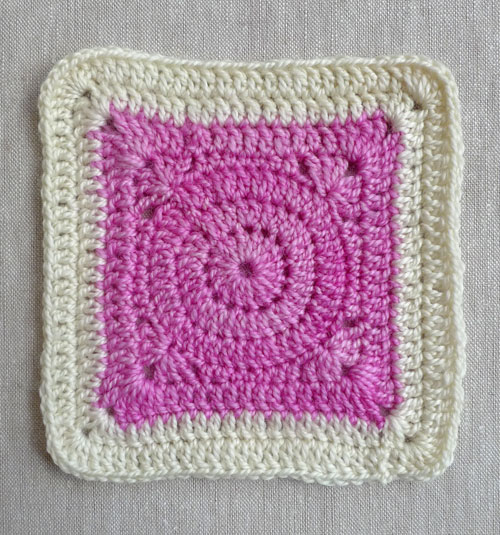
Crocheted Square Pattern
Gauge
6 1/4 double crochets crochets = 1 inch
Finished Size
Each square is 4 1/2 x 4 1/2 inches
Inside Square
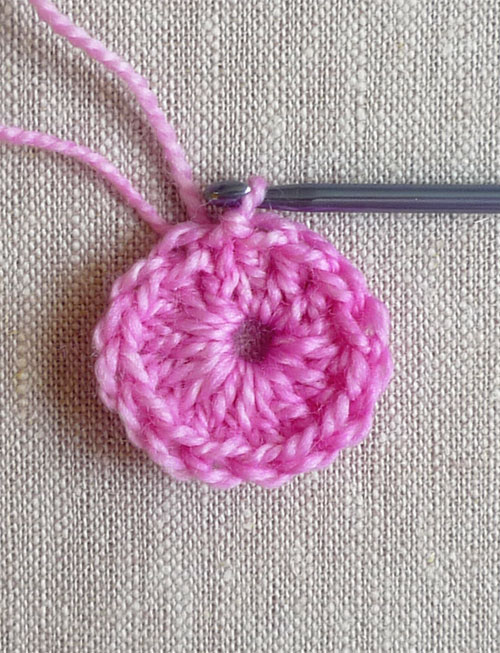
Round 1: With the Inside Color, chain 3 into an adjustable loop, make 15 double crochet (dc) into the loop…
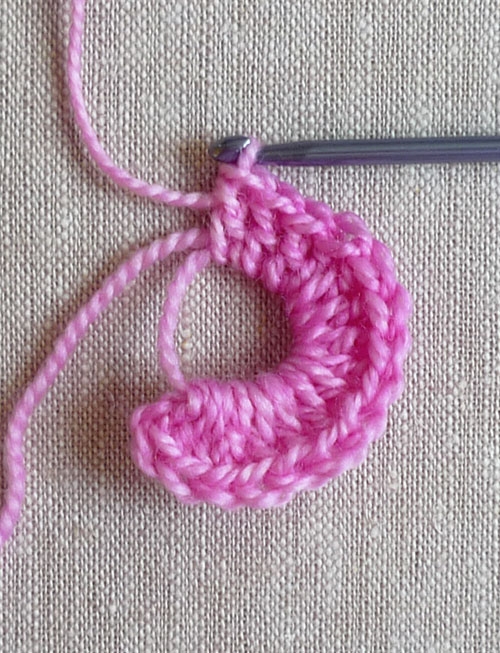
… join to third stitch of beginning chain with a slip stitch. (16 stitches)
Round 2: Chain 3, [2 dc into next stitch] 15 times to beginning chain, 1 dc into base of chain…
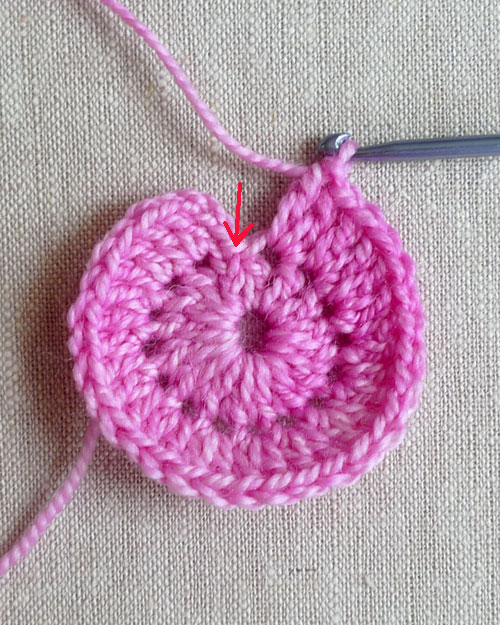
… join to third stitch of chain with a slip stitch. (32 stitches)
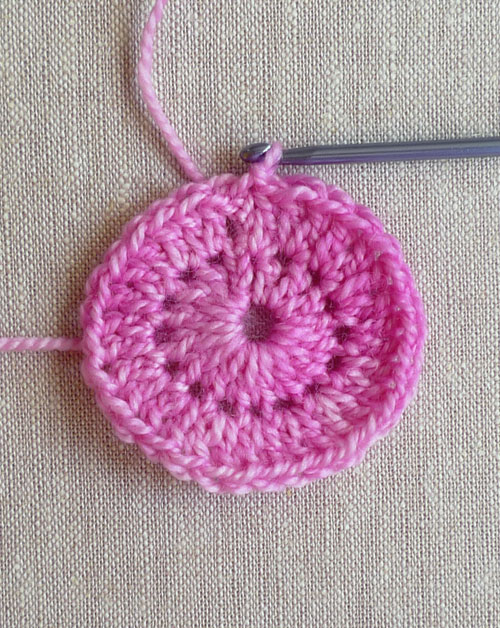
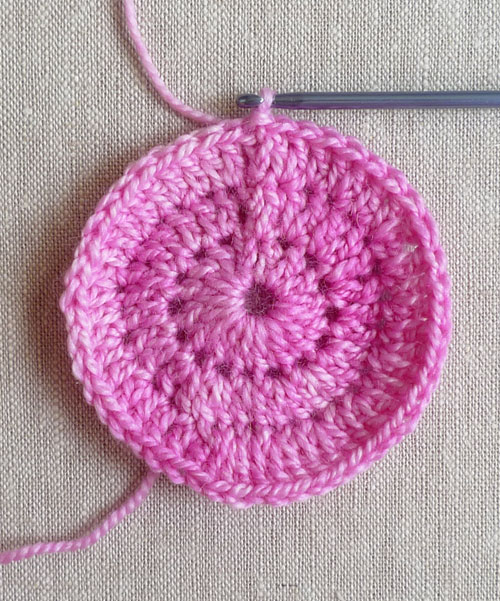
Round 3: Chain 3, *2 dc into next stitch, 1 dc into next stitch, repeat from * to last stitch, 2 dc into last stitch, slip stitch into third chain. (48 stitches)
Round 4: Chain 4, (2 dc, ch 2, 2 dc, 1 treble crochet [tr]) into the base of the chain…

..*skip 2 stitches, 1 half double crochet (hdc) into next 2 stitches, 1 sc into next 3 stitches, 1 hdc into next 2 stitches, skip 2 stitches, (1 tr, 2 dc, chain 2, 2 dc, 1 tr) into next stitch, repeat from * 2 more times, skip 2 stitches, 1 hdc into next 2 stitches, 1 sc into next 3 stitches, 1 hdc into next 2 stitches, slip stitch into 4th chain.

Round 5: Chain 3, 1 dc into next 2 stitches, *(1 dc, 2 tr, ch 2, 2 tr, 1 dc) into corner space, 1 dc into each stitch to corner (13 dc’s), rep from * 2 more times, (1 dc, 2 tr, ch 2, 2 tr, 1 dc) into corner space, 1 dc into each stitch to beginning chain (10 dc’s), slip stitch into 3rd chain. Cut the yarn and pull it through the last stitch.

Outside Border
Round 1: Join Border Color into a corner space. (Chain 3, 1 dc, chain 2, 2 dc) into corner space, *1 dc into each stitch to next corner space (19 dc’s), (2 dc, chain 2, 2 dc) into corner space, repeat from * 2 more times, 1 dc into each stitch to beginning corner (19 dc’s), slip stitch into 3rd chain.

Round 2: Chain 3, 1 dc into next stitch, *5 dc into corner space, 1 dc into each stitch to next corner space (23 dc’s), repeat from * 2 more times, 5 dc into corner space, 1 dc into each stitch to beginning chain (21 dc’s), slip stitch into 3rd chain. Cut the yarn and pull it through the last stitch.
Weave in whatever ends you didn’t already crochet over.
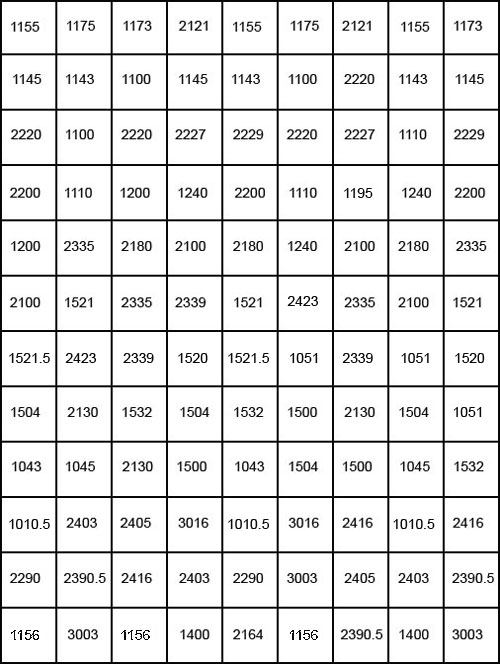
Layout
If you are making the same exact blanket as this one, here is the layout of all the squares. (Note that in some of the story’s photos the blanket is flipped over so that this layout is a mirror image of what you may see in the photos.)
Assembling
There are lots of ways to attach your squares together. Some people like to crochet them together using a slip stitch or even a single crochet, but I prefer to sew them together with a length of yarn and a tapestry needle. And again there are several of ways to do that: a running stitch, some variation on a blanket stitch, or my preferred method, a whip stitch. Experiment and decide what you like best!
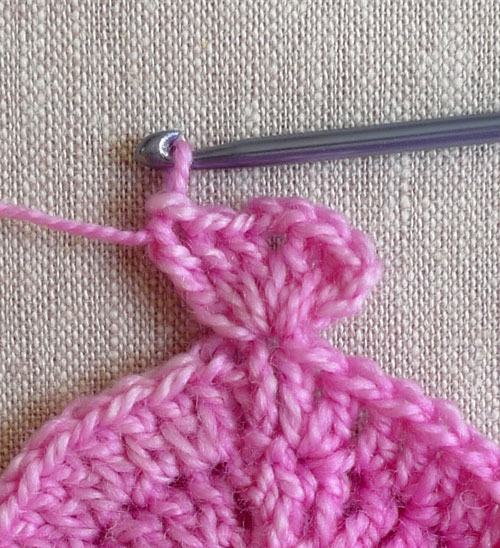
To whip stitch, I brought the needle under both strands of the edge stitches. Instead of turning the needle around to come back the other way, I pushed my needle through in the same direction for every stitch.
Remember to save yourself some trouble and sew over whatever ends you can!

I hope you enjoy this project as much as I did! And happy hooking!


Hello
I bough the kit for this lovely blanket and love working on it. I will of course have a lot of yarn left and I would love to do a ‘rainbow’ jumper for myself. Do you have any sugg stone for suitable patterns? Maybe a top to bottom design? Do you think I could use the Striped Spring Shirt pattern?
Anna-Lena
Hi Anna-Lena,
Thanks for writing in. So glad you are liking the Koigu for this blanket. I suggest you follow a top down pattern from one of Ann Budd’s books. The book is called “Knitter’s Handy Book of Top Down Sweaters” and it lets you create any top down sweater design in any gauge yarn. It is such a great source for those who need a basic sweater pattern but would like to add design details. Good luck!
Best,
Adam
Is it possible to knit granny squares? My daughter has sent me the link to this pattern, and we love it. However, I am an avid knitter, and while I can crochet, it effects my carpal tunnel terribly. Thand you for your time!
Hi Laurie,
Thanks for writing in! It is totally possible to knit granny squares. They look a little different but are beautiful and good for travel knitting. While we don’t have any knitted granny square patterns, there should be plenty on Ravelry or YouTube. Good luck on the search!
-Adam
Hi!
I adore this pattern but can’t afford the entire blanket kit in one pop. I was hoping to buy the yarn individually as I could afford it but it looks like some of the colors aren’t available on an individual basis. Is this true and if so is there another place I can get access to individual skeins?
thanks!
Hi Lindsey,
I’m so glad you love this pattern! It’s a really sweet blanket. Since this is an old pattern there are some colors we don’t carry anymore. I suggest you choose colors that are close to the out of stock colors. There are so many Koigu colors to choose from! Best of luck on the project!
-Adam
Hey Whitney!
I was so inspired by your design that I picked it up for my project and it’s finished. Took me 9 months, but I’m really proud. I am not too fond of wool for crochet, so I used cotton instead. I guess it’s heavier than yours.
Thanks for your pattern!
Regards,
Sanne (the Netherlands)
I crocheted this beautiful blanket for my stepdaughter using her favorite autumn colors in Madelinetosh fingering merino wool two years ago. Two of the squares developed holes, which must be moth or beetle damage. Needless to say, I was horrified to see the damage! She uses the blanket in her living room as a cover while watching TV, so it is always out. I have it now and have already soaked it in a 50/50 solution of water and distilled white vinegar, rinsed and dried it flat. Now I’m ready to crochet the replacement squares and do the repairs on the blanket. I have searched the net for ways to protect fine knitted/crocheted items from this kind of problem, but wonder if you could offer some additional comments and/or advice. This blanket is especially precious for many reasons. One is that I damaged my right wrist so badly from the work that it required release surgery to resolve the tendonitis! A warning to everyone out there working with needles and beautiful natural fibers, beware of insect damage and take extra good care of your hands and wrists.
Hi Linda,
How heartbreaking! As knitters and crocheters, moths are our great enemy! Storing hand knits with lavender and cedar certainly helps to keep the moths at bay. Making some nice sachets to store with the blanket could help greatly. Additionally, cleaning the blanket regularly (even if it is dry cleaning the item) can help keep moths away. Finally, after washing, you can store the item in an airtight bin when it is not in use for extended periods.
I hope that this helps and take care of your wrists!
Cassy
Hello I want to make this blanket in queen size. Have you any advice on how to arrange the squares to get w bigger size. I was looking for advice on colour placement? Many thanks
Hi Clare,
Thanks for writing in! First of all you will need about 270 squares to get a blanket around 65″x79″. this is more of a queen size bed topper and you will have 15 squares along the width and 18 along the height of the blanket. The best way to go about arranging color is by doubling the blanket and adding some more similar colors. If you’ll notice in one of the first pictures the blanket starts with pinks and then moves to reds, oranges, yellows, greens, blues and then purples. I would try to stick to this color spread if you want the blanket to look similar. Let us know how it goes!
Best,
Adam
Hi. I have just finished all my squares for a crib sized blanket. I am kind of confused about seaming it up. I plan on doing the whip stitch, but the video posted seems different than the way it was done in this pattern. Could you please tell me the best way to assemble the squares? Thank you so much!
Hi Alexis,
Thanks for writing in! You can certainly assemble these squares in a number of ways. I will say that no one way is better than the other. Some people prefer to crochet them together but my preference is to whip stitch them together. This video illustrates how I have whipped stitched crocheted squares together in the past. I think that it makes an easy but neat and lovely finish. I would highly recommend it!
I hope that this helps and happy crocheting!
Cassy
Thank you Cassy. Would you recommend doing each row first and then sewing the rows together? I understand how to do the whip stitch but am confused about the order of how to assemble them. Not sure if my question is making sense.
Thanks!
Hi Alexis,
My preference is to make all of the squares and then arrange them and sew them together. I sew rows together and then sew each row to the next. However, there is not wrong answer and no set order of operations! You can sew them together in any order that works best for you!
I hope that this helps!
Cassy
Hi:
Es posible mandarme el gráfico de este grany square, porque no me sale bien con las indicaciones.
Muchas gracias
Hi Mari,
Thanks for writing in! I hope that I am translating your question correctly. We do not have visual or graph directions for this project at present. Only the written directions are available. We will certainly keep your request in mind!
Best,
Cassy
Hi,
I wonder if you have and could share the charts of this granny square. I´m folling the directions, but I don’t get to the same point… I think that a chart will help me.
Thanks in advance!
Hi M,
Thanks for writing in! We do not have visual or graphed directions for this project at present. Only the written directions are available. We will certainly keep your request in mind!
Best,
Cassy
Hi! I was taking notice of the photo of you whip stitching your squares together, I really like the needle you were using. I would like to know what kind that is cause it looks like it is easier to use than the needles I have been using. Thank-you in advance for your answer. Also thanks for making your web site available with so much info.
Happy Crocheting,
Joanwin
Hi Joanwin,
Great question! The needle that we used here is Clover’s Jumbo Bent Tip Tapestry Needle. The bent tips on these needles are very helpful for stitching knit or crocheted fabric together!
I hope that this helps!
Cassy
Hi – just wondering when the blanket bundle will be back in stock?
Thanks
Hi Cath!
Thank you for writing in! We can definitely let you know when the blanket bundles are in stock. If you go here and select the bundle you’re interested in a little box appears under the price. You can enter your email in the box and we’ll email you once the bundle is in stock!
Best wishes,
Kumeko
Lovely pattern! I’ve noticed the whip-stitched outer edges of these squares look a bit less straight than for granny squares. Any tips on getting straighter seams? Should I try a border of sc stitches after assembling the blanket, or maybe adding a chain stitch to the corners of the last round of each square, for extra ease while whip-stitching (instead of 5 dc in each corner, do [2 dc, chain 1, 2 dc] maybe)? Or should I just pull the whip stitches tighter?
Hi,
Thanks for writing in! The edges of this lovely blanket are, indeed, slightly rounded. We think that it adds to the charm of the blanket. I am not sure that there is a straightforward way to square out the corners without reworking the pattern. You could block the individual squares into a squarer shape before stitching them together.
I hope that this helps!
Cassy
Love the crochet blanket .Can you tell me what ply is this koigu merino that you have used thankyou
Hi Heather,
The Koigu that is used is a fingering weight yarn. It takes a size D-F crochet hook or a us 3-5 knitting kneedle.
I hope this helps,
Melissa
Hello. I’m having a problem on round four of this pattern. By the time I get to “slip stitch into 4th chain” I the round, I’m not close enough to the 4th chain. Some how I must not be skipping stitches correctly…? Any help would be appreciated. Thank you!
Hi Jessica,
Thanks for writing in and my apologies for the delayed response! One thing that might be helpful is to use locking stitch markers to mark the stitches that you are working ahead of time. I also find it helpful to say the directions out loud as I do them. This helps me to not make a mistake as I am saying what I should be doing as I work.
I hope that this helps!
Cassy
I’ve been holding onto this pattern for years- and now that I finally learned to crochet, I’m ready to make it! I really want to use leftover yarn from years of knitting projects- like an actual vintage quilted blanket pieced together from fabric scraps, each yarn has a sentimental value to it. But that means that the yarns are all different weights- some merino, some worsted, some bulky- should I adjust the pattern for each type of weight, so that the squares end up roughly the same size? Like doing two rounds instead of three before adding the round with the corners (round four in the pattern)?
Thanks! -Kerri
Hi Kerri,
Thanks for writing in! It certainly may be possible to use different gauges here but I am afraid that there is not a prescribed method to do so. You may have to do a bit of trial and error to figure out what will work for you. The main thing to keep in mind is that using different gauges will result in a blanket that is thicker in some places and thinner in others. I would recommend trying a few squares in different gauges and see what works and how you like it. The nice thing about this pattern is that the modular quality allows you to try things out in advance of jumping into the whole blanket!
I hope that this helps!
Cassy
I have wanted to make this blanket for a very long time! I am an experienced knitter but I don’t know how to crochet (yet). Do you have any suggestions for specific books, blogs or websites that would help teach me, with this project in mind?
Thanks ~ Jennifer
Hi Jen,
Welcome to the world of crochet! I think you will have a fairly easy time picking it up since you already knit, and you will be pleased to see how much faster crochet can be than knitting! The TNNA guide “How to Crochet” is very straightforward and has clear pictures and explanations of everything. I would also recommend either the Stitch Encyclopedia – Crochet or Crocheting in Plain English as they go more in depth than the TNNA guide – unfortunately the second two books are out of stock, but you can sign up to be notified when they return on the product pages.
Alternately, if you would like to try a simpler yet similar project before attempting Bear’s Rainbow Blanket, our Granny Square Blanket Kit has everything you need to get started, and the included Granny Square Blanket Pattern is designed with brand new crocheters in mind!
Best of luck, and happy crocheting!
Julianna
I spotted this pattern early last year and loved it so much I decided to teach myself to crochet and make it. The wool you used isn’t available here in NZ so instead I decided to make it from a variety of brands of 8ply (DK) 100% wool because a) there was lots of colour and brand choice, and b) I thought it would be a bit easier to have a thicker yarn seeing it was my first attempt.
A year and a few months later it’s done! I made 80 squares 8×10) in the end and I’m so pleased with it! I never got bored crocheting it as the ever-changing colours kept the interest up.
Thank you so much for posting this pattern! Your instructions were very detailed and so helpful and such an inspiration.
Cheers
Rosie
Hello Rosie,
Thank you for reaching out and sharing your story! I’m thrilled to hear you had such a great experience.
Happy Crocheting!
-Marilla
Hi @ll at Purl Soho,
I am crocheting this beauty now since dec 2013 and it was thought as a long time project from the beginning. But nowadays I want to get finished with it and am nearly done. There will be 195 (13×15) squares in the end. Now I am thinking about the assembly of all my squares, have already spread them on the floor to have a preview on the finished look – I could hardly wait to cuddle in it now 😉
I like the look of the whipstitch and will try it this way.
My question is: do you reccommend to wash and block all these squares before sewing together?
Thanks for your suggestions – Melanie
Hello Melanie,
This is a great question! KPM is machine washable on a cold, gentle cycle. However, please be aware that, while Koigu does its best to set their hand-dyed colors, they do note that “Under certain water and/or soap types this yarn may bleed.” For thorough instructions and excellent tips on setting your yarn’s dye before you begin, please visit our Re-fixing Dyes Tutorial. I would recommend washing your squares with color catchers, which can be found at your local super market.
I hope this helps and congratulations on being almost done!
-Marilla
Hi,
I, too, am about to assemble the blanket squares I have put together. Are you saying we should wash all the squares with color catchers BEFORE we see the blanket together, or just always when we put them in the wash? And we don’t need to block the squares? I’m a little nervous, as I made 4 of this over the course of a year for the kids, and worry I will ruin them.
Thanks again,
Andrea
Hi Andrea,
Thanks for reaching out! If you didn’t re-fix the dye before crocheting the squares, the safest option would be to block the squares separately before putting them all together, just in case one of the colors bleeds! It isn’t strictly necessary, but it’s also much easier to sew together crocheted squares after blocking, so your seams will turn out extra tidy. To save on time, I don’t think it’s necessary to do a full soak and wash, but a quick five-minute soak in cool water with a bit of no-rinse wool soap, like our Sweater Soap, should be enough time to see if the color bleeds and to get the square wet enough to pin out and block. You could also batch up similar colors to wash together, but if you see the water change color at all, I would get everything out quickly so you can determine which square is the culprit! Any squares with color issues should be soaked with a color catcher and rinsed thoroughly, and I would throw a few in with the blanket the first time it’s washed after assembly just to be on the safe side!
I hope that helps!
Julianna
When will this complete kit be back in? Seems like it’s been a long time! Thanks!
Hi Andrea,
Thanks for reaching out! I’m sorry to say that we are no longer stocking this kit; however, we do still carry Koigu KPPPM and KPM, and all the colors you need are listed above and can be ordered separately. I do apologize that this item is still listed – we’ll look into correcting that as soon as possible!
I hope that helps!
Julianna
Hi there
Love this pattern and am thinking of making the crib size.
Is there a layout plan for the 7 x 9 baby crib blanket please?
Thanks
Margaret 🙂
Hi Margaret,
Thanks so much for the kind words and for writing in! We do not have a recommended layout for the smaller blankets, so you can arrange the squares in whatever order you find pleasing!
Happy crocheting!
Julianna
Hello – I’m here because I followed a link from a Facebook page We Like Knitting who posted a “tip” from beautifulskills.com. It was just a direct copy and link to your page. Nice to find Purl Soho as usual, with your great tips, but questioning whether you permit/like this? Is it just more publicity for you, therefore ok?
Hi and thanks for reaching out! While we do prefer that blog and website owners ask permission before linking to our projects and tutorials, this does lead back to Purl Soho for the actual pattern, which is ultimately what we prefer. Thank you for bringing this link to our attention, and we will contact the page owners to ask for proper credit!
Best,
Julianna
I’ve started this beautiful blanket and love doing it. I’ve been blocking the squares as I go. (the squares are very out of shape when finished). I’m really stretching to get them close to 4x4in. And then, there seems to be a good bit more space between the stitches that what appears in your squares. Any suggestions or thoughts on what I could be doing wrong?
Hello Jill,
Thank you for reaching out! It sounds like your gauge is just a bit off. I would reccomend going up a hook size.
I hope this helps and let us know if you continue to have issues!
Warmly,
Marilla
Hi,
I think I have found a discrepancy between this pattern and the rainbow blanket bundle and was wondering if you could help me with it.
The rainbow blanket bundle has color 2343 but this one instead has color 2423.
what should I do?
Thanks,
Cecile
Hi Cecile,
Thanks for reaching out, and I’m so sorry to hear that you have received the wrong color in your bundle! Please do reach out to us at customerservice@purlsoho.com and we will be happy to send along the correct color!
Best,
Julianna
Thank you Julianna,
There was no error in what I ordered if that’s what my email made you think. I was just wondering what the accurate color was suppose to be 2423 or 2343?
Best,
Cecile
Hi Cecile,
I apologize for the confusion! The colors of Koigu KPM often shift over the years and can vary quite a bit between dye lots, so we do occasionally have to change what colors we include in the bundle if they no longer match what we used in the original blanket. In this case, 2423 was used in the original blanket and at that time was a light olive green, but now is a grey that is quite different, so we are using 2343 in our kits. You may find a few other deviations in your bundle, but rest assured that we have done our best to match the colors you see in the images here!
Best,
Julianna
Could you recommend another yarn for the border color? KPM 0000 seems to be out of stock everywhere.
Thanks!
Emily
Hi Emily,
Thanks for writing in! The most similar yarn we have that would work for this pattern would be Posy, but unfortunately we are also out of Posy in Heirloom White. You might consider Posy in Mourning Dove or Drizzle Gray for a different, yet still neutral, main color!
Happy knitting!
Julianna
Hi, 2 questions. My circle is puckering (ie, is not flat) as I crochet it. Any advice? Also, I’m having trouble determining where to put the slip stitch when I finish a round. By the way I’m counting, the right stitch is the last one in the chain up, therefore I’m putting the needle through the middle of the V. Is that right? Otherwise it seems like I’m putting the slip stitch into the first dc of the round. I’m sorry if this is confusing. Thank you!
Hi Julie,
Thanks for reaching out! If you are sure that you have the correct number of stitches per round, I suspect that the square simply needs to be completed and blocked! I would suggest counting your stitches after each round for a little while to make sure you are getting in enough increases, if you aren’t already. That does sound like you are working into the chain correctly! If you want to double check, you could place a removable stitch marker in the third chain stitch at the beginning of the next round so you can clearly see where to work your slip stitch when you work back around to the stitch marker.
I hope that helps!
Julianna
Hi, I am enjoying crocheting these squares and find the pattern and the yarn both very beautiful. I have already made quite a few of them, and have always the same trouble: on round 5 , after I do the corner, I only have space for 12 stitches instead of 13. I think my round 4 is correct, it goes along perfectly well with what the pattern says. What could I be doing wrong in round 5? I would love some help. On another note, my squares look great but are not flat at all, not sure why. I guess that will be fixed when I attached them together, but I am not sure. Thanks!
Hi Carolina,
Thanks for writing in! As long as you are starting with the correct number of stitches, there will be 13 stitches along each side of the square in this row, so I suspect you might be missing the first stitch after working (1 dc, 2 tr, ch 2, 2 tr, 1 dc) into the corner space. When you have to squish so many stitches into a small corner space, it’s quite likely that they will overlap the first stitch of the side edge. I would recommend scooting these stitches to the right so you can locate the first stitch, keeping in mind that crochet stitches are shaped like upside-down L’s, so the correct spot to insert your hook will be located just to the right of the post of the first stitch.
I hope that helps!
Julianna
thanks for writing, Julianna! i looked again and I am not missing that stitch after the working space. could it be that i am not counting correctly?
Hi Carolina,
Hmm, that is odd! This blanket has been made by many crafters without problems, and I crocheted a square to test it out and it worked fine, so something must be amiss with your stitch counts! I would recommend counting very carefully while you are crocheting the previous row. If all else fails, it should be fine to increase one stitch in Row 5 to make the stitch count correct for the rest of the square!
Best,
Julianna
I’m enjoying working on this blanket! I absolutely LOVE the design, and it made me want to learn how to crochet. This is only my second project after your granny square blanket, so I’m still quite new. I am using a DK weight for this project (Cascade Sport 220), as I could not afford the Koigu, as beautiful as it is. My question is that I’ve noticed a gap between the chain and the first DC in the round. When I come back to slip stitch into the chain, I still see it. Do you have any tips to make this gap less apparent? Perhaps it’s the yarn? I tried doing sort of a standing DC (though I think that method is supposed to be for changing colors), and I slip stitched into the true first stitch of the row. That sounds confusing but it sort of worked, though I’m sure you aren’t supposed to do that in crochet, probably. 🙂 I saw a video about trying a DC2Tog at the end of the row. Any suggestions? Thanks again!
Hi there! Just wanted to add that I tried a technique I just read about in the comments section of the same video. The poster said to chain 2 at the start of the round, DC in the same space, and then continue around. Instead of slipping into the third chain at the beginning of the round, slip into that first DC. Worked like a charm! No gapping. Hopefully this technique won’t mess up the pattern otherwise and will make for a slightly neater look in my work. Just thought I’d share! Still curious to hear what you would do. Thanks!
Hi Jess,
Thank you for the great tips! It is somewhat normal to have a gap or irregular area at the beginning of each round when beginning with a chain, but it’s usually much less apparent after the squares are blocked. I usually find that I can avoid this by working my starting chain a little tighter than usual, but there are several methods for tidying this area up, so I’m glad you found one that works for you!
Best,
Julianna
Thank you! To anyone interested, I like the look of the closed up circle better (Chain 2, DC at start of the round), but it doesn’t work up quite as square as the regular pattern. So I think I’m going to go back to the pattern as written. 🙂 I’m sure no one else will even notice!
Love this pattern. Have made about 60 squares so far with 12 colours, so have to work out a design before going any further. Making with 100% cotton 8ply
Hi Michele,
Thanks for reaching out! That sounds great, I am so glad to hear that you are enjoying this pattern and can’t wait to hear how it turns out!
Warmly,
Gianna
Hi,
I am down to last 3 colors but I cannot find these colors so I’m wondering if you can suggest the closest color that you have in stock for me. The color I see in the picture through the computer doesn’t seem so accurate. The colors I need are 3016, 1532, 1173. Thanks for your help!
Hi Hannah,
Thanks for reaching out! Unfortunately those 3 colors are discontinued and there isn’t an exact substitution them so I can suggest some that will be close but not the same! For 3016 I would recommend 2409, for 1532 I would recommend 1503 and for 1173 I would recommend 1156!
I hope this helps, happy knitting!
Gianna
Hi!
What color substitution would you recommend for colors 1100 and 2200?
Thanks!
Hi Andrea!
I’d suggest KPM 642 in place of 1100 and KPM 1195 or 2220 in place of 2200.
Take care,
Kelsey
Hello!
I have made this blanket twice (we love it!) and I still have some yarn left on every color. Any idea what I can make with it? Thanks!!
Hi Hannah,
Thanks for writing in! I am so glad to hear that you have enjoyed making this blanket! Here is our full collection of fingering weight yarn accessories: Fingering Weight Yarn Accessories
Depending on how much yarn you have left you could possibly make a hat, hand warmers, a pair of socks, or even a scarf! Just be sure to check your gauge prior to beginning!
I hope this helps and please let me know if you have any more questions!
Gianna
Any hot tips on how to weave in the ends? this is my first flat crochet project, and the ends are all dangly!
Hi Chloe,
Thanks for writing in! There isn’t a specific method or technique for weaving in ends in crocheted pieces, but due to the dense and textured nature of crochet fabric, it’s much more forgiving in terms of hiding your ends than knitting!
If you are weaving in near a seam, I would suggest hiding your ends in the seam itself. Otherwise, to weave in your ends in crochet, on the wrong of side of the work, you can either work them through the row they are on or, in a more open fabric, work diagonally, going around any lacy areas or holes for 2 to 3 inches. As long as you make sure not to go across the middle of any open spaces, they should be quite easy to disguise! Also, another tip I learned is that it’s good to weave the ends in going in three different directions (e.g. going upwards through a back loop, then back down through the next back loop, and then up again through the next back loop). You can do this as any times as you feel necessary, and the idea is that no amount of pulling in any direction will cause the yarn to become undone!
I hope that helps!
All the best,
Cat
As many of the colors for this pattern are no longer available, are there suggested substitutions?
Hi Aimee!
Thank you for your question! You can use your favorite fingering weight yarn for these colors, and since there are so many included in this pattern, this blanket is a great way to use up scraps from other projects as well. Posy is one of my favorite fingering weight colorful yarns, and Brooklyn Tweed’s Peerie is another fantastic choice for your Rainbow Blanket, if you’re looking for some new yarn!
I hope this helps!
All the best,
Margaret
I’m a beginner and I really don’t know what you’re talking about when you say make an adjustable chain. I really loved your blanket and I would like to make my own. Is there any way you could post a video of it. I’m also a visual learner… Thanks
Hi Janice!
Thank you for your question. An adjustable loop is a loop of yarn that is used to create the initial round of double crochet stitches in this pattern. We have a full tutorial for an adjustable loop that you can check out right here!
I hope this helps, and happy crocheting!
All the best,
Margaret
Hi Purl Soho! I am excitedly waiting for the restock of the Linen Quill Minis. Would those work for this pattern with some additional skeins of Linen Quill for the white “background” yarn?
Thanks,
Maxine
Hi Maxine,
Thank you for writing in and what a wonderful idea! You can definitely use the Linen Quill Mini Bundle for the project with quite a bit of yarn left over! Please let us know if you have any other questions!
Happy making,
Gavriella
Hey Purl Soho team – wanted to know what other yarns you recommend for this project since it seems you no longer carry the yarn used here. Any recs would be great!
Hi Vivian,
Thank you for reaching out! Our Linen Quill Mini bundle would be absolutely wonderful for this project! Please let us know if you have any questions!
Happy making,
Gavriella