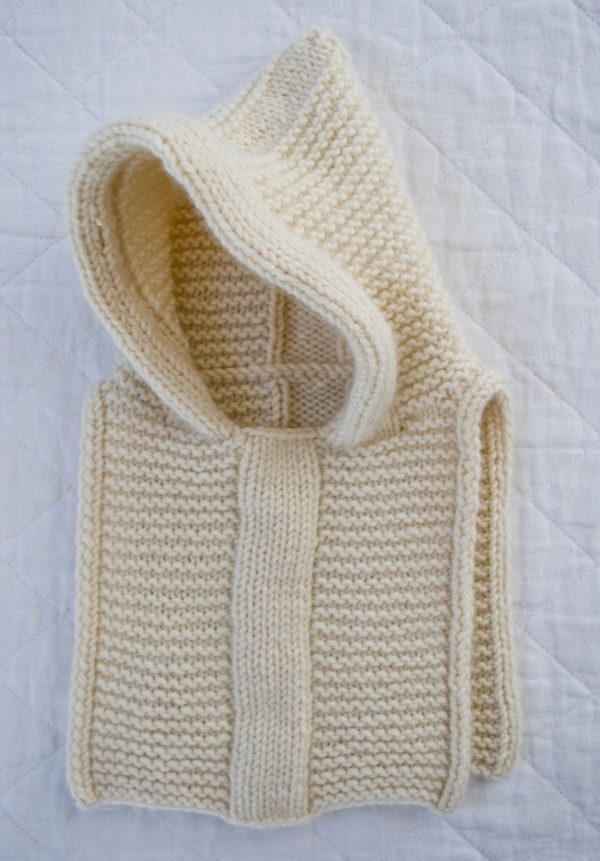
Petite Popover
They were skeptical at first, but I think I’ve finally convinced my colleagues of the magnificence of the dickie! I mean, seriously, what could be better?
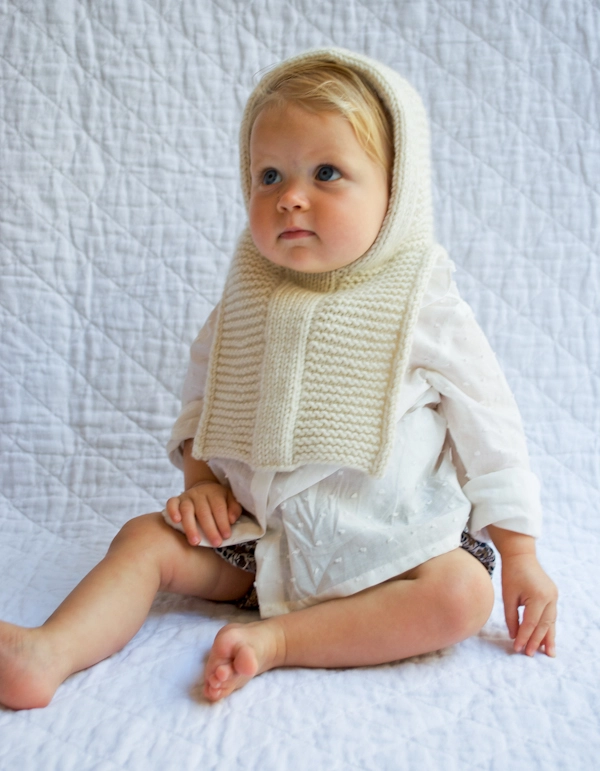
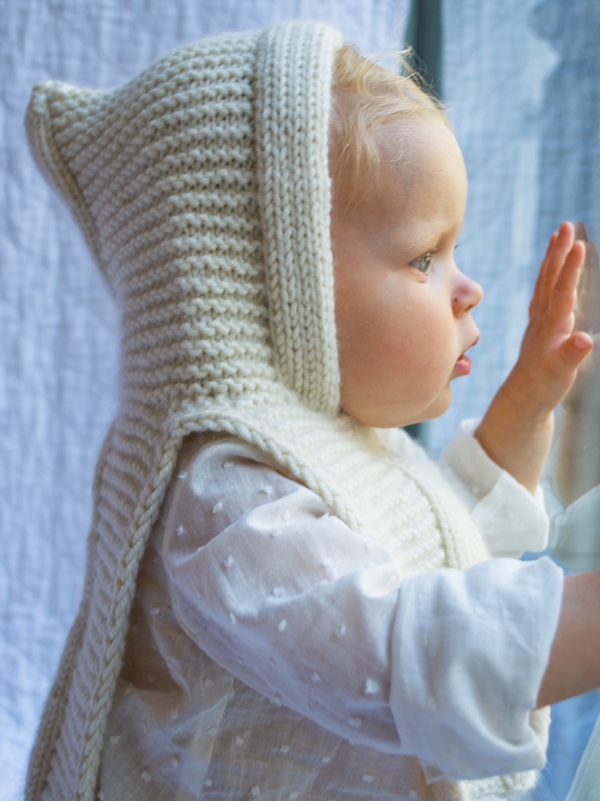
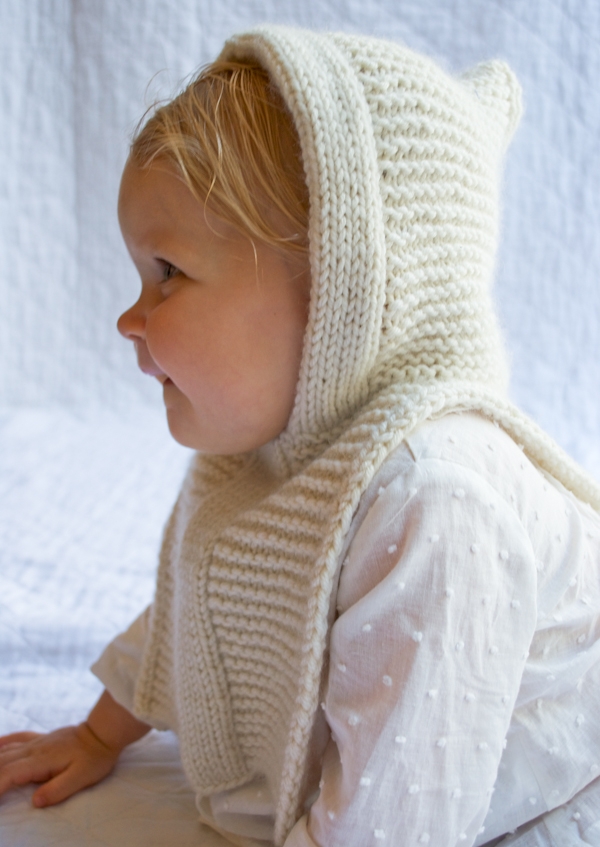
No worrying about cramming layers into layers, just pop it on over a shirt or sweater, under a coat or jacket. Snug as a bug, I say! Your baby or tot’s core will be toasty warm and his or her arms, flexible and free. Plus, this one has a cozy hood, eliminating one more thing bound to fall behind at the park or sadly slip out of a pocket.
Can you feel my soapbox enthusiasm? I do not exaggerate when I write that for a solid year of meetings I have espoused the renaissance of the dickie. And let’s be honest, the majority of my co-workers’ doubt focussed on the name. “Dickie” is not nearly as cute or endearing as Popover! (Thank you for the re-brand, Whitney!)
So here is my attempt to resurrect the dignity of the side-less vest. Knit in classic Worsted, rich, organic merino from Swans Island, and another in the super soft, plush and elegant 8-Ply Cashmere from Jade Sapphire. One needle. One little hood seam. Two classic stitch patterns. From both a knitter’s and a parent’s point of view, it’s a no-brainer!
So, what do y’all think?!?! Can we bring back the dickie? Say yes! -Laura
Designed by Purl Soho designer, Laura Ferguson.
Share your progress and connect with the community by tagging your pics with #PurlSoho, #PurlSohoBusyHands, and #PurlSohoPetitePopover. We can’t wait to see what you make!
Materials
- For the Gray Popover: 1 (1, 2) skein of Swans Island’s Worsted, 100% organic merino. Each skein is 250 yards/ 100 grams; approximately (250, 250, 500) yards required.
This color is Seasmoke. - For the Ecru Popover: 2 (3, 4) skeins of Jade Sapphire’s 8-ply Cashmere, 100% Mongolian cashmere. Each skein is 100 yards/ 55 grams; approximately (200, 300, 400) yards required.
This color is Ivory. - A US 8 (5 mm), 16-inch circular needle
- Stitch holder or scrap yarn
Gauge
20 stitches = 4 inches garter stitch
Sizes
To fit most 12-18 month olds (2-4, 4-6 year olds)
- Length from cast on to back of neck: 7 ¼ (8 ¼, 10 ¼) inches (adjustable)
- Overall length from cast on to top of hood: 12 ¾ (14 ¾, 17 ¾) inches (adjustable)
- Width across chest: 7 (8, 9) inches
Notes
Slip stitches as if to knit on the right side and as if to purl on the wrong side.
Pattern
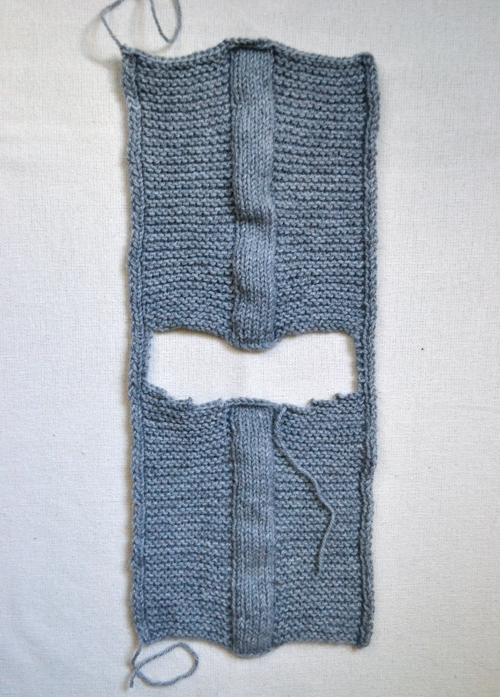
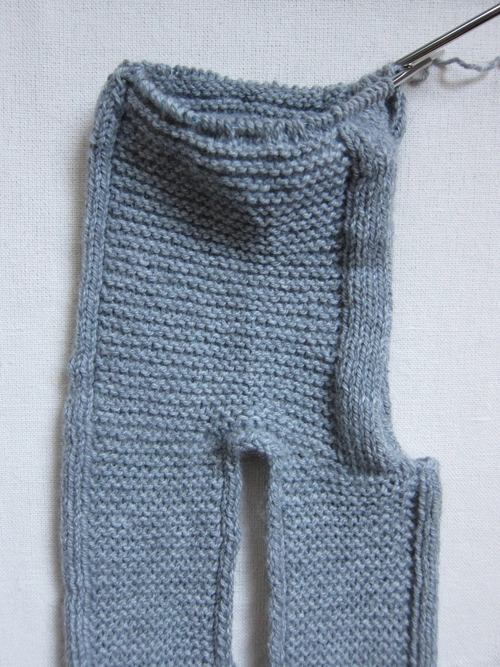
The Front
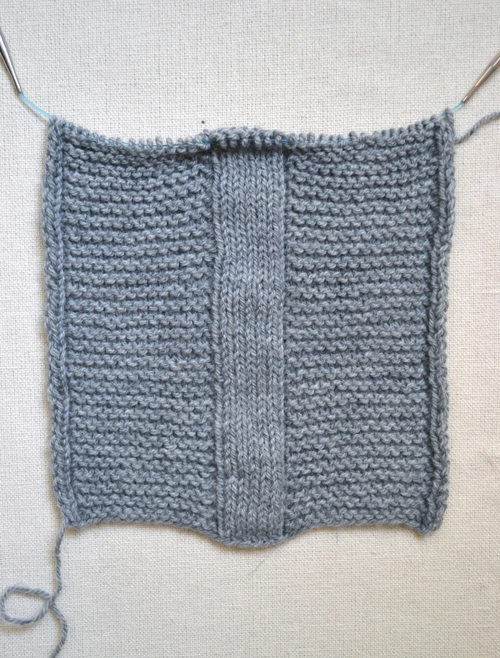
Cast on 36 (40, 44) stitches. We used a basic Long Tail Cast On.
Row 1 (right side): Slip 1, k1, p1, k11 (13, 15), p1, k6, p1, k11 (13, 15), p1, k2.
Row 2: Slip 1, p1, k13 (15, 17), p6, k13 (15, 17), p2.
Repeat Rows 1 and 2 until piece measures 7 (8, 9) inches, or desired length, from the cast on edge.
The Neck
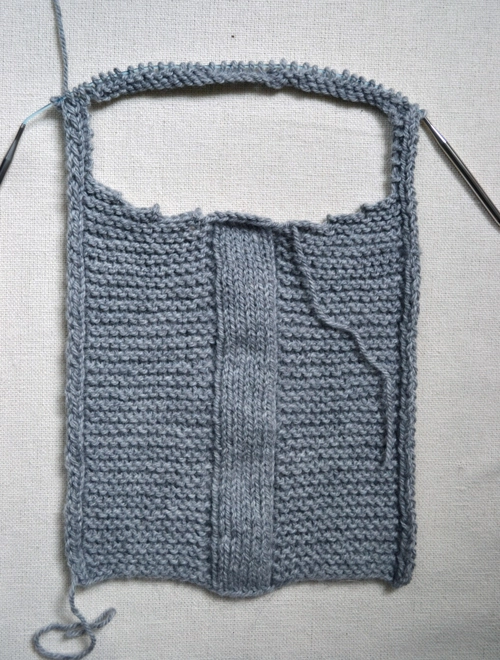
Row 1 (right side): Slip 1, k1, p1, k10 (13, 14), bind off in pattern the next 10 (8, 10) stitches, knit to the last 3 stitches, p1, k2. 26 (32, 34) total stitches; 13 (16, 17) for each shoulder.
Row 2: Slip 1, p1, knit to bound off stitches.
The Right Shoulder
Now working just the 13 (16, 17) stitches of the Right Shoulder…
Row 1 (right side): Bind off 4 (4, 4) stitches, knit to last 3 stitches, p1, k2. 9 (12, 13 ) stitches
Row 2: Slip 1, p1, knit to bound off stitches.
Repeat Row 1 one more time. 5 (8, 9) stitches
For 2-4 and 4-6 Sizes ONLY
Next Row (wrong side): Slip 1, p1, knit to bound off stitches.
Next Row: Bind off 3 (4) stitches, k1, p1, k2. 5 (5) stitches
For ALL Sizes
Row 1 (wrong side): Slip 1, p1, k3.
Row 2: K2, p1, k2.
Repeat Rows 1 and 2 three (four, five) more times.
Repeat Row 1.
Cut yarn. Place stitches on a holder.
The Left Shoulder
With the wrong side facing you, join new yarn to the 13 (16, 17) stitches of the Left Shoulder. And now just working those stitches…
Row 1 (wrong side): Bind off 4 (4, 4) stitches, knit to last 2 stitches, p2. 9 (12, 13) stitches
Row 2: Slip 1, k1, p1, knit to bound off stitches.
Repeat Row 1 one more time. 5 (8, 9) stitches.
For 2-4 and 4-6 Sizes ONLY
Next Row (right side): Slip 1, k1, p1, knit to end.
Next Row: Bind off 3 (4) stitches, k2, p2. 5 (5) stitches
For ALL Sizes
Row 1 (right side): Slip 1, k1, p1, k2.
Row 2: K3, p2.
Repeat Rows 1 and 2 two (three, four) more times.
Repeat Row 1.
Next Row (wrong side): Cable cast on 26 (30, 34) stitches, working across newly cast on stitches, k10 (12, 14), p6, knit to last 2 stitches, p2. 31 (35, 39) stitches; 5 (5, 5) stitches still on hold for the Right Shoulder
Next Row: Slip 1, k1, p1, k11 (13, 15), p1, k6, p1, knit across rest of stitches, then work across 5 stitches on holder, k2, p1, k2. 36 (40, 44) stitches
The Back
Row 1 (wrong side): Slip 1, p1, k13 (15, 17), p6, k13 (15, 17), p2.
Row 2: Slip 1, k1, p1, k11 (13, 15), p1, k6, p1, k11 (13, 15), p1, k2.
Repeat Rows 1 and 2 until The Back measures 7 1/4 (8 ¼, 9 1/4) inches or desired length.
Repeat Row 1.
Bind off in pattern.
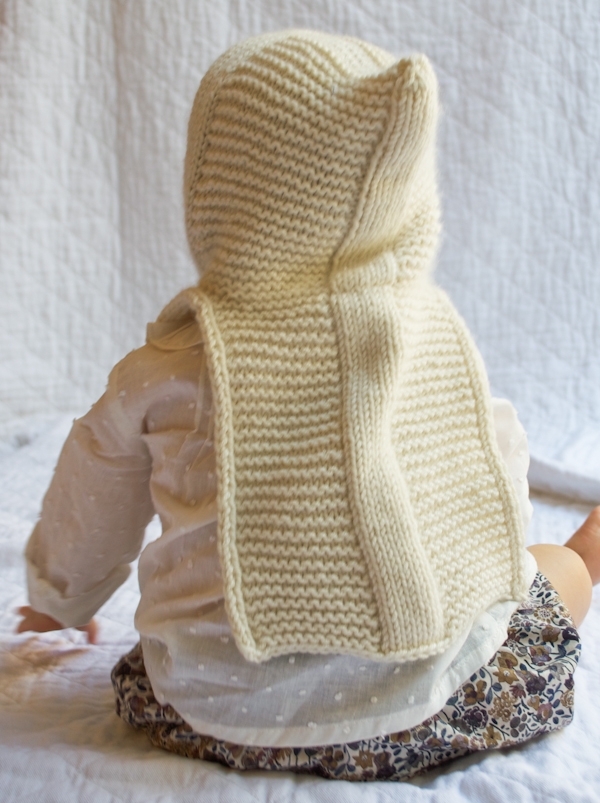
The Hood
Joining new yarn, start to the left (as you look at the sweater) of the center stockinette stripe and…

…pick up 60 (68, 76) stitches all the way around the neck to the right side of the center stockinette stripe.
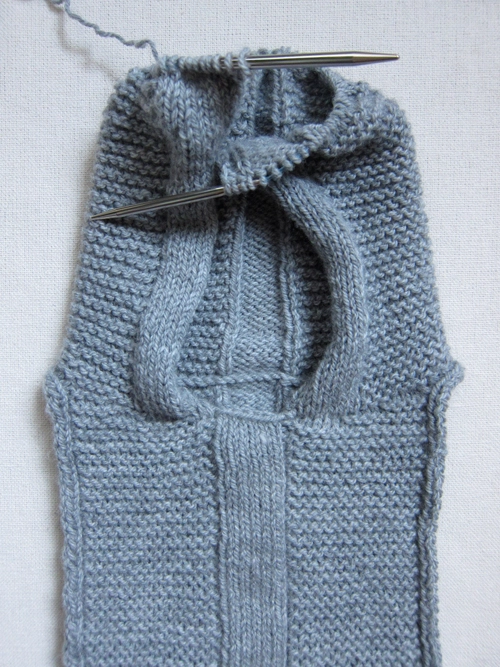
Turn work.
Row 1 (wrong side): Cable cast on 3 stitches, purl those 3 stitches, k1, p6, k20 (24, 28), p6, k20 (24, 28), p6, k1. 63 (71, 79) stitches
Row 2: Cable cast on 3 stitches, knit those 3 stitches, p1, k6, p1, k18 (22, 26), p1, k6, p1, k18 (22, 26), p1, k6, p1, k3. 66 (74, 82) stitches
Row 3: P3, k1, p6, k20 (24, 28), p6, k20 (24, 28), p6, k1, p3.
Row 4: K3, p1, k6, p1, k18 (22, 26), p1, k6, p1, k18 (22, 26), p1, k6, p1, k3.
Repeat Rows 3 and 4 until piece measures 5 1/2 (6 ½, 7) inches, or desired length, from the back of the Neck.
Repeat Row 3.
Decrease Row (right side): K3, p1, k6, p1, k18 (22, 26), p1, ssk, k2, k2tog, p1, k18 (22, 26), p1, k6, p1, k3. 64 (72, 80) stitches
Next Row: P3, k1, p6, k20 (24, 28), p4, k20 (24, 28), p6, k1, p3.
Decrease Row: K3, p1, k6, p1, k18 (22, 26), p1, ssk, k2tog, p1, k18 (22, 26), p1, k6, p1, k3. 62 (70, 78) stitches
Next Row: P3, k1, p6, k1, p18 (22, 26), k1, p2, k1, p18 (22, 26), k1, p6, k1, p3. Note: You are no longer working the sides of the hood in garter, but rather in stockinette to prepare for seaming the top of the hood!
Cut yarn leaving a generous tail of about 20 inches.
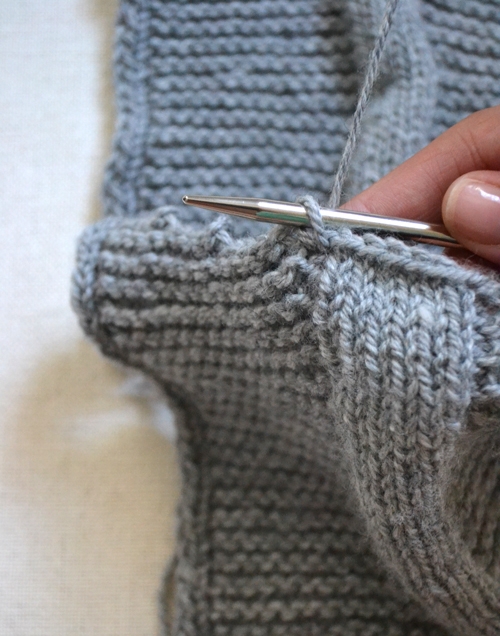
Seam the Top of the Hood
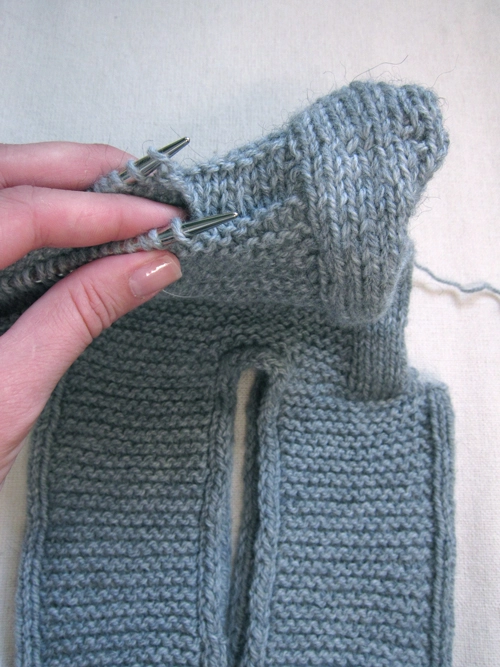
Divide the stitches in two, sliding half the stitches to each end of the circular needle. Use the Kitchener Stitch to graft the two sides of the hood together.
Finish the Hood
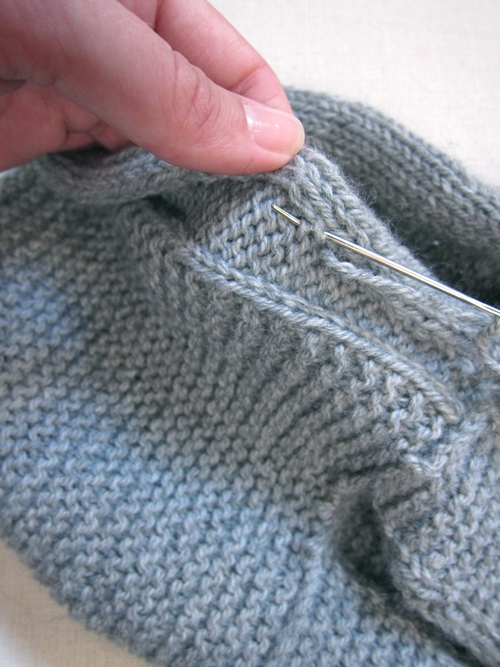
Using the column of purl stitches as a guide, fold the three edge stitches of the hood to the inside of the hood. Using a long piece of yarn, whip stitch the edge down. This will create a nicely finished edge.
Weave in your ends and pop it over the head of your little loved one!!


I am making the 2-4yo size and I can’t get the stitches for the hood to pick up evenly across the stripe at the back. When I knit row 1, I only knit 22 stitches between the hood edge and the back stripe, and 26 to the other side of the hood.
Is this going to look terrible? How do I even out the stitches when I pick up around the collar?
Hi Jillian,
Thank you for writing in! It sounds like you may have picked up the incorrect amount of stitches which has caused your first row to be slightly offset. I would recommend ripping back and beginning the hood pick-up stitches again to make sure you are able to even out the sides of your hood. I hope this helps but please let me know if you have any other questions.
All the best,
Gavriella