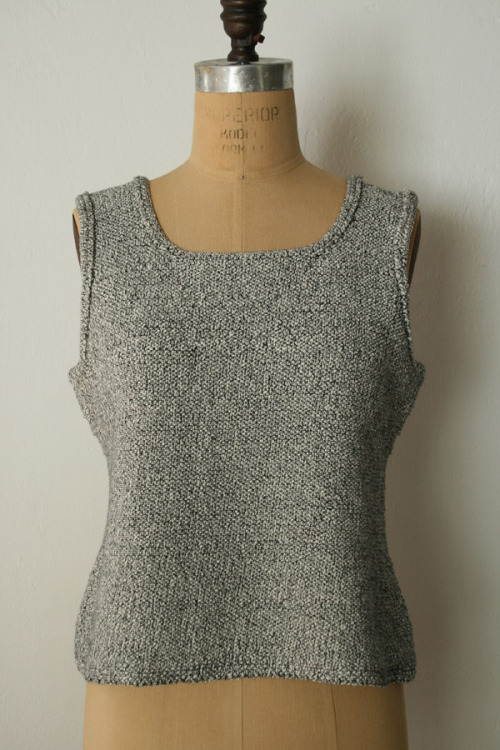
Pebble Tank
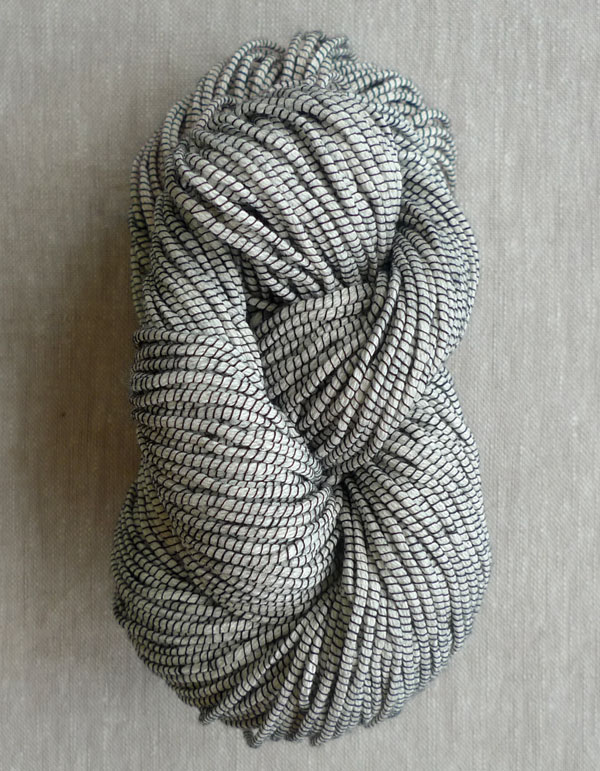
We talk a lot about color here, but beautiful texture is really just as intriguing! Texture is the reason we bother with stitch patterns; it’s why we decide between hand-spun and machine-spun fibers; and it’s why we adore some of our very favorite yarns, like Alchemy’s Silken Straw, Knit Collage’s Pixie Dust and this one, Habu Textiles’ Natural Cover Cotton.
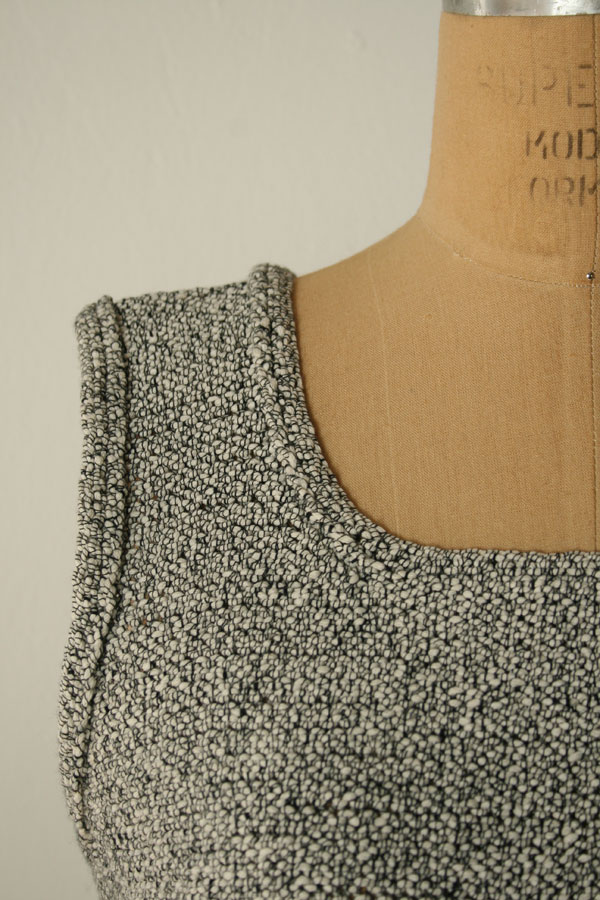
At Habu’s workshops, fearless designers explore innovative ingredients and fascinating spinning techniques, embracing the wild and interesting textures that result from their mad science. Natural Cover Cotton starts with a simple cream colored plied cotton yarn that is then beautifully wrapped in a very fine colored thread. In reverse stockinette, I think the effect is absolutely gorgeous, like the stony bed of a mountain stream or the pebbly remains of a retreating tide.

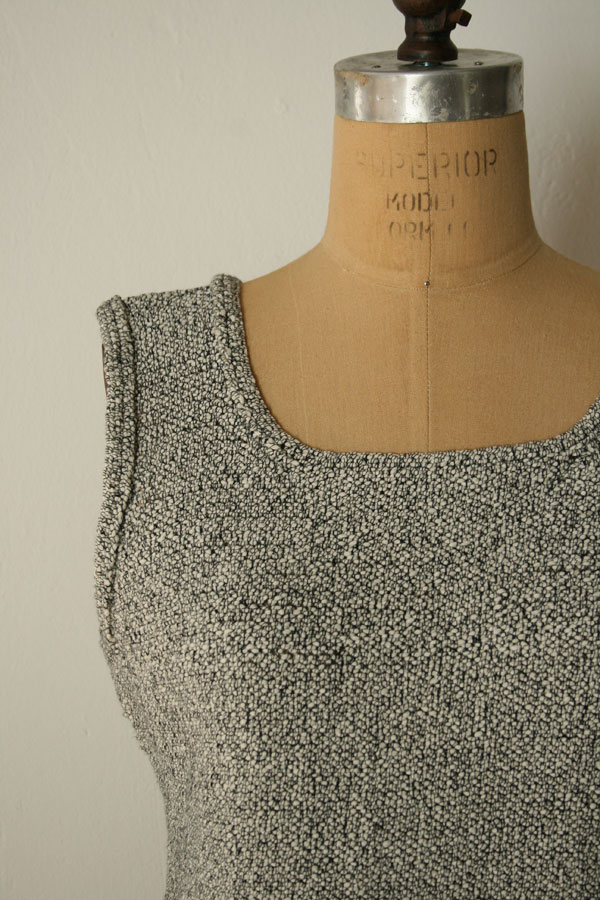
The simple silhouette of a warm weather tank is the perfect backdrop for all of this earthiness. Together the impact is chic and casual. Wear it with jeans and flats in Soho or with shorts and moccasins in the Rockies!
Designed by Purl Soho designer, Whitney Van Nes.
Share your progress and connect with the community by tagging your pics with #PurlSoho, #PurlSohoBusyHands, and #PurlSohoPebbleTank. We can’t wait to see what you make!
Materials
- 4- 5, (4-5, 5-6, 6, 6-7) skeins of Habu’s Natural Cover Cotton, 100% cotton. This color is Black. (Tip: Don’t roll the last skein into a ball so that if you end up not needing it, you can return it for store credit!)
- US 7 (4.5 mm), 24 or 32-inch circular needles
- US 7, 16 or 20-inch circular needles
- 6 or 7 stitch holders (optional, you can use scrap yarn if you prefer!)
Gauge
18 stitches = 4 inches in stockinette stitch
Sizes
NOTE: For help picking a size, please check out our Understanding Ease + Selecting Size Tutorial!
32 (35, 38¼, 41⅓, 44½)
- Hip and Chest Circumference: 32 (35, 38¼, 41⅓, 44½) inches
- Waist Circumference: 29⅓ (32½, 35½, 38⅔, 41¾) inches
- Length from Bottom Edge to Underarm: 13 inches
- Length from Bottom Edge to Top of Shoulder: 22 inches
Notes
How to Adjust the Length Measurements
There are many places in the pattern to easily shorten or lengthen the given measurements. Here are some:
1. At the beginning of the pattern when it says to knit until the piece measures 3 inches from the bottom edge: instead, measure from your waist to where you want the bottom edge of the sweater to be and subtract 4 1/2 inches from that number. This is how many inches you should knit before starting the waist shaping.
2. At the waist where you knit 3 inches without increasing or decreasing: feel free to subtract or add rounds.
3. When the pattern says to knit until the piece measures 13 inches from the cast on edge: stop knittimg sooner or keep knitting for longer if you’d like.
4. When you knit until the armholes measure 9 inches: adjust this length to whatever you want. Make sure you knit all four shoulders the same length and be aware that changing this measurement will also lower or raise the neckline.
When deciding on these adjustments, I recommend putting the stitches on a long piece of scrap yarn or on a very long needle so you can try on your tank to make sure you get the fit you want. It’s a small effort, but it can make a big difference!
Final Notes
- The final sweater is in reverse stockinette (purl side out), but you actually knit the sweater inside out with the knit side facing you. To avoid total confusion, instead of using the conventional terms “right side” and “wrong side”, for this pattern, I used “knit side” and “purl side”.
- The photographs that accompany this pattern illustrate the middle size (38 1/4) vest.
Pattern
Body
Using the 24 or 32-inch circular needle, cast on 144 (158, 172, 186, 200) stitches. We used a basic Long Tail Cast On.
Place a marker and join for working in the round, being careful to not twist the stitches.
Knit 1 round.
Purl 1 round.
Repeat last two rounds.
Knit every round until the piece measures 3 inches from the cast on edge.
Next round: K 72 (79, 86, 93, 100), place a different color marker, knit to end of round.
*Decrease Round 1: Knit to last 3 stitches, ssk, k1. (1 stitch decreased)
Decrease Round 2: K1, k2tog, knit to 3 stitches before next marker, ssk, k1, slip marker, k1, k2tog, knit to end of round. (3 stitches decreased)
Knit 4 rounds.**
Repeat from * to ** two more times. 132 (146, 160, 174, 188) stitches
Knit until piece measures 9 inches from the cast on edge (about three inches from the last decrease).
*Increase Round 1: Knit to last stitch, make 1 right (m1r), k1. (1 stitch increased)
Increase Round 2: K1, make 1 left (m1l), knit to 1 stitch before first marker, m1r, k1, slip marker, k1, m1l, knit to end of round. (3 stitches increased)
Knit 4 rounds. **
Repeat from * to ** two more times. 144 (158, 172, 186, 200) stitches
Knit until piece measures 13 inches from the cast on edge.
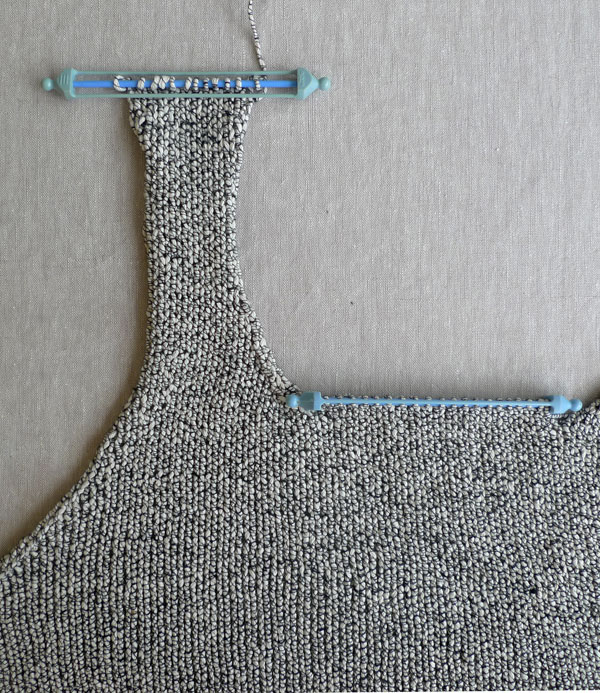
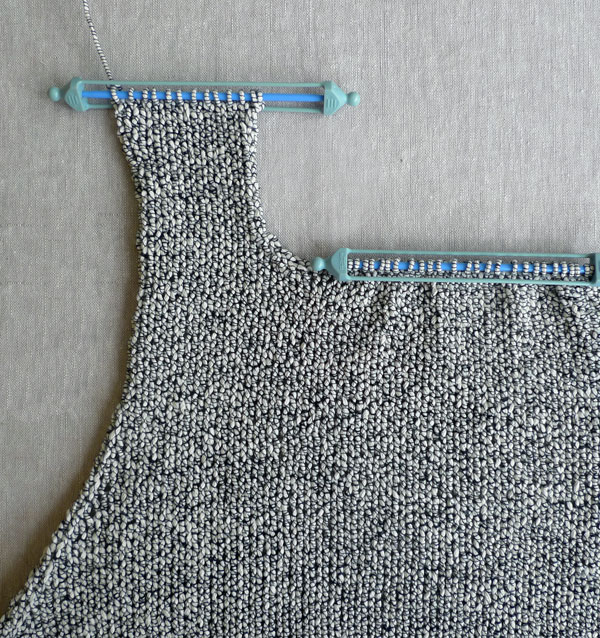
Divide the Front and Back
Knit 5, slip the last 10 stitches onto a stitch holder (removing the marker), knit to next marker, remove the marker, knit 5, put last 10 stitches onto a stitch holder. (Do not knit to end of round.) 62 (69, 76, 83, 90) stitches for front and back, and 10 stitches on hold for each underarm
Put the last 62 (69, 76, 83, 90) stitches onto stitch holders or a piece of scrap yarn for now (they will later be used to knit the back).
Front
For this section you will work just the next 62 (69, 76, 83, 90) stitches, turning the work at the end of each row.
Row 1 (knit side): K1, ssk, knit to last 3 stitches, k2tog, k1. (2 stitches decreased)
Row 2 (purl side): P1, p2tog, purl to last 3 stitches, purl 2 together through the back loop (p2tog tbl), p1. 58 (65, 72, 79, 86) stitches
Row 3: Repeat Row 1. (2 stitches decreased)
Row 4: Purl.
Repeat the last two rows 4 (4, 5, 5, 5) more times. 48 (55, 60, 67, 74) stitches
Next Row: Knit.
Next Row: Purl.
Next Row: Repeat Row 1. (2 stitches decreased)
Next Row: Purl.
Repeat the last 4 rows one more time. 44 (51, 56, 63, 70) stitches **
Next Row: Knit 31 (35, 38, 42, 46) put the last 18 (19, 20, 21, 22) stitches on a stitch holder, k1, ssk, knit to end of row. 13 (16, 18, 21, 24) stitches for right front (as you will wear it, purl side out), 12 (15, 17, 20, 23) stitches for left front, and 18 (19, 20, 21, 22) stitches on hold for neckline
Left Front Shoulder
Now work just the 12 (15, 17, 20, 23) stitches of the left front, turning the work at the end of each row. (Just ignore for now the right front stitches that are also on the needle.)
Row 1 (purl side): Purl to last 3 stitches, p2tog tbl, p1. 11 (14, 16, 19, 22) stitches
Row 2 (knit side): K1, ssk, knit to end. (1 stitch decreased)
Row 3: Purl.
Row 4: Repeat Row 2. (1 stitch decreased)
Rows 5 and 6: Repeat Rows 3 and 4. 8 (11, 13, 16, 19) stitches
Row 7: Purl.
Row 8: Knit.
Row 9: Purl.
Row 10: Repeat Row 2. 7 (10, 12, 15, 18) stitches
Work in stockinette stitch until the armhole measures 9 inches (about 4 inches from the last decrease). Cut an 18-inch tail and put the remaining stitches on a stitch holder.
Right Front Shoulder
For this section you will just be working the 13 (16, 18, 21, 24) stitches of the right front shoulder, turning the work at the end of each row.
With the knit side facing you, join new yarn.
Row 1 (knit side): Knit to last 3 stitches, k2tog, k1. (1 stitch decreased)
Row 2 (purl side): P1, p2tog, purl to end. 11 (14, 16, 19, 22) stitches
Row 3: Repeat Row 1. 10 (13, 15, 18, 21) stitches
Row 4: Purl.
Row 5: Repeat Row 1. (1 stitch decreased)
Rows 6 and 7: Repeat Rows 4 and 5. 8 (11, 13, 16, 19) stitches
Row 8: Purl.
Row 9: Knit.
Row 10: Purl.
Row 11: Repeat Row 1. 7 (10, 12, 15, 18) stitches
Work in stockinette stitch until the armhole measures 9 inches (equal to the left front shoulder). Cut an 18-inch tail and put the remaining stitches on a stitch holder.
Back
Return to the needle the 62 (69, 76, 83, 90) stitches that have been on hold. For this section, you will work just these stitches, turning the work at the end of each row.
With the knit side facing you, join new yarn.
Work from Row 1 of the Front section until the **, ending with 44 (51, 56, 63, 70) stitches.
Next Row: Knit.
Next Row: Purl.
Repeat last 2 rows four more times.
Next Row (knit side): Knit 34 (38, 41, 45, 49), put the last 24 (25, 26, 27, 28) stitches on a stitch holder, k1, ssk, knit to end of round. 10 (13, 15, 18, 21) for left back (as you wear it, purl side out), 9 (12, 14, 17, 20) stitches for right back, and 24 (25, 26, 27, 28) stitches on hold for neckline.
Right Back Shoulder
Now you’ll work just the 9 (12, 14, 17, 20) stitches of the right back, turning the work at the end of each row.
Row 1 (purl side): Purl.
Row 2 (knit side): K1, ssk, knit to end. (1 stitch decreased)
Rows 3 and 4: Repeat Rows 1 and 2. 7 (10, 12, 15, 18) stitches
Work in stockinette stitch until the armhole measures 9 inches (equal to the front right shoulder). Cut the yarn and put the remaining stitches on a stitch holder.
Left Back Shoulder
For this section you will just be working the 10 (13, 15, 18, 21) stitches of the left back shoulder, turning the work at the end of each row.
With the knit side facing you, join new yarn.
Row 1 (knit side): Knit to last 3 stitches, k2tog, k1. (1 stitch decreased)
Row 2 (purl side): Purl.
Repeat Rows 1 and 2 two more times. 7 (10, 12, 15, 18) stitches
Work in stockinette stitch until the armhole measures 9 inches (equal to the front left shoulder). Cut the yarn and keep the stitches on your needle, ready to graft them together with the front left shoulder.
Finishing
Grafting the Shoulders
Slip the left front shoulder stitches onto the other end of your knitting needle, making sure the 18-inch tail is accessible at the point-end of the needle (depending on whether you ended your shoulders with knit or purl rows, you may have to remove the stitches from the needle and reorient them so that everything is properly arranged). With the purl sides facing each other (double check that the shoulders are not twisted), graft the left shoulders together using the Kitchener Stitch.
Arrange the right shoulder stitches onto each end of your needle, again leaving the 18-inch tail at the point end of the needle. Make sure that the work isn’t twisted, and with the purl sides facing, graft the right shoulders together (again, using the Kitchener Stitch).
Knitting the Armhole Edges
NOTE: You will work all the edges with the knit side still facing you. This may seem wrong since the seam created by picking up stitches ends up on the purl side, which is the “right side”, but believe it or not, after lots of experimenting, it’s what I thought looked the best! Strange, I know…
With the knit side facing you and using the 16 or 20-inch needle, join new yarn to knit the 10 stitches from one of the underarm stitch holders. Then, pick up two stitches for every three rows of knitting all the way around the armhole.
Place a stitch marker, and now working in the round…
Round 1: Purl.
Round 2: Knit.
Bind off in purl stitch.
Repeat for the other armhole.
Knitting the Neckline Edge
With the knit side facing you and using the 16 or 20-inch needle, join new yarn to knit the stitches from the back neckline stitch holder. Then, pick up two stitches for every three rows of knitting all the way around the neckline. Knit the stitches from the front stitch holder when you get to them.
Place a stitch marker, and now working in the round…
Round 1: Purl.
Round 2: Knit.
Bind off in purl stitch.
Weave all your ends into the knit side of the fabric. Turn your tank right side out, block it and wear it!


Dear ladies at Purl Bee, I am currently knitting this top and am a bit puzzled at the following bit: “Knit 5, slip the last 10 stitches onto a stitch holder (removing the marker), knit to next marker, remove the marker, knit 5, put last 10 stitches onto a stitch holder.”
What do you mean by “last 10 stitches”? “last stitches before marker” or “next 10 stitches after the 5 knitted stitches”? Thanks a lot in advance for your kind answer!
Hi Lydia,
The “last 10 stitches” are the five stitches before the marker together with the five stitches after the marker. I hope this clarifies things for you!
Thanks for your question and good luck!
Whitney
Dear Whitney, thanks a lot for your kind explanation! I have another question.
In this part:
“Repeat the last 4 rows one more time. 44 (51, 56, 63, 70) stitches **
Next Row: Knit 31 (35, 38, 42, 46) put the last 18 (19, 20, 21, 22) stitches on a stitch holder, k1, ssk, knit to end of row. 13 (16, 18, 21, 24) stitches for right front (as you will wear it, purl side out), 12 (15, 17, 20, 23) stitches for left front, and 18 (19, 20, 21, 22) stitches on hold for neckline”
Isn't there a problem with the stitch count? I am knitting size 2, if 51 stitches are left, how can I have 35 + 18 which would be 53 stitches? Then, in the next sentence, the stitch count is 16+15+19 (-1 decrease) so I think the “51” is the right number, but can you please confirm? Thanks a lot!
Hi Lydia,
You don't actually add 35 + 18 (or actually 19) because you knit 35 and put the last 19 you knit onto a stitch holder. So your stitch count at that point is just 35 since the 19 are taken from the 35.
Please let me know if things still aren't working out for you and we'll figure it out!
Whitney
Hi Whitney, thank you for your kind and quick reply. Maybe I was not very clear when writing my question. I understand part of the stitches are on hold but I am worried at the stitch count, because first we have :
“Repeat the last 4 rows one more time. 44 (51, 56, 63, 70) stitches”
(51 in my case)
and then
Knit 31 (35, 38, 42, 46) put the last 18 (19, 20, 21, 22) stitches on a stitch holder, k1, ssk, knit to end of row
so on my needle i have 35 + 19 – 1 which would be 53 (?)
and then
13 (16, 18, 21, 24) stitches for right front (as you will wear it, purl side out), 12 (15, 17, 20, 23) stitches for left front, and 18 (19, 20, 21, 22) stitches on hold for neckline”
so 16 + 15 + 19 = 50
So I was wondering if the first set of numbers (“Knit 31 (35, 38, 42, 46) put the last 18 (19, 20, 21, 22) stitches”) was wrong?
I hope my question is more clear now.
Thanks a lot,
Lydia
Hi Lydia,
I'm sorry for not explaining better! I always wish I could just sit down with our readers and talk it out, but here's second best:
Okay, you start the row with 51 stitches. You knit 35 and then put 19 of those stitches on hold (the last 19 you knit). So you've still only worked 35 stitches: 19 on hold for the neckline and 16 on the needle for the right front (19 + 16 = 35). Then you knit 1, ssk, which is 3 stitches, so now you're up to 38 total stitches. And you'll knit 13 more stitches to finish the row (and to leave 15 stitches for the left front), which is 38 + 13 = 51.
Does this make sense? Please, please let me know if it doesn't!
Thank you for your persistence!
Whitney
Thank you Whitney, this is very clear!! I hope I will not need to bother you again 🙂 Have a wonderful week-end!
Dear Whitney,
I am having trouble knitting clothes that fit. How should my actual measurements relate to the measurements given in the pebble tank pattern? Thank you, Susan
Hi Whitney,
Great question! The Yarn Council has a standard answer to this question. Here is what they say:
For a very close-fitting garment, knit the finished piece at your actual chest/bust measurement, .
For a close-fitting garment, knit the finished piece 1-2 inches bigger than your actual measurement.
For a standard fit, knit the finished garment 2-4 inches bigger than your actual measurement.
For a loose fit, knit the finished garment 4-6 inches bigger than your actual measurement.
And for an oversized garment, knit it 6 inches or more bigger than your actual measurement.
So, having said all that, for this particular vest, I would knit the Chest Circumference that is about 3 inches bigger than your actual measurement. If you envision a different kind of fit, then I hope the Yarn Council's standards help to steer you in the right direction!
Thanks for asking and good luck!
Whitney
I'm just starting the back now and I'm lost at this part: Work from Row 1 of the Front section until the **, ending with 44 (51, 56, 63, 70) stitches. What **? I thought I was only working the 83 stitches on hold…how did it get down to 63?
Hi Amy,
Working the Back 83 stitches, you will go to Row 1 of the Front section and follow all of those instructions until you reach the double asterisk symbol (i.e. **). At that point the Back will have 63 stitches.
I hope this clarifies things! Please let me know if you need any more help and thanks for your questions!
Whitney
I just realized I'm one stitch short after knitting the three decreases. Is there anyway to fix this without having to start from the very beginning? I'd like to avoid that solution if at all possible. Thanks for your help!
Hi Katrina,
When you're knitting a sweater, a stitch or two here or there is never cause for drastic action! In this case, I would knit to 6 rounds before the increases should start, work an Increase Round 1, knit 5 rounds, and then work the increase section as written. That should put you back on track!
Please let us know if you have any other questions and thank you so much for this one!
Whitney
Thanks for your help! I think you may regret that last statement though since I already have 2 more questions. 🙂
This is my first sweater/tank where I had to put stitches on a holder. So when I'm supposed to knit until the next 10 stitches to put on another holder so I connect my previous 5? It didn't seem right since it puckered the area where the 10 stitches are.
Also the knit 5, place 10 on holder remove marker, is that the marker we have for the beginning of the round or is that the marker that we used a different color for?
Hi Katrina,
I don't totally follow your questions, so I think I'll write out the directions for putting the underarm stitches on hold more explicitly for you, and hopefully your questions will get answered!
So, you're at the beginning of the round and you knit 5. Then you slip the last 10 stitches you knit (5 stitches after the stitch marker and 5 before the stitch marker) onto a stitch holder. As you do so, you remove the beginning-of-the-round stitch marker.
Then you knit to next marker (the different color one) and remove it. You knit 5 stitches past where the marker was and then put the last 10 stitches you knit onto a stitch holder. And then you stop knitting so you can put the last 62 (69, 76, 83, 90) stitches you knit onto stitch holders or a piece of scrap yarn.
If you're still confused, please ask again and I'll be happy to try again
Whitney
Thanks! That's exactly what I needed to know. I was knitting 5 and then putting the next 10 onto the holder, but that didn't seem right and nothing I found Googling helped at all. 🙁 You guys are the best!
As per ravelry, I am knitting this vest in Mission Falls 1824 cotton, which, like the pattern, calls for a size 7 US needle. After 5 rows, what I have looks like it will fit a giantess, although I cast on 158 stitches for a fairly small garment. I knit a swatch, and I am at gauge, so that’s not the problem. Any ideas?
Hi Rachel,
Thank you for the comment! If your getting 4.5 stitches per inch for your gauge than I can’t think of any reason it would be bigger than the finishing dimensions in the pattern. It’s pretty hard to tell what size something is coming out until you’ve knit at least 3 inches so I would continue and see if it may just appear large in the beginning.
I wish you the best of luck and feel free to write back if things still don’t seem to be coming out right!
Happy Knitting!
Jake
I knit several more inches and it still looked enormous, so we did a try-on, confirmed the enormity, decided it was too big by about a third, and so I cast on again at 106, and I think that will work. A friend suggested that working in the round would give a different gauge than back and forth, but we agreed that would probably make it smaller, not bigger. Still a mystery.
Stay tuned!
Hi Rachel,
I’m so glad this is working out! I haven’t been able to think of why the size is so drastically different then expected but if I think of anything I will let you know.
Happy Knitting!
Jake
Is there a reason that one shoulder is 12 and the other 13 stitches? And why not knit both at once, starting a second line, since we are using a circular needle?
Hi Rachel,
Both Shoulders end up with 10 stitches (and start with a different number so that the neck bind off can be centered).
And if you are comfortable working both Shoulders at once, we encourage you to do so! We didn’t write the pattern that way because working two Shoulders at once can be a bit overwhelming for inexperienced knitters. We assume that more advanced knitters will make whatever adjustments make sense to them but are aware that beginning knitters may not be capable of simplifying instructions.
Thanks so much for your questions and please let us know if you have any others!
Whitney
I’m confused about the finishing….for the arm holes, do you knit the 10 stitches three times before picking up any stitches? Wouldn’t that look weird? And how do you knit 10 stitches in the round…sorry if this is a silly question but I tried what I thought it meant and the arm hole came out super tiny. Thanks for your help!
Hi Alex,
Thanks for writing in! You will start by knitting the 10 underarm stitches once and then picking up the stitches around the armhole. The whole armhole is knit in the round, so there are definitely more than 10 stitches. By picking up stitches around the armhole and knitting in the round you are creating a finished edge that circles the entire armhole. Hope this helps!
Best,
Adam
Under Front: and the last paragraph, “Next Row: Knit 31 (which is the size I am making), put the last 18 sts. on a stitch holder there are only 13 sts. (which makes the count of 44 sts. after repeating the 4 rows one more time). Why the miscount? Thanks for a reply asap. Doris Boon
Hi Doris,
I think I can help! When the pattern states “Put the last 18 stitches on a holder” it is referring to the last 18 stitches of the 31 you just knitted – in other words, when you complete this row, you will have the middle 18 stitches on a holder, with 13 live stitches on either side of that holder still on the needle.
I hope that answers your question!
Regards,
Julianna
Love the pattern and easy to follow. I knit it for my daughter using Habu as suggested . Unfortunately she lives out of town so getting her actual measurements were difficult. It is now finished, she has it but says it’s a bit short and could I lengthen it.! Don’t know what happened as I followed the pattern with measurement I got from her from her waist to bottom of sweater, I still have some yarn but don’t want to tear the whole sweater apart. As it is not a top-down pattern is there any way I could add an inch or two? If so , how!?
Hi Judy,
Thanks for writing in! Although it is a little scary, it is possible to add some length to the bottom of this sweater! I would start by threading a lifeline through the first row of stockinette, right above the garter stitch edging, and then either unpick or cut your cast on edge off. You should then be able to unravel to your lifeline, place the stitches back on the needle, and knit down seamlessly to your desired length.
Good luck with your sweater surgery and please let us know how it turns out!
Best,
Julianna
Beginner here! I am totally confused and can’t find anything online to help understand how to complete the armholes. Can anyone explain super clearly, post a picture, or point me to a video or other resource? Loved the pattern and plan to make more once I figure this out!
Hi Lavinia,
Thanks for reaching out! Fortunately we do have a video tutorial on Picking Up Stitches, which is the technique you will use to start the armhole edging! Please let us know if you run into any other questions!
Best,
Julianna
Hello! I love this pattern! I have some leftover cascade 220 (worsted weight 20st on #7 us) from my last project. I was wondering if this wool yarn would work for this beautiful top?
Looks to be about the same gauge.
Is there supposed to be a specific amount of positive ease? Wondering if I should make the 38.5 or one size smaller. I usually end up with my projects a bit large on me…. Loose knitter? Bust size is 35″.
Thank you!!
Hi Simone,
Thanks for reaching out! Although you should always knit a gauge swatch to be sure, I do think Cascade 220 would be a good substitute for this pattern! We don’t include a recommended amount of ease for this pattern, but for a general comfortable but not oversized fit, I would suggest choosing a size that is one to two inches larger than your bust measurement. As long as you knit your gauge swatch and match our gauge, you should end up with a well fitting top!
Best,
Julianna