


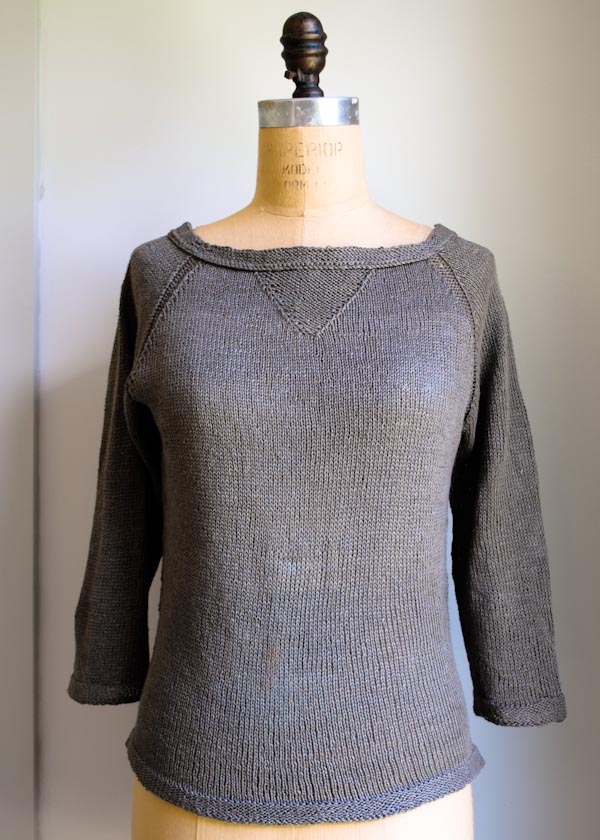
Everyday Linen Raglan

Growing up as the sister of two older brothers, to say I was a tomboy is a bit of an understatement. I was one of the boys! While my girlfriends were playing softball, I insisted on being in the all-boys baseball league. My ‘Sunday’s Best’ consisted of hand-me-down golf shirts, khaki pants and bucks. I blindly and adoringly echoed my brothers’ every move. If they wouldn’t wear it (or do it or like it), well then, neither would I.

So for those who knew me back then, my current love for linen dresses and fancy clutches, cashmere wraps and backless sweaters, floral hankies and pretty much all things fem is something of a shock. Yet while my style has drastically shifted, those tomboy roots do run deep. Put me in jeans and a t-shirt and I am one happy camper. Put me in jeans and a linen shirt, and I’m in heaven!
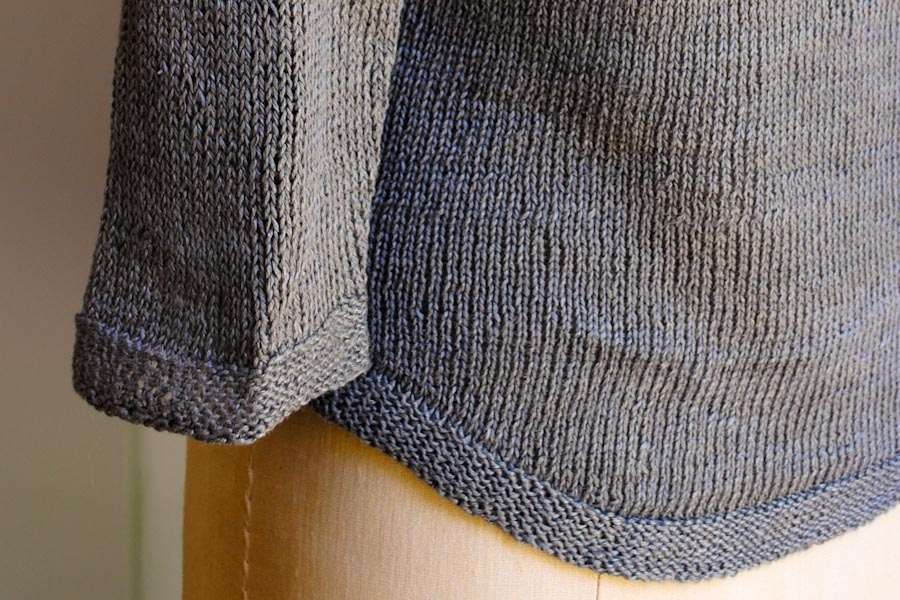
This lightweight, 3/4-sleeve raglan top harkens back to sunny days at the ball park, but with the natural elegance and drape of 100% linen. It’s the best of both worlds, classic and casual for everyday, but not without a pinch of feminine subtlety.

Knit up in Euroflax’s beautiful sportweight linen, this favorite yarn of mine pairs a rugged durability with a chic grace, a duality I have come to greatly appreciate!

Designed by Purl Soho designer, Laura Ferguson.
Share your progress and connect with the community by tagging your pics with #PurlSoho, #PurlSohoBusyHands, and #PurlSohoEverydayLinenRaglan. We can’t wait to see what you make!
Materials
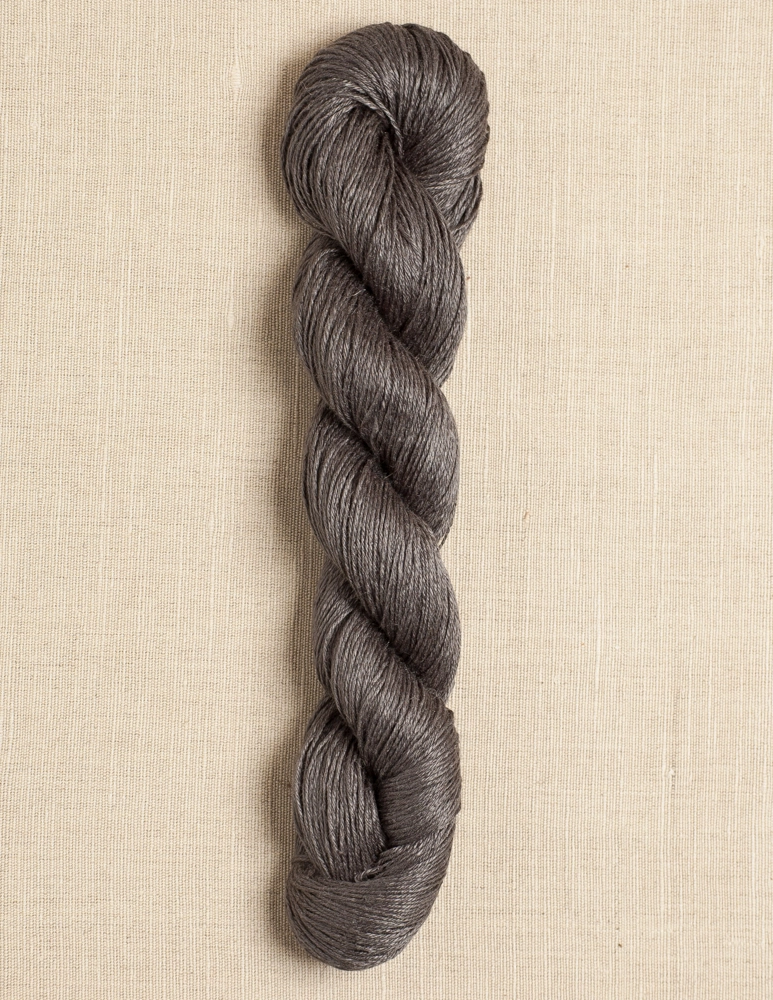
- 4 (5) skeins of Louet’s Euroflax, 100% Linen. Each skein is 270 yards/ 100 grams; approximately 1,080 (1,350) yards required.
I used the color Pewter. - A US 4 (3.5 mm), 24 inch circular needle
- An extra circular needle US 4 or smaller, 24 to 40 inches
- Set of US 4 double pointed needles
- Four stitch markers
- One removable stitch marker
Gauge
24 stitches = 4 inches in stockinette stitch, blocked
Sizes
NOTE For help picking a size, please check out our Understanding Ease + Selecting Size Tutorial!
Small/Medium (Medium/Large)
- Finished Chest Circumference: 36 (40) inches
- Finished Hip Circumference: 31 (34) inches
- Bottom Hem to Underarm: 12½ (13¾) inches
- Cuff to Underarm: 12 inches

Pattern
Sleeves
NOTE: If you are long-limbed, you may want to knit an extra round between each increase row.
Using the double pointed needles, cast on 57 (60) stitches. We used a basic Long Tail Cast On.
Place marker and join for working in the round, being careful to not twist the stitches.
Purl 8 rounds.
Increase Round: K1, make 1 left (m1L), knit to last stitch, make 1 right (m1R), k1. [59 (62) stitches]
**Knit 7 rounds.
Increase Round: K1, m1L, knit to last stitch, m1R, k1. [61 (64) stitches]
Repeat from ** 10 more times. [81 (84) stitches]
Place stitches on stitch holders or scrap yarn and put aside.
Make a second sleeve identical to the first.
Body
With the 24 inch circular needle, use the provisional cast on method to cast on 188 (208) stitches.
Place marker and join for working in the round, being careful to not twist the stitches.
Knit 16 rounds.
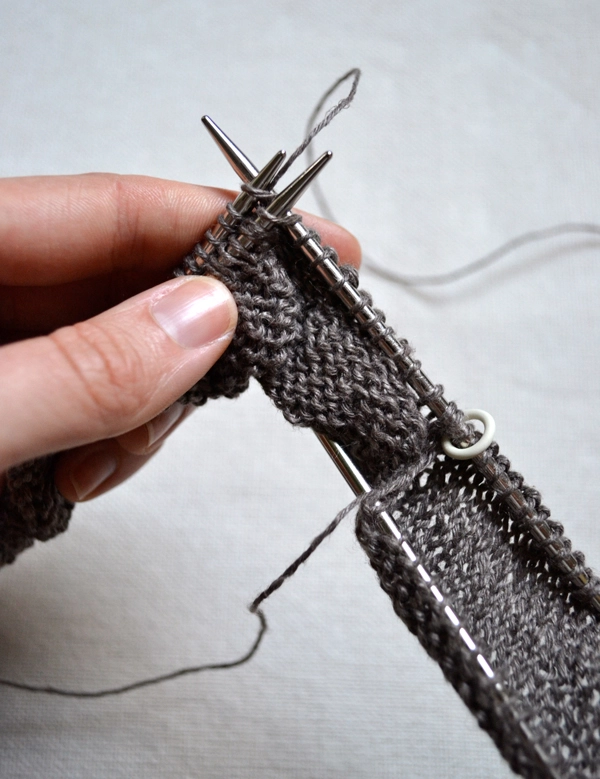
Hem the Bottom
Use the extra circular needle to pick up the cast on stitches. Once the cast on stitches are on the new needle, fold the fabric towards you so the knit sides are facing each other and the purl side of the hem is on the outside (the right side of the sweater should also be facing you). Holding the two left needles parallel to each other, knit 1 stitch from the front needle together with 1 stitch from the back needle. Repeat to end of round. [188 (208) stitches]
Shape the Back Tail
NOTE: The back of the sweater has a slight dip formed by using Short Rows (working back and forth, turning the work part way through each round instead of continuing to the end of the needle). This portion of the pattern is optional. If you would like your sweater to be even across the bottom, skip ahead to the Body section below. For a great Short Row Tutorial, click here!
Row 1 (right side): K94 (104), place marker, k71 (81), wrap and turn.
Row 2 (wrong side): P48 (58), wrap and turn.
Row 3: K48 (58), knit the wrapped stitch together with the picked-up wrap, k1, wrap and turn.
Row 4: P50 (60), purl the wrapped stitch together with the picked-up wrap, p1, wrap and turn.
Row 5: K52 (62), knit the wrapped stitch together with the picked-up wrap, k1, wrap and turn.
Row 6: P54 (64), purl the wrapped stitch together with the picked-up wrap, p1, wrap and turn.
Continue in this fashion, working up to the wrapped stitch, working the wrapped stitch with the picked-up wrap, working one more stitch and then wrapping and turning. End with the wrong side row that starts with purling 90 (100).
Next Row (rs): K92 (102), knit the wrapped stitch together with the picked-up wrap.
Now continuing to work in the round again.
Next Round: Knit to 1 stitch past the next marker, pick up wrap on next stitch (this time knitting the wrap and stitch together through back loop), knit to end of round.
Continue Body
NOTE: If you are long waisted, you may want to knit an extra round between each increase row.
**Knit 10 (11) rounds.
Increase Round: K1, m1L, knit to marker, m1R, slip marker, k1, m1L, knit to end of round, m1R. (4 stitches increased)
Repeat from ** 7 more times. [220 (240) stitches]
Knit 10 (11) rounds (or number required to reach desired length from bottom hem to underarm).
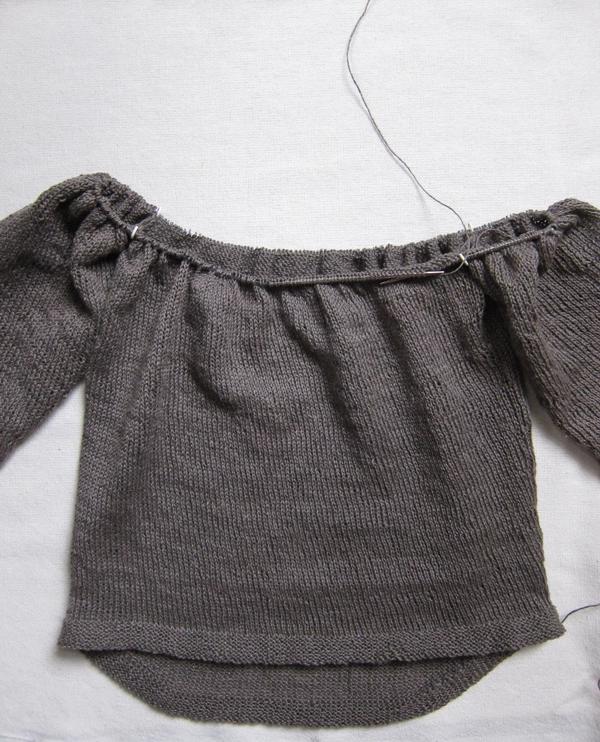
Yoke
Attaching the Sleeves
Knit to first marker, slip marker, knit across 81 (84) sleeve stitches, place marker, knit to end of round, place marker, knit across 81 (84) stitches of the second sleeve. [81 (84) stitches for each sleeve, 110 (120) stitches for front and back. 382 (408) total stitches]
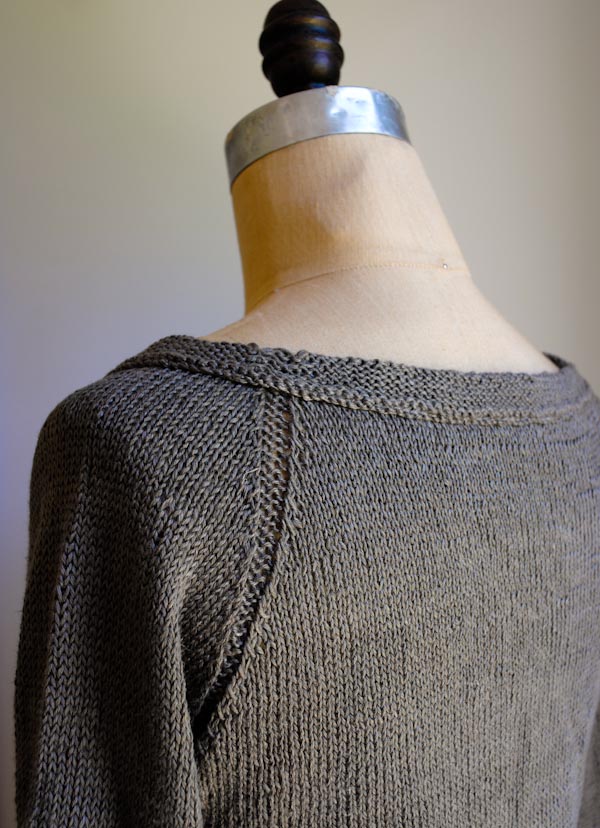
Shape the Raglan
Decrease Round: *P1, k2tog, knit to 3 stitches before next marker, ssk, p1, slip marker, repeat from * to end of round. (8 stitches decreased)
Next Round: *P1, knit to 1 stitch before next marker, p1, slip marker, repeat from * to end of round.
Repeat last two rounds 12 (13) more times. [55 (56) stitches for each sleeve, 84 (92) stitches for front and back; 278 (296) total stitches]
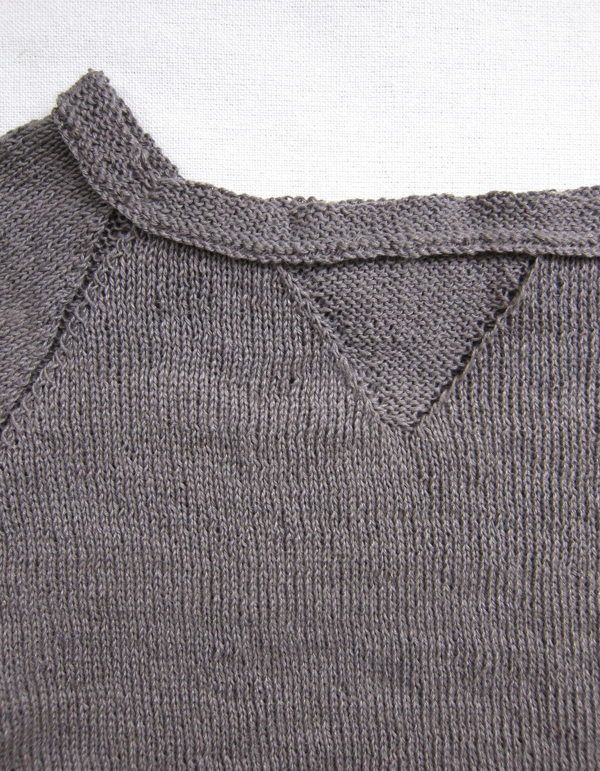
Shape the V
NOTES:
- Make one stitch purl-wise (m1 purl-wise): Pick up the strand between the last and next stitch from the back and purl through the front loop.
- Slipped stitches are done purl-wise.
ERRATA:
- December 29, 2013: For size Medium/Large, the Front stitches knit on either side of the “V” were corrected to coordinate with stitch counts.
Decrease Round 1: P1, k2tog, k36 (40), ssk, p2, k2tog, k36 (40), ssk, p1, slip marker, *p1, k2tog, knit to 3 stitches before next marker, ssk, p1, slip marker, repeat from * to end of round. [53 (54) stitches for each sleeve, 82 (90) stitches for back, 80 (88) stitches for front; 268 (286) total stitches]
Next Round: P1, k37 (41), slip 1 (sl1), p2, sl1, k37 (41), p1, slip marker, *p1, knit to 1 stitch before the next marker, p1, slip marker, repeat from * to end of round.
Decrease Round 2: P1, k2tog, k34 (38), ssk, m1 purl-wise (see note above), p2, m1 purl-wise, k2tog, k34 (38), ssk, p1, slip marker, *p1, k2tog, knit to 3 stitches before next marker, ssk, p1, slip marker, repeat from * to end of round. [51 (52) stitches for each sleeve, 80 (88) stitches for back, 78 (86) stitches for front; 260 (278) total stitches]
Next Round: P1, k35 (39), sl1, p4, sl1, k35 (39), p1, slip marker, *p1, knit to 1 stitch before the next marker, p1, slip marker, repeat from * to end of round.
Decrease Round 3: P1, k2tog, k32 (36), ssk, m1 purl-wise, p4, m1 purl-wise, k2tog, k32 (36), ssk, p1, slip marker, *p1, k2tog, knit to 3 stitches before next marker, ssk, p1, slip marker, repeat from * to end of round. [49 (50) stitches for each sleeve, 78 (86) stitches for back, 76 (84) stitches for front; 252 (270) total stitches]
Next Round: P1, k33 (37), sl1, p6, sl1, k33 (37), p1, slip marker, *p1, knit to 1 stitch before the next marker, p1, slip marker, repeat from * to end of round.
Decrease Round 4: P1, k2tog, k30 (34), ssk, m1 purl-wise, p6, m1 purl-wise, k2tog, k30 (34), ssk, p1, slip marker, *p1, k2tog, knit to 3 stitches before next marker, ssk, p1, slip marker, repeat from * to end of round. [47 (48) stitches for each sleeve, 76 (84) stitches for back, 74 (82) stitches for front; 244 (262) stitches]
Next Round: P1, k31 (35), sl1, p8, sl1, k31 (35), p1, slip marker, *p1, knit to 1 stitch before the next marker, p1, slip marker, repeat from * to end of round.
Decrease Round 5: P1, k2tog, k28 (32), ssk, m1 purl-wise, p8, m1 purl-wise, k2tog, k28 (32), ssk, p1, slip marker, *p1, k2tog, knit to 3 stitches before next marker, ssk, p1, slip marker, repeat from * to end of round. [45 (46) stitches for each sleeve, 74 (82) stitches for back, 72 (80) stitches for front; 236 (254) stitches]
Next Round: P1, k29 (33), sl1, p10, sl1, k29 (33), p1, slip marker, *p1, knit to 1 stitch before the next marker, p1, slip marker, repeat from * to end of round.
Decrease Round 6: P1, k2tog, k26 (30), ssk, m1 purl-wise, p10, m1 purl-wise, k2tog, k26 (30), ssk, p1, slip marker, *p1, k2tog, knit to 3 stitches before next marker, ssk, p1, slip marker, repeat from * to end of round. [43 (44) stitches for each sleeve, 72 (80) stitches for back, 70 (78) stitches for front; 228, (246) stitches]
Next Round: P1, k27 (31), sl1, p12, sl1, k27 (31), p1, slip marker, *p1, knit to 1 stitch before the next marker, p1, slip marker, repeat from * to end of round.
Decrease Round 7: P1, k2tog, k24 (28), ssk, m1 purl-wise, p12, m1 purl-wise, k2tog, k24 (28), ssk, p1, slip marker, *p1, k2tog, knit to 3 stitches before next marker, ssk, p1, slip marker, repeat from * to end of round. [41 (42) stitches for each sleeve, 70 (78) stitches for back, 68 (76) stitches for front; 220 (238) stitches]
Next Round: P1, k25 (29), sl1, p14, sl1, k25 (29), p1, slip marker, *p1, knit to 1 stitch before the next marker, p1, slip marker, repeat from * to end of round.
Decrease Round 8: P1, k2tog, k22 (26), ssk, m1 purl-wise, p14, m1 purl-wise, k2tog, k22 (26), ssk, p1, slip marker, *p1, k2tog, knit to 3 stitches before next marker, ssk, p1, slip marker, repeat from * to end of round. [39 (40) stitches for each sleeve, 68 (76) stitches for back, 66 (74) stitches for front; 212 (230) stitches]
Next Round: P1, k23 (27), sl1, p16, sl1, k23 (27), p1, slip marker, *p1, knit to 1 stitch before the next marker, p1, slip marker, repeat from * to end of round.
Decrease Round 9: P1, k2tog, k20 (24), ssk, m1 purl-wise, p16, m1 purl-wise, k2tog, k20 (24), ssk, p1, slip marker, *p1, k2tog, knit to 3 stitches before next marker, ssk, p1, slip marker, repeat from * to end of round. [37 (38) stitches for each sleeve, 66 (74) stitches for back, 64 (72) stitches for front; 204 (222) stitches]
Next Round: P1, k21 (25), sl1, p18, sl1, k21 (25), p1, slip marker, *p1, knit to 1 stitch before the next marker, p1, slip marker, repeat from * to end of round.
Decrease Round 10: P1, k2tog, k18 (22), ssk, m1 purl-wise, p18, m1 purl-wise, k2tog, k18 (22), ssk, p1, slip marker, *p1, k2tog, knit to 3 stitches before next marker, ssk, p1, slip marker, repeat from * to end of round. [35 (36) stitches for each sleeve, 64 (72) stitches for back, 62 (70) stitches for front; 196 (214) stitches]
Next Round: P1, k19 (23), sl1, p20, sl1, k19 (23), p1, slip marker, *p1, knit to 1 stitch before the next marker, p1, slip marker, repeat from * to end of round.
Decrease Round 11: P1, k2tog, k16 (20), ssk, m1 purl-wise, p20, m1 purl-wise, k2tog, k16 (20), ssk, p1, slip marker, *p1, k2tog, knit to 3 stitches before next marker, ssk, p1, slip marker, repeat from * to end of round. [33 (34) stitches for each sleeve, 62 (70) stitches for back, 60 (68) stitches for front; 188 (206) stitches]
Next Round: P1, k17 (21), sl1, p22, sl1, k17 (21), p1, slip marker, *p1, knit to 1 stitch before the next marker, p1, slip marker, repeat from * to end of round.
Decrease Round 12: P1, k2tog, k14 (18), ssk, m1 purl-wise, p22, m1 purl-wise, k2tog, k14 (18), ssk, p1, slip marker, *p1, k2tog, knit to 3 stitches before next marker, ssk, p1, slip marker, repeat from * to end of round. [31 (32) stitches for each sleeve, 60 (68) stitches for back, 58 (66) stitches for front; 180 (198) stitches]
Next Round: P1, k15 (19), sl1, p24, sl1, k15 (19), p1, slip marker, *p1, knit to 1 stitch before the next marker, p1, slip marker, repeat from * to end of round.
Decrease Round 13: P1, k2tog, k12 (16), ssk, m1 purl-wise, p24, m1 purl-wise, k2tog, k12 (16), ssk, p1, slip marker, *p1, k2tog, knit to 3 stitches before next marker, ssk, p1, slip marker, repeat from * to end of round. [29 (30) stitches for each sleeve, 58 (66) stitches for back, 56 (64) stitches for front; 172 (190) stitches]
Next Round: P1, k13 (17), sl1, p26 , sl1, k13 (17), p1, slip marker, *p1, knit to 1 stitch before the next marker, p1, slip marker, repeat from * to end of round.
Medium/Large Size Only
Decrease Round 14: P1, k2tog, k14, ssk, m1 purl-wise, p26, m1 purl-wise, k2tog, k14, ssk, p1, slip marker, *p1, k2tog, knit to 3 stitches before next marker, ssk, p1, slip marker, repeat from * to end of round. [28 stitches for each sleeve, 64 stitches for back, 62 stitches for front; 182 stitches]
Next Round: P1, k14, sl1, p28, sl1, k14, p1, slip marker, *p1, knit to 1 stitch before the next marker, p1, slip marker, repeat from * to end of round.
Both Sizes
[29 (28) stitches for each sleeve, 58 (64) stitches for back, 56 (62) stitches for front; 172 (182) total stitches]
Collar
Next Round: Purl, placing a removable stitch marker on the first stitch of the round.
Next Round: Knit.
Decrease Round: *K1, k2tog, knit to 3 stitches before next marker, ssk, k1, slip marker, repeat from * to end. (8 stitches decreased)
Repeat last two rounds two more times. [148 (158) stitches]
Next Round: Knit.
Increase Round: *K1, m1L, knit to 1 stitch before next marker, m1R, k1, slip marker, repeat from * to end. (8 stitches increased)
Next Round: Knit.
Repeat last two rounds. [164 (174) stitches]
Repeat Increase Round. [172 (182) stitches]
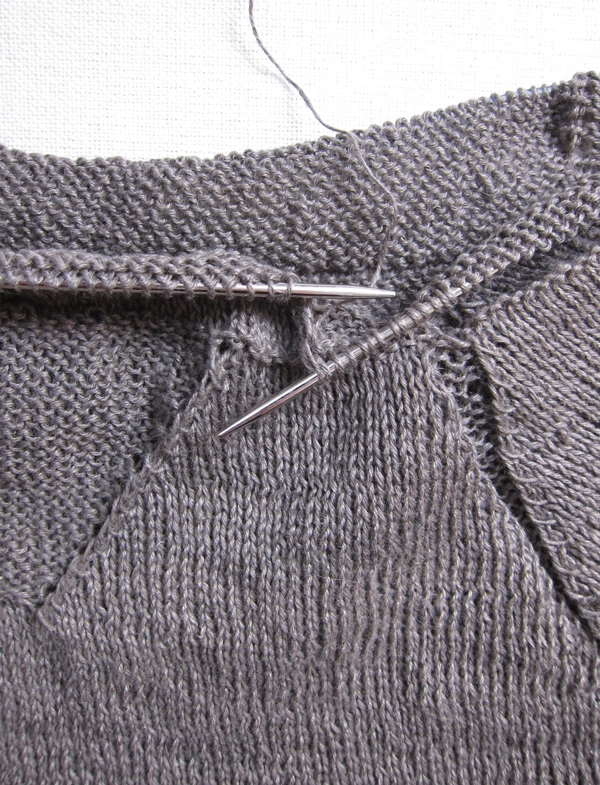
Hem the Collar
*With the right side facing you, use a double pointed needle to pick up the first stitch of the purl round (the marked stitch) 12 rows below. Holding the double point and left needle parallel to each other, knit 1 stitch from the front (double pointed) needle together with 1 stitch from the back (circular) needle. Repeat from * to end of round.
Finish
Bind off in stockinette.
Weave in your ends.
Block heavily to even out any tension inconsistencies and to get the beautiful drape of linen.


Laura, how much design ease did you build into this pattern? I'm going to need to modify it, and it would be useful to know what percentage to add to my body measurements for wearing ease.
Thanks. I'm eager to get started!
Hi Mary Ann,
Great question. The dimensions above are the measurements of the finished product. It is designed to have a positive ease of around 2 inches. It is meant to fit, but not tightly. Our dress form has a 34-inch bust and is wearing the smaller size which has a 36-inch circumference. Does this help? Hope you enjoy the pattern. Please let me know if you have any other questions.
Laura
I just finished "shaping the raglan" and should have 82 stitches on the front and back but instead have 110. Was I to decrease on the body portion as well as the sleeve portion? My sleeve stitches seemed to work out alright since they are 55 stitches. Have I missed something obvious?
Hi Laura,
I am really excited about starting this pullover! One question though Do the sleeves have a hem like the bottom edge of the sweater. It looks like it from some of the pictures, but I don't see a provisional cast on for them. What did you do?
Thanks,
Polly
Hi Monica.
Oh dear. Yes, you were to decrease on the fronts and backs as well as on the sleeves. You decrease on either side of each of the stitch markers.
This should fix that pesky stitch count straight away.
Let me know if you have any other questions.
Laura
Hi Laura,
I've got through most of this sweater fine, but I'm having some trouble with the "shaping the V" section. I'm getting gaps on either side of the V, particularly the right hand side. Any ideas on what I'm doing wrong? Thanks!
Emily
Hi Polly,
The sleeve do not have a hem like the bottom, They are simply worked in reverse stockinette stitch for a few rows.
Thanks,
Laura
Hi Emily.
I am not sure where the holes are coming from. Are you familiar with ssk and k2tog? When you ssk do you slip your stitches knitwise or purlwise. I tend do slip the first one knitwise and the second purlwise, but both knitwise is also great for a more seamless look.
Laura
July 31,2013
I've started to knit this with Madelinetosh Pashmina. I am in love with the pattern so far. But for future patterns it would be nice if we knew about how much yarn you had left. For the super tall and long limbed girls its nice to know if we need to buy an extra skein or if we will have enough yarn. For every pattern I've used from the site I've bought an extra skein to add 2-3" on the arms and typically around 4" to the bodice and not had to use it all that often.
just a suggestion, but great pattern by the way. Cant wait for the fall so I can wear it.
Andrea,
Wonderful suggestion. I'll let our team here on the Purl Bee know your thoughts!
Laura
In Shape the V section, each row is missing "slip marker, P1" after the P1 in the pattern directions after the initial v portion. In the * portion of each row instruction: "*p1, knit to 1 stitch before the next marker, p1, slip marker, repeat from * to end of round." . Am I missing something or is the direction correct as written?
Hi Jenna,
Thank you for writing in. I have corrected the pattern!
There was a "p1, slip marker," missing before the * in every other round of instructions under Shaping the V.
I really appreciate you taking the time to write in. Please let me know if you have any other questions.
Best.
Laura
Hi Laura,
I've knitted the sleeves&the body,yet when I try to attach the sleeves to the body there seem to be gaping holes on both sides of the armpit. Is there a way to avoid that? Thanks in advance,
Regards,Ferah
Hello Ferah,
Great question. I had the same holes. I closed these holes at the end when I wove in my ends.
Thanks,
Laura
Hi there,
I love this pattern! I'm so excited to be almost done just in time for fall.
I'm at the 'shape the V section' and I have a question about the 'make 1 purl wise'. The 'slip one purl wise' leaves a long bar that could be picked up in making that sitch, is that the intention or should one use the regular bar between stitches to 'make 1 purl wise'?
Thank you so much!
Alanna
Hi Alanna,
I'm so glad you like the pattern!
I used the regular bar between stitches.
Thanks.
Laura
Hi, I knitted this in linen and loved it! It was my first "no sew" knitted sweater. I was wondering if I could knit it as written in your Purl Soho line weight yarn or would I need to modify it since the yarn is fingerling weight instead of sport?
Thanks,
Jennie
Hi Jennie.
I am thrilled to hear you enjoyed this pattern. I think the Line Weight is going to be a tad on the thin side. Line Weight at 6 stitches to the inch would be a very loose looking/feeling fabric. How about…
Blue Sky's Sport Weigh in Solidst: https://www.purlsoho.com/purl/products/item/714-Blue-Sky-100-Sport-Weight-Alpaca-Solids
or in Melange: https://www.purlsoho.com/purl/products/item/1105-Blue-Sky-100-Sport-Weight-Alpaca-Melanges
Blue Sky's Alpaca Silk: https://www.purlsoho.com/purl/products/item/722-Blue-Sky-Alpaca-Silk
Madeline Tosh Light: https://www.purlsoho.com/purl/products/item/7957-Madelinetosh-Tosh-Merino-Light
Anzula Cricket: https://www.purlsoho.com/purl/products/item/8710-Anzula-Cricket
Let me know if you have any questions on these yarns.
Laura
Hi there,
I am also in agreement that the stitch count for the "V" shaping is off. Your pattern only accounts for 90 stitches, not the 92 that you should be left with. Either the knitter should knit an extra decrease tow to end up with the 90 stitches or perhaps the instructions for the "V" could be corrected.
Meanwhile, I shall knit on….
Patricia,
THANK YOU! Yes the number of Front stitches knit on either side of the "V" was off by one stitch (for the Medium/Large) size. The pattern has been corrected!
Thank you again for writing in.
Laura
Could you do this same pattern in sport wieght cotton?
Hi Karen,
Great question! And the answer is YES! The fabric will have a different feel and weight of course, but it sounds lovely. Just be sure to find the appropriate needles for your yarn to get the gauge given above. AND also let us know how it goes!
Laura
I skipped the short rows for the tail and went ahead to the steps for the body. After knitting the first 10(11) rows, the directions are to start an increase row. Where it states knit to marler, should this be at stich 94 as mentioned in the first step as if knitting the tail?
Hi Tiffany.
Yes. The stitch marker should be after the 94th stitch if you are making the smaller size. Be sure to place the marker before doing the increase round, otherwise the stitch marker will be in the wrong place.
Thanks for asking Tiffany. I will try to clarify this in the pattern.
Laura
Absolutely gorgeous – the color, the style, the choice of fiber, everything!!
Would love to try this on a knitting machine – do you have any schematics to help me please?? Many thanks IA!
Hi Alison-
None of us have experience with knitting machines so I'm not sure how much help we can be! But the finished dimensions are listed at the top of the pattern if that helps at all.
Thanks for writing in!
Molly
Hi,
Please clarify, sl 1 purlwise in the v- shaping. Is this wyif or wyib?
Thanks.
Hi Suzi,
The slip 1 purlwise in the V-shaping is with the yarn in back, wyib.
Thanks for writing in.
Laura
Do you have modifications for a larger size? My mother has larger bust and hip measurements. Thanks!
Hi Cathy.
Thank you for writing in and for your interest in the pattern.
Unfortunately, right now, we do not have any modifications in the work for larger sizes, however it is very much on our radar and we’re hoping to revisit this pattern soon!
Please stay tuned. And thank you again for your interest.
Best,
Laura
The sweater is lovely! But i was wondering if it would be possible for you to post an option omitting the v?
Hi Gee.
Thank you for your interest in this sweater. I appreciate your request. We will definitely see if we can work it into your schedule. Right now, unfortunately we do not have this pattern worked out without the V.
But… essentially… to omit the V, you simply work evenly across the front ignoring the instructions for making the V. Just be sure to pay attention to the raglan shaping that occurs at the 4 different points, 2 at each sleeve.
Simple as that!
Let me know if you have any questions along the way.
Laura
Thanks so much!
This is my first endeavor into sweater knitting, and so far the pattern has been amazing! However, I am at the part where I am suppose the attach the sleeves, and am a bit confused as to how to go about it.. The pattern says to “knit across 81(84) sleeve stitches, but I did this and it is ABSOLUTELY not right. I knit across the 84 stitches of my first sleeve and I somehow attached it so you can’t out your arm through. Was I not suppose to knit all of the stitchers onto the body just yet? Because that’s what I’m thinking but I’m not sure…
Can I get clarification on the part of the pattern? Am I suppose to knit across all 84 stitches to attach it to the body? If so, can you help me out with how I’m suppose to align the sleeve up with the body so I don’t make the same mistake twice? Thanks so much!
Hi Jessica.
You have done it correctly. I know it doesn’t seem like it, but I think you have. It’s just going to be very tight to knit for the next few rounds, then it will loosen up and you’ll see how in fact your arm will be able to go through. Try and continue for a few more rounds and let me know if it goes!
Thanks for writing in Jessica.
Let me know if you have questions.
Laura
Ok! Thanks! I’ll give it a try and see how it goes!
So I definitely attached the sleeves wrong somehow. Not sure what I did or didn’t do, but they somehow got twisted, and were not attached the right way. I have undone those stitches already, and would like to try again! Are there any pointers that you can give me in how you attached the sleeves, or tutorials on this site that I can follow so that I can attach the sleeves the right way this time around? Thank you!
Hi Jessica.
Unfortunately we don’t have any additional how-to photos for this project.
Essentially, what you’re doing here is working across the front, work across one sleeve, work across the back, work across the second sleeve and then continue around again and again across the front, one sleeve, the back, the second sleeve…
What exactly is it that you did last time? Perhaps if you could write to me explaining what you did I’ll catch something that seems off or wrong. I’d really like to help figure this out. Let me know if there’s anything I can do!
Laura
Hi! So I knit to the first marker, slipped marker, took the 1st sleeve in my left hand and used my right needled to knit all 84 stitches of the sleeve onto my right needle. When they were ill on the needle I knit the rest of the round and then did the same with the 2nd sleeve… After a few more rounds it was very clear that something was not right with how the sleeves were attached. It was almost if they were attached backwards, if that makes sense, and every time I knit the next round, the sleeve portion was facing the wrong way so the stitches were raised and the same stitch as the inside of the sweater. Any ideas??
Hi Jessica.
Thanks for explaining. Is there any way you could rip back to the round where you joined and knit the sleeves on so they aren’t upside down? You should go across the sleeve stitches, starting at the marker and with the right side facing. Please let me know if I’m not being clear. I’d love to get this figured out with you.
Laura
Hi there,
Just wanted to say that I love this pattern (raglan is my favorite!) although I did have quite a time getting those sleeves in! But my stitch count is off. At the point of putting in the sleeves, I had the correct number of stitches, or so I thought. In the pattern, I’m confused as to how you get 296 total stitches, when if I ‘ve stared with 408 sts, decreased 13 times ( for a med/large) with 8 sts decreased each row , and get 104 sts decreased. Shouldn’t that give me 304 sts remaining? Not sure what I should do at this point..I don’t want to rip it all out;)
Thanks for all the lovely patterns! Hopefully I can nail this one!
Hi Kelly.
First of all, apologies for the delayed response.
Second of all, let’s get this figured out together! After joining the sleeves, you work a decreases round, then you work one even round where you don’t decrease at all. You repeat these two rounds 13 MORE times making a total of 14 decrease round + 14 even rounds, equalling 28 total rounds worked since you joined the sleeves.
408 – 14 decrease rounds x 8 decreases per round = 296 stitches
Lastly, sorry the sleeves were such a pain. This was one of my first raglan patterns and I have since learned there is a much more elegant way of attaching the sleeves. Hopefully one day I’ll get a change to edit this pattern to improve it.
Thanks for writing in. Let me know if you have any questions.
Laura
What’s the hip measurement on your dress form? The pattern says that the finished hip circumference for this pattern is 31 inches. I’m pear-shaped and have a super high waist, so that would only be as wide as I am at my belly button. I think the short row shaping on the back would functionally add to the circumference. I’m 33x28x37ish. Please help me understand how this would fit.
Hi Marie!
I am so sorry I am not entirely certain of the hip circumference of the dress form. I will get it for you though after the holidays! Like you said, the short row tail in the back will definitely provide some give or space. The shaping is subtle… but… you could always just cast on the 220 (240) stitches and then just be sure to center the short row shaping and then omit the increases between the bottom hem and the bust.
Please let me know if you have any questions!
Thanks for writing in.
Happy Holidays.
Laura
Could I use the sport wt Merino for this sweater? Or is it not a dense enough gauge for such a stretchy yarn? thanks
Hey Trish.
I think a sport weight merino would be wonderful for this project!
Let us know how it goes!!
Laura
Is there a particular row gauge I need to meet when I am swatching?
Any progress on an xl size? Or has anyone made adjustments?
Thank you,
Karen
Hi Karen,
Thanks for your continued interest in this pattern! Unfortunately, at the moment we do not have the resources to write additional sizes for this sweater. I also took a look through Ravelry and did not see anyone moding it for a larger size yet.
Best,
Cassy
Baseball-style shirts typically have sleeves in a contrasting color, which I would like to do here. I’m not sure how much of yarn I would need for that. Can you suggest?
Hi Julie,
Thanks for writing in. I think this is a great idea, but you’ll have to adapt the pattern for flat knitting if you want contrasting color sleeves. If you were to knit contrasting color sleeves in the round, you’d have to carry the contrast color throughout the body as if you were faire isling. This could pucker the body fabric and disrupt the tension. Either way, it’s always a good idea to set aside a quarter of your yarn for the sleeves. Best of luck and happy knitting!
-Adam
Is it possible to knit this linen raglan pattern in large to extra size?
Hi Betsy,
Thanks for reaching out! Unfortunately, we do not have instructions at this time for knitting this sweater in a larger size. We really do appreciate that bodies come in all shapes and sizes and share your concern that patterns be as inclusive as possible. We are in the midst of expanding the size range of all our sweater patterns and are happy to report that many of them now fit chest sizes up to 62-64 inches. We are steadily working to make sure this is true of all our patterns. Please be on the lookout, and thank you so much for adding your voice to this issue. In the meantime, you may be interested in our Lightweight Raglan Pullover, which is still awaiting an update to our current size range, but comes in a few more sizes than this sweater. We greatly appreciate your feedback!
Best,
Julianna
Since Euroflax is no longer available, can you suggest an alternate linen yarn for this pattern?
Thanks!
Hi Ann,
Thanks for reaching out! I’d recommend checking out our Blackbird Linen as a substitute for the Euroflax! This yarn is very similar in weight to Euroflax, however, it’s best to knit a gauge swatch before casting on for your project to make sure you are using the right needles to get 6 stitches x 6 rows = 1″ that the pattern calls for. Here’s our tutorial, All About Gauge, that might be helpful for this project.
Please let us know if you have any other questions!
All the best,
Carly