Cap Sleeve Lattice Top

I can remember lying for hours under the pergola in my grandmother’s yard. In the fall I’d watch the grid-like shadows shift across the grass as the sun moved across the sky. And in the spring I’d stare up, tracking the path of the vines weaving in and out of the lattice work structure. Empty or abundant, I loved the woven wood overhead.

My fondness towards this geometric patterning does not stop at the garden wall. It carries over to painted kitchen floors, pie crusts and, as you see here, knits! The lattice stitch I used is an organic interpretation of the woven grids and crisscrossing ridges that I find so fascinating and beautiful!
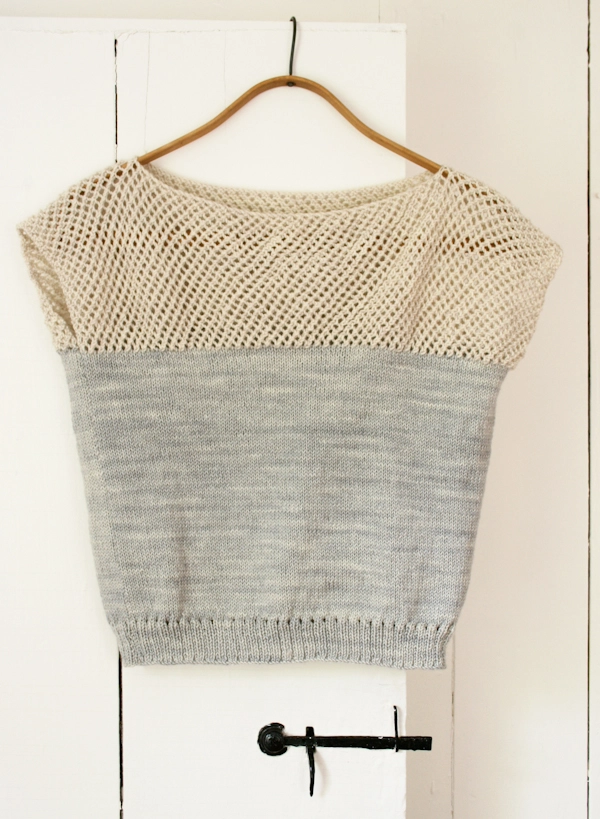
I made this Cap Sleeve Lattice Top with one of our newest (and most favorite!) yarns, MadelineTosh’s Tosh Sport. It’s a superwash merino wool, machine spun but hand dyed, with gorgeous depths of color (even in the neutrals). The pattern, like the sweater, is easy breezy, knit up the back over the shoulders and down the front, two seams and you’re done!
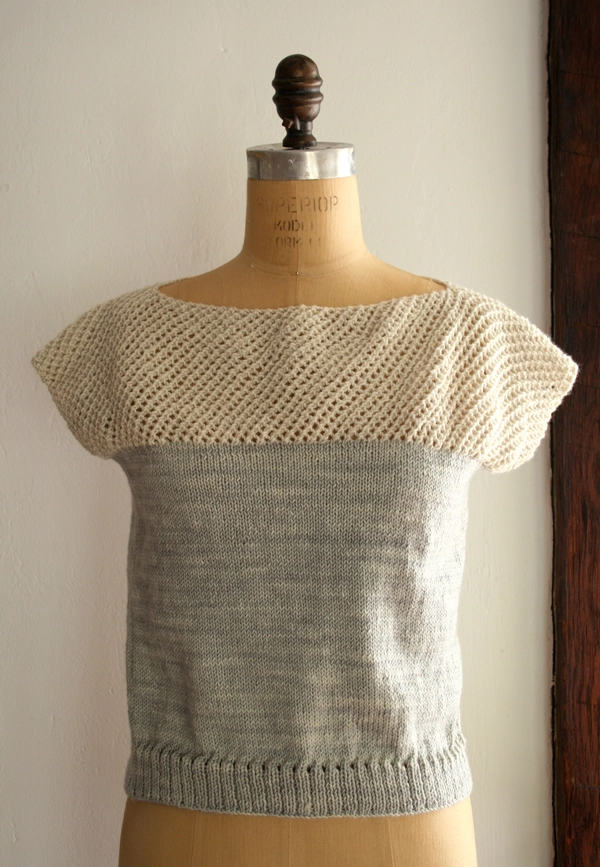
Watching the sparse grid of the pergola become overrun with wisteria and roses was a sure sign of the hot summer days to come. This sweater is a delightfully quick project to welcome spring and to wear right through summer. I think if I found myself sitting under that pergola right now, I’d be sporting this top, cool beverage in hand, gazing up at the greenery! -Laura
Designed by Purl Soho designer, Laura Ferguson.
Share your progress and connect with the community by tagging your pics with #PurlSoho, #PurlSohoBusyHands, and #PurlSohoCapSleeveLatticeTop. We can’t wait to see what you make!
Materials

- Main Color (MC): 2 (2, 3) skeins of Madeline Tosh’s Tosh Sport, 100% superwash merino wool. Each skein is 270 yards/ 100 grams; approximately 500 (540, 600) yards required. I used the color Silver Fox.
- Contrast Color (CC): 1 (1, 2) skeins of MadelineTosh’s Tosh Sport; approximately 250 (270, 300) yards required. I used the color Antler.
- US 5 (3.75 mm), 16- or 24-inch circular needles, depending on size you are making
- US 6 (4 mm), 16- or 24-inch circular needles, depending on size you are making
NOTE: You could also use Anzula’s Cricket, 80% superwash merino, 10% cashmere, 10% nylon. Each skein is 250 yards/ 100 grams; approximately 2 (3, 3) skeins of MC and 1 (2, 2) skeins of CC required. (NOTE: This yarn is no longer available.)
Gauge
24 stitches = 4 inches in stockinette stitch on larger needles
Sizes
NOTE For help picking a size, please check out our Understanding Ease + Selecting Size Tutorial!
34 (36, 38)
- Finished Chest Circumference: 34 (36, 38) inches
- Finished Length from Shoulder to Cast On Edge: 18½ (20½, 22½) inches
- Finished Length from Underarm to Cast On Edge: 12 (13, 14) inches
Note
To alter the size be sure to cast on an odd number that is a multiple of 3 plus 1.
Pattern
Back
Back Ribbing

Using the smaller needles and MC, cast on 103 (109, 115) stitches, leaving a 24 inch tail. We used a basic Long Tail Cast On.
Row 1 (Wrong Side): P1, *k1, p2, repeat from * to end.
Row 2 (Right Side): *K2, p1, repeat from * to last stitch, k1.
Repeat Rows 1 and 2 until piece measures 1¾ inches from cast on edge, ending with a WS row.
Change to larger needles.
Eyelet Row (RS): K2, *yarn over (yo), knit two together (k2tog), k1, repeat from * to last 2 stitches, yo, k2tog.
Back Body

Next Row (WS): Purl.
Next Row (RS): Knit.
Continue in stockinette stitch until piece measures 12 (13, 14) inches from cast on edge, ending with a RS row.
Cut yarn leaving a 24 inch tail.
Back Lattice
Change to CC.
Lattice Row 1 (WS): K1, *yo, k2tog, repeat from * to end.
Lattice Row 2 (RS): Knit.
Lattice Row 3 (WS): K2, *yo, k2tog, repeat from * to last stitch, k1.
Lattice Row 4 (RS): Knit.
Repeat Lattice Rows 1-4 until you have 6½ (7½, 8½) inches, ending with Lattice Row 4.
Back Neck

Next Row (WS): K1, (yo, k2tog) 11 (12, 13) times, bind off the following 57 (59, 61) stitches knitwise, *yo, k2tog, repeat from * to end. (46, 50, 54 stitches)
Front
Front Neck
Next Row (RS): K23 (25, 27) cable cast on 57 (59, 61) stitches, knit to end. (103, 109, 115 stitches)
Front Lattice
Starting with Lattice Row 3, work the four Lattice Rows until piece measures 6½ (7½, 8½) inches from cable cast on, ending with Lattice Row 4.
Front Body
Change to MC.
Next Row (WS): Purl.
Next Row (RS): Knit.
Continue in stockinette stitch until piece measures 10¼ (11¼, 12¼) inches from end of lattice stitch, ending with a WS row.
Eyelet Row (RS): K1, *yo, k2tog, k1, repeat from * to end.
Front Ribbing
Change to smaller needles.
Next Row (WS): *P2, k1, repeat from * to last stitch, p1.
Next Row (RS): K1, *p1, k2 repeat from * to end.
Repeat previous 2 rows for approximately 1¾ inches (1 fewer row than for Back Ribbing).
Bind off in pattern on WS, cut yarn leaving a 24 inch tail.
Finish
Seam the Sides
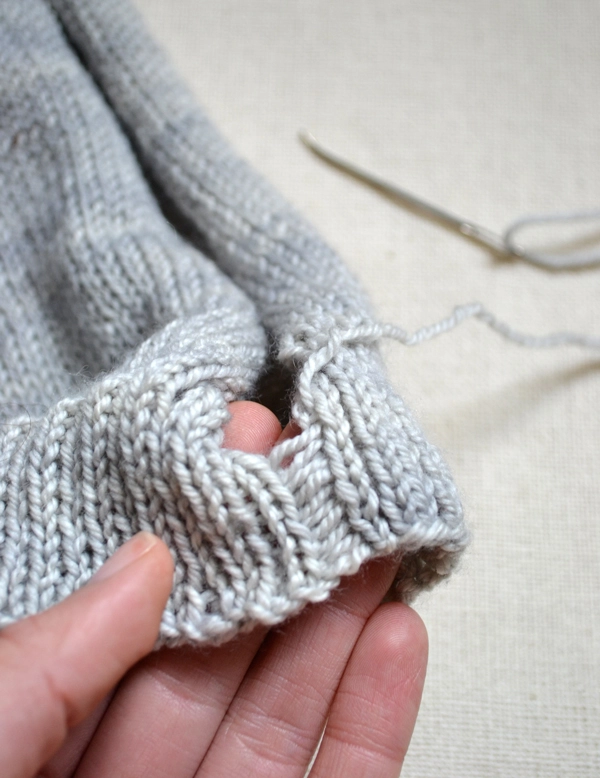
Take your knit piece and fold it in half so that the bottom hems align. Using the mattress stitch and the tails of yarn you left, seam the rib and stockinette sides of the sweater together at the main color.
Block your new top if you want and wear it all spring!


Hi Laura,
I’m curious about knitting this in “petite.” I’m 5’1 and will knit the small size. I would like the lattice to start around my armpits–would I shorten the lattice at the top, start it later, remove some of the beginning section after the rib, or something else I haven’t even considered yet? What would you suggest?
Thanks so much!
Mona
Hi Mona.
Thanks for writing in!
The shirt is currently designed so that the lattice starts at the underarms, so you are in luck on that front.
As for modifying the pattern for a more petite body… You can both shorten the length of the stockinette body as well as the length of the lattice. Currently the body is worked until the piece measures 12 (13, 14) inches from the cast on edge, but you can very easily stop working the body at 10 or 11 inches if you desire and move on to the lattice portion of the pattern.
The lattice portion measures 6 1/2 (7 1/2, 8 1/2) inches before you make the neckline. This ends up being the dimension from the shoulder to the underarm, so you may not want to modify this too too much, or the top might become too snug around your arms.
I hope this information helps! Please do not hesitate to write back in if you have any additional questions.
Laura
I am a pretty novice knitter, however, I really want to try this pattern. I will need to format it for plus sizes. Any advice on how to do that?
Hi Natasha.
Thanks for writing in. In regards to modifying the pattern… There is a 6 stitch difference between each of the given sizes. To modify this pattern for a larger circumference, simply add 6 stitches to the largest existing cast on number until you have the appropriate number of stitches for 1/2 of the finished circumference you’d like (for example 121, 127, 133, 139…). Then, when you get to the neck… Take the total number of stitches and subtract an odd number of stitches you’d like to use for the neck, then divide what you have left by 2 and then subtract 1. Then take that number and divide by 2 once more. For instance, if you take the largest size in my pattern…
115 cast on stitches – 61 bound off stitches = 54 stitches
54 stitches / 2 = 27 stitches
27 – 1 = 26 stitches
26 stitches / 2 = 13
That number (13) is how many time you’ll (yo, k2tog) in the row that reads:
Next Row (WS): K1, (yo, k2tog) 11 (12, 13) times, bind off in knit following 57 (59, 61) stitches, *yo, k2tog, repeat from * to end. (46, 50, 54 stitches)
I hope these tips help.
Please let us know if you have any questions!
Laura
Love this pattern, and am making it for a friend who would like slightly longer sleeves maybe two inches longer than the cap. How would I best make this happen without destroying the look. one of the photos seems to have longer cap sleeves that the one at then end of the pattern. If you think this will not work well, please let me know.
Many thanks for such a lovely pattern.
Melanie
Hi, I am about to start the front piece and was wondering if I have done it correct. The transition from back piece to lattice is a row with yarn overs. The transition from front body to lattice are two solid knit rows, so no holes from grey to white?
Thank you and have a nice day.
Hi Nakuna! Yes! That is correct!! Thanks for writing in. Please let us know if you have any other questions. -Laura
Hi
I am making your lovely pattern all in one color. I am also using a sport weight merino wool yarn and have adjusted the number of stitches to match the gauge. My question is regarding the lattice . I want less of the lattice rows so that the top of my bra will be covered. Can I continue straight up past the armholes before starting ? Will it pull at the arms or will the fact that it is a cap sleeve allow for this adjustment ?
Hello Aunrey,
You absolutely could make that change! The pattern is created by just folding a long rectangle in half. Therefore you could definitely adjust the armholes since there’s no shaping involved!
Happy stitching! -Alyson
I have another question for you. I ended up using an aran weight yarn with 82 stitches on my needles. I’m trying to figure out the math for the neckline from what you wrote in your other replies..
I worked out that you are allowing a 9-10″ opening which would be 45 stitches that I would cast off leaving me 37 stitches remaining.
Minus 1 =36 (if I divide by 2 first I end up working with fractions)
36 divided by 2= 18
18 divided by 2 = 9 which is the number of times I will yo, k2tog
Did I figure this correctly ? Thank you so much for you patience and help !
Hi Aunrey.
It sounds like you’re on the right track, but I have a small adjustment for you! I started with an odd number and then bound off an odd number in order to get an even number. Since you’re starting with an even number, you’ll want to bind off an even number.
Here are the numbers for the largest size…
115 cast on stitches – 61 bound off stitches = 54 stitches
54 stitches / 2 = 27 stitches
27 – 1 = 26 stitches
26 stitches / 2 = 13
That number (13) is how many time you’ll (yo, k2tog).
But for you, starting with 82 stitches, let’s work backwards assuming you’ll do 9 (yo, k2tog)
9 x 2 = 18
18 + 1 = 19
19 x 2 = 38
82 – 38 = 44 stitches at the neck
Aunrey, is this making sense? Please do not hesitate to write back!!
Laura
Yes, it makes perfect sense. Thank you so much !
Aunrey
Hi,
Lovely pattern. I have a beginner’s question: Can we follow the same instructions to work with straight needles?
Many thanks,
Eva
Hello Eva!
Yes you can! As long as you can squish the stitches onto your straight needles, you definitely don’t NEED to use circular needles. Thanks for your question! -Alyson
Hello,
I am finding that since starting the back lattice, it seems skewed to one side. Any suggestions as to what I could be doing wrong?
Thanks,
Erica
Hi Erica.
I’m glad you wrote in. That slanting of the fabric… It should straighten out when you block. If you want, you can steam block (hover a steaming iron an inch above your knit fabric) your project before working too far, just to ensure it’ll straighten up some. And then do a full blown submerging block when you complete the project.
Let us know if you have any questions!
Laura
Hello, I was wondering why for the medium size, the back stockinette stitch rows measure 13 inches, but the corresponding front rows only measure 11 1/4 inches. How should I line these areas up to stitch them together?
Hi Kelly.
Thanks for writing in.
The pattern instructs you to work the back until it measures 13 inches from the cast on edge, that 13 inches includes 1 3/4 inches of ribbing and 11 1/4 inches of stockinette. Then you work the back lattice and then the front lattice. Then, for the front you are instructed to work 11 1/4 inches of stockinette for the front body before finally working 1 3/4 inches of ribbing. All together the front stockinette section should measure the same as the back stockinette section.
If you have 1 3/4 inches of ribbing and then 13 inches of stockinette on the back, I suggest you mirror that modification on the front side so that you can align them for seaming!
I hope this helps! Please let us know if you have any questions!
Laura
I am excited to get started on this sweater. I plan to knit it in one color and purchased three skeins of Anzula’s Cricket in Au Natural through Purl Soho. I did a gauge swatch last night and in order to get 6 stitches in an inch in stockinette, I had to use size 7 needles. The fabric appears a little looser than what is pictured in the pattern pictures, but it’s not open/loopy and doesn’t bother me much since I’ll be wearing it in the Spring/Summer. Any concerns with size 7s for the larger needle?
Never mind. I remade and blocked my two gauge swatches and the size 6 needle is more on gauge. Will go with that!
Hi Jennifer!
If size 7s is what you need to achieve gauge… then size 7s sound great!
Thanks for writing in.
I hope you enjoy the pattern and wearing your new Cap Sleeve Lattice Top!
Laura
Hi! I just received the Tosh Merino Light in Paper and Charcoal and am excited to start this project. As I was looking at the yarn, I noticed that it recommended to alternate the skeins every two rows if using more than one. Is this something that you did or would recommend? Thanks so much!
Hi, Candace!
Thank you so much for writing in. Sorry for the delayed response! The recommendation to alternate skeins every two rows arises from the fact that Madelinetosh’s dye lots can vary widely. Alternating the skeins hides this variation. If the skeins that you purchased have a noticeable color variation or if you are concerned about the dye lots not matching I recommend alternating skeins. For me, if the yarn’s tags indicate that they are from the same dye lot I don’t bother alternating the skeins.
If you have further questions, please let us know!
Best wishes,
Kumeko
I am knitting this on circular needle from bottom up and plan to hold half of the stitches on another needle while working the lattice. I want the lattice to be shorter, only 6 or 7 repeats. Do I just continue knitting the body until I reach the point where I want to begin the lattice? If not, what do I need to do around the armhole?
Hi Sandi,
Thanks for writing in! If you’d like the lattice portion to be shorter, then I would continue knitting with the main yarn until you want to start the lace stitch, putting the piece up to your body as you go to gauge where you want to start the new stitch. By knitting stockinette flat, your edges will curl on the armhole, so I suggest slipping the first stitch and creating a mini-border, like garter or seed stitch, to avoid this. Good luck and happy knitting!
Best,
Adam
So excited to be almost finished this lovely piece – first piece of ‘clothing’ I’ve ever knit! I am just at the part where I seam up the sides – would you go every bar or go two bars at a time for this weight? Thanks so much, can’t wait to show it off!
Hello, Sara!
I am so glad to hear that you’ve enjoyed knitting this top! With this weight yarn you could do either, going every bar or every other bar, it’s really just a matter of preference!
Please let us know how it goes!
Best wishes,
Kumeko
Hi. I recently made this in a smaller size and I noticed in the note you said for altering the size you must cast on a multiple of 3 plus 1 so that’s what I did. However it must also be a multiple of 2 plus 1 for the lattice. Unfortunately I found this out the hard way. Thought you might like to add this to the note.
Hi Laura,
I enjoy the patterns on the site! B-e-a-utiful!
Can I ask, what is in grams of one skein? How much ~ material do I need for the L of XL ?
Thanks and best regards,
Grazina
Hi Grazina,
Thanks for writing in! The large size takes three skeins for the bottom and two for the top, 300 and 200 grams total respectively. If you are changing the pattern to do an extra large, I would buy one more skein each, just in case. Good luck and happy knitting.
Best,
Adam
I really want to work this in more financially available sport yarn from Herrschner’s its their Sweetie Pie a lovely soft acrylic from Village Yarns.
1.75 oz 50g 138 yds gauge 5.75 on #6 needles.
Substituting yarns is a pain to figure out! But I love the simplicity of this pattern.
Hi Marsha,
Thanks for writing in! We certainly understand that sometimes our yarn suggestions are more of an inspiration than a reality for many people. You can certainly use an alternate yarn here. The gauge that you list here is a bit bigger than what this pattern uses. If you can get 6 stitches per inch on US 6 needles with this yarn, you should be all set. If you have some of the yarn already, I would suggest knitting a gauge swatch to ensure that you can get gauge and that you like the fabric. If you are getting gauge, you should be all set!
Best,
Cassy
A neighborhood lady taught me how to crochet when I was an adolescent. I made what was called in the 60s’ a hippie vest. I blocked it and put it on top of an old car sitting in our driveway. A cat got it and tore it up.
I taught myself how to knit when I was in college. I have enjoyed many, many hours knitting, crocheting and sewing. I LOVE YOUR PROJECTS! Each is elegant (I did not know what elegant means mathematically but it fits.) I have a baby blanket to finish and a pair of mittens to finish but I am going to make something from PurlSoho and I am going to feel elegant. Thank you.
I love this pattern and hope to finish this summer (I’m a slow knitter) I am reading the switch from back lattice to front lattice. I am confused with the instructions that read “K1 (yo, K2tog)” why the parenthesis? Does that mean begin with K1 and not repeat that stitch but repeat what are in the ( )’s?
Thank you! I love your patterns and have a stack of them to work thru!
Hi Elsie,
Thanks for writing in! Yes, you will (yo, k2tog) eleven, twelve or thirteen times depending on which size you are doing. Do not k1 each time — this is only for the first stitch. Hope this helps.
Best,
Adam
Hi! I’m currently knitting this awesome project and I have a question: I’m working the front neck, just started the cable cast on but I have no idea how I’m going to tie in with the stitches on the other side since the cast on stitches are in the left needle. Am I doing something wrong or is there an instruction missing?
I’m casting on the left needle but seems I should be casting on to the right needle to continue building the neck line. Please help!
Many thanks in advance
Dear Catha,
Thanks for writing in! I think that I see what the issue is. When you start the row, you knit the first 23(25, 28) stitches and then cable cast-on the required stitches. Using the cable cast on, you cast on stitches onto the right needle next to the stitches that you have just knit. We do have a helpful tutorial for the cable cast on that I think could be very helpful. It can be found here: https://www.purlsoho.com/create/2008/07/07/cable-cast-on/
I hope that this helps and happy knitting!
Cassy
Thank you, Cassy, for the link on the cable-cast-on and thank you for this lovely Lattice top pattern.
Hi Laura,
I’m knitting this lovely top in the round. I’m at the lattice section and realizing I will need to knit the front and back lattice separately. Do you recommend several knit rows at the neck and shoulders so that I can seam them nicely? Or do I follow the lattice pattern for front and back and somehow join the lattice and the bodice together with a seam?
Thanks
Hi Elena,
Thanks for writing in! I did a quick search of the pattern on Ravelry and found several knitters who made this pattern in the round. Techniques ranged from grafting the lace at the top of the sleeves to knitting the lattice portion (from the in the round body) as written and then grating the lattice to the body of the sweater. All of the options look lovely and I think that which ever method you end up going with will yield a lovely finished garment. I also think that your idea of knitting a row or two and then kitchnering those rows together would work. It would, however, yield a bit of a different look than the sample.
Let us know how it goes and please feel free to reach out again!
Happy knitting!
Cassy
I’m making this at the moment. I knit the lattice section first, flat. I’ve then picked up stiches with the MC to complete this section in the round, working down to the bottom. So far, it’s worked an absolute treat.
I will try this technique. Knit the lattice section first then the body.
Can I do the body in circular needle? Should I adjust the # of stitches or just use what’s in the pattern?
Also, can I do provisional cast on to start the lattice and use it for the body.
Thank you for sharing your thoughts.
Best of luck!
-Adam
Has anyone made this in the lattice only? I was thinking this would be pretty layered over a tank.
Hi Gina,
Thanks for writing in! I think that you should totally try making this in the lattice stitch. It would be really cool. I think you’d need the same amount of yarn and you could hold the front body up to you in order to tell when you need to start the front chest. Just make sure you do the same amount of rows for the front as the back since you’ll be seaming at the sides in the end. If you decide to do this stitch, I’d add an extra stitch for seaming on either end so it will make your seam more even.
Best of luck!
-Adam
I am a new knitter and am highly motivated to try this pattern, it is so pretty. My first question: After you knit the back ribbing it says to do an eyelet row. I understand the technique but not the why. Is that one row of decreasing and then proceeding straight up for the back?
2nd question: Am I correct in thinking you are knitting bottom up for the back and then top down (lattice work first) for the front? Thank you for your time.
Hi Kathi,
Thanks for your interest in this pattern! The eyelet row after the ribbing is for decoration only and you can omit it if you don’t like it. For your second question, you are correct. You will start at the bottom front and knit the whole piece over the shoulders and down the back. There are no shoulder seams in this piece but there are side seams. Best of luck on this project and happy knitting!
-Adam
I have been dreaming of knitting this up for some time now, but I’m curious if it would be doable in your lovely line weight to make a lighter top?
Hi Stephanie,
Thanks for writing in! This would be lovely in Line Weight but the gauge is much different. You’d have to do some math to figure out an appropriate cast on amount. I’d do a gauge swatch and just make sure that whatever you cast on is a multiple of 3 + 1. Thanks again!
-Adam
I’ve been checking the comments on here and on the ravelry page but can’t seem to get a clear consensus….if I’m knitting this in the round and want to cast on just slightly less than the small size in the pattern, am I picking an odd number that’s a 3+1 (I chose 198)? I’ve seen several different ways of adding up a CO number so now I’m just lost.
Thanks!
Hi Michelle,
Thanks for writing us! You’ll still want to pick a cast on that is a multiple of 3 + 1 because the lattice portion is not knit in the round. When you finish with the body you will divide front and back to start the lattice lace. This is when 3 + 1 is important. All in all, 198 seems like a good cast on! The only thing you’ll have to adjust is the ribbing at the bottom since 198 is not divisible by 3. I suggest doing a k2p2 rib. Good luck with the project!
Best,
Adam
198 is divisible by 3….it’s 66!
Just for anyone out there looking to get an idea about how to cast on for in the round….
The ribbing needs to be divisible by 3…..ie 198.
The eyelot row will also need to be slightly different (one less K stitch at the start of row):
Eyelet Row (RS): K1, *yo, k2tog, k1, repeat from * to last 2 stitches, yo, k2tog.
Then when you get to the lattice work, divide your work in half (99) keeping half on scrap yarn. As you start to work the lattice, you will need to add an extra stitch (bringing it up to 100st) to make the lattice stitch lean properly. knit the lattice up and over and graft onto your live stitches in whichever manner you like best.
Hi! I am about to start this pattern for my 12 year old daughter. Her actual bust is 291/2 and we are going to go with 16 long from shoulder to bottom. Can you help with the other dimensions? I was thinking 9 from underarm to bottom and am not sure what the ease is/finished chest circumference should be. Thanks so much!
Hi Julie,
I think this is a lovely top for a 12 year old girl! Great idea! I would cast on 12-16 stitches less than the pattern, which will make your finished chest about 31-31 1/2″ around. This is a good amount of ease because you don’t want the top to be skin tight. Depending on your daughter’s torso length, I’d measure from an inch below her underarm to about an inch below her hip bone for the side length. This way you’ll get a more accurate measurement than me suggesting one off the top of my head! I think this project will be lovely! Best of luck!
-Adam
I wear a size 14 and I cast on 115 stitches on a round needle. This doesn’t look as if it is going to fit , I’m so disappointed. Is this pattern for an adult or child?
Hi Mya,
Thanks for writing in! This pattern is knit flat and seamed up the sides. Make sure you didn’t join the the round! As long as your chest size is around 38″ you should be good to go on this pattern! Enjoy it and good luck!
-Adam
Thank you
I seem to be adding stitches to the back lattice in the 3rd row. When K2, *yo, k2tog, repeat from * to last stitch, k1. Initially, I cast on 109 stitches. K2 + 35(yo, k2tog) leaves 2 stitches, so I yo the second to last stitch then k1 for a total of 110. Should I not do the final yo? What should I do?
Hello Angelika,
Thanks for writing us! First, I would make sure that you started the lattice lace with 109 stitches and not 110. If you did start with 109, then I’d look down your needle and make sure you have a yo in between each stitch after the initial k2. It’s probably best to not increase to 110 stitches because this will offset the lattice stitch and it won’t come out right. Let me know how it goes and feel free to write back if you have any more questions!
-Adam
Hi, I don’t understand how to start the back lattice. After reaching 14 inches, cut yarn leave a 24 inch tail. Do I cast on 115 stitches again and start with cc color. Is the lattice knit separately and then seamed to the back??? I’m totally lost
Hi May,
Thanks for writing in! The lattice is not a separate piece actually. Once you complete the back body you’ll cut your main yarn and simply start knitting with the contrast color for your lattice stitch. Your stitches will still be live on the needle, so there is no need to cast off or on. Let me know if you have any other questions! Good luck and happy knitting!
-Adam
What a beautiful pattern! I have ordered the yarn and can’t wait to start.
I would like to knit it in the round to eliminate the side-seams– do you think I will run into any trouble with this adaptation and/or do you have any tips for this?
Hi Marianna,
So glad you are digging the pattern! Many of our customers have adapted this for working in the round. I suggest casting on double the flat cast on in the pattern, knitting the body in the round and dividing for the front/back when you’ve reached your desired torso length. When knitting this in the round you’ll divide your stitches in half and knit up the front lattice portion as in the pattern. The only difference is that you’ll graft the end of your lattice stitches with the end of your back torso stitches. Let me know if you have any other questions!
-Adam
I’m planning on casting on for this sometime in the very near future, but can’t decide on sizing. I have a very pear shaped body, bust being 43″, and hips clocking in at an epic 51″. I can’t figure if the best plan to keep the integrity of the garment’s design is to go with a 44″ sized cast-on, and hope it fits my hips, or go with something closer to the hips numbers, 50″ or 52″, and hope the chest is a bit forgiving, or if I should just go with shaping around the hips and waist, and forget about the otherwise looser garment style. Does the ribbing at the bottom allow for that much give? I just don’t know!!
Hi Katie,
Thanks for writing in! I’m so happy you’re choosing this pattern! I suggest you give this top about 4″ of ease for the bust and not worry about the hips. The top is supposed to hit just at the hip bone and if you give it a little ease it will slouch and look pretty cute (in my opinion). The beauty of this top is that you can customize where it falls on your body. Let me know if you have any questions!
-Adam
I made this beautiful top a couple of years ago when I first joined Ravelry and didn’t realise until today it was one of Purl Soho patterns. I’ve fallen completely in love with your styles and have knitted many projects but this top knitted in pale lemon with cream and lemon speckled wool for the lattice is still a firm favourite and I always get complimented upon i.
I Can’t recommend it enough for a simple but beautiful knit.
Thank you Purl Soho
Hello Siobhan,
Thank you for this lovely comment! It is great to hear that this project is one of your favorites.
-Marilla
I’d like to make this one more like a tank top, without the cap sleeves. I’d be knitting the smallest size for my daughter and the second size for myself.
Any ideas how to fit the lattice portion to the stockinette portion to do this?
Thank you, guys…never met a Purl Soho pattern I didn’t love!
Hello Liz,
Thank you for reaching out!
This might be a bit tricky to figure out and might require some trial and error. My best guess of how to achieve this would be to add decreases at the beginning and end of your row when knitting up the back and putting in increases that correspond with the decreases when knitting down the front of the lattice portion. When doing this you will want to make sure that you stay in stitch pattern which might mean adding some knit stitches at the begging and end so that rows 1 and 3 line up correctly. I would experiment with making swatches with decreases to see if you like the way it looks before jumping in.
Please let me know if I need to clarify any of this.
Warmly,
Marilla
Thank you, Marilla! Your advice made perfect sense. I’m swatching right now (well, not this very second, but you know what I mean), and I think I’m getting the stitch count worked out. It’ll probably take a few goes of playing with increases and decreases.
I’ve made a few of the lattice tops as given in the original pattern, and then Daughter said, “Hey, what if…” So, of course, now I have to knit up a tank version!
Thank you for your help!
I’m so happy to hear it! I would love to see the end result when you’re done. I think it’s a great idea!
Warmly,
Marilla
Hi! I’ve started a gauge and am wondering how big I need to knit it, since you only have the 6 stitches to an inch info. Do I need to knit up a full square? I cast on 36 stitches. If I knit it a few inches deep, will that suffice? (This is my first gauge swatch ever… I’m a newbie!)
Hello,
Thanks for reaching out! I recommend knitting about 20 rows, or until you can get a clear understanding of how many stitches per inch you are getting. For a more in-depth look at gauge swatching check out our tutorial .
I hope this clears things up for you!
-Marilla
Okay, thanks. So the pattern says 6 stitches per inch. Is that six stitches and six rows, or just six inches and the rows don’t matter?
I just measure my 20 row swatch in three places, and I’m getting 6 stitches per inch in all three places, but about 8 rows… so I’m hoping that’s normal? The wool I’m using is a merino/silk blend. The store I bought it from advised me to wet my gauge swatch and block it then remeasure. Really hoping this will work out without having to adjust needle size!
Hello,
Sounds like you are on the right track! Your local yarn shop is correct – you always want to block your swatch. I’m betting the most it will do is even out those 8 rows. Let me know if you run into any issues!
Warmly,
Marilla
Hello,
Thanks for the question! I usually like to make a nice square for my swatches, but for most patterns (unless otherwise stated) you don’t need to worry about gauge length.
I hope this is helpful!
-Marilla
I would like to knit this beautiful sweater for my 11-year-old granddaughter, but I would like to use a fingering weight yarn that matches a sweater I’ve already made for her brother.
My question is whether you think by following the smallest size of the pattern, but with fingering weight yarn (and smaller needles such as US#2 for the ribbing and US#5 for the body), the sweater would “magically” work out to the correct size (roughly 31″ chest) without having to adjust the stitch count?
Thank you!
Hi,
Great question! To determine if this will work for you, you will need to knit a gauge swatch using the yarn and needles that you would like to use. Once you know the stitches that you are getting per inch, you will want to figure out how much smaller your gauge is. For example, if you are getting 7 stitches per inch, this is about 15% smaller than the 6 stitches per inch that we are getting for this pattern. The smallest size is a 34 and 34 x 85% would be 28.9 inches. At this gauge the 36 size would yield you 30.6 inches. These are just examples but I hope that is gives you a way to figure out how to gauge the size down. It will certainly take a bit of trial and error and be sure to make sure that the neck hole will fit over your granddaughter’s head but I think that you could certainly give it a go!
Best,
Cassy
Hi there,
I love this pattern! I am going to give it a try with some yarn I already have, but it calls for larger needles (size 8). Would this pattern still work? I know the pattern suggests two different sizes for needles as well, so would I size up or down if I am able to use this yarn?
Thanks!!
Rachel
Hello Rachel,
Great question! Unfortunately it sound like your yarn is going to be to thick, though it really all depend on the gauge of the yarn. You are looking for a sport/dk yarn that has a gauge of 6 stitches per inch on a US 6 needle. You could try knitting a gauge swatch with the yarn you have and see what happens- to achieve gauge you will want to go down in needle size, though this could make your knitted fabric to dense.
I hope this all makes sense and let me know if I can clarify anything for you!
Happy knitting,
Marilla
Do you think this top can be made out of DK weight yarn? Thank you
Hello Donna,
Thank you for reaching out! This pattern calls for a sport weight yarn, so if you use a true DK it will likely come out larger than expected. I would be sure to check the gauge of the yarn you are considering to use to see how close it is to the suggested gauge of 6 stitches per 1 inch in stockinette stitch on US 6.
I hope this helps and happy knitting!
-Marilla
I have had this sweater in my “favorites” for the longest time and I would like to knit it now. My bust measurement is 39″ and my hips are about 43-1/2″. I usually look best when a sweater has an a-line shape. Any suggestions about sizing and shaping? Thanks/
Hi Paula,
Thanks for reaching out! I would suggest starting with 121 stitches which will give you one inch of positive ease, and the easiest way to give the top a slight A-Line appearance would be to omit the ribbing and begin with either a garter or seed stitch edging on the larger needles. If you would like a more exaggerated A-Line, it would require a bit more work to plan, but not too much! You could decide how many stitches to start with by multiplying your stitch gauge by half of your desired width at the bottom of the sweater and then decrease at both edges, spacing your decreases evenly along the length of the back, until you are down to 121 stitches an inch or two before beginning the Back Lattice section. Once you have completed both the Front and Back Lattice instructions, you will mirror the shaping on the front by increasing at both edges to match the back.
I hope that helps!
Julianna
I am just finishing this sweater. I LOVED making this! I used Cascade 220 superwash sport (colors Aran and Extra Cream). It’s so pretty my 14 year old has been waiting patiently to wear it and I think by this weekend it will happen! Thanks! Great, super easy pattern and great photos!
Hello!
I love this pattern! But I do have one question.
You tell us if we want to alter the size to cast on a multiple of 3 plus 1, althought when we achieve the back lattice the very first row (WS) it says: k1, *yo, k2tog, repeat from* to end. This row doesn´t have a multiple of 3 plus 1… So when we alter the size this does not work with some numbers…
Can you help me?
Thank you!
Hi Joana,
Thank you so much for the kind words! Not only does the cast on have to be a multiple of 3 plus 1, it also has to be an odd number. This will result in a number that is also a multiple of 2 plus 1 so the lattice pattern will work as well!
Best of luck and happy knitting!
Julianna
HELP! bleeding yarn. The recommended Madelelinetosh sport yarn was used and the care instructions were followed. The color bled all over any recommendations?
Dear Julia,
I’m so sorry this happened to you- what a tragedy!! We recommend Shout Color Catchers that may help a lot with picking up the excess yarn dye. You can find these at your local grocery store
I would recommend trying this product with your blanket in just a tub of cool water or in the sink with very little agitation. I wouldn’t let it soak for too long, no more that 10-15 minutes.
Please let us know how it goes and best of luck!
Warmly,
Marilla
I’d like to do this beautiful top in linen. Has anyone done this? Any suggestions? Weight of yarn? Needle size?
Hi Molly,
Thanks for reaching out! Although we haven’t tried it ourselves, there are quite a few projects on Ravelry that used linen yarn for this top and they all turned out lovely. This pattern calls for sport weight yarn, so I would recommend using Field Linen. You will have to knit a gauge swatch to determine the correct needle size, but I would start with the US 6 the pattern calls for.
Happy knitting!
Julianna
I’m a new knitter, so this may be a silly question. I’m noticing that the lattice portion of my top is longer on one side than the other. It’s sort of stretched out on the right side.. is this something I can fix when I block it at the end? Or am I doing something wrong?
Thanks!
Hi Caitlin,
Thanks for writing in! It’s possible that this is just a normal tension issue which will block out; however, if the right side is significantly longer than the left, I would suggest counting your rows on each side to see if you are accidentally turning around in the middle of a row frequently, which would add more rows and length to just one side. You could also try blocking it now by placing all your stitches on scrap yarn to make sure you will be happy with the lattice section before you go any further.
I hope that helps!
Julianna
Hi I love the look of this top. My problem is the lattice has grown 57 stitches. Where did I go wrong? When I was try getting ready to graft the two pieces together I noticed the growth. Your help would be appreciated.
Hi Bernie,
Thanks for reaching out! Can you add a bit more information about which size you are making and where you are in the pattern? This top should be knit all in one piece without any grafting or kitchener stitch, so I’m not sure where you have run into difficulties!
Best,
Julianna
I want to make this for my granddaughter but she is 43″ in the bust. To have the correct number of ease inches what would I cast on (I matched gauge) and would there be any changes that need to be done for the lattice portion?
Hello Patti,
Thank you for reaching out- this is a great question! I would reccomend casting on 133 stitches for a 43″ bust. You shouldn’t need to change the lattice portion until the neck where I would do;
Next Row (WS): K1, (yo, k2tog) 15 times, bind off the following 71 stitches knitwise, *yo, k2tog, repeat from * to end. 60 stitches remain.
Next Row (RS): K30 cable cast on 71 stitches, knit to end. 133 stitches
I hope this helps and happy knitting!
-Marilla
Do you think your Season Alpaca would work for this project? I’m leery about using 100% alpaca for a garment, but it seams that you recommend it for everything?
Hello Giovanne,
Thank you for reaching out! Alpaca does tend to stretch of long periods of time because of its weight. On the other hand it is incredibly soft and easy to work with. If you do go with our Season Alpaca yarn it will likely have some drape to it.
I hope this helps and happy knitting!
-Marilla
I have read the comments but no one sent you this question
So here is my question I used the same yarn for the whole top. Where did the cap sleeves come from? I was expecting to add stitches at each side of the lattice.
Sorry for the ignorance
Thanks
Linda
Hi Linda,
Great question! Although you don’t add any stitches or shaping, the lattice stitch has a much wider gauge than stockinette, so the top of the sweater turns out several inches wider than the bottom, especially after blocking. This results in the lovely little sleeve caps!
I hope that clears things up!
Julianna
Hi, a few people in my knitting group are planning on making this top for summer. Do you recommend any yarns in your shop for this top that would be nice and cool for summer wear (i.e. not wool). Maybe linen or cotton?
Thank You, great patterns!
Hi Debbie,
Thanks for writing in! I think this top would be absolutely beautiful (and very warm-weather friendly!) in either Cotton Pure or Spectrum Silk. We can’t wait to see your group’s finished tops!
Happy knitting!
Julianna
Hi
I love this top, am I able to sell it, or is your pattern only for home use?
Hi Claire,
Thank you for your interest in our patterns! While we’re happy you like our Cap Sleeve Lattice Top, our patterns and designs are copyrighted and are for home use only. This means that you can’t use our patterns to make things for sale. We hope you understand!
All the best,
Gianna
Hi there, I’m super excited to get started on this pattern.
But I’m a little confused with how much I need.
I have a sock/4ply skein for the bottom which is 100g/450m. Please could you recommend how many skeins I would need for the bottom part?
Thank you!
Hi Kerry,
Thanks for reaching out! We recommend 500-750 yards (depending on the size you plan on making) of a light worsted/dk weight yarn! Your sock yarn may be a bit thin so I suggest working up a gauge swatch to insure you are consistent with the pattern prior to beginning!
I hope this helps!
Warmly,
Gianna
I made this top two years ago. I have lost some weight and the neckline is a little big now. I was thinking about doing a crochet border to pull in the neckline. Would this work or is there a better way to pull in the neckline?
Hi Kimberly,
Thanks for reaching out! I think that would work great! A crochet border should help tighten the neckline a bit, I would also recommend reblocking the piece once you finish to further help with the fit! I suggest checking out our Blocking tutorial is an excellent resource to use!
I hope this helps!
Gianna
I’m excited to start this pattern. Trying to decide on sizing. How is the fit of the sweater. My chest is 35” which is between small and medium. Otherwise I’d assume I’m a small. Should I make a medium then? Or does it come out a little loose? I’m generally a tighter knitter.
Hi Adele,
Thanks for reaching out! This top fits pretty true to size, so if you are between sizes, I recommend choosing the medium! Since the chest fits 34 (36, 38) inches, this will give you an inch of ease and a more comfortable fit!
I hope this helps, happy knitting!
Gianna