Short Row Sweater
As a young child, I remember my wonderfully elegant grandmother wearing her cardigans backwards with the first couple of buttons undone, creating a soft V dipping down from her shoulders. As an adult I turn to her back-revealing style still, as I love wearing her summer frocks from the 50s with cutouts that reveal the small of my back.
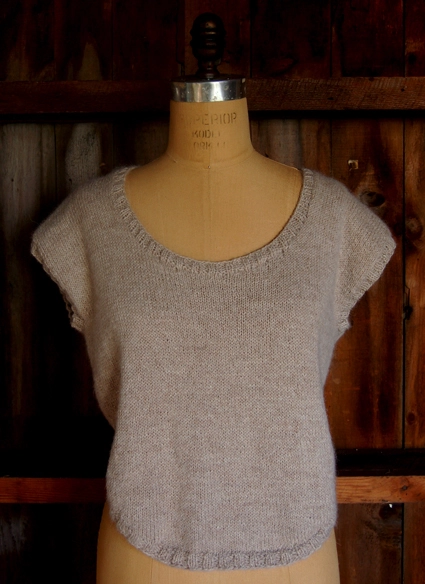
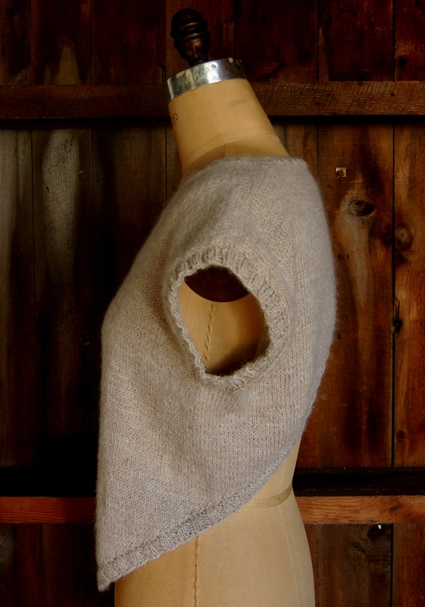
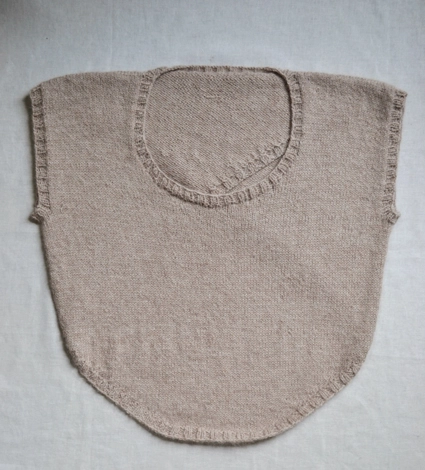
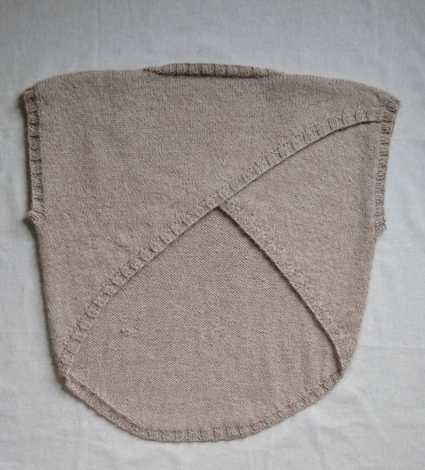
The Short Row Sweater is my autumn ode to the grace and distinction of a bit of bare back. Knit in one piece, this wrap of a sweater is a half moon shape, folded around to create a sweeping crisscross in the back. I used the superlatively soft Blue Sky Sport Weight Alpaca for its draping ease and classic simplicity.
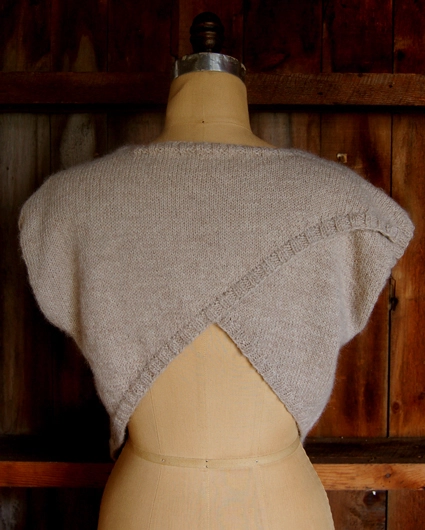
I have thrown on this sweater with jeans and flats for some of my last outdoor brunches of the season. At night, I’ve worn a silk camisole underneath it. And I know that in just a few more short weeks, I’ll be pairing it with a long sleeve nautically striped tee. Even layered, the crossed back adds just the right amount of feminine frolic to my step! -Laura
Designed by Purl Soho designer, Laura Ferguson.
Share your progress and connect with the community by tagging your pics with #PurlSoho, #PurlSohoBusyHands, and #PurlSohoShortRowSweater. We can’t wait to see what you make!
Materials
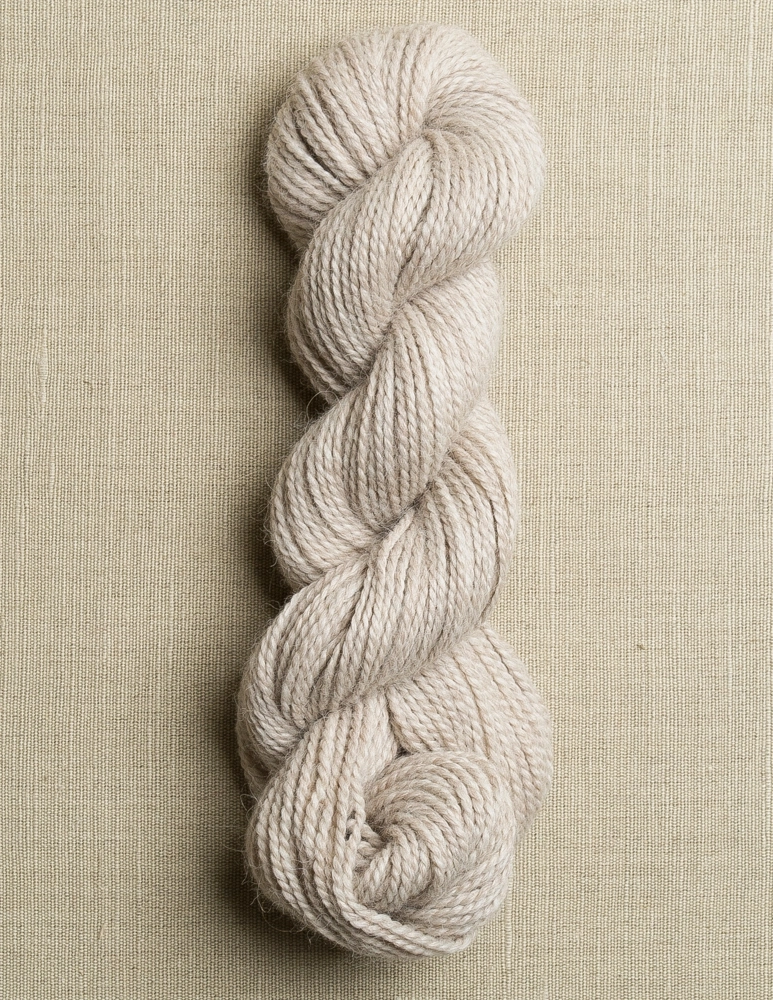
- 5 (6) skeins of Blue Sky Alpaca’s Sport Weight (100% Baby Alpaca). I used color Natural Taupe #505, a Sport Weight Solid, but the Sport Weight Melanges would work beautifully too! (Update: We no longer carry Blue Sky Alpaca’s Sport Weight but think our Season Alpaca would make a lovely substitution! For this pattern you’ll need 3 (4) skeins for the appropriate yardage and please remember to check your gauge!)
- A US 5 (3.75 mm), 24 inch or 32-inch circular needle
- A US 5 16-inch circular needle
- 1 set of US 5, double pointed needles
- 2 Stitch Holders
- 2 markers
- Scrap Yarn
Gauge
6 stitches = 1 inch in stockinette stitch
Sizes
Sizes: XSmall/Small (Medium/Large)
- Finished Chest Circumference: 34 (38) inches
- Length from Center Front Hem to Back Neck: 19½ (22) inches
Notes
You will work a large portion of this piece in short rows. You work back and forth, turning the work part way through each row instead of continuing to the end of the needle. For a great Short Row Tutorial, click here!
Pattern
Begin
With the longer circular needle, cast on 306 (342) stitches. We used a basic Long Tail Cast On.
Row 1 (RS): *K2, P2, repeat from * to last 2 stitches, k2.
Row 2 (WS): *P2, k2, repeat from * to last 2 stitches, p2.
Repeat Rows 1 and 2 until piece measure 3/4-inches from cast on edge.
Right Side (RS): K171 (K189), wrap and turn.
Wrong Side (WS): P36, wrap and turn.
RS: K36, knit the wrapped stitch together with the picked up wrap, K1, wrap and turn.
WS: P38, purl the wrapped stitch together with the picked up wrap, P1, wrap and turn.
RS: K40, knit the wrapped stitch together with the picked up wrap, K1, wrap and turn.
WS: P42, purl the wrapped stitch together with the picked up wrap, P1, wrap and turn.
Continue in this pattern, working up to the wrapped stitch, working the wrapped stitch with the wrap picked up, working one more stitch, wrapping and turning. Ending with a RS row.
WS: P178 (P214), purl the wrapped stitch together with the picked up wrap, P1, wrap and turn.
Separate for Armholes
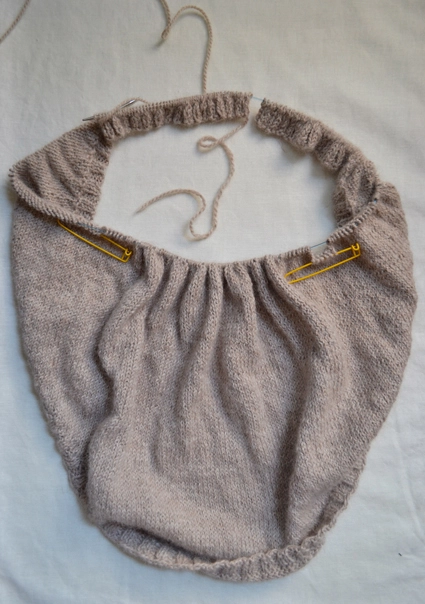
RS: K42 (K54), place last 6 stitches on a holder, K102 (K114) place last 6 stitches on a holder, K36 (K48), knit the wrapped stitch together with the picked up wrap, K1, wrap and turn. (99, 111 stitches for Right Back. 6 stitches for each Underarm. 96, 108 stitches for Front. 99, 111 stitches for Left Back. This count includes all of the stitches on your needles, not just the stitches you have just worked. This count adds up to your Cast On number.)
Work the Right Back
NOTE: The Right Back is worked over just the next 99 (111) stitches with the row ending at the stitch holder.
WS: Purl across until you reach the stitch holder, turn your work.
RS: Knit to the wrapped stitch, knit the wrapped stitch together with the picked up wrap, K1, wrap and turn.
WS: Purl.
RS: Knit to the wrapped stitch, knit the wrapped stitch together with the picked up wrap, K1, wrap and turn.
Continue in this fashion. On the RS: knit up to the wrapped stitch, knit the wrapped stitch with the picked up wrap, K1, wrap and turn. On the WS: Purl. Ending with the WS row, purling across 96 (108) stitches.
RS: K96 (K108), knit the wrapped stitch together with the picked up wrap, K2.
WS: Purl.
Cut the yarn. Place all 99 (111) stitches on scrap yarn.
Work the Front

NOTES: Before working the Front, place the Left Back stitches (the 99 (111) stitches to the right of the right stitch holder if RS facing) on either scrap yarn or your 16 inch circular needles. For the Front section, you will be working the 96 (108) stitches between the two stitch holders.
With the wrong side facing, join yarn and purl.
RS: Knit across.
Continue working in stockinette for 5 more rows, ending with a WS row.
Neck Shaping: the Front Right Side
RS: K45 (K51), bind off 6 stitches, knit to end. (90, 102 stitches)
Place the first 45 (51) stitches you knit on to scrap yarn or add them to the Left Back stitches on the 16 inch circular needle. (45, 51 stitches remain for Front Right Side)
WS: Purl across row until you reach bound off stitches.
RS: Bind off 4 stitches, knit to end. (41, 47 stitches)
WS: Purl.
Repeat previous two rows two more times. (33, 39 stitches)
RS: Bind off 1 stitch, knit to end. (32, 38 stitches)
WS: Purl.
Repeat previous two rows five more times. (27, 33 stitches)
Work in stockinette until the right edge of the Front matches the length of the Right Back, ending on a WS row.
RS: K27 (K33), place marker, then knit across the 99 (111) stitches of the Right Back stitches. (126, 144 stitches)
Cut yarn.
Neck Shaping: the Front Left Side
Note: You will now be shaping the Front Left Side of the neck, working 45 (51) stitches you previousl placed on hold. (If you haven’t already, you can place the Left Back stitches on to scrap yarn, or if they don’t bother you, you can work the Front stitches with the Left Back stitches on the needle.)
With RS facing, join yarn and knit knit until you reach the previously bound off stitches.
WS: Bind off 4 stitches purlwise, purl to end. (41, 47 stitches)
RS: Knit.
Repeat previous two rows two more times. (33, 39 stitches)
WS: Bind off 1 stitch purlwise, purl to end. (32, 38 stitches)
RS: Knit.
Repeat previous two rows five more times. (27, 33 stitches)
Work in stockinette until the right edge of the Front matches the length of the Right Back, ending on a wrong side row.
Cut yarn.
Either place these 27 (33) stitches on scrap yarn, or keep them on the needle, being careful not to confuse them with the Left Back stitches you are about to work.
Work the Left Back

NOTE: You will now be working the 99 (111) stitches of the Left Back of the sweater.
With wrong side facing, joing new yarn.
WS: Purl to the wrapped stitch, purl the wrapped stitch together with the picked up wrap, P1, wrap and turn.
RS: Knit.
WS: Purl to the wrapped stitch, purl the wrapped stitch together with the picked up wrap, P1, wrap and turn.
RS: Knit.
Continue in this fashion. On the WS: purl up to the wrapped stitch, purl the wrapped stitch with the picked up wrap, P1, wrap and turn. On the WS: knit across. Ending with the RS row, knitting across 96 (108) stitches.
WS: P96 (108), pick up wrap and purl together with wrapped stitch, P2.
RS: K99 (111), place marker, then knit across the 27 (33) stitches of Front Left Side. (126, 144 stitches)
Do not cut yarn. Keep this ball attached, you will use it to pick up stitches for the neck line later.
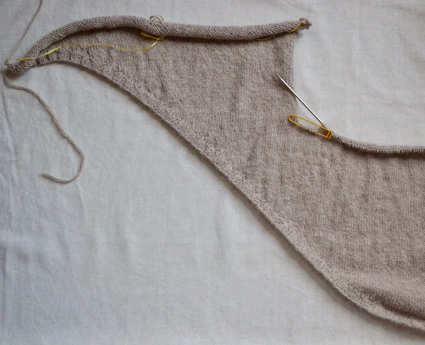
Fold the Sweater
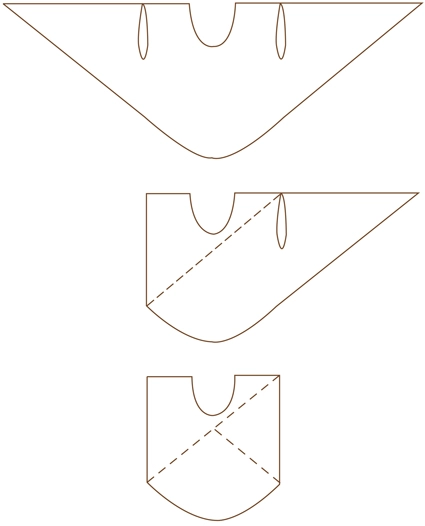
Place the 27 (33) stitches from the Front Left on a double pointed needle, removing the marker.
Place the 27 (33) stitches from the Front Right on a second double pointed needle, removing the marker.
Fold the Right Back behind the Front so that the edge aligns with the end stitches on the double pointed needle.
Fold the Left Back behind the Right Back, aligning their top and side edges.

Attach the Right and Left Backs
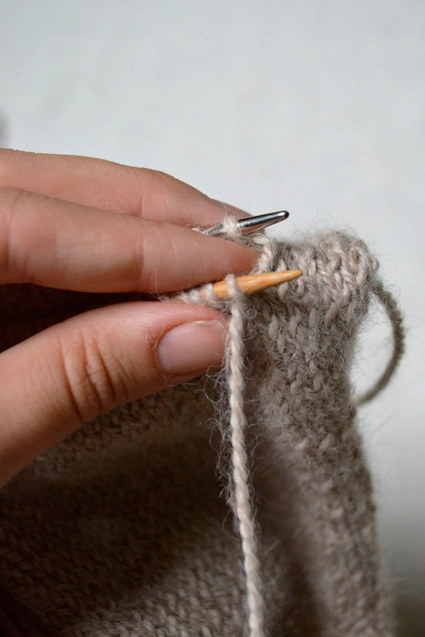
Holding the two circular needles parallel, with the wrong side facing, join yarn and purl across both needles at once. Here’s how…

With yarn in front, use the longer circular and insert the needle purlwise into the first stitch on the back needle and then into the first stitch on the front needle. Purl the stitches together, pulling the needle back through both the front and back stitches.
The folded back sides of the sweater are now attached along their top edge. There are 99 (111) stitches on the longer circular needle.
Cut yarn leaving a 20 inch tail.
Lay the sweater flat, front side facing.
Attach the Front and Back
First attach the Front Left Side and Left Back. Hold the double pointed needle and circular needle parallel. With a threaded tapestry needle, use the Kitchener Stitch to graft the front to the back.
Next, flip your work so the back of the sweater is facing. Hold the circular needle parallel with the double pointed needle. With a tapestry needle threaded with the 20 inch tail you left, once again, use the Kitchener Stitch to graft the back to the front.
Transfer the remaining 45 stitches to your 16 inch circular needle.
Pick up for the Neck
With attached ball of yarn and circular needle that is holding the 45 back of neck stitches, pick up 99 stitches evenly around the Neck. (144 stitches)
Place a stitch marker and working in the round, work in 2 x 2 rib for 4 rounds.
Bind off in 2 x 2 rib pattern.
Cut yarn.
Pick up for the Armholes
With the 16 inch circular needle, join new yarn and knit the 6 stitches from the underarm stitch holder. Then pick up 86 stitches evenly around the Armhold. (92 stitches)
Place a stitch marker and working in the round, work in 2 x 2 rib for 4 rounds.
Bind off in 2 x 2 rib pattern.
Repeat for second Armhole.
Weave in your ends. Block gently. You are finished!!!


I have read all of these posts, but my problem is that I think this is going to turn out too long. I have measured the length at 21 inches and I believe I will have to keep knitting another 22 rows to achieve the goal of 214 stitches. I have measured the stitches and all appears accurate. Should I just start over? I love this pattern so much that I have purchased three different yarns to make 3 different sweaters. Thanks Nadia
Hi Nadia,
Hummm, you are the first one to have that issue with this pattern. How interesting. I have to ask… you're gauge is right? This pattern is based on stitch counts for it's construction. If you are on gauge, even if you rip it out and start over, I feel you will run into the same problem, unless you begin your short rows farter from center (that initial K171 (K189) and then P36 which is 18 stitches the past center of the front).
Let me know if you decide to rip it out and start over, we can figure out a different place for you to start doing your short rows.
Laura
I did rip it out, and I will try it ONE MORE TIME, if it happens again, I will contact you, this was my first try at short rowing and I did measure the gauge and it was correct. I am determined to make this sweater, and thanks for answering my letter.
PS I used a Knit Picks yarn, sport weight 6 stitches=1 inch but of course the needle size was larger, could this be the issue?
Hi Nadia,
I think you found the culprit. That larger needle is probably effecting the row gauge.
Laura
Hi,
I have started on this project and am up to separating for armholes section. Do I have to cut the yarn to keep knitting the next section?
Thank you,
Sarah
Hi Sarah,
No, you do not need to cut the yarn at this point.
Laura
I am hoping to make this sweater longer as well, maybe a couple inches… I see some additional comments/answers regarding this but they all involve more short rows which would make the dip a little more dramatic. I really like the gentle curve and I am maybe a third of the way through the short rows, is there any other way to make it longer? Is it possible to intersperse some rows of knitting all stitches and purling all stitches or would that really bugger things up?
Megan.
Hi. Yes, there is still a way to lengthen the piece.
After you pick up the wrapped stitch, you're instructed to work one stitch and then wrap and turn. If you do not work that one stitch, but rather wrap and turn immediately after picking up your wrapped stitch, you will be adding one extra row. Do this enough times and you'll have extra inches. This will change the smooth slope of the edge, but it is a way to get some length into your piece at the point you are at now. I would definitely do this before the armholes, or it may get very confusing keeping track of the armhole height, etc.
Let me know if you have any questions.
Laura
Hi Laura – thanks so much. Can you provide me with a row gauge on this sweater to help me guesstimate how many rows to add?
Thanks.
Hi Megan.
When I was stitching this sweater the row gauge was approximately 7 1/4 rows = 1 inch. The sweater is now on display at the shop in SoHo so I asked the girls there to double check for me. They came back with 7 1/2 rows = 1 inch. Alpaca is beautiful and heavy fiber. The sweater will bloom and stretch a bit lengthwise over time. Hope this helps.
-Laura
Hi,
I got to this part and I am a bit confused:
SEPARATE FOR ARMHOLES
RS: K42 (K54), place last 6 stitches on a holder, K102 (K114) place last 6 stitches on a holder, K36 (K48), knit the wrapped stitch together with the picked up wrap, K1, wrap and turn. (99, 111 stitches for Right Back. 6 stitches for each Underarm. 96, 108 stitches for Front. 99, 111 stitches for Left Back. This count includes all of the stitches on your needles, not just the stitches you have just worked. This count adds up to your Cast On number.)
My issue is that I am making the medium/large and with those numbers after I place the second stitch holder there are only 36 stitches till the turn not 48. Is this a mistake? I counted my stitches 3 times and all the other numbers seem fine. Any help would be great.
Hello Daniella.
When you knit 54, did you put the PREVIOUS 6 stitches on a holder? or NEXT 6?
When you knit 114, did you put the PREVIOUS 6 stitches on a holder? or NEXT 6?
I think this might account for the missing stitches.
Laura
I put the next 6 not the last. Should it be the last?
Hi Daniella…
Yes, it should be the last or "previous" 6.
Laura
Hello thanks for the pattern i am trying to make it right now and i got the idea that it would look so good with long sleeves. If i am going to do this Will i still have to close of the mask for the arms and then knit a sleeve and attach it by sewing it on?
Hi Andrea.
Sleeves are a great idea!
Where it says PICK UP FOR THE ARMHOLES, pick up as instructed and then work the sleeve top down (from shoulder to wrist).
I know a few people have done this before and have posted their projects on Ravelry (a knitting website).
http://www.ravelry.com/projects/pilarination/short-row-sweater
http://www.ravelry.com/projects/millamelli/short-row-sweater
Let me know if you have any questions along the way. I haven't done it myself, but am here if you need. Thanks for writing in.
Laura
Hi! I have some questions on the Laura's Loop Short Row Sweater. I'd like to make it a little longer and I'm not sure where best to continue with same size rows in the pattern. I'd also like longer sleeves and I'm not entirely sure the best route for these as well. Any advice you could provide would be greatly appreciated. I'm looking forward to working on this beautiful sweater.
Hello Maude.
To lengthen the piece, you can wrap and turn each stitch rather than knitting (or purling if on the ws) a stitch between each wrapped stitch.
As for lengthening the sleeves… Where it says PICK UP FOR THE ARMHOLES, pick up as instructed and then work the sleeve top down (from shoulder to wrist).
I know a few people have done this before and have posted their projects on Ravelry (a knitting website).
http://www.ravelry.com/projects/pilarination/short-row-sweater
http://www.ravelry.com/projects/millamelli/short-row-sweater
Let me know if you have any questions along the way. I haven't done it myself, but am here if you need. Thanks for writing in.
Laura
My apologies If someone has asked this question but in the beginning stages of the pattern where the wrap and turns start, it says RS: K36, knit the wrapped stitch together with the picked up wrap, K1, wrap and turn. Once I knit the 36, am I to knit the wrap stitch together and THEN K1?
Thanks so much for the help!
Hi Tunesia.
YES. You are correct. Knit the 36, then knit the wrapped stitch together with its wrap and then knit one and then wrap and turn.
Please let us know if you have any other questions!
Laura
I'm considering knitting this with Tosh Merino but I'm concerned a worsted weight will be too bulky. Has anyone knitted this with a heavier yarn?
Hi Shannon.
I knit one for myself in Alchemy's Mysterioso (sadly, we no longer sell it). Its'a worsted weight to aran weight yarn. I love how the sweater came out. It drapes beautifully and has a lovely halo. It is almost 70% silk though and that may attribute to how it falls and it never feeling bulky. I think it could be great in Tosh Merino. Maybe you could knit it with a larger needle than you normally would?
Let us know how it goes!
Laura
I have 430 yards of really lovely worsted weight that might be good, but I would have to cut down on the stitch count a little. Did you modify the pattern at all for the heavier yarn?
Hi Marie.
Thanks for writing in and for your interest in the pattern. Unfortunately, I have not modified the pattern for a heavier yarn! I will keep your request in mind though!
Thanks again for writing in.
Laura
HELP! I am at the part of the pattern that requires the kitchener stitch, but I am having problems because the working yarn is on the front needle instead of the back needle (working yarn from purling two back pieces together). What do I do?
Help! I'm at the "attaching the right and left backs" and have no clue on how to go about this. I don't have two circular needles on the garment. I have 1 circular, holding the left back (99) stitches, 2 double pointed needles holding the two front parts (each with 27 stitches), and the right back side on scrap yarn. What am I supposed to knit together? Thanks for any and all your help!
Hi Jennifer.
Attaching the Right and Left Backs is definitely possible to do with one circular needle and 2 double pointed needles.
Place the front stitches on hold on scrap yarn.
Place the Right Back on the double pointed needles.
Fold the garment as instructed above in the pattern. Hold the circular needle and first double pointed parallel to one another, both in your left hand. Then use the end left end of your circular needle to work across the stitches on both the circular and double pointed needle at the same time, as instructed above.
Please let me know if you need any more clarification. I hope you've enjoyed the pattern so far. We're here for any questions you have!
Laura
Megan!
Do not fret… just skip step 1 from this photo tutorial and then continue on as you normally would. https://www.purlsoho.com/create/knitting-tutorials-finishing/2008/1/23/kitchener-stitch.html
Please let us know if you have any other questions! Thanks for writing in. Laura
Hi Laura,
SOS! I'm hoping you can help me through this. I'm knitting the XS/S. Unfortunately I didn't read through all the comments before starting and after the first row I had to tink in order to get the ribbing correct. I decided on a K1, P1.
I'm at the point where I'm ready to frog the entire project, but want to give it one last shot. I can't figure out the last step of the Begin section. I am not coming up with P178, purl the wrapped stitch… not matter what I do. I saw where Kelli Ann mentioned it was P180. That would work, but then the next step for the Separate for Armholes doesn't work out right.
I need help. Can you please explain how the Begin section ends and then how the Separate for Armholes should work. I would love to finish this, but am really ready to give and try something else.
Thanks,
Kim
Hi Kim.
Let's try and get you back on track.
I'm not sure if you read my response to Kelli Ann's comments… but, at the end of BEGIN, you do in fact: P178 (P214), purl the wrapped stitch together with the picked up wrap, P1, wrap and turn.
The next row, you will cumulatively knit 180 stitches, separating for armholes as you go, before knitting the wrapped stitch together with the wrap… It seems you must have gotten off by a couple stitches along the way. You want to be sure you are working across 180 stitches when you separate for armholes, working 39 for one back, 6 for the first armhole, 96 for the front, 6 for the second armhole and 39 for the other back.
If you have 180 on the purl side… you can divide the fronts and backs on that side… just follow that line fist line of pattern but purl rather than knit:
P42, place last 6 stitches on a holder, p102 place last 6 stitches on a holder, p36, purl the wrapped stitch together with the picked up wrap, p1, wrap and turn.
Of course then your working yarn will be attached to the LEFT BACK rather than the RIGHT BACK, so you might as well shape that side first, continuing the short row shaping.
Does his help!?! Please let me know if you have any other questions.
Laura
Thanks Laura! I think I'm back on track. I think I've made it past this problem. I finally decided to figure out if I had the right number of stitches to do the next section and that helped me get to the next step.
Now I'm trying to figure out how to knit the 27 stitches 99 stitches together. I'm hoping I can find a few helpful hints in the comments. Any advice you can give me on this section would be greatly appreciated.
Thanks again for your help! I'm able to move forward.
Kim
Wonderful Kim! Glad you're on track.
Kim, could you explain where you are? I'd love to help get you through the next portion of the pattern, but I want to be sure I understand where you are first.
After you work across the stitches of both backs simultaneously, grafting the backs together, you will use kitchener stitch to graft the shoulder stitches to one another. The back of the neck stitches will remain 'live' (not bound off) on the needle between the two grafted shoulders. Then you'll pick up for the neck…
For a kitchener photo tutorial: https://www.purlsoho.com/create/knitting-tutorials-finishing/2008/1/23/kitchener-stitch.html
For a kitchener video tutorial: https://www.purlsoho.com/create/knitting-tutorials-finishing/2013/11/11/kitchener-stitch-video.html
Write me back!
Laura
Hi Laura,
I'm now at the left back.
"Continue in this fashion. On the WS: purl up to the wrapped stitch, purl the wrapped stitch with the picked up wrap, P1, wrap and turn. On the WS: knit across. Ending with the RS row, knitting across 96 stitches."
I was actually going to say my armhole is lined up with the 27 stitches as far as the length and yet I wasn't at 96 stitches.
In typing the instructions I think I just found my error. I don't think I was doing the P1 after I picked up the wrapped stitch. Darn…my error. Time to TNIK.
Now my issue is figuring how much I need to TINK. Off to TINK…
Will let you know when I get to the next step.
Happy 4th!
Thanks,
Kim
The pattern says to "Continue in this pattern, working up to the wrapped stitch, working the wrapped stitch with the wrap picked up, working one more stitch, wrapping and turning. Ending with a RS row" how long do you continue in that pattern?
Hi Anna…
Thanks for writing in.
So you'll work, wrapping and turning, until you K176 (K212) and then you'll go to the next line of instructions:
WS: P178 (P214), purl the wrapped stitch together with the picked up wrap, P1, wrap and turn.
Is that clear? Please let me know if you have any questions!
Laura
Hi! I really want to make this sweater but i am currently a size xl to xxl, how man stitches/ what would i have to do to make this sweater in my size?
Hi Katrina,
Thank you so very much for your interest in this pattern.
Unfortunately, at this moment we do not have this pattern sized for xl or xxl.
Have you seen the Tulip Tank Top? It has a broader range of sizes and a similar effect.
https://www.purlsoho.com/create/2014/06/27/lauras-loop-tulip-tank-top/
Thanks again.
Best,
Laura
I am getting so many compliments on this sweater and it’s not even finished. Thank you for such an elegant design, for your generosity to make it free and for making me look smart when people try to figure out the construction. Best regards
Hi!
I am quite lost when it comes to attaching the right and left backs. Once I purl the stitches from both needles together, do I purl only that stitch or am I purling across that row?
Also, when I attach the front left side and left back, am I working that from the RS or WS?
Thank you as always for your help,
Tunesia
Hi Tunesia.
To attach the backs, you’ll be working with the wrong side facing you and you will need to purl across both needles at one time, all the way across the row.
Hope this helps!
Let me know if you have any questions.
Laura
Hi Laura,
I love this pattern so much 🙂
Do you think that it would be possible to knit it with a summer-cotton yarn or would it be to rigid?
I´ve alredy had problems trying to adapt the recommended yarn with one of my own criteria…
Thank you very much,
Marta
Hi Marta.
I’m so glad you like the pattern so much!
I think you could definitely do this in a summer-cotton yarn. Cotton is a heavier fiber so it’ll drape a bit more. Have you looked at Cascade’s cotton yarn Ultra Pima (https://www.purlsoho.com/purl/products/item/7117-Cascade-Yarns-Ultra-Pima). It’ has a beautiful drape and softness to it. I don’t think it would be too ridged at all. I know some people have worked this up in Alchemy’s Silken Straw (https://www.purlsoho.com/purl/products/item/1408-Alchemy-Silken-Straw). It’s a very different look, but fantastic for spring and summer.
Let me know if you have any questions as you look into yarn substitutions. We’re here to help!
Laura
Le pull est super sympa, est ce que vous vendez les explications en français , si oui je suis preneuse. merci
Hi Cecile-
I’m afraid none of us speak French well enough to translate patterns! I’m so sorry we can’t be of more help!
Best-
Molly
Hi Laura,
I’m a bit confused after reading through the comments and only seeing folks have issues with the beginning ribbing for the M/L size. Even for the small with 306 stitches, the 2×2 rib isn’t working out for me. Am I missing something? Thanks!
Marissa
Hi Marissa.
Thank you so much for writing in!!! I have edited that first little section of the pattern. Please let me know if you have any questions.
Best,
Laura
Help! I am almost finished with the begin section and I just now realized that I was not supposed to join in the round at the very beginning! 🙁 Is there any way I can fix this without taking it all apart?!
Hi Laura,
Thanks for writing in.
Sadly, I do not know how you could fix this without taking it all apart. I’m so sorry.
Please let u know if you have any questions!
Laura
I don’t know if you are still checking this comment thread, but I am having a terrible time with the gauge. I am using a 50g merino silk blend, how many stitches and how many rows in my gauge? (ps I’ve tried size 5 and size 6 needles) I just don’t think I am doing this properly.
Hi Libby.
Yes! We will always be checking this comment thread. I’m so glad you wrote in. Let’s see if we can figure out this gauge issue. Are you having a hard time measuring your swatch? Or are you struggling to find the appropriate needle and yarn combination to get the same gauge as I got?
I used a sport weight yarn and a size US 5 needle to get a fabric with 6 stitches per inch.
Have you seen our tutorials on Gauge and Tension?
https://www.purlsoho.com/create/2006/08/29/swatching-for-gauge/
https://www.purlsoho.com/create/2006/12/06/tension-a-not-too-tight-tutorial/
I hope you write us back.
I would love to get you on your way with this project.
Thanks,
Laura
Hi. This pattern is beautiful! I’m wondering if it would be a good idea to use your worsted twist heather yarn though? Would the pattern need any adjustment?
Thanks,
C.
Hello C!
The pattern would need quite a bit of adjustment since the original yarn is a sport weight and therefore significantly thinner than Worsted Twist. If you wanted to substitute for a Purl Soho exclusive yarn, try using the Mulberry Merino found here: https://www.purlsoho.com/mulberry-merino.html
Best of luck! -Alyson
Hello! Sorry for the super simple question, but just want to clarify: Does the line below from the ‘begin’ section mean to continue the short rows until all 306 of the original stitches have been picked up? Thanks 🙂
Continue in this pattern, working up to the wrapped stitch, working the wrapped stitch with the wrap picked up, working one more stitch, wrapping and turning. Ending with a RS row. –
Hi, Hanalae!
Thank you for writing in! Sorry about the delayed response! So, for this section you’ll work, wrapping and turning, until you K176 (K212) and then you’ll go to the next line of instructions:
WS: P178 (P214), purl the wrapped stitch together with the picked up wrap, P1, wrap and turn.
Please let us know if you have further questions!
Best wishes,
Kumeko
Hello!
I’ve had my fun with scarves and I would love to progress on to a jumper and I love this one. But when I try and get the link to the short row tutorial it says the page isn’t available and I can’t find it.
I understand the concept of how it works but its just the wrap that’s confusing me. Would anyone be able to direct me to the right page so I can make this?
Thanks!
Hello Becca,
Thanks for writing us and for catching that glitch. I have fixed the hyperlink and it should be working now. For your convenience, here is a link to the short row tutorial pasted below:
https://www.purlsoho.com/create/2008/06/18/short-rows/
Happy knitting!
Best,
Adam
Thank you!
hello! do you have any tips for picking up stitches along the neckline and armholes? i’m at the stage where i’m picking up for the neck, but am picking up more than double the stated number or 99. should i be picking up every other or every third stitch?
Hello Hana,
Thanks for writing us! You should have 144 stitches total after picking up the front neck stitches because your back neck stitches are already on the needle. Be sure to be very consistent regarding where and how you pick up your stitches. Let us know if you still have too many stitches after reading this.
Best,
Adam
Help!! I am about to tear it out and restart. I have separated for armholes, but my knitting is not symmetrical! Where did I go wrong?
Hello Chloe,
Thanks for writing in! Sorry you are having trouble with this! There could be a few things that went wrong during the process of knitting this sweater. You could have cast on the wrong number but done the short row correctly, which wold have offset the dip in the sweater at center front. Also, you could have miscounted the amount to knit for the first short row and this could have also offset your stitch count on either side. How uneven is the knitting? if it’s by a couple stitches, I don’t think this should be a problem.
-Adam
I really want to make this from my homespun but can’t find the yardage to know if I have enough. Please help! Thank you in advance.
LJ
Hi LJ,
Thanks for writing in! Calculating yardage on a homespun yarn without a label is tough. I suggest cutting a piece of cardboard a half of a yard wide and wrapping the yarn around and around. You can either keep count or wrap the yarn in an organized manner so you can count later. The reason you will cut a half of a yard piece of cardboard is that you wrap around the front and back of it. I hope this solves it!
-Adam
Thank you Adam, I know the yardage of the yarn I spun (sorry for phrasing my inquiry in such a misleading way) What I meant to ask is how much yardage do I need for this project? I know the homespun I have is the right weight. Thank you!!
Hi LJ,
Sorry about the misunderstanding! You’ll need roughly 550 or 660 yards depending on the size you make. I hope you’ll enjoy knitting this project!
-Adam
Perfect!! Thank you so very much!
I would love to adapt this for my daughter. Any suggestions for making a smaller size
Hi Rowan,
I think this would look great in a smaller size! I don’t know your daughter’s size, but I can offer some suggestions. Firstly, you’ll want to do a gauge swatch to determine your stitches per inch. The total cast on for this sweater is about 50% more than the chest circumference because of the overlap. When doing the short rows, you can keep 36 stitches in the center of the work and short row however many until you reach the end. The rest of the body just needs to be divided evenly (i.e. the neckline). I hope this helps you get off on the right foot!
Happy knitting!
Adam
When I’m doing the short rows before the arm holes do I pick up all the stitches and then put the armhole stitches on holders? Or do I just do 214 stitches for the m/l? I’m very confused.
Hi Hannah,
Thank you for writing us! I am not sure I understand your question. You only purl 214 stitches for the last row on the wrong side. After your wrap and turn from that row you will knit across, reserving stitches on holders for each armhole as you go. Once you get to the wrap on the knit side you will wrap and turn and work only between the armhole and end of your work. I hope this answers your question! Let me know if you are still confused!
-Adam