Short Row Sweater
As a young child, I remember my wonderfully elegant grandmother wearing her cardigans backwards with the first couple of buttons undone, creating a soft V dipping down from her shoulders. As an adult I turn to her back-revealing style still, as I love wearing her summer frocks from the 50s with cutouts that reveal the small of my back.
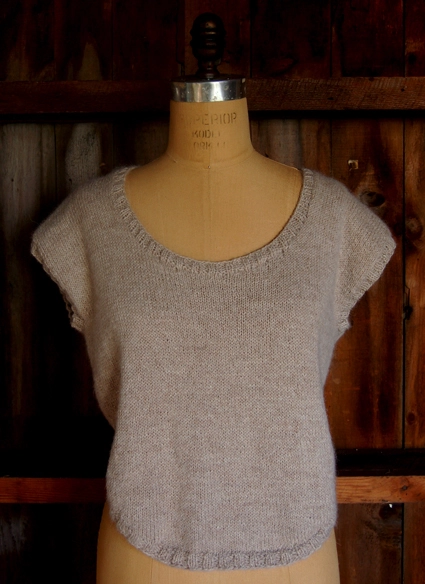
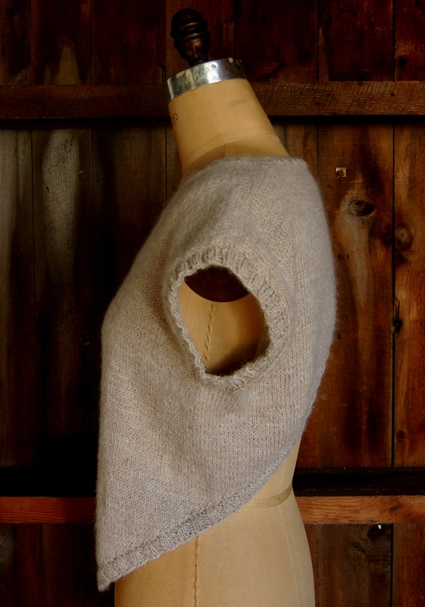
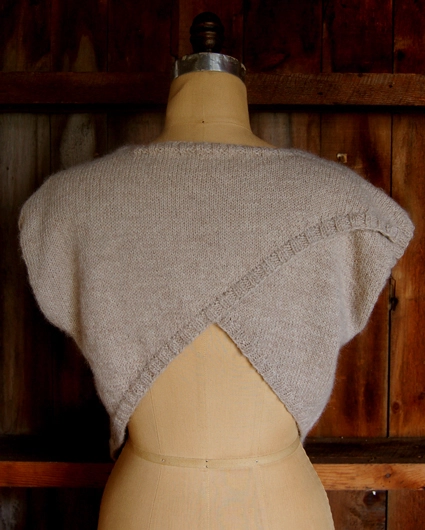
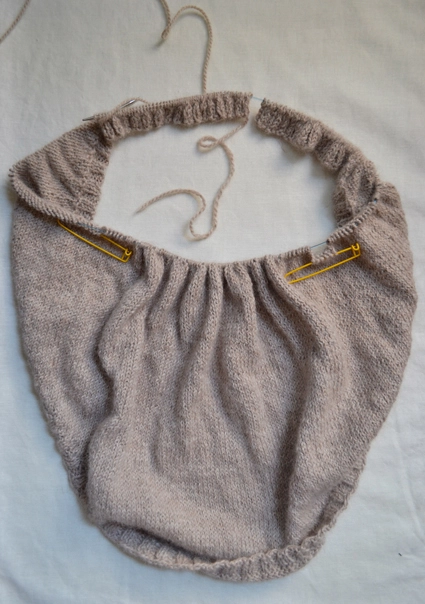
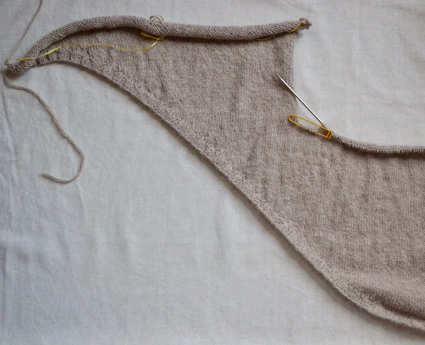
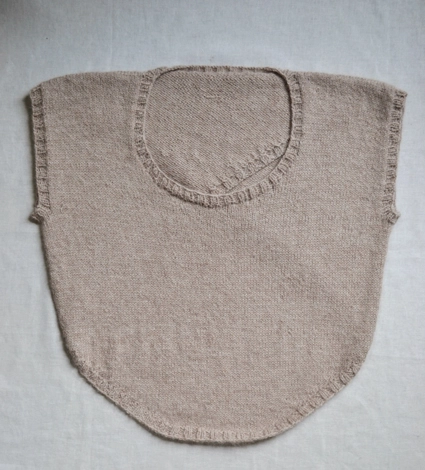
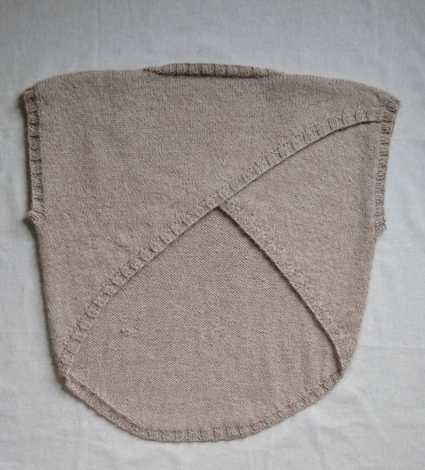
The Short Row Sweater is my autumn ode to the grace and distinction of a bit of bare back. Knit in one piece, this wrap of a sweater is a half moon shape, folded around to create a sweeping crisscross in the back. I used the superlatively soft Blue Sky Sport Weight Alpaca for its draping ease and classic simplicity.
I have thrown on this sweater with jeans and flats for some of my last outdoor brunches of the season. At night, I’ve worn a silk camisole underneath it. And I know that in just a few more short weeks, I’ll be pairing it with a long sleeve nautically striped tee. Even layered, the crossed back adds just the right amount of feminine frolic to my step! -Laura
Designed by Purl Soho designer, Laura Ferguson.
Share your progress and connect with the community by tagging your pics with #PurlSoho, #PurlSohoBusyHands, and #PurlSohoShortRowSweater. We can’t wait to see what you make!
Materials
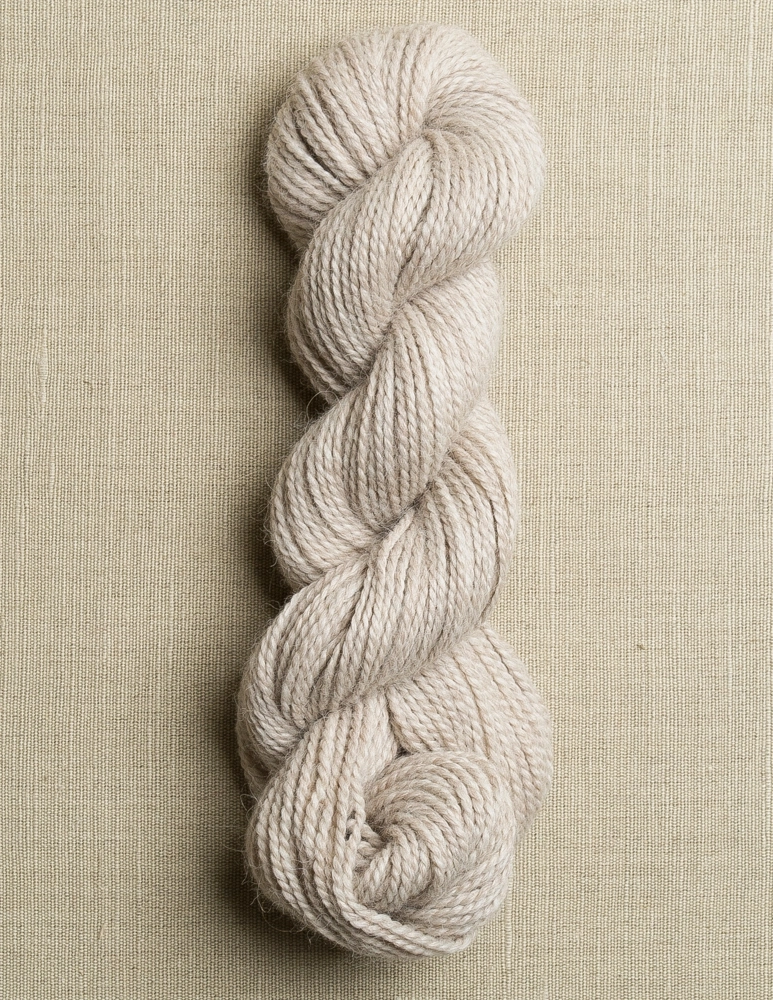
- 5 (6) skeins of Blue Sky Alpaca’s Sport Weight (100% Baby Alpaca). I used color Natural Taupe #505, a Sport Weight Solid, but the Sport Weight Melanges would work beautifully too! (Update: We no longer carry Blue Sky Alpaca’s Sport Weight but think our Season Alpaca would make a lovely substitution! For this pattern you’ll need 3 (4) skeins for the appropriate yardage and please remember to check your gauge!)
- A US 5 (3.75 mm), 24 inch or 32-inch circular needle
- A US 5 16-inch circular needle
- 1 set of US 5, double pointed needles
- 2 Stitch Holders
- 2 markers
- Scrap Yarn
Gauge
6 stitches = 1 inch in stockinette stitch
Sizes
Sizes: XSmall/Small (Medium/Large)
- Finished Chest Circumference: 34 (38) inches
- Length from Center Front Hem to Back Neck: 19½ (22) inches
Notes
You will work a large portion of this piece in short rows. You work back and forth, turning the work part way through each row instead of continuing to the end of the needle. For a great Short Row Tutorial, click here!
Pattern
Begin
With the longer circular needle, cast on 306 (342) stitches. We used a basic Long Tail Cast On.
Row 1 (RS): *K2, P2, repeat from * to last 2 stitches, k2.
Row 2 (WS): *P2, k2, repeat from * to last 2 stitches, p2.
Repeat Rows 1 and 2 until piece measure 3/4-inches from cast on edge.
Right Side (RS): K171 (K189), wrap and turn.
Wrong Side (WS): P36, wrap and turn.
RS: K36, knit the wrapped stitch together with the picked up wrap, K1, wrap and turn.
WS: P38, purl the wrapped stitch together with the picked up wrap, P1, wrap and turn.
RS: K40, knit the wrapped stitch together with the picked up wrap, K1, wrap and turn.
WS: P42, purl the wrapped stitch together with the picked up wrap, P1, wrap and turn.
Continue in this pattern, working up to the wrapped stitch, working the wrapped stitch with the wrap picked up, working one more stitch, wrapping and turning. Ending with a RS row.
WS: P178 (P214), purl the wrapped stitch together with the picked up wrap, P1, wrap and turn.
Separate for Armholes
RS: K42 (K54), place last 6 stitches on a holder, K102 (K114) place last 6 stitches on a holder, K36 (K48), knit the wrapped stitch together with the picked up wrap, K1, wrap and turn. (99, 111 stitches for Right Back. 6 stitches for each Underarm. 96, 108 stitches for Front. 99, 111 stitches for Left Back. This count includes all of the stitches on your needles, not just the stitches you have just worked. This count adds up to your Cast On number.)
Work the Right Back
NOTE: The Right Back is worked over just the next 99 (111) stitches with the row ending at the stitch holder.
WS: Purl across until you reach the stitch holder, turn your work.
RS: Knit to the wrapped stitch, knit the wrapped stitch together with the picked up wrap, K1, wrap and turn.
WS: Purl.
RS: Knit to the wrapped stitch, knit the wrapped stitch together with the picked up wrap, K1, wrap and turn.
Continue in this fashion. On the RS: knit up to the wrapped stitch, knit the wrapped stitch with the picked up wrap, K1, wrap and turn. On the WS: Purl. Ending with the WS row, purling across 96 (108) stitches.
RS: K96 (K108), knit the wrapped stitch together with the picked up wrap, K2.
WS: Purl.
Cut the yarn. Place all 99 (111) stitches on scrap yarn.
Work the Front

NOTES: Before working the Front, place the Left Back stitches (the 99 (111) stitches to the right of the right stitch holder if RS facing) on either scrap yarn or your 16 inch circular needles. For the Front section, you will be working the 96 (108) stitches between the two stitch holders.
With the wrong side facing, join yarn and purl.
RS: Knit across.
Continue working in stockinette for 5 more rows, ending with a WS row.
Neck Shaping: the Front Right Side
RS: K45 (K51), bind off 6 stitches, knit to end. (90, 102 stitches)
Place the first 45 (51) stitches you knit on to scrap yarn or add them to the Left Back stitches on the 16 inch circular needle. (45, 51 stitches remain for Front Right Side)
WS: Purl across row until you reach bound off stitches.
RS: Bind off 4 stitches, knit to end. (41, 47 stitches)
WS: Purl.
Repeat previous two rows two more times. (33, 39 stitches)
RS: Bind off 1 stitch, knit to end. (32, 38 stitches)
WS: Purl.
Repeat previous two rows five more times. (27, 33 stitches)
Work in stockinette until the right edge of the Front matches the length of the Right Back, ending on a WS row.
RS: K27 (K33), place marker, then knit across the 99 (111) stitches of the Right Back stitches. (126, 144 stitches)
Cut yarn.
Neck Shaping: the Front Left Side
Note: You will now be shaping the Front Left Side of the neck, working 45 (51) stitches you previousl placed on hold. (If you haven’t already, you can place the Left Back stitches on to scrap yarn, or if they don’t bother you, you can work the Front stitches with the Left Back stitches on the needle.)
With RS facing, join yarn and knit knit until you reach the previously bound off stitches.
WS: Bind off 4 stitches purlwise, purl to end. (41, 47 stitches)
RS: Knit.
Repeat previous two rows two more times. (33, 39 stitches)
WS: Bind off 1 stitch purlwise, purl to end. (32, 38 stitches)
RS: Knit.
Repeat previous two rows five more times. (27, 33 stitches)
Work in stockinette until the right edge of the Front matches the length of the Right Back, ending on a wrong side row.
Cut yarn.
Either place these 27 (33) stitches on scrap yarn, or keep them on the needle, being careful not to confuse them with the Left Back stitches you are about to work.
Work the Left Back

NOTE: You will now be working the 99 (111) stitches of the Left Back of the sweater.
With wrong side facing, joing new yarn.
WS: Purl to the wrapped stitch, purl the wrapped stitch together with the picked up wrap, P1, wrap and turn.
RS: Knit.
WS: Purl to the wrapped stitch, purl the wrapped stitch together with the picked up wrap, P1, wrap and turn.
RS: Knit.
Continue in this fashion. On the WS: purl up to the wrapped stitch, purl the wrapped stitch with the picked up wrap, P1, wrap and turn. On the WS: knit across. Ending with the RS row, knitting across 96 (108) stitches.
WS: P96 (108), pick up wrap and purl together with wrapped stitch, P2.
RS: K99 (111), place marker, then knit across the 27 (33) stitches of Front Left Side. (126, 144 stitches)
Do not cut yarn. Keep this ball attached, you will use it to pick up stitches for the neck line later.
Fold the Sweater
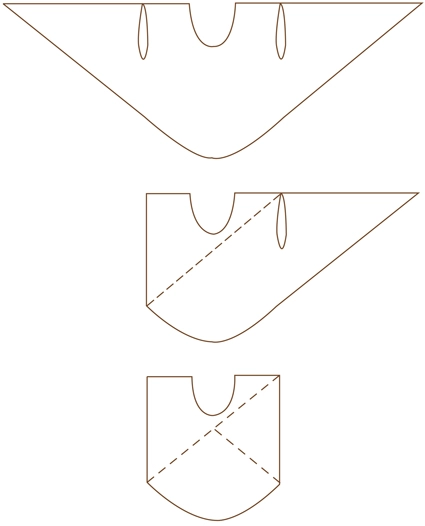
Place the 27 (33) stitches from the Front Left on a double pointed needle, removing the marker.
Place the 27 (33) stitches from the Front Right on a second double pointed needle, removing the marker.
Fold the Right Back behind the Front so that the edge aligns with the end stitches on the double pointed needle.
Fold the Left Back behind the Right Back, aligning their top and side edges.

Attach the Right and Left Backs
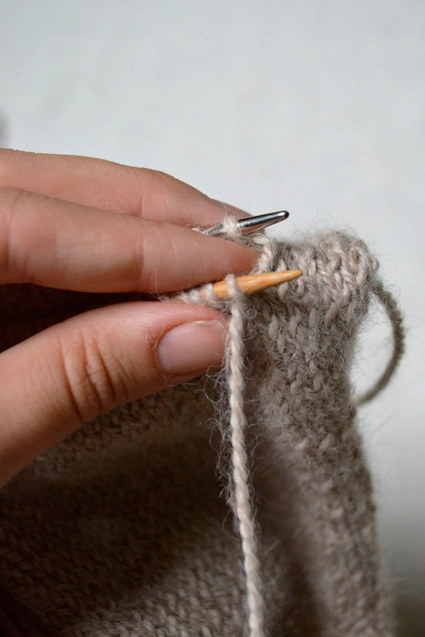
Holding the two circular needles parallel, with the wrong side facing, join yarn and purl across both needles at once. Here’s how…

With yarn in front, use the longer circular and insert the needle purlwise into the first stitch on the back needle and then into the first stitch on the front needle. Purl the stitches together, pulling the needle back through both the front and back stitches.
The folded back sides of the sweater are now attached along their top edge. There are 99 (111) stitches on the longer circular needle.
Cut yarn leaving a 20 inch tail.
Lay the sweater flat, front side facing.
Attach the Front and Back
First attach the Front Left Side and Left Back. Hold the double pointed needle and circular needle parallel. With a threaded tapestry needle, use the Kitchener Stitch to graft the front to the back.
Next, flip your work so the back of the sweater is facing. Hold the circular needle parallel with the double pointed needle. With a tapestry needle threaded with the 20 inch tail you left, once again, use the Kitchener Stitch to graft the back to the front.
Transfer the remaining 45 stitches to your 16 inch circular needle.
Pick up for the Neck
With attached ball of yarn and circular needle that is holding the 45 back of neck stitches, pick up 99 stitches evenly around the Neck. (144 stitches)
Place a stitch marker and working in the round, work in 2 x 2 rib for 4 rounds.
Bind off in 2 x 2 rib pattern.
Cut yarn.
Pick up for the Armholes
With the 16 inch circular needle, join new yarn and knit the 6 stitches from the underarm stitch holder. Then pick up 86 stitches evenly around the Armhold. (92 stitches)
Place a stitch marker and working in the round, work in 2 x 2 rib for 4 rounds.
Bind off in 2 x 2 rib pattern.
Repeat for second Armhole.
Weave in your ends. Block gently. You are finished!!!


I would love to knit this with long sleeves and longer in general. Any plans for creating such a pattern?
Hi Paula,
Long sleeves will look great with this sweater! I will pass it along and maybe it will go into work! In the meantime, I suggest picking up the armhole stitches and knitting down, decreasing evenly until you get to the wrist. Best of luck and let me know if you need any assistance!
-Adam
Hello,
I have just completed the neckline ribbing (the project has been a great adventure for me so far) and wondering if there is a particular bind-off technique that you recommend for this pattern?
Thank you!
Hi Claire,
Thank you for writing us! Glad you’re nearing the end! I suggest a loose pass-over bind off (traditional) or a tubular bind off if you want to be fancy. If you bind off tightly, I would try Elizabeth Zimmerman’s Better Bind Off.
Best of luck,
Adam
Hi, so I have been trying to work on this sweater and I even went to a yarn store to get help and I think they told me the wrong thing. Now I am so screwed up on where I am in the sweater and I have absolutely no idea how to fix it or where I have gone really wrong. How do I get help? I have been working on what is supposed to be the right side but now it appears that I have done something really wrong and I am really frustrated…..
Hi Lindsay,
Thanks for writing in! I am sorry to hear that you are having difficulties. We’d be happy to try to help. Can you describe the issues that you are having and where you are in the pattern. You could also send images to us at store@purlsoho.com and we could take a look at them and see if we can be of service!
Best,
Cassy
Can you guys add a video on how to do this? I am a beginnner/intermediate knitter and have been trying to knit this for the last 6 years and is always stuck at the wrap and turn.
Hello Lily,
Thanks for writing in! We currently do not have a tutorial video for Wrap and turns, but we do have a picture tutorial that I find very helpful.
I hope this helps and let me know if you have any further questions!
-Marilla
Hi! I love the look of this sweater! What’s the fit like it? How much positive ease is included in the measurements? I’d love to knit this sweater, however, I’m concerned about the fit. My chest/bust measurement is 31 inches across the fullest part. How do I make the sweater smaller if I need to? Please and thank you for any insight you can offer.
Toodles,
Ayesha
Hi Ayesha,
Thanks for writing in! The measurements provided are finished chest measurements. If you would like a little ease, you can factor that in when choosing the size. For the smaller size, this would give you 3 inches of positive ease. At present we do not have a modification for making a smaller version. You could try going down a needle size to tighten up the gauge, however, this will shorten the sweater some. Earlier in the comments, Laura did suggest a way to lengthen it that might be helpful if you decide to go this route.
Thanks again for your interest and happy knitting!
Cassy
HI!
Thank you for the wonderful pattern! My knitting guild had a lot of compliments for the sweater when I told them about it and someone looked it up on Ravelry. Question: Have the errors mentioned in earlier posts been corrected, and are they reflected in the pattern I see above?
Thanks again!
Ayesha!
Hi Ayesha,
Thanks for writing in! For our online, free patterns, we update the pattern above to correct any errors that may have been caught. That is to say, that the pattern above has had all errata incorporated and is the most up to date version!
Best,
Cassy
I’m working up the front and I have somehow added 2 stitches. When I count all the stitches on the needles I have 344 instead of 342 (m/l size). There are no visible mistakes so I don’t want to unravel the whole thing. Where is the best place to reduce stitches so I have the correct number when I get to the next stage of the pattern? I was thinking in the row when I separate for the armholes, in the center front between the arms will not be very noticeable (one decrease on each side close to each arm hole). Can you recommend a relatively invisible decrease stitch? I’d appreciate your thoughts.
Hi Alice,
Thanks for writing in! I think that we have all been there at some point. The best place would be at the sides, decreasing one stitch on each side. I would suggest the row before the armholes in the middle of the stitches that will be used for the armholes. This will hide the decreases the best!
I hope that this helps!
Cassy
Hi! I think this is a gorgeous sweater, love how it tucks in at the natural waist. Id like to second Paula’s comment about a winterized long sleeve version if possible 😉 . That said, I’m also interested in making a summer version of this top – kind of a cross between this and the Tulip top. Would changing the yarn make it impossible to create this lovely top?
Hi Grace,
Thanks for writing in! We we will certainly keep your request in mind! You can definitely knit this up in the Euroflax that we used on the Tulip Tank as they knit a similar gauges. As always when replacing yarn, I would suggest knitting a gauge swatch to ensure that you like the fabric and can get gauge!
Best,
Cassy
I’m having trouble right before it says to “separate for armholes”. Am I supposed to do the “wrap and turn” steps till the end when I can’t “wrap and turn” anymore? In the picture it doesn’t look like those steps were repeated all the way through, and there are a lot of stitches left over. It would be amazing if I could get some clarity on that. Maybe how many stitches I should leave when started the armholes? Sorry if it’s obvious and I just don’t get it.
Thank you!
Hi Tessa,
Thanks for writing in! I think that I can help! In the short row section, you will see that at the beginning of each row you will begin by knitting or purling 2 more stitches than you did in the previous row. After the stated rows are complete, you will continue on until you get to a wrong side row that begins with P178 (P214). This will not be until you cannot wrap and turn anymore as there will be some left over stitches on each edge.
I hope that this helps!
Cassy
I am just very confused once I have the sweater folded. What two circular needles are you referring to.? There one back side still on needles, one back side on scrap yarn, and then the two front shoulders on DPNs. Am I connecting the two back pieces together? What am I connecting it with? My ball of yarn is there to make the neck finishing right…or maybe wrong… Thanks for any help you can provide!
Hello Katrina,
Thank you for reaching out! This portion of the pattern is referring to to the stitches that are on a circular needle, as well as the stitches that are currently on scrap yarn. You will be connecting the two back pieces together. If you don’t have a spare circular needle, you can always use two double points instead by doing the following;
Place the front stitches on hold on scrap yarn.
Place the Right Back on the double pointed needles.
Fold the garment as instructed above in the pattern. Hold the circular needle and first double pointed parallel to one another, both in your left hand. Then use the end left end of your circular needle to work across the stitches on both the circular and double pointed needle at the same time, as instructed above.
I hope this helps and let us know if you have any further questions.
Happy knitting!
-Marilla
Thank you. It says “join yarn” before I start to purl through both back pieces. Currently my ball of yarn is attached to a front shoulder. Do I start from there or was I supposed to have a free ball of yarn and I didn’t buy enough?
Hello Katrina,
Great Question! Looking at the pattern I know that it says “Do not cut yarn. Keep this ball attached, you will use it to pick up stitches for the neck line later.”, however if you are on your last ball of yarn I would cut your yarn at this point so that you can use it to attach the back pieces.
I hope this clears things up, and of course let us know if you have any further questions!
Happy knitting,
Marilla
I created this in the ultra pima, but after washing and drying it, it is still too large. I should have made the xs/s size. Can I drop this late in the game and have the yarn be useable? Thanks!
Hello Katrina,
Thank you for reaching out! Though I can’t see/touch your project I’m tempted to say yes. Primarily because cotton tends to be a pretty resilient yarn, plus if you aren’t going to wear it at the size you made I say why not try re-using the yarn!
I hope this helps and happy unraveling!
-Marilla
Thank you. I will give it a go and see how it turns out.
I am at the point where I need to separate the arm holes and I am short 2 stitches. Do I need to frog? Thank you for any advice you can give.
Hi Katrina,
Thanks for writing in! I certainly wouldn’t start over after all that work if you are only off by two stitches! The easiest fix for this will be to increase two stitches in an unobtrusive place – two stitches will not make a significant change to the size of the sweater, but everything in this sweater will be easier to follow if we get your stitch count back on track! I would probably divide the sweater so that you have the correct number of stitches for the front and left back but are short two stitches on the right back. Since the right back gets folded under the left back, you can work two Make Ones anywhere in the last few rows of the right back and they will be completely hidden when the top is assembled.
I hope that helps!
Julianna
I just finished making this shirt in the small size and I guess I didn’t pay too much attention to the 19 1/2 inch length so the shirt is pretty short but fits perfectly everywhere else. Do you think it would be possible to pick up 306 stitches onto the bottom of the 2×2 rib of the shirt to add extra length? Or do you have another idea to add length to the bottom of it.
Hello Jessica,
Thank you for reaching out! The only other Idea I can think of is wet blocking your sweater and pinning it out to add a bit of length. However this will not give you as much control or legnth as picking up and knitting.
I hope this help and let us know how it goes!
Marilla
I’m not sure what this means.
“WS: P42, purl the wrapped stitch together with the picked up wrap, P1, wrap and turn.
Continue in this pattern, working up to the wrapped stitch, working the wrapped stitch with the wrap picked up, working one more stitch, wrapping and turning. Ending with a RS row.”
When you say continue in this pattern ( which is by 2’s) how far am I suppose to go? The next is WS P178. So, if I did my math correctly I’d have to do this short row business (x2) 68 times. Am I understanding that correctly?
Thanks
Hi Sandy,
Thanks for reaching out! It does sound like you have it figured out – this sweater involves quite a few short rows! You will continue working the short rows as set, moving out by two stitches each short row, until your wrong side row is long enough that you Purl 178 stitches before reaching the next wrapped stitch.
I hope that clears things up!
Julianna
Hi. I’m having trouble folding the sweater. I don’t understand how it’s supposed to be folded and then seamed together. Maybe I’m just having a brain fart. Lol. Any help would be appreciated!
Hello Callie,
Thanks for reaching out! This part can be tricky to visualize- I totally get it. Once you have your stitches placed on your double pointed needles lay your garment out on the floor so that the front is down touching the floor. Once you have done this it should be clear that there are basically four sections of lives stitches on needles. You will first fold your Right Back behind the Front so that the edge aligns with the end stitches on the double pointed needle and then fold the Left Back behind the Right Back, aligning their top and side edges. You are now in position to graft your shoulders together!
I hope this helps and let us know if we can clarify anything for you!
-Marilla
Thank you so much for this pattern. I made it for my sister who bought the baby alpaca yarn for a blanket for her grandson. I had some skeins left over, so I found this pattern and made it for her. She absolutely loved it! And, it looked beautiful on her! So, thank you again for the pattern.
I absolutely love this sweater and am dying to make it but I am confused about the yardage! The suggest yarns link isn’t working anymore so I don’t know the amount of yarn I need for the med/large size.
Thanks!
Hi Rachel,
Thanks so much for the kind words and for reaching out! The original yarn had 110 yards per skein, so you will need 550 yards for the extra small/small, or 660 yards for the medium/large.
I hope that helps, and happy knitting!
Julianna
OMG I love this and need it asap! Unfortunately I am not so experienced and will hace to take a very close look to the “wrap” thing cause never done that and I am abosolutely confused, but thanks so much for sharing!
I recently finished this and it didn’t come out right. My version is uneven and short. When looking at it, the left front came out well but the right front is shorter and at an angle. Do you have any guidance on what I can do when I try this again? I want to give this another go so that I can actually wear it. Any advice is very much appreciated!
Hi Sarah,
Thanks for writing in, and I’m so sorry to hear that your sweater didn’t turn out like ours! It’s hard to say what exactly went wrong without seeing your work, but it’s not uncommon to have more trouble seeing wrap and turns on the purl side of knitting, so I would guess that, since the right front is not quite right, you may have worked the wrong side short rows incorrectly. If you think that sounds like it might be the case, I find it very helpful to place a removable stitch marker in each wrapped stitch immediately after working the wrap and turn so you can easily spot it on the next row. If you’re new to short rows, you may also want to consider working a smaller practice project like our Bandana Cowl to really get the hang of things before trying the sweater again!
I hope that helps, and happy knitting!
Julianna
Hi, I really love this pattern and keen to give it a go. Would it be feasible to change the neckline from scoop to v-neck? If so, any suggestions on how to alter the pattern to incorporate this?
Thanks!
Hi Zarinne,
Thanks for writing in! I’m afraid we don’t have instructions for altering this sweater to a V-Neck, as it does require re-writing quite a bit of the pattern. However, you may be able to use the V-Neck instructions from a sweater that is knit at a similar gauge, such as our Shoulder Forward Pullover, to work out the changes on your own!
I hope that helps!
Julianna
Just in case you’re still checking this comment thread here is my question! I would like to make this longer, and I see back in the comments Laura recommends skipping the K1 before wrap and turn in order to achieve more length. I want to check, is this for the whole length? Or is it better to knit as the pattern states for x number of rows before then skipping the K1?
Hi Jennifer,
Thanks for reaching out! Both options will give you extra length for the entire length. I think you could go either route depending on your preference, but be sure to keep in mind that either option will change the overall roundness of the bottom!
I hope this helps, happy knitting!
Gianna
Hi there! I am late to the party—just got the courage to try it out. Lol
I haven’t had any trouble up to now, but I am working on separating for the armholes. I have knitted the 42 and slipped 6 onto a holder, but now I am unsure of what to do. Do I continue knitting the remaining as the pattern states, or do I need to start with another ball of yarn? I read through all the comments and more of the pattern to see if I could figure it out. I feel I must be special because no one else is asking this question. 😬
As I said, I moved 6 off and went to knit but don’t know if I am supposed to knit as usual. I feel this would not work, but I know nothing. Lol
Please help I really want to be successful with this.
Thank you,
Amber
Hi Amber,
Thanks for reaching out. It sounds as if you slipped the next 6 stitches onto a holder, rather than the last 6 stitches! By slipping the final 6 stitches you just knit previously onto the holder, your working yarn will be in the correct place to continue on knitting the row without having to start anew. Hope this helps clarify things!
All the best,
Lili
Thank you, that is what I did. Apparently I need to learn to read. I read it several times but just saw what I wanted I guess. 😬🤣
Finger crossed I get it.