Adjustable Apron

I wear aprons all the time, and I’m not kidding when I say “all the time”. My typical at-home outfit involves a bandana to keep my hair back and an apron to keep at bay all of the thread and fabric fuzz that follow me everywhere. When friends stop by unexpectedly they are always surprised by my house frau attire, but nobody wants a lint brush for a best friend!

As you might imagine, I have a good collection of aprons, many of them vintage and quite feminine. Some of my favorites include a pink one from the 50s made out of a feedsack and one with ruffles and a pie shaped pocket that my sister made for me. Even though I love them all, these fanciful aprons don’t come in very handy when it’s time to roll up my sleeves and get messy in the kitchen, nor does my husband really appreciate his options. So I decided to make a rugged, adjustable apron for both of us to use in the kitchen. It’s big enough to be worn by a 6 foot tall guy but can easily be folded up to fit a 5 foot 4 gal like myself. Plus the no-nonsense styling means neither of us will risk batter-splattered ruffles!

The Adjustable Apron is an update of a pattern I designed way back in 2008 called the BBQ Apron. Although this version is perfect for Labor Day grilling, its classic design and super simple construction make it useful well beyond the BBQ pit. I used some amazing new fabric, Kokka Canvas Ticking, which seems like it was born to be an apron. It’s both soft and strong and will wear and wash beautifully. I love its classic denimy feel and its subtle colors. Best of all this apron is beyond simple to make. It’s so easy that I think I might make two so my husband and I don’t have to share!
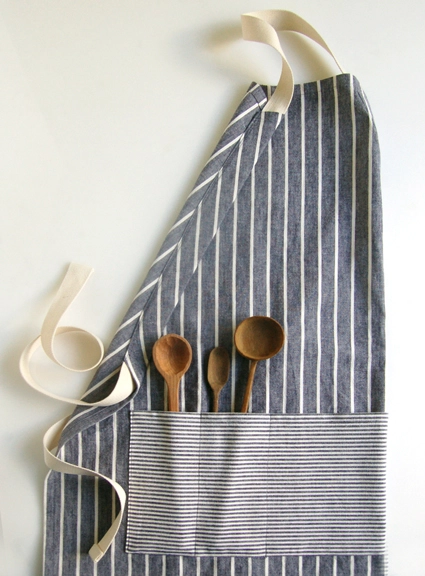
(P.S. The beautiful wooden spoons in the pictures above can be found at Timber from Live Wire Farm right here.)
Update: February 2012
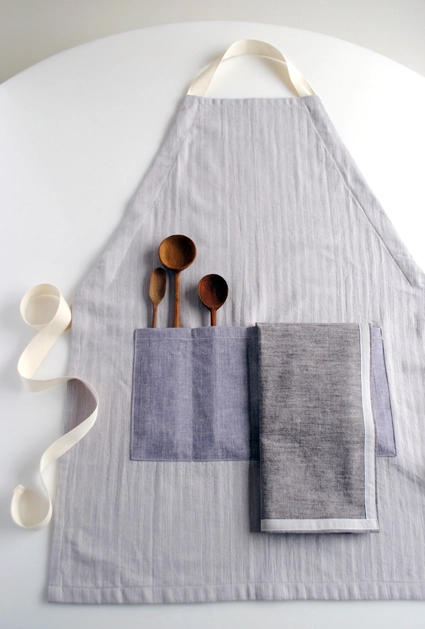
In February 2012 we made a a new version of this fantastic apron! For more images of the new version plus the pattern for the matching dishtowels, click here.
Designed by Purl Soho designer, Molly Schnick. Click here to see even more of Molly’s work!
Materials
For the Original Adjustable Apron
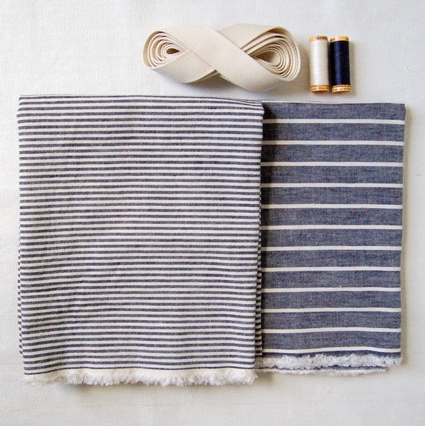
- 1 1/4-yard Kokka Canvas Ticking in Navy Thick for the body of the apron. (This particular fabric is no longer available, but please check out all of our current upholstery weight fabrics for some great alternatives!)
- 1/2-yard of Kokka Canvas Ticking in Navy Thin for the pocket. (This particular fabric is no longer available, but please check out all of our current upholstery weight fabrics for some great alternatives!)
- 3-yards Cotton Webbing in Natural
- 100% Cotton Thread in color 7400 (to match the apron fabric) and 1040 (to match the webbing)
Pattern
Marking and Cutting

Press the main body fabric in half lengthwise, selvedge to selvedge. Trim the top of the fabric so it makes a clean 90 degree angle with fold.
Using tailors chalk or an erasable fabric marker make a 1-inch vertical mark at the top of the fabric, 6 1/2-inches from the fold. This is mark A and is shown in red in the picture above.
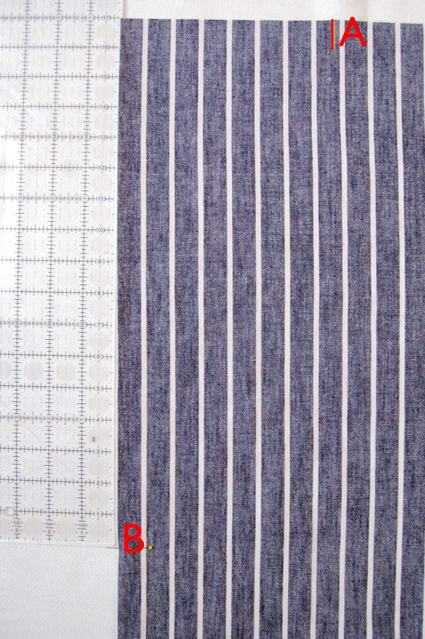
Place a pin along the fold, 17-inches from the top of the fabric. This is mark B.
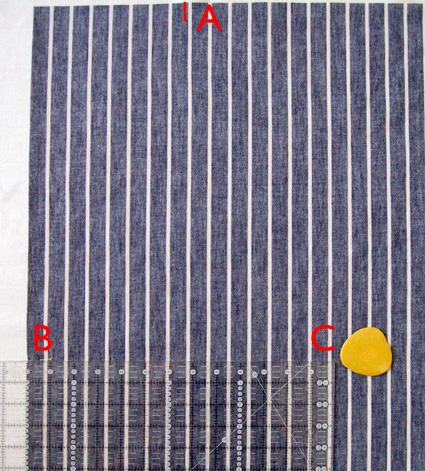
Make a mark using the chalk 13-inches from the fold and directly perpendicular to mark B. This is mark C.

Make a mark on the fold 20-inches below mark B. This is mark D.
Make a mark 20-inches vertically below mark C. This is mark E.
Using the chalk connect these marked lines together with straight lines as shown in red above, going from the bottom of mark A diagonally to mark C, then down to mark E and over to mark D.

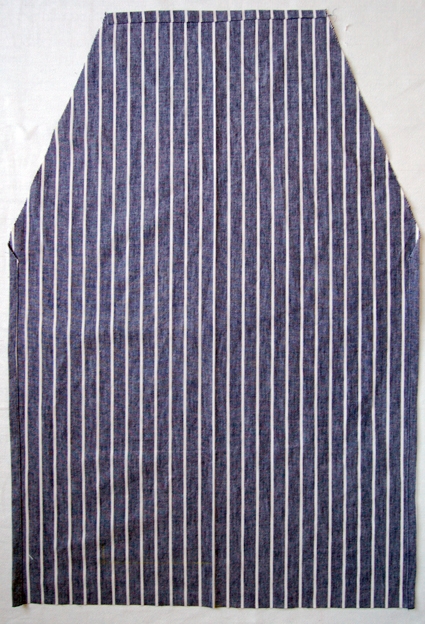
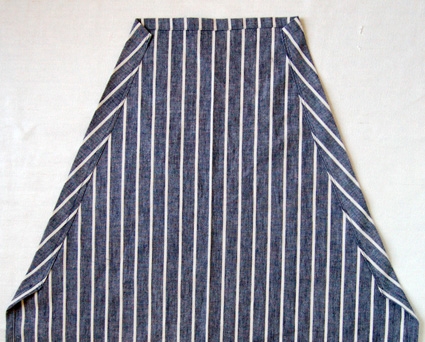
Cut the apron out following along these lines. Here is a picture of it cut out but still folded down the middle.
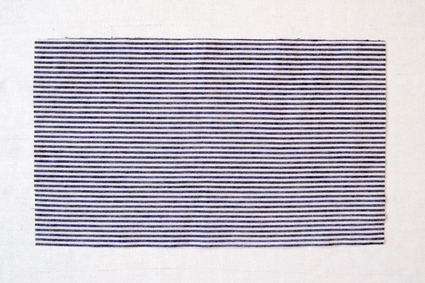
Cut a 17-inch by 10-inch rectangle, with the stripes running horizontally for the pocket.
Sewing the Apron
Unfold the main apron piece.
Using the darker thread hem the top and straight sides by folding them over 1/2-inch twice towards the wrong side and edge stitching the folds down.

Hem the bottom in the same manner.
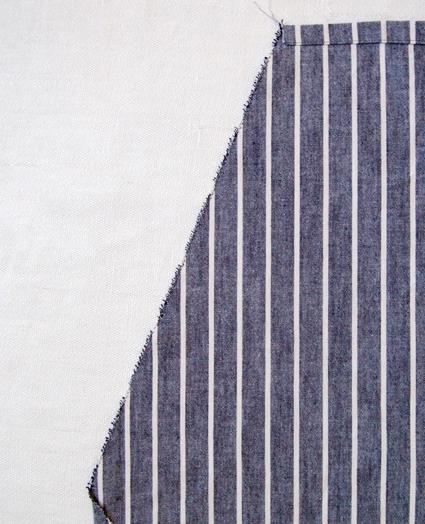
Zig zag stitch along the diagonal sides.
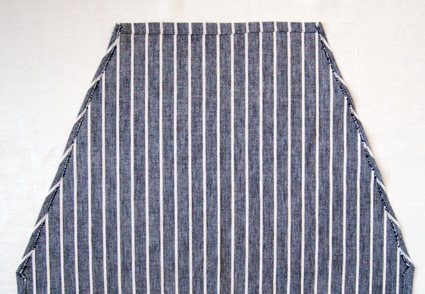
Press the diagonal sides down 1/4-inch to the wrong side and edge stitch them down.
Press the diagonal sides down 1-inch to the wrong side and edge stitch them down. This will form a scant 1-inch channel along the diagonal sides that the cotton webbing will be threaded through later.
Attaching the Pocket

Hem the top of the pocket by pressing it down 1/2-inch twice towards the wrong side and edge stitching the fold down.
Zig zag stitch along the three other sides.

Press the right and left sides towards 1/2-inch towards the wrong side and then press the bottom edge up 1/2-inch towards the wrong side as well.

Tuck the extra fabric of the corners inside of the pressed folds forming little miters as shown above.
Press the pocket flat.
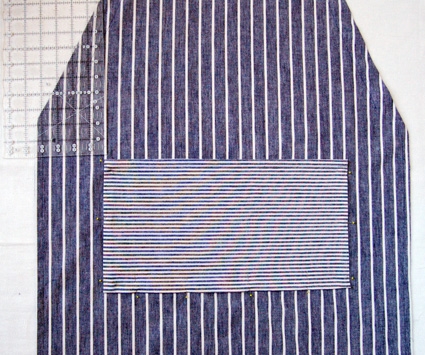
Pin the bottom, left, and right sides of the pocket to the main apron panel, 2 1/2-inches below where the diagonal sides start and 4 1/4-inches from either side. Make sure it’s straight and centered.

Edge stitch the pocket on around the left, right, and bottom sides.

Using a Hera Marker or erasable fabric marker mark vertically along the pocket 3 1/2-inches from the left side and then 3 1/2-inches to the left of that mark.
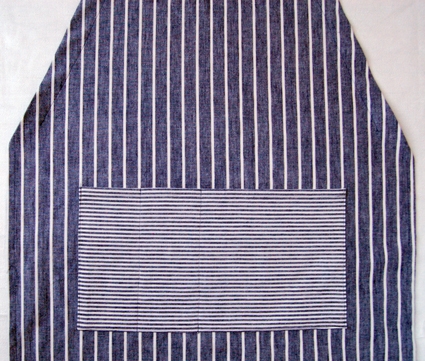
Sew along these marks to form two pocket divisions for cooking tools.
Adding the Tie

Cut the cotton webbing to be 97-inches long.
Press the ends 1/2-inch to the wrong side twice.
Using the off white thread edge stitch these folds down.

Using a knitting needle or another long sharp opject pull one end of the webbing through the bottom left diagonal channel with the wrong side of the apron facing up.

When you reach the top of the apron turn pull the webbing out at the top and turn the apron to the right side. Being careful not to twist it thread the webbing into the opposite diagonal channel from the top, pulling it all the way through to the bottom of the channel.
Pull the webbing until both sides are equal and you’re all done!


What a fantastic idea…Brilliant….thankyou so much for sharing 🙂
Thanks for such a great pattern. I am making it right now for my husband's birthday. He doesn't like to share aprons, either. I am wondering the purpose of the zigzag stitch? Is it to prevent the material from raveling? Thanks, again, for a simple, practical idea that even I can make!
I believe the zigzag stitch is to avoid breaking the thread if the fabric gets stretched from use, washing, etc.
Hi Kayla-
The zig zag is to avoid fraying, so you don’t end up with a bunch of annoying stray threads when you pull the apron ties through the channel.
Thanks for getting in touch~
Best-
Molly
Thanks so much for sharing! This apron is so simple yet awesome. I have some amazing hand dyed fabric my mother got in china and it's so special i wanted to make something as useful, humble and cool as an apron. Your easy pattern is perfect. Simple and sweet and perfect!
Thanks!
Great pattern! Making two of these for sister and brother in-laws for Christmas gifts. One suggestion, instead of folding fabric in half,fold one side 14 inches leaves a larger price of fabric to make matching dish towels, pot holders or tote bags.
Thanks
if you'd like to see a really lovely finished version using the pattern, please look here: http://veryvision.net/post/14511424209/hannahs-apron
IN. LOVE. I was just about to sit down and make an apron for a newly married friend and stumbled upon this – I'm so excited! Love the simplicity… now need to make a his and hers. 🙂
I have to thank you for this tutorial. I was able to use it to make kid size aprons for the little boys in my life who want to help cook but can never find aprons their size that are not girly. If you like to see them I shared them on my blog. I'm very new to blogging and did my best to point my readers here to you.
I just finished 2 of these for Father's Day gifts and LOVE the pattern! Your tutorial is so easy to follow and the end result is a beautifully constructed apron. Thank you for sharing! I'm sure I will use it again!
Lovely Apron – I am inspired to go make one, or two, or five……
I have a suggestion for threading the tape thru the channels – use a large safety pin attached to the tape manouvering the pin to pull the tape thru. I do this all the time with elastic in leotard leglines. Works a treat and you don't lose the elastic as you work.
Thanks for this pattern – First thing I've ever properly sewn and I'm mega proud. The blog and patterns are pretty & inspiring and I have had some great ideas – including a fruit felt mobile for a newborn baby (thanks for the Apple Coasters, cant wait to make it!).
Look on my tumblr for the apron I made :). http://www.thechinacow.tumblr.com
Can you offer a good method to help the ribbon from slipping through the sleeves? I've made this and now the ribbon is thinking to slip through one of the sleeves…. please help.
Deanna
Hi Deanna-
It sounds like you just need to sew the channel that holds the ribbon smaller. So instead of folding the diagonal sides down 1-inch, try folding them 3/4-inch. If you want to fix an apron that you've already sewn 1/4-inch in from the existing seams.
Please let us know if you have any more questions.
Molly
Thank you for this tutorial. I used it to make a Christmas present for my children to give to their father's girlfriend (yes….I know…). I used a photo of them printed onto fabric as the pocket – and she loved it. So now I have linked to you on my blog!
http://alittlebirdmademe.wordpress.com/tutorials/
go ahead girl as we know life is to short!
Love this Apron Idea! I'm going to make this. I have been sewing for 40 yrs since I was 18. Very clever idea the way you put the webbing tie to serve two purposes & like the pocket for tools & maybe cell phone! Thanks Jean Hayes – Dunn, NC
makeing this for my grandaughter , loveit thank you
THANK YOU!!!! SO simple I will be making many – for allllllllllllllllllllllll my friends
You are a star!
Made one this morning, very easy. Thankyou.
tanks very good no speak english i am irani
My son-in-law does all the cooking. I think he deserves a real man's apron. Also everyone in this family is a different size so this coverup is perfect. Thanks.
Always difficult to make something for a man (in my opinion) but this is a great gift for my father's birthday!! It turned out great (damn, i want to keep it 🙂 ) Thanks for the tutorial
What a clearly explained pattern! Thankyou. I will be making several of these, thanks again from the U kK
Is the fabric folded
Inside out or right side out?
Hi Kathy s-
Are you talking about the initial folding, before you cut? If so, it doesn't matter if you fold it right sides or wrong sides together since it's a symmetrical piece.
Please let us know if this doesn't answer your question.
Molly
Just made 3 for Christmas presents…your instructions are so clear! Do you have the measurements for a child's apron…3 year old. Would love to make one to go with her Mom's! Maybe I will make one for her dolly as well! Thanks.
I have a question. When I open this pattern from the list of patterns, the majority of the pictures only open half way. The bottom half of the photo is green. Is this a problem with my computer or is it a problem with the images posted here?
Please help. I would like to make this pattern for a gift.
Thank you.
Hi Julie-
The images are loading fine for us. You might want to try opening this page in a different browser?
Hope that helps. Thank you!
Molly
Hi, I am so anxious to try this! I'm a new sewer so that may be the reason for my question… do you not sew the strap in place? Doesn't it move, or is that the purpose so it's adjustable? Love this idea and your fabric choice! Thanks!!
Hi Kristen-
Yes, the strap is adjustable so it is not sewn into place. It slides so it can adjust to any size!
Thank you!
Molly
This is my first ever sewing project and a great one to start with. Thanks a million for your great instructions, helpful images and for taking the time to post this pattern online!
very cute…..love it…
What an amazing tutorial. This is only my second sewing project and it came out beautifully! Thank you for the easy to follow instructions and photos. I hope the boyfriend likes his new apron!
Your instructions are very clear! Great job! I just made two for a couple getting married next weekend. I embroidered their names at the top and put their university's mascot on the pocket! Sweet gift and no cost…. I had everything I needed in my "stash". They look so cute! Thanks for the simple pattern!
Is there a pattern for this apron. when I click on pattern it only comes up with the instructions. please help. Really need to make for a gift, thank you
Hi Dorothy-
You don’t need a paper pattern for this, the complete instructions are in the pattern section. Please read through and let us know if you have any questions.
Thanks for getting in touch and good luck with the project
This is a fab tutorial, really easy to follow. I have made one and have another two cut ready to go. All for gifts, I can’t wait to give them.
Do you have a basic pillow case pattern, nothing fancy, just a bed pillow case.???
Hi Alberta-
Yes we do!
https://www.purlsoho.com/create/2014/04/20/corinnes-thread-pillowcases-for-every-bed/
Thanks for getting in touch!
Molly
You might want to sew the strap in place on one side, leaving the other side for adjusting. Also, a hanging loop tucked under the top hem is useful.
Hi Judith, I just made this apron and discovered if someone picked it up by the neck-strap, the entire strap would come out. I was attempting to find a solution to this problem while retaining the adjust ability of the apron. Thanks so much for the suggestion of just anchoring one side.
Thank you for your pattern! Was wondering what I would make for my two brothers for Christmas (beading earrings for my sisters!). Know I know what I am going to do!
I love this apron and was hoping to make it for my dad for Christmas. He is 6’8″ and I was wondering if you might have some size adjustment suggestions? I was just going to add a few inches to each dimension? Any advice would be greatly appreciated! Thanks!
Hi Mary-
I think you’ll be fine following the pattern as is. Since the ties are adjustable it really fits anyone!
Thank you and good luck with the project!
Molly
Love, love, LOVE! I would like to make one for my daughter – who is 12. A little bigger than a kid’s size but smaller than adult. Any suggestions? THANK YOU!
Hi Sharon-
We actually have a kids version of this apron which you can see here: https://www.purlsoho.com/create/2014/03/23/mollys-sketchbook-kids-ric-rac-apron/
The larger size may be a bit small for a 12 year old, but please check out the finished measurements to make sure. If you would like to make it a bit bigger I would add 2 inches to the width and length of the original cut piece and then just follow the directions for the big kid size.
Please let us know if you have any more questions. This sounds like a lovely project!
Best-
Molly
Thank you so much for responding! Can’t wait to get started!
Just made a bunch of these in different colors to give as Christmas presents for my family and friends. They came out great! So excited to give them out next week!
I am so excited, I have been looking for a pattern like this forever. I have a special piece of cloth that I want to make this with. Here is my question. I am a beginner so bear with me. I am a big girl, How do I measure this so it fits me?
Thanks
Robin
Hi Robin-
I am confident that this will fit you! It fits me (I’m short and small) as well as my 6 foot tall husband (and it could easily fit someone taller). If you still have doubts the finished measurements are: 24-inches wide and 35-inches long. If that doesn’t seem tall and/or wide enough just add the extra inches you think you’ll need to the initial cutting. If you need help with the math just let me know!
Thanks for getting in touch and good luck!
Best-
Molly
Fun pattern, have loved making it today. Many thanks,
Finally! The apron I’ve been searching for!! Great lines, functional and not fru-fru at all. Can’t wait to make it. Thanks!!
Thank you for this pattern! It was very straight forward. I did notice something though. I’m only 5’1 and when I put it on, the tie in back tied around my butt, even though the top was as high as I could get it. I’m thinking that the 17″ mark might be too long of a distance between the top of the apron and where the tie comes out for the back. Unless I did it incorrectly, I’m thinking I just have a short torso! Going to try 13″ instead, so it ties around my waist.
Hi Kristy-
You didn’t do it incorrectly. On shorter folks (like you and I!) the apron is meant to be worn folded on itself at the center, as shown in the first photo. If you would like to make one that fits without folding I would recommend this pattern: https://www.purlsoho.com/create/2013/12/13/mollys-sketchbook-simple-linen-apron/
It is finished differently but you can follow the cutting instructions for the apron piece and pocket then follow this Adjustable Unisex Apron pattern for the finishing if you like.
Please let us know if you have any more questions!
Best-
Molly
Thanks for the pattern – it looks very simple to make. I am going to use the same material for the ties as well as the body – I would like to make one for my mother for mothers day and need your advice. I have measured one of my mother’s aprons to get some idea of the size as she is very petit. I have measured 30 inches long and 23.5 inches wide, so you can see that she is very short. I’m not sure how far down to measure at B – would it be the same or a bit shorter?
Hi Margaret-
If you are making this only for your mom and not to share with someone larger I would recommend using the cutting measurements from this other apron pattern: https://www.purlsoho.com/create/2013/12/13/mollys-sketchbook-simple-linen-apron/%5D and then just following the rest of the pattern as written.
I hope this helps. Please let us know if you have any more questions!
Molly
Thanks for the memories! This is an old pattern that I used way back in the 60’s as a new mom. Got it from my sister-in-law and she had used hers for a few years so it is pretty old pattern. Still works good
today too!
Hi Linda!
I’m so glad to hear that you like this pattern. I haven’t seen the older patterns for aprons like this that you mention. I actually got the idea to make an adjustable tie from an old apron from India that I unearthed at my parents house! But it is a timeless idea and I’m so glad to hear that your aprons are still in use today!
Best-
Molly
Thank
Can this pattern be duplicated, sewn and made, and then be sold online. Are there any copyright laws or can anyone make and sell these at will? Thanks. Great pattern.
Hi Ann-
We’re sorry, items made from our patterns cannot be sold or auctioned. All of our patterns are copyrighted and are intended for personal home use only.
Please let us know if you have any more questions and thanks for getting in touch!
Molly
thank you so much for sharing that awesome apron pattern. Just love it and I’m also making one for my friends. I hope it’s okay to share one with them since it’s a gift and not for selling.
Hi Claudia-
Of course! What a lovely gift!
Molly
This is the first apron pattern that I actually want to make as I’m not a girly girl (and as a baker I NEED one). Thanks for the pattern.