Weaving In Your Ends
I have some good news. And, I have some bad news. Good news first: there is no one right way to weave in your ends. So, chances are, you haven’t been doing it wrong! Now, the bad news: there are so many different ways to weave in your ends, you might not be doing it the best way either.
Having options, it’s a blessing and a curse. While options allow us a certain freedom, they also give us cause for doubt and uncertainty! Sure, as knitters we do live by a few hard and fast rules (such as: no knots!), but for the most part, there is always another way to do it, no matter what it happens to be. This truth became abundantly clear during my days working at the Purl Soho shop.
Some of our most seasoned customers would come in to find a knitting newbie at the communal table, finishing up a project in some newfangled kind of way. The old pro would sheepishly ask about it in an apologetic tone, pre-emptively saying “I know, I know I should know this.” It turns out the most basic questions are the most common. And, so as simple as this tutorial may sound, it’s not just for beginners! It’s for everyone who has a creeping feeling of doubt whenever she or he tucks away those last stray tails, “Is this really how you do it?”.
The perhaps unsettling truth is that there is probably another way to do whatever it is you are doing. It might not be a better way, just different. We all have our favorites. To help you pick yours, I’ve gathered together some of my favorite techniques for hiding ends. Some I picked up from the humbling-ly talented Joelle Hoverson, some from the witty Whitney of Whit’s Knits, a lot from customers and of course a few from dear Mom. The techniques below are by no means a conclusive list. We’d all love to hear if you have another favorite method!
Stockinette
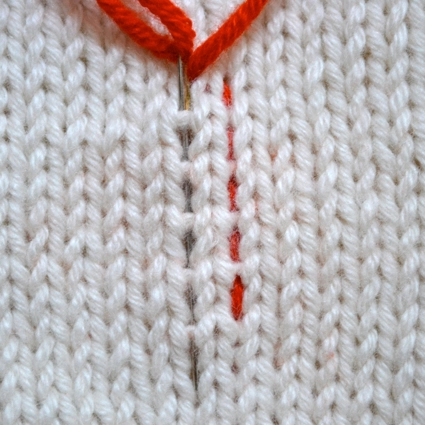
Weaving in Ends with Duplicate Stitch (on the ‘Right Side’)
Weaving your ends using the duplicate stitch method means you will sew along your fabric, following the path of the stitched yarn.
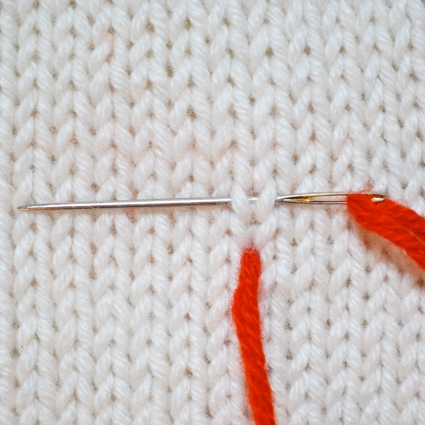
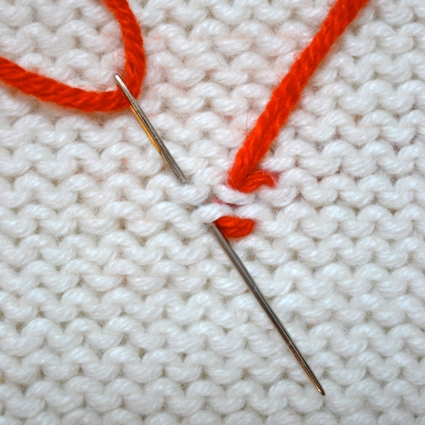
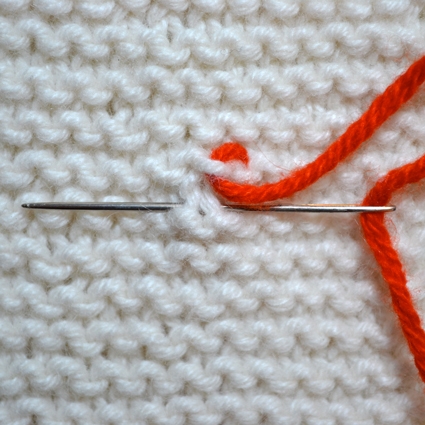
With your tapestry needle threaded, bring your needle from the back or ‘wrong side’ of the fabric to the front or ‘right side’ of your fabric at the base of the nearest ‘V’ created by the knit stitches. Orienting the needle parallel to your rows of knitting, bring your needle behind the ‘V’ of the row above.
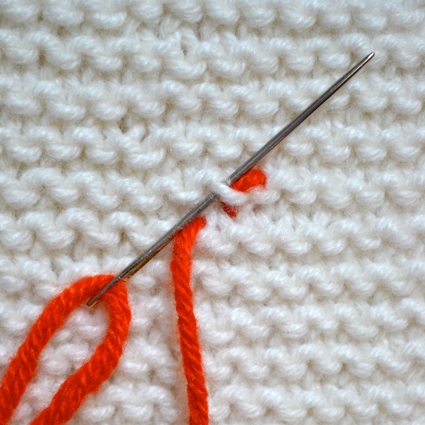
Next, insert the needle back into the bottom of the ‘V’, the same place where you began. You have now duplicated one stitch.

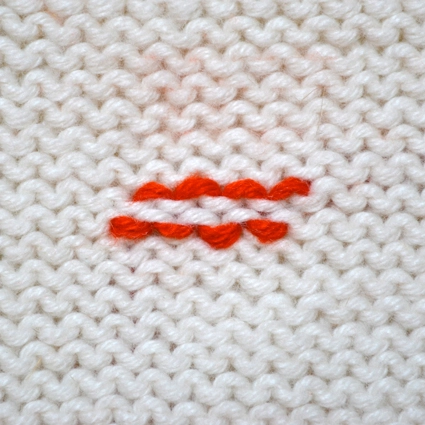
To make your next stitch, bring your needle to the front again, at the base of the adjacent ‘V’. Run your needle behind the ‘V’ of the row above. Pull your end though. Then bring the needle back through the hole at the base of the ‘V’ below, where you began your second duplicate stitch.

Continue in this fashion for a few more stitches or until your feel your end is secure.
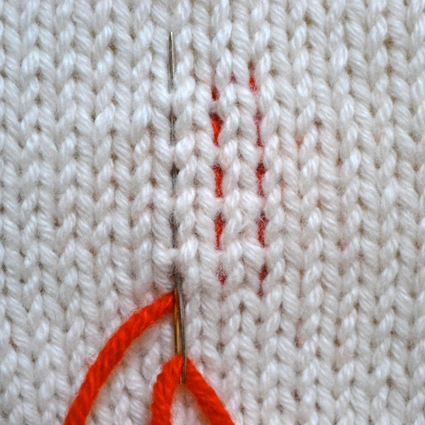
Weaving in Ends on the Vertical
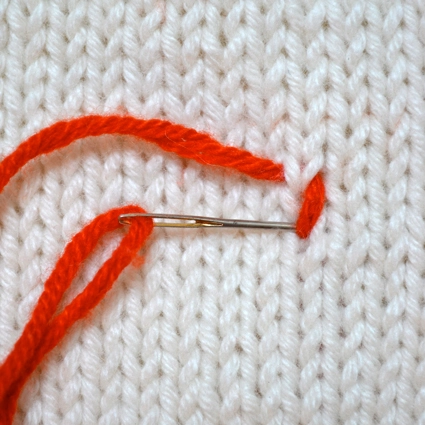
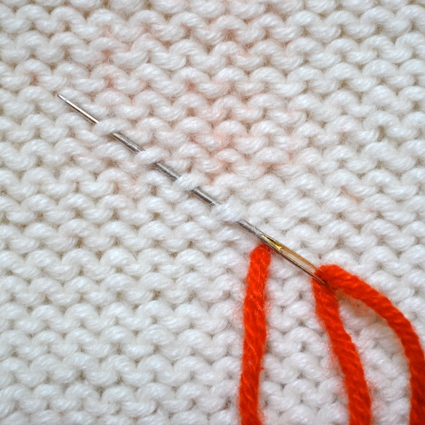
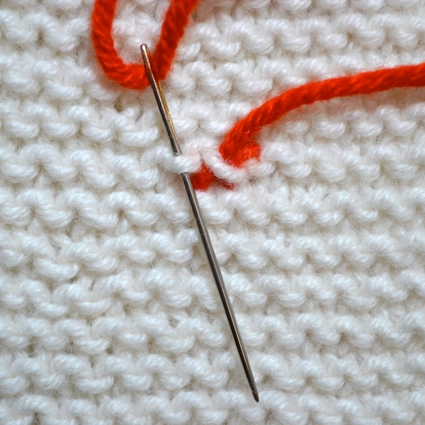
Hold your fabric with the ‘right side’ facing you. Bring your threaded needle from the ‘wrong side’ to the ‘right side’. Point the needle vertically away from you. Weave the needle under every other horizontal strand that stretches between the ‘V’s created by the knit stitches. To see these horizontal strands more clearly, hold your fabric on the right and left sides and gently tug, stretching the fabric slightly.
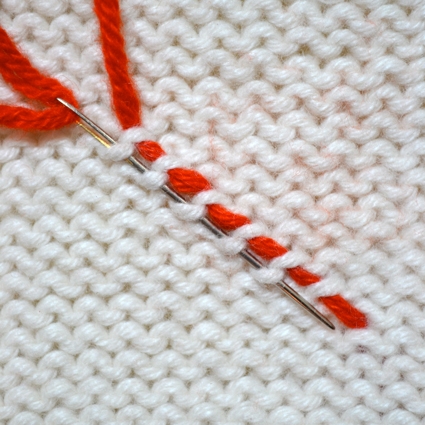
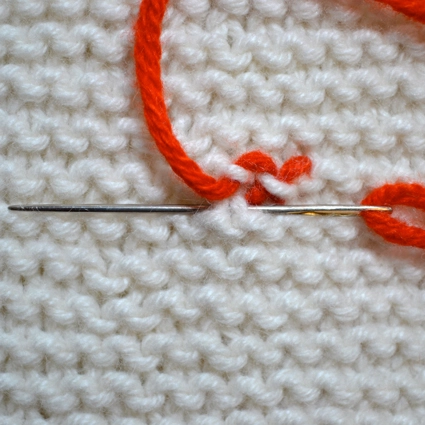
Hold the needle perpendicular to the stitches you just made. Run your needle under the adjacent ‘V’.
Point the needle vertically toward you. Run it under every other horizontal strand found between the ‘V’s made by the knit stiches.
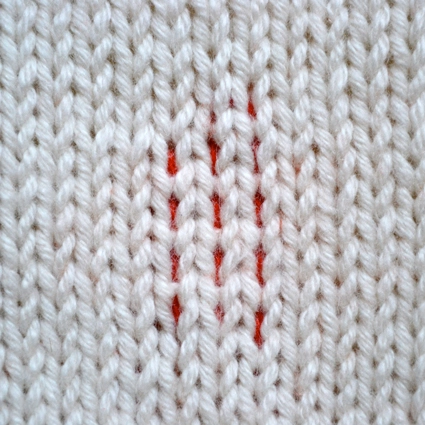
Weaving your end into the fabric in two directions should secure your tail. If you want to be extra sure your end is tucked, rotate your needle and weave it vertically away from you once more.
Weaving in Ends with Duplicate Stitch (on the ‘Wrong Side’)

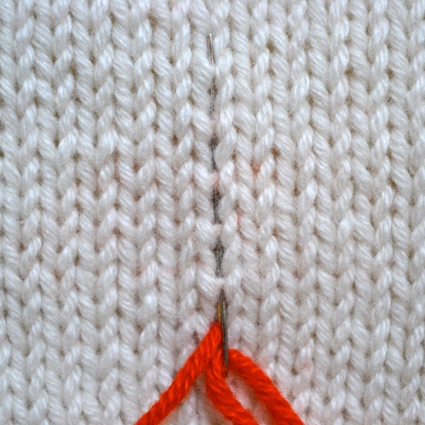
Orient your fabric with the ‘wrong side’ facing you. With your needle threaded, bring it from the ‘right side’ to the ‘wrong side’ of your work, the side you are looking at. Point the needle away from you. Go up through the nearest purl bump.
Closely following the path of the yarn in the stitched fabric, rotate your needle and bring it towards you. First go under the purl bump adjacent to the original purl you went under. Then take your needle under the purl bump in the row below, slightly to the right.

Once again, rotate your needle. Point it away from you, and slightly to the left. Draw the needle under the purl bump adjacent to the one you recently went under, and then under the purl bump from the row above that you previously came down through.
Continue in this fashion, following the path of the knit yarn, for a few more stitches or until your feel your end is secure.
Weaving in Ends on the Diagonal
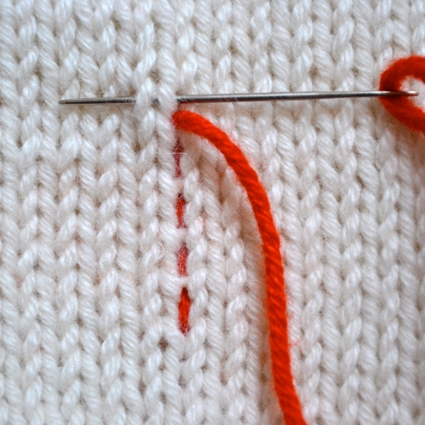
Hold your fabric with the ‘wrong side’ facing you. With your needle threaded, bring it from the ‘right side’ of the fabric through to the ‘wrong side’, the side you are looking at. Point your needle at roughly a 45 degree angle. Weave it at a diagonal, under the purl bumps of each of the above rows.
After taking 4 to 6 stitches, rotate your needle 180 degrees. Take another 4 to 6 stitches, parallel to your original stitches. For extra security, you can rotate your needle once again and take a few more stitches.

Garter
Weaving in Ends with Duplicate Stitch
Duplicate stitch for garter is a combination of duplicate stitch for stockinette and reverse stockinette. By that I mean, you will follow the path of the knit yarn, grabbing a purl stitch at the top of the row and then a ‘V’ of the row below.

With your needle threaded, point the needle away from you. Run the needle under the closest purl bump.
Rotate the needle. Pointing the needle towards you, pull your loose end under the adjacent purl bump. Next, orient your needle parallel to the rows of ridges created by the garter stitch. Slide the needle under the base of the ‘V’ in the row below.
Following the path of the knit yarn, point the needle away from you. Run the needle under the purl bump you last came through.
Once again, point your needle towards you and bring it under the adjacent purl bump.
Continue in the fashion until you have duplicated 4 to 6 stitches total.
Garter can be tricky for weaving in ends, but I find this method nearly invisible and quite secure.
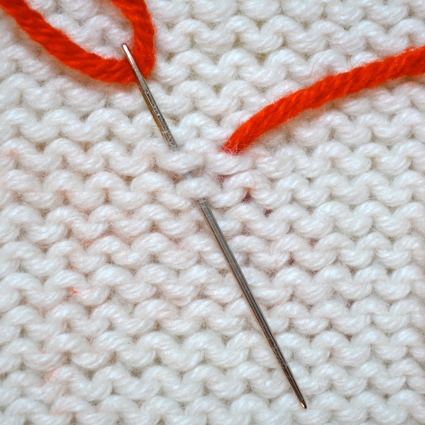
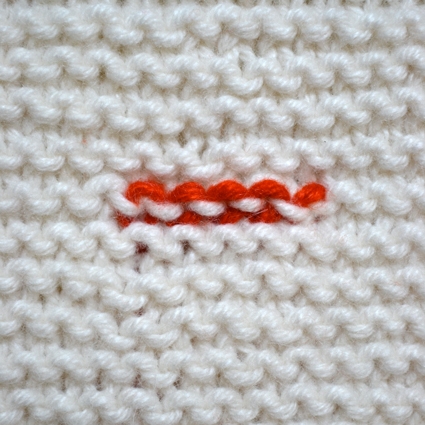
Weaving in Ends on the Horizontal
With your needle threaded and your loose end brought through the fabric to the side you are looking at. Garter stitch creates ridges of purl bumps. The ridges are created by pairs of slightly staggered purl bumps, one slightly above the other, one making a smiley face, one making a frowney face.
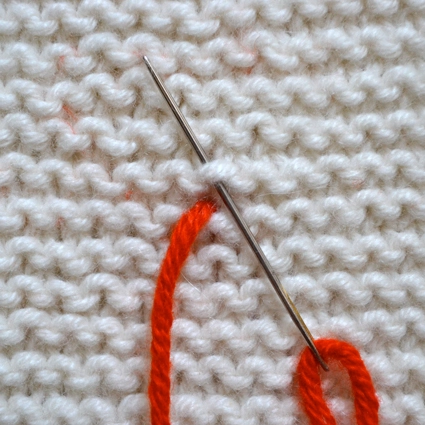
While pointing the needle away from you, run the needle under the nearest higher, frowney face purl bump.
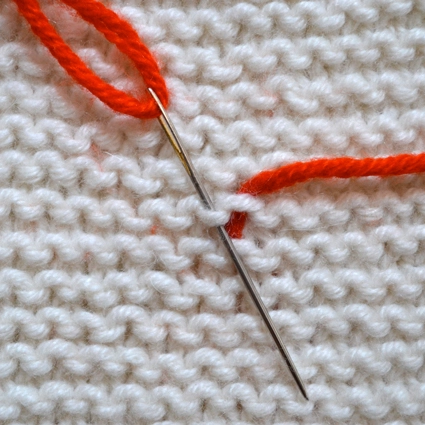
Rotate your needle. Run the needle under the adjacent purl bump, it is slightly lower and making more of a smiley face.
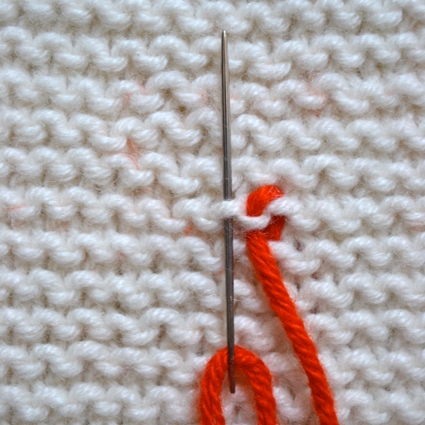
Once again, rotate the needle. Run it under the adjacent purl bump. Continue in this fashion for several more stitches.
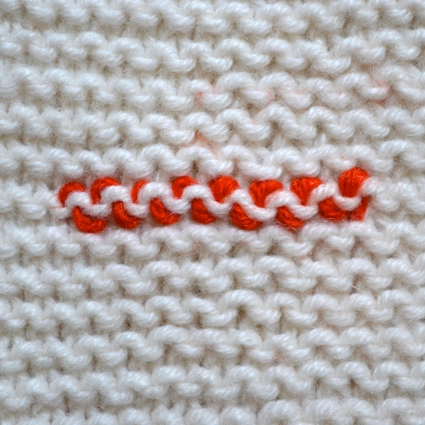
With this method, you are only weaving your tail in one general direction. Because of this, I tend to take a few extra stitches to make sure the end is secure.
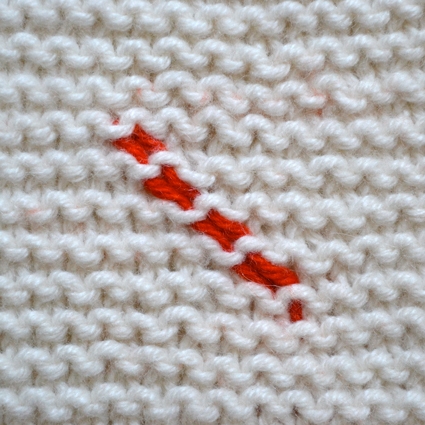
Weaving in Ends on the Diagonal
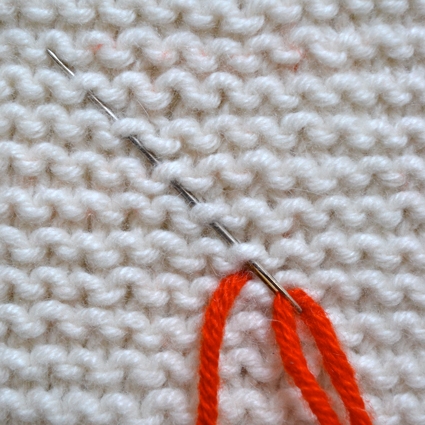
This method is very similar to weaving in ends on the diagonal on a stockinette stitch fabric.
With your needle threaded, point your needle at roughly a 45 degree angle. Weave it at a diagonal, under the purl bumps of each of the above rows.

After taking 4 to 6 stitches, rotate your needle 180 degrees. Take another 4 to 6 stitches, parallel to your original stitches. For extra security, you can rotate your needle once again and take a few more stitches.
Rib
Weaving in Your Ends on the Vertical
Whitney tipped me off to this method and its usefulness especially with ribbed knits.

This method is similar to that of weaving in ends vertically on a stockinette stitch fabric.
Point the needle vertically away from you. Weave the needle under every other horizontal strand that stretches between the ‘V’s created by the knit stiches. To see these horizontal strands more clearly, hold your fabric on the right and left sides and gently tug, stretching the fabric slightly.

After taking 4 to 6 stitches, run the needle horizontally on the ‘wrong side’ of the fabric over to the adjacent rib column. Next, point the needle towards you. Take another 4 to 6 stitches, parallel to your original stitches.

For extra security, you can stitch away from you once more.
Materials Used
To demonstrate I used Jade Sapphire’s 8-ply Cousin Coral to contrast with the Ivory swatches. To weave in the ends I used a Clover darning needle from this chibi set. Although, sometimes I prefer to use a tapestry needle for weaving in my ends; the bent tip helps grab the stitches easily.
What is your Favorite Technique?
As I said before, this is by no means a conclusive list of all the methods for weaving in ends. These are simply some of our favorites. What are yours?
–Laura
PS: the pictures at the top of the post are from the following stories: Winter Hats for Everybody, Baby Girl Fair Isle Cardigan, Big Herringbone Cowl and Perfect Fit Socks.


What an amazing resource!! I’m a self-taught knitter and have been knitting for almost a decade, but honestly when it came to weaving in my ends I always just kind of made it up to what seemed the least noticable. Will definitely be trying out some of these techniques on my next project!!
An additional set of suggestions for seed stitch would be amazing.
Thank you for all this great information and excellent photos.
Hello Deirdre,
Thank you for reaching out! I like using the duplicate stitch method to weave in my ends, no matter what stitch pattern the fabric is made up of.
If the garment has a front and back, you can weave in your ends on the wrong side, on the diagonal on a seed stitch stitch fabric.
I hope this helps and happy knitting!
-Marilla
I cannot thank-you enough for this comprehensive tutorial. I wonder if you have a recommendation for a loose garter stitch tunic, knit sideways. Thanks for any advice you can provide.
With appreciation.
Hello Dorie,
Thank you for reaching out and for your kind words! With loosely knit things I will often weave in a longer tail for the extra security. It is also helpful to weave in your ends on a diagonal to maintain the stretchy nature of your knit fabric.
I hope this helps and happy knitting!
-Marilla
Thanks for this tool! I’m still not sure if I should weave the ends in before or after blocking. Any thoughts?
Hi Linda,
Thanks for reaching out! You could really go either way with this, but for me personally, I prefer to weave in my ends before blocking. Soaking and blocking a piece after the ends have been woven helps the ends grip and stick to the yarn around them so they become more secure, and if there is any extra bulk in the spot where the end was woven in, it will be much less noticeable after blocking. Some people find that if they have woven in their end too tightly and either the knitted fabric relaxes quite a bit or they block very aggressively they may end up with a tight or puckered area, but I haven’t experienced this myself. I would suggest trying both ways to see which you prefer!
I hope that helps!
Julianna
One thing I always wonder about the first technique “Weaving in Ends with Duplicate Stitch”. In what way is this different from knitting with both strands for a reasonable number of stitches then snipping the ends off neatly?
Hello Petera,
Thank you for reaching out- great question! The duplicate stitch is mimicking a stitch rather than being an actual stitch. This means that it is less bulky than knitting two strands at once.
I hope this makes sense and happy knitting!
-Marilla
Thank you SOO much for this splendidly clear and understandable overview! It is most helpful!
I am still having difficulties in finding a good way for weaving in my ends in a piece of reversible linen-stitch knitting though. Is there a reasonably invisible way of dealing with that?
I’d be most greatful for your help.
Kind regards,
– Maria
Hi Maria,
Thanks for writing in! Sometimes in special stitches, like linen stitch, there is a bit of trial and error involved in finding a way to weave in your ends. If it is a regular linen stitch that looks like seed stitch on the wrong side, I would try using the diagonal method through the seed stitch bumps on the back of the work. If it is a variation that doesn’t have clear purl bumps on the back, I would try weaving horizontally across the surface of the work, through one of the rows of “V’s” created by the slipped stitches.
Best of luck, and I hope that helps!
Julianna
Hi, I am wondering why there is no mention of what to do with the tail that inevitably results, how long to have it and where to put it. Thanks for your help.
Hi Jean,
Thanks for reaching out! After weaving in your ends as described above to secure them, you can then trim off what is left about a quarter inch away from the surface of your knitting. This tiny remaining end should work its way into the fabric over time as the piece is washed and used, but if you find its too noticeable after the first few wears or uses of the knitted piece, you can always trim it a bit shorter!
Best,
Julianna
These are a big help but how do you weave in ends on a seamed block in crochet. (Granny Squares)
Hi Mary,
Thanks for writing in! There isn’t a specific method or technique for weaving in ends in crocheted pieces – due to the textured nature of crochet, it’s much more forgiving in hiding your ends than knitting! If you are weaving in near a seam, I would suggest hiding your ends in the seam itself. Otherwise, you can weave your ends under the loops of your stitches, and as long as you make sure not to go across the middle of any open spaces, they should be quite easy to disguise!
Best,
Julianna
Thankyou for your tutorial.. please advise how to weave tails on the edge of a striped ( 9 colours)baby blanket.
The blanket is a metre by a metre. And a 4 row stripe !
Thankyou
Prudence hassan australia
Hi Prudence,
Thanks for reaching out! I would recommend using the Duplicate Stitch method that is shown above – although it is the most time consuming way to weave in ends, it is also nearly invisible from both sides of the work, so it’s great for blankets!
Best,
Julianna
How do you weave the ends when hand knitting a chunky blanket?
Hi Linda,
Thanks for reaching out! Whenever possible, we recommend using a wet splice to join chunky wool yarns as it can be a bit tricky to weave in the ends invisibly! If your yarn is plied, you can separate the plies and weave them in separately to reduce bulk. You may have to experiment a bit to see what method looks the best on your blanket. I personally am a fan of the diagonal method above, but instead of weaving in right next to the first path, I’ll go in another direction, almost like I’m stitching a big “V” with my end, to spread the bulk out as much as possible.
I hope that helps!
Julianna
How do you handle weaving in ends when you’ve added yarn (new ball )? I always get a hole.
Hi Mary,
Great question! If you join a new yarn by simply starting to knit with the new ball, as we show in our Adding A Ball Of Yarn tutorial, you will end up with a hole. To close it up, you simply have to cross the two yarn tails over each other, giving them a little tug if necessary to tighten up the surrounding stitches, before weaving the two ends in using one of the methods above.
I hope that clears things up!
Julianna
Mary, I knit one stitch using both the new and the old yarn. Later I weave in the ends. I think I learned this from a Suzanne Bryan video.
Wow! I had no idea possible. I’m doing an afghan with lace yarn and doing it in the Old Shale stitch. What method do you think would be best to weave in the ends? Also since I’m going to try and block it once I’m done do you suggest I leave the ends till after I block it or do them as I go?
Hi Susan,
Great questions! Weaving in ends in lace can be tricky! I would recommend using a combination of duplicate stitch and the diagonal method, being careful never to go directly across a yarn over hole, to keep everything as invisible as possible. When it comes to blocking, you could really go either way with this, but for me personally, I prefer to weave in my ends before blocking. Soaking and blocking a piece after the ends have been woven helps the ends grip and stick to the yarn around them so they become more secure, and if there is any extra bulk in the spot where the end was woven in, it will be much less noticeable after blocking. Some people find that if they have woven in their end too tightly and either the knitted fabric relaxes quite a bit or they block very aggressively they may end up with a tight or puckered area, but I haven’t experienced this myself. I would suggest trying both ways to see which you prefer!
Happy knitting!
Julianna
Thank you for the details in weaving in ends. I am curious to know what you suggest for weaving in end when the yarn is not necessarily wool ( over time wool will almost fuse together which helps weaved ends). I have knit pieces with ‘slippery’ yarns that seem to be able to work their way out of the weaving. Which method is best for this situation? Thank you!
Hi Helen,
Great question! With a plant fiber, I would still recommend using the methods above, but weaving in a longer portion of your ends. With a wool or grippy yarn, I will usually only weave for about two inches before going back in the opposite direction, but in a cotton piece, I may weave in three or more inches of the tail before switching directions. I would also recommend snipping the tail at least a 1/4 inch away from the surface of the fabric to minimize the chance that it will op through to the right side, and if it does, just tug it back to the wrong side without trimming it any further. Even though the fibers don’t actually felt together, with use and washing, the end should still become more settled and secure over time.
I hope that helps!
Julianna
Fairly new knitter here. I love your instructions for weaving in tails. I just knit a trivit using 5mm cotton cord (twisted, three-ply) using garter stitch. The pattern said nothing about how to weave in the ends and I’ve looked in vain for guidance. I thought about separating the plies and weaving in separately, but each ply is composed of many threads that separate almost as soon as I separate the plys. Any suggestions? I can’t really tape the ends with tape because these trivits are designed to be washed. Any suggestions appreciated! Thank you
Hi Hazel,
Thanks for reaching out! That is a new one for me, so it’s hard to say what might work best! If you aren’t able to weave in the ends, you may have to use glue or a product designed to keep fabric from fraying to keep the ends in place, and you might also want to only hand wash or spot clean the trivets.
I hope that helps!
Julianna
First time end weaver here….is there a particular method you would suggest for your no-purl ribbed blanket pattern?? All I have left is cast off and weaving in my ends! Thanks!
Hi Erin,
Thanks for writing in! For the No-Purl Ribbed Blanket, try a combination of the techniques above for Weaving In Ends in Duplicate Stitch for both the Right Side (for your knits) and the Wrong Side (for your purls). It might seem intimidating at first but take it slow and follow the stitches. Please let us know how it goes!
Gaby
I wish so much that when you show pictures of, for example, Sand Drift Blanket, you would show some that show where the ends have been woven in, or write a bit about how the designer/master knitter finished off a particular project.
Also. in the tutorials, is the end “buried” in the woven in stitches? I don’t see any ends!!
Hi Annie,
Thanks for writing in! I’ll definitely pass on your suggestion for adding notes or photos into projects about the finishing details. In the tutorial, the ends are just clipped really short at the last point woven in, which makes them disappear into the work. I hope this helps!
Best,
Cassandra
Ditto-this is an awesome resource.
My question is this: How much of a tail should I leave when casting on, binding off, and/or attaching a new skein/color?
Does it make sense to have a longer tail so that weaving with an upholstery needle is manageable and then clipping it after weaving a particular amount?
Thank you for your guidance!
Hi Heather,
Thanks so much for writing in! I usually leave a 9-10 inch tail to weave in later, which is enough to not have to fuss with a length of yarn too short to get on a needle and maneuver. I often have more length than that, because I’m usually so eager to get started that I don’t bother to try to estimate how much yarn I need for my cast on! You can always leave a longer tail, as long as you’re not worried about running out of yarn at the end of your project, and a little extra never hurts, because you can clip off whatever excess you have. I’m so glad that you found this tutorial helpful! Please let me know if you have any other questions, we’re always happy to help!
Happy Knitting!
Cassandra
I am not your biggest customer but I am definitely your biggest fan. Not only do you sell gorgeous yarn and have fabulous ideas, your tutorials have taught me so much. Whenever I am stymied I look to Purl Soho for help. I wanted to take a course on weaving in ends, the most dreaded part of knitting for me. Ta da Purl Soho had a fabulous tutorial. Thank you from the bottom of my heart!
When seaming – how does one deal with the tails ends – same as other tail ends; simply weave them in?
Hi Zoee,
Great question! Yes, you will treat these ends exactly the same as any other!
Best,
Julianna
I’ve always used a multi-directional method, a combination of the ones above. It is so effective even I couldn’t find it when having to rip back. But the one thing I do that really helps is to make sure there is space for small ends to appear by stretching it a little every few stitches. This allows the woven end to ‘retreat’ without escaping from the captor stitch. If one does, snip it with just a tiny end showing that will become hidden.
Oh what a fabulous resource! I have always been haphazard about weaving in ends (and hated doing it), but with your suggestions, I’m actually enjoying making those pesky ends neatly disappear. Thank you so much.
Does anyone have any good suggestions for how to weave in ends on twisted ribbing (k1tbl, p1)? i find that the end shows through if I try to use the method for ribbing shown here, the end shows through on the twisted knit stitches.
Thanks for the great tutorial and the pictures are so helpful!
I just want to add that when I weave my ends in I always go back through the yarn I am weaving so that the natural spin of the yarn helps to hold it in place.
Hi Anne,
Thanks for reaching out! I am so glad that you found our tutorial helpful and thank you for sharing your tip with everyone, it is much appreciated!
All the best,
Gianna
Oh my goodness I have been knitting for 5 years and have never heard of the no knot rule! How did I not know this? This resource is amazing. So I no longer need to tie a knot in my tails before weaving them in I just weave the ends in, does this not create a little hole? I can see that I have actually been using some of these methods, self-taught…. However I am about to start knitting your Ombre Wrap in seed stitch – as the front and back are both visible which would be the best technique to use ? Thanks so much again for this wonderful tutorial.
Kind regards
Charlotte
Hi Charlotte,
Thanks for reaching out! Yes that is correct! No need for a not, and it wont leave you with a hole if woven in correctly! For the Ombre Wrap, even though it is seed stitch and both sides look the same you will still have a designated wrong side to weave in ends! I would recommend the weaving in the ends on the horizontal or weaving in the ends on with a duplicate stitch!
Please let us know how this goes!
All the best,
Gianna
Hi Gianna thanks so much for taking the time to respond that is really helpful!
Hi Charlotte,
I am happy to help!
All the best,
Gianna
Hi!
I have knit a couple pieces with some extra bulky Knit Collage yarn and am having a hard time concealing knitting in the ends. One of the pieces is in seed stitch, the other in stockinette. What methods would you suggest for these pieces with such bulky yarn?
-Caitlin
Hi Caitlin,
Thanks for reaching out! For stockinette I would recommend WEAVING IN ENDS ON THE VERTICAL or WEAVING IN ENDS ON WITH DUPLICATE STITCH (ON THE ‘WRONG SIDE’) and for seed stitch I would recommend following the options for garter stitch and WEAVING IN ENDS ON THE HORIZONTAL or WEAVING IN ENDS ON THE DIAGONAL!
I also recommend checking out our Wet Splice (aka Spit Splice) tutorial, this is an especially great technique for bulky yarns like those from Knit Collage!
I hope this helps, happy knitting!
Gianna
Hi! So I have finished knitting a baby blanket using the garter stitch. I was wondering which method to weave in is the best because there is more than one options?
Thanks in advance!
Hi Dee,
Thanks for writing in! All of the garter stitch methods would be a good choice and work great for your blanket! My favorite methods to use are the WEAVING IN ENDS WITH DUPLICATE STITCH or WEAVING IN ENDS ON THE HORIZONTAL!
I hope this helps and please let me know if you have any more questions!
Gianna
Hi, Is there a good way to weave closed a hole that was caused by joining a raglan sleeve to the body of a top-down knitted sweater? I’m using round needles.
Thank you for any advice on this.
Karen
Hi Karen,
Thanks for writing in. I always close up those holes using duplicate stitch! You can use the end of the yarn from beginning each sleeve to do this. I would also recommend tugging on any looser stitches beforehand to even out the tension before beginning the duplicate stitch. Hope this helps!
All the best,
Lili
I’m knitting a baby blanket in fan & feather pattern there’s 4 rows to the pattern do I cast off in the last row which is a knit row or the next row which is also a knit row, also which method is best for weaving in ends from adding new balls of wool
Hi Deborah,
Thanks for writing in! You will want to work as many rows as written and then bind off, so if it says to knit 4 more rows you will want to do that and then bind off when it says to. As for weaving in your ends, if it is knit in garter stitch a great option is the Duplicate Stitch method!
I hope this helps!
Gianna
Super tutorial!!! Bookmarked and saved!! 😀 Thank you so much!! Julie
This is such a helpful tutorial. I have been making it up as I go along for years. So happy to know have these variations for weaving in ends in my toolbox.
Hi! I recently finished knitting a reversible cotton baby blanket. The pattern is similar to basketweave except the alternating sections of knit and purl are triangles instead of squares. So there isn’t a “wrong/back” side to the blanket and since the cotton yarn used comes in 50 g skeins there are many ends to weave in. I’m wondering how best to do this? And does it help that I started each new skein by overlapping 4 stitches of the old yard with the new yarn?
Hi Linda,
Thanks for reaching out. The best way to deal with weaving in ends in a “reversible” design is to designate one side to be the wrong side, even though it looks the same as the other side! Then, you can weave in all your ends on this one side. Even though you overlapped the yarn for 4 stitches, I’d still recommend weaving it in further, especially because you used cotton yarn. Hope this helps!
All the best,
Lili
I’m finishing the Super Easy Baby Blanket and weaving in the ends. First time doing my own weaving in. Is there a picture of what it should look like just before and just after I cut off the yarn, post-weaving? I should just cut the yarn right at the surface of the blanket? ….in the spirit of measure twice, cut once, I want to get it right. Thank you. PS The blanket is terrific. Can’t wait to send it to my brand new grandchild.
Hi Patty,
Thanks for reaching out! When I weave in my ends, I like to leave about half an inch of yarn when I cut it off from the skein. That just ensures that the yarn will stay on the wrong side of the blanket and won’t pop out to the right side!
All the best,
Lili
One more question: do I weave in the tails left when I cast on and cast off? I assume yes.
Hi Patty,
Yes! You should weave in the cast-on and bind-off tails as well.
All the best,
Lili
Hi, just found your wonderful tutorial. I am not a fan of superwash and try to use non as much as possible. But I find myself being seduced by some of the lovely hand dyed which is usually superwash. What will happen to the little tail cut off at the back after front duplicate stitch as it won’t felt in?
Hi Anne,
Thanks for reaching out. You can just let the little tails be after weaving them in and cutting them short! Since they’ll be on the wrong side of the knit fabric, they won’t be noticeable.
All the best,
Lili
What a fabulous resource!! Thank you. I’m currently participating in the KAL Prism Blanket made with your Good Wool. Based on some of your earlier answers, I’m assuming that I should work in the ends on the wrong side of the blanket. Do you recommend a particular method from the tutorial suggestions for this pattern with this yarn? And what is the best way to deal with the points where we join 6 ends of triangles to make them come together cleanly? (No knots and twisting the yarns around one another before weaving in?) Where do we weave in those ends? The connecting seams or in the blanket fabric itself? Sorry for all the questions!
Hi Rebecca,
These are great questions! For garter stitch, I personally like using the diagonal method. But I’d recommend playing around with this to determine which you prefer. As for the corners of the squares, you can essentially twist each end around one from the opposite side and then bring it back around to the triangle of its own color to weave in there. This will lock the corner in place and reduce the gap significantly!
All the best,
Lili
Thank you!
I am working on the Super Easy Baby Blanket in Morning. Could you walk me through how to do a duplicate stitch weave in on the color change on the ends? With the slip stitch/color change end, I want to see if I can still maintain the pretty edging.
Hi Julia,
Thanks for reaching out! You can pretty much follow the photo tutorial as shown, but I’d recommend twisting your differently-colored ends once around each other before weaving them in. That will make sure that the two stripes are solidly joined at the edge so that no gaps appear at that spot!
All the best,
Lili
I’m looking to make a 3-color, single-stripe baby blanket using the metgod in your Gradient Blanket design. Which technique above would you recommend for that one since each color stripe is only a single row of stitches? It looks like all of these need at least 2 rows of the same color to be invisible.
Hi Kathleen,
I’m afraid that there isn’t a completely invisible way to weave in ends, especially over single-row stripes. My best advice is to use your preferred weaving-in method that works for the stitch pattern you’ll be using and making sure to weave in all the ends on the wrong side of the blanket. They will not show through to the right side, and they should blend in pretty well on the wrong side!
All the best,
Lili
Wonderful tutorial. Im just finishig my 4th Prism blanket so lots of ends to sew in. This one has 49 squares – itll fit a super king bed.
Thanks so much for all your fantastic patterns and helpfulness.
Hi Jenny,
We are thrilled to hear you enjoyed this tutorial! Congratulations on finishing your wonderful project!
Warmly,
Gavriella