Mini Quilt of the Month, April: The Vegetable Patch

This darling little quilt marks the fourth in our Mini Quilt of the Month series. Each month this year we are bringing you a pattern for a new mini quilt. These small projects are the perfect way to learn a new skill and make something beautiful in the process. To see all of our Mini Quilts so far, please click here.

For April we decided to do something in celebration of Springtime and inspired by nature. We all fell in love with the idea of a graphic image of root veggies growing in the ground using bright bold colors. The nature of this quilt makes it a perfect introduction to the world of machine applique which involves no turning under of seams or other tricky techniques. It’s just a simple, straightforward way to sew on any shape in a tidy manner. It feels like making a fun fabric collage. It’s a great technique to learn if you’re new to the sewing machine because it opens up a whole new world of possibilities.

This quilt will make such a beautiful wall hanging, perfect for a kitchen or nursery. The full color step-by-step printed pattern, complete with full size templates for all the veggies, is available here. – Molly
Materials
Fabric for the Background and Binding
- 1/2 yard Linen for the soil
- 3/4 yard Robert Kaufman’s Kona Cotton, Azure for the sky
Fabric for the Backing
- 3/4 yard Moda Muslin 45″ 200 count, Natural
Fabric for the Veggie Leaves
- Purl Soho Spectrum Bundle, Emerald
Fabric for the Veggies
- 1/2 yard cotton fabric in an assortment of solid colors, dots, and stripes
You will also need . . .
- Crib size Quilter’s Dream Cotton Batting
- 100% cotton thread in coordinating colors
- DMC Pearl Cotton Embroidery Thread – #8, color B5200
- 1 yard fusible interfacing
- A Hera Marker
- Quilter’s Curved Safety Pins
- Please Note: The Vegetable Patch Quilt Pattern is no longer available for purchase. For assistance, please contact us at customerservice@purlsoho.com.
Size
25 by 36 inches
Pattern
Cut + Prep

Cut the Sky fabric into a 18-inch by 25-inch piece. Repeat with the Soil fabric. Sew these pieces together along one of their long sides with a 1/2-inch seam allowance and press the seam allowance towards the dark fabric.
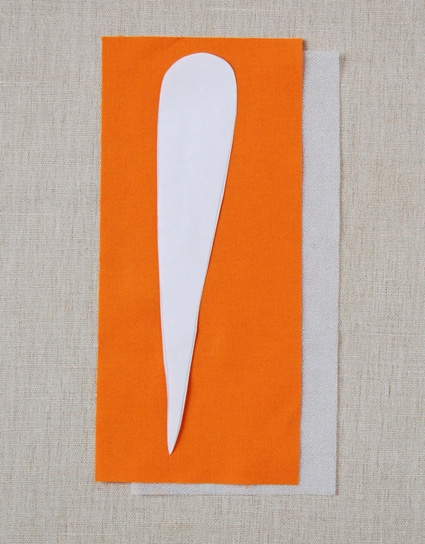
Cut out all of the vegetable and leaf templates.
You will be cutting the Leave from the Spectrum Bundle and the Vegetables from the assortment of solid, dot and striped fabrics. Reference the picture of the finished quilt on the cover of the pattern for inspiration.
For each template cut the fusible interfacing and the fabric you want to use into a rectangle or square a little bigger than the template.

Iron the interfacing onto the wrong side of the fabric securely and then trace the template onto the right side of the fabric with a pencil.
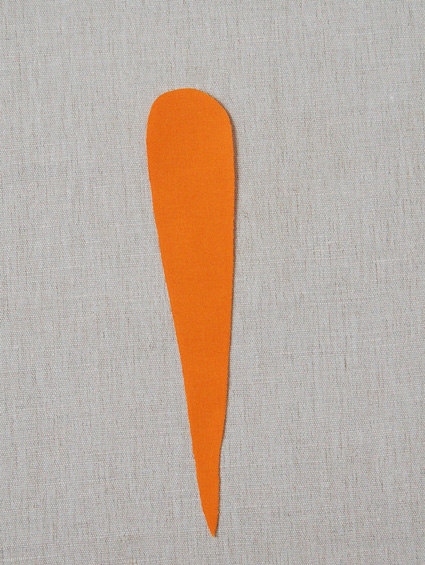
Carefully cut out the traced template, cutting just inside the traced lines.

Do this for each template.
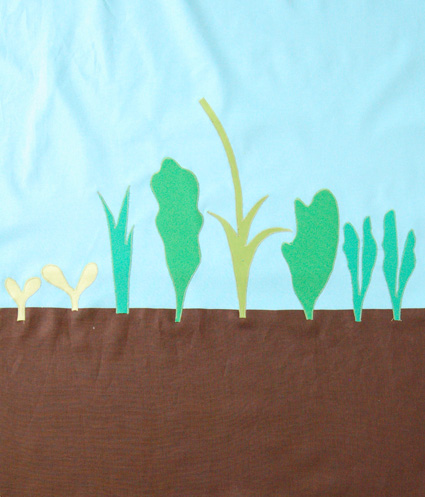
Arrange all of the cut pieces onto the right side of the blue and brown quilt top as shown with the veggies laying on top of their leaves to hide the bottom ends. Make sure all of the pieces are neatly cut out and that you like the placement of each.

Put the cut out vegetable pieces aside. Carefully pin the leaves to the quilt top in the exact location you will want them on the finished quilt. Make sure the bottom of each leaf piece dips into the brown soil section of the quilt top just a bit (you will be sewing the veggies on top to hide these ends later).
Applique
Now for the zig-zag applique! You might want to test this process on some scrap fabric before you dive in. You can use a regular presser foot, but if you have an applique foot this is a good time to use it.

Thread the machine with the green thread in the top and blue thread in the bobbin.
Using a small, close zig zag stitch, approximately 1/16-inch wide sew one of the leaf templates down around it’s raw edges. You should be sewing right at the edge so that the outer zig is just on the outside of the leaf and the inside zag is firmly sewing through the leaf fabric.

When you get to a sharp turn leave the needle down, lift up the foot and pivot the quilt top, then continue sewing.
Applique all of the leaves on in this manner and then press the quilt top flat.

Next, thread the bobbin with brown thread. Pin the radishes on first making sure to place them so that they hide the ends of their stems.

Using the red thread in the top zig zag applique the radishes in the same manner you did for the leaves.

Pin the vegetables on as you sew them. Always use the brown thread in the bobbin but use the yellow thread in the top for the onion, garlic bulb, garlic flower, carrot, and turnips. Use the red thread in the top for the radishes and the beet.
Press the quilt top when you are done sewing on all of the veggies.
Baste

Press the muslin and cut it and the batting to be 40-inches by 27-inches. Lay the muslin on a flat clean surface tape it’s corners down with masking tape to get it taut and flat. Lay the batting on top of the muslin. Lay the quilt, right side up, on top of that. This is your quilt sandwich.
Using curved safety pins, pin all three layers, the muslin, the batting, and the top, together every few inches across the entire area of the quilt.
Quilt

Using a Hera Marker or other temporary fabric marker, mark the blue section of the top with vertical lines, every two inches. Skip over the leaves and only mark in the blue section.

Using the yellow thread in the bobbin and the blue thread in the top quilt across these vertical lines backstitching or using a very small stitch length and the beginning and end of each seam. When you come to a safety pin take it out. Do not quilt over the appliqued sections, only along the blue fabric.

Mark the brown section of the quilt in a similar manner but with 2-inch apart horizontal lines. Skip over the appliquéd vegetable sections.

Using the brown thread in the top and keeping the yellow thread in the bobbin quilt along these lines, backstitching or using a very small stitch length at the beginning and end of each seam. Do not quilt over any of the appliquéd sections.
Once the piece is quilted trim the muslin and the batting to match the top.
Bind
Bind the quilt using the remaining blue fabric. For this quilt you will need a piece together binding strip that is at least 130-inches long.
If you haven’t bound a quilt before please visit the binding instructions from our January Mini Quilt of the Month: Courthouse Steps here. This quilt (and all quilts!) can be bound in exactly the same manner. Once you get to the story, scroll down near the end to the sections called “Prepare the Binding” and “Bind the Quilt”.
Finish
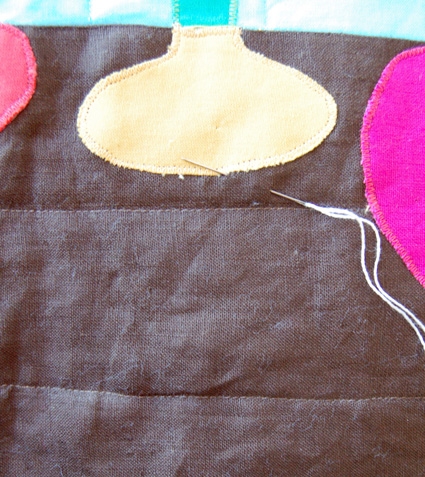
After you’re done with the binding there is still one more step: embroidering the onion roots.
Cut an 18-inch length of the embroidery thread and thread it into an embroidery needle. Tie a small knot at the end of the thread. To hide this end knot and start your embroidery pull the needle through the top and batting layers (but don’t go through to the back) and pull it out at the point you want to start your embroidery, at the bottom of the onion Then, with a gentle tug, pull the end knot inside the fabric hiding it between the layers of the quilt.

Using a back stitch, embroider three small roots at the bottom of the onion. Embroider only through the top layer of the quilt, do not stitch through to the back.
Hide your end knot in the same manner that you hid the starting knot.


Thanks so much for this pattern, you guys! I will definitely be making this. I appreciate the kit, but I'm so grateful for your posting and sharing the pattern pieces to everyone:) Thanks and happy growing andn sewing!
So simple and adorable. Thanks!
These are super cute!
Mine is done! Not as beautiful as the original, but my family likes it. I eyeballed the shapes and picked colors from scraps I had; but I bought the linen and the blue sky / binding fabric. Thank you so much for continuing to create and share these lovely mini quilts! This is my second one; the first one I tried was the Liberty circles quilt (February), which took many hours longer than this one but is equally appealing.
https://www.facebook.com/media/set/?set=a.10150187264483256.323922.638828255&l=b27b3357a7
I just ordered this kit and I can't wait to dive into my first quilt. It's adorable. Thanks for this step-by-step how-to guide. I'll definitely need it. 🙂
I'm wondering if this quilt could be adapted to use on an actual crib instead of as a wall hanging ? Maybe by substituting the linen for something else in the same colour but softer and same for the muslin backing? Does anyone have any comments about that – would it stand up to washing I wonder?
Thanks
Hi Dara-
It needs to be handwashed but it would certainly be a very lovely crib quilt.
Thank you for your question!
Molly
What a cute quilt! That's about the only way I can grow a successful garden – LOL! Great, detailed tutorial. Have a super day!
Just found this awesome quilt and will be making it soon for my new niece. Quick question: what is the best way to skip over the appliqued sections while quilting? I'm a bit new and it seems like backstitching would be too messy?
Hi Stephanie-
If you only take a few back stitches and do it very carefully the quilting should look fine. The only other alternative is to reduce your stitch length to be very very small at the beginning and end of each seam (it should almost be like you're stitching in place). However, with many machines you aren't able to adjust the stitch length this small so it's safer to back stitch.
Thank you for writing in.
Best- Molly
Can you recommend what weight wadding to use with this please? Would a polyester one be okay? Thanks
Hi Rachel-
We recommend a mid weight cotton batting for this: https://www.purlsoho.com/purl/products/item/1811-Quilters-Dream-Natural-Select-Dream-Mid-Loft
Polyester might be a little too fluffy for this project, but it's really a matter of opinion.
Thank you!
Molly
Hi,
This is an old post, but I’ve not quilted before, so this may be a silly question, but why wouldn’t you applique the vegetables after you quilt the main body so that you don’t have to stop and start around the vegetables?
Thanks!
Hi Michele,
Thanks for writing in and great questions! For this lovely little quilt, we use a zig-zag stitch to attach the appliques! We do not want this stitch to show on the back of the quilt. We find that it looks a bit neater overall to attach them before quilting. You can certainly change it up if you like. I would suggest using some scrap fabric and batting to give it a try as a quilt sandwich can move a bit differently when using a zig-zag stitch and could be a bit challenging.
I hope that this helps!
Cassy
Hi There! This looks so cute! I am trying to click your link for the templates, but I get a “404 Not Found”. Can you please relink or send me the templates?
Hi Nora,
Thanks for bringing this to our attention! The error link should be fixed now!
All the best,
Lili