Strip Pieced Christmas Stocking
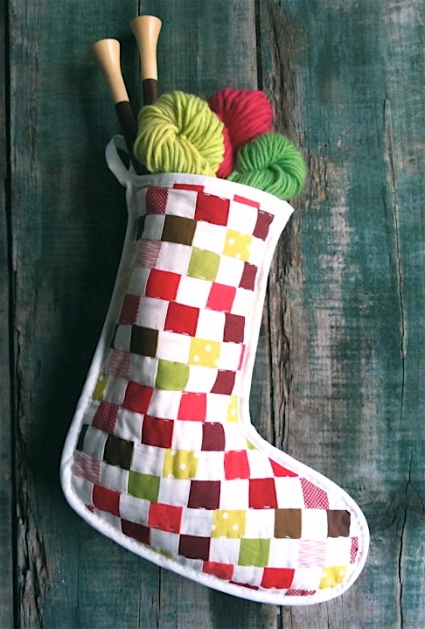 100% cotton batting. The patchwork of the stocking is put together in a very cool way by strip piecing. That means you don’t have to cut a million little squares and piece them all together one by one. Instead you cut long strips, sew them together and then cut the sewn pieces. If you’ve never tried strip piecing this is a great first project since it’s so small and satisfying.
This is also a great first hand quilting project since the hand quilting isn’t trying to be totally tiny or even and it’s the hand quilting and the hand sewn binding on this project that really make it special. This was was also the most enjoyable part of the process for me. I loved sitting and stitching it, inch by inch as I started to think about the holidays. -Molly
Materials

- A Stocking Fat Quarter bundle
- 1 3/4-yard White Muslin
- 1 package of High Loft Batting in craft size
- Natural (color #6) Embroidery Thread
- Cotton Thread in color 1040
- A 1-inch bias tape maker
- Blue or Yellow Tailor’s Chalk
- A Stocking Template available for free download here printed, cut out, and taped together
Pattern
Cutting the Strips

Organize your colored fabrics into two groups, group 1 and group 2. There doesn’t have to be much rhyme or reason to this, just group the fabrics that you think look good together.
Cut four 1 1/2-inch strips lengthwise from each fat quarter, (the strips will be 1 1/2-inches by 22-inches) Keep the strips in their groups.
Cut thirty 1 1/2-inch by 22-inch strips from the white fabric.
Piecing and Cutting- Part 1

Pick out seven strips from group 1 of the colored fabrics. Since each group has six fabrics you’ll have to repeat one.
Arrange the seven strips in a pleasing order.
With a 1/4-inch seam allowance and starting with a white strip, piece the strips right sides together with a white strip in-between every colored strip. End with a white strip. Start piecing each strip at the short cut side, not the selvage side. This way there will be one straight side and one wobbly side as you can see above.

Now pick 8 strips from group two of the colored fabrics and piece them in the same manner with a white strip in between each colored one, but this time start and end with a colored strip.

Cut eight 1 1/2-inch strips from each of the sewn pieces. Cut across the strips perpendicularly so you get one little rectangle of each color on each 1 1/2-inch strip. Put these strips aside. They will be used for side 1.
Repeat these steps with your remaining colored and white strips (you will have some colored strips left over). The resulting strips will be used for side 2.
Piecing- Part 2

Using your strips for side 1 of the stocking, piece the strips together, always sewing them right sides together and with a 1/4-inch seam allowance like this:
- Start with a piece from group 1 and piece it with a strip from group 2
- The sew on a piece from group 1 that has been flipped around
- Next add a piece from group 2 that’s been flipped around
- Start over with a non-flipped piece from group 1 and repeat this piecing order until you have pieced all sixteen strips together.

Here is side 1 totally pieced.

Repeat this for side 2. And don’t worry too much if you mess up this step a little. The stocking will look beautiful no matter if the strips are pieced in the exact right order.
Quilting

Cut two 18-inch X 18-inch squares from your white fabric.
Cut two 17-inch X 17-inch squares from your batting.
Make your quilt sandwich for side 1: Lay the white fabric down and smooth it out. Lay the batting on top of the fabric and smooth it as well. Lay side 1 on top of the batting, right side up and smooth it on top of the batting.
This is such a small piece that basting is unnessesary.
Using your tailor’s chalk trace the stocking template on top of side 1 as shown above. You have a little bit of leeway here. Trace the stocking template on a pretty part of side 1. You could even trace it diagonally if you wanted!

Using the white embroidery thread and starting just at the inside of the chalk markings sew through all three layers- the back, the batting, and the top.

Sew along the horizontal seams of the patchworked top, making sure to sew through all three layers with every stitch. Stop your stitching just at the inside of the chalk markings on the other side. You can tie little knots at the beginning and end of each row of this quilting since you’ll be encasing them in binding later.

This quilting stitch doesn’t have to be tiny or totally straight. Their imperfect quality adds to the charm of the project. My stitches were about 1/4-inch long but they could have be even wider and still worked just fine. You also don’t have to worry about trying to do a rocking quilting stitch or anything like that. Just sew one stitch at a time through all three layers of the quilt sanwich and you’ll be fine.

Quilt like this across all the horizontal seams, within the chalk markings on side 1.

You can see the quilting better on the back side.

Cut the stocking shape out along the chalk lines being careful not to cut into your quilting stitches.
Repeat these steps for side 2 with one important variation: You must flip the template over when you trace it on side 2 so that the toe is facing the other direction.
Binding

Cut a 36-inch by 2-inch strip from the white fabric on the bias. Depending on how much white fabric you have, you may have to piece a couple of strips together to get this length. (For instructions on how to do this please click here.)
Cut two 8-inch by 2-inch strips on the bias from the white fabric as well.
Press these three strips into bias tape using the instructions on the bias tape maker (if you need more help with this step please click here.)
Pin one of the 8-inch piece of the bias tape around the top raw edge of side 1 of your cut out stocking making sure to encase all three layers.
Sew it on using the white embroidery thread and a very small running stitch along the inside edge of the binding. Make sure you catch both sides of the binding with every stitch.
Repeat for side 2.

Pin side 1 to side 2 wrong sides together.
Using the thinner thread sew the two sides together with an overcast stitch or a running along the raw edges. Make sure to sew through all six layers- the two backs, battings, and tops. This doesn’t have to be too neat, it’s just to baste it together while you sew on the binding.

Trim the ends of the top binding pieces so they are flush with the edges of the stocking.
Pin one side of the binding all the way around side 1. Leave a 7-inch tail at the outside corner (the left corner in the picture above.) and a 3-inch tail at the inside corner. You don’t have to pin through all the layers here, just one side of the binding and the top of side 1.

Flip the stocking over and pin the back half of the binding to side two in the same manner.

Trim the 3-inch tail to 1 1/2 -inches. Press it’s raw end into a little triangle towards the wrong side as shown above.

Fold the tail into the stocking and lay it snugly along the side seam. Then pin the binding tape all the way up to the corner. When you sew the binding down you will trap the tail inside.

Start sewing on the binding from the inside edge with the embroidery thread and a very small running stitch along the binding’s inside edge all the way around the stocking. It is very important that you make sure you are sewing through both sides of the binding.

When you get to the outside corner tail stop sewing 1/1/2-inches from the top. Press the raw edge of the binding into a little triangle just as you did for the other tail and tuck it into the side seam 1 1/2-inches down. Sew the binding to the top edge and then continue sewing both sides of the binding shut past the stocking as shown in the picture above. Sew around the loop. Stop once you get back to the stocking and tie a knot. Hide the knot in the corner.

You’re all done and ready for a visit from St. Nick!


i really love this, its absolutely great… thanks for sharing it!
This is so lovely – thank you for sharing!
that is brilliant! i thought it was going to be so complicated… thanks for the great idea!
I just got married and wanted to start a family set of stockings for my husband and I and our children in the future and this is so cute and each family member can have different colors so that each looks individualized and personalized. Thank you for the idea it looks great!
Beautiful Molly! I love that you used strip piecing!
I love this christmas stocking and I am definitely going to give it a go even though I have never tried strip piecing before. I have one worry though, there seems to be alot of wastage when you cut out the stocking shape. Does anyone have any ideas what to do with the spare bits?
@Anna. I was able to cut 2 stocking templates out. (Sorry, in that, I realize I'm a year behind you….) It is a tight fit but given my mom asked for new stockings for the WHOLE family, now the p-rents can have 'matching' stockings. I did however use a different embroidery pattern and different bias tape to differentiate between the two. Else, with the spare bits you could make coffee coasters or a reusable coffee cup sleeve, ornaments for the Christmas tree or a small door adornment, something for the end of the banister…options are nearly limitless especially if you have cookie cutters to help with the tracing. The question is if you want something functional or decorative (which is function for the eyes of course!).
Definitely going to do this for our stockings this year! It seems like the stocking bundle is unavailable now – any suggestions on how much fabric to buy a la carte?
Thank you! These instructions are perfect!
Thank you for a great tutorial! LOVE the stocking!
Is there a difference between a stocking fat quarter bundle and a regular fat quarter bundle?
Hi Chelsea-
No, theyWe no longer sell the Stocking Fat Quarter bundles so I can see why you are confused! To make this stocking you will need 12 Fat quarters in place of the bundle. You could also use regular quarter yards!
Thanks for your question and please let me know if you have any more!
Best
Molly