Double Pointed Needles
 The dreaded double pointed needles! Learning to use double pointed needles is probably the biggest leap a beginner knitter can take into the world beyond scarves. Hats, sleeves, mittens, gloves, socks… all pretty much require the use of double pointed needles. So if you’re ready, here we go!
An Overview
Double pointed needles are used to knit things in the round that are too small for circular needles. For example, when you knit a hat on a circular needle, toward the top of the hat the stitches become so few that they no longer reach around the circular needle. At that point you need to switch to double pointed needles. Other projects start out too small for circular needles, like the Toadstool Baby Rattle, which is the project this tutorial is illustrating.
If you’ve never knit anything in the round before, it’s very important to know that you never turn your work around when you knit circularly. In other words, the right side of the fabric always faces you. The major consequence of this is that some stitch patterns are different in the round than they are flat. For example, to knit stockinette stitch in the round you only use the knit stitch; you never purl. As you gain experience, this concept won’t sound so complicated!
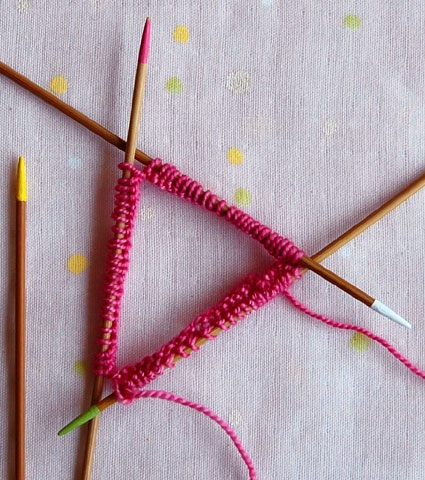
Double pointed needles come in a pack of five, but the knitting tradition in America is to usually use only four at a time. Three needles hold the stitches while a fourth knits them. Sometimes you do use all five, four to hold the stitches and the fifth to knit. This would come in handy when the pattern increases or decreases in multiples of four or if you can’t fit all the stitches onto three. Either way, the instructions are basically the same, but this tutorial illustrates the more common use of four double pointed needles.
And, finally, I painted my double pointed needles four different colors to help you keep track of which needle is doing what!

Casting On
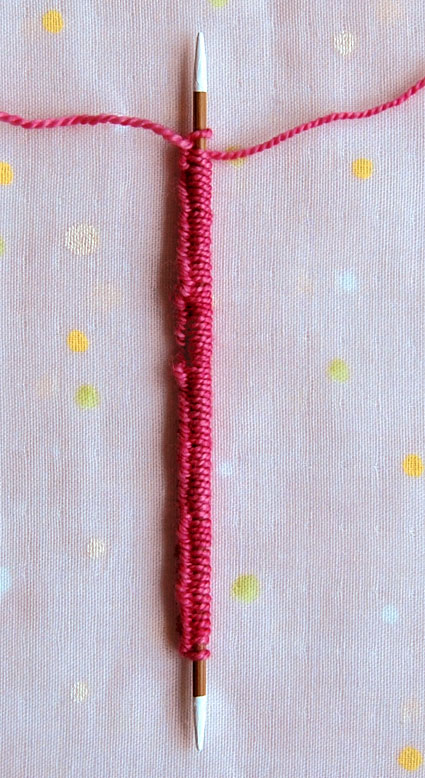
Cast all the stitches onto one double pointed needle. Try to cast on somewhat loosely, so that the stitches are able to slide freely on the needle.
Then slip 2/3 of the stitches onto a second double pointed needle. (In this case, there are 72 cast on stitches, divided by 3 = 24 x 2 = 48.)

Slip 1/2 of the stitches from the second needle onto a third double pointed needle. Each needle now holds a third of the total number of cast on stitches (24 stitches on each needle). (If the cast on is not exactly divisible by 3, then just have one more or less stitch on one needle.)

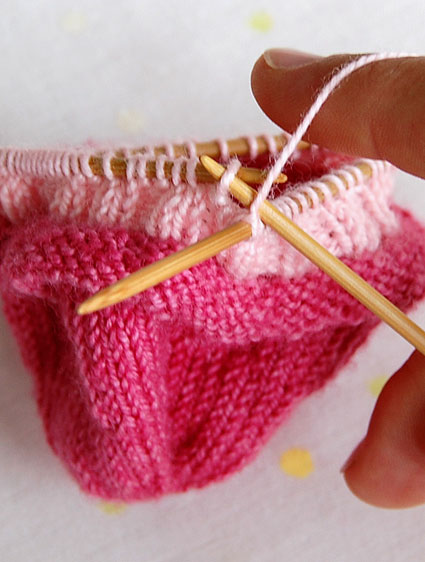
Join into the Round
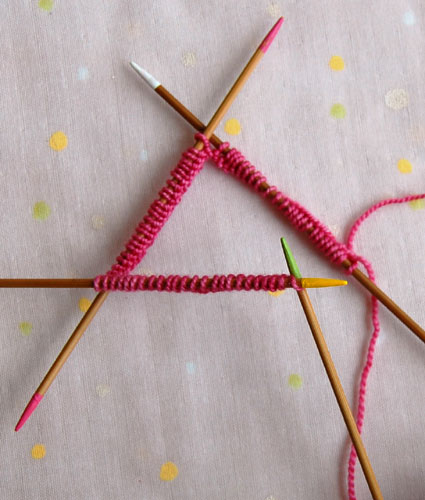
In order to join for working in the round, you need the needle where tail and yarn are coming from (the “white” needle) in your right hand. This usually requires that you flip everything around, the needle in your left hand switching with the needle in your right hand.
Arrange the stitches so they are all facing the same way and aren’t spun around on any of the needles.
Insert the fourth (empty) needle into the first stitch of the left needle.
Firmly knit the first stitch.
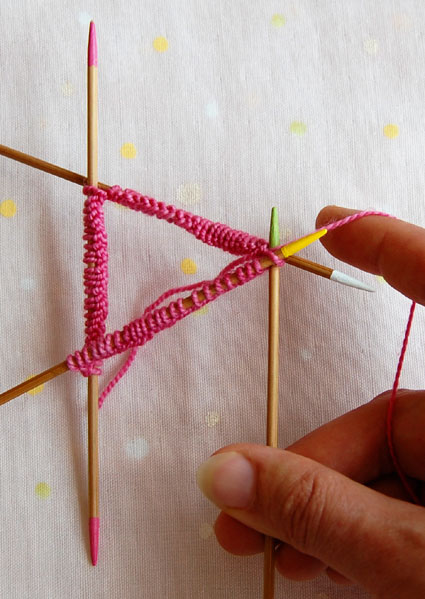
You’re joined into the round!
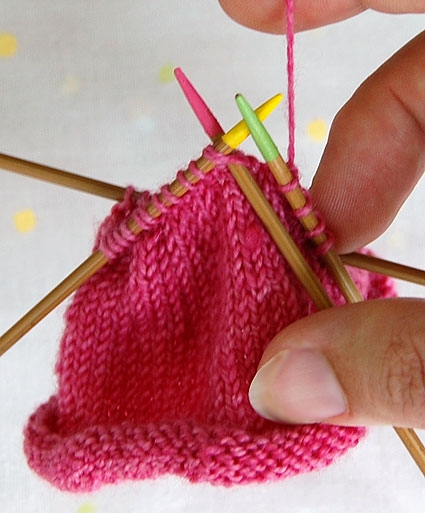
Knitting with Double Pointed Needles
Continue to knit across the stitches of this first needle. Just pretend that you’re knitting with two needles instead of four!

Having knit across all the stitches of the first needle, that needle becomes free to knit the stitches of the next needle. For example, the green needle knit all of the stitches of the yellow needle, freeing the yellow needle to now knit the stitches of the pink needle.
Keep knitting around and around, three needles holding the stitches, one needle knitting. (The first round is the trickiest because the needles tend to squirm around a bit. Don’t despair! It gets easier!)
Tips and Details
End of the Round Marker
You don’t usually need a marker to indicate the end of the round when you use double pointed needles. Instead, the end of the round is marked by the cast on tail. The first stitch of the needle where the tail comes from is the first stitch of the round.
If, occasionally, you do need a marker, it’s easier to put it after the first stitch so that the marker doesn’t keep sliding off the needle. Just remember that the first stitch is actually the one before the marker.
The First Stitch of Each Needle
If the first stitch of a new needle is a knit stitch, then make sure that the needle you’re knitting with is situated under the previous needle (in this photo, the yellow needle is positioned under the green one, ready to knit the first stitch of the pink needle.)
This helps to prevent a column of loose stitches at the intersection of the needles.

If the first stitch on the needle is a purl stitch, then it’s better to start the new needle above the previous needle.
Also, always give the first stitch of each needle a bit of an extra tug to close the gap between needles.
Decreasing
If you need to decrease at the end of a needle and only have one stitch left on the needle,

then slip that 1 stitch to the next needle, and do the decrease at the beginning of the next needle.
That’s about it! Good luck with this new skill. I hope that it opens many knitting doors for you!


Hi there- I’m a novice knitter & have gotten dpn’s down pretty good as long as it’s in stockinette stitch or rib type stitches. I’m tackling a pattern that has a lot of wrap & turns/purls in the same row & am having a hard time keeping track of the turns as well as when a wrap & turn happens on the last stitch of the needle, I’m not sure how to knit it to the next stitch. Any tips would be so appreciated! Thanks
Hello Kendra,
Thank you for reaching out! Short Rows can be a bit tricky on dpns. If possible, I would suggest you switch to circular needles which will eliminate the issue of coming to end of your needles for your wrap and turn. I would also suggest making your wrap and turns if you are having trouble seeing where they are. I think you will also find our short row tutorial helpful, just so you can see a visual explanation of the stitch.
I hope this helps and happy knitting!
-Marilla
Hi there, thanks for this tutorial! Can’t you point me towards a tutorial that would show how to join for knitting in the round with DPNs when using a provisional cast one (1step method)? Thanks!
Hi Mallory,
Thanks for reaching out! While we don’t have a tutorial for this exact technique, all you need to do is, after working your provisional cast on using waste yarn, knit one row with your main yarn without joining in the round. You will then be able to join your work in the round as usual when you start your second round of your main yarn.
I hope that helps!
Julianna
I was beyond myself with frustration trying to knit in the round with DPNs. The painted needle tips were genius! You saved my sanity and my project.
Thank you!
My pattern requires me to knit a sleeve on DPNs – I start off with 63 stitches and will increase both ends of every fourth row until I have 107 stitches. I’m wondering how easy it is to move my stitches around so that all my increases aren’t on one DPN and I end up with far more stitches on one DPN than on the others.
Hello Jo,
Thank you for reaching out! This is very simple, you can move your stitches around as much as you would like. The only thing I would consider is if your pattern is telling you to have a specific number of stitches on each needle. If your pattern does mot specify you can arrange your stitches however you like!
Happy knitting,
Marilla
Hi there. I was wondering what sort of paint you used for the tips of your bamboo needles. Bamboo is hard to paint as it is naturally waxy in a way. Has your paint chipped off in used. Did you prep the bamboo in anyway before painting?
Hi Lily,
Thanks for writing in! I am sorry to say that we are not sure what paint we used as this tutorial was created quite a while ago (2008!). We did paint them for the purposes of the tutorial and not for long term use so we can’t really speak to what holds up. I have used clear nail polish in the past to correct small spurs on wooden needles and it has held up well so I wager that if you were to used nail polish in different colors, that this might be a bit more long lasting than other options.
I do hope that this helps!
Cassy
Hi Jo! I’m knitting a pig ( pinkie pig from cascade yarn pattern) and am confused about this one section. I’m sure it’s much easier than my brain is making it out to be! The pattern goes as follows: put 6 sts on scrap yarn. Put next 20 sts on dpn 5, next 9 on dpn 3, next 8 on dpn 1, next 9 on dpn 2, next 20 on dpn 4, and remaining 6 on scrap yarn. I know this is supposed to form the head, but I can’t seem to wrap my brain around it. I’ve got the first 2 steps down, but it’s the jumping from dpn 5 to dpn 3 that is tripping me up. Thanks for any help!
Hi Emily,
Thanks for reaching out! I am sorry to say that we are not familiar with that pattern and do not have access to it and so cannot speak to what they might mean. It sounds as though they have named the DPNs by number earlier in the pattern. It might be worth trying to contact the designer on Ravelry for clarification on the pattern.
I am sorry that we could not be of more help!
Cassy
Good Morning. Looking for some help in starting one of your hat patterns that begins with DP needles at the top of the hat with 6 stitches, Any advice? I am tangling the 6 stitches constantly.
Hello Heather,
Thank you for reaching out! Casting on and knitting the first round of dpns is always the most challenging part. Just go slow and keep the two needles in your hands as stable as possible. After you get past the first two rows it will become infinitely easier- I promise!
I hope this helps and good luck!
-Marilla
I’m working a project I found here on Purl Soho – the top-down ear flap hat. I’ve just recently started using dpns…and am fairly comfortable with them. BUT, I’m just on the third row and am unable to see how to make the LLI. It’s fine with two needles, but I can’t figure out how to find that left leg to lift 2 rows below. I’ve searched for a tutorial doing the lift on dpns…not having any luck. Part of my problem is that I have a very dark yarn AND the stitches are so tiny!! AGH. Any suggestions?
Hi Pamela,
Thanks for writing in! Working a lifted increase on double pointed needles shouldn’t be any different from working it on circular or straight needles, but it is certainly much more difficult in a dark colored yarn or at the beginning of the hat when there are very few stitches on the needles! If you need to, you can substitute a M1L for the first round or two of increases and switch to LLI once you are a bit further into the hat.
I hope that helps, and happy knitting!
Julianna
Having struggled with laddering when using double pointed needles I found your tip on placing the working needle UNDER the needle to knit next and it has completely cured the problem. I am so thrilled that such a simple adjustment can make such a difference, I just cannot thank you enough.
Hi, it’s there any tutorial that shows you how to switch FROM Dpn to circular needles? I can find lots on switching the other way round but not this way.
Hi Nickie,
Thanks for reaching out! I’m not aware of any tutorials or videos for switching from double pointed needles to circular needles, but I’m happy to walk you through it! If you are working a pattern that has you start with a few stitches on DPNs and increase, like our Top-Down Ear Flap Hat, you will want to wait until you have enough stitches to stretch around the circular needle, or until your DPNs are quite full. When you’re ready, at the beginning of the round, you will hold the circular needle in your right hand and use it to knit across the first DPN. When you get to the end of the DPN, just set it aside and rotate slightly so the next DPN is in your left hand, still holding the circular needle in your right hand, and knit across the next set of stitches. Continue on in this manner until you get to the end of the round, at which point all your stitches should be on the circular needle, and you can place your marker for the beginning of the round and carry on!
I hope that clears things up!
Julianna
I am knitting your easy sock pattern, top down version, and I am having a little difficulty with the heel. Do you have a video tutorial on how to knit the heal??
Thank you!
Hi Myrna,
Thanks for reaching out! We don’t have a tutorial for sock heels, but I’m happy to help answer any questions you may have! Is there a particular part of the heel instructions that is tripping you up?
Best,
Julianna
I am knitting a little sweater for a ‘softie’ toy. It’s done in the round and so far all is going well. The cast on instruction has a term I’m not familiar with – fog. Here is an excerpt from the pattern – Cast on 72 stitches with double-pointed needles size 3 mm = US 2.5 and fog. What does fog mean?
Thanks so much,
Beth
Hi Beth,
Thanks for reaching out! Unfortunately, I don’t know of any knitting abbreviations or terms with those letters – this is a new one to me! I also did a quick search and couldn’t find anything that would explain this, so it is probably either a typo or something specific to this pattern. If there isn’t a definition in the notes of the pattern, I would recommend reaching out to the designer to see if they can help clear things up. I’m sorry I couldn’t be of more help!
Best,
Julianna
Hi! So, when knitting on the DPNs, my work is coming towards me. The right side is out, but the tube (mitten cuff) is basically between me and my needles. Is it supposed to? Or is it supposed to go away from me (so needles should be closest to me when I am holding them)? If it is meant to be growing farther away from me, any ideas why it isn’t and how to fix it?
Thank you!
Hi A.J.
Thanks for reaching out! When working on DPNs you should have it oriented so that the needles are facing you, the right side of the fabric is on the outside and then fabric is growing downwards away from you. I think it may just be a matter of getting the correct orientation to begin with (following the images in this tutorial!)
I hope this helps and please let me know if you have any other questions!
Warmly,
Gianna
I’m using double pointed needles to make mittens and I realized that the right side of my work is on the inside and it’s not facing me. How do I change that?
Hi Morgan,
Thanks for reaching out! You should be able to simply flip your work inside-out on the needles so that the right side is on the outside and continue working!
Warmly,
Gianna
Honestly this is the clearest, most concise and best photographed set of instructions I have found. Great job and thank you for sharing. 🙏
Hi Judy,
Thanks for reaching out and for your kind words! I am so thrilled to hear that you have enjoyed our tutorial and found it so useful!
Happy knitting!
Gianna
I am a crocheter and a newbie with knitting. Every time I even thought about trying dpn’s I got discouraged. I must say that your tutorial was wonderful, especially with painting the tips different colors to illustrate how to proceed. Thank you so very much for this wonderful tutorial.
I am working on the crown for the classic ribbed hat. The instructions for the crown do not indicate where to switch to DPNs and this tutorial doesn’t explain that to me. As I start the crown I have 120 stitches. At one point (roughly) in the decreasing should I begin with the DPNs? I’m knitting the round. And do I use two or three or four? Thanks!
Hi Susan,
Thank you for writing in! You will switch to DPNs once you feel like your stitches are struggling to get around your needles. As you decrease, you will notice that the stitches are starting to stretch around the cable, making it harder to knit or purl the next stitch. This is the point you will want to switch. There isn’t an point at which you have to switch, its just what is most comfortable to you. I would recommend knitting on 4 DPNs rather than 3 but again, this is a preference and you will want to do what makes you feel most comfortable while knitting. I hope this helps but please let me know if you have any other questions!
Happy knitting,
Gavriella
Gavriella,
Thanks so much for all lyour instructions and I must say they have helped me so much. I love Purl Soho and will keep ordering patterns and yarn from them.
Elizabeth. Reilly.
You are very welcome Elizabeth! I am always happy to help!